CDVI UCA3 Manuel D'installation

Manuels Connexes pour CDVI UCA3


Sommaire des Matières pour CDVI UCA3
- Page 1 FRANCAIS ENGLISH UCA3 3-Door Standalone controller (Radio/Proximity) Centrale autonome 3 portes (Radio/Proximité) Range: Integrated Access Control / Gamme : Contrôle d’Accès intégré INSTALLATION MANUAL MANUEL D’INSTALLATION Group products...
- Page 17 INSTALLATION MANUAL UCA3 3-Door standalone controller (Radio/Proximity) COMPANY: INSTALLER: STAMP: BUILDING: N° ADDRESS : CITY: ADDITIONAL INFORMATION : cdvi.com cdvigroup.com...
-
Page 18: Table Des Matières
MANUEL D’INSTALLATION UCA3 Centrale autonome 3 portes (Radio/Proximité) 1] PRÉSENTATION DU PRODUIT ..............P. 20 2] RAPPEL ET RECOMMANDATIONS ............P. 21 3] ÉLÉMENTS FOURNIS ................P. 21 4] MONTAGE ..................P. 21 5] SCHÉMAS DE CÂBLAGE ............... P. 22 6] PROGRAMMATION ................ -
Page 19: Rappel Et Recommandations
17,3 cm de longueur, n’oubliez pas de placer de la centrale. doit être raccordé sur la borne la varistance sur le système 2 de l’UCA3, ceci afi n d’obtenir AVERTISSEMENT de verrouillage en parallèle une bonne réception. Ne pas utiliser d’alimentation à... - Page 20 MANUEL D’INSTALLATION UCA3 Centrale autonome 3 portes (Radio/Proximité) 2] RACCORDEMENTS LECTEURS + VERROUILLAGE cdvi.com cdvigroup.com...
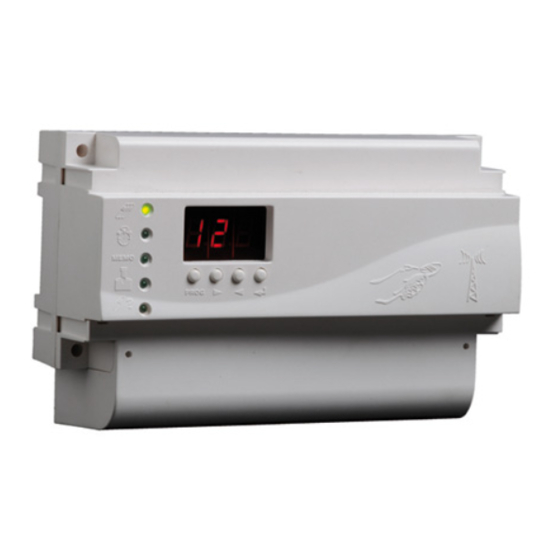
- Page 21 MANUEL D’INSTALLATION UCA3 Centrale autonome 3 portes (Radio/Proximité) 2] PROGRAMMATION A - FONCTIONNALITÉS Touche de programmation PROG Touche défi lement des menus suivants Touche défi lement des menus précédents Touche de validation Connexion PC par câble USB fourni Menu 1...
-
Page 22: B - Accès Au Menu Principal
- PORTE 2 > Commandée par le lecteur auxiliaire 2. Pour la programmation, affecter les portes souhaitées (1 et/ou 2) et passer les badges sur le lecteur intégré à la façade de l’UCA3. Tous les badges programmés auront la même affectation de portes. Radio fréquence La radio fréquence est programmable sur les portes 1 et 3 :... -
Page 23: D - Entrée En Programmation (Accès Au Menu Principal)
PROG en programmation. - Si un badge maître est programmé, présenter un badge devant le lecteur intégré à la façade de l’UCA3. - Si le badge présenté n’est pas le badge maître, un relais d’ouverture peut être commandé, les touches de programmation sont bloquées et l’entrée en programmation est impossible. -
Page 24: F - Enregistrement De Badges Radio
MANUEL D’INSTALLATION UCA3 Centrale autonome 3 portes (Radio/Proximité) Les points affi chés après chaque portes indiquent que le badge aura accès sur ces deux portes. Voir le tableau ci-dessous pour l’affectation des portes : Enregistrement du badge Enregistrement du badge... - Page 25 MANUEL D’INSTALLATION UCA3 Centrale autonome 3 portes (Radio/Proximité) L’affi cheur indique appuyer L’affi cheur indique Appuyer L’affi cheur indique sur la sur la touche touche suivant de validation L’affi cheur indique quelles portes peuvent Les points affi chés après êtres affectées sur le badge (Badges chaque portes indiquent que radio seulement sur les portes 1 &...
-
Page 26: G - Suppression Ou Modification D'un Enregistrement
MANUEL D’INSTALLATION UCA3 Centrale autonome 3 portes (Radio/Proximité) Quand l’enregistrement est terminé, la centrale passe au rang suivant pour l’enregistrement d’autres badges la confi guration des portes restera identique. Répéter les opérations ci-dessus pour modifi er la confi guration des portes. - Page 27 MANUEL D’INSTALLATION UCA3 Centrale autonome 3 portes (Radio/Proximité) MODIFICATION D’UN BADGE Pour supprimer un badge programmé, rentrer en programmation comme pour enregistrer un nouveau badge. - Rentrer dans le menu 1 - Appuyer sur la touche de validation L’affi cheur indique (MOD pour «MODIFY»)
-
Page 28: H - Programmation Des Temporisations
MANUEL D’INSTALLATION UCA3 Centrale autonome 3 portes (Radio/Proximité) H - PROGRAMMATION DES TEMPORISATIONS La durée des temporisations peut être programmée de 01 à 99 secondes. Lorsque la temporisation 00 est programmée, le relais de la porte fonctionne en mode bistable (pas de temporisation, fonctionnement style télérupteur). -
Page 29: I - Programmation Du Badge Maître
MANUEL D’INSTALLATION UCA3 Centrale autonome 3 portes (Radio/Proximité) I - PROGRAMMATION DU BADGE MAÎTRE La programmation du badge maître permet de limiter l’accès à la centrale au détenteur de ce badge. Le badge maître donne un accès à toutes les portes, un seul badge maître peut être programmé. A la suite de l’enregistrement du badge maître, la défi nition du lecteur d’apprentissage s’affi che directement. -
Page 30: K - Identification Des Badges
MANUEL D’INSTALLATION UCA3 Centrale autonome 3 portes (Radio/Proximité) - Appuyer sur la touche suivant L’affi cheur indique - Appuyer sur la touche de validation pour supprimer le badge maître, L’affi cheur indique - L’affi chage indique que le badge maître est supprimé. L’affi cheur s’éteind et le voyant devient clignotant K - IDENTIFICATION DES BADGES - Ce menu sert à... - Page 31 MANUEL D’INSTALLATION UCA3 Centrale autonome 3 portes (Radio/Proximité) UTILISATION DES BADGES RADIO - L’utilisation de badges radio fréquence est identique. - Lorsqu’un badge non programmé est présenté : l’affi cheur indique - Lorsqu’un badge est reconnu mais qu’il n’est pas présenté sur le bon lecteur, l’affi cheur indique le rang sur lequel est programmé...
-
Page 32: Tableau D'affectation Des Badges
MANUEL D’INSTALLATION UCA3 Centrale autonome 3 portes (Radio/Proximité) - Appuyer sur les quatres boutons qui se trouvent en dessous de l’affi cheur. - Tout en restant appuyé sur ceux-ci, rebrancher l’alimentation. L’affi cheur indique - Lorsque l’affi cheur s’éteint relacher les quatres boutons, le badge maître est maintenant effacé. - Page 33 MANUEL D’INSTALLATION UCA3 Centrale autonome 3 portes (Radio/Proximité) SOCIÉTÉ : INSTALLATEUR : CACHET : IMMEUBLE : N° ADRESSE : VILLE : INFORMATIONS COMPLÉMENTAIRES : cdvi.com cdvigroup.com...
- Page 34 MANUEL D’INSTALLATION UCA3 Centrale autonome 3 portes (Radio/Proximité) NOTES NOTES cdvi.com cdvigroup.com...
-
Page 35: Notes
MANUEL D’INSTALLATION UCA3 Centrale autonome 3 portes (Radio/Proximité) NOTES NOTES cdvi.com cdvigroup.com... - Page 36 Reference : G0301FR0203V02 Extranet : EXE-CDVI_IM UCA3 CMYK A5 EN-FR 02 Manufacturing Access Control since 1985 CDVI Group CDVI CDVI DIGIT FRANCE TAIWAN ITALIA FRANCE (Headquarters/Siège social) Phone: +33 (0)1 48 91 01 02 Phone: +886 (0)42471 2188 Phone: +39 0331 97 38 08...