Publicité

Les langues disponibles

Les langues disponibles

Liens rapides

Get user manuals:
See SafeManuals.com
OWNER'S MANUAL
MANUEL DE L'UTILISATEUR
MANUAL DEL PROPIETARIO
DIGITAL AM/FM/MPX RADIO WITH COMPACT DISC PLAYER
RADIO AM/FM/MPX NUMÉRIQUE AVEC LECTEUR DE DISQUE CD
RADIO DIGITAL AM/FM/MPX CON TOCA CD
ACD-18
ACD-18
ACD-18
ACD-18
ACD-18

Publicité

Table des Matières
loading

Sommaire des Matières pour Audiovox Rampage ACD-18

  • Page 1 OWNER'S MANUAL MANUEL DE L'UTILISATEUR MANUAL DEL PROPIETARIO ACD-18 ACD-18 ACD-18 ACD-18 ACD-18 DIGITAL AM/FM/MPX RADIO WITH COMPACT DISC PLAYER RADIO AM/FM/MPX NUMÉRIQUE AVEC LECTEUR DE DISQUE CD RADIO DIGITAL AM/FM/MPX CON TOCA CD Get user manuals: See SafeManuals.com...
  • Page 2: Installation Instructions

    INSTALLATION INSTRUCTIONS INSTALLATION INSTRUCTIONS INSTALLATION INSTRUCTIONS INSTALLATION INSTRUCTIONS INSTALLATION INSTRUCTIONS This unit is designed for installation in cars, trucks, and vans with an existing radio opening. In many cases, a special installation kit will be required to mount the radio to the dashboard. These kits are available at electronics supply stores and car stereo specialist shops.
  • Page 3 T T T T T OLL-FREE INST OLL-FREE INST OLL-FREE INST ALLA A A A A T T T T T ION ASSIST ION ASSIST ION ASSIST ION ASSISTA A A A A NCE OLL-FREE INST OLL-FREE INSTALL ION ASSIST The installation and wiring connections for this unit are so simple, we doubt you'll need our help, but, if you do, we're here to help you.
  • Page 4 R R R R R A A A A A DIO WIRING DIO WIRING DIO WIRING DIO WIRING DIO WIRING REFER TO PAGE 4 AND 5 FOR SPEAKER WIRING AUTOMATIC ANTENNA ANTENNA BLUE (0.5 AMP FUSE) IMPORTANT FUSEBLOCK THE BLUE WIRE CAN BE USED TO REMOTELY ACTIVATE AN AUTOMATIC ANTENNA OR AN EXTERNAL AMPLIFIER (SEE...
  • Page 5 SPEA A A A A K K K K K ER WIRING ER WIRING ER WIRING ER WIRING ER WIRING WARNING! lNEVER COMBINE (BRIDGE) OUTPUTS FOR USE WITH 1 SPEAKER. 2 SPEAKER SYSTEMS l NEVER GROUND NEGATIVE SPEAKER LEADS TO CHASSIS GROUND. REFER TO PAGE 3 l FAILURE TO WIRE EXACTLY AS SHOWN BELOW MAY CAUSE ELECTRICAL DAMAGE TO THE RADIO.
  • Page 6 SPEA A A A A K K K K K ER WIRING ER WIRING ER WIRING ER WIRING ER WIRING WARNING! lNEVER COMBINE (BRIDGE) OUTPUTS FOR USE WITH 1 SPEAKER. 4 SPEAKER SYSTEMS l NEVER GROUND NEGATIVE SPEAKER LEADS TO CHASSIS GROUND. REFER TO PAGE 3 l FAILURE TO WIRE EXACTLY AS SHOWN BELOW MAY CAUSE ELECTRICAL DAMAGE TO FOR RADIO WIRING...
  • Page 7: Tone Control

    OPER OPER A A A A A T T T T T ING INSTRUC OPER ING INSTRUC ING INSTRUC ING INSTRUCT T T T T IONS IONS IONS OPER OPER ING INSTRUC IONS IONS FUNCTION (MODE) SELECTOR ON-OFF SWITCH / VOLUME CONTROL AM/FM BAND SELECTOR Turn this knob clockwise to turn the unit on.
  • Page 8 frequency is shown on the display and DISC SLOT adjust the control so that you are receiving With the label surface facing up, fully insert a clear signal. If the radio is tuned off- a compact disc into the slot until the frequency, you could experience distorted mechanism engages.
  • Page 9 DISC EJECT BACKWARD TRACK SELECTOR ( Disc play is stopped and the disc is ejected This button is used to quickly select the by pressing this button (nocd will appear on beginning of a particular track in the the display panel). Remove the disc and backward direction.
  • Page 10 ERROR CODE OR CODE OR CODE OR CODE OR CODE If a problem should develop while operating the CD player, the error code nocd may appear on the display panel. This can indicate a number of problems with the unit, including a mechanical error or an error in the microprocessor control of the player.
  • Page 11: Care And Maintenance

    CARE AND MAINTENANCE CARE AND MAINTENANCE CARE AND MAINTENANCE CARE AND MAINTENANCE CARE AND MAINTENANCE The radio section of your new sound system does not require any maintenance. recommend that you keep this manual for reference on the many features found in this unit as well as how to set the clock.
  • Page 12 This Warranty gives you specific legal rights and you may also have other rights which vary from state to state. U.S.A.: AUDIOVOX CORPORATION, 150 MARCUS BLVD., HAUPPAUGE, NEW YORK 11788 • 1-800-645-4994 CANADA: CALL 1-800-645-4994 FOR LOCATION OF WARRANTY STATION SERVING YOUR AREA Form No.
  • Page 13 12 12 12 12 Get user manuals: See SafeManuals.com...
  • Page 14: Retirer L'autoradio Des Installations De La Gaine De Montage

    DIREC DIREC DIREC DIREC DIRECT T T T T I I I I I VES D’INST VES D’INST VES D’INST VES D’INSTALL VES D’INST ALLA A A A A T T T T T ION Cet appareil est conçu pour être installé dans une voiture, un camion ou une fourgonnette étant déjà doté d’une ouverture pour la radio.
  • Page 15: Horaires Cóte Quest Montagne

    ASSIST ASSIST ASSIST ASSIST ASSISTA A A A A NCE GR NCE GR NCE GR NCE GR A A A A A TUI NCE GR TUITE TE TE TE TE Le montage et les branchements sont si simples que vous n'aurez vraisemblablement besoin d'aucune assistance;...
  • Page 16 SCHEMA DE CABL SCHEMA DE CABLA A A A A GE SCHEMA DE CABL GE GE GE GE SCHEMA DE CABL SCHEMA DE CABL ANTENNE A COMMANDE ANTENNE ELECTRIQUE BLEU (0.5 AMP.) IMPORTANT DU FIL BLEU PEUT ETRE UTILISE POUR COFRET À...
  • Page 17: Systeme Des 2 Haut-Parleurs

    SYSTEME DES 2 HAUT-PARLEURS ATTENTION! l NE COMBINEZ JAMAIS (PAR UN MONTAGE EN PONT) DES SORTIES POUR UNE UTILISATION AVEC 1 HAUT-PARLEUR. l NE METTEZ JAMAIS A LA MASSE DES CABLES DES HAUT-PARLEURS NEGATIFS. l TOUT MAUVAIS CABLAGE PEUT ENDOMMAGER L'AUTORADIO. POSTE DE RADIO RACORDER TOUS LES AUTRES FILS COMME IL...
  • Page 18: Systeme Des 4 Haut-Parleurs

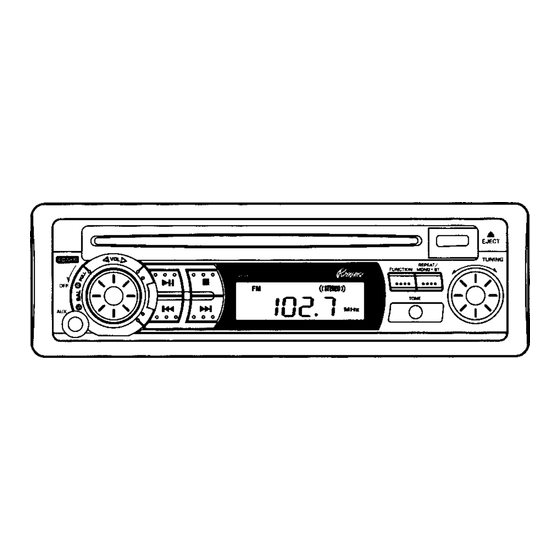
    SYSTEME DES 4 HAUT-PARLEURS ATTENTION! l NE COMBINEZ JAMAIS (PAR UN MONTAGE EN PONT) DES SORTIES POUR UNE UTILISATION AVEC 1 HAUT-PARLEURS. l NE METTEZ JAMAIS A LA MASSE DES CABLES DES HAUT-PARLEURS NEGATIFS. l TOUT MAUVAIS CABLAGE PEUT ENDOMMAGER L'AUTORADIO. HAUT-PARLEUR AVANT DROIT HAUT-PARLEUR AVANT GAUCHE 4 –...
  • Page 19 MODE D'EMPLOI MODE D'EMPLOI MODE D'EMPLOI MODE D'EMPLOI MODE D'EMPLOI BOUTON D’ALIMENTATION (ON/OFF)/ On sent la présence d’une encoche au milieu de la rotation. Lorsque le réglage de l’équilibre RÉGLAGE DU VOLUME est terminé, pousser sur le bouton afin qu’il Tourner ce bouton dans le sens horaire pour revienne à...
  • Page 20: Sélecteur Fm Stéréo/Mono

    sélectionnée en ordre croissant et dans le peuvent être légèrement moins sens anti-horaire pour les syntoniser en ordre visibles. L’affichage de l’ACL décroissant. La fréquence syntonisée redeviendra normal lorsque la apparaît sous forme numérique sur l’afficheur. température s’élèvera jusqu’à Lorsque vous syntonisez une station, ajuster un niveau satisfaisant.
  • Page 21: Sélecteur D'arrêt De Lecture De Cd ( N )

    que la lecture du disque reprenne à partir de SÉLECTEUR DE PLAGE SUIVANTE ( la première plage, appuyer sur le sélecteur Cette touche sert à sélectionner rapidement de lecture/pause le début d’une plage particulière parmi les plages suivantes. Chaque fois que l’on appuie ÉJECTION DU DISQUE sur cette touche, la plage portant le numéro En appuyant sur cette touche, la lecture...
  • Page 22: Code D'erreur

    CODE D’ERREUR Si un problème de fonctionnement du lecteur de CD survenait, il se peut que le code d’erreur nocd apparaisse sur l’afficheur. Ceci peut indiquer que l’appareil éprouve certains problèmes; il peut s’agir, entre autres, d’une erreur mécanique ou d’une erreur dans la commande de microprocesseur du lecteur.
  • Page 23: Soins Et Entretien

    SOINS ET ENTRETIEN SOINS ET ENTRETIEN SOINS ET ENTRETIEN SOINS ET ENTRETIEN SOINS ET ENTRETIEN La portion radio de votre nouveau système de son n’a pas besoin d’entretien. Nous vous recommandons de garder ce manuel à la portée de la main pour y référer ultérieurement concernant les nombreuses caractéristiques de cet appareil et la façon de régler l’horloge.
  • Page 24 IE LIMI TÉE DE 12 MOIS AUDIOVOX CORPORATION (la Société) garantit à l’acheteur initial du produit que si tout ou partie de ce produit, en cours d’utilisation et sous des conditions normales, venait à présenter des vices de matière primitive ou des défauts de fabrication, dans les 12 mois suivant la date d’achat initial, ce(s) défaut(s) sera(seront) réparé(s) ou remplacé(s) par un...
  • Page 25 24 24 24 24 Get user manuals: See SafeManuals.com...
  • Page 26 INSTRUCCIONES DE INST INSTRUCCIONES DE INST INSTRUCCIONES DE INSTAL AL AL AL ALACIÓN ACIÓN ACIÓN INSTRUCCIONES DE INST INSTRUCCIONES DE INST ACIÓN ACIÓN Esta unidad está diseñada para instalarse en automóviles, camiones y camionetas que ya tengan un lugar para una radio.
  • Page 27 IL IL IL IL ILA A A A A MA MADA GR DA GR DA GR A A A A A T T T T T IS P DA GR IS P IS PA A A A A R R R R R A ASISTENCI IS P A ASISTENCI A ASISTENCIA DE INST...
  • Page 28 DI DI DI DI DIA A A A A GR GR A A A A A MA DE CABLE MA DE CABLE MA DE CABLE MA DE CABLE MA DE CABLEA A A A A DO ANTENA ANTENA AUTOMATICA AZUL (0.5 AMP.) IMPORTANTE EL ALAMBRE AZUL PUEDE SER FUSIBLES DEL...
  • Page 29 SYSTEMA DE 2 ALTAVOZ SYSTEMA DE 2 ALTAVOZ SYSTEMA DE 2 ALTAVOZ SYSTEMA DE 2 ALTAVOZ SYSTEMA DE 2 ALTAVOZ PRECAUCIÓN! l NUNCA COMBINE (CONECTE) LAS SALIDAS PARA USO CON 1 ALTOVOZ. l NUNCA CONECTE A TIERRA LOS CONDUCTORES NEGATIVOS DE LOS ALTOVOZ A LA CONEXIÓN A TIERRA DEL CHASIS. l EL ALAMBRADO INCORRECTO PODRÁ...
  • Page 30 SY SY SY SYSTEMA DE 4 AL STEMA DE 4 AL STEMA DE 4 AL STEMA DE 4 AL STEMA DE 4 ALT T T T T A A A A A VOZ PRECAUCIÓN! l NUNCA COMBINE (CONECTE) LAS SALIDAS PARA USO CON 1 ALTOVOZ. l NUNCA CONECTE A TIERRA LOS CONDUCTORES NEGATIVOS DE LOS ALTOVOZ A LA CONEXIÓN A TIERRA DEL CHASIS.
  • Page 31 I I I I I NSTRUCCIONES DE OPERACIÓN NSTRUCCIONES DE OPERACIÓN NSTRUCCIONES DE OPERACIÓN NSTRUCCIONES DE OPERACIÓN NSTRUCCIONES DE OPERACIÓN INTERRUPTOR DE APAGADO ENCEN- cuando se llega al centro de la rotación. Una DIDO Y CONTROL DE VOLUMEN vez regulado el balance deseado, empuje el botón para regresar a la posición de control Para encender el aparato gire este botón en de volumen.
  • Page 32: Selector De Fm En Estereo O En Mono (Monos L St)

    visualización aparecerá en forma de dígitos que el mecanismo engrane. Si se ha la frecuencia sintonizada. Para asegurar una seleccionado la modalidad CD con el Selector recepción clara de la radioemisora de Funciones , la pantalla indicará sintonizada, ajustar siempre el control hasta el número de pistas que contiene el disco.
  • Page 33 SELECTOR DE REPETICIÓN DE nocd. Saque el disco e introduzca otro disco LECTURA en el aparato. Pulse el Selector Lectura/ Pausa para iniciar la lectura del disco Durante la lectura, pulse este botón para nuevamente introducido o pulse el Selector seleccionar la función de repetición de la de Funciones para hacer funcionar el pista o del disco.
  • Page 34: Código De Error

    CÓDIGO DE ERROR Si se presentase un problema al hacer funcionar el lector de disco compacto, es posible que la pantalla indique nocd. Esto puede señalar varios problemas con el aparato, inclusive un problema mecánico o un error en el control del microprocesador del lector. Si este código de error aparece en la pantalla, trate de expulsar y volver a colocar el disco dentro del lector.
  • Page 35: Manejo De Los Discos Compactos

    CUIDA CUIDA CUIDADO Y MA CUIDA CUIDA DO Y MA DO Y MA DO Y MA DO Y MANTENIMIENT NTENIMIENT NTENIMIENT NTENIMIENT NTENIMIENTO O O O O La sección de la radio de su nuevo sistema de sonido no requiere mantenimiento alguno. Le recomendamos guardar este manual para consultar las diversas funciones que tiene la unidad y la forma de poner la hora.
  • Page 36 EE. UU.: AUDIOVOX CORPORATION, 150 MARCUS BLVD., HAUPPAUGE, NEW YORK 11788 l 1-800-645-4994 CANADA: LLAMAR AL TELÉFONO 1-800-645-4994 PARA LA UBICACIÓN DE LA ESTACIÓN QUE LE PROPORCIONA SERVICO DE GARANTÍA A SU AREA...

Table des Matières