Publicité

Les langues disponibles

Les langues disponibles

Liens rapides

O O O O O WNER'S MANU
MANUEL D'UTILISA
MANUEL D'UTILISA
MANUEL D'UTILISA
MANUEL D'UTILISATION
MANUEL D'UTILISA
MANU
MANU
MANU
MANUAL DEL USU
MANU
ACD-16
VOL
B AND
VOL
AUX IN
DETACHABLE FRONT PANEL, AM/FM/MPX RADIO WITH COMPACT DISC
AUTORADIO AM/FM/MPX AVEC FAÇADE AMOVIBLE, DOTÉ D'UN LECTEUR
DE DISQUES COMPACTS, DE COMMANDES DE CHANGEUR DE CD ET D'UNE
PANEL DELANTERO DESMONTABLE CON
RADIO AM/FM/MPX, CON REPRODUCTOR Y CAMBIADOR
DE DISCOS COMPACTOS Y RELOJ DE CUARZO
Released 5-10-00.
Rev. A: 6-7-00 – Add French and Spanish.
Rev. B: 5-7-02 Added CD-R and CD-RW specification notice.
Rev. C: 10-03-02- Changed power ratings.
WNER'S MANU
WNER'S MANU
WNER'S MANU
WNER'S MANUAL
AL DEL USU
AL DEL USU
AL DEL USU
AL DEL USUARIO
RND
LOU
LOC/RPT
CD-
CD+
ACD-16
ACD-16
ACD-16
ACD-16
ACD-16
PLAYER, CD CHANGER CONTROLS
AND QUARTZ CLOCK
MONTRE À QUARTZ
AL
AL
AL
AL
TION
TION
TION
TION
ARIO
ARIO
ARIO
ARIO
MUTE
TRACK
INT
MON
T/F
128-5807C
EJ
PWR
REL
G
1 of 44

Publicité

Table des Matières
loading

Sommaire des Matières pour Audiovox Rampage ACD-16

  • Page 1 O O O O O WNER'S MANU WNER'S MANU WNER'S MANU WNER'S MANU WNER'S MANUAL MANUEL D'UTILISA MANUEL D'UTILISA TION TION MANUEL D'UTILISA MANUEL D'UTILISATION MANUEL D'UTILISA TION TION MANU MANU AL DEL USU AL DEL USU ARIO ARIO MANU MANU MANUAL DEL USU AL DEL USU...
  • Page 2: Installation Instructions

    INSTALLATION INSTRUCTIONS INSTALLATION INSTRUCTIONS INSTALLATION INSTRUCTIONS INSTALLATION INSTRUCTIONS INSTALLATION INSTRUCTIONS This unit is designed for installation in cars, trucks, and vans with an existing radio opening. In many cases, a special installation kit will be required to mount the radio to the dashboard. These kits are available at electronics supply stores and car stereo specialist shops.
  • Page 3 T T T T T OLL-FREE INST OLL-FREE INST OLL-FREE INST OLL-FREE INSTALL ALLA A A A A T T T T T ION ASSIST ION ASSIST ION ASSISTA A A A A NCE ION ASSIST OLL-FREE INST ION ASSIST The installation and wiring connections for this unit are so simple, we doubt you'll need our help, but, if you do, we're here to help you.
  • Page 4 R R R R R A A A A A DIO WIRING DIO WIRING DIO WIRING DIO WIRING DIO WIRING REFER TO PAGE 4 FOR SPEAKER WIRING AUTOMATIC ANTENNA ANTENNA BLUE (0.5 AMP FUSE) IMPORTANT FUSEBLOCK THE BLUE WIRE CAN BE USED TO REMOTELY ACTIVATE AN AUTOMATIC ANTENNA OR AN EXTERNAL AMPLIFIER (SEE...
  • Page 5 ! NEVER GROUND NEGATIVE SPEAKER LEADS TO CHASSIS GROUND. ! FAILURE TO WIRE EXACTLY AS SHOWN BELOW MAY CAUSE ELECTRICAL NOTE: CHECK WITH YOUR RAMPAGE/AUDIOVOX CAR STEREO SPECIALIST OR CALL 1-800-645-4994 FOR RCA JACKS RECOMMENDATIONS OF THE MODELS THAT WILL LINE OUT WORK WITH YOUR RADIO.
  • Page 6: Bass Control

    OPER OPER OPERA A A A A T T T T T ING INSTRUC ING INSTRUC ING INSTRUC ING INSTRUCT T T T T IONS IONS IONS IONS OPER OPER ING INSTRUC IONS ACD-16 MUTE BAND TRACK AUX IN LOC/RPT 1 1 1 1 1 levels as described in ON-OFF POWER BUTTON (PWR)
  • Page 7 balance position will be shown on the display Bass mode by pressing the Select button panel from BAL 10 (full left) to BAr 10 (full so the BAS indication appears on the right). When the volume level between the display panel. Within 5 seconds of choosing left and right speakers is equal, BAL 0 will the Bass mode, press the down side of the be shown on the display panel.
  • Page 8 The LCD read-out will return to pressed, the next lower track number will normal when the temperature be selected as shown on the display panel. 9 9 9 9 9 increases to a normal range. DISC SELECT ( CD- CD+ bo bo bo bo bo DISC SLOT During CD changer operation, this button...
  • Page 9: Re-Set Button

    4. When taking the front panel with you, prevent it from being accidentally damaged please use the supplied carrying case to will appear on the display panel to protect the panel from dirt and damage. indicate that a disc is loaded in the player). Make sure there is no dust or dirt on Play of the disc can be resumed by using the electrical terminals on the back of...
  • Page 10 clock. The display will return to the radio the control so that the correct broadcast frequency indication after 5 seconds. frequency is shown on the display and adjust the control so that you are receiving During CD player and CD changer operation, a clear signal.
  • Page 11 cq cq cq cq cq MONO RADIO PLAY/INTRODUCTION 10 seconds of each track on the disc (INT DISC PLAY (MON/INT) will appear on the display panel). When a desired track is reached, press the button During FM radio operation, this button is again to cancel the function (INT will used to select mono or stereo reception of disappear from the display panel) and play...
  • Page 12 SETT T T T T ING THE CLOCK ING THE CLOCK ING THE CLOCK ING THE CLOCK ING THE CLOCK 1. Switch the vehicle ignition and radio “on”. 2. Press the Time/Frequency button to call the time display. 3. Press and hold in the Time/Frequency Selector button with the time displayed.
  • Page 13 SPECIFICATIONS SPECIFICATIONS SPECIFICATIONS SPECIFICATIONS SPECIFICATIONS Size: 7" W 2" H x 6-1/8" D 178 mm x 50 mm x 155 mm Operating Voltage: 12 volts DC, negative ground Fuse Ratings: Constant (yellow) lead: 5 AMP. Switched (red) lead: 0.5 AMP. Output Power: 160 watts maximum (40 watts x 4 channels)
  • Page 14: Care And Maintenance

    CARE AND MAINTENANCE CARE AND MAINTENANCE CARE AND MAINTENANCE CARE AND MAINTENANCE CARE AND MAINTENANCE The radio section of your new sound system does not require any maintenance. recommend that you keep this manual for reference on the many features found in this unit as well as how to set the clock.
  • Page 15 This Warranty gives you specific legal rights and you may also have other rights which vary from state to state. U.S.A.: AUDIOVOX CORPORATION, 150 MARCUS BLVD., HAUPPAUGE, NEW YORK 11788 • 1-800-645-4994 CANADA: CALL 1-800-645-4994 FOR LOCATION OF WARRANTY STATION SERVING YOUR AREA Form No.
  • Page 16 NOTICE D'INSTALLATION NOTICE D'INSTALLATION NOTICE D'INSTALLATION NOTICE D'INSTALLATION NOTICE D'INSTALLATION Cet appareil est conçu pour être installé dans les voitures, camions et fourgonnettes dotés d'un logement aménagé dans le tableau de bord. Le recours à une trousse d'installation sera souvent nécessaire pour poser l'autoradio sur le tableau de bord. On peut se procurer ces trousses dans les magasins d'électronique et chez les spécialistes de l'autoradio.
  • Page 17: Assistance Sans Frais Pour L'installation

    ASSISTANCE SANS FRAIS POUR L'INSTALLATION ASSISTANCE SANS FRAIS POUR L'INSTALLATION ASSISTANCE SANS FRAIS POUR L'INSTALLATION ASSISTANCE SANS FRAIS POUR L'INSTALLATION ASSISTANCE SANS FRAIS POUR L'INSTALLATION L'installation et les branchements de l'appareil sont très simples et vous n'aurez en principe pas besoin d'aide, dans le cas contraire cependant, nous sommes là...
  • Page 18: Schéma De Câbl

    SCHÉMA DE CÂBL SCHÉMA DE CÂBL SCHÉMA DE CÂBL SCHÉMA DE CÂBL SCHÉMA DE CÂBLA A A A A GE DE L'AUT GE DE L'AUT GE DE L'AUT GE DE L'AUTOR GE DE L'AUT ORA A A A A DIO VOIR CÂBLAGE DES HAUTS-PARLEURS PAGE 18 ANTENNE ANTENNE...
  • Page 19: Dépannage

    AU CHÂSSIS DE LA VOITURE. ! TOUT MAUVAIS CÂBLAGE EST SUSCEPTIBLE D'ENDOMMAGER L'AUTORADIO. REMARQUE : CONSULTEZ VOTRE SPÉCIALISTE DES AUTORADIOS RAMPAGE/AUDIOVOX OU APPELEZ LE 1-800-645-4994 POUR SAVOIR QUELS SONT LES MODÈLES COM- SORTIES RCA BAS NIVEAU À PATIBLES AVEC VOTRE AUTORADIO.
  • Page 20: Touche De Marche-Arrêt (Pwr)

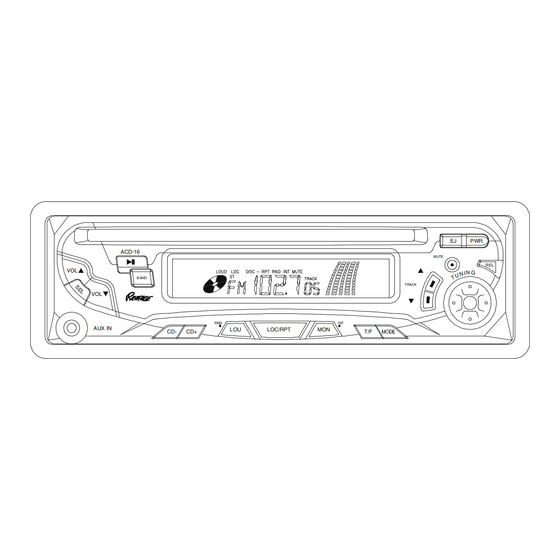
    NOT T T T T ICE D'UT ICE D'UT ICE D'UT ILISA ILISA ILISAT T T T T ION ICE D'UT ICE D'UTILISA ILISA ACD-16 MUTE BAND TRACK AUX IN LOC/RPT 1 1 1 1 1 les sections TOUCHE DE MARCHE-ARRÊT (PWR) 3 3 3 3 3 Appuyez sur cette touche pour allumer ou SÉLECTEUR (SEL)
  • Page 21: Réglage Des Aigus

    que l'indication BAS s'affiche. Dans un délai de BAL 10 (haut-parleurs droits coupés) et BAr 10 5 secondes après avoir choisi le mode Basses, (haut-parleurs gauches coupés). Lorsque le appuyez sur la partie « vers le bas » de la volume entre les haut-parleurs droit et gauche touche de réglage du volume pour diminuer...
  • Page 22: Fente D'insertion Du Disque Compact

    9 9 9 9 9 liquides redevient normal SÉLECTION DU CD (CD- CD+) lorsque la température se Lorsque l'on utilise le changeur de CD, cette normalise. bo bo bo bo bo touche permet de sélectionner le disque FENTE D'INSERTION DU compact que l'on veut écouter.
  • Page 23: Bouton De Verrouillage De La Façade (Rel)

    de l'appareil dans un délai de 10 secondes S'assurer qu'il n'y a pas de poussière ni de saletés sur les bornes situées au dos de la après avoir été éjecté, il sera automatiquement façade car cela pourrait provoquer un faux réinséré...
  • Page 24 Lorsque vous utilisez le lecteur ou le changeur réglages de manière à ce que la réception soit bonne. Si l'autoradio n'est pas réglé exactement de CD, la première pression sur cette touche affiche l'heure. L'affichage reviendra au sur la bonne fréquence, il sera possible d'entendre des distorsions, du bruit ou d'avoir numéro du disque au bout de 5 secondes, que vous utilisiez le lecteur ou le changeur de...
  • Page 25: Écoute De La Radio En Mono/ Balayage Des Introductions Des Plages ( Mon/Int)

    cq cq cq cq cq ÉCOUTE DE LA RADIO EN MONO/ disque compact (l'indication INT s'affiche). Lorsque vous avez trouvé la plage souhaitée, BALAYAGE DES INTRODUCTIONS appuyez de nouveau sur la touche pour DES PLAGES ( MON/INT) désactiver la fonction (l'indication INT s'efface) et la lecture de la plage sélectionnée se Lorsque l'on écoute la radio sur la bande FM, poursuivra.
  • Page 26: Codes D'erreur Du Lec

    RÉGL RÉGL RÉGLA A A A A GE DE L GE DE L GE DE L GE DE LA MONTRE A MONTRE A MONTRE A MONTRE RÉGL RÉGL GE DE L A MONTRE 1. Mettez le contact du véhicule et allumez l'autoradio. Appuyez sur le sélecteur d'heure/fréquence de façon à...
  • Page 27: Caractéristiques Techniques

    CARACTÉRISTIQUES TECHNIQUES CARACTÉRISTIQUES TECHNIQUES CARACTÉRISTIQUES TECHNIQUES CARACTÉRISTIQUES TECHNIQUES CARACTÉRISTIQUES TECHNIQUES 178 (L) x 50 (H) x 155 (P) mm Dimensions : 7" (L) x 2" (H) x 6 1/8"(P) Tension de fonctionnement : 12 volts c.c., masse négative Constant (jaune) : 5 A Calibres des fusibles : Commuté...
  • Page 28: Précautions Et Entretien

    PRÉCAUTIONS ET ENTRETIEN PRÉCAUTIONS ET ENTRETIEN PRÉCAUTIONS ET ENTRETIEN PRÉCAUTIONS ET ENTRETIEN PRÉCAUTIONS ET ENTRETIEN La partie autoradio de votre nouvelle chaîne stéréo ne nécessite aucun entretien. Nous vous conseillons de conserver ce manuel pour vous reporter ultérieurement aux nombreuses fonctions de cet appareil ainsi qu'au réglage de la montre.
  • Page 29: Tée De 12 Mois

    IE LIMI TÉE DE 12 MOIS AUDIOVOX CORPORATION (ci-après, « la Société ») garantit au premier acheteur au détail de cet appareil, que si, dans des conditions normales d'utilisation, il est démontré que cet appareil, ou une quelconque de ses pièces, présente un ou des défauts de matériaux ou de fabrication dans un délai de 12 mois à...
  • Page 30: Instrucciones Para La Instalación

    INSTRUCCIONES PARA LA INSTALACIÓN INSTRUCCIONES PARA LA INSTALACIÓN INSTRUCCIONES PARA LA INSTALACIÓN INSTRUCCIONES PARA LA INSTALACIÓN INSTRUCCIONES PARA LA INSTALACIÓN Esta unidad está diseñada para ser instalada en automóviles, camiones y camionetas que ya tengan una abertura para radio. En muchos casos, se necesitará un equipo de instalación especial para montar la radio en el tablero de instrumentos. Se puede conseguir estos equipos en las tiendas de artículos electrónicos y en los negocios especializados en equipos estereofónicos para automóviles.
  • Page 31 ASISTENCI ASISTENCI A GR A GRA A A A A TUI A GR TUIT T T T T A P A PA A A A A R R R R R A L A INST A INST A INSTAL AL AL AL ALACIÓN ACIÓN ACIÓN ASISTENCI...
  • Page 32 CABLE CABLE CABLEA A A A A DO DE L DO DE L DO DE L A RA A A A A DIO CABLE CABLE DO DE L DO DE LA R PARA EL CABLEADO DE LOS PARLANTES CONSULTE LA PÁGINA 32 ANTENA ANTENA AUTOMÁTICA...
  • Page 33 ! SI NO SE REALIZAN LAS CONEXIONES TAL COMO SE ILUSTRA A CONTINUACIÓN, SE PUEDE PROVOCAR FALLAS ELÉCTRICAS. NOTA: CONSULTE A SU ESPECIALISTA EN EQUIPOS ESTEREO- FÓNICOS PARA AUTOMÓVILES RAMPAGE/AUDIOVOX, O BIEN LLAME AL 1-800-645-4994 PARA OBTENER SALIDAS RCA RECOMENDACIONES SOBRE LOS MODELOS QUE VAN A PARA USAR CON FUNCIONAR CON SU RADIO.
  • Page 34 INSTRUCCIONES DE FUNCIONA INSTRUCCIONES DE FUNCIONA INSTRUCCIONES DE FUNCIONA INSTRUCCIONES DE FUNCIONA INSTRUCCIONES DE FUNCIONAMIENT MIENT MIENT MIENT MIENTO O O O O ACD-16 MUTE BAND TRACK AUX IN LOC/RPT 1 1 1 1 1 se describe en BOTÓN DE ALIMENTACIÓN 3 3 3 3 3 ON-OFF (PWR) BOTÓN SELECTOR (SEL)
  • Page 35: Control De Equilibrio Acústico Izquierdo/Derecho

    seleccione la modalidad grave apretando el la derecha. La posición de equilibrio estará botón selector hasta que la indicación BAS indicada en el panel de visualización por aparezca en el panel de visualización. A los 5 BAL 10 (totalmente a la izquierda) a Bar 10 segundos de elegir la modalidad grave, oprima (totalmente a la derecha).
  • Page 36 les tome más tiempo iluminarse que De igual manera, cada vez que se aprieta el en condiciones normales. Además, lado del botón de selección de pista hacia la visibilidad de los números en el atrás (TRACK ), se selecciona el número visor o pantalla LCD puede disminuir siguiente de pista en orden descendente, tal levemente.
  • Page 37 visualización indicando que hay un disco en el intermitente u otros desperfectos. br br br br br reproductor). Se puede reanudar la reproduc- INDICADOR L.E.D. ANTIRROBO ción del disco pulsando el botón selector de modalidad para elegir la modalidad de El diodo emisor de luz (L.E.D.), ubicado en el reproducción de CD.
  • Page 38 bu bu bu bu bu co co co co co SELECTOR DE BANDA AM/FM (BAND) SELECTOR DE SEÑAL LOCAL/ REPRODUCCIÓN REPETIDA Cada vez que se oprima este botón, se (LOC/RPT) cambiará la banda de la radio. La indicación AM o FM aparecerá en el panel de visualización Durante el funcionamiento de la radio, apriete según cuál sea su elección.
  • Page 39 cr cr cr cr cr transmisión. En condiciones de recepción CONECTOR AUX IN normal, la unidad tiene que dejarse en la El conector AUX IN proporciona al usuario la modalidad estereofónica que se indica ST opción de conectar una fuente externa a la en la pantalla al sintonizar una señal FM estéreo.
  • Page 40: Códigos De Err

    A A A A A JUSTE DEL RELOJ JUSTE DEL RELOJ JUSTE DEL RELOJ JUSTE DEL RELOJ JUSTE DEL RELOJ Ponga la llave de contacto del vehículo y la radio en "on". Oprima el botón selector de hora/frecuencia para que aparezca la hora en el panel de visualización.
  • Page 41 ESPECIFICACIONES ESPECIFICACIONES ESPECIFICACIONES ESPECIFICACIONES ESPECIFICACIONES Tamaño: 7" (ancho) x 2" (altura) x 6-1/8" (profundidad) 178 mm x 50 mm x 155 mm Tensión de servicio: 12 voltios CC, negativo a masa Fusibles: Conductor constante (amarillo): 5 AMP. Conductor conmutado (rojo): 0,5 AMP. Potencia de salida: máxima de 160 vatios (40 vatios x 4 canales)
  • Page 42: Cuidado Y Mantenimiento

    CUIDADO Y MANTENIMIENTO CUIDADO Y MANTENIMIENTO CUIDADO Y MANTENIMIENTO CUIDADO Y MANTENIMIENTO CUIDADO Y MANTENIMIENTO La sección de la radio de su nuevo sistema de sonido no requiere mantenimiento alguno. Le recomendamos guardar este manual para consultar las diversas funciones que tiene la unidad y la forma de poner la hora. La sección del reproductor de discos compactos tampoco requiere mantenimiento constante, pero los conocimientos adecuados del sistema, su uso y manejo le ayudarán a disfrutar al máximo sus posibilidades.
  • Page 43 E.U.A: AUDIOVOX CORPORATION, 150 MARCUS BLVD., HAUPPAUGE, NEW YORK 11788 - 1-800-645-4994 CANADÁ: LLAME 1-800-646-4994 PARA OBTENER INFORMACIÓN SOBRE EL CENTRO AUTORIZADO PARA SERVICIOS POR GARANTÍA MÁS CERCANO A SU DOMICILIO.
  • Page 44 © 2000 Audiovox Corp., 150 Marcus Blvd., Hauppauge, N.Y. 11788 128-5807C 128-5807C 44 of 44...

Table des Matières