Publicité

Les langues disponibles
  • FR

Les langues disponibles

Liens rapides

Publicité

Table des Matières
loading

Sommaire des Matières pour auna Concept 620

  • Page 3: Table Des Matières

    Sehr geehrter Kunde, wir gratulieren Ihnen zum Erwerb Ihres Gerätes. Lesen Sie die folgenden Hinweise sorgfältig durch und befolgen Sie diese, um möglichen Schäden vorzubeugen. Für Schäden, die durch Missachtung der Hinweise und unsachgemäßen Gebrauch entstehen, übernehmen wir keine Haftung. Scannen Sie den folgenden QR-Code, um Zugriff auf die aktuellste Bedienungsanleitung und weitere Informationen rund um das Produkt zu erhalten:...
  • Page 4: Technische Daten

    TECHNISCHE DATEN Artikelnummer 10006335 Stromversorgung 220-240 V ~ 50/60 Hz BT-Frequenz 2402-2480 MHz BT-Sendeleistung (max.) 3,31 dBm Frequenzempfindlichkeit 40 Hz-20 KHz S/N Verhältnis ≥75 dB Kanaltrennung ≥50 dB Lautsprecher 6.5“+3“x5...
  • Page 5: Sicherheitshinweise

    SICHERHEITSHINWEISE Allgemeine Hinweise • Blitzschlag - Wenn Sie das Gerät länger nicht benutzen oder es gewittert, ziehen Sie den Stecker aus der Steckdose der trennen Sie das Gerät vom Antennenanschluss. Dadurch werden Schäden am Produkt durch Blitzschlag und Überspannung vermieden. •...
  • Page 6: Vorderseite

    VORDERSEITE • INPUT SET: Wählen Sie hiermit die Eingangsquelle. • MASTER VOLUME: Drehen zum Einstellen der Lautstärke. • PRO-LOGIC: Pro-Logic-Taste • AUTO/ : USB/SD Wiedergabe/Pause. • VOL-/ /CH-: Zurück, wenn Sie die Taste länger als 3 Sek. halten, reduziert sich die Lautstärke. •...
  • Page 7: Fernbedienung

    FERNBEDIENUNG Ein-/Ausschalter (Standby) SD-Wiedergabe Pro-Logic-Kanalwahl USB-Speicher AUX-Wiedergabe DVD-Wiedergabe BLUE BT-Wiedergabe Wiedergabe/Pause USB/SD: Vorheriger Titel USB/SD: Nächster Titel SLEEP Einschlaftimer FL +/- Lautstärke vorne links FR +/- Lautstärke vorne rechts SW +/- Lautstärke Subwoofer CEN +/- Lautstärke Center VOL +/- Gesamtlautstärke SL +/- Lautstärke Surround links SR +/-...
  • Page 8: Anschlussplan 1

    ANSCHLUSSPLAN 1 Lautsprecheranschlüsse Schließen Sie die vorderen, den Center- und die Surroundlautsprecher entsprechend an die 5.1-Anschlüsse an. • Schließen Sie die vorderen Lautsprecher an den Anschluss FRONT SPEAKERS an. • Schließen Sie den Center-Lautsprecher an den Anschluss CENTER an. • Schließen Sie den Surroundlautsprecher an den Anschluss SURROUND SPEAKERS an.
  • Page 9: Anschlussplan 2

    ANSCHLUSSPLAN 2 Radioantenne Anschluss von Zubehör Schließen Sie das Zubehör den Farben entsprechend an: Rote Stecker und Anschlüsse: Linker Audiokanal. Hinweis: Schließen Sie die Stecker richtig an. Lose Verbindungen können ein Summen und andere Störgeräusche verursachen. Wichtig: Schließen Sie sämtliches Zubehör an und verbinden Sie erst danach das Gerät mit dem Stromnetz.
  • Page 10: Positionierung Der Lautsprecher

    POSITIONIERUNG DER LAUTSPRECHER (a) Subwoofer: Stellen Sie den Subwoofer auf den Boden. (b) Vordere Lautsprecher (c) Surroundlautsprecher: Stellen Sie diese Lautsprecher auf Höhe und ein wenig hinter Ihrer Sitzposition ca. 1 m oberhalb Ihrer Ohren auf. (d) Mittlerer Lautsprecher: Stellen Sie diesen Lautsprecher zwischen den vorderen Lautsprechern auf.
  • Page 11: Reinigung Und Pflege

    REINIGUNG UND PFLEGE • Verwenden Sie ein weiches Tuch, um die Oberfläche des Lautsprechers zu reinigen. Verwenden Sie zur Reinigung keine Scheuerschwämme, Scheuermittel oder scharfe Reiniger. • Wenn der Lautsprecher während eines Gewitters nicht richtig funktioniert, ziehen Sie den Stecker aus der Steckdose und stecken Sie ihn nach einer Minute wieder ein.
  • Page 12: Spezielle Entsorgungshinweise Für Verbraucher In Deutschland

    SPEZIELLE ENTSORGUNGSHINWEISE FÜR VERBRAUCHER IN DEUTSCHLAND Entsorgen Sie Ihre Altgeräte fachgerecht. Dadurch wird gewährleistet, dass die Altgeräte umweltgerecht verwertet und negative Auswirkungen auf die Umwelt und menschliche Gesundheit vermieden werden. Bei der Entsorgung sind folgende Regeln zu beachten: • Jeder Verbraucher ist gesetzlich verpflichtet, Elektro- und Elektronikaltgeräte (Altgeräte) sowie Batterien und Akkus getrennt vom Hausmüll zu entsorgen.
  • Page 13 • Bei einem Vertrieb unter Verwendung von Fernkommunikationsmitteln ist die unentgeltliche Abholung am Ort der Abgabe auf Elektro- und Elektronikgeräte der Kategorien 1, 2 und 4 gemäß § 2 Abs. 1 ElektroG, nämlich „Wärmeüberträger“, „Bildschirmgeräte“ (Oberfläche von mehr als 100 cm²) oder „Großgeräte“ (letztere mit mindestens einer äußeren Abmessung über 50 Zentimeter) beschränkt.
  • Page 14: Hinweise Zur Entsorgung

    Berlin Brands Group UK Limited PO Box 42 272 Kensington High Street London, W8 6ND United Kingdom Hiermit erklärt Chal-Tec GmbH, dass der Funkanlagentyp Concept 620 der Richtlinie 2014/53/EU entspricht. Der vollständige Text der EU-Konformitätserklärung ist unter der folgenden Internetadresse verfügbar: use.berlin/10006335...
  • Page 15 Dear Customer, Congratulations on purchasing this device. Please read the following instructions carefully and follow them to prevent possible damages. We assume no liability for damage caused by disregard of the instructions and improper use. Scan the QR code to get access to the latest user manual and more product information.
  • Page 16: Technical Data

    TECHNICAL DATA Item number 10006335 Power supply 220-240 V ~ 50/60 Hz BT frequency 2402-2480 MHz BT radio-frequency power (max.) 3.31 dBm Frequency Response 40 Hz-20 kHz S/N Ratio ≥75 dB Separation ≥50 dB Speaker 6.5“+3“x5...
  • Page 17: Safety Instructions

    SAFETY INSTRUCTIONS General information • Lightning - If you are not going to use the device for a long time or if there is a storm, disconnect the plug from the electrical outlet and disconnect the device from the antenna connector. This will avoid damage to the product that may be caused by lightning or overvoltage.
  • Page 18: Front Panel

    FRONT PANEL • INPUT SET: when pressing the button, the function is „input“ function. • MASTER VOLUME: when rotating the button, the function os Volume+/ Volume- function. • PRO-LOGIC: pro-logic function key. • AUTO/ : USB/SD pause/play function key. • VOL-/ /CH-: „previous“...
  • Page 19: Control Panel

    CONTROL PANEL On/off switch (standby) SD playback Pro-Logic channel selection USB memory AUX playback DVD playback BLUE BT playback Play/Pause USB/SD: Previous track USB/SD: Next track SLEEP Sleep timer FL +/- Volume front left FR +/- Volume front right SW +/- Subwoofer volume CEN +/- Center volume...
  • Page 20: Connection Diagram 1

    CONNECTION DIAGRAM 1 Speaker Terminals Connect front speakers, a center speaker, surround speakers to 5.1 speaker output terminals. • The front speaker‘s cords to the FRONT SPEAKERS terminals • The center speaker‘s cord to the CENTER SPEAKERS terminals. • The surround speaker‘s cords to SURROUND SPEAKER terminals. Note: Do not leave objects generating magnetism near the speakers.
  • Page 21: Connection Diagram

    CONNECTION DIAGRAM 2 Radio antenna Connection of accessories Connect the accessories according to the colors: Red plugs and connectors: Left audio channel. Note: Connect the connectors properly. Loose connections can cause buzzing and other noise. Important: Connect all accessories and only then connect the device to the mains.
  • Page 22: Positioning The Speakers

    POSITIONING THE SPEAKERS (a) Subwoofer: Place the subwoofer any place on the floor. There is no directional requirement for the Bass effect. (b) Front speakers (c) Surround Speakers: Place the surround spakers in the same level slightly behind the listening area by facing it. Align horizontally about 1 metre above ear high.
  • Page 23: Cleaning And Care

    CLEANING AND CARE • Use a soft cloth or cotton dipped in a neutral solution for cleaning the surface of the speaker. Do not use the type of cloth that you use for washing dishes or aggressive chemical agents. • If the speaker is not working properly during a storm, please disconnect the plug from the power socket and reinsert it after a minute.
  • Page 24: Disposal Considerations

    For Great Britain: Hereby, Chal-Tec GmbH declares that the radio equipment type Concept 620 is in compliance with the relevant statutory requirements. The full text of the declaration of conformity is available at the following...
  • Page 25 Cher client, Toutes nos félicitations pour l’acquisition de ce nouvel appareil. Veuillez lire attentivement les instructions suivantes de branchement et d’utilisation afin d’éviter d’éventuels dommages. Le fabricant ne saurait être tenu pour responsable des dommages dus au non-respect des consignes de sécurité et à la mauvaise utilisation de l’appareil.
  • Page 26: Fiche Technique

    FICHE TECHNIQUE Numéro d'article 10006335 Alimentation 220-240 V ~ 50/60 Hz WiFi fréquence 2402-2480 MHz WiFi puissance de radiofréquence (max.) 3,31 dBm Sensibilité en fréquences 40 Hz-20 KHz Rapport S/N ≥75 dB Séparation des canaux ≥50 dB Haut-parleurs 6.5“+3“x5...
  • Page 27: Consignes De Sécurité

    CONSIGNES DE SÉCURITÉ Consignes générales • Foudre - Si vous n‘utilisez pas l‘appareil pendant une longue période ou s‘il y a de l‘orage, débranchez la fiche de la prise et débranchez l‘antenne de l‘appareil. Cela évite d‘endommager le produit à cause de la foudre et des surtensions.
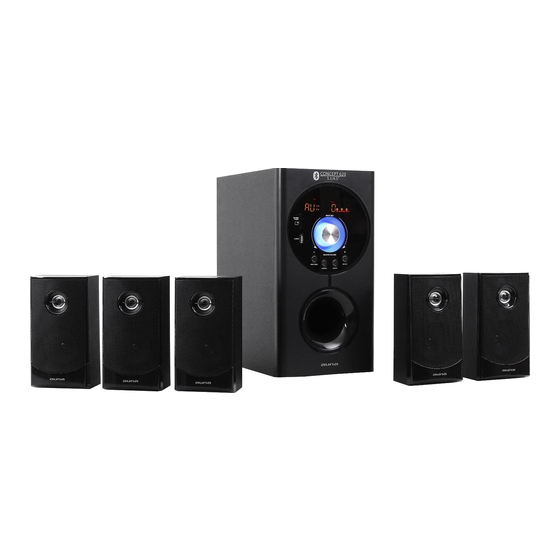
  • Page 28: Façade Avant

    FAÇADE AVANT • INPUT SET : Pour sélectionner la source en entrée. • MASTER VOLUME : Tourner pour régler le volume. • PRO-LOGIC : Touche Pro-Logic • AUTO / : USB/SD Lecture/Pause. • VOL-/ /CH- : Retour, diminue le volume si vous appuyez pendant plus de 3 secondes.
  • Page 29: Télécommande

    TÉLÉCOMMANDE Bouton ON/OFF (Standby) Lecture SD Choix du canal Pro-Logic Prise USB Lecture AUX Lecture DVD BLUE Lecture BT Lecture/Pause USB/SD : Titre précédente. USB/SD : Titre suivant SLEEP Sleep timer FL +/- Volume avant gauche FR +/- Volume avant droit SW +/- Volume Subwoofer CEN +/-...
  • Page 30: Schéma Des Branchements 1

    SCHÉMA DES BRANCHEMENTS 1 Branchement des enceintes Branchez les enceintes avant, centrales et surround conformément aux prises 5.1. • Branchez les enceintes avants aux prises FRONT SPEAKERS. • Branchez les enceintes centrales aux prises CENTER. • Branchez les enceintes surround aux prises SURROUND SPEAKERS. Remarque : Ne placez pas d‘objets magnétiques à...
  • Page 31: Schéma Des Branchements

    SCHÉMA DES BRANCHEMENTS 2 Antenne radio Branchements des accessoires Branchez les accessoires en respectant les indica- tions de couleur. La prise rouge correspond au canal audio gauche. Note : Enfoncez bien les câbles dans les prises sans quoi des distorsions pourraient survenir.
  • Page 32: Positionnement Des Enceintes

    POSITIONNEMENT DES ENCEINTES (a) Subwoofer : Posez les subwoofers sur le sol. (b) Enceintes avants. (c) Enceintes Surround : Placez ces enceintes en hauteur, à environ un mètre en retrait de vos oreilles. (d) Enceintes centrales : Placez ces enceintes entre les enceintes avants.
  • Page 33: Nettoyage Et Entretien

    NETTOYAGE ET ENTRETIEN • Utilisez un chiffon doux ou du coton trempé dans une solution neutre pour nettoyer la surface de l‘enceinte. N‘utilisez pas le type de tissu que vous utilisez pour laver la vaisselle ni des agents chimiques agressifs. •...
  • Page 34: Conseils Pour Le Recyclage

    London, W8 6ND United Kingdom Le soussigné, Chal-Tec GmbH, déclare que l’équipement radioélectrique du type Concept 620 est conforme à la directive 2014/53/UE. Le texte complet de la déclaration UE de conformité est disponible à l’adresse internet suivante : use.berlin/10006335...
  • Page 35 Estimado cliente: Le felicitamos por la adquisición de este producto. atentamente siguiente manual siga cuidadosamente las instrucciones de uso con el fin de evitar posibles daños. La empresa no se responsabiliza de los daños ocasionados por un uso indebido del producto o por haber desatendido las indicaciones de seguridad.
  • Page 36: Datos Técnicos

    DATOS TÉCNICOS Número de artículo 10006335 Alimentación 220-240 V ~ 50/60 Hz Frecuencia BT 2402-2480 MHz Potencia de transmisión BT (máx.) 3,31 dBm Sensibilidad de frecuencia 40 Hz-20 KHz Relación señal/ruido ≥75 dB Separación de canales ≥50 dB Altavoz 6,5“+3“x5...
  • Page 37: Indicaciones De Seguridad

    INDICACIONES DE SEGURIDAD Indicaciones generales • Rayos- Si no va a utilizar la unidad durante un período prolongado de tiempo, o si hay rayos, desenchufe la unidad de la toma de corriente y desconecte el conector de la antena. Esto evitará que el producto resulte dañado por los rayos y las subidas de tensión.
  • Page 38: Parte Delantera

    PARTE DELANTERA • INPUT SET: seleccione la fuente de entrada. • MASTER VOLUME: gire el regulador para ajustar el volumen. • PRO-LOGIC: tecla Pro-logic • AUTO/ : Reproducción/pausa en USB/SD. • VOL-/ /CH-:Atrás; cuando se mantiene la tecla presionada más de 3 seg, se reduce el volumen.
  • Page 39: Mando A Distancia

    MANDO A DISTANCIA Encender/apagar (modo de espera) Reproducción SD Selección de canal Pro-Logic Memoria USB Reproducción AUX Reproducción DVD BLUE Reproducción BT Reproducción/pausa USB/SD: pista anterior USB/SD: pista siguiente SLEEP Temporizador de apagado FL +/- Volumen altavoz delantero izquierdo FR +/- Volumen altavoz delantero derecho SW +/- Volumen subwoofer...
  • Page 40: Esquema De Conexiones 1

    ESQUEMA DE CONEXIONES 1 Tomas para altavoces Conecte los altavoces delanteros, el central y los surround a las tomas 5.1 según corresponda. • Conecte los altavoces delanteros a la toma FRONT SPEAKERS. • Conecte el altavoz central a la toma CENTER. •...
  • Page 41 ESQUEMA DE CONEXIONES 2 Antena de radio Conexión de accesorios Conecte los accesorios siguiendo los colores: conector y tomas en color rojo: canal de audio izquierdo. Nota: introduzca correctamente el conector. Las conexiones sueltas pueden ocasionar zumbidos y otras interferencias. Importante: conecte todos los accesorios primero y, posteriormente, enchufe el aparato a la red eléctrica.
  • Page 42: Colocación De Los Altavoces

    COLOCACIÓN DE LOS ALTAVOCES (a) Subwoofer: coloque el subwoofer en el suelo. (b) Altavoces delanteros (c) Altavoces surround: coloque estos altavoces en altura y un poco más hacia atrás que su asiento, aprox. a 1 m por encima de su campo auditivo.
  • Page 43: Limpieza Y Cuidado

    LIMPIEZA Y CUIDADO • Utilice un paño suave para limpiar la superficie de los altavoces. No utilice esponjas abrasivas, productos abrasivos ni limpiadores potentes para la limpieza. • Si el altavoz no funciona correctamente durante una tormenta, desconecte el enchufe de la toma de corriente y vuelva a enchufarlo transcurrido un minuto.
  • Page 44: Retirada Del Aparato

    London, W8 6ND United Kingdom Por la presente, Chal-Tec GmbH declara que el tipo de equipo radioeléctrico Concept 620 es conforme con la Directiva 2014/53/UE. El texto completo de la declaración UE de conformidad está disponible en la dirección Internet siguiente: use.berlin/10006335...
  • Page 45 Gentile Cliente, La ringraziamo per aver acquistato il dispositivo. La preghiamo di leggere attentamente le seguenti istruzioni per l’uso e di seguirle per evitare possibili danni. Non ci assumiamo alcuna responsabilità per danni scaturiti da una mancata osservazione delle avvertenze di sicurezza e da un uso improprio del dispositivo.
  • Page 46: Tdati Tecnici

    TDATI TECNICI Numero articolo 10006335 Alimentazione 220-240 V ~ 50/60 Hz Frequenza BT 2402-2480 MHz Potenza di trasmissione BT (max.) 3,31 dBm Sensibilità in frequenza 40 Hz-20 KHz Rapporto S/N ≥75 dB Separazione tra i canali ≥50 dB Altoparlanti 6.5“+3“x5...
  • Page 47: Avvertenze Di Sicurezza

    AVVERTENZE DI SICUREZZA Avvertenze generiche • Colpo di fulmine - Se non si usa più il dispositivo o se ci sono temporali, staccare la spina dalla presa elettrica e scollegare il dispositivo dall'antenna. In questo modo si evitano danni al prodotto dovuti a colpi di fulmine e sovratensione.
  • Page 48: Lato Anteriore

    LATO ANTERIORE • INPUT SET: per selezionare la sorgente di ingresso. • MASTER VOLUME: ruotare la manopola per impostare il volume. • PRO-LOGIC: pulsante Pro-Logic • AUTO/ : USB/SD play/pausa. • VOL-/ /CH-: indietro, quando si tiene premuto il pulsante per più di 3 secondi il volume si abbassa.
  • Page 49: Telecomando

    TELECOMANDO Interruttore on/off (standby) Riproduzione SD Selezione canale Pro-Logic Memoria USB Riproduzione AUX Riproduzione DVD BLUE Riproduzione BT Play/pausa USB/SD: brano precedente USB/SD: brano successivo SLEEP Sleep timer FL +/- Volume davanti sinistra FR +/- Volume davanti destra SW +/- Volume subwoofer CEN +/- Volume center...
  • Page 50: Schema Di Collegamento 1

    SCHEMA DI COLLEGAMENTO 1 Collegare gli altoparlanti Collegare gli altoparlanti anteriori, center e surround secondo gli allacci raffigurati in 5.1. • Collegare gli altoparlanti anteriori ai FRONT SPEAKERS. • Collegare l'altoparlante center a CENTER. • Collegare l'altoparlante surround ai SURROUND SPEAKERS. Nota: non sistemare oggetti magnetici vicino agli altoparlanti.
  • Page 51 SCHEMA DI COLLEGAMENTO 2 Antenna radio Collegare gli accessori Collegare gli accessori seguendo i colori: spine rosse e allacci: canale audio sinistro. Nota: inserire la spina correttamente. I collegamenti lenti possono causare ronzii e altre interferenze. Importante: collegare prima tutti gli accessori e poi il dispositivo alla rete elettrica.
  • Page 52: Posizionamento Degli Altoparlanti

    POSIZIONAMENTO DEGLI ALTOPARLANTI (a) Subwoofer: sistemare il subwoofer sul pavimento. (b) Altoparlanti anteriori (c) Altoparlanti surround: sistemare gli altoparlanti in alto a ca. 1 m sopra le proprie orecchie e poco più indietro rispetto a dove si sta seduti. (d) Altoparlante centrale: sistemare l'altoparlante tra gli altoparlanti anteriori.
  • Page 53: Pulizia E Manutenzione

    PULIZIA E MANUTENZIONE • Utilizzare un panno morbido per pulire la superficie dell'altoparlante. Non ricorrere a pagliette, prodotti abrasivi o detergenti aggressivi. • Se l'altoparlante non funziona bene durante un temporale, togliere la spina dalla presa elettrica e reinserirla dopo circa un minuto. •...
  • Page 54: Smaltimento

    272 Kensington High Street London, W8 6ND United Kingdom Il fabbricante, Chal-Tec GmbH, dichiara che il tipo di apparecchiatura radio Concept 620 è conforme alla direttiva 2014/53/UE. Il testo completo della dichiarazione di conformità UE è disponibile al seguente indirizzo Internet: use.berlin/10006335...

Ce manuel est également adapté pour:

10006335

Table des Matières