Table des Matières
Publicité
Les langues disponibles
Les langues disponibles
Liens rapides
Publicité
Chapitres
Table des Matières
Dépannage

Manuels Connexes pour auna 10032586


Sommaire des Matières pour auna 10032586
-
Page 3: Table Des Matières
Sehr geehrter Kunde, wir gratulieren Ihnen zum Erwerb Ihres Gerätes. Lesen Sie die folgenden Hinweise sorgfältig durch und befolgen Sie diese, um möglichen Schäden vorzubeugen. Für Schäden, die durch Missachtung der Hinweise und unsachgemäßen Gebrauch entstehen, übernehmen wir keine Haftung. INHALT Technische Daten 4 Sicherheitshinweise 5... -
Page 4: Technische Daten
TECHNISCHE DATEN Artikelnummer 10032586, 10034039 220-240 V~ 50/60 Hz Stromversorgung Stromverbrauch im Betrieb 45 W Standby-Verbrauch <2 W Frequenzen 174,928 - 239,200 MHz 87,5 - 108 MHz Abmessungen Gerät 245 x 250 x 118 mm Lautsprecherboxen 148 x 190 x 222 mm... -
Page 5: Sicherheitshinweise
SICHERHEITSHINWEISE VORSICHT Bei diesem Gerät handelt es sich um ein Laserprodukt der Klasse 1. Die Verwendung von nicht vom Hersteller empfohlenen Bedienelementen oder Modifikationen am Gerät, kann dazu führen, dass Sie sich selbst gefährlicher Laserstrahlung aussetzen. Öffnen Sie keinesfalls die Geräteabdeckung und versuchen Sie nicht, dass Gerät selbst zu reparieren. - Page 6 • Verbiegen oder knicken Sie das Netzstromkabel nicht. • Stellen Sie keine mit Wasser gefüllten Gegenstände, wie beispielsweise Vasen, auf dem Gerät ab. Verwenden Sie das Gerät ausschließlich in trockener Umgebung. • Stellen Sie keine Feuerquellen mit offener Flamme, wie beispielsweise Kerzen, auf dem Gerät ab.
- Page 7 Erklärung der Symbole auf dem Gerät CAUTION RISK OF ELECTRIC SHOCK DO NOT OPEN VORSICHT: Öffnen Sie, zum Reduzieren der Stromschlaggefahr, weder die Geräteabdeckung noch die Rückseite des Geräts. Dieses Gerät muss geerdet werden. Das Gerät enthält keine Teile, die vom Kunden gewartet werden könnten. Bitte wenden Sie sich zur Wartung und Reparatur an den Kundendienst oder an in ähnlicher Weise qualifiziertes Personal.
-
Page 8: Geräteübersicht
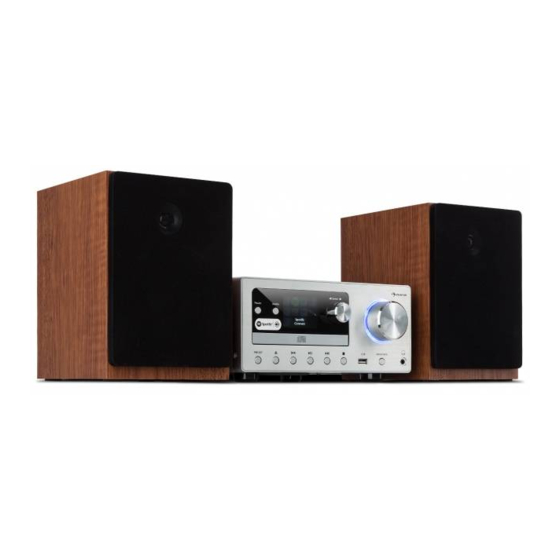
GERÄTEÜBERSICHT Frontansicht /Power – Gerät einschalten/ – In Spotify, Musikwie- Standby dergabe und BT-Modus zum vorherigen Titel springen MODE – Zwischen den Modi Internet, Spotify Connect, – Wiedergabe pausieren Musikwiedergabe, DAB, FM, oder fortsetzen AUX IN, CD und BT wechseln –... - Page 9 Rückansicht 16 Netzstromkabelanschluss 17 Teleskopantenne 18 AUX IN 19 Lautsprecherausgabe L/ R...
- Page 10 Fernbedienung...
- Page 11 Gerät einschalten/ Standby Eject – Ausgabetaste Mode – Modus wechseln Info - Informationen Menu – Menüauswahl EQ – Tonhöhenregler Folder + – nächsten MP3-Ordner auswählen Folder - – g vorherigen MP3-Ordner auswählen Preset 10 FM-Modus – zwischen Stereo und Mono auswählen Spotify –...
- Page 12 Display Symbole auf dem Display WiFi-Status Musik/ Programm ist pausiert Musikwiedergabe – Musik/ Programmwiedergabe vom Medienserver Ihres Netzwerks Wiedergabe wiederholen Zufallswiedergabe Alarm 1 ist aktiviert Alarm 2 ist aktiviert Automatisches Abschalten ist aktiviert, Gerät wechselt nach ## Minuten in Standby Sender speichern auf Position RDS (Radio Data System) Ein Sender mit RDS zeigt Programmnamen, Programmart,...
-
Page 13: Inbetriebnahme Und Bedienung
INBETRIEBNAHME UND BEDIENUNG Verpackungsinhalt • Gerät • Fernbedienung • Bedienungsanleitung Einsetzen der Batterien in die Fernbedienung • Legen Sie 2 Batterien des Typs AAA 1,5 V (nicht im Lieferumfang enthalten), entsprechend der Polarität, in das Batteriefach ein. • Verwenden Sie ausschließlich Batterien mit hoher Qualität, da Batterien mit niedriger Qualität lecken und dadurch Schäden verursachen könnten •... - Page 14 Automatisches Einstellen der Uhrzeit • Die Uhrzeit stellt sich automatisch ein, wenn sich das Gerät mit dem Internet verbindet oder ein DAB-/ FM-Signal Ihres Standorts empfängt. Zur Synchronisierung der Uhr mit der richtigen Uhrzeit, müssen Sie das Gerät für kurze Zeit im Internet Radio-, DAB- oder FM-Modus lassen. Gehen Sie zum Hauptmenü...
-
Page 15: Internetradio
INTERNETRADIO 1. Der LED-Bildschirm zeigt „Main menu“ an, nachdem der Installationsassistent beendet ist. Drücken Sie den Knopf SCROLL/ SELECT, um den Internetradiomodus auszuwählen. 2. Drücken Sie den Knopf SCROLL/ SELECT zum Bestätigen, während die Senderliste „Station list“ erleuchtet wird. 3. Wählen Sie anschließend, wie im Folgenden Abschnitt beschrieben, einen Sender aus. - Page 16 Auswahl eines lokalen Radiosenders Die lokalen Radiosender verändern sich entsprechend Ihres Standortes. Lokale Sender Ihres aktuellen Standorts werden angezeigt. 1. Drücken Sie die Taste MENU – Station list (Senderliste) – Local „Country“ (lokales „Land“) und drücken Sie zum Bestätigen Ihrer Länderauswahl des Knopfes SCROLL/SELECT.
- Page 17 b. Drehen Sie zur Auswahl der gewünschten Region am Knopf SCROLL/ SELECT und drücken Sie diesen zum Bestätigen. c. Drehen Sie zur Auswahl des gewünschten Landes am Knopf SCROLL/ SELECT und drücken Sie diesen zum Bestätigen. d. Drehen Sie zur Auswahl des gewünschten Senders am Knopf SCROLL/ SELECT und drücken Sie diesen zum Bestätigen.
- Page 18 Senderspeicherung Sie können bis zu 10 Ihrer Lieblingsinternetradiosender speichern. Dadurch bekommen Sie einen schnellen und einfachen Zugang zu Ihren Lieblingssendern. 1. Drücken und halten Sie während der Wiedergabe Ihres Lieblingssenders so lange die Taste PRESET des Geräts, bis der Bildschirm folgendes anzeigt: Drehen Sie am Knopf SCROLL/SELECT, um eine Ziffer zwischen 1 und 10 auszuwählen.
-
Page 19: Spotify Connect
SPOTIFY CONNECT Begrüße mit uns Spotify Premium Mit Spotify Premium kannst du dir Millionen von Songs ohne Werbung anhören. Deine Lieblingskünstler, die aktuellsten Hits und neue Entdeckungen – nur für dich! Einfach auf ‘Play’ drücken und du hörst jeden Song, der dir gefällt, bei höchster Soundqualität. Schau dir unsere Premium- Abonnement Angebote auf spotify.com/premium an. -
Page 20: Dab-Modus
DAB-MODUS 1. Drücken Sie mehrfach die Taste MODE, um den DAB-Modus auszuwählen. 2. Bei der ersten Verwendung wir das Radio automatisch einen Sendersuchlauf starten und die gefundenen Sender speichern. 3. Sobald der Sendersuchlauf beendet ist, werden die DAB/DAB+ Sender in alphanummerischer Reihenfolge angezeigt. Der erste Sender der Liste wird automatisch ausgewählt. -
Page 21: Sendersuche
SENDERSUCHE Drücken Sie die Taste MENU und drehen Sie zur Auswahl von „Scan“ (Suche) am Knopf SCROLL/SELECT. Drücken Sie zu einem vollständigen Sendersuchlauf die Taste SCROLL/SELECT. Manueller Sendersuchlauf Wenn Sie die Antenne justieren oder Sender hinzufügen möchten, die während des automatischen Sendersuchlaufs übersprungen wurden, ist diese Funktion sehr hilfreich. - Page 22 Falls Sie die Sender in einer anderen Reihenfolge anzeigen lassen möchten, gehen Sie folgendermaßen vor: 1. Drücken Sie die Taste MENU und drehen Sie zur Auswahl von „Station order“ (Senderreihenfolge) am Knopf SCROLL/SELECT und drücken Sie diesen zum Bestätigen. 2. Drehen Sie am Knopf SCROLL/SELECT um „Alphanumeric“, „Ensemble“ oder „Valid“...
- Page 23 Signalstärke Minmale Signalstärke...
-
Page 24: Fm-Radio
FM-RADIO 1. Drücken Sie zur Auswahl des FM-Modus mehrfach die Taste MODE. 2. Bei der ersten Verwendung, startet das Gerät am Anfang der FM- Frequenz (87,50 MHZ). 3. Drücken Sie zum manuellen Ändern der FM-Frequenz die Taste TUNE/ VOL., um die Suchfunktion des Knopfs SCROLL/SELECT zu aktivieren. Drehen Sie den Knopf SCROLL/SELECT anschließend im oder gegen den Uhrzeigersinn, um die Frequenz in 0,05 MHZ-Schritten zu verändern. - Page 25 stoppen an jeder verfügbaren Station. Dies kann zu einem schlechten Signal-Rausch-Verhältnis (Rauschen) von schwachen Stationen führen. Audioeinstellungen Werksseitig eingestellt werden alle Sender in Stereo wiedergegeben. Bei Sendern mit schwachem Signal kann dies zu einem schlechten Signal- Rausch-Verhältnis (rauschen) führen. 1. Drücken Sie die Taste MENU und drehen Sie zur Auswahl von „Audio setting“...
-
Page 26: Aux-Modus
2. Wählen Sie mit dem Knopf SCROLL/SELECT den Sender, welchen Sie gerne wieder geben möchten aus und drücken Sie den Knopf zum Bestätigen Ihrer Auswahl. 3. Wenn der ausgewählten Zahl kein Sender zugewiesen wurde, zeigt der Bildschirm „Preset Empty“ an. AUX-MODUS Im AUX-Modus können Sie ganz einfach einen MP3-Player oder andere externe Audioquellen an das Gerät anschließen. -
Page 27: Bt-Betrieb
BT-BETRIEB Verbinden Sie das Gerät zur Musikwiedergabe via BT mit einem externen Audiogerät: 1. Drücken Sie zur Auswahl des BT-Modus die Taste MODE. 2. Auf dem Bildschirm wird wiederholt das BT-Symbol aufblinken. 3. Aktivieren Sie BT auf Ihrem externen Audiogerät und gehen Sie in die Anzeigeliste. -
Page 28: Verschiedene Einstellungen
VERSCHIEDENE EINSTELLUNGEN Sleep-Einstellung (automatisches Ausschalten) Diese Funktion ermöglicht es, dass das Radio nach Ablauf einer von Ihnen eingestellten Zeit, automatisch in den Standby-Modus wechselt. 1. Drücken Sie die Taste MENU – Main menu (Hauptmenü) – Sleep und drücken Sie zum Bestätigen die Taste SCROLL/SELECT. 2. - Page 29 Letzter gelisteter oder gespeicherter Sender (nicht verfügbar im Preset Buzzermodus) Alarmlautstärke Volume Save Alarm speichern 4. Wenn der Bildschirm „Alarm Saved“ anzeigt, wurde der Alarm erfolgreich eingestellt. oder wird auf dem Bildschirm angezeigt. 5. Zum zeitweisen Ausschalten des Alarms, drücken Sie mehrfach den Knopf SCROLL/SELECT um die Schlummerfunktion auf 5, 10, 15 oder 30 Minuten einzustellen.
- Page 30 Netzwerk-Einrichtungsassistent Nach verfügbaren Netzwerken suchen PBC WLAN einstellen Richten Sie ein WPS-verschlüsseltes Netzwerk ein (nur zur Unterstützung, der Router verwendet WPS 2.0) Einstellungen anschauen Einstellungen wie MAC-Adresse, WLAN- Region, IP-Adresse etc. Manuelle Einstellung Drahtlose Verbindung herstellen Netzwerkprofil Liste registrierter Netzwerke oder einige ungewünschte Netzwerke löschen Im Netzwerk verbleiben Bleiben Sie im DAB-, FM-, BT-, AUX-IN-...
- Page 31 Auf Werkseinstellung zurücksetzen Durch das Nutzen dieser Funktion werden alle nutzerbezogenen Daten wie Zeit/Datum, DAB-Senderliste und gespeicherte Sender gelöscht. 1. Drücken Sie die Taste MENU – Main menu (Hauptmenü) – System settings (Systemeinstellungen) – Factory Reset (auf Werkseinstellungen zurücksetzen) und bestätigen Sie Ihre Auswahl durch Drücken des Knopfes SCROLL/SELECT.
-
Page 32: Cd-Player
CD-PLAYER CD-Modus Stellen Sie sicher, dass sich das Gerät im CD-Modus befindet. Falls sich das Gerät noch nicht im CD-Modus befindet, drücken Sie die Taste MODE auf dem Gerät oder der Fernbedienung und wählen Sie mit dem Knopf SCROLL/SELECT auf dem Gerät oder den Tasten oder auf der Fernbedienung, „CD“... - Page 33 Im Titel schnell zurückspulen Drücken Sie lang die Taste . Stopp: Drücken Sie die Taste . Wiedergabe gespeicherter CD-Titel In diesem Wiedergabemodus können Sie die Reihenfolge der Wiedergabe der Titel auf Ihrer CD festlegen. Sie können insgesamt bis zu 20 Titel in beliebiger Reihenfolge speichern.
-
Page 34: Usb-Wiedergabe
CD entnehmen Drücken Sie kurz die Taste , um das CD-Fach zu öffnen. Der Bildschirm zeigt „Eject“ an. Legen Sie Ihre Finger um die äußeren Kanten der CD und nehmen Sie sie auf dem CD-Fach heraus. Drücken Sie erneut die Taste um das CD-Fach zu schließen. -
Page 35: Multiroom
MULTIROOM Diese Funktion ermöglicht Ihnen die Bedienung Ihres Radios (oder mehreren) über die App UNDOK. Sie können das Hören von Musik genießen, indem Sie ein Smartphone oder Tablet, welches über die App UNDOK verfügt, verwenden, um die Radios (multiroomfähige Geräte) in Küche, Schlafzimmer oder Wohnzimmer zu bedienen. - Page 36 5. Wenn Sie mehr als ein Radio besitzen (multiroomfähiges Gerät), können Sie diese zu einer Gruppe zusammenführen, so dass die Wiedergabe synchron ist. Drücken Sie auf das Symbol , um zur Geräteliste zurückkehren“. 6. Erstellen Sie eine Gruppe, klicken Sie auf das Symbol „Bearbeiten“. „Group Setup“...
- Page 37 Gruppenname Abb. 3 Gruppenname Hauptgerät Stummschalten Lautstärkeregler Abb. 4...
- Page 38 Stummschalten Abb. 5 Abb. 6...
- Page 39 7. Alternativ können Sie die Gruppen über Ihr Radio anpassen a. Drücken Sie die Taste MENU – Main menu (Hauptmenü) – System settings (Systemeinstellungen) – Multi-room und drücken Sie zum Bestätigen den Knopf SCROLL/SELECT. b. Drehen Sie zur Auswahl der Optionen am Knopf SCROLL/SELECT und drücken Sie diesen zum Bestätigen Ihrer Auswahl.
-
Page 40: Fehlersuche Und Behebung
FEHLERSUCHE UND BEHEBUNG Problem Lösung • Vergewissern Sie sich, dass der Netzstecker eingesteckt ist Kein Strom • Stellen Sie sicher, dass das Gerät eingeschaltet ist • Das Gerät könnte während der Das Gerät reagiert nicht, Verwendung „hängengeblieben“ sein. wenn Tasten gedrückt Schalten Sie das Gerät aus und wieder werden ein, um es zurückzusetzen. -
Page 41: Hinweise Zur Entsorgung
Hersteller: Chal-Tec GmbH, Wallstraße 16, 10179 Berlin. Dieses Produkt entspricht den folgenden Europäischen Richtlinien: 2011/65/EU (RoHS) 2014/53/EU (RED) 2014/35/EU (LVD) Die vollständige Konformitätserklärung des Herstellers finden Sie unter folgenden Link. Scannen Sie dazu diesen QR-Code oder geben Sie die URL ein. use.berlin/10032586... - Page 42 Chal-Tec GmbH Wallstr. 15 10179 Berlin www.chal-tec.com Die Spotify-Software unterliegt den Nutzungsrechten von Drittanbietern, die auf folgender Seite eingesehen werden können: www.spotify.com/connect/third-party-licenses Alle aufgeführten Marken sind Warenzeichen der jeweiligen Unternehmen. Fehler und Auslassungen ausgenommen und technischen Änderungen unterliegend. Unsere allgemeinen Geschäftsbedingungen finden Anwendung.
- Page 43 Dear Customer, Congratulations on purchasing this equipment. Please read this manual carefully and take care of the following hints on installation and use to avoid technical damages. Any failure caused by ignoring the items and cautions mentioned in the operation and installation instructions is not covered by our warranty and any liability.
-
Page 44: Technical Data
TECHNICAL DATA Item number 10032586, 10034039 220-240 V~ 50/60 Hz Power requirements Power consumption in operation 45 W Standby consumption <2 W Frequency 174.928 - 239.200 MHz 87.5 - 108 MHz Dimensions Unit 245 x 250 x 118 mm Speaker box... -
Page 45: Safety Instructions
SAFETY INSTRUCTIONS CAUTION This device is a laser product of class 1. The use of controls or modifications not recommended by the manufacturer may expose you to dangerous laser radiation. Do not open the unit cover or attempt to repair the unit yourself. - Page 46 • Unplug the product during lightning storms or when unused for long periods of time. Not doing so may result in fire or electric shock. • Do not cover the ventilation openings of the product with items such as newspapers, tablecloths, curtains etc. or insert objects into the slots available on the products, as this could result in the product temperature rising and could cause a fire.
- Page 47 Explanation of the symbols on the appliance CAUTION RISK OF ELECTRIC SHOCK DO NOT OPEN CAUTION: TO REDUCE THE RISK OF ELECTRIC SHOCK AND SERIOUS PERSONAL INJURY, DO NOT REMOVE ANY COVER. NO USER-SERVICABLE PARTS INSIDE. REFER SERVICING TO QUALIFIED SERVICE PERSONNEL ONLY. Triangle with lightning plus explanation as follows: DANGEROUS VOLTAGE: The lightning flash with arrowhead symbol within the equilateral triangle is intended to alert the user to the...
-
Page 48: Product Overview
PRODUCT OVERVIEW Front view /power button Press to switch unit on or Press to skip previous track in standby Spotify, music player and BT mode MODE button Press to switch mode button bewtween Internet, Spotify Press to pause or play currently Connect, music player, DAB, FM, playing track AUX in, CD and BT mode. - Page 49 Rear view 16 Power lead 17 Telescopic antenna 18 AUX IN 19 Speaker L / R output...
- Page 50 Remote control...
- Page 51 Standby Eject Mode (Change Function mode) Information Menu Select EQ Setting Folder - Folder + (Select MP3 File) Preset/Program Select 10 FM Mode (Select Stereo/Mono) Spotify Select 12 Mute Select 13 Combined Operation (Play/Pause/Up) Stop/Down – Previous Skip ...
- Page 52 Icons on display Table of icons on the display WiFi level Music/program is paused Music player mode - Music/programs played from a Media Server on your network Repeat play Random play Alarm 1 is active Alarm 2 is active Sleep timer is active and unit will go to standby after"##" minutes Preset station "#"...
-
Page 53: Getting Started
GETTING STARTED What you can find inside your package • Main Unit • Remote Control • Manual Battery operation for remote control • Insert 2 batteries (1. 5 V, type AAA) (not included ) according to the polarity markings inside the battery compartment and on the batteries. •... - Page 54 Wireless LAN setting • A broadband internet connection. • A wireless access point (Wi-Fi) connected to your broadband internet, preferably via a router. • If your wireless network is configured to use Wired Equivalent Privacy (WEP) or WiFi-Pprotected Access (WPA) data encryption then you need to know the WEP or WPA code so you can get the Internet Radio to communicate with the network.
-
Page 55: Internet Radio Mode
INTERNET RADIO MODE 1. The display will show “Main menu” after “Setup wizard” is complete. Press SCROLL/SELECT knob to select Internet radio mode. 2. While “Station list” is highlighted, press SCROLL/SELECT knob to confirm. 3. Then refer to the following section to choose stations. Or if the radio fail to connect to the network, please follow these steps: a. - Page 56 Selecting a local station Local “Country” will change according to your current location (e.g. Local Australia). It displays local stations of your current location 1. To enter local stations, press MENU button - Station list - Local “Country," press SCROLL/SELECT knob to confirm. 2.
- Page 57 b. Turn SCROLL/SELECT knob to select the region you want, and then press SCROLL/SELECT knob to confirm. c. Turn SCROLL/SELECT knob to select the country you want, and then press SCROLL/SELECT knob to confirm. d. Turn SCROLL/SELECT knob to select the station you want, and then press SCROLL/SELECT knob to confirm.
-
Page 58: Spotify
SPOTIFY Spotify gives you millions of songs at your fingertips. The artists you love, the readymade playlists for every mood and genre, the latest hits and new discoveries just for you. With Spotify Connect feature, you can play and control all this music wirelessly. - Page 59 DAB MODE 1. Press MODE button repeatedly to select DAB mode. 2. For initial use, radio will carry out a full scan and store stations list in memory. 3. Once the scanning is completed, the DAB/DAB+ stations will be displayed in alphanumeric order. The first station in the list will be selected, press SCROLL/SELECT knob to broadcast.
-
Page 60: Scanning Stations
SCANNING STATIONS Press MENU button, turn SCROLL/SELECT knob to select “Scan,” and then press SCROLL/SELECT knob to full scan. Manual Tune This can help you when adjusting your antenna or when adding stations that were missed while auto tuning. 1. Press MENU button, turn SCROLL/SELECT knob to select “Manual tune,” and then press SCROLL/SELECT knob to confirm. - Page 61 Alphanumeric Display all stations in alphanumeric order Ensemble List currently broadcasting active stations before inactive ones. Valid Remove inactive stations from the station list. Viewing Station Information DAB/DAB+ stations broadcast additional information. To view DAB station information, press SCROLL/SELECT knob. Press INFO button repeatedly to view information through DLS (Dynamic Label Segment), Ensemble, Program Frequency, Signal Quality, Signal Strength, Bitrate, Codec, Channel and Date.
- Page 62 • The indicator on the signal bar shows the minimum acceptable signal level. • Stations with signal strength below the minimum signal level may not provide a steady stream of audio.
-
Page 63: Fm Mode
FM MODE 1. Press MODE button repeatedly to select FM mode. 2. For initial use, it will start at the beginning of the FM frequency range (87.50 MHz).Otherwise, the last listened FM station will be selected. 3. To manually change the FM frequency: while FM frequency shows up, press TUNE/VOL. - Page 64 2. The display will show “Listen in Mono only?” Turn SCROLL/SELECT knob to select “YES,” and then press SCROLL/SELECT knob to confirm. Storing preset stations Your radio can store up to 10 of your favourite FM stations. This will enable you to access your favourite stations quickly and easily.
-
Page 65: Aux Mode
AUX MODE AUX in allows for quick and easy connection to an MP3 player or other external audio sources. 1. Before connecting to the mains socket, use a 3.5 mm audio cable (not supplied) to connect to your external audio device through the AUX IN socket on the rear of unit. -
Page 66: Bt Mode
BT MODE Pair the unit with a BT device to listen to music: 1. Press the MODE button to select BT mode. 2. The display will flash the BT symbol repeatedly. 3. Activate your BT device and select the search mode. 4. -
Page 67: General Settings
GENERAL SETTINGS Setting Sleep This feature enables your radio to switch to standby mode by itself after a set sleep time. 1. Press MENU button - Main menu - Sleep, and then press SCROLL/ SELECT knob to confirm. 2. Turn SCROLL/SELECT knob to view options Sleep OFF, 15, 30, 45, 60 or 90 MINS, press SCROLL/SELECT knob to confirm. - Page 68 5. To temporarily switch off alarm, press SCROLL/SELECT knob repeatedly to set snooze time for 5, 10, 15 or 30 minutes in turn. The set snooze time will show on the display and unit will go to standby. 6. To turn off alarm, press /POWER button when the alarm sounds. 7.
- Page 69 Set time/date 1. Press MENU button - Main menu - System settings - Time/Date, press SCROLL/SELECT knob to confirm. 2. Turn SCROLL/SELECT knob to select options, and then press SCROLL/ SELECT knob to confirm the setting. Manually Set time / date "Update from DAB,"...
- Page 70 Timeout 10 sec… 45 sec… 60 sec… 90 sec… 180 sec… On On Level High, Medium, Low Dim Level Medium, Low...
-
Page 71: Cd Player
CD PLAYER CD mode Check that your HiFi is in CD mode. If you are not already in CD mode, short press the Mode button on the HiFi or on the remote control, then use the rotary Tune/Select control on the HiFi or the and buttons on 1 the remote control to highlight CD. - Page 72 Fast backward within a track: Long press the button on the HiFi or on the remote control. Stop: Short press the button on the HiFi or on the remote control. Programmed play mode In programmed play mode, you can program the play order of the tracks on your CD.
-
Page 73: Usb Media Play
Remove the CD Short press the button on the front of the HiFi or on the remote control to open the CD drawer. 'Eject will be displayed. Short press the button on the front of the HiFi or on the remote control to close the CD drawer. "No disc"... -
Page 74: Multi-Room Function
MULTI-ROOM FUNCTION Multi-room is a feature that enables you to control your radio (one or more) via UNDOK App for playback. You can enjoy music by using your smartphone or tablet which has UNDOK App to respectively control the radios (multi-room capable devices) in the kitchen, bedroom or living room. Of course you also can group control the radios for playing.. - Page 75 5. If you have more than one radio (multi-room capable device), you can group them to play synchronously. Tap the “Return to device list” icon. 6. Create group, tapping the edit icon which is following device name on device list, then “Group Setup” screen will be shown. (Please refer to Figure 1 and 2.) a.
- Page 76 Fig. 3 Fig. 4...
- Page 77 Fig. 5 Fig. 6...
- Page 78 7. Alternatively, you can edit group through your radio a. Press MENU button - Main menu - System settings - Multi-room, and then press SCROLL/SELECT knob to confirm. b. Turn SCROLL/SELECT knob to select options, and then press SCROLL/ SELECT knob to confirm. View details View your radio state (Ungrouped, Server or Client) and the group which it belongs to.
-
Page 79: Trouble Shooting
TROUBLE SHOOTING Problem Solution • Ensure the mains cable is properly connected. No Power • Make sure that the unit is turned on • The device may have "stuck" during use. The unit does not respond Turn the device off and on again to reset when pressing any buttons •... -
Page 80: Disposal Considerations
DISPOSAL CONSIDERATIONS According to the European waste regulation 2012/19/EU this symbol on the product or on its packaging indicates that this product may not be treated as household waste. Instead it should be taken to the appropriate collection point for the recycling of electrical and electronic equipment. - Page 81 Chal-Tec GmbH Wallstr. 15 10179 Berlin, Germany www.chal-tec.com The Spotify software is subject to third party licenses found here: www.spotify.com/connect/third-party-licenses All listed brands are trademarks of their companies. Errors and omissions excepted, and subject to technical change. Our general terms of delivery and payment are applied.
- Page 83 Chère cliente, cher client, Toutes nos félicitations pour l’acquisition de ce nouvel appareil. Veuillez lire attentivement et respecter les instructions de ce mode d’emploi afin d’éviter d’éventuels dommages. Nous ne saurions être tenus pour responsables des dommages dus au non-respect des consignes et à la mauvaise utilisation de l’appareil.
-
Page 84: Fiche Technique
FICHE TECHNIQUE Numéro d'article 10032586, 10034039 220-240 V~ 50/60 Hz Alimentation Consommation en marche 45 W Consommation en veille <2 W Fréquences 174,928 - 239,200 MHz 87,5 - 108 MHz Dimensions Appareil 245 x 250 x 118 mm Enceintes 148 x 190 x 222 mm... -
Page 85: Consignes De Sécurité
CONSIGNES DE SÉCURITÉ ATTENTION Cet appareil est un produit laser de classe 1 L'utilisation de commandes non mentionnées dans le mode d'emploi ou une modification non autorisée de l'appareil peut entraîner une exposition dangereuse aux rayons laser. N'ouvrez en aucun cas le cache de l'appareil et n'essayez pas de le réparer vous-même. - Page 86 électrique. • Ne faites pas passer le câble d'alimentation à proximité de sources de chaleur telles qu'un radiateur, une cuisinière ou un fer à repasser. Une chaleur excessive peut faire fondre l'isolation des câbles et exposer les fils et provoquer un incendie ou un choc électrique. •...
- Page 87 Explication des symboles sur l'appareil CAUTION RISK OF ELECTRIC SHOCK DO NOT OPEN ATTENTION : pour réduire les risques de chocs électriques, ne démontez aucun cache. L'appareil ne contient aucune pièce à entretenir. adressez-vous uniquement à des personnels qualifiés pour la maintenance. L'éclair avec la flèche à...
-
Page 88: Aperçu De L'appareil
APERÇU DE L'APPAREIL Vue de face /Power – pour allumer / – aller au titre précédent mettre en veille l'appareil en modes Spotify, lecture de musique et BT MODE – pour basculer entre les modes Internet, Spotify – mettre en pause la lecture Connect, lecture de musique, ou reprendre DAB, FM, AUX IN, CD und BT... - Page 89 Vue de dos 16 Prise du câble d'alimentation secteur 17 Antenne télescopique 18 AUX IN 19 Sortie vers les enceintes L/ R...
- Page 90 Télécommande...
- Page 91 Pour allumer / mettre en veille l'appareil Eject – Touche eject Mode – pour choisir le mode Info - Informations Menu – choix du menu EQ – réglage du son Dossier + – choisir le dossier MP3 suivant Dossier - – choisir le dossier MP3 précédent Preset 10 Mode FM –...
- Page 92 Ecran Symbole de l'écran Statut du WiFi Musique / Programme en pause Lecture de musique – Musique / Lecture programmée depuis le serveur multimédia de votre réseau Répéter la lecture Lecture aléatoire Alarme 1 activée Alarme 2 activée L'arrêt automatique est activé, l'appareil passe en veille après ## minutes Mémorisation de la station sur cet emplacement RDS (Radio Data System)
-
Page 93: Mise En Marche Et Utilisation
MISE EN MARCHE ET UTILISATION Contenu de l'emballage • Appareil • Télécommande • Mode d'emploi Installation des piles dans la télécommande • Insérez 2 piles de type AAA 1,5 V (non fournies) dans le compartiment à piles en respectant la polarité. •... - Page 94 Réglage automatique de l'heure • L'heure se règle automatiquement lorsque l'appareil se connecte à Internet ou reçoit un signal DAB / FM de votre emplacement. Pour synchroniser l'horloge avec l'heure correcte, vous devez laisser l'appareil en mode radio Internet, DAB ou FM pendant une courte période.
-
Page 95: Radio Internet
RADIO INTERNET 1. L'écran LED affiche "Menu principal" une fois l'assistant d'installation terminé. Appuyez sur le bouton SCROLL / SELECT pour sélectionner le mode radio Internet. 2. Appuyez sur le bouton SCROLL/ SELECT pour confirmer quand la liste des stations est affichée "Station list". 3. - Page 96 Choix d'une station de radio locale Les stations de radio locales changent en fonction de votre emplacement. Les stations locales de votre emplacement actuel sont affichées. 1. Appuyez sur la touche MENU - Station list (Liste des stations) - Local "country"...
- Page 97 b. Pour choisir la région souhaitée, tournez le bouton SCROLL/SELECT et confirmez en appuyant sur le bouton. c. Pour choisir le pays souhaité, tournez le bouton SCROLL/SELECT et confirmez en appuyant sur le bouton. d. Pour choisir la station souhaitée, tournez le bouton SCROLL/SELECT et confirmez en appuyant sur le bouton.
- Page 98 Mémorisation des stations Vous pouvez mémoriser jusqu'à 10 de vos stations de radio Internet préférées. Vous aurez ainsi un accès rapide et facile à vos stations préférées. 1. Pendant la lecture de votre station favorite, maintenez la touche PRESET de l'appareil jusqu'à ce que l'écran affiche ce qui suit : Tournez le bouton SCROLL / SELECT pour sélectionner un nombre compris entre 1 et 10.
-
Page 99: Spotify Connect
SPOTIFY CONNECT Bienvenue avec nous chez Spotify Premium Avec Spotify Premium, écoutez des millions de chansons sans publicité. Vos artistes préférés, les derniers succès et les nouvelles découvertes - rien que pour vous ! Appuyez simplement sur "Play" et écoutez toutes les chansons que vous aimez avec la meilleure qualité... -
Page 100: Mode Dab
MODE DAB 1. Appuyez plusieurs fois sur la touche MODE pour sélectionner le mode DAB. 2. Lors de la première utilisation, la radio lance automatiquement une recherche de station et enregistre les stations trouvées. 3. Dès que la recherche de station est terminée, les stations DAB / DAB + s'affichent dans l'ordre alphanumérique. -
Page 101: Recherche De Stations
RECHERCHE DE STATIONS Appuyez sur la touche MENU et tournez le bouton SCROLL / SELECT pour sélectionner "Scan". Appuyez sur le bouton SCROLL / SELECT pour effectuer une recherche complète des stations. Recherche manuelle de stations Cette fonction est très utile si vous souhaitez régler l'antenne ou ajouter des stations qui ont été... - Page 102 1. Appuyez sur la touche MENU et tournez le bouton SCROLL / SELECT pour sélectionner "Ordre des stations" puis appuyez dessus pour confirmer. 2. Tournez le bouton SCROLL / SELECT pour sélectionner "Alphanumérique", "Ensemble" ou "Valid" et appuyez dessus pour confirmer.
- Page 103 Force du signal Force minimale du signal...
-
Page 104: Fm-Radio
FM-RADIO 1. Appuyez plusieurs fois sur la touche MODE pour choisir le mode FM. 2. Lors de la première utilisation, l'appareil démarre au début de la bande de fréquence FM (87,50 MHZ). 3. Pour changer la fréquence FM manuellement, appuyez sur la touche TUNE / VOL. - Page 105 s'arrêtent à chaque station disponible. Cela peut entraîner un mauvais rapport signal / bruit (bruit) pour les stations faibles. Paramètres audio Par défaut, toutes les stations sont lues en stéréo. Pour les stations avec un signal faible, cela peut conduire à un mauvais rapport signal / bruit (bruit). 1.
-
Page 106: Mode Aux
2. Utilisez le bouton SCROLL / SELECT pour sélectionner la station que vous souhaitez écouter à nouveau et appuyez sur le bouton pour confirmer votre sélection. 3. Si aucune station n'est associée au numéro sélectionné, l'écran affiche "Preset empty" MODE AUX En mode AUX, vous pouvez facilement connecter un lecteur MP3 ou d'autres sources audio externes à... -
Page 107: Mode Bt
MODE BT Connectez l'appareil à un appareil audio externe pour la lecture de musique par BT : 1. Appuyez sur la touche MODE pour sélectionner le mode BT. 2. Le symbole BT clignote plusieurs fois sur l'écran. 3. Activez BT sur votre appareil audio externe et accédez à la liste d'affichage. -
Page 108: Paramètres Divers
PARAMÈTRES DIVERS Réglage de Sleep (arrêt automatique) Cette fonction permet à la radio de passer automatiquement en mode veille après une durée définie. 1. Appuyez sur la touche MENU – Main menu (menu principal) – Sleep et confirmez en appuyant sur le bouton SCROLL/SELECT. 2. - Page 109 Dernière station répertoriée ou enregistrée (non disponible en mode Preset buzzer) Volume de l'alarme Volume Save Enregistrer l'alarme 4. Si l'écran affiche "Alarm Saved", l'alarme a été réglée avec succès s'affiche à l'écran. 5. Pour désactiver temporairement l'alarme, appuyez plusieurs fois sur le bouton SCROLL / SELECT pour régler la fonction de répétition sur 5, 10, 15 ou 30 minutes.
- Page 110 Assistant d'installation réseau Recherche des réseaux disponibles Réglage du Wifi PBC Configurez un réseau crypté WPS (uniquement pour la prise en charge, le routeur utilise WPS 2.0) Affichage des paramètres Paramètres tels que l'adresse MAC, la région de Wifi, l'adresse IP etc. Réglage manuel Etablissement d'une liaison sans fil Profil réseau...
- Page 111 Retour aux paramètres d'usine Cette fonction vous permet de supprimer toutes les données liées à l'utilisateur telles que l'heure / la date, la liste des stations DAB et les stations enregistrées. 1. Appuyez sur la touche MENU - Main menu (Menu principal) - System settings (Paramètres système) –...
-
Page 112: Lecteur Cd
LECTEUR CD Mode CD Assurez-vous que l'appareil est en mode CD. Si l'appareil n'est pas encore en mode CD, appuyez sur la touche MODE de l'appareil ou de la télécommande et utilisez le bouton SCROLL / SELECT de l'appareil ou les touches ... - Page 113 Lecture des pistes de CD enregistrées Dans ce mode de lecture, vous pouvez déterminer l'ordre dans lequel les pistes sont lues sur votre CD. Vous pouvez enregistrer jusqu'à 20 pistes au total dans n'importe quel ordre. REMARQUE : Pour enregistrer des pistes de CD dans une liste de lecture, le CD doit être à...
-
Page 114: Lecture Par Usb
REMARQUE : Si vous arrêtez ou interrompez la lecture du CD pendant 30 minutes, l'appareil passe automatiquement en mode veille. Manipulation des CD • Ne touchez pas le dessous du CD. • Ne collez pas de papier, de ruban adhésif ou d'autres matériaux sur le •... -
Page 115: Multiroom
MULTIROOM Cette fonction vous permet d'utiliser votre radio (ou plus) avec l'application UNDOK. Vous pouvez écouter de la musique avec un smartphone ou une tablette dotés de l'application UNDOK pour faire fonctionner les radios (appareils multiroom) dans la cuisine, la chambre ou le salon. Vous pouvez également affecter les radios à... - Page 116 5. Si vous disposez de plus d'une radio (appareil compatible multiroom), vous pouvez les fusionner en un groupe afin que la lecture soit synchrone. Appuyez sur l'icône , pour revenir à la liste des appareils. 6. Créez un groupe, cliquez sur l'icône "Modifier". "Group Setup" s'affiche alors à...
- Page 117 Nom du groupe Abb. 3 Nom du groupe Appareil principal Fonction muet Réglage du volume Fig. 4...
- Page 118 Fonction muet Fig. 5 Fig. 6...
- Page 119 7. Vous pouvez aussi modifier vos groupes à partir de la radio. a. Appuyez sur la touche MENU – Main menu (menu principal) – System settings (paramètres système) – Multi-room et confirmez en appuyant sur le bouton SCROLL/SELECT. b. Pour sélectionner les options, tournez le bouton SCROLL / SELECT et appuyez dessus pour confirmer votre sélection.
-
Page 120: Identification Et Résolution Des Problèmes
IDENTIFICATION ET RÉSOLUTION DES PROBLÈMES Problème Solution • Vérifiez que la prise est bien branchée Pas de courant • Vérifiez que l'appareil est allumé • Il peut arriver que l'appareil reste L'appareil ne répond pas "bloqué" pendant l'utilisation. Éteignez lorsque l'on appuie sur les puis rallumez l'appareil pour le touches réinitialiser. -
Page 121: Informations Sur Le Recyclage
Fabricant : Chal-Tec GmbH, Wallstraße 16, 10179 Berlin. Ce produit est conforme aux directives européennes suivantes : 2011/65/UE (RoHS) 2014/53/UE (RED) 2014/35/UE (LVD) La déclaration complète de conformité du fabricant est accessible par le lien suivant. Pour y accéder, scannez ce QR-code ou saisissez l'URL. use.berlin/10032586... - Page 122 Chal-Tec GmbH Wallstr. 15 10179 Berlin www.chal-tec.com Le logiciel Spotify est soumis aux droits d'utilisation de tiers consultables sur la page suivante : www.spotify.com/connect/third-party-licenses Toutes les marques citées sont des marques déposées de leurs sociétés respectives. Sous réserve d'erreurs et omissions et de modifications techniques.
- Page 123 Estimado cliente: Le felicitamos por la compra de este producto y le agradecemos su confianza. Lea atentamente el manual de instrucciones para evitar posibles daños. No nos responsabilizamos de los daños causados si no se han tenido en cuenta las instrucciones de este manual. Escanee el código QR para descargar el manual de instrucciones más reciente en su idioma y más informaciones acerca de este producto.
-
Page 124: Datos Técnicos
DATOS TÉCNICOS Número del artículo 10032586, 10034039 220-240 V~ 50/60 Hz Fuente de alimentación Consumo de energía en 45 W funcionamiento Consumo en espera <2 W Frecuencias 174,928 - 239,200 MHz 87,5 - 108 MHz Dimensions Aparato 245 x 250 x 118 mm... -
Page 125: Instrucciones De Seguridad
INSTRUCCIONES DE SEGURIDAD PRECAUCIÓN Este dispositivo es un producto láser de clase 1. El uso de controles o modificaciones no recomendados por el fabricante puede exponerle a una peligrosa radiación láser. No abra la tapa del dispositivo ni intente repararlo usted mismo. - Page 126 peligro de descarga eléctrica. • No coloque el cable de alimentación cerca de fuentes de calor, como calentadores, hornos o planchas. El calor excesivo puede hacer que el aislamiento del cable se derrita y exponga los cables, causando ambos incendios. y el riesgo de una descarga eléctrica. •...
- Page 127 Explicación de los símbolos del dispositivo CAUTION RISK OF ELECTRIC SHOCK DO NOT OPEN PRECAUCIÓN: Para reducir el riesgo de una descarga eléctrica, no abra la tapa ni la parte trasera de la unidad. Este dispositivo debe estar conectado a tierra. No hay piezas que puedan ser reparadas por el cliente dentro de la unidad.
-
Page 128: Descripción Del Producto
DESCRIPCIÓN DEL PRODUCTO Vista frontal /Power – Encender / En – En Spotify, la reproduc- espera ción de música y el modo BT, salta a la pista anterior MODE – Cambia entre los mo- dos Internet, Spotify Connect, – Pausa o reanudación de Reproducción de música, DAB, la reproducción FM, AUX IN, CD y BT... - Page 129 Vista posterior 16 Conexión del cable de alimentación 17 Antena telescópica 18 AUX IN 19 Salida del altavoz L/R...
- Page 130 Mando a distancia...
- Page 131 Encienda el dispositivo / en espera Expulsar - Botón de salida Modo - Cambiar el modo Info - Información Menú - Selección de menú EQ - Control de tono Carpeta + - seleccione la siguiente carpeta de MP3 Carpeta - - g seleccione la carpeta anterior de MP3 Preset 10 Modo FM - seleccione entre estéreo y mono Spotify - Selección de Spotify...
- Page 132 Pantalla Símbolos de la pantalla WiFi-Status Música y pausa Reproducción de música - reproducción de música/programas desde su servidor de medios en red Repetición Aleatorio Alarm 1 activada Alarm 2 activada Se activa el apagado automático, el dispositivo pasa a modo de espera después de ## minutos Guardar la estación en posición RDS (Radio Data System) Una estación con RDS muestra el...
-
Page 133: Puesta En Marcha Y Funcionamiento
PUESTA EN MARCHA Y FUNCIONAMIENTO Contenido del embalaje • Dispositivo • Mando a distancia • Instrucciones de operación Insertar las pilas en el mando a distancia • Inserte 2 pilas AAA de 1,5 V (no incluidas) en el compartimento de las pilas, haciendo coincidir la polaridad. - Page 134 Ajuste automático de la hora • La hora se ajusta automáticamente cuando la unidad se conecta a Internet o recibe una señal DAB/FM desde su ubicación. Para sincronizar el reloj con la hora correcta, debe dejar la unidad en el modo de radio por Internet, DAB o FM durante un breve período de tiempo.
-
Page 135: Radio Internet
RADIO INTERNET 1. La pantalla LED mostrará "Menú principal" después de que el asistente de instalación haya terminado. Presione el botón SCROLL/SELECT para seleccionar el modo de radio por Internet. 2. Presione el botón SCROLL/SELECT para confirmar mientras se ilumina la lista de estaciones "Lista de estaciones”. - Page 136 Seleccionar una estación de radio local Las estaciones de radio locales cambian según su ubicación. Se muestran las estaciones locales de su ubicación actual. 1. Pulse el botón MENÚ - Lista de estaciones - "País" local y pulse el botón SCROLL/SELECT para confirmar la selección del país.
- Page 137 b. Gire el mando de SCROLL/SELECT para seleccionar la región deseada y pulse el mando para confirmar. c. Gire el botón SCROLL/SELECT para seleccionar el país deseado y pulse para confirmar. d. Gire el mando de SCROLL/SELECT para seleccionar la emisora deseada y pulse para confirmar.
- Page 138 Almacenamiento de la estación Puedes guardar hasta 10 de tus emisoras de radio favoritas de Internet. Esto te da un acceso rápido y fácil a tus canales favoritos. 1. Mientras reproduce su estación favorita, mantenga pulsado el botón PRESET de la unidad hasta que la pantalla muestre lo siguiente: Gire el mando de SCROLL/SELECT para seleccionar un número entre el 1 y el 10.
-
Page 139: Spotify Connect
SPOTIFY CONNECT Entre con nosotros en Spotify Premium Con Spotify Premium, escucha millones de canciones sin anuncios publicitarios. Tus artistas favoritos, los últimos éxitos y los nuevos descubrimientos, ¡sólo para ti! Sólo tienes que pulsar 'Play' y escuchar todas las canciones que te gustan con la mejor calidad de sonido. Descubre nuestras ofertas de suscripción premium en spotify.com/premium. -
Page 140: Modo Dab
MODO DAB 1. Pulse el botón MODE repetidamente para seleccionar el modo DAB. 2. La primera vez que use la radio, se iniciará automáticamente un escaneo de emisoras y guardará las que encuentre. 3. Una vez que se complete el escaneo de la estación, las estaciones DAB/ DAB+ se mostrarán en orden alfanumérico. -
Page 141: Búsqueda De Emisoras
BÚSQUEDA DE EMISORAS Presione el botón MENÚ y gire el botón MENU para seleccionar "Escanear". Presione el botón SCROLL/SELECT para un escaneo completo. Búsqueda manual de canales Si desea ajustar la antena o añadir emisoras que se saltaron durante la búsqueda automática de canales, esta función es muy útil. - Page 142 3. Presione el botón MENÚ y gire el botón SCROLL/SELECT para seleccionar "Orden de la estación" y púlselo para confirmar. 4. Gire el mando de SCROLL/SELECT para seleccionar "Alfanumérico", "Conjunto" o "Válido" y púlselo para confirmar. Afanumérico Mostrar todas las estaciones en orden alfanumérico. Ensemble Disponga los transmisores activos antes que los inactivos.
- Page 143 Señal mínima Fuerza de la señal...
-
Page 144: Radio Fm
RADIO FM 1. Pulse el botón MODE repetidamente para seleccionar el modo de FM. 2. Cuando se usa por primera vez, la unidad comenzará al principio de la FM-frecuencia (87.50 MHZ). 3. Para cambiar la frecuencia de FM manualmente, pulse el botón TUNE/ VOL. - Page 145 buscan todas las estaciones disponibles. Esto puede llevar a una pobre relación señal-ruido (ruido) de las estaciones débiles. Ajustes de audio El ajuste de fábrica es reproducir todas las emisoras en estéreo. En el caso de las estaciones con una señal débil, esto puede llevar a una mala relación señal-ruido (ruido).
-
Page 146: Modo Aux
2. Utilice el botón SCROLL/SELECT para seleccionar la emisora que desea reproducir y pulse el botón para confirmar su selección. 3. Si no se asigna ninguna emisora al número seleccionado, en la pantalla aparecerá "Preset Empty”. MODO AUX En el modo AUX puede conectar fácilmente un reproductor MP3 u otras fuentes de audio externas al dispositivo. -
Page 147: Operación De Bt
OPERACIÓN DE BT Conecta el dispositivo a un dispositivo de audio externo a través de BT para la reproducción de música: 1. Presione el botón MODE para seleccionar el modo BT 2. El icono de BT parpadeará repetidamente en la pantalla. 3. -
Page 148: Ajustes Diversos
AJUSTES DIVERSOS Ajuste del sueño (apagado automático) Esta función permite que la radio entre automáticamente en el modo de espera después de un tiempo establecido por usted. 1. Presione el botón MENU - Menú principal - Sleep y presione el botón SCROLL/SELECT para confirmar 2. - Page 149 Última estación listada o guardada (no disponible en el modo de Preset timbre) Volumen de la alarma Volume Save Guardar alarma 4. Cuando aparece en la pantalla “Alarma guardada”, la alarma se ha configurado con éxito se muestra en la pantalla. 5.
- Page 150 Asistente de configuración de Buscar redes disponibles la red Configurar PBC WLAN Configurar una red encriptada WPS (sólo para soporte, el enrutador utiliza WPS 2.0) Ver la configuración Ajustes como la dirección MAC, la región WLAN, la dirección IP, etc. Ajuste manual Establecer una conexión inalámbrica Perfil de la red...
- Page 151 Restablecer los ajustes de fábrica Usando esta función se borrarán todos los datos relacionados con el usuario como la hora/fecha, la lista de estaciones DAB y las estaciones almacenadas. 1. Pulse el botón MENU - Menú principal - Ajustes del sistema - Reseteo de fábrica y confirme su selección pulsando el botón SCROLL/SELECT.
-
Page 152: Reproductor De Cd
REPRODUCTOR DE CD Modo CD Asegúrese de que el dispositivo está en modo CD. Si la unidad aún no está en el modo CD, pulse el botón MODE de la unidad o del mando a distancia y seleccione "CD" con el botón SCROLL/SELECT de la unidad o los botones ... - Page 153 Reproducir pistas de CD guardadas En este modo de reproducción, puede establecer el orden en que se reproducen las pistas delCD. Puedes almacenar hasta 20 pistas en total en cualquier orden. NOTA : Para almacenar las pistas de un CD en una lista de reproducción, el CD debe estar en stop en la bandeja de CD.
-
Page 154: Reproducción Usb
Manipulación de CD • No toque la parte inferior del CD. • No pegue papel, cinta u otros materiales en el CD. • Las huellas dactilares y el polvo en el CD pueden causar desgaste. Pase un paño suave de adentro hacia afuera para limpiarlo. Mantenga el CD limpio. -
Page 155: Multiroom
MULTIROOM Esta función le permite operar su aparato (o varios) a través de la aplicación UNDOK. Puede disfrutar escuchando música usando un smartphone o tableta que tenga la aplicación UNDOK para controlar los aparatos (dispositivos multi-habitación) en la cocina, dormitorio o sala de estar. También puede organizar un grupo para su reproducción. - Page 156 5. Si tiene más de una radio (dispositivo con capacidad para varias habitaciones), puede combinarlas en un grupo para que la reproducción esté sincronizada. Pulse el icono , para volver a la lista de dispositivos. 6. Crear un grupo, haga clic en el icono "Editar". A continuación, se visualiza en la pantalla "Group Setup"...
- Page 157 Nombre del grupo Abb. 3 Nombre del grupo Aparato principal Función de Ajustar el silencio volumen Fig. 4...
- Page 158 Función de silencio Fig. 5 Fig. 6...
- Page 159 7. También puede ajustar los grupos a través de su radio a. Pulse el botón MENU - Menú principal - Ajustes del sistema - Multi-sala y pulse para confirmar pulse el botón SCROLL/SELECT. b. Gire el botón SCROLL/SELECT para seleccionar las opciones y pulse de nuevo para confirmar tu selección.
-
Page 160: Solución De Problemas
SOLUCIÓN DE PROBLEMAS Problema Solución • Asegúrate de que el enchufe está conectado No hay energía • Asegúrese de que el dispositivo está encendido • Es posible que la unidad se haya El dispositivo no reacciona "atascado" durante su uso. Apáguelo y cuando se presionan las enciéndalo para reiniciar la unidad. -
Page 161: Instrucciones Para La Eliminación
Fabricante : Chal-Tec GmbH, Wallstraße 16, 10179 Berlin. Este producto respeta las siguientes directivas europeas: 2011/65/UE (RoHS) 2014/53/UE (RED) 2014/35/UE (LVD) La declaración de conformidad del fabricante completa la encuentra en el siguiente link, puede escasear el código RQ o visitar la URL: use.berlin/10032586... - Page 162 Chal-Tec GmbH Wallstr. 15 10179 Berlin www.chal-tec.com El software de Spotify está sujeto a los derechos de uso de terceros que se pueden consultar en la siguiente página: www.spotify.com/connect/third-party-licenses Todas las marcas enumeradas son marcas comerciales de las respectivas compañías. Se exceptúan los errores y omisiones y están sujetos a cambios técnicos.
- Page 163 Gentile Cliente, La ringraziamo per aver acquistato il dispositivo. La preghiamo di leggere attentamente le seguenti istruzioni per l’uso e di seguirle per evitare possibili danni tecnici. Non ci assumiamo alcuna responsabilità per danni scaturiti da una mancata osservazione delle avvertenze di sicurezza e da un uso improprio del dispositivo.
-
Page 164: Dati Tecnici
DATI TECNICI Numero articolo 10032586, 10034039 220-240 V~ 50/60 Hz Alimentazione Consumo energetico in funzione 45 W Consumo energetico in standby <2 W Frequenze 174,928 - 239,200 MHz 87,5 - 108 MHz Dimensioni Dispositivo 245 x 250 x 118 mm... -
Page 165: Avvertenze Di Sicurezza
AVVERTENZE DI SICUREZZA ATTENZIONE Questo dispositivo è un prodotto laser di classe 1. L’utilizzo di elementi di controllo non consigliati dal produttore o modifiche al dispositivo possono causare l’esposizione a radiazioni laser. Non aprire assolutamente la copertura del dispositivo e non cercare di ripararlo autonomamente.. INFORMAZIONI IMPORTANTI •... - Page 166 o ferri da stiro. Un calore eccessivo può causare lo scioglimento dell’isolamento del cavo ed esporre I cavi interni, con il conseguente rischio di incendi e folgorazioni. • Staccare la spina del dispositivo dalla presa in caso di temporali o in lunghi periodi di non utilizzo, altrimenti si corre il rischio di incendio e folgorazione.
- Page 167 Spiegazione dei simboli sul dispositivo CAUTION RISK OF ELECTRIC SHOCK DO NOT OPEN ATTENZIONE: Per ridurre il rischio di folgorazione, non aprire la copertura del dispositivo, né il retro del dispositivo. Questo dispositivo deve essere dotato di messa a terra. Il dispositivo non contiene componenti che necessitano di manutenzione da parte dell’utente.
-
Page 168: Descrizione Del Dispositivo
DESCRIZIONE DEL DISPOSITIVO Vista frontale /Power – accendere il dispo- – passare al titolo pre- sitivo/standby cedente in modalità Spotify, Riproduzione musicale e BT MODE – selezionare tra le mo- dalità Internet, Spotify Connect, – avviare o mettere in pau- Riproduzione musicale, DAB, sa la riproduzione FM, AUX IN, CD e BT... - Page 169 Vista posteriore 16 Connessione cavo di alimentazione 17 Antenna telescopica 18 AUX IN 19 Uscita altoparlanti L/R...
- Page 170 Telecomando...
- Page 171 Accendere dispositivo/Standby Eject – espulsione Mode – cambiare modalità Info – informazioni Menu – selezione menu EQ – regolazione audio Folder + – selezionare cartella MP3 successiva Folder - – selezionare cartella MP3 precedente Preset 10 Modalità FM – scegliere tra mono e stereo Spotify –...
- Page 172 Display Simboli sul display Stato Wi-Fi Musica/programma in pause Riproduzione musicale – Musica/Riproduzione programma dal server media della vostra rete Ripetere riproduzione Riproduzione casual Sveglia 1 attiva Sveglia 2 attiva Spegnimento automatico attivato. Dispositivo passa in standby dopo XX minuti. Salvare emittente in posizione RDS (Radio Data System) Un’emittente con RDS mostra nome, tipo, contenuto del...
-
Page 173: Messa In Funzione E Utilizzo
MESSA IN FUNZIONE E UTILIZZO Contenido del embalaje • Dispositivo • Telecomando • Manuale d’uso Inserire le batterie nel telecomando • Inserire due batterie AAA da 1,5 V (non incluse in consegna) nel vano delle batterie, rispettando la corretta polarità. •... - Page 174 Impostazione automatica dell’ora • Se il dispositivo è collegato a Internet o riceve un segnale DAB/ FM della vostra località, l’ora si imposta automaticamente. Per sincronizzare l’orologio con l’ora esatta, è necessario abbandonare brevemente la modalità web radio, DAB o FM. Andare a Menu principale –...
-
Page 175: Web Radio
WEB RADIO 1. Lo schermo LED mostra “Main Menu” una volta concluso l’assistente di configurazione. Premere SCROLL/SELECT per selezionare la modalità web radio. 2. Premere SCROLL/SELECT per confermare mentre si illumina la lista emittenti “Station list”. 3. Scegliere poi un’emittente come descritto di seguito. Se non è possibile connettersi alla rete, procedere in questo modo. - Page 176 Selezionare un’emittente radio locale Le emittenti radio locali cambiano in base alla vostra località. Vengono mostrate le emittenti locali della vostra località attuale. 1. Premere MENU – Station list (lista emittenti) – Local “Country” (“Paese” locale) e premere SCROLL/SELECT per confermare il vostro Paese. 2.
- Page 177 b. Ruotare la manopola SCROLL/SELECT per selezionare la regione desiderata e premerla per confermare. c. Ruotare la manopola SCROLL/SELECT per selezionare il Paese desiderato e premerla per confermare. d. Ruotare la manopola SCROLL/SELECT per selezionare l’emittente desiderata e premerla per confermare. La riproduzione dell’emittente inizia automaticamente.
- Page 178 Salvataggio emittenti Possono essere salvate fino a 10 emittenti web preferite. In questo modo potrete accedere in modo semplice e rapido alle vostre emittenti preferite. 1. Tenere premuto PRESET durante la riproduzione della vostra emittente preferita, fino a quando sullo schermo compare quanto segue: ruotare SCROLL/SELECT per selezionare un numero tra 1 e 10.
-
Page 179: Spotify Connect
SPOTIFY CONNECT Entre con nosotros en Spotify Premium Con Spotify Premium è possibile ascoltare milioni di canzoni senza pubblicità. Gli artisti preferiti, le hit del momento e nuove scoperte – tutto su misura per voi! Basta premere “Play” e potrete ascoltare tutte le canzoni che preferite, con la migliore qualità... -
Page 180: Modalità Dab
MODALITÀ DAB 1. Premere più volte MODE per selezionare la modalità DAB. 2. Al primo utilizzo, la radio inizia automaticamente una ricerca emittenti e salva quelle trovate. 3. Una volta finita la ricerca, le emittenti DAB/DAB+ vengono mostrate in ordine alfanumerico. La prima emittente della lista viene selezionata automaticamente. -
Page 181: Ricerca Emittenti
RICERCA EMITTENTI Premere MENU e ruotare SCROLL/SELECT per selezionare “Scan” (cerca). Premere SCROLL/SELECT per una ricerca completa delle emittenti. Ricerca emittenti manuale Se si desidera regolare l’antenna o aggiungere emittenti saltate durante la ricerca automatica, questa funzione risulta utilissima. 1. Premere MENU e ruotare SCROLL/SELECT per selezionare “Manual tune”... - Page 182 Se si desidera visualizzare le emittenti in un ordine diverso, procedere in questo modo: 1. Premere MENU e ruotare SCROLL/SELECT per selezionare “Station order” (ordine emittenti). Premere poi SCROLL/SELECT per confermare la selezione. 2. Ruotare la manopola SCROLL/SELECT per selezionare “Alphanumeric”, “Ensemble”...
- Page 183 Intensità del segnale Intensità minima del segnale...
-
Page 184: Radio Fm
RADIO FM 1. Premere MODE più volte per selezionare la modalità FM. 2. Al primo utilizzo, il dispositivo inizia dal principio della frequenza FM (87,50 MHz). 3. Per modificare manualmente la frequenza FM, premere TUNE/VOL, in modo da attivare la funzione di ricerca di SCROLL/SELECT. Ruotare poi SCROLL/SELECT in senso antiorario per modificare la frequenza in passaggio di 0,05 MHz. - Page 185 Impostazioni audio L’impostazione di fabbrica prevede l’ascolto di tutte le emittenti in stereo. Questo può comportare durante l’ascolto di emittenti con segnale debole la presenza di un cattivo rapporto segnale-rumore (gracchiare). 1. Premere MENU, ruotare SCROLL/SELECT per selezionare “Audio Setting” e premere poi SCROLL/SELECT per confermare.
-
Page 186: Modalità Aux
2. Con SCROLL/SELECT, selezionare l’emittente da riprodurre e premere per confermare. 3. Se il numero selezionato non presenta emittenti, lo schermo mostra “Preset Empty”. MODALITÀ AUX In modalità AUX è possibile collegare al dispositivo un lettore MP3 o altre fonti audio esterne. 1. -
Page 187: Funzionamento Bt
FUNZIONAMENTO BT Collegamento tramite BT con un altro dispositivo per la riproduzione musicale: 1. Premere MODE per selezionare la modalità BT. 2. Sullo schermo lampeggia ripetutamente il simbolo BT. 3. Attivare il BT sul dispositivo esterno e andare nella lista di visualizzazione dispositivi. -
Page 188: Diverse Impostazioni
DIVERSE IMPOSTAZIONI Impostazione Sleep (spegnimento automatico) Questa funzione permette il passaggio automatico in standby allo scadere del tempo impostato. 1. Premere MENU – Main menu (menu principale) – Sleep e premere SCROLL/SELECT per confermare. 2. Ruotare SCROLL/SELECT per visualizzare le opzioni Sleep (off) e selezionare 15, 39, 45, 60 o 90 minuti. - Page 189 Ultima emittente elencata o salvata (non disponibile in modalità Preset buzzer) Volume sveglia Volume Save Salvare sveglia 4. Quando lo schermo mostra “Alarm Saved”, la sveglia è impostata con successo. Sullo schermo compare 5. Per spegnere temporaneamente la sveglia, premere più volte SCROLL/ SELECT per impostare la funzione snooze su 5, 10, 15 o 30 minuti.
- Page 190 Assistente di configurazione di Cercare reti disponibili. rete Impostare PBC Wi-Fi Configurare una rete con codifica WPS (solo per supporto il router utilizza WPS 2.0). Visualizzare impostazioni Impostazioni come indirizzo MAC, regione Wi-Fi, indirizzo IP, ecc. Impostazione manuale Stabilire una connessione senza fili. Profilo di rete Cancellare reti registrate in lista o alcune reti indesiderate.
- Page 191 Tornare alle impostazioni di fabbrica Utilizzando questa funzione vengono cancellati tutti i dati legati all’utente, come data/ora, lista emittenti DAB ed emittenti salvate. 1. Premere MENU – Main menu (menu principale) – System settings (impostazioni di sistema) – Factory Reset (tornare alle impostazioni di fabbrica) e premere SCROLL/SELECT per confermare.
-
Page 192: Lettore Cd
LETTORE CD Modalità CD Assicurarsi che il dispositivo sia in modalità CD. Se il dispositivo non si trova ancora in modalità CD, premere MODE sul dispositivo o sul telecomando e selezionare “CD” con SCROLL/SELECT sul dispositivo o con o sul telecomando. - Page 193 a piacere. NOTA : Per salvare una lista di riproduzione di titoli CD, il CD nel vano deve essere stoppato. Questa funzione non è disponibile durante la riproduzione o se il CD è in pausa. 1. Premere PRESET sul dispositivo o Prog. sul telecomando per raggiungere la modalità...
-
Page 194: Riproduzione Usb
• Se non è possibile rimuovere la polvere con un panno morbido, sfregarlo prima con un panno leggermente inumidito e poi con uno asciutto. • Non utilizzare mai solventi, detergenti disponibili in commercio o spray antistatici su vinile, altrimenti si rovina la superficie del CD. •... -
Page 195: Multiroom
MULTIROOM Questa funzione permette il controllo della radio (o di diverse radio) con la app UNDOK. È possibile ascoltare la musica utilizzando uno smartphone o tablet con app UNDOK per gestire le radio (dispositivi adatti a multiroom) in cucina, camera da letto o soggiorno. Per la riproduzione, è possibile anche raggruppare le radio. - Page 196 5. Se si dispone di più di una radio (dispositivo adatti a multiroom), è possibile raggrupparle, in modo da avere una riproduzione sincronizzata. Premere , per tornare alla lista dei dispositivi. 6. Creare un gruppo, cliccare sul simbolo “Modificare”. Sullo schermo compare “Group Setup”...
- Page 197 Nome del gruppo Abb. 3 Nome del gruppo Dispositivo principale Muto Regolazione volume Fig. 4...
- Page 198 Muto Fig. 5 Fig. 6...
- Page 199 7. In alternativa è possibile regolare i gruppi tramite la radio. a. Premere MENU – Main menu (menu principale) – System settings (impostazioni di sistema) – Multiroom e premere SCROLL/SELECT per confermare. b. Ruotare SCROLL/SELECT per selezionare le opzioni e premere per confermare.
-
Page 200: Ricerca E Correzione Degli Errori
RICERCA E CORREZIONE DEGLI ERRORI Problema Soluzione • Assicurarsi che la spina sia collegata. Non c’è corrente. • Assicurarsi che il dispositivo sia acceso. • Il dispositivo si è “bloccato” durante Il dispositivo non reagisce l’uso. Spegnerlo e riaccenderlo. quando si premono i tasti. •... -
Page 201: Smaltimento
Produttore: Chal-Tec GmbH, Wallstraße 16, 10179 Berlino, Germania. Questo prodotto è conforme alle seguenti direttive europee: 2011/65/UE (RoHS) 2014/53/UE (RED) 2014/35/UE (LVD) La dichiarazione di conformità completa del produttore è disponibile al seguente link. https://use.berlin/10032586 use.berlin/10032586... - Page 202 Chal-Tec GmbH Wallstr. 15 10179 Berlin www.chal-tec.com Il software Spotify è sottoposto ai diritti di utilizzo di parti terze, che posso- no essere visionati alla pagina web seguente: www.spotify.com/connect/third-party-licenses Tutti i marchi indicati sono marchi registrati delle rispettive aziende. Esclusi errori e omissioni e soggetto a modifiche tecniche. Si applicano le nostre condizioni contrattuali.
- Page 203 EU-Konformitätserklärung Wir, die CHAL-TEC GmbH Wallstraße 16 10179 Berlin erklären hiermit, dass der nachfolgend bezeichnete Funkanlagentyp: Auna Internet/DAB+ Radio Artikelnr. 10032586, 10034039 allen folgenden einschlägigen Bestimmungen entspricht: RED-Richtlinie 2014/53/EU LVD-Richtlinie 2014/35/EU RoHS-Richtlinie 2011/65/EG Angewandte harmonisierte Normen: EN 60065:2014 EN 55032 : 2015...