Table des Matières

Publicité

Les langues disponibles
  • FR

Les langues disponibles

Liens rapides

Publicité

Table des Matières
loading

Sommaire des Matières pour auna Microstar

  • Page 3: Table Des Matières

    Sehr geehrter Kunde, wir gratulieren Ihnen zum Erwerb Ihres Gerä- tes. Lesen Sie die folgenden Hinweise sorgfäl- tig durch und befolgen Sie diese, um möglichen Schäden vorzubeugen. Für Schäden, die durch Missachtung der Hinweise und unsachgemäßen Gebrauch entstehen, übernehmen wir keine Haf- tung.
  • Page 4: Technische Daten

    TECHNISCHE DATEN Artikelnummer 10035301, 10035302 Stromversorgung AC/DC adapter (Included) ⎓ Eingang AC 230 – 240 V ~ 50/60Hz Ausgang DC 5 V 1.5 A Verbrauch im Standby 0,4 W Lautsprecher RMS 2 W x 2 W (RMS) USB-Speichermedium- Max 32 GB (formatiert auf FAT32) Unterstützung AUX IN Jack (x1): 3,5 mm (Stereo)
  • Page 5: Erklärung Der Symbole Auf Dem Gerät

    ERKLÄRUNG DER SYMBOLE AUF DEM GERÄT CAUTION RISK OF ELECTRIC SHOCK DO NOT OPEN VORSICHT: DAS GEHÄUSE NICHT ÖFFNEN, UM EINEN STROMSCHLAG UND ERNSTE PERSONENVERLETZUNGEN ZU VERMEIDEN. IM INNEREN KEINE VOM KUNDEN ZU WARTENDEN KOMPONENTEN. WENDEN SIE SICH AUSSCHLIESSLICH AN QUALIFIZIERTE FACHLEUTE. WARNUNG: UM DIE GEFAHR EINES BRANDS ODER EINES STROMSCHLAGS ZU VERRINGERN, DAS GERÄT NICHT IN WASSER, REGEN ODER FEUCHTIGKEIT AUSZUSETZEN.
  • Page 6: Sicherheitshinweise

    SICHERHEITSHINWEISE Lesen Sie die Anleitung. Alle Anwendungshinweise müssen vor der Verwendung des Geräts gelesen werden. • Kinder ab 8 Jahren, psychisch, sensorisch und körperlich eingeschränkte Menschen dürfen das Gerät nur benutzen, wenn sie vorher von einer für sie verantwortlichen Aufsichtsperson ausführlich mit den Funktionen und den Sicherheitsvorkehrungen vertraut gemacht wurden und die damit verbundenen Risiken verstehen.
  • Page 7 Erwärmen Sie den Raum allmählich und lassen das Gerät vor dem Gebrauch trocken werden. Bei Problemen ziehen Sie den Netzstecker und wenden sich an den Kundendienst. Möbelschutz • Dieses Gerät ist mit rutschfesten Gummifüßen ausgestattet, damit das Gerät sich beim Benutzen der Bedienelemente nicht bewegt. Diese Füße bestehen aus abriebfestem Gummi, das speziell dafür entwickelt wurde, um auf den Möbeln keine Spuren zu hinterlassen.
  • Page 8: Geräteübersicht

    GERÄTEÜBERSICHT Vorderansicht Draufsicht...
  • Page 9 Linker Lautsprecher CD-Fach Rechter Lautsprecher Standby / Wahl der Quelle USB-Anschluss Titel zurück/Suche rückwärts Programmspeicher - Lichtshow Titel vor/Suche vorwärts Programmspeicher + IR-Sensor (Fernbedienung) 10 FM-Anzeige MP3 -Anzeige 12 LED-Anzeige 13 Programmanzeige 14 Anzeige Wiederholgungsmodus 15 Wiedergabe/Pause/FM-Sendersuche 16 Memory, Wiedergabemodus 17 BT-Kopplung / Stopp 18 CD-Fach öffnen/schließen 19 Basslautstärke...
  • Page 10 Fernbedienung Standby Zufallswiedergabe Wiedergabe/Pause Lichteffekte Titel zurück/Suche zurück Stopp Titel anspielen (INTRO) Stumm Lautstärke - 10 CD-Fach Öffnen/Schließen Modus 12 Wiederholungsmodus 13 Memory/Programmspeicher 14 FM-Sendersuche 15 Titel vor / Suche vorwärts 16 BT-Kopplung 17 Speicher - 18 Speicher + 19 Lautstärke +...
  • Page 11 Einlegen der Batterien in die Fernbedienung Die Fernbedienung wird mit einer CR2025-Batterie (im Lieferumfang enthalten) betrieben. Um die Fernbedienung zu benutzen, entfernen Sie die in das Batteriefach eingelegte Isolierlasche. Ersetzen Sie die Originalbatterie durch eine neue CR2025-Lithiumbatterie, wenn der Betrieb der Fernbedienung intermittierend oder unbefriedigend wird.
  • Page 12: Einrichtung

    EINRICHTUNG Anschluss Schließen Sie das dabeiliegende Netzgerät auf der Rückseite des Gerätes an und stecken Sie es in eine Steckdose mit einer Stromversorgung von 220-240 V~ 50/60 Hz. Hinweis: Wenn das Gerät lange benutzt wird, trennen Sie das Netzgerät vom Gerät und von der Steckdose. Wandsteckdose Netzadapter Gleichstrom-...
  • Page 13: Bedienung Der Funktionen

    BEDIENUNG DER FUNKTIONEN Einschalten und Playback 1. Funktionswahl • Drükken Sie die Taste SOURCE am Gerät oder MODE auf der Fernbedienung, um CD/USB auszuwählen. • Drücken Sie SOURCE am Gerät in die Position USB, um MP3 von einem USB-Stick wiederzugeben. •...
  • Page 14 Programmfunktion Mit dieser Funktion können die Titel in einer programmierten Reihenfolge abgespielt werden. Dazu muss die Wiedergabe angehalten sein ( drücken). 1. Die PROGRAM-Taste drücken. Die Programmnummer 01 erscheint im Display und die Programm-LED blinkt. 2.  oder  drücken, um vor- oder zurückzublättern und den zu programmierenden Titel auszuwählen.
  • Page 15: Fm-Radio

    Hinweis: Wenn Sie 2x  drücken, brechen Sie die Programmwiedergabe ab und löschen die Programmliste vollständig. Die Programmanzeige im Display verschwindet. Ansehen der Programmliste Bei angehaltenem Gerät können Sie die Programmliste mit den Tasten  und  betrachten. Eingänge • DC–Stromanschluss: Den 5-V-DC-Stecker des Netzgeräts an diese Buchse anschließen.
  • Page 16 1. Halten Sie die PLAY/SCAN-Taste 2 Sekunden lang auf der Haupteinheit oder der Fernbedienung SCAN-Taste gedrückt, um "P-xx" zu wählen. Die Anzahl der gefundenen Sender wird während des automatischen Sendersuchlaufs angezeigt. Wenn die automatische Sendersuche beendet ist, wird der zuletzt gehörte Sender eingestellt. Wenn der letzte Sender, den Sie gehört haben, nicht mehr verfügbar ist, stellt er den ersten Sender in der alphabetischen Liste ein.
  • Page 17: Bt-Modus

    BT-MODUS Die drahtlose Bluetooth-Technologie ist eine Funktechnologie mit kurzer Reichweite, die eine drahtlose Kommunikation zwischen verschiedenen Arten von digitalen Geräten wie Mobiltelefonen oder Computern ermöglicht. Sie funktioniert innerhalb einer Reichweite von etwa 10 Metern, ohne dass diese Geräte mühsam mit Kabeln verbunden werden müssen.
  • Page 18 Pairing mit anderen Bluetooth-Quellgeräten. 4. Führen Sie den Kopplungsvorgang am Quellgerät durch, um diese Einheit zu erkennen. "MICROSTAR" erscheint in der Liste der erkannten Geräte (falls verfügbar) im Quellgerät. (Einzelheiten finden Sie in der Bedienungsanleitung des Quellgeräts).
  • Page 19: Bass-Regler

    3. Starten Sie die Bluetooth-Verbindung vom Bluetooth-Stereo-Audio- Quellgerät aus. 4. Drücken Sie die PLAY/PAUSE-Taste (auf der Haupteinheit, der Fernbedienung oder dem Quellgerät). HINWEIS: Wenn das Quellgerät über eine zusätzliche Bassfunktion oder Equalizer-Funktion verfügt, stellen Sie diese auf aus. Wenn diese Funktionen eingeschaltet sind, wird der Ton möglicherweise verzerrt.
  • Page 20: Fehlerbehebung

    FEHLERBEHEBUNG Problem Mögliche Ursache Lösung Das Gerät geht beim Das Netzgerät ist nicht Schließen Sie das Netzgerät an Drücken der Ein/Aus- angeschlossen oder der und stecken Sie den Stecker in die Taste nicht an. Stecker ist nicht an die Steckdose. Steckdose angeschlossen.
  • Page 21: Reinigung Und Pflege

    REINIGUNG UND PFLEGE • Reinigen Sie Ihr Gerät mit einem feuchten (niemals nassen) Tuch. Lösungs- oder Reinigungsmittel sollten niemals verwendet werden. • Lassen Sie Ihr Gerät nicht an heißen, feuchten oder staubigen Orten stehen. • Halten Sie Ihr Gerät von Heizgeräten und elektrischen Geräuschquellen wie Leuchtstofflampen oder Motoren fern.
  • Page 22: Hinweise Zur Entsorgung

    HINWEISE ZUR ENTSORGUNG Befindet sich die linke Abbildung (durchgestrichene Mülltonne auf Rädern) auf dem Produkt, gilt die Europäische Richtlinie 2012/19/EU. Diese Produkte dürfen nicht mit dem normalen Hausmüll entsorgt werden. Informieren Sie sich über die örtlichen Regelungen zur getrennten Sammlung elektrischer und elektronischer Gerätschaften.
  • Page 25 Dear Customer, Congratulations on purchasing this equipment. Please read this manual carefully and take care of the following hints to avoid damages. Any failure caused by ignoring the items and cautions men- tioned in the instruction manual are not covered by our warranty and any liability.
  • Page 26: Specifications

    SPECIFICATIONS Item number 10035301, 10035302 AC Operation AC/DC adapter (Included) ⎓ Input AC 230 – 240 V ~ 50/60Hz Output DC 5 V 1.5 A Power stand-by 0.4 W Speaker Output 2 W x 2 W (RMS) USB Flash Drive Support Max 32 GB (FAT32 formatted) AUX IN Jack (x1): 3.5 mm (stereo) Compact Disc Support...
  • Page 27: Explanation Of The Warning Symbols

    EXPLANATION OF THE WARNING SYMBOLS CAUTION RISK OF ELECTRIC SHOCK DO NOT OPEN AUTION: TO REDUCE THE RISK OF ELECTRIC SHOCK AND SERIOUS PERSONAL INJURY, DO NOT REMOVE ANY COVER. NO USER-SERVICABLE PARTS INSIDE. REFER SERVICING TO QUALIFIED SERVICE PERSONNEL ONLY. WARNING.
  • Page 28: Safety Instructions

    SAFETY INSTRUCTIONS Read these instructions. All uses guidelines must be read before using the device. Keep the instructions for future use. • Children over the age of 8 and persons with reduced physical, sensory or mental capabilities or those with a lack of experience and knowledge may only use the device if they are instructed on how to do so by a person responsible for their safety, or if they are supervised and understand the hazards associated with the use of the device.
  • Page 29 Should any trouble occur, remove the power source and refer servicing to qualified personnel. Protect your furniture • This system is equipped with non-skid rubber ‘feet’ to prevent the product from moving when you operate the controls. These ‘feet’ are made from non-migrating rubber material specially formulated to avoid leaving any marks or stains on your furniture.
  • Page 30: Product Description

    PRODUCT DESCRIPTION Front view Top view...
  • Page 31 L-SPEAKER CD DOOR R-SPEAKER STAND BY BUTTON / SOURCE BUTTON USB JACK SKIP/SEARCH BACKWARD, PRESET- BUTTON LIGHT SHOW BUTTON SKIP/SEARCH FORWARD PRESET+ BUTTON REMOTE SENSOR 10 FM INDICATOR MP3 INDICATOR 12 LED DISPLAY 13 PROGRAM INDICATOR 14 REPEAT INDICATOR 15 PLAY/PAUSE, FM SCAN BUTTON 16 MEMORY BUTTON, PLAY MODE BUTTON 17 BT PAIR BUTTON / STOP 18 CD OPEN/CLOSE BUTTON...
  • Page 32: Open/Close Button

    Remtoe Control STANDBY BUTTON RANDOM BUTTON PLAY/PAUSE BUTTON LIGHT SHOW BUTTON SKIP/SEARCH BACKWARD BUTTON STOP BUTTON INTRO BUTTON MUTE BUTTON VOL - BUTTON 10 OPEN/CLOSE BUTTON MODE BUTTON 12 REPEAT BUTTON 13 MEMORY/PROG BUTTON 14 SCAN BUTTON 15 SKIP/SEARCH FORWARD BUTTON 16 BT PAIR BUTTON 17 PRESET - BUTTON 18 PRESET+ BUTTON...
  • Page 33 Installing batteries into the remote control The remote control operates on one CR2025 battery (included). To activate the remote control, remove the insulation tab inserted in the battery compartment. When the operation of the remote control becomes intermittent or unsatisfactory, replace the original battery with a new CR2025 lithium battery.
  • Page 34: Setting Up For Operation

    SETTING UP FOR OPERATION Connecting power Plug the supplied AC adapter into the DC jack on the rear side of the unit and connect to a standard AC wall socket with 220-240V~ 50/60Hz continuous power supply. Note: When the unit is not operated for long periods of time, unplug the AC adapter from the unit and wall outlet.
  • Page 35: Control Functions

    CONTROL FUNCTIONS Power and playback functions 1. Functions selector • Press the SOURCE button on main unit or remote control the MODE button Select CD/USB • Press the SOURCE Button to USB position to playback MP3 files on a USB flash drive. •...
  • Page 36 PROGRAM function This function allows music tracks to be played in a programmed sequence. NOTE: Program function can only be set in STOP mode 1. Press the PROGRAM button once. Program Number 01 will display and PROGRAM INDICATOR will flash. 2.
  • Page 37 Program review In stop mode, you can review the program list by pressing the NEXT or PREV BUTTON. Input functions • DC JACK : Connect the DC plug of the DC5V output AC Adapter (included) to this jack. • USB JACK: Connect a USB flash drive (FAT32 formatted) up to 32GB (not included) to this jack for playback of MP3 files.
  • Page 38: Fm Radio Operation

    FM RADIO OPERATION AUTO Scan (SCAN) You can use the scan (auto tune) function to automatically scan for new digital radio stations and remove inactive ones. 1. Press hold the PLAY/SCAN Button for 2 seconds the on main unit or remote control SCAN button to choose “P-xx”.
  • Page 39: Bt Operation

    BT OPERATION Bluetooth wireless technology is a short-range radio technology that enables wireless communication between various types of digital devices, such as mobile phone or computer. It operates within a range of about 10meters (30 feet) without the hassle of having to use cables to connect these devices.
  • Page 40 5. Select “MICROSTAR” from the source list. If Pass code* is required, enter “0000”. * Pass code may be called PIN Code, Passkey, PIN number or Password.
  • Page 41: Bass Control

    4. Press PLAY/PAUSE button (on main unit, remote control or source device). NOTE: If the source device has an extra bass function or equalizer function, set them to off. If these functions are on, sound may be distorted. BASS CONTROL Adjust this to obtain the desired BASS level from the built-in speaker.
  • Page 42: Troubleshooting Guide

    TROUBLESHOOTING GUIDE Problem Possible Cause Solution No power when DC plug of the AC adapter is Re-insert the DC plug of the AC POWER ON/OFF not plugged into the DC JACK adapter properly. BUTTON is pressed properly. No power when The AC outlet may not have Check the outlet with a working plugged in...
  • Page 43: Care And Maintenance

    CARE AND MAINTENANCE • Clean your unit with a damp (never wet) cloth. Solvent or detergent should never be used. • Avoid leaving your unit in hot, humid or dusty places. • Keep your unit away from heating appliances and sources of electrical noise such as fluorescent lamps or motors.
  • Page 44: Disposal Considerations

    DISPOSAL CONSIDERATIONS According to the European waste regulation 2012/19/ EU this symbol on the product or on its packaging indicates that this product may not be treated as household waste. Instead it should be taken to the appropriate collection point for the recycling of electrical and electronic equipment.
  • Page 47 Cher client, Toutes nos félicitations pour l’acquisition de ce nouvel appareil. Veuillez lire attentivement les instructions suivantes de branchement et d’utilisation afin d’éviter d’éventuels dommages. Le fabricant ne saurait être tenu pour responsable des dommages dus au non-respect des consignes de sécurité...
  • Page 48: Fiche Technique

    FICHE TECHNIQUE Numéro d'article 10035301, 10035302 Alimentation Adaptateur AC/DC (compris) ⎓ Entrée AC 230 – 240 V ~ 50/60Hz Sortie DC 5 V 1.5 A Consommation en veille 0,4 W Enceinte RMS 2 W x 2 W (RMS) Dispositif de stockage Max 32 GB (formaté en FAT32) USB-Support AUX IN Jack (x1): 3,5 mm (Stereo)
  • Page 49: Explication Des Symboles Sur L'appareil

    EXPLICATION DES SYMBOLES SUR L'APPAREIL CAUTION RISK OF ELECTRIC SHOCK DO NOT OPEN ATTENTION : N'OUVREZ PAS LE BOÎTIER POUR ÉVITER LES CHOCS ÉLECTRIQUES ET LES BLESSURES GRAVES. PAS DE COMPOSANTS INTERNES À ENTRETENIR PAR LE CLIENT. NE CONTACTER QUE DES PROFESSIONNELS QUALIFIÉS.
  • Page 50: Consignes De Sécurité

    CONSIGNES DE SÉCURITÉ Lisez les instructions. Toutes les consignes d'utilisation doivent être lues avant d'utiliser l'appareil. • Les enfants à partir de 8 ans ainsi que les personnes aux capacités physiques, mentales ou sensorielles réduites ne doivent utiliser l’appareil qu'après avoir été familiarisés par une personne responsable de leur sécurité...
  • Page 51 • Réchauffez la pièce progressivement et laissez l'appareil sécher avant utilisation. En cas de problème, débranchez la fiche d'alimentation et contactez le service client. Protection des meubles • Cet appareil est équipé de pieds en caoutchouc antidérapants pour empêcher l'appareil de bouger pendant le fonctionnement. Ces pieds en caoutchouc résistant à...
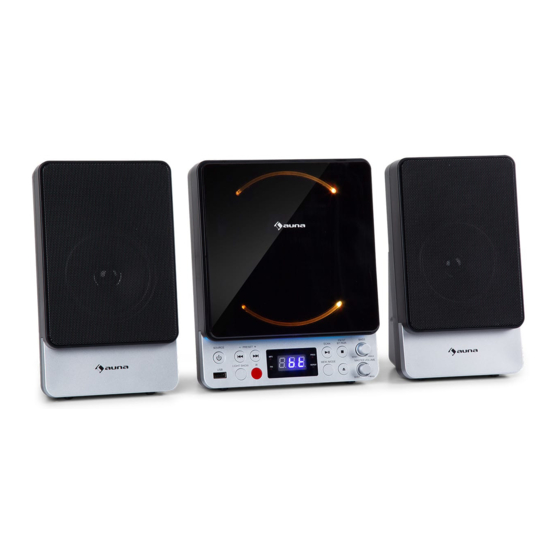
  • Page 52: Aperçu De L'appareil

    APERÇU DE L'APPAREIL Vue de face Vue de haut...
  • Page 53 Enceinte gauche Lecteur CD Enceinte droite Veille / choix de la source Port USB Titre précédent /recherche arrière mémorisation de programme - Spectacle de lumière Titre suivant vor/recherche avant mémorisation de programme + Capteur IR (télécommande) 10 Affichage FM Affichage MP3 12 Écran LED 13 Affichage du programme 14 Affichage du mode de répétition...
  • Page 54 Télécommande Marche / veille Lecture aléatoire Lecture / Pause Effets de lumière Titre précédent / recherche arrière Stop Début des titres (INTRO) Sourdine Volume 10 Ouverture / fermeture du lecteur CD Mode 12 Mode de lecture 13 Memory/mémorisation de programme 14 Recherche de stations FM 15 Titre suivant / recherche avant 16 Jumelage BT...
  • Page 55: Retirez La Bande De Sécurité Avant Utilisation

    Insertion des piles dans la télécommande La télécommande est alimentée par une pile CR2025 (incluse). Pour utiliser la télécommande, retirez-la languette isolante du compartiment à piles. Remplacez la pile d'origine par une nouvelle pile au lithium CR2025 si le fonctionnement de la télécommande devient intermittent ou insatisfaisant. 1.
  • Page 56: Configuration

    CONFIGURATION Branchement Branchez le bloc d'alimentation fourni à l'arrière de l'appareil puis branchez l'autre extrémité dans une prise avec une alimentation de 220-240 V ~ 50/60 Hz. Remarque : Si l'appareil a été utilisé pendant une longue période, débranchez le bloc d'alimentation de l'appareil et de la prise. Prise murale Bloc d'alimentation...
  • Page 57: Utilisation Des Fonctions

    UTILISATION DES FONCTIONS Allumage et lecture 1. Sélection de la fonction • Appuyez sur SOURCE sur l'appareil ou MODE sur la télécommande pour sélectionner CD / USB. • Appuyez sur SOURCE sur l'appareil en position USB pour lire des MP3 à partir d'une clé...
  • Page 58 Fonction programme Cette fonction vous permet de lire les titres dans un ordre programmé. Pour cela vous devez d'abord arrêter la lecture (appuyez sur ) 1. Appuyez sur PROGRAM. Le numéro de programme 01 apparaît à l'écran et la LED de programme clignote. 2.
  • Page 59: Fm-Radio

    Remarque : Si vous appuyez deux fois sur  , vous pouvez annuler la lecture programmée et effacer complètement la liste des programmes. Le voyant de programme disparaît de l'affichage. Voir la liste des programmes Lorsque l'appareil est arrêté, vous pouvez afficher la liste des programmes en appuyant sur ...
  • Page 60 1. Maintenez la touche PLAY / SCAN de l'unité principale ou la touche SCAN de la télécommande pendant 2 secondes pour sélectionner "P-xx". Le nombre de stations trouvées s'affiche pendant la recherche automatique de stations. Lorsque la recherche automatique des stations est terminée, la dernière station écoutée est lue.
  • Page 61: Mode Bt

    MODE BT La technologie sans fil Bluetooth est une technologie radio à courte portée qui permet une communication sans fil entre différents types d'appareils numériques tels que les téléphones portables ou les ordinateurs. Il fonctionne dans une portée d'environ 10 mètres (30 pieds) sans avoir à connecter des câbles à...
  • Page 62 5. Sélectionnez "MICROSTAR" dans la liste des sources. Si le code d'accès* est requis, entrez "0000". * Le code d'accès peut être appelé code PIN, mot de passe, numéro PIN ou mot de passe.
  • Page 63: Réglage Des Basses

    sélectionner la fonction Bluetooth. 3. Démarrez la connexion Bluetooth à partir de l'appareil source audio stéréo Bluetooth. 4. Appuyez sur la touche PLAY/PAUSE (sur l'unité principale, la télécommande ou le dispositif source). REMARQUE : si l'appareil source a une fonction de basse supplémentaire ou une fonction d'égalisation, réglez-la sur off.
  • Page 64: Résolution Des Problèmes

    RÉSOLUTION DES PROBLÈMES Problème Cause possible Solution L'appareil ne Le bloc d'alimentation n'est pas Branchez le bloc d'alimentation et démarre pas connecté ou la fiche n'est pas insérez la fiche dans la prise. lorsqu'on appuie sur connectée à la prise. la touche de marche/ arrêt.
  • Page 65: Nettoyage Et Entretien

    NETTOYAGE ET ENTRETIEN • Nettoyez votre appareil avec un chiffon humide (jamais mouillé). N'utilisez jamais de solvants ou détergents. • Ne laissez pas votre appareil dans des endroits chauds, humides ou poussiéreux. • Éloignez votre appareil des radiateurs et des sources de bruit électrique comme les lampes fluorescentes ou les moteurs.
  • Page 66: Informations Sur Le Recyclage

    INFORMATIONS SUR LE RECYCLAGE Vous trouverez sur le produit l’image ci-contre (une poubelle sur roues, barrée d‘une croix), ce qui indique que le produit se trouve soumis à la directive européenne 2012/19/UE. Renseignez-vous sur les dispositions en vigueur dans votre région concernant la collecte séparée des appareils électriques et électroniques.
  • Page 69 Estimado cliente: Le felicitamos por la adquisición de este producto. Lea atentamente el siguiente manual y siga cuidadosamente las instrucciones de uso con el fin de evitar posibles daños. La empresa no se responsabiliza de los daños ocasionados por un uso indebido del producto o por haber desatendido las indicaciones de seguridad.
  • Page 70: Datos Técnicos

    DATOS TÉCNICOS Número de artículo 10035301, 10035302 Alimentación eléctrica Adaptador AC/DC (Incluido) ⎓ Entrada AC 230 – 240 V ~ 50/60Hz Salida DC 5 V 1.5 A Consumo en Standby 0,4 W Altavoces RMS 2 W x 2 W (RMS) Soporte para dispositivos Máximo 32 GB (formateado a FAT32) de almacenamiento USB...
  • Page 71: Seguridad Del Láser

    EXPLICACIÓN SÍMBOLOS DEL DISPOSITIVO CAUTION RISK OF ELECTRIC SHOCK DO NOT OPEN ATENCIÓN: PARA REDUCIR EL RIESGO DE DESCARGAS ELÉCTRICAS Y LESIONES PERSONALES, NO ABRA LA CARCASA. NO HAY PIEZAS QUE PUEDAN SER REPARADAS POR EL USUARIO DENTRO DE LA UNIDAD. EN CASO DE REPARACIÓN, CONTACTE SÓLO CON PERSONAL CUALIFICADO.
  • Page 72: Instrucciones De Seguridad

    INSTRUCCIONES DE SEGURIDAD Lea las instrucciones. Todas las instrucciones de uso deben ser leídas antes de usar la máquina. • Los niños a partir de los 8 años de edad y las personas con discapacidades mentales, sensoriales y físicas sólo podrán utilizar el dispositivo si un supervisor responsable les ha familiarizado a fondo con las funciones y las precauciones de seguridad y comprenden los riesgos que conlleva.
  • Page 73 • Caliente la habitación gradualmente y deje que el aparato se seque antes de usarlo. En caso de problemas, desenchufe el cable de alimentación y póngase en contacto con el representante del servicio técnico. Protector de muebles • Esta unidad está equipada con bases de goma antideslizantes para evitar que la unidad se mueva cuando se utilizan los controles.
  • Page 74: Descripción Del Aparato

    DESCRIPCIÓN DEL APARATO Vista frontal Vista superior...
  • Page 75 Altavoz izquierdo Bandejas de CD Altavoz derecho Standby / selección de fuentes Conexión USB Pista atrás/búsqueda atrás - Memoria de programa - Espectáculo de luces Pista adelante/búsqueda adelante - Memoria de programa + Sensor IR (control remoto) 10 Pantalla FM Pantalla de MP3 12 Pantalla LED 13 Visualización del programa...
  • Page 76 Mando a distancia En espera / selección de la fuente Reproducción aleatoria Reproducción/pausa Espectáculo de luces Pista atrás/ Buscar atrás Stop Reproducir pista Silencio Nivel de volumen 10 Bandeja de CD abierta/cerrada Modo 12 Modo de repetición 13 Memoria/Memoria de programa 14 Búsqueda de emisoras FM 15 Pista adelante / Búsqueda adelante 16 Emparejamiento BT...
  • Page 77 Insertar las pilas en el mando a distancia El mando a distancia funciona con una pila CR2025 (incluida). Para usar el control remoto, retire la lengüeta aislante insertada en el compartimento de la batería. Sustituya la pila original por una nueva pila de litio CR2025 si el funcionamiento del mando a distancia se vuelve intermitente o insatisfactorio.
  • Page 78: Configuración

    CONFIGURACIÓN Conexión del dispositivo Conecte la fuente de alimentación adjunta en la parte posterior de la unidad y enchúfela a una toma de corriente con una tensión de alimentación de 220-240 V~ 50/60 Hz. Nota: Si se va a utilizar la unidad durante un largo período de tiempo, desconecte la fuente de alimentación de la unidad y de la toma de corriente.
  • Page 79: Manejo De Las Funciones

    MANEJO DE LAS FUNCIONES Encender y reproducir 1. Selección de funciones • Pulse el botón SOURCE de la unidad o MODE del mando a distancia para seleccionar CD/USB. • Presione SOURCE en la unidad en la posición USB para reproducir MP3 desde una memoria USB.
  • Page 80 Función del programa Esta función permite que las pistas se reproduzcan en un orden programado. Para ello, la reproducción debe ser pausada ( presione ) 1. Presiona el botón PROGRAMA. El número de programa 01 aparece en la pantalla y el LED de programa parpadea. 2.
  • Page 81: Fm-Radio

    Nota: Si presiona dos veces , cancela la reproducción del programa y borra la lista de programas por completo. La indicación del programa en la pantalla desaparece. Ver la lista de canales Cuando la unidad está parada, puede ver la lista de canales con las teclas ...
  • Page 82 1. Mantenga pulsado el botón PLAY/SCAN durante 2 segundos en la unidad principal o el botón SCAN del mando a distancia para seleccionar “P-xx". El número de estaciones encontradas se mostrará durante el escaneo automático de estaciones. Cuando la búsqueda automática de emisoras termine, se sintonizará...
  • Page 83: Modo Bt

    MODO BT La tecnología inalámbrica Bluetooth es una tecnología de radio de corto alcance que permite la comunicación inalámbrica entre diferentes tipos de dispositivos digitales como teléfonos móviles o computadoras. Funciona dentro de un rango de alrededor de 10 metros sin la necesidad de conectar estos dispositivos con cables.
  • Page 84 5. Selecciona "MICROSTAR Sing" de la lista de fuentes. Si se requiere una clave de acceso*, introduzca "0000". * La clave de acceso puede llamarse código PIN, clave de acceso, número PIN o contraseña.
  • Page 85: Control De Bajos

    1. Pulse el botón POWER de la unidad principal o del mando a distancia para encender la unidad. 2. Pulse el botón SOURCE de la unidad principal o del mando a distancia para seleccionar la función Bluetooth. 3. Inicie la conexión Bluetooth desde el dispositivo de fuente de audio estéreo Bluetooth 4.
  • Page 86: Solución De Problemas Y Corrección De Errores

    SOLUCIÓN DE PROBLEMAS Y CORRECCIÓN DE ERRORES Problema Posible causa Solución La unidad no se El adaptador de CA no está Enchufe el adaptador de CA e inserte enciende cuando se conectado o el enchufe no el enchufe en la toma de corriente. pulsa el botón de está...
  • Page 87: Limpieza Y Mantenimiento

    LIMPIEZA Y MANTENIMIENTO • Limpie su dispositivo con un paño húmedo (nunca mojado). Nunca deben utilizarse disolventes o agentes de limpieza. • No deje su dispositivo en lugares calientes, húmedos o polvorientos. • Mantenga su dispositivo alejado de calentadores y fuentes de ruido eléctrico como luces fluorescentes o motores.
  • Page 88: Retirada Del Aparato

    RETIRADA DEL APARATO Si la ilustración de la izquierda (cubo de basura con ruedas tachadas) está en el producto, se aplica la Directiva Europea 2012/19/EU. Estos productos no deben eliminarse con los residuos domésticos normales. Consulte la normativa local para la recogida selectiva de residuos eléctricos y electrónicos.
  • Page 91 Gentile cliente, La ringraziamo per aver acquistato il dispositivo. La preghiamo di leggere attentamente le seguenti istruzioni per l’uso e di seguirle per evitare possibili danni tecnici. Non ci assumiamo alcuna responsabilità per danni scaturiti da una mancata osservazione delle avvertenze di sicurezza e da un uso improprio del dispositivo.
  • Page 92: Dati Tecnici

    DATI TECNICI Codice articolo 10035301, 10035302 Alimentazione Adattatore AC/DC (incluso) ⎓ Ingresso AC 230 - 240 V ~ 50/60Hz Uscita DC 5 V 1,5 A Consumo in standby 0,4 W Altoparlanti RMS 2 W x 2 W (RMS) Dispositivo di Max 32 GB (formattato su FAT32) memorizzazione USB Jack AUX IN (x1)
  • Page 93 SPIEGAZIONE DEI SIMBOLI DEL DISPOSITIVO CAUTION RISK OF ELECTRIC SHOCK DO NOT OPEN ATTENZIONE: NON APRIRE L’ALLOGGIAMENTO ONDE EVITARE SCOSSE ELETTRICHE E GRAVI LESIONI PERSONALI. IL PRODOTTO NON CONTIENE COMPONENTI CHE NECESSITANO DI ASSISTENZA DA PARTE DEL CLIENTE. RIVOLGERSI ESCLUSIVAMENTE A TECNICI QUALIFICATI.
  • Page 94: Avvertenze Di Sicurezza

    AVVERTENZE DI SICUREZZA Leggere tutte le istruzioni per l’uso prima di utilizzare il dispositivo. • Questo dispositivo può essere utilizzato dai bambini maggiori di 8 anni e dalle persone con limitate capacità fisiche, sensoriali o mentali o da persone con esperienza e conoscenze insufficienti, solo se sono stati informati sulle funzioni del dispositivo e sono consapevoli dei rischi e dei pericoli connessi.
  • Page 95 • Riscaldare gradualmente il locale e lasciare che il dispositivo si asciughi prima dell’uso. Se dovessero esserci problemi togliere la spina e rivolgersi al servizio d’assistenza clienti. Come proteggere i mobili • Il dispositivo è attrezzato con piedini di gomma antiscivolo in modo tale da non spostarsi quando si usano gli elementi di comando.
  • Page 96: Descrizione Del Dispositivo

    DESCRIZIONE DEL DISPOSITIVO Vista frontale Vista superiore...
  • Page 97 Altoparlante sinistro Vano CD Altoparlante destro Standby / Selezione della fonte Collegamento USB Brano indietro/ricerca indietro - Memoria programma - Spettacolo di luci Brano avanti/ricerca avanti - Memoria programma + Sensore IR (telecomando) 10 Spia FM Spia MP3 12 Spia LED 13 Spia programma 14 Spia modalità...
  • Page 98 Telecomando On/Standby Riproduzione casuale Play/Pause Effetti di luce Brano indietro/Ricerca indietro Stop Riprodurre il brano (INTRO) Mute Volume - 10 Aprire/Chiudere il vano CD Modalità 12 Modalità di ripetizione 13 Memory/Memoria programma 14 Ricerca stazione FM 15 Brano avanti / Ricerca avanti 16 Accoppiamento BT 17 Memoria - 18 Memoria +...
  • Page 99 Come inserire le pile nel telecomando Il telecomando funziona con una pila CR2025 (contenuta nel volume di consegna). Per usare il telecomando rimuovere la linguetta di isolamento posta nel vano pile. Sostituire la pila originale con una CR2025 al litio quando il funzionamento del telecomando è...
  • Page 100: Configurazione

    CONFIGURAZIONE Collegamento del dispositivo Collegare l’alimentatore incluso al retro del dispositivo e inserirlo in una presa con un’alimentazione di 220-240 V~ 50/60 Hz. Nota: se il dispositivo viene utilizzato a lungo, scollegare l’alimentatore dal dispositivo e dalla presa. Presa Adattatore di rete Collegamento a corrente...
  • Page 101: Utilizzo Delle Funzioni

    UTILIZZO DELLE FUNZIONI Accensione e playback 1. Selezione delle funzioni • Premere il tasto SOURCE sul dispositivo oppure MODE sul telecomando per selezionare CD/USB. • Premere SOURCE sul dispositivo in posizione USB per riprodurre gli MP3 da una chiavetta USB. •...
  • Page 102 Funzione programma Con questa funzione è possibile riprodurre i brani in sequenza programmata. Per fare ciò però bisogna fermare la riproduzione (premere ). 1. Premere il tasto PROGRAM. Sul display appare il numero 01 e il LED lampeggia. 2. Premere  o  per scrollare avanti o indietro e selezionare il brano programmato.
  • Page 103: Radio Fm

    Nota: premendo due volte  si interrompe la riproduzione e si cancella completamente l’elenco dei programmi. La spia del programma sparisce dal display. Visione dell’elenco dei programmi In modalità stop è possibile visionare l’elenco dei programmi con i tasti  o .
  • Page 104 1. Tenere premuto per 2 secondi il tasto PLAY/SCAN sul dispositivo oppure il tasto SCAN sul telecomando per selezionare “P-xx”. Viene visualizzata la quantità delle emittenti trovate durante la ricerca automatica. Quando la ricerca si è conclusa, viene impostata l’ultima stazione ascoltata. Se non è...
  • Page 105: Modalita' Bt

    MODALITÀ BT La tecnologia bluetooth senza fili è una tecnologia radiofonica con un raggio d’azione breve che consente la comunicazione wireless tra i diversi tipi di dispositivi digitali come i telefoni cellulari o i computer. Funziona entro un raggio di 10 m senza dover collegare il dispositivo con i cavi. Dato che la tecnologia bluetooth non richiede un collegamento visivo tra i dispositivi comunicanti, non è...
  • Page 106 Ulteriori dettagli riguardanti l’accoppiamento del dispositivo con l’apparecchio sorgente si trovano nel manuale d’uso del dispositivo sorgente. 5. Selezionare “MICROSTAR” dall’indice sorgente. Se è necessaria una password*, digitare “0000”. *Il codice può essere chiamato codice PIN, passkey, numero PIN oppure password.
  • Page 107: Regolatore Dei Bassi

    1. Premere il tasto POWER sul dispositivo o sul telecomando per accendere l’apparecchio. 2. Premere il tasto SOURCE sul dispositivo o sul telecomando per selezionare la funzione bluetooth. 3. Avviare il collegamento bluetooth dal dispositivo sorgente audio bluetooth. 4. Premere il tasto PLAY/PAUSE (sul dispositivo, sul telecomando o sull’apparecchio sorgente).
  • Page 108: Correzione Degli Errori

    CORREZIONE DEGLI ERRORI Problema Causa possibile Soluzione Il dispositivo non si L’alimentatore non è collegato Collegare l’alimentatore e inserire la accende quando si oppure la spina non è inserita spina nella presa. preme il tasto on/off. nella presa. Il dispositivo non si La presa non porta corrente.
  • Page 109: Pulizia E Manutenzione

    PULIZIA E MANUTENZIONE • Pulire il dispositivo con un panno umido (non bagnato). Non usare mai detergenti o solventi. • Non sistemare il dispositivo in luoghi caldi, umidi o polverosi. • Tenere lontano il dispositivo da caloriferi e fonti elettriche di rumore come lampade fluorescenti o motori.
  • Page 110: Smaltimento

    SMALTIMENTO Se sul prodotto è presente la figura a sinistra (il cassonetto dei rifiuti sbarrato), si applica la direttiva europea 2012/19/UE. Questi prodotti non vanno smaltiti con i rifiuti generici urbani. Informarsi sulle disposizioni vigenti in merito alla raccolta differenziata di dispositivi elettrici ed elettronici.

Ce manuel est également adapté pour:

1003530110035302

Table des Matières