Publicité

Les langues disponibles

Les langues disponibles

Liens rapides

PORTABLE AIR CONDITIONER
Owner's Manual.............................1 - 20
CLIMATISEUR PORTABLE
Manuel du propriétaire.................21 - 40
AIRE ACONDICIONADO PORTÁTIL
Manual del propietario.................41 - 60
www.Danby.com
*
*
DANBY PRODUCTS LIMITED, ONTARIO, CANADA N1H 6Z9
DANBY PRODUCTS INC., FINDLAY, OHIO, USA 45840
OWNER'S MANUAL
MANUEL DU PROPRIÉTAIRE
MANUAL DEL PROPIETARIO
MODEL • MODÈLE • MODELO
DPA080E3WDB-6
DPA080E3BDB-6
DPA080HE3WDB-6
DPA080HE3BDB-6
2020.11.24

Publicité

Table des Matières
loading

Sommaire des Matières pour Dandy DPA080E3WDB-6

  • Page 1 OWNER’S MANUAL MANUEL DU PROPRIÉTAIRE MANUAL DEL PROPIETARIO PORTABLE AIR CONDITIONER Owner’s Manual......1 - 20 MODEL • MODÈLE • MODELO CLIMATISEUR PORTABLE DPA080E3WDB-6 Manuel du propriétaire....21 - 40 DPA080E3BDB-6 DPA080HE3WDB-6 AIRE ACONDICIONADO PORTÁTIL DPA080HE3BDB-6 Manual del propietario....41 - 60 DANBY PRODUCTS LIMITED, ONTARIO, CANADA N1H 6Z9 www.Danby.com...
  • Page 2: Need Help

    Welcome to the Danby family. We are proud of our quality products and we believe in dependable service. We suggest that you read this owner’s manual before plugging in your new appliance as it contains important operation information, safety information, troubleshooting, and maintenance tips to ensure the reliability and longevity of your appliance.
  • Page 3: Important Safety Information

    Important Safety Information READ AND FOLLOW ALL SAFETY INSTRUCTIONS SAFETY REQUIREMENTS GROUNDING INSTRUCTIONS This appliance must be grounded. Grounding DANGER: Risk of fi re or explosion. Flammable reduces the risk of electrical shock by providing an refrigerant used. Do not damage the refrigerant escape wire for the electrical current.
  • Page 4 Important Safety Information READ AND FOLLOW ALL SAFETY INSTRUCTIONS Any person involved with working on the refrigerant 5. Presence of fi re extinguisher: If any hot work is circuit should hold a current, valid certifi cate from to be conducted on the refrigeration equipment an industry accredited assessment authority which or any associated parts, appropriate fi...
  • Page 5 Important Safety Information READ AND FOLLOW ALL SAFETY INSTRUCTIONS The following checks shall be applied to installations Repairs to sealed components using fl ammable refrigerants: 1. During repairs to sealed components, all • The charge size is in accordance with the room electrical supplies shall be disconnected from size within which the refrigerant containing the equipment being worked upon prior to any...
  • Page 6 Important Safety Information READ AND FOLLOW ALL SAFETY INSTRUCTIONS Cabling Removal and evacuation Check that cabling will not be subject to wear, When breaking into the refrigerant circuit to make corrosion, excessive pressure, vibration, sharp repairs or for any other purpose conventional edges or any other adverse environmental effects.
  • Page 7 Important Safety Information READ AND FOLLOW ALL SAFETY INSTRUCTIONS Decommissioning Recovery Before carrying out this procedure, it is essential When removing refrigerant from a system, either for that the technician is completely familiar with the servicing or decommissioning, it is recommended equipment in all its detail.
  • Page 8: Installation Instructions

    INSTALLATION INSTRUCTIONS ACCESSORIES REQUIRED TOOLS 1. Air outlet adapter 1. Medium sized Phillips screwdriver 2. Exhaust hose 2. Tape measure or ruler 3. Window slider adapter 3. Knife or scissors 4. 8 Bolts 5. Window slider A and B 4. Saw (if window sliders need to be cut to size) 6.
  • Page 9: Installing The Window Kit

    INSTALLATION INSTRUCTIONS INSTALLING THE WINDOW KIT The window kit can be used in either a hung window or a sliding window application. The images at the right are for a hung window. The steps for a sliding window are the same. 1.
  • Page 10 OPERATING INSTRUCTIONS FEATURES LOCATION Place the air conditioner on a smooth, level fl oor 1. Control panel that is strong enough to support it and all included 2. Louver accessories. 3. Display 4. Handle (both sides) Make sure the appliance is level to minimize noise 5.
  • Page 11: Control Panel

    OPERATING INSTRUCTIONS CONTROL PANEL DISPLAY PANEL 1. Fan button: Used to set the fan speed; low, 1. Temperature, time and icon display medium, high or auto. 2. Cool mode indicator 2. Decrease button: Used to decrease the set temperature. 3. Temperature scale indicator 3.
  • Page 12: Operating Modes

    OPERATING INSTRUCTIONS OPERATING MODES OPERATING MODES Cool Mode Fan Mode • Press the mode button until the snowfl ake icon • Press the mode button until the fan icon appears appears on the display. on the display. • Use the increase and decrease buttons to choose •...
  • Page 13: Child Lock

    OPERATING INSTRUCTIONS TIMER CHILD LOCK The timer function can be used to turn the appliance The child lock can be activated by pressing the on or off after a period of time to conserve energy. temperature control buttons on the remote control at the same time for 3 seconds.
  • Page 14 OPERATING INSTRUCTIONS SLEEP FOLLOW ME The sleep feature can be used to conserve energy The follow me feature can only be activated from during sleeping hours. This feature can be used the remote control. during cool and heat mode. The remote control has a thermostat inside of When selected in cool mode, the set temperature it.
  • Page 15: Remote Control

    OPERATING INSTRUCTIONS REMOTE CONTROL 1. Power button: Used to turn the appliance on or off. 2. Turbo button: The turbo feature is not available on this model. 3. Temperature control buttons: Used to increase or decrease the set temperature. 4. Timer button: Used to set the timer function. 5.
  • Page 16: Replacing The Remote Batteries

    OPERATING INSTRUCTIONS REPLACING THE REMOTE BATTERIES This equipment has been tested and found to comply with the limits for a Class B digital device, pursuant to Part 15 of the FCC Rules. These limits This air conditioner comes with two AAA batteries. are designed to provide reasonable protection Place the batteries in the remote control before use.
  • Page 17: Water Drainage

    OPERATING INSTRUCTIONS WATER DRAINAGE 2. Continuous Drain When the internal drain pan becomes full the During the dry mode, you may wish to set up the appliance will stop operating and the display continuous drain option so that the appliance will will show error code “Ft”.
  • Page 18: Care & Maintenance

    CARE & MAINTENANCE CLEANING LONG-TERM STORAGE • Unplug the appliance before cleaning or 1. Drain all water from the appliance. servicing. 2. Run the appliance on fan mode for half a day in • Clean the cabinet with a lukewarm damp cloth a warm room to dry the inside of the appliance and neutral detergent.
  • Page 19: Frequently Asked Questions

    FREQUENTLY ASKED QUESTIONS Can I leave my AC in place through the winter? This is not recommended. What are the standard wattage and amps used? Information pertaining to watts and amps can be found on the rating plate located on the side of the unit. When should I use the exhaust hose? The exhaust hose should be used in cool, dry, heat and auto modes.
  • Page 20 TROUBLESHOOTING Appliance will not operate • Plug is not fully inserted into the wall outlet • Blown fuse or circuit breaker Insuffi cient cooling • Air fi lter is dirty • Blocked air fl ow • Appliance size is too small for application Noise •...
  • Page 21 LIMITED “IN HOME” WARRANTY LIMITED IN-HOME APPLIANCE WARRANTY This quality product is warranted to be free from manufacturer’s defects in material and workmanship, provided that the unit is used under the normal operating This quality product is warranted to be free from manufacturer’s defects in material and workmanship, provided that the unit is used conditions intended by the manufacturer.
  • Page 22: Besoin D'assistance

    Bienvenue dans la famille Danby. Nous sommes fi ers de nos produits de qualité et nous croyons en un service fi able. Nous vous suggérons de lire ce manuel du propriétaire avant de brancher votre nouvel appareil car il contient des informations de fonctionnement importantes, des informations de sécurité, des conseils de dépannage et d’entretien pour assurer la fi...
  • Page 23: Consignes De Sécurité Importantes

    Consignes de sécurité importantes LIRE ET SUIVRE TOUTES LES INSTRUCTIONS DE SÉCURITÉ EXIGENCES DE SÉCURITÉ INSTRUCTIONS DE MISE À LA TERRE DANGER: Risque d’incendie ou d’explosion. Cet appareil doit être mis à la terre. La mise à Fluide frigorigène infl ammable utilisé. Ne pas la terre réduit le risque de choc électrique en endommager le circuit de réfrigérant.
  • Page 24: Lire Et Suivre Toutes Les Instructions De Sécurité

    Consignes de sécurité importantes LIRE ET SUIVRE TOUTES LES INSTRUCTIONS DE SÉCURITÉ Toute personne impliquée dans le travail sur le circuit de fl uide frigorigène doit détenir un certifi cat 5. Présence d’extincteur: Si des travaux à chaud en cours de validité, délivré par une autorité doivent être effectués sur l’équipement de d’évaluation accréditée du secteur, attestant de sa réfrigération ou sur toute pièce associée, un...
  • Page 25 Consignes de sécurité importantes LIRE ET SUIVRE TOUTES LES INSTRUCTIONS DE SÉCURITÉ Les contrôles suivants doivent être appliqués aux Réparation de composants scellés installations utilisant des réfrigérants infl ammables: 1. Lors de la réparation de composants scellés, • La taille de la charge est conforme à la taille de toutes les alimentations électriques doivent la pièce dans laquelle les pièces contenant le être débranchées de l’équipement utilisé...
  • Page 26 Consignes de sécurité importantes LIRE ET SUIVRE TOUTES LES INSTRUCTIONS DE SÉCURITÉ Le câblage Enlèvement et évacuation Lorsque vous pénétrez dans le circuit de fl uide Vérifi ez que le câblage ne sera pas soumis à frigorigène pour effectuer des réparations ou à l’usure, à...
  • Page 27 Consignes de sécurité importantes LIRE ET SUIVRE TOUTES LES INSTRUCTIONS DE SÉCURITÉ Déclassement Récupération Avant d’effectuer cette procédure, il est essentiel que Lorsque vous retirez du fl uide frigorigène d’un le technicien connaisse parfaitement l’équipement système, que ce soit pour un entretien ou une mise dans tous ses détails.
  • Page 28: Accessoires

    INSTRUCTIONS D’INSTALLATION ACCESSOIRES OUTILS REQUIS 1. Adaptateur de sortie d’air 1. Tournevis Phillips de taille moyenne 2. Tuyau d’échappement 2. Ruban à mesurer ou règle 3. Adaptateur de glissière de fenêtre 3. Couteau ou ciseaux 4. 8 boulons 4. Scie (si les curseurs de fenêtre doivent être 5.
  • Page 29: Installation Du Trousse De Fenêtre

    INSTRUCTIONS D’INSTALLATION INSTALLATION DU TROUSSE DE FENÊTRE Le kit de fenêtre peut être utilisé dans une fenêtre suspendue ou dans une application de fenêtre coulissante. Les images à droite sont pour une fenêtre suspendue. Les étapes pour une fenêtre coulissante sont les mêmes. 1.
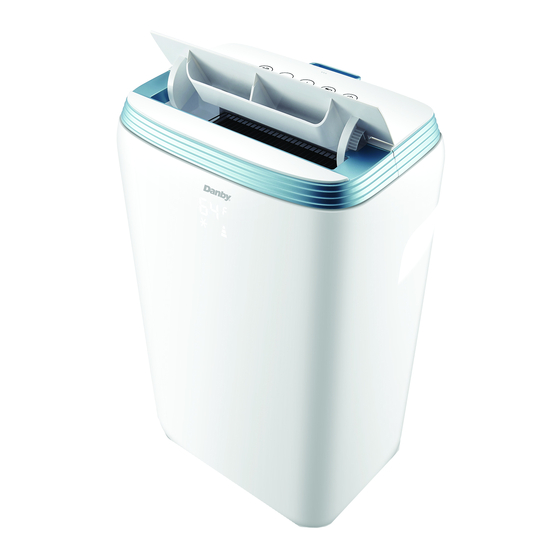
  • Page 30: Caractéristiques

    INSTRUCTIONS D’UTILISATION CARACTÉRISTIQUES EMPLACEMENT Placez le climatiseur sur un plancher lisse et plat 1. Panneau de confi guration qui est assez solide pour le supporter et tous les 2. Persienne accessoires inclus. 3. Affi cher 4. Poignée (des deux côtés) Assurez-vous que l’appareil est à...
  • Page 31: Panneau De Contrôle

    INSTRUCTIONS D’UTILISATION PANNEAU DE CONTRÔLE PANNEAU D’AFFICHAGE 1. Bouton du ventilateur : Utilisé pour régler la 1. Affi chage de la température, du temps et des vitesse du ventilateur; faible, moyen, élevé ou icônes auto. 2. Indicateur de mode froid 2.
  • Page 32: Modes De Fonctionnement

    INSTRUCTIONS D’UTILISATION MODES DE FONCTIONNEMENT MODES DE FONCTIONNEMENT Mode refroidissement (cool) Mode ventilateur (fan) • Appuyez sur le bouton de mode jusqu’à ce • Appuyez sur le bouton de mode jusqu’à ce que que l’icône de fl ocon de neige apparaisse sur l’icône du ventilateur apparaisse sur l’écran.
  • Page 33: Fonction De Minuterie

    INSTRUCTIONS D’UTILISATION FONCTION DE MINUTERIE VERROUILLAGE ENFANT La fonction de minuterie peut être utilisée pour Le verrouillage d’enfants peut être activée en allumer ou éteindre l’appareil après un certain appuyant simultanément sur les boutons de contrôle temps afi n d’économiser de l’énergie. de la température de la télécommande pendant 3 secondes.
  • Page 34: Fonction De Veille

    INSTRUCTIONS D’UTILISATION FONCTION DE VEILLE FONCTION SUIVEZ-MOI La fonction de veille peut être utilisée pour La fonction Suivez-moi ne peut être activée qu’à économiser de l’énergie pendant les heures de partir de la télécommande. sommeil. Cette fonction peut être utilisée en mode refroidissement et chauffage.
  • Page 35: Télécommande

    INSTRUCTIONS D’UTILISATION TÉLÉCOMMANDE 1. Bouton d’alimentation : utilisé pour allumer ou éteindre l’appareil. 2. Bouton turbo : la fonction turbo n’est pas disponible sur ce modèle. 3. Boutons de contrôle de température : utilisés pour augmenter ou diminuer la température de consigne. 4.
  • Page 36: Remplacement Des Piles De La Télécommande

    INSTRUCTIONS D’UTILISATION REMPLACEMENT DES PILES DE LA Cet équipement a été testé et s’est avéré conforme aux limites d’un appareil numérique de classe TÉLÉCOMMANDE B, conformément à la partie 15 des règles de la FCC. Ces limites sont conçues pour fournir une Ce climatiseur est livré...
  • Page 37 INSTRUCTIONS D’UTILISATION VIDANGE D’EAU 2. Drain continu Lorsque le bac de vidange interne devient plein, En mode de séchage, vous pouvez confi gurer l’appareil sonne 8 fois et l’affi chage numérique l’option de vidange continue pour que l’appareil affi chera le code d’erreur “Ft”. L’action de la vidange automatiquement l’eau collectée.
  • Page 38: Soins Et Maintenance

    SOINS ET MAINTENANCE NETTOYAGE ENTREPOSAGE À LONG TERME • Débranchez l’appareil avant de le nettoyer ou 1. Égoutter toute l’eau de l’appareil. de l’entretenir. 2. Faites fonctionner l’appareil sur le mode • Nettoyez l’armoire avec un chiffon humide tiède Ventilateur pendant une demi-journée dans et un détergent neutre.
  • Page 39: Questions Fréquemment Posées

    QUESTIONS FRÉQUEMMENT POSÉES Puis-je laisser mon climatiseur en place pendant l’hiver? Ce n’est pas recommandé. Quels sont la puissance et les amplis standard utilisés? Les informations relatives aux watts et aux ampères se trouvent sur la plaque signalétique située sur le côté de l’appareil.
  • Page 40: Dépannage

    DÉPANNAGE L’appareil ne fonctionnera pas • La fi che n’est pas complètement insérée dans la prise murale • Fusible ou disjoncteur grillé Refroidissement insuffi sant • Le fi ltre à air est sale • Flux d’air bloqué • La taille de l’appareil est trop petite pour l’application Bruit •...
  • Page 41 GARANTIE LIMITÉE « À DOMICILE » LIMITED IN-HOME APPLIANCE WARRANTY Cet appareil de qualité est garanti exempt de tout vice de matière première et de fabrication, s’il est utilisé dans les conditions This quality product is warranted to be free from manufacturer’s defects in material and workmanship, provided that the unit is used under the normal operating normales recommandées par le fabricant.
  • Page 42 Bienvenido a la familia Danby. Estamos orgullosos de nuestros productos de calidad y creemos en un servicio confi able. Le sugerimos que lea este manual del propietario antes de enchufar su nuevo electrodoméstico, ya que contiene información importante de funcionamiento, información de seguridad, solución de problemas y consejos de mantenimiento para garantizar la confi...
  • Page 43: Importantes Instrucciones De Seguridad

    Importantes Instrucciones de Seguridad LEA Y SIGA TODAS LAS INSTRUCCIONES DE SEGURIDAD REQUERIMIENTOS DE SEGURIDAD INSTRUCCIONES DE CONEXION A TIERRA PELIGRO: Riesgo de incendio o explosión. Este aparato debe estar conectado a tierra. La Refrigerante infl amable utilizado. No dañe el puesta a tierra reduce el riesgo de descarga circuito de refrigerante.
  • Page 44 Importantes Instrucciones de Seguridad LEA Y SIGA TODAS LAS INSTRUCCIONES DE SEGURIDAD Cualquier persona involucrada en trabajar en el circuito de refrigerante debe tener un certifi cado 5. Presencia de extintor de incendios: Si se debe válido y vigente de una autoridad de evaluación realizar algún trabajo en caliente en el equipo acreditada de la industria que autorice su de refrigeración o en cualquier pieza asociada,...
  • Page 45 Importantes Instrucciones de Seguridad LEA Y SIGA TODAS LAS INSTRUCCIONES DE SEGURIDAD Se aplicarán los siguientes controles a las Reparaciones a componentes sellados. instalaciones que utilizan refrigerantes infl amables: 1. Durante las reparaciones de componentes • El tamaño de carga está de acuerdo con el sellados, todos los suministros eléctricos se tamaño de la habitación dentro de la cual se deben desconectar del equipo en el que se...
  • Page 46 Importantes Instrucciones de Seguridad LEA Y SIGA TODAS LAS INSTRUCCIONES DE SEGURIDAD Cableado Traslado y evacuación Al entrar en el circuito de refrigerante para realizar Compruebe que el cableado no esté sujeto a reparaciones o para cualquier otro propósito, se desgaste, corrosión, presión excesiva, vibración, deben utilizar procedimientos convencionales.
  • Page 47 Importantes Instrucciones de Seguridad LEA Y SIGA TODAS LAS INSTRUCCIONES DE SEGURIDAD Desmantelamiento Recuperación Antes de llevar a cabo este procedimiento, Cuando se retira refrigerante de un sistema, ya sea es esencial que el técnico esté completamente para servicio o cierre, se recomienda que todos los familiarizado con el equipo en todo su detalle.
  • Page 48: Herramientas Requeridas

    INSTRUCCIONES DE INSTALACIÓN ACCESORIOS HERRAMIENTAS REQUERIDAS 1. Destornillador Phillips de tamaño mediano 1. Adaptador de salida de aire 2. Cinta métrica o regla 2. Manguera de escape 3. Cuchillo o tijeras 3. Adaptador deslizante de la ventana 4. Sierra (si los deslizadores de ventana deben cortarse a la medida) 4.
  • Page 49 INSTRUCCIONES DE INSTALACIÓN INSTALAR EL KIT DE VENTANA El kit de ventana se puede utilizar en una ventana suspendida o en una aplicación de ventana deslizante. Las imágenes de la derecha son para una ventana colgada. Los pasos para una ventana deslizante son los mismos.
  • Page 50 INSTRUCCIONES DE OPERACIÓN CARACTERISTICAS UBICACIÓN Coloque el acondicionador de aire en un piso liso 1. Panel de control y nivelado que sea lo sufi cientemente fuerte para 2. Persiana soportarla y todos los accesorios incluidos. 3. Monitor 4. Asa (ambos lados) Asegúrese de que el aparato esté...
  • Page 51: Panel De Control

    INSTRUCCIONES DE OPERACIÓN PANEL DE CONTROL PANEL DE VISUALIZACIÓN 1. Botón del ventilador: Se utiliza para establecer 1. Pantalla de temperatura, tiempo e iconos. la velocidad del ventilador; bajo, medio, alto o auto. 2. Indicador de modo frío 2. Botón de disminución: Se utiliza para disminuir 3.
  • Page 52: Modos De Funcionamiento

    INSTRUCCIONES DE OPERACIÓN MODOS DE FUNCIONAMIENTO MODOS DE FUNCIONAMIENTO Modo frío (cool) Modo de ventilador (fan) • Presione el botón de modo hasta que aparezca • Presione el botón de modo hasta que aparezca el icono del copo de nieve en la pantalla. el icono del ventilador en la pantalla.
  • Page 53: Función De Temporizador

    INSTRUCCIONES DE OPERACIÓN FUNCIÓN DE TEMPORIZADOR BLOQUEO INFANTIL La función de temporizador se puede usar para El bloqueo para niños se puede activar presionando encender o apagar el aparato después de un los botones de control de temperatura en el control período de tiempo para ahorrar energía.
  • Page 54 INSTRUCCIONES DE OPERACIÓN FUNCIÓN DEL SUEÑO FUNCIÓN SÍGUEME La función de reposo se puede utilizar para La función Sígueme solo se puede activar desde el conservar energía durante las horas de sueño. Esta control remoto. función se puede utilizar durante el modo de frío y calor.
  • Page 55: Control Remoto

    INSTRUCCIONES DE OPERACIÓN CONTROL REMOTO 1. Botón de encendido: se utiliza para encender o apagar el dispositivo. 2. Botón Turbo: la función turbo no está disponible en este modelo. 3. Botones de control de temperatura: se utilizan para aumentar o disminuir la temperatura establecida.
  • Page 56 INSTRUCCIONES DE OPERACIÓN REEMPLAZO DE LAS BATERÍAS REMOTAS Este equipo ha sido probado y cumple con los límites para un dispositivo digital de Clase B, de acuerdo con la Parte 15 de las Reglas de la FCC. Este aire acondicionado viene con dos pilas AAA. Estos límites están diseñados para proporcionar una Coloque las pilas en el control remoto antes de protección razonable contra interferencias dañinas...
  • Page 57 INSTRUCCIONES DE OPERACIÓN EL DRENAJE DEL AGUA 2. Drenaje Continuo Cuando el recipiente de drenaje interno se llene, Durante el modo de secado, es posible que el aparato emitirá un pitido 8 veces y la pantalla desee confi gurar la opción de drenaje continuo digital mostrará...
  • Page 58: Cuidado Y Mantenimiento

    CUIDADO Y MANTENIMIENTO LIMPIEZA ALMACENAMIENTO A LARGO PLAZO • Desconecte el aparato antes de limpiarlo o 1. Vacíe todo el agua del aparato. repararlo. 2. Haga funcionar el aparato en modo ventilador • Limpie el gabinete con un paño húmedo tibio durante medio día en una habitación caliente y detergente neutro.
  • Page 59: Preguntas Frecuentes

    PREGUNTAS FRECUENTES ¿Puedo dejar mi aire acondicionado en su lugar durante el invierno? No se recomienda. ¿Cuáles son las potencias y amperios estándar que se utilizan? La información relacionada con vatios y amperios se puede encontrar en la placa de clasifi cación ubicada en el costado de la unidad.
  • Page 60: Solución De Problemas

    SOLUCIÓN DE PROBLEMAS El aparato no funciona • El enchufe no está completamente insertado en el tomacorriente de pared • Fusible o disyuntor quemado Refrigeración insufi ciente • El fi ltro de aire está sucio • Flujo de aire bloqueado •...
  • Page 61 GARANTÍA LIMITADA “A DOMICILIO” LIMITED IN-HOME APPLIANCE WARRANTY Este producto de calidad está garantizado contra defectos de fabricación, incluyendo partes y mano de obra, siempre y This quality product is warranted to be free from manufacturer’s defects in material and workmanship, provided that the unit is used under the normal operating cuando la unidad se utilice bajo las condiciones normales de funcionamiento para las que fue diseñado.
  • Page 62 NOTES / REMARQUES / NOTAS : __________________________________________________________________________________________ __________________________________________________________________________________________ __________________________________________________________________________________________ __________________________________________________________________________________________ __________________________________________________________________________________________ __________________________________________________________________________________________ __________________________________________________________________________________________ __________________________________________________________________________________________ __________________________________________________________________________________________ __________________________________________________________________________________________ __________________________________________________________________________________________ __________________________________________________________________________________________ __________________________________________________________________________________________ __________________________________________________________________________________________ __________________________________________________________________________________________ __________________________________________________________________________________________ __________________________________________________________________________________________ __________________________________________________________________________________________ __________________________________________________________________________________________ __________________________________________________________________________________________ __________________________________________________________________________________________ __________________________________________________________________________________________...
  • Page 63 NOTES / REMARQUES / NOTAS : __________________________________________________________________________________________ __________________________________________________________________________________________ __________________________________________________________________________________________ __________________________________________________________________________________________ __________________________________________________________________________________________ __________________________________________________________________________________________ __________________________________________________________________________________________ __________________________________________________________________________________________ __________________________________________________________________________________________ __________________________________________________________________________________________ __________________________________________________________________________________________ __________________________________________________________________________________________ __________________________________________________________________________________________ __________________________________________________________________________________________ __________________________________________________________________________________________ __________________________________________________________________________________________ __________________________________________________________________________________________ __________________________________________________________________________________________ __________________________________________________________________________________________ __________________________________________________________________________________________ __________________________________________________________________________________________ __________________________________________________________________________________________...
  • Page 64 Danby Products Limited, Guelph, ON, Canada N1H 6Z9 Danby Products Inc., Findlay, Ohio, USA 45840 *Trademarks of Danby Products Limited and/or its subsidiaries Printed in China * Marques de commerce de Danby Products Limited et / ou de ses filiales Imprimé...

Ce manuel est également adapté pour:

Dpa080e3bdb-6Dpa080he3wdb-6Dpa080he3bdb-6

Table des Matières