Publicité

Les langues disponibles
  • FR

Les langues disponibles

BANSIN SMART
Konvektions-Heizung
Convection Heater
Radiador de convección
Radiateur convecteur
Radiatore a convezione
10035400 10035401 10035402 10035403
www.klarstein.com
Hinweis: Dieses Produkt ist nur für gut isolierte Räume
oder für den gelegentlichen Gebrauch geeignet.
Note: This product is only suitable for well insulated
spaces or occasional use.
Nota: Este producto está indicado únicamente en
lugares abrigados o para una utilización punctual.
Remarque : Ce produit ne peut être utilisé que dans
des locaux bien isolés ou de manière occasionnelle.
Advertencia: Questo prodotto è adatto solo per spazi
ben isolati o uso occasionale.

Publicité

Table des Matières
loading

Sommaire des Matières pour Klarstein BANSIN SMART

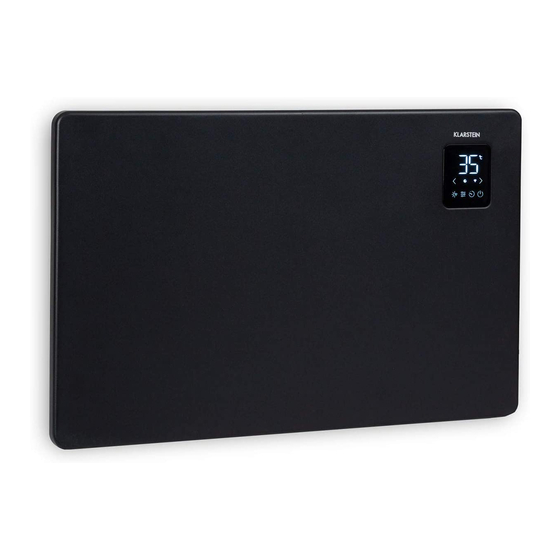
  • Page 1 BANSIN SMART Konvektions-Heizung Convection Heater Radiador de convección Radiateur convecteur Radiatore a convezione 10035400 10035401 10035402 10035403 www.klarstein.com Hinweis: Dieses Produkt ist nur für gut isolierte Räume oder für den gelegentlichen Gebrauch geeignet. Note: This product is only suitable for well insulated spaces or occasional use.
  • Page 3: Table Des Matières

    Sehr geehrter Kunde, wir gratulieren Ihnen zum Erwerb Ihres Gerätes. Lesen Sie die folgenden Hinweise sorgfältig durch und befolgen Sie diese, um möglichen Schäden vorzubeugen. Für Schäden, die durch Missachtung der Hinweise und unsachgemäßen Gebrauch entstehen, übernehmen wir keine Haftung. Scannen Sie den folgenden QR-Code, um Zugriff auf die aktuellste Bedienungsanleitung und weitere Informationen rund um das Produkt zu erhalten.
  • Page 4: Produktdatenblatt

    PRODUKTDATENBLATT Modellkennung(en) 10035400, 10035401 Angabe Symbol Wert Einheit Angabe Einheit Wärmeleistung Nur bei elektrischen Speicher-Einzelraumheizgeräten: Art der Regelung der Wärmezufuhr Nennwärmeleistung Manuelle Regelung der Wärmezufuhr mit k.A. integriertem Thermostat Mindestwärmeleistung 0,75 Manuelle Regelung der Wärmezufuhr k.A. (Richtwert) mit Rückmeldung der Raum- und/oder Außentemperatur Maximale kontinuierliche Elektronische Regelung der Wärmezufuhr...
  • Page 5 Modellkennung(en) 10035402, 10035403 Angabe Symbol Wert Einheit Angabe Einheit Wärmeleistung Nur bei elektrischen Speicher-Einzelraumheizgeräten: Art der Regelung der Wärmezufuhr Nennwärmeleistung Manuelle Regelung der Wärmezufuhr mit k.A. integriertem Thermostat Mindestwärmeleistung 1,25 Manuelle Regelung der Wärmezufuhr k.A. (Richtwert) mit Rückmeldung der Raum- und/oder Außentemperatur Maximale kontinuierliche Elektronische Regelung der Wärmezufuhr...
  • Page 6: Sicherheitshinweise

    SICHERHEITSHINWEISE • Prüfen Sie vor der Benutzung die Spannung auf der Geräteplakette und schließen Sie das Gerät nur an Steckdosen an, die der Spannung des Geräts entsprechen. • Falls das Netzkabel beschädigt ist, lassen Sie es von einer ausgebildeten Fachkraft ersetzen. •...
  • Page 7: Installation

    INSTALLATION • Überprüfen Sie vor der Installation, ob alle im Lieferumfang enthaltenen Bestandteile vollständig und unbeschädigt sind. • Wenn Sie das Gerät freistehend verwenden möchten, befestigen Sie die im Lieferumfang enthaltenen Standfüße daran (befolgen Sie hierfür die unten genannten Installationshinweise). Stellen Sie sicher, dass das Gerät auf einer ebenen, stabilen und sauberen Oberfläche abgestellt wird.
  • Page 8 Wandinstallation (1) Entfernen Sie die Wandhalterung Legen Sie das Heizgerät mit der Vorderseite nach unten. Öffnen Sie die obere Verriegelung mit einem Schraubendreher und bewegen Sie die Wandhalterung nach unten, um sie zu entfernen. Hebeln Sie die Verschluss der Schieben Sie die Wandhalterung in Wandhalterung auf.
  • Page 9 (2) Befestigen Sie die Wandhalterung Markieren Sie, abhängig von den Maßen Ihres Modells, die Stellen an der Wand, an welchen Löcher gebohrt werden sollen. Bohren Sie die Löcher und stecken Sie die im Lieferumfang enthaltenen Dübel in die Löcher. Befestigen Sie die Wandhalterung mit den im Lieferumfang enthaltenen Schrauben.
  • Page 10 (3) Befestigen Sie das Heizgerät Kippen Sie das Heizgerät so, dass Sie die unteren beiden Löcher am Heizgerät an der Wandhalterung (P1) einhängen können. Nach dem Einhängen drehen Sie das Heizgerät, bis es sich über der Wandhalterung (P2) befindet. Senken Sie das Heizgerät an und befestigen Sie den Sperrriegel am Heizgerät.
  • Page 11: Display Und Tastenfunktionen

    DISPLAY UND TASTENFUNKTIONEN Bedienfeld Temperaturanzeige Aktuelle Temperatur Tastensperre Temperatur runter Temperatur hoch WiFi-/Lichttaste Ein/Aus Moduswechsel Timer...
  • Page 12: Inbetriebnahme Und Bedienung

    INBETRIEBNAHME UND BEDIENUNG Das Gerät piept, sobald der Netzstecker in die Steckdose gesteckt wurde. Das Gerät befindet sich nun im Standbymodus und zeigt die Ein-/Austaste und das WLAN- Symbol Heizvorgang starten Drücken Sie, um den Heizvorgang zu beginnen, die Taste .
  • Page 13 Tastensperre • Halten Sie zur Aktivierung der Tastensperre die Taste so lange gedrückt, bis das Schlosssymbol auf dem Bildschirm angezeigt wird. Das Bedienfeld ist nun gesperrt. • Halten Sie zum Deaktivieren der Tastensperre die Taste gedrückt. Das Schlosssymbol wird nun nicht mehr auf dem Bildschirm angezeigt und alle Tasten des Bedienfeldes können wieder verwendet werden.
  • Page 14: Gerätesteuerung Per Smartphone

    GERÄTESTEUERUNG PER SMARTPHONE Wenn Sie Ihr Klarstein-Gerät in Ihr heimisches WLAN einbinden, können Sie es ganz bequem über die dazugehörige Klarstein-App bedienen. Die App ermöglicht es Ihnen, nicht nur das Gerät über Ihr Smartphone fernzusteuern, sondern bietet Ihnen zudem Zugang zu Rezepten und weiterführenden Informationen.
  • Page 15: Reinigung Und Pflege

    Fehlerbehebung bei Verbindungsproblemen Wenn Ihr Klarstein-Gerät im WLAN nicht gefunden werden kann, überprüfen Sie Folgendes: • Ist das Gerät eingesteckt? • Ist die WLAN-Funktion des Smartphones aktiviert? • Ist die WLAN-Funktion des Klarstein-Gerätes aktiviert? (Befolgen Sie die Anweisungen in der App.) •...
  • Page 16: Hinweise Zur Entsorgung

    HINWEISE ZUR ENTSORGUNG Wenn es in Ihrem Land eine gesetzliche Regelung zur Entsorgung von elektrischen und elektronischen Geräten gibt, weist dieses Symbol auf dem Produkt oder auf der Verpackung darauf hin, dass dieses Produkt nicht im Hausmüll entsorgt werden darf. Stattdessen muss es zu einer Sammelstelle für das Recycling von elektrischen und elektronischen Geräten gebracht werden.
  • Page 17 Dear Customer, Congratulations on purchasing this device. Please read the following instructions carefully and follow them to prevent possible damages. We assume no liability for damage caused by disregard of the instructions and improper use. Scan the QR code to get access to the latest user manual and more product information.
  • Page 18: Product Data Sheet

    PRODUCT DATA SHEET Model identifier(s): 10035400, 10035401 Item Symbol Value Unit Item Unit Heat output Type of heat input, for electric storage local space heaters only Nominal heat output manual heat charge control, with integrated thermostat Minimum heat output 0.75 manual heat charge control with room and/or (indicative) outdoor temperature feedback...
  • Page 19 Model identifier(s): 10035402, 10035403 Item Symbol Value Unit Item Unit Heat output Type of heat input, for electric storage local space heaters only Nominal heat output manual heat charge control, with integrated thermostat Minimum heat output 1.25 manual heat charge control with room and/or (indicative) outdoor temperature feedback Maximum continuous heat...
  • Page 20: Safety Instructions

    SAFETY INSTRUCTIONS • Check that the voltage indicates on the data plate corresponds with that of the local network before connecting the appliance to the mains power supply. • If the supply cord is damaged, it must be replaced by a qualifi ed engineer in order to avoid a hazard.
  • Page 21: Installation

    INSTALLATION • Before installation, check that all components included in the scope of delivery are complete and undamaged. • If you want to use the unit in a free-standing position, attach the supplied feet to it (follow the installation instructions below). Make sure that the unit is placed on a flat, stable and clean surface.
  • Page 22 Wall installation (1) Remove the wall bracket Place the heater face down. Open the top latch with a screwdriver and move the wall bracket down to remove it. Pry open the latch on the wall bracket. Slide the wall bracket in the direction of the arrow.
  • Page 23 (2) Attach the wall bracket. Depending on the dimensions of your model, mark the places on the wall where holes are to be drilled. Drill the holes and insert the dowels included in the scope of delivery into the holes. Fasten the wall bracket with the screws included in the delivery. 10035400, 10035401 10035402, 10035403 Distance...
  • Page 24 (3) Attach the heater Tilt the heater so that you can hook the bottom two holes on the heater to the wall bracket (P1). After hooking, turn the heater until it is above the wall bracket (P2). Lower the heater and attach the locking latch to the heater.
  • Page 25: Display And Key Functions

    DISPLAY AND KEY FUNCTIONS Control panel Temperature display Current temperature Key lock Temperature down Temperature up WiFi/light button On/Off Change mode Timer...
  • Page 26: Commissioning And Operation

    COMMISSIONING AND OPERATION The device beeps as soon as the power plug is plugged into the socket. The device is now in standby mode and displays the on/off button and the WLAN symbol Starting the heating process To start the heating process, press the key .
  • Page 27 Key lock • To activate the key lock, press and hold the key until the lock symbo appears on the screen. The control panel is now locked. • To deactivate the key lock, hold down the key The lock symbol is now no longer displayed on the screen and all keys on the control panel can be used again.
  • Page 28: Device Control By Smartphone

    Make sure your smartphone is connected to the same WiFi network that your Klarstein device is to be connected to. Open the Klarstein app. Sign in to your account. If you do not have an account, sign up in the Klarstein app. Follow the instructions from the app. App Download Use the scan function of your smartphone to scan the QR code and save the app on your smartphone.
  • Page 29: Cleaning And Care

    If your Klarstein device cannot be found in the WLAN, check the following: • Is the device plugged in? • Is the WiFi feature of my phone enabled? • Is the WiFi function of the Klarstein device activated? (Follow the instructions in the app) • Has the WLAN password been entered correctly? •...
  • Page 30: Declaration Of Conformity

    DISPOSAL CONSIDERATIONS If there is a legal regulation for the disposal of electrical and electronic devices in your country, this symbol on the product or on the packaging indicates that this product must not be disposed of with household waste. Instead, it must be taken to a collection point for the recycling of electrical and electronic equipment.
  • Page 31 Estimado cliente: Le felicitamos por la adquisición de este producto. Lea atentamente el siguiente manual y siga cuidadosamente las instrucciones de uso con el fin de evitar posibles daños. La empresa no se responsabiliza de los daños ocasionados por un uso indebido del producto o por haber desatendido las indicaciones de seguridad.
  • Page 32: Hoja De Datos Del Producto

    HOJA DE DATOS DEL PRODUCTO Denominación del modelo 10035400, 10035401 Dato Símbolo Valor Unidad Dato Unidad Potencia térmica Solo con disposítivos de acumulación de calor eléctricos para abastecimiento local: Tipo de regulación del abastecimiento de calor Potencia térmica nominal Regulación manual del abastecimiento de calor con termostato integrado: Potencia térmica mínima 0.75...
  • Page 33 Denominación del modelo 10035402, 10035403 Dato Símbolo Valor Unidad Dato Unidad Potencia térmica Solo con disposítivos de acumulación de calor eléctricos para abastecimiento local: Tipo de regulación del abastecimiento de calor Potencia térmica nominal Regulación manual del abastecimiento de calor con termostato integrado: Potencia térmica mínima 1.25...
  • Page 34: Indicaciones De Seguridad

    INDICACIONES DE SEGURIDAD • Antes de utilizar el aparato, compruebe la tensión en la placa técnica del mismo y conecte el aparato solamente a tomas de corriente que se adecuen a dicha tensión. • Si el cable de alimentación está dañado, deberá ser sustituido por un servicio técnico. •...
  • Page 35: Instalación

    INSTALACIÓN • Antes de la instalación, compruebe que todos los componentes incluidos en el envío de la estén completos y sin daños. • Si desea utilizar la unidad en una posición independiente, coloque los pies suministrados en ella (siga las siguientes instrucciones de instalación). Asegúrese de que la unidad se coloca en una superficie plana, estable y limpia.
  • Page 36 Instalación en la pared (1) Retire el soporte de pared Coloque el calentador boca abajo. Abra el pestillo superior con un destornillador y mueva el soporte de pared hacia abajo para retirarlo. Haga palanca para abrir el pestillo del Deslice el soporte de pared en la soporte de pared.
  • Page 37 (2) Coloque el soporte de pared Dependiendo de las dimensiones de su modelo, marque los lugares de la pared donde se van a perforar los agujeros. Taladre los agujeros e inserte las clavijas suministradas en los agujeros. Fije el soporte de la pared con los tornillos suministrados. 10035400, 10035401 10035402, 10035403 Distancia...
  • Page 38 (3) Colocar el calentador Incline el calefactor para poder enganchar los dos agujeros inferiores del calefactor al soporte de pared (P1). Tras el enganche, gire el calefactor hasta que quede por encima del soporte de pared (P2). Baje el calefactor y asegure el pestillo de bloqueo al calefactor.
  • Page 39: Funciones De La Pantalla Y De Las Teclas

    FUNCIONES DE LA PANTALLA Y DE LAS TECLAS Panel de control La visualización de la temperatura La temperatura actual Cerradura de llave Bajar la temperatura Temperatura alta WiFi/botón de luz Encendido/apagado Modo Temporizador...
  • Page 40: Puesta En Marcha Y Funcionamiento

    PUESTA EN MARCHA Y FUNCIONAMIENTO El dispositivo emite un pitido en cuanto se enchufa en la toma de corriente. El dispositivo está ahora en modo de espera y muestra el botón de encendido/apagado y el símbolo de WLAN Iniciar el proceso de calentamiento Para iniciar el proceso de calentamiento, pulse la tecla .
  • Page 41 Bloqueo de seguridad • Para activar el bloqueo de teclas, mantenga pulsada la tecla hasta que aparezca el símbolo de bloqueo en la pantalla . El panel de control está ahora bloqueado. • Para desactivar el bloqueo, mantenga la tecla presionada.
  • Page 42: Control Del Dispositivo Por Smartphone

    Si conecta el aparato a su red WLAN doméstica, podrá controlarlo cómodamente mediante la App correspondiente de Klarstein. La App le permite no solo controlar el aparato mediante su smartphone, sino que también le ofrece acceso a recetas y otra información adicional.
  • Page 43: Limpieza Y Cuidado

    Solución de problemas de conexión Si su dispositivo Klarstein no se encuentra en la WLAN, compruebe lo siguiente: • ¿Está enchufado el dispositivo? • ¿Está activada la función WiFi de mi teléfono? • ¿Está activada la función WiFi del dispositivo Klarstein? (Sigue las instrucciones de la aplicación)
  • Page 44: Retirada Del Aparato

    RETIRADA DEL APARATO Si en su país existe una disposición legal relativa a la eliminación de aparatos eléctricos y electrónicos, este símbolo estampado en el producto o en el embalaje advierte que no debe eliminarse como residuo doméstico. En lugar de ello, debe depositarse en un punto de recogida de reciclaje de aparatos eléctricos y electrónicos.
  • Page 45 Cher client, Toutes nos félicitations pour l’acquisition de ce nouvel appareil. Veuillez lire attentivement les instructions suivantes de branchement et d’utilisation afin d’éviter d’éventuels dommages. Le fabricant ne saurait être tenu pour responsable des dommages dus au non-respect des consignes de sécurité et à la mauvaise utilisation de l’appareil.
  • Page 46: Fiche De Données Produit

    FICHE DE DONNÉES PRODUIT Référence (s) du produit 10035400, 10035401 Donnée Symbole Valeur Unité Donnée Unité Puissance calorifique Uniquement pour les radiateurs électriques à accumulation : Type de régulation de l'apport de chaleur Puissance calorifique Régulation manuelle de l'apport de chaleur Sans nominale avec thermostat intégré...
  • Page 47 Référence (s) du produit 10035402, 10035403 Donnée Symbole Valeur Unité Donnée Unité Puissance calorifique Uniquement pour les radiateurs électriques à accumulation : Type de régulation de l'apport de chaleur Puissance calorifique Régulation manuelle de l'apport de chaleur Sans nominale avec thermostat intégré objet Puissance calorifique 1.25...
  • Page 48: Consignes De Sécurité

    CONSIGNES DE SÉCURITÉ • Avant utilisation, vérifi ez la tension sur l‘étiquette de l‘appareil et ne branchez l‘appareil que sur des prises correspondant à la tension de l‘appareil. • Si le câble d‘alimentation est endommagé, faites-le remplacer par un professionnel qualifi é.
  • Page 49: Installation

    INSTALLATION • Avant l‘installation, vérifiez que tous les composants inclus dans la livraison sont complets et intacts. • Si vous souhaitez utiliser l‘appareil de manière autonome, fixez-y les pieds inclus dans la livraison (suivez les instructions d‘installation ci-dessous). Assurez-vous que l‘appareil est placé...
  • Page 50 Installation murale (1) Retirer le support mural Placez l‘appareil de chauffage face au sol. Ouvrez le loquet supérieur avec un tournevis et déplacez le support mural vers le bas pour le retirer. Ouvrez le loquet du support mural en Faites glisser le support mural dans le faisant levier.
  • Page 51 (2) Fixez le support mural Selon les dimensions de votre modèle, marquez les emplacements sur le mur où les trous doivent être percés. Percez les trous et insérez les chevilles incluses. Fixez le support mural avec les vis incluses dans la livraison. 10035400, 10035401 10035402, 10035403 Ecart...
  • Page 52 (3) Fixez l‘appareil de chauffage Inclinez l‘appareil de manière à pouvoir accrocher les deux trous inférieurs de l‘appareil au support mural (P1). Après l‘accrochage, tournez l‘appareil jusqu‘à ce qu‘il soit au- dessus du support mural (P2). Abaissez le radiateur et fixez le loquet de verrouillage au radiateur.
  • Page 53: Ecran Et Fonctions Des Touches

    ECRAN ET FONCTIONS DES TOUCHES Panneau de commande Affichage de la température Température actuelletempérature Verrouillage des touches Diminuer la Augmenter la température température Bouton WiFi / Marche / arrêt éclairage Changement de mode Minuterie...
  • Page 54: Mise En Marche Et Utilisation

    MISE EN MARCHE ET UTILISATION L‘appareil émet un bip dès que la fiche secteur est insérée dans la prise. L‘appareil est maintenant en mode veille et affiche le bouton marche / arrêt ] et le symbole Wifi Démarrage du chauffage Appuyez sur le bouton pour démarrer le chauffage.
  • Page 55 Verrouillage des touches • Pour activer le verrouillage des touches, maintenez la touche jusqu‘à ce que le symbole de verrouillage s‘affiche à l‘écran. Le panneau de contrôle est maintenant verrouillé. • Maintenez la touche pour désactiver le verrouillage des touches. Le symbole de verrouillage disparaît de l‘écran et toutes les touches du panneau de commande peuvent être réutilisées.
  • Page 56: Contrôle De L'appareil Par Smartphone

    à distance l‘appareil via votre smartphone, mais vous donne également accès à des recettes et à des informations supplémentaires. Procédez comme suit pour connecter votre smartphone avec votre appareil Klarstein : Téléchargez d‘abord l‘application Klarstein en scannant le code QR avec votre smartphone (voir ci-dessous) ou téléchargez-le directement depuis l‘App Store ou...
  • Page 57: Nettoyage Et Entretien

    Dépannage des problèmes de connexion Si votre appareil Klarstein ne se trouve pas dans le WLAN, vérifiez les points suivants : • L‘appareil est-il branché ? • La fonction WiFi de mon téléphone est-elle activée ? • La fonction WiFi de l‘appareil Klarstein est-elle activée ? (Suivez les instructions dans l‘application)
  • Page 58: Déclaration De Conformité

    CONSEILS POUR LE RECYCLAGE S‘il existe une réglementation pour l‘élimination ou le recyclage des appareils électriques et électroniques dans votre pays, ce symbole sur le produit ou sur l‘emballage indique que cet appareil ne doit pas être jeté avec les ordures ménagères. Vous devez le déposer dans un point de collecte pour le recyclage des équipements électriques et électroniques.
  • Page 59 Gentile cliente, La ringraziamo per aver acquistato il dispositivo. La preghiamo di leggere attentamente le seguenti istruzioni per l’uso e di seguirle per evitare possibili danni tecnici. Non ci assumiamo alcuna responsabilità per danni scaturiti da una mancata osservazione delle avvertenze di sicurezza e da un uso improprio del dispositivo.
  • Page 60: Scheda Informativa Del Producto

    SCHEDA INFORMATIVA DEL PRODUCTO Identificazione del modello (i) 10035400, 10035401 Indicazione Simbolo Valore Unità Indicazione Unità Potenza termica Solo per gli apparecchi per il riscaldamento d'ambiente locale elettrici ad accumulo: Tipo di controllo dell´apporto termico Potenza termica nominale Controllo manuale del carico termico con N.D.
  • Page 61 Identificazione del modello (i) 10035402, 10035403 Indicazione Simbolo Valore Unità Indicazione Unità Potenza termica Solo per gli apparecchi per il riscaldamento d'ambiente locale elettrici ad accumulo: Tipo di controllo dell´apporto termico Potenza termica nominale Controllo manuale del carico termico con N.D.
  • Page 62: Avvertenze Di Sicurezza

    AVVERTENZE DI SICUREZZA • Prima dell‘uso, controllare la tensione sulla targhetta del dispositivo e collegare il dispositivo solo ad una presa che corrisponde alla tensione indicata. • Se il cavo di alimentazione è danneggiato, farlo sostituire da un tecnico qualifi cato. •...
  • Page 63: Installazione

    INSTALLAZIONE • Verificare prima dell’installazione che ci siano tutti i pezzi contenuti nel volume di consegna e che siano integri. • Se si vuole utilizzare il dispositivo in posizione freestanding basta fissare i piedini d’appoggio contenuti nel volume di consegna (seguire le istruzioni di montaggio sottostanti).
  • Page 64 Installazione a muro (1) Rimuovere la staffa a muro Posizionare il riscaldatore a faccia in giù. Aprire il fermo superiore con un cacciavite e spostare la staffa a muro verso il basso per rimuoverla. Fate leva sul fermo della staffa a muro. Far scorrere il supporto a parete nella direzione della freccia.
  • Page 65 (2) Fissare la staffa a muro A seconda delle dimensioni del proprio modello, evidenziare i punti sulla parete in cui praticare i fori. Fare dei buchi nella parete e inserire i tasselli nei fori. Fissare il supporto a parete con le viti contenute nel volume di consegna. 10035400, 10035401 10035402, 10035403 Distanza...
  • Page 66 (3) Fissare il riscaldatore Inclinare il riscaldatore in modo da poter agganciare i due fori inferiori del riscaldatore alla staffa a muro (P1). Dopo l‘aggancio, girare il riscaldatore fino a quando non si trova sopra la staffa a muro (P2). Abbassare il riscaldatore e fissare il fermo di bloccaggio al riscaldatore.
  • Page 67: Display E Tasti Funzione

    DISPLAY E TASTI FUNZIONE Pannello di controllo Indicazione temperatura Temperatura attuale Blocco tasti Temperatura giù Temperatura su Tasto WiFi/luce On/off Cambio modalità Timer...
  • Page 68: Messa In Funzione E Utilizzo

    MESSA IN FUNZIONE E UTILIZZO Il dispositivo emette un suono non appena si inserisce la spina nella presa. Ora la stufa si trova in modalità standby e il tasto on/off e il simbolo WiFi vengono visualizzati. Accendere il riscaldamento Premere il tasto per accendere il riscaldamento.
  • Page 69 Blocco dei tasti • Per attivare il blocco dei tasti tenere premuto il tasto finché sullo schermo appare il simbolo del lucchetto Ora il pannello di controllo è bloccato. • Per disattivare il blocco dei tasti tenere premuto il tasto Sullo schermo non appare più...
  • Page 70: Gestione Tramite Smartphone

    Per collegare il telefono al dispositivo Klarstein, procedere come segue: Per prima cosa scaricare l‘app Klarstein scansionando il codice QR con lo smartphone (vedere sotto) o scaricarla direttamente dall‘App Store o da Google Play.
  • Page 71: Pulizia E Manutenzione

    • Il dispositivo è collegato? • La funzione WiFi del telefono è abilitata? • La funzione WiFi del dispositivo Klarstein è attivata? (Seguire le istruzioni nell‘app) • La password WLAN è stata immessa correttamente? • Il router, il dispositivo Klarstein e lo smartphone sono nelle immediate vicinanze durante il tentativo di connessione? (Idealmente a non più...
  • Page 72: Smaltimento

    SMALTIMENTO Se nel proprio paese si applicano le regolamentazioni inerenti lo smaltimento di dispositivi elettrici ed elettronici, questo simbolo sul prodotto o sulla confezione segnala che questi prodotti non possono essere smaltiti con i rifi uti normali e devono essere portati a un punto di raccolta di dispositivi elettrici ed elettronici.

Ce manuel est également adapté pour:

10035400100354011003540210035403

Table des Matières