Table des Matières
Publicité
Les langues disponibles
Les langues disponibles
Liens rapides
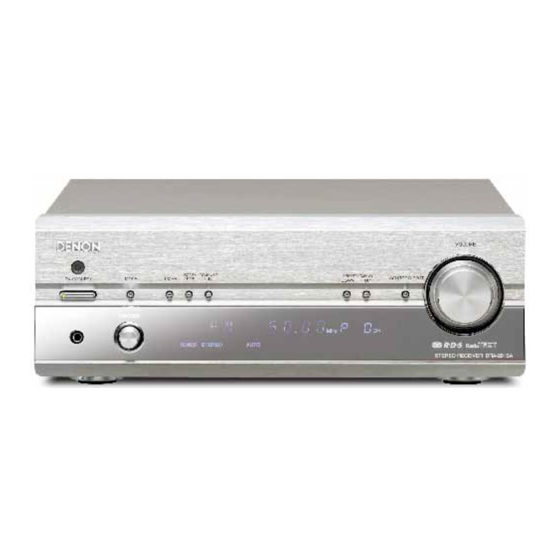
STEREO RECEIVER
DRA-201SA
OPERATING INSTRUCTIONS
BEDIENUNGSANLEITUNG
MODE D'EMPLOI
ISTRUZIONI PER L'USO
BAND
ON / STANDBY
MODE
TIMER
/ RDS
PHONES
FUNCTION
TUNED
All manuals and user guides at all-guides.com
INSTRUCCIONES DE OPERACION
GEBRUIKSAANWIJZING
BRUKSANVISNING
MEMORY
PRESET / TUNING
/ SET
DOWN
UP
SOURCE DIRECT
MHz
CH
STEREO
AUTO
STEREO RECEIVERER DRA-201SA
OFF
ON
SYSTEM
POWER
PROG /
DIRECT
1
2
3
CALL
4
5
6
CLEAR
7
8
9
RANDOM
REPEAT
10
+10
CD SRS
CD-R
TAPE
MD
TIME EDIT
REV.
TIME/
Dolby NR
DIMMER
MODE
PANEL
TUNING
RDS
BAND
STOP
PLAY
VOLUME
/SELECT
PRESET
VOLUME
+
-
TAPE
SLEEP
FUNCTION
MODE
CD
TUNER
MD
CD-R
TAPE
RC-906
REMOTE CONTROL UNIT
FOR ENGLISH READERS
PAGE
004 ~ PAGE
FÜR DEUTSCHE LESER
SEITE
021 ~ SEITE
POUR LES LECTEURS FRANCAIS
PAGE
038 ~ PAGE
PER IL LETTORE ITALIANO
PAGINA 055 ~ PAGINA 071
PARA LECTORES DE ESPAÑOL
PAGINA 072 ~ PAGINA 088
VOOR NEDERLANDSTALIGE LEZERS
PAGINA 089 ~ PAGINA 105
FOR SVENSKA LÄSARE
SIDA
106 ~ SIDA
020
037
054
121
Publicité
Chapitres
Table des Matières

Manuels Connexes pour Denon DRA-201SA


Sommaire des Matières pour Denon DRA-201SA
- Page 2 All manuals and user guides at all-guides.com SVENSKA NEDERLANDS ESPAÑOL ITALIANO FRANCAIS DEUTSCH ENGLISH NOTE ON USE / HINWEISE ZUM GEBRAUCH / OBSERVATIONS RELATIVES A L’UTILISATION / NOTE SULL’USO CAUTION NOTAS SOBRE EL USO / ALVORENS TE GEBRUIKEN / OBSERVERA RISK OF ELECTRIC SHOCK DO NOT OPEN CAUTION:...
-
Page 38: Caracteristiques
7. Unité de télécommande de système ACCESSORIES subtilité et de puissance. Le DRA-201SA est fourni avec une télécommande qui 2. Un fort circuit de puissance supportant les Vérifier que les articles suivants sont inclus dans le carton en plus de l’unité principale: peut servir à... -
Page 39: Raccorder Les Antennes
All manuals and user guides at all-guides.com FRANCAIS RACCORDER LES ANTENNES Installation de l’antenne FM intérieure Installation de l’antenne-cadre AM Installation d’une antenne AM extérieure Syntonisez une station FM (voir page 47), orientez Syntonisez une station AM (voir page 47) et placez Raccordez le câble de signal de l’antenne AM externe au l’antenne afin que la distorsion et les parasites du signal l’antenne aussi loin que possible du système afin de... -
Page 40: Connexions
• Lors de connexions de système avec la série 201SA, connecter le Le DRA-201SA n'est pas équipé de cordons de raccordement. Utiliser les cordons de raccordement inclus avec les composants cordon de système au connecteur de système du DRA-201SA (1 ou connectés au DRA-201SA. - Page 41 B Lors de la connexion des enceintes, s’assurer que mettre l’appareil hors circuit et de laisser un espace d'au moins 10 cm au-dessus du DRA-201SA de manière à ne pas obstruer ses trous d'aération. l’âme des fils des cordons d’enceinte ne sort pas et ne vérifier les connexions aux enceintes.
-
Page 42: Appellation Des Pieces Et Fonctions
(aiguës), LOUDNESS (commutateur de sonorité) y mise hors tension avant de la remettre.) Utiliser pour connecter un enregistreur de MD. • Lorsque le DRA-201SA est connecté en un système et BALANCE (balance)) peuvent être utilisées avec la série 201SA, sa touche d'alimentation lorsque ce commutateur est en position OFF. -
Page 43: Telecommande De Systeme
All manuals and user guides at all-guides.com FRANCAIS (3) Affichage [o] TELECOMMANDE DE SYSTEME Indicateurs de mode Affichage du numéro présélectionné L'unité de télécommande (RC-906) comprise peut être utilisée pour effectuer les principales opérations des unités de • Le numéro présélectionné est affiché ici. •... - Page 44 Frequency Affichage CT Utilisez cette fonction pour corriger l’heure de l’horloge sur le DRA-201SA. Appuyez sur la touche PANEL lorsque l’heure d’une station RDS est captée correctement. “CT” et “TIME” sont affichés et l’horloge du DRA- 201SA est remise à...
- Page 45 : DRA-201SA composants, se reporter à leurs • Lecteur de CD : DCD-201SA manuels respectifs. • Platine-cassette : DRR-201SA • Enregistreur de MD : DMD-201SA Les touches ci-dessus pour lesquelles il n’y a aucune explication ne fonctionnent pas avec le DRA-201SA.
-
Page 46: Operation
(SELECT) de l’unité de télécommande. B Lorsque l’unité de télécommande est VOLUME /SELECT utilisée pour mettre le DRA-201SA sous Ajuster les commande BALANCE, BASS et FUNCTION tension à partir du mode d’attente, la TREBLE, et régler la position LOUDNESS à la fonction est réglée à... -
Page 47: Ecouter La Radio
(Unité principale) (Télécommande) TUNED STEREO AUTO gauche chaque fois que la touche est STEREO RECEIVERER DRA-201SA La fonction des touches UP/DOWN change et enfoncée. • Pour régler à “ON”. permet la navigation entre les stations. “LOUDNESS” ne peut pas être sélectionné... - Page 48 FUNCTION commande à distance sur TUNED STEREO AUTO TUNED STEREO AUTO TUNED STEREO AUTO “TUNER”. STEREO RECEIVERER DRA-201SA STEREO RECEIVERER DRA-201SA (RC-906) STEREO RECEIVERER DRA-201SA Procédure 1, 3 1, 2, 5, 9 3, 7,10 MEMORY MEMORY / SET / SET...
- Page 49 All manuals and user guides at all-guides.com FRANCAIS Réception d’émissions RDS (FM uniquement) Recherche PTY Programme (Nouvelles) Météo et compteur BAND Appuyez sur la touche BAND/RDS / RDS BAND Appuyez sur la touche BAND/RDS et / RDS (Affaires) Finance pendant au moins 3 secondes. activez la fonction FM AUTO.
-
Page 50: Utilisation De La Minuterie
“Présélectionner des stations AM et FM” à la page 48.) de réglage de la fonction au PRESET/TUNING> 2 Le DRA-201SA est équipé de deux types de minuteries: La minuterie quotidienne qui met sous tension et éteint sein du mode de réglage de la Utilisez les touches d’accord l’appareil aux mêmes heures tous les jours et la minuterie unique qui met sous tension et éteint l’appareil une seule... - Page 51 “35”. tension. Les fonctions heure et minuterie sont incorporées dans cet appareil. Mettez hors tension. Lorsque le DRA-201SA est connecté dans un système Réglages de la minuterie ON / STANDBY avec des appareils de la série 201SA, appuyez sur la touche Type d’opérations de la minuterie...
-
Page 52: Fonctions De Systeme
L’appareil peut être mis sous tension et hors tension à une heure précise ou à la même heure tous les jours, quel que L’opération est encore plus facile lorsque les composants de la série 201SA sont connectés au DRA-201SA avec des soit le mode utilisé... -
Page 53: Localisation Des Pannes
All manuals and user guides at all-guides.com FRANCAIS LOCALISATION DES PANNES Vérifier les points suivants avant de constater que l’appareil est en panne: 1. Toutes les connexions sont-elles correctes ? 2. L’appareil est-il utilisé correctement comme décrit dans le mode d’emploi ? 3. -
Page 54: Specifications
All manuals and user guides at all-guides.com FRANCAIS SPECIFICATIONS PARTIE AMPLIFICATEUR DE PUISSANCE 50 W + 50 W (Charge 4 Ω/ohms, DIN, 1 kHz, D.H.T. 0,7%) Puissance nominale: Bornes de sortie: 4 à 16Ω/ohms • PRE-AMPLI Puissance nominale: 150 mV (Borne de sortie d’enregistrement) Sensibilité...