Table des Matières

Publicité

Les langues disponibles
  • FR

Les langues disponibles

Liens rapides

Instruction Manual
Manuale di istruzioni
Manuel d'instructions
Manual de instrucciones
Bedienungsanleitung
OHS 200 ADVANCE Overhead stirrers
F20100480, F20110480
OHS 100 ADVANCE Overhead stirrers
F20100481, F20110481
OHS 60 ADVANCE Overhead stirrers
F20100482, F20110482
General Information / Informazioni Generali / Informations Générales / Información General / Allgemeine Hinweise
Before using the unit, please read the following instruction manual carefully.
Prima dell'utilizzo dello strumento si raccomanda di leggere attentamente il seguente manuale operativo.
Avant d'utiliser l'instrument, il est recommandé de lire attentivement le présent manuel d'instructions.
Antes de utilizar el instrumento, le recomendamos que lea con atención el siguiente manual de funcionamiento.
Bitte lesen Sie vor Inbetriebnahme des Geräts diese Bedienungsanleitung sorgfältig durch
Do not dispose of this equipment as urban waste, in accordance with EEC directive 2002/96/CE.
Non smaltire l'apparecchiatura come rifiuto urbano, secondo quanto previsto dalla Direttiva 2002/96/CE.
Ne pas recycler l'appareil comme déchet solide urbain, conformément à la Directive 2002/96/CE.
No tirar el aparato en los desechos urbanos, como exige la Directiva 2002/96/CE.
Dieses Gerät unterliegt der Richtlinie 2002/96/EG und darf nicht mit dem normalen Hausmüll entsorgt werden.
This unit must be used for laboratory applications indoor only. The manufacturer declines all responsibility for any use of the unit that
does not comply with these instructions. If the product is used in a not specified way by the manufacturer or with not specified
accessories, product's safety may be compromised.
Questo strumento deve essere utilizzato solo per applicazioni di laboratorio per uso interno. La società produttrice declina ogni
responsabilità sull'impiego non conforme alle istruzioni degli strumenti. Se il prodotto viene utilizzato in un modo non specificato o con
accessori non specificati dal costruttore stesso, la sicurezza del prodotto potrebbe essere compromessa.
Cet instrument ne peut être
responsabilité en cas d'utilisation non conforme aux instructions concernant ces instruments. Si le produit est utilisé d'une manière non
spécifiée par le fabricant ou accessoires non spécifiés, la sécurité du produit peut être compromise.
Este dispositivo sólo debe utilizarse para aplicaciones de laboratorio para uso interno.
El fabricante declina toda responsabilidad por el uso no conforme a las instrucciones de los dispositivos. Si se utiliza el producto de una
manera no especificada o con accesorios no especificados de el fabricante, la seguridad del producto puede estar comprometida.
Dieses Gerät muss nur für Laboranwendungen verwendet
oder Nichtbeachtung dieser Bedienungsanleitung ab. Wenn das Produkt in einer Weise verwendet wird, die nicht vom Hersteller oder mit
unsachgemäßer Zubehör angegeben , kann das Produkt die Sicherheit beeinträchtigt werden.
This unit has been designed and manufactured in compliance with the following standards:
Lo strumento è stato progettato e costruito in accordo con le seguenti norme:
L'instrument a été conçu et fabriqué conformément aux normes suivantes:
El dispositivo se ha sido diseñado y fabricado de acuerdo con las siguientes normas:
Das Gerät wurde in Übereinstimmung mit folgenden Normen entwickelt und gebaut:
Safety requirements for electrical equipment for measurement, control and for laboratory use
Prescrizioni di sicurezza per apparecchi elettrici di misura, controllo e per l'utilizzo in laboratorio
Règles de sécurité pour appareils électriques de mesurage, de régulation et de laboratoire
utilisé pour les applications de laboratoire à l'intérieur
werden.Der Hersteller lehnt jede Haftung für unsachgemäße Verwendung
1
seulement. Le fabriquant décline toute
IEC/EN 61010-1 IEC/EN
61010-2-051

Publicité

Table des Matières
loading

Sommaire des Matières pour Velp Scientifica OHS 200 ADVANCE

  • Page 1 Instruction Manual Manuale di istruzioni Manuel d’instructions Manual de instrucciones Bedienungsanleitung OHS 200 ADVANCE Overhead stirrers F20100480, F20110480 OHS 100 ADVANCE Overhead stirrers F20100481, F20110481 OHS 60 ADVANCE Overhead stirrers F20100482, F20110482 General Information / Informazioni Generali / Informations Générales / Información General / Allgemeine Hinweise Before using the unit, please read the following instruction manual carefully.
  • Page 2 Prescripciones de seguridad para equipos eléctricos de medición, control y su uso en laboratorio Sicherheitsbestimmungen für elektrische Mess-, Steuer-, Regel- und Laborgeräte Electrical equipment for laboratory use UL 61010-1 General requirement - Canadian electrical code CAN/CSA-C22.2 No.61010-1 VELP reserves the right to modify the characteristics of its products with the aim to constantly improving their quality. Nell’impegno di migliorare costantemente la qualità...
  • Page 3 einschließlich der persönlichen Schutzausrüstung und dem Vorhandensein einer Extraktion in Kraft sind Haube, die einen mindestens 10- fachen Luftwechsel gemäß den Normen EN 14175 und DIN 12924 gewährleistet. It is dangerous to run the unit with the stirring blade turning in free air. Always place the stirring shaft in the receptacle before turning the unit on.
  • Page 4: Table Des Matières

    Contents / Indice / Inhalt INTRODUCTION ................................6 ASSEMBLY AND INSTALLATION ........................... 7 DISPLAY SYMBOLS ................................ 7 WORKING ..................................8 EXTERNAL CONNECTIONS ............................9 VELP ERMES CONFIGURATION ..........................10 MENU ..................................... 11 .................................. 11 TRUCTURE ....................................12 ETHODS 7.2.1 Method set-up ..................................12 ....................................
  • Page 5 11. CARATTERISTIQUE TECHNIQUE ..........................45 12. ACCESSOIRES / PIÈCES DE RECHANGE........................46 INTRODUCCIÓN ................................47 MONTAJE E INSTALACIÓN ............................48 SÍMBOLOS DE LA PANTALLA ............................48 CONTROLES DE FUNCIONAMIENTO ......................... 49 CONEXIONES EXTERNAS ............................49 CONFIGURACIÓN VELP ERMES ..........................51 MENÚ...
  • Page 6: Introduction

    OHS overhead stirrers with electronic speed control, brushless motor, and advanced safety features are able to satisfy the most difficult laboratory applications in terms of viscosity and volume. The new chuck ensures higher safety for the operator and allows to use a passing rod of up to 8,5mm in diameter. OHS 200 Advance – Frontal Figura 1. Figure 1.
  • Page 7: Assembly And Installation

    Current Torque Current temperature (only when Pt100 probe is connected to OHS) Figure 3. Display (OHS 200 Advance) Gear button (only for OHS 200) Graph button (for other models) Timer button Menu button Current Gear symbol (only for OHS 200)
  • Page 8: Working

    Display (A) shows Welcome page and the main screen Commissioning Figure 4. Main OHS 60 Advance Figure 5. Main OHS 200 Advance ➢ Adjust speed set point by turning the speed control knob (C). As soon as the knob is moved, set rpm (6) becomes blue. ➢...
  • Page 9: External Connections

    5. External Connections ➢ Each model has USB connection in the back for PC controlling, data logging and software upgrading by PC. ➢ Software version, dedicated program to be installed in the PC, and software installation guide have to be requested by e-mail to service@velp.it ➢...
  • Page 10: Velp Ermes Configuration

    Reading multiple register: Serial number Request Reply Field (Hex) Field (Hex) Description Address 0x64 Address 0x64 Control command 0x03 Control command 0x03 High start address 0x00 Number of bytes 0x06 Low start address 0x02 High register value 0x31 12345 Number of High registers 0x00 Low register value 0x00...
  • Page 11: Menu

    7. Menu Clicking Menu button (13) the following figure appears Figure 7. Menu OHS 200 Advance Figure 8. Menu OHS 100 - 60 Advance It’s possible to move among submenus rotating the speed control knob (C). Enter in a submenu with a click of the speed control knob (C) once it’s highlighted in blue. Press Home to go back to the main screen.
  • Page 12: Methods

    Service Reset Torque Real Torque Pt100 Alignment Check Locking Ring Reset Parameters Update Software Counter Ermes Motor Calibration Timer Gear * * Graph for models OHS 100 and OHS 60 ** Not visualized for models OHS 100 and OHS 60 7.2 Methods In this submenu is possible to set 10 different methods.
  • Page 13 ➢ 5 steps can be set for each method. ➢ All steps are programmable with speed, timer, ramp, and intermittent mode. ➢ A method is considered set when at least speed and timer are set for one step. Figure 5 Steps ➢...
  • Page 14: Graph

    7.3 Graph In this submenu is possible to visualize the graph of the current analysis. For models OHS 100 and OHS 60 is possible to access to the graph directly through the main screen. Click RESET to erase the graph. Only the last 60 minutes are shown. Click ZOOM to see the last 3 minutes. Figure 6.
  • Page 15: Set-Up

    7.5 Set-up ➢ The decision of the instrument’s restart mode in case of blackout or power loss. ➢ Enter in the menu, rotate speed control knob (C) to select Stop or Run. Click to confirm. ➢ Stop: when the instrument is switched on, it’s requested a click of the control knob to start stirring. Start Mode ➢...
  • Page 16 ➢ Alignment sensitivity 0.1°C. ➢ It allows to control the right functioning of Smart Chuck system. ➢ Figure 20 Enter in the menu. is visualized. Check Locking Ring Figure 12. Check Locking Ring Figure 11. Check Locking Ring performed ➢ Follow instructions described in the screen.
  • Page 17: Smartchuck Tm

    Temperature too high (only with Pt100 inserted) AL12 Temperature too low (only with Pt100 inserted) To remove the error message, disconnect the instrument from the power supply. If alarm persists on the display, please contact VELP Scientifica’s technical service department. service@velp.it...
  • Page 18: Maintenance

    10. Maintenance ➢ No routine or extraordinary maintenance is necessary; ➢ Repairs must be carried out by authorized Velp personnel only; ➢ Instrument must be transported in its original packaging any indications present on the original packaging must Maintenance be followed (e.g. palletized); ➢...
  • Page 19: Introduzione

    Sono in grado di soddisfare le più svariate applicazioni di laboratorio in termini di volume e viscosità. Il nuovo sistema di chiusura del mandrino garantisce una maggiore sicurezza all’operatore permettendo di utilizzare aste passanti fino a 8,5mm di diametro. OHS 200 Advance – Vista frontale Figura 17.
  • Page 20: Montaggio E Installazione

    Temperatura attuale (solo quando la sonda Pt100 è connessa) Tasto marcia (solo per OHS 200) Tasto grafico (per altri modelli) Figure 3. Display (OHS 200 Advance) Tasto timer Tasto Menu Icona Marcia attuale (solo per OHS 200) Indicazione metodo in corso...
  • Page 21: Controlli Di Funzionamento

    Figure 18. Schermata principale Figure 19. Schermata principale OHS 60 Advance OHS 200 Advance ➢ Impostare la velocità di set point ruotando l’encoder (C). Non appena l’encoder si muove, la velocità di set point (6) (set rpm) diventa blu. ➢...
  • Page 22: Connessioni Esterne

    5. Connessioni esterne ➢ Ogni modello ha una connessione USB sul retro dello strumento per il controllo tramite PC e per l’aggiornamento software. ➢ La versione software, il programma dedicato da installare a PC e la guida di installazione devono essere richiesti via e-mail all’indirizzo service@velp.it.
  • Page 23: Configurazione Velp Ermes

    Registro multiplo lettura: Numero di serie Richiesta Richiesta Campo (Hex) Campo (Hex) Descrizione Indirizzo 0x64 Indirizzo 0x64 Control command 0x03 Control command 0x03 High start address 0x00 Number of bytes 0x06 Low start address 0x02 High register value 0x31 12345 Number of High registers 0x00 Low register value...
  • Page 24: Menu

    7. Menu Cliccando il tasto menu (13) appaiono le seguenti schermate Figura 22. Menu OHS 200 Figura 21. Menu OHS 100 - 60 Advance Advance È possibile muoversi tra i sottomenu ruotando l’encoder (C). Entrare tramite click dell’encoder (C) quando la relativa voce è in blu. Cliccare Home per tornare alla schermata principale. 7.1 Struttura del menu Menu Metodi...
  • Page 25: Metodi

    Aggiornamento Software Contatore Ermes Calibrazione Coppia Timer Marcia * * Grafico per I modelli OHS 100 e OHS 60 ** Non visualizzato per i modelli OHS 100 e OHS 60 7.2 Metodi In questo sottomenu è possibile impostare fino a 10 metodi diversi. Per OHS 200, 10 metodi diversi per ogni range di velocità. Una volta impostato, la scritta del metodo diventa Bianca e appare una barra blu sulla sinistra della stessa riga.
  • Page 26 ➢ Possono essere impostati fino a 5 livelli per ogni metodo. ➢ Tutti i livelli sono programmabili con velocità, timer, rampa di salita, modalità di intermittenza. ➢ Un metodo viene considerate impostato quando almeno velocità e timer sono settati per un livello. Figura 26.
  • Page 27: Grafico

    7.3 Grafico In questo sottomenu è possibile visualizzare il grafico dell’analisi in corso. Per i modelli OHS 100 e OHS 60 è possibile accedere al grafico direttamente tramite la schermata principale. Cliccare RESET per cancellare il grafico. Vengono mostrati gli ultimi 60 minuti di analisi. Cliccare ZOOM per visualizzare gli ultimi 3 minuti.
  • Page 28: Impostazioni

    7.5 Impostazioni ➢ Permette di decidere la modalità di ripartenza dello strumento in caso di blackout o mancanza di tensione. Entrare nel menu, ruotare l’encoder (C) per selezionare Stop o Run. Cliccare per confermare. ➢ ➢ Stop: quando lo strumento è acceso, è necessario un click dell’encoder per far partire l’agitazione. Modalità...
  • Page 29: Service

    7.6 Service ➢ Permette di azzerare il valore della coppia corrente a display. Reset Coppia Cliccare l’encoder (C) per azzerare la coppia. ➢ ➢ Permette di tornare al valore reale di coppia annullando l’offset impostato in precedenza. ➢ Cliccare l’encoder (C) per tornare al valore di coppia reale. Coppia Reale ➢...
  • Page 30: Smartchuck Tm

    Temperatura troppo elevate (solo con sonda Pt100 inserita) AL12 Temperatura troppo bassa (solo con sonda Pt100 inserita) Al fine di rimuovere il messaggio d’errore, disconnettere lo strumento dall’alimentazione. Se l’allarme persiste sul display contattare VELP Scientifica al seguente indirizzo mail: service@velp.it...
  • Page 31: Manutenzione E Pulizia

    10. Manutenzione e Pulizia ➢ Non sono previsti interventi di manutenzione ordinaria e straordinaria. ➢ Eventuali riparazioni dovranno essere eseguite soltanto da parte di personale autorizzato Velp. ➢ Il trasporto dello strumento tramite spedizionieri, corrieri o altro, deve essere effettuato utilizzando l'imballo originale antiurto di cui lo strumento è...
  • Page 32: Accessori / Parti Di Ricambio

    12. Accessori / Parti di ricambio A00000002 Cavo di prolunga sonda, 1 m A00001305 Asta di agitazione pale basculanti A00000363 Sonda temperatura in vetro OHS Advance A00001306 Asta di agitazione a pala fissa A00000366 Stativo completo di asta OHS A00001307 Asta di agitazione ad elica A00000369 Stativo telescopico completo di asta OHS...
  • Page 33: Introduction

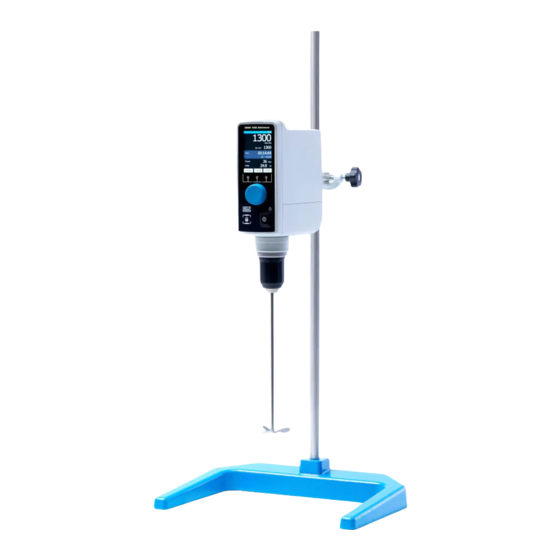
    Ils sont capables de satisfaire les applications de laboratoire les plus variées en termes de volume et de viscosité. Le nouveau système de fermeture de broche assure une plus grande sécurité à l'opérateur en permettant l'utilisation de tiges jusqu'à 8,5 mm de diamètre. OHS 200 Advance – Vue de Figure 38. OHS 200 Advance Figure 37.
  • Page 34: Montage Et Installation

    Température actuelle (uniquement lorsque la sonde Pt100 est connectée) Bouton de démarrage (uniquement pour OHS 200) Touche graphique (pour les autres modèles) Bouton minuterie Bouton de menu Icône de rapport actuel Figure 3. Display (OHS 200 Advance) (uniquement pour OHS 200)
  • Page 35: Vèrification De Fonctionnement

    Affichage L'affichage (A) montre la page d'accueil et l'écran principal. Allumage Figure 4. Afficage principaux OHS 200 Advance ➢ Réglez la vitesse du point de consigne en tournant le codeur (C). Dès que l'encodeur se déplace, la vitesse de consigne (6) (vitesse de rotation définie) devient bleue.
  • Page 36 Affectation du registre du contrôleur Adresse du registre Nom du registre Écriture Nombre de byte Fonction Instrument Modèle d'instrument Numéro de série Numéro de série de l'instrument Code produit Code de produit de l'instrument Fiche base Version sw fiche base Sw fiche display Version sw fiche base display L'état...
  • Page 37: Configuration Velp Ermes

    Registre de lectures multiples: numéro de série Demande Rèponse Champ (Hex) Champ (Hex) Description Addresse 0x64 Addresse 0x64 Control command 0x03 Control command 0x03 High start address 0x00 Number of bytes 0x06 Low start address 0x02 High register value 0x31 12345 Number of High registers 0x00...
  • Page 38: Menu

    7. Menu En cliquant sur le bouton de menu (13), les écrans suivants apparaissent Figure 6. Menu OHS 200 Figure 7. Menu OHS 100 - 60 Advance Advance Il est possible de passer d'un sous-menu à l'autre en tournant le codeur (C). Entrez dans un sous-menu en cliquant sur l'encodeur (C) lorsque l'élément relatif est mis en surbrillance en bleu.
  • Page 39: Méthodes

    Service Réinitialiser le couple Coup le efficace Alignement Pt100 Vérifier la blague de broche Réinitialiser les paramètres Mise à jour du logiciel Compteur Ermes étalonnage du couple Minuterie Marche * * Tableau pour les modèles OHS 100 et OHS 60 ** Non affiché...
  • Page 40 ➢ Vous pouvez définir jusqu'à 5 niveaux pour chaque méthode. ➢ Tous les niveaux sont programmables avec vitesse, minuterie, montée en puissance, mode intermittent. ➢ Une méthode est considérée comme définie lorsqu'au moins la vitesse et la minuterie sont définies pour un niveau.
  • Page 41: Graphique

    7.3 Graphique Dans ce sous-menu, il est possible de visualiser le graphique de l'analyse en cours. Pour les modèles OHS 100 et OHS 60, il est possible d'accéder au graphique directement à partir de l'écran principal. Cliquez sur RESET pour supprimer le graphique. Les 60 dernières minutes d'analyse sont affichées. Cliquez sur ZOOM pour afficher les 3 dernières minutes.
  • Page 42: Paramétres

    ➢ Vous permet de définir un niveau de sensibilité aux vibrations. ➢ Entrez dans le menu, tournez le codeur (C) pour sélectionner OFF, Bas, Moyen ou Haut. Cliquez pour Capteur de confirmer. vibrations ➢ Lorsque le capteur de vibrations est différent de OFF, l’icône (3) apparaît sur la barre d'état bleue.
  • Page 43: Service

    7.6 Service ➢ Il permet de réinitialiser la valeur de la couple actuelle Reset Couple ➢ Cliquez sur l'encodeur (C) pour réinitialiser la couple. ➢ Il permet de revenir à la valeur de couple réel en annulant le décalage précédemment défini. ➢...
  • Page 44: Smartchuck Tm

    Température trop élevée (uniquement avec sonde Pt100 insérée) AL12 Température trop basse (uniquement avec sonde Pt100 insérée) Pour supprimer le message d'erreur, débranchez l'instrument de la source d'alimentation. Si l'alarme persiste à l'écran, contactez VELP Scientifica à l'adresse électronique suivante: service@velp.it...
  • Page 45: Manutention Et Nettoyage

    10. Manutention et nettoyage ➢ Les opérations de maintenance ordinaires et extraordinaires ne sont pas prévues. ➢ Les réparations ne doivent être effectuées que par du personnel Velp agréé. ➢ Le transport de l'instrument par des transitaires, des messagers ou autres, doit être effectué dans son emballage d'origine résistant aux chocs, dont il est doté...
  • Page 46: Accessoires / Pièces De Rechange

    12. Accessoires / Pièces de rechange A00000002 Cable extension sonde, 1 m A00000363 Sonde de température en verre OHS Advance A00000366 Stand complet avec vente aux enchères SST A00000369 Support télescopique complet avec tige OHS A00000391 OHS/ControllerSoft A00001300 Pied de statif A00001301 Noix de fixation double A00001302...
  • Page 47: Introducción

    El nuevo mandril garantiza una mayor seguridad para el operador y permite utilizar varilla pasante de hasta 8,5 mm de diámetro. OHS 200 Advance – Visión Figura 2.
  • Page 48: Montaje E Instalación

    Pt100 está conectada al OHS) Tecla de engranaje (solo para OHS 200) Tecla gráfico (para otros modelos) Tecla Temporizador Tecla Menú Símbolo de engranaje actual (solo para Figura 3. Display (OHS 200 Advance) OHS 200) Indicación del método actual...
  • Page 49: Controles De Funcionamiento

    Figura 5. Panatalla principal OHS 60 Advance OHS 200 Advance ➢ Establezca la velocidad girando el botón de control de velocidad (C). En cuanto el botón se mueve, la velocidad establecida se vuelve azul. Pulsar el botón (C), para empezar la agitación.
  • Page 50 Asignación de registro del controlador Escritur Dirección de registro Nombre de registro Número de bytes Función Instrumento Modelo de instrumento Numero de serie Número de serie del instrumento Codigo de producto Código del instrumento Tarjeta base Sw Versión de tarjeta base Sw Tarjeta Pantalla Sw Versión de tarjeta pantalla Sw Status...
  • Page 51: Configuración Velp Ermes

    Registro de escritura única: STOP rotación Richiesta Campo (Hex) Descrizione Dirección 0x64 Control command 0x06 High start address 0x00 Low start address 0x6A High register value 0x00 Detener la rotacion Low register value 0x01 High CRC 0xE3 Low CRC 0x61 Puerta serial virtual Baudrate 9600...
  • Page 52: Menú

    7. Menú Pulsando sobre la tecla menu (13) aparecen las siguientes figuras Figura 7. Menú OHS 200 Figura 8. Menú OHS 100 - 60 Advance Advance Es posible moverse entre submenús girando el botón de control de velocidad (C). Entre a un submenú con un clic del botón de control de velocidad (C) una vez que esté resaltado en azul. Pulsa Inicio para volver a la pantalla principal.
  • Page 53: Métodos

    Service Reset Torque Real Torque Pt100 Alignment Check Locking Ring Reset Parameters Update Software Counter Ermes Calibracion de par Timer Gear * * Gráfico para modelos OHS 100 y OHS 60 ** No se visualizan para los modelos OHS 100 y OHS 60 7.2 Métodos En este submenú...
  • Page 54 ➢ Se pueden establecer 5 etpas para cada método. ➢ Todas las etapas son programables con velocidad, temporizador, rampa y modo intermitente. ➢ Un método se considera establecido cuando al menos la velocidad y el temporizador están configurados para una etapa. Figura 44 Etapas ➢...
  • Page 55: Gráficos

    7.3 Gráficos En este submenú es posible visualizar la gráfica del análisis actual. Para los modelos OHS 100 y OHS 60 es posible acceder al gráfico directamente a través de la pantalla principal. Haga clic en RESET para borrar el gráfico. Sólo se muestran los últimos 60 minutos. Haga clic en ZOOM para ver los últimos 3 minutos. Figure 45.
  • Page 56: Puesta En Marcha

    7.5 Puesta en marcha ➢ Permite decidir el modo de reinicio del instrumento en caso de apagón o pérdida de tensión. ➢ Entre en el menú, gire el botón de control de velocidad (C) para seleccionar Stop o Run. Haga clic para confirmar.
  • Page 57: Servicio

    7.6 Servicio ➢ Restablecer Permite restablecer el torque actual. ➢ Haga clic con el botón de control de velocidad (C) para restablecer el torque. Torque ➢ Permite volver al valor de torque real. ➢ Torque Real Haga clic con el botón de control de velocidad (C) para volver al valor de torque real. ➢...
  • Page 58: Smartchuck Tm

    Temperatura demasiado baja (solo con Pt100 insertado)) Para eliminar el mensaje de error, desconecte el instrumento de la fuente de alimentación. Si la alarma persiste en la pantalla, comuníquese con el departamento de servicio técnico de VELP Scientifica service@velp.it. 10. Mantenimiento ➢...
  • Page 59: Datos Técnicos

    11. Datos técnicos F20100480, F20100481, F20110480, F20110481, Modelos F20100482 F20110482 230 V / 50-60 Hz (+/-10%) 115V / 60 Hz (+/-10%) Fuente de alimentación 90x315x235 mm 90x315x235 mm OHS 200 (3.54x12.40x9.25 in) (3.54x12.40x9.25 in) Medidas (alt., anch. y prof.) 90x285x235 mm 90x285x235 mm OHS 100 –...
  • Page 60: Einleitung

    Bezug auf die Viskosität und das Volumen anspruchsvollsten Laboranwendungen eingesetzt werden. Das neue Spannfutter bietet dem Bediener eine verbesserte Anwendungssicherheit und ermöglicht die Verwendung eines Rührstabs mit einem Durchmesser von bis zu 8,5 mm. OHS 200 Advance – Abbildung 46. Abbildung 1.
  • Page 61: Aufstellung Und Anschluss

    Timer-Einstellung Derzeitiges Drehmoment Derzeitige Temperatur (nur wenn ein Pt100-Fühler am OHS angeschlossen ist) Gang-Taste (nur bei OHS 200) Abbildung 3. Display (OHS 200 Advance) Graphik-Taste (bei anderen Modellen) Timer-Taste Menü-Taste Derzeitiger Gang (nur bei OHS 200) Anzeige der derzeitigen Methode...
  • Page 62: Betrieb

    4. Betrieb ➢ Das Gerät am Hauptschalter (E) einschalten. ➢ Das Display (A) zeigt die Start-Seite und dann die Hauptseite an. Inbetriebnahme Abbildung 4. Hauptseite OHS Abbildung 5. Hauptseite OHS 60 Advance 200 Advance ➢ Durch Drehen des Reglers (C) die Geschwindigkeit einstellen. Sobald der Regler bewegt wird, färbt sich die eingestellte Drehzahl (6) blau.
  • Page 63 Zuweisung von Steuerungsregister Adresse registrieren Name eintragen Schreiben Byte Nummer Funktion Werkzeug Gerätemodell Seriennummer Seriennummer des Instruments Produktcode Produktcode des Instruments Sw Grundplatine Grundplatine SW-Version SW-Grafikkarte Anzeigetafel SW-Version Status Betriebszustand des Instruments Alarm Das Gerät meldet einen Alarm Gang Gang einstellen (nur für OHS200) Geschwindigkeit rpm detektiert Drehmoment...
  • Page 64: Konfiguration Von Velp Ermes

    Single Write Register: STOP Rotation Anfrage Campo (Hex) Beschreibung Adresse 0x64 Control command 0x06 High start address 0x00 Low start address 0x6A High register value 0x00 Stoppen Sie die Drehung Low register value 0x01 High CRC 0xE3 Low CRC 0x61 Virtuelle serielle Schnittstelle Baudrate 9600...
  • Page 65: Menü

    7. Menü Nach dem Anklicken der Menü-Taste (13) wird folgende Seite aufgerufen: Abbildung 7. Menü OHS 200 Abbildung 8. Menü OHS 100 - Advance 60 Advance Durch Drehen des Geschwindigkeitsreglers (C) kann von einem Untermenü zum nächsten oder vorherigen gewechselt werden. Um ein Untermenü...
  • Page 66: Methoden

    Wartung Drehmoment zurücksetzen Tatsächliches Drehmoment Pt100-Abgleich Sicherungsring überprüfen Parameter zurücksetzen Software-Update Zähler Ermes Drehmomentkalibrierung Timer Gang * * Graphik für die Modelle OHS 100 und OHS 60 ** Wird bei den Modellen OHS 100 und OHS 60 nicht angezeigt 7.2 Methoden In diesem Untermenü...
  • Page 67 ➢ Für jede Methode können 5 Schritte eingestellt werden. ➢ Für jeden Schritt kann die Drehzahl, die Zeit, eine Rampe und der intermittierende Modus eingestellt werden. ➢ Eine Methode wird als eingestellt betrachtet, wenn zumindest die Drehzahl und der Timer für einen Schritt festgelegt wurden.
  • Page 68: Graphik

    7.3 Graphik In diesem Untermenü kann die graphische Aufarbeitung der derzeitigen Analyse angezeigt werden. Bei den Modellen OHS 100 und OHS 60 kann die Graphik direkt von der Hauptseite aus aufgerufen werden. Um die Graphik zu löschen, RESET anklicken. Es werden lediglich die vergangenen 60 Minuten angezeigt. ZOOM anklicken, um die vergangenen 3 Minuten anzuzeigen.
  • Page 69: Einstellungen

    Symbol angezeigt. 7.5 Einstellungen ➢ Hier kann entschieden werden, wie das Gerät nach einem Stromausfall oder einem Stromabfall weiterläuft. ➢ Das Menü aufrufen, den Geschwindigkeitsregler (C) drehen und Stop (Stopp) oder Run (Betrieb) auswählen. Zum Bestätigen auf den Regler drücken. ➢...
  • Page 70: Wartung

    7.6 Wartung ➢ Drehmoment Hier kann das derzeitige Drehmoment zurückgesetzt werden. ➢ zurücksetzen Auf den Geschwindigkeitsregler (C) drücken, um das Drehmoment zurückzusetzen. ➢ Hier kann zum tatsächlichen Drehmoment-Wert zurückgekehrt werden. Tatsächliches ➢ Auf den Geschwindigkeitsregler (C) drücken, um zum tatsächlichen Drehmoment zurückzukehren. Drehmoment ➢...
  • Page 71: Smartchuck Tm

    Temperatur zu hoch (nur wenn Pt100 eingeschaltet) AL12 Temperatur zu niedrig (nur wenn Pt100 eingeschaltet) Um die Fehlermeldung zu löschen, den Netzstecker des Gerätes ziehen. Wenn eine Fehlermeldung auf dem Display angezeigt wird, bitte an den Technischen Kundendienst von VELP Scientifica wenden. service@velp.it...
  • Page 72: Instandhaltung

    10. Instandhaltung ➢ Es sind keine regelmäßigen oder außerordentlichen Instandhaltungsarbeiten erforderlich. ➢ Reparaturen dürfen ausschließlich von dazu befugtem Personal von VELP ausgeführt werden. ➢ Das Gerät muss in seiner Originalverpackung transportiert werden und alle auf dieser Verpackung angegebenen Anweisungen sind zu beachten (z. B. Transport auf einer Palette). Instandhaltung ➢...
  • Page 73: Wiring Diagram / Schema Elettrico / Schéma Électrique / Esquema Eléctrico / Schaltplan

    13. Wiring diagram / Schema elettrico / Schéma électrique / Esquema eléctrico / MULTI Schaltplan 1. Main switch / Interruttore generale / Interrupteur général / Interruptor general / Netzschalter 2. Main board / Scheda base / Carte d'alimentation / Tarjeta de potencia / Grundkarte 3.
  • Page 74: Declaration Of Conformity / Dichiarazione Di Conformita / Declaration De Conformite

    14. Declaration of conformity / Dichiarazione di conformità / Déclaration de conformité / Declaración de conformidad / Konformitätserklärung We, the manufacturer VELP Scientifica, under our responsibility declare that the product is manufactured in conformity with the following standards: Noi, casa costruttrice VELP SCIENTIFICA, dichiariamo sotto la ns. responsabilità che il prodotto è conforme alle seguenti norme: Nous, VELP Scientifica, déclarons sous notre responsabilité...
  • Page 76 Radiation Detector Rilevatore di Radiazioni Open Circulating Baths Bagni Termostatici Pumps Pompe 10007708/B1 www.velp.com VELP Scientifica Srl 20865 Usmate (MB) ITALY Distributed by: Via Stazione, 16 Tel. +39 039 62 88 11 Fax. +39 039 62 88 120 We respect the environment by printing our manuals on recycled paper.

Table des Matières