Sony DAV-FR10W Mode D'emploi

Manuels Connexes pour Sony DAV-FR10W


Sommaire des Matières pour Sony DAV-FR10W
- Page 116 ® ENERGY STAR en matière d’utilisation efficace de l’énergie. Félicitations ! Vous venez de faire l’acquisition d’un système DVD Home Theatre Sony. Avant de la faire fonctionner, lisez attentivement ce mode d’emploi et conservez-le pour toute référence ultérieure.
- Page 117 Pour toute question ou tout problème concernant votre qualifié. chaîne, n’hésitez pas à consulter votre revendeur Sony Installation le plus proche. • Installez la chaîne dans un endroit suffisamment Entretien des disques ventilé...
- Page 118 Commande du téléviseur avec la Lecture de disques......... 36 télécommande fournie ....76 Reprise de la lecture à l’endroit où vous Utilisation de la fonction SONY TV avez arrêté le disque ....... 38 DIRECT ......... 78 (Reprise de la lecture) Utilisation du magnétoscope ou d’autres...
- Page 119 Sélections et réglages Utilisation du menu d’installation..86 Sélection de la langue des menus et de la plage audio........87 (CHOIX DE LA LANGUE) Réglages de l’écran ....... 88 (REGLAGE DE L’ECRAN) Réglages personnalisés ......90 (REGLAGE PERSONNALISE) Réglages des enceintes......92 (REGLAGE H-P) Configuration rapide et réinitialisation du système ...........
-
Page 120: A Propos De Ce Mode D'emploi
A propos de ce mode Cette chaîne peut lire les d’emploi disques suivants • Les instructions contenues dans le présent Format des Logo des disques mode d’emploi décrivent les commandes de la disques télécommande. Vous pouvez également DVD VIDEO utiliser les commandes de la chaîne, si elles portent le même nom ou un nom analogue à... - Page 121 • Album Remarque sur les fonctions PBC Il s’agit d’une section d’un morceau musical (commande de lecture) (CD ou d’une image sur un CD de données VIDEO) contenant des plages audio MP3 ou des Ce système est compatible avec les versions 1.1 fichiers JPEG.
- Page 122 • les disques recouverts de papier ou Code local d’autocollants. • les disques sur lesquels il reste des traces de Votre chaîne est identifiée par un code local bande adhésive ou de cellophane. indiqué à l’arrière de l’appareil et elle ne peut lire que les DVD identifiés par un code local Remarques au sujet des CD-R/CD-RW/DVD-R/ identique.
-
Page 123: Remarques Sur Les Disques
Copyrights Remarques sur les disques Ce produit intègre une technologie de protection Manipulation des disques des droits d’auteur couverte par des brevets américains ainsi que d’autres droits sur la • Pour que les disques restent propres, tenez-les propriété intellectuelle. L’emploi de cette par la partie périphérique. -
Page 124: Remarque Sur Le Changeur De Dvd 5 Disques
Remarque sur le changeur de DVD 5 disques Changeur de disque Chargeur DISC 1 DISC 2 Disque DISC 3 DISC 4 DISC 5 Unité de lecture Ce changeur de disque est constitué d'une unité de lecture et d’un chargeur qui achemine les disques jusqu’à... -
Page 125: Utilisation Du Menu De Commande
Utilisation du menu de commande Utilisez le menu de commande pour sélectionner la fonction souhaitée. Le menu de commande s’affiche lorsque la touche DVD DISPLAY est enfoncée. Pour plus de détails, reportez-vous aux pages indiquées entre parenthèses. Numéro du titre en cours de lecture (CD Nombre total de Vidéo/Super Audio CD/CD : numéro de titres ou de plages... - Page 126 AUDIO (DVD/CD VIDEO/ Super Modifie le réglage audio. Audio CD/CD/MP3 uniquement) (page 60) SOUS-TITRE (DVD uniquement) Affiche les sous-titres. Modifie la langue des sous-titres. (page 70) ALBUM (JPEG uniquement) Sélectionne l’album (JPEG) à lire. (page 44) FICHIER (JPEG uniquement) Sélectionne le fichier (JPEG) à lire. (page 44) DATE (JPEG uniquement) Affiche les informations relatives à...
-
Page 127: Préparation
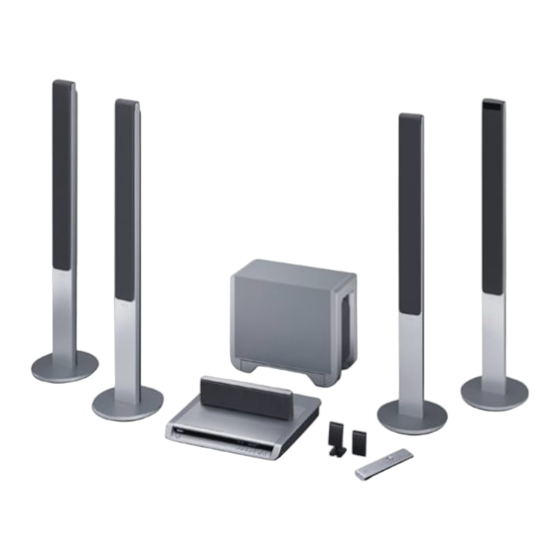
Insertion des piles dans la Préparation télécommande Déballage Vous pouvez commander la chaîne au moyen de Assurez-vous que vous disposez de l’ensemble la télécommande fournie. Insérez deux piles des accessoires suivants : AAA (R03) en faisant correspondre les pôles 3 et # des piles avec les signes représentés à... -
Page 128: Etape 1 : Raccordement Des Enceintes
Etape 1 : Raccordement des enceintes Raccordez les enceintes d’origine à l’aide des cordons des enceintes fournis en faisant correspondre les couleurs des prises avec celles des cordons. Ne raccordez que les enceintes fournies avec cette chaîne. Pour optimiser le son surround, spécifiez les paramètres des enceintes (distance, niveau, etc.) à la page 35. - Page 129 Récepteur IR Utilisé lorsque le récepteur IR de l’enceinte Surround ne peut recevoir aucun rayon infrarouge en raison de sa position. Raccordez-le à l’enceinte Surround (L). Pour obtenir plus de détails, reportez-vous à la section « Utilisation du récepteur IR » (page 30). Lorsque vous utilisez le support du récepteur IR, fixez-le en veillant à...
- Page 130 Bornes de raccordement des enceintes Raccordez A/Aux Enceintes avant Prises SPEAKER FRONT L (blanche) et R (rouge) de la chaîne Enceinte centrale Prise SPEAKER CENTER (verte) de la chaîne Caisson de graves Prises SPEAKER WOOFER (violette) de la chaîne Enceinte Surround (R) Prise SPEAKER (grise) de l’enceinte Surround (L) Emetteur IR Prise DIR-T1 (rose) de la chaîne...
- Page 131 Remarque sur la mise en place des enceintes • N’installez pas les enceintes en position inclinée. • N’installez pas les enceintes aux endroits suivants : – extrêmement chauds ou froids – poussiéreux ou encrassés – très humides – soumis à des vibrations –...
- Page 132 Pour raccorder l’enceinte surround arrière Cette chaîne est compatible avec le système surround 6.1. Pour lire un DVD compatible avec le système surround 6.1, notamment un disque DTS-ES, raccordez l’enceinte surround arrière (non fournie) et réglez ses paramètres (voir « Réglages des enceintes » à la page 92). VIDEO S VIDEO OPTICAL...
- Page 133 Pour modifier les câbles des enceintes Si vous souhaitez utiliser un câble d’enceinte différent, vous pouvez détacher la fiche de l’accessoire vers un autre câble. Retrait Catcher En orientant le catcher vers le bas, appuyez sur la fiche et maintenez-la enfoncée contre une surface plane, puis détachez les fils de le la fiche.
- Page 134 A propos du système sans fil Ce système sans fil adopte le système Digital Infrared Audio Transmission (page 105). Le schéma suivant indique la zone d’émission infrarouge (la plage dans laquelle les rayons infrarouges peuvent être captés). En cas d’utilisation du récepteur IR de l’enceinte Surround (L) Vue du haut Vue latérale Signal infrarouge...
-
Page 135: Etape 2 : Raccordements Des Antennes
Etape 2 : Raccordements des antennes Raccordez les antennes AM/FM fournies pour écouter la radio. Bornes de raccordement des antennes Raccordez A/Aux Antenne cadre AM Bornes AM Fil d’antenne FM Prise FM 75Ω COAXIAL Antenne cadre AM VIDEO S VIDEO OPTICAL (DVD ONLY) DIGITAL IN... - Page 136 Conseil Si la réception FM laisse à désirer, utilisez un câble coaxial 75 ohms (non fourni) pour raccorder la chaîne à une antenne FM extérieure comme illustré ci-dessous. Antenne FM extérieure FM 75 COAXIAL Chaîne...
-
Page 137: Etape 3 : Raccordements Du Téléviseur Et Des Composants Vidéo
Etape 3 : Raccordements du téléviseur et des composants vidéo Cordons requis Cordon vidéo pour raccordement à un téléviseur Jaune Cordons audio (non fournis) Lorsque vous raccordez un cordon, veillez à faire correspondre les manchons à codes couleurs aux prises appropriées des composants. Blanc (L/audio) Rouge (R/audio) Bornes de raccordement des composants vidéo... - Page 138 Téléviseur avec prises Magnétoscope COMPONENT VIDEO IN AUDIO VIDEO S VIDEO OPTICAL (DVD ONLY) DIGITAL IN AUDIO IN SPEAKER FM 75 COAXIAL FRONT R CENTER FRONT L DIR-T1 COMPOMEMT VIDEO OUT SURROUND BACK AUDIO IN VIDEO MONITOR OUT WOOFER WOOFER S VIDEO VIDEO OPTICAL...
- Page 139 Pour reproduire le son d’une console de jeu (par exemple, PlayStation 2) à l’aide de la chaîne Raccordez les prises de sortie audio de la console de jeu aux prises SAT AUDIO IN (L/R) de la chaîne à l’aide de cordons audio (non fournis). En cas de raccordement à...
- Page 140 Reproduction du son du téléviseur ou du magnétoscope par les enceintes Raccordez les cordons audio. Raccordez les prises AUDIO OUT (L/R) du téléviseur ou du magnétoscope aux prises VIDEO (AUDIO IN L/R) de cette chaîne à l’aide des cordons audio Téléviseur ou Magnétoscope AUDIO VIDEO...
-
Page 141: Etape 4 : Raccordement Des Cordons D'alimentation Secteur
Etape 4 : Raccordement des cordons d'alimentation secteur Avant de raccorder les cordons d’alimentation secteur de cette chaîne et de l’enceinte Surround (L) à une prise murale, raccordez les enceintes avant et centrale à la chaîne et l’enceinte Surround (R) à l’enceinte Surround (L) (voir page 16). -
Page 142: Etape 5 : Réglage Du Système Sans Fil
• Si le témoin POWER/ON LINE clignote en rouge, le récepteur IR de l’enceinte Surround (L) reçoit un POWER rayon infrarouge d’un autre produit Sony. Déplacez l’émetteur IR et/ou l’enceinte Surround (L) afin que POWER le témoin POWER/ON LINE vire au vert. - Page 143 Exemple d’installation Positionnez l’émetteur IR et l’enceinte Surround (L) de la manière illustrée. Installez l’émetteur IR et le récepteur IR de l’enceinte Surround (L) face à face et réglez leur orientation jusqu’à ce que le témoin POWER/ON LINE vire au vert. Vue du haut Enceinte centrale Enceinte...
- Page 144 Utilisation du récepteur IR Selon la disposition des enceintes (autrement dit lorsque vous orientez l’enceinte Surround (L) vers la position d’écoute, etc.), ou en cas d’obstacle (présence d’une personne ou d’un objet entre l’émetteur IR et le récepteur IR de l’enceinte Surround (L)), vous pouvez utiliser le récepteur IR externe (fourni). Celui-ci est compact et facile à...
- Page 145 Fixation au mur d’un émetteur IR et d’un récepteur IR Vous pouvez accrocher l’émetteur IR et le récepteur IR sur un mur dans les cas suivants : – Présence d’un obstacle entre l’émetteur IR et le récepteur IR. – Passages fréquents entre l’émetteur IR et le récepteur IR. Si vous accrochez l’émetteur IR et le récepteur IR, réglez la position de l’émetteur IR après avoir déterminé...
- Page 146 Une fois l’émetteur IR installé, assurez- mur insuffisamment solide. vous qu’il demeure bien immobile. • Sony n’assume aucune responsabilité pour les dégâts ou accidents consécutifs à une installation incorrecte Emetteur IR (mur trop fragile, par exemple), un mauvais usage de ce produit ou une catastrophe naturelle.
-
Page 147: Etape 6 : Exécution De La Configuration Rapide
Etape 6 : Exécution de la configuration rapide Une fois les 4 premières étapes terminées, effectuez les réglages initiaux à l’aide de la Configuration rapide. Vous pouvez définir pas à pas le réglage initial des paramètres [CHOIX DE LA LANGUE], [DIMENSIONS DE LA PIECE], [POSITION D’ECOUTE] et [TYPE TV]. - Page 148 Sélectionnez une taille adéquate entre Remarques [PETIT], [MOYENNE] ou [GRAND] à • Quand vous appuyez sur CLEAR dans le message de guidage, il disparaît. Pour modifier des réglages, l’aide de , puis appuyez sur ENTER. sélectionnez [RAPIDE] sous [REGLAGE] dans le Le réglage est sélectionné...
-
Page 149: Réglage Des Enceintes
A propos des enceintes blindées Réglage des enceintes (pour éviter les irrégularités de couleur sur l’écran du téléviseur) Le caisson de graves de cette chaîne est blindé Positionnement des afin d’éviter toute fuite magnétique. Des fuites enceintes peuvent toutefois survenir en présence d’un Pour optimiser le son surround, toutes les aimant très puissant. -
Page 150: Lecture De Disques
Appuyez sur la touche DISC1–5 Appuyez sur la touche Z correspondent au Lecture de disques numéro du disque que vous souhaitez écouter. Lecture de disques « NO DISC» apparaît dans la fenêtre d’affichage du panneau frontal et la chaîne est prête à charger le disque. Exemple : Lorsque vous souhaitez charger Certaines opérations peuvent être différentes ou le disque dans le chargeur de disque 1,... - Page 151 Après l’étape 6 Opérations complémentaires Suivant le disque, un menu peut s’afficher sur l’écran du téléviseur. Vous pouvez lire le disque en mode interactif en suivant les instructions du menu. (DVD : page 39), (VIDEO CD : DISC SKIP page 40). ./>...
-
Page 152: Reprise De La Lecture À L'endroit Où Vous Avez Arrêté Le Disque
Conseil Reprise de la lecture à Si un DVD contient plus de deux titres, vous ne pouvez pas passer au suivant ou revenir au précédent en l’endroit où vous avez appuyant sur . ou sur >. Ces touches ne fonctionnent qu’au sein d’un même titre. Si vous arrêté... -
Page 153: Utilisation Du Menu Dvd
Remarques Utilisation du menu DVD • La lecture répétée n’est pas disponible pendant la lecture aléatoire ou la lecture programmée. • Selon la position d’arrêt, il est possible que la chaîne ne reprenne pas la lecture exactement au même endroit. Un DVD est divisé... -
Page 154: Lecture De Cd Video Dotés De Fonctions Pbc (Ver. 2.0)
Remarque Lecture de CD VIDEO dotés Si le menu principal du DVD ou un menu DVD demeure affiché lors la lecture du DVD pendant une de fonctions PBC heure environ, la chaîne se met automatiquement hors tension. (Ver. 2.0) (Lecture PBC) Vous pouvez bénéficier d’une certaine interactivité, à... -
Page 155: Lecture D'une Plage Audio Mp3
Pour revenir au menu Lecture d’une plage audio Appuyez sur O RETURN. Remarques • Selon le CD VIDEO, le menu n’apparaît pas à l’étape • Selon le CD VIDEO, l’instruction « Appuyez sur ENTER » de l’étape 3 peut être remplacée par Vous pouvez lire des plages audio MP3 sur des «... - Page 156 Sélectionnez (PLAGE) à Sélection d’un album et d’une l’aide de X/x, puis appuyez sur ENTER. plage La liste des plages figurant sur l’album en cours apparaît. 3:HOME TOWN ROCK BEST HIT HIGHWAY VIEW POINT MY CHILDREN DVD TOP DANCING GOOD TASTE DVD MENU/ MENU/ DESTINATION...
-
Page 157: Lecture Des Fichiers Image Jpeg
• Tant que la lecture du disque n’a pas commencé ou Lecture des fichiers image tant que vous ne sélectionnez pas un album à l’étape 2, le nom de l’album s’affiche sous la forme JPEG « **Album » (** étant un numéro) dans le menu de commande, puis le nom de l’album proprement dit apparaît. - Page 158 Lorsque la liste de tous les fichiers ou Sélection d’un album et d’un albums ne peut pas être affichée, la barre de fichier défilement apparaît. Appuyez sur c pour sélectionner l’icône de la barre de défilement, puis déplacez-la pour afficher le reste de la liste à...
- Page 159 Diaporama à partir d’un Pour faire pivoter l’image en disque de données JPEG cours Appuyez sur M alors qu’une image Faites pivoter l’image en cours à l’aide de JPEG est affichée. C/c. Le diaporama démarre à partir de l’image A chaque pression de c, l’image tourne de 90° en cours.
-
Page 160: Sélection Du Mode De Lecture
TOUS/UN/ALBUM Sélection du mode de • TOUS : La chaîne lit successivement tous les disques de la chaîne, dans l’ordre des numéros lecture des fentes d’insertion et vous pouvez sélectionner la Lecture aléatoire ou la Lecture (Tous disques, Un disque ou Album) répétée pour tous les disques. -
Page 161: Création De Votre Propre Programme
défilement pour afficher le reste de la liste à Création de votre propre l’aide de X/x. Appuyez sur c ou O RETURN pour revenir à la liste des programme plages. Vous ne pouvez sélectionner l’icône de la (Lecture programmée) barre de défilement que si plus de 9 plages ou albums ont été... - Page 162 Fonctions complémentaires Sélectionnez la plage que vous souhaitez programmer. Pour Vous devez Par exemple, sélectionnez la plage « 7 ». Désactiver le Appuyer sur PLAY MODE en menu de mode d’arrêt pour désactiver le Program Disc programmes menu de programmes. DISC1(CD) Track DISC2(CD)
-
Page 163: Lecture Dans Un Ordre Quelconque
Pour revenir à une lecture Lecture dans un ordre normale quelconque En mode d’arrêt, appuyez plusieurs fois sur PLAY MODE jusqu’à ce que l’indication (Lecture aléatoire) « SHUF » disparaisse de l’affichage du panneau frontal (annulation de ALEATOIRE). Procédez de la même manière pour annuler la lecture ALEATOIRE (ALBUM). - Page 164 Remarque Réglage du mode aléatoire Lors de la lecture aléatoire de tous les disques, vous ne dans le menu de commande pouvez pas utiliser la touche DISC SKIP de la télécommande ou les touches DISC1-5 de la chaîne. Vous pouvez sélectionner soit la lecture aléatoire normale, soit la lecture aléatoire des albums (MP3 uniquement).
-
Page 165: (Lecture Aléatoire) Lecture Répétée
Sélectionnez le réglage de la lecture Lecture répétée répétée, puis appuyez sur ENTER. 1:DVD (Lecture répétée) 1 2 ( 2 7 ) TITLE12 1 8 ( 3 4 ) 1 : 3 2 : 5 5 Vous pouvez lire tous les titres/plages/fichiers TOUS ou un seul titre/chapitre/plage d’un disque. -
Page 166: (Lecture Répétée) Recherche D'un Point Spécifique Sur Le Disque
Remarques Recherche d’un point • Suivant le DVD, il se peut que la lecture répétée ne fonctionne pas. spécifique sur le disque • Si [TOUS] est sélectionné, la lecture répétée est limitée à 5 occurrences. (Balayage, Lecture au ralenti) Conseils •... -
Page 167: Recherche D'un Titre/Chapitre/Plage/Index
Pour changer la vitesse de Recherche d’un titre/ balayage (DVD/CD VIDEO uniquement) chapitre/plage/index/ A chaque fois que vous appuyez sur m ou M album/fichier en cours de balayage, la vitesse de lecture change. Il existe deux vitesses. L’affichage est modifié comme suit à chaque pression de la touche : Vous pouvez rechercher un titre (DVD), un chapitre (DVD), une plage (CD, CD VIDEO,... - Page 168 sur C ou sur O RETURN pour revenir à la Recherche d’un titre/plage/ liste des plages ou de l’album. album/fichier 4:CD STAY Appuyez sur DVD DISPLAY. BEAUTIFUL Le menu de commande apparaît. HOLD.ME FIRST TIME BLUE SKY Appuyez sur X/x pour sélectionner la OUR EARTH NO NAME méthode de recherche, puis appuyez...
- Page 169 Appuyez sur ENTER ou sur c. Entrez le code temporel à l’aide des touches numériques, puis appuyez sur ENTER. « ** (**) » est remplacé par « -- (**) ». Par exemple, pour trouver le point de votre 1:DVD choix à 2 heures, 10 minutes et 20 secondes 1 2 ( 2 7 ) TITLE12 après le début, vous n’avez qu’à...
-
Page 170: Visualisation Des Informations Relatives Au Disque
Lors de la lecture d’un DVD Visualisation des Temps de lecture et numéro du titre en cours informations relatives au TITLE CHAP disque Temps restant et numéro du titre en cours TITLE CHAP Visualisation du temps de lecture et de la durée restante Temps de lecture et numéro du titre en cours sur l’affichage du panneau... - Page 171 Lors de la lecture d’un CD VIDEO Lors de la lecture d’un MP3 (sans fonction PBC), d’un Super Temps de lecture et numéro de plage en cours de lecture Audio CD ou d’un CD Temps de lecture et numéro de plage en cours de lecture Temps restant sur la plage en cours...
- Page 172 Remarques Vérification du temps de • Selon le type de disque en cours de lecture et le mode lecture et de la durée restante de lecture, les informations relatives au disque peuvent ne pas s’afficher. Vous pouvez vérifier le temps de lecture et la •...
- Page 173 • C–**:**:** Vérification des informations Durée restante du chapitre en cours relatives à la date (JPEG • **:**:** uniquement) Durée de lecture du menu ou du titre en cours sans chapitre Vous pouvez vérifier les informations relatives à x Lors de la lecture d’un CD VIDEO la date lorsque l’étiquette Exif* est enregistrée (doté...
-
Page 174: Réglages Du Son
Appuyez sur X/x pour sélectionner (AUDIO), puis appuyez sur Réglages du son ENTER ou c. Commutation du son Les options de AUDIO apparaissent. 1:DVD 1 2 ( 2 7 ) TITLE12 1 8 ( 3 4 ) 1 : 3 2 : 5 5 1: ANGLAIS Si le DVD est enregistré... - Page 175 Remarques * L’indication [PCM,] [MPEG], [DTS] ou • Tous les disques ne vous donnent pas les trois [DOLBY DIGITAL] apparaît. choix ci-dessus en lecture Super Audio CD. Lorsque l’indication [DOLBY DIGITAL] Tout dépend de la configuration des couches du s’affiche, les canaux de la plage de lecture sont Super Audio CD à...
-
Page 176: Utilisation Du Son Surround
Décodage automatique du Utilisation du son signal d’entrée audio (AUTO surround FORMAT DIRECT AUTO) La fonction de décodage automatique détecte le type de signal audio entré (Dolby Digital, DTS Vous pouvez bénéficier du son surround en ou signal stéréo 2 canaux) et effectue le sélectionnant simplement l’un des champs décodage requis, le cas échéant. - Page 177 Utilisation des enceintes Sélection d’un champ avant et du caisson de graves acoustique (touche AUTO uniquement (2 CHANNEL FORMAT DIRECT) STEREO) Ce mode émet le son des enceintes avant gauche et droite et du caisson de graves. Les sources deux canaux (stéréo) standard omettent complètement le traitement du champ acoustique.
- Page 178 Entertainment, Sony a mesuré l’environnement sonore de ses studios et a intégré les résultats de ces mesures à la technologie DSP (Digital Signal Processor) propre à Sony pour développer le concept de « Digital Cinema Sound ». Le « Digital Cinema Sound » simule l’environnement sonore d’une salle de cinéma...
- Page 179 Reproduit les caractéristiques sonores du studio aucun son provenant directement des enceintes de production cinématographique « Cary Grant surround. Theater » de Sony Pictures Entertainment. Il s’agit d’un mode standard parfaitement adapté à Pour la musique ou autres la plupart des types de films.
-
Page 180: Sélection Du Mode De Décodage Surround Arrière
Pour désactiver l’effet surround Sélection du mode de Appuyez plusieurs fois sur AUTO FORMAT DIRECT jusqu’à ce que l’indication « A.F.D. décodage surround arrière AUTO » apparaisse sur l’affichage du panneau frontal. Lors du branchement du casque sur la prise PHONES Cette fonction permet de sélectionner le mode de décodage des signaux surround arrière du Appuyez plusieurs fois sur la touche AUTO... - Page 181 Appuyez sur X/x pour sélectionner le Sélection de « SB OFF » mode surround arrière souhaité en Le signal surround arrière n’est pas décodé. fonction du flux d’entrée, puis appuyez sur ENTER ou AMP MENU. a) Les informations relatives à l’indicateur de Le réglage par défaut est «...
-
Page 182: Utilisation De L'effet Sonore
Remarques Utilisation de l’effet • La fonction NIGHT MODE n’est activée que si le flux entrant est au format Dolby Digital. sonore • Lorsque vous raccordez le casque à la chaîne, la fonction DSGX n’est pas disponible. • Ces deux types d’effets sonores ne peuvent pas être activés simultanément. -
Page 183: Utilisation De Diverses Fonctions Complémentaires
Appuyez sur X/x pour sélectionner (ANGLE). Utilisation de diverses fonctions Le numéro d’angle apparaît. complémentaires Le numéro entre parenthèses indique le nombre total d’angles. Le témoin [ANGLE] Commutation des angles s’allume en vert lorsque des angles sont enregistrés sur le disque. 1:DVD 1 2 ( 2 7 ) TITLE12 Si plusieurs angles sont enregistrés sur un DVD... -
Page 184: Affichage Des Sous-Titres
Appuyez sur X/x pour sélectionner la Affichage des sous-titres langue. Les langues que vous pouvez sélectionner diffèrent suivant les DVD. Si 4 chiffres sont affichés, ils représentent le Si des sous-titres sont enregistrés sur un disque, code de langue. Reportez-vous à la liste des vous pouvez activer ou désactiver l’affichage codes de langue à... -
Page 185: Verrouillage De Disques
Insérez le disque à verrouiller. Verrouillage de disques Si le disque est en cours de lecture, appuyez sur x pour arrêter la lecture. (VERROUILLAGE PARENTAL En mode d’arrêt, appuyez sur DVD PERSONNALISE, CONTROLE DISPLAY. PARENTAL) Le menu de commande apparaît. Appuyez sur X/x pour sélectionner (VERROUILLAGE Vous pouvez définir deux sortes de restrictions... - Page 186 x Si vous avez déjà saisi un mot de Saisissez votre mot de passe à 4 chiffres à passe l’aide des touches numériques, puis appuyez sur ENTER. L’écran de saisie du mot de passe apparaît. Saisissez un nouveau mot de passe à 4 chiffres à...
- Page 187 Appuyez sur X/x pour sélectionner Lecture limitée pour les [CONTROLE PARENTAL t], puis sur enfants (contrôle parental) ENTER ou c. (DVD uniquement) x Si vous n’avez pas saisi de mot de passe La lecture de certains DVD peut être limitée L’écran de saisie d’un nouveau mot de suivant un niveau prédéterminé, tel que l’âge des passe apparaît.
- Page 188 Appuyez sur X/x pour sélectionner Si vous faites une erreur [STANDARD], puis appuyez sur ENTER Appuyez sur O RETURN ou sur C pour ou sur c. revenir à l’écran précédent. Les paramètres de sélection de Pour désactiver le menu [STANDARD] sont affichés. d’installation Appuyez plusieurs fois sur DVD SETUP REGLAGE PERSONNALISE...
- Page 189 Code de zone Lecture d’un disque en mode Norme Numéro de code de contrôle parental Allemagne 2109 Insérez le disque et appuyez sur H. Argentine 2044 L’écran [CONTROLE PARENTAL] Australie 2047 apparaît. Autriche 2046 Saisissez votre mot de passe à Belgique 2057 4 chiffres à...
-
Page 190: Fonctions Complémentaires
012, 016, 039 ce dernier remplace le code précédemment saisi. AKAI • Lorsque vous remplacez les piles de la télécommande, le numéro de code peut être réinitialisé au réglage par défaut (SONY). Bell&Howell 016, 039 Réinitialisez le numéro de code approprié. Broksonic... - Page 191 Ajuster le volume du téléviseur. CATV TV CH +/– Sélectionner le canal du Fabricant Numéro de code téléviseur. SONY Commande du téléviseur à l’aide des HAMLIN/REGAL 123, 124, 125, 126, 127 touches numériques 128, 129, 130 Lorsque vous réglez la télécommande sur le...
-
Page 192: Utilisation De La Fonction Sony Tv
SONY TV DIRECT TV/VIDEO Pas de source d’entrée (réglage par défaut) La fonction SONY TV DIRECT permet de VIDEO1 mettre sous tension votre téléviseur SONY ainsi VIDEO2 que la chaîne, de basculer la chaîne en mode VIDEO3 « DVD », puis de sélectionner la source d’entrée du téléviseur sur appui d’une seule touche. -
Page 193: Utilisation Du Magnétoscope Ou D'autres Appareils
Remarques • Cette fonction est réservée uniquement à la série FUNCTION SONY TV. • Si la distance entre le téléviseur et la chaîne est excessive, il se peut que la fonction ne fonctionne pas. Installez alors la chaîne à proximité du téléviseur. -
Page 194: Ecoute Du Son Radio Multiplex (Dual Mono)
xSUB Ecoute du son radio Le son secondaire est restitué par les enceintes gauche et droite. multiplex (DUAL MONO) xMAIN+SUB Le son principal et le son secondaire sont Vous pouvez profiter du son radio multiplex restitués par les enceintes gauche et droite. lorsque votre chaîne capte un signal radio multiplex AC-3. -
Page 195: Utilisation De La Radio
Appuyez plusieurs fois sur C/c/ Utilisation de la radio jusqu’à ce que l’indication « MEMORY ? » apparaisse sur l’affichage du panneau frontal. Présélection des stations de Appuyez sur ENTER. radio Un numéro présélectionné apparaît dans la Vous pouvez présélectionner 20 stations pour la fenêtre d’affichage du panneau frontal. - Page 196 Pour écouter des stations de Ecoute de la radio radio non présélectionnées Commencez par présélectionner des stations de Utilisez la syntonisation manuelle ou radio dans la mémoire de la chaîne (voir automatique à l’étape 2. « Présélection des stations de radio » à la Pour une syntonisation manuelle, appuyez page 81).
- Page 197 Appuyez plusieurs fois sur C/c jusqu’à Affectation d’un nom aux ce que l’indication « NAME IN? » stations présélectionnées apparaisse sur l’affichage du panneau frontal. Vous pouvez saisir un nom de 8 caractères maximum pour chaque présélection. Ces noms Appuyez sur ENTER. (par exemple, «...
-
Page 198: Utilisation De La Minuterie D'endormissement
Pour annuler la minuterie Utilisation de la minuterie d’endormissement d’endormissement Appuyez plusieurs fois sur FUNCTION jusqu’à ce que l’indication « SLEEP OFF » apparaisse sur l’affichage du panneau frontal. Vous pouvez programmer l’extinction de la chaîne à une heure déterminée et vous endormir ainsi au son de la musique. -
Page 199: Modification De La Luminosité De L'affichage Du Panneau Frontal
Modification de la Restauration des réglages luminosité de l’affichage par défaut du panneau frontal Vous pouvez rétablir les réglages par défaut des paramètres de la chaîne, tels que les réglages des Vous pouvez modifier la luminosité de enceintes et les présélections. l’affichage du panneau frontal en deux étapes. -
Page 200: Sélections Et Réglages
Le menu d’installation apparaît. Sélections et réglages CHOIX DE LA LANGUE ECRANS : ANGLAIS Paramètre MENU DVD : ANGLAIS principal Utilisation du menu AUDIO : ANGLAIS SOUS-TITRE : ANGLAIS d’installation L’utilisation du menu d’installation vous permet d’effectuer divers réglages de paramètres Appuyez sur X/x pour sélectionner le comme l’image et le son. -
Page 201: Sélection De La Langue Des Menus Et De La Plage Audio
Sélectionnez un réglage à l’aide de X/x, Sélection de la langue des puis appuyez sur ENTER. Le réglage est sélectionné et l’installation menus et de la plage audio est terminée. Exemple : [4:3 PAN SCAN] (CHOIX DE LA LANGUE) Réglage sélectionné Le menu [CHOIX DE LA LANGUE] vous REGLAGE DE L'ECRAN TYPE TV:... -
Page 202: (Choix De La Langue) Réglages De L'écran
Conseil Réglages de l’écran Si vous sélectionnez [AUTRES t] dans [MENU DVD], [AUDIO] ou [SOUS-TITRE], sélectionnez et (REGLAGE DE L’ECRAN) entrez le code de langue à partir de la liste en utilisant les touches numériques (page 114). Après avoir effectué une sélection, le code de langue (4 chiffres) s’affiche de nouveau lorsque vous Choisissez les réglages en fonction du téléviseur sélectionnez [AUTRES t]. - Page 203 x SORTIE COMPOSANTE 4:3 LETTER BOX Modifie le type de sortie de signal provenant des prises COMPONENT VIDEO OUT de la chaîne. Pour plus d’informations sur les différents types, reportez-vous à la page 107. 4:3 PAN SCAN INTERLACE Sélectionnez ce paramètres si vous êtes raccordé...
-
Page 204: (Reglage De L'ecran) Réglages Personnalisés
Remarques Réglages personnalisés • Si votre téléviseur accepte les signaux progressifs, raccordez les prises COMPONENT VIDEO OUT de (REGLAGE PERSONNALISE) la chaîne au téléviseur à l’aide d’un cordon pour composants vidéo (non fourni) et réglez le format progressif. • Lorsque [PROGRESSIVE] est sélectionné sous Permet de régler le contrôle parental et d’autres [REGLAGE DE L’ECRAN], aucun signal n’est paramètres. - Page 205 • Suivant le DVD, le canal audio prioritaire peut être x DATE JPEG prédéterminé. Dans ce cas, vous ne pouvez pas Modifie l’ordre des informations relatives à la donner la priorité aux formats audio DTS, Dolby date d’une image JPEG dans le menu de Digital ou MPEG en sélectionnant [AUTO].
-
Page 206: Réglages Des Enceintes
Schéma des positions Réglages des enceintes (REGLAGE H-P) Pour optimiser le son surround, réglez la dimension des enceintes que vous avez raccordées et leur distance par rapport à la position d’écoute. Utilisez ensuite le test de tonalité pour régler le niveau et la balance des enceintes au même niveau. - Page 207 x DISTANCE SURROUND La distance de l’enceinte surround Le réglage de distance par défaut des enceintes ARRIERE arrière peut être réduite jusqu’à 4,6 1,6 m/ par rapport à la position d’écoute est illustré ci- mètres (15 pieds) maximum de la 5 pieds dessous.
- Page 208 SURROUND Règle le niveau de l’enceinte Réglage de la balance et du ARRIERE surround arrière (– 10 dB à + 10dB, niveau des enceintes à l’aide 0 dB incréments de 1 dB). (apparaît quand de la tonalité de test vous réglez le paramètre Appuyez sur DVD SETUP en mode [SURROUND...
- Page 209 CUSTOMIZE Réglage des enceintes à DUAL MONO MAIN l’aide de la fenêtre d’affichage du panneau frontal de la MAIN+SUB chaîne MAIN/SUB SL SR REV Vous pouvez régler les enceintes à l’aide du menu AMP qui apparaît sur l’affichage du SB DEC SB MATRIX panneau frontal.
- Page 210 Appuyez sur ENTER ou sur c. SB DIST La distance de l’enceinte (distance surround arrière peut être Appuyez sur X/x pour sélectionner surround réduite jusqu’à 4,6 mètres (15 l’élément souhaité, puis appuyez sur arrière) pieds) maximum de la ENTER ou sur c. 1,6 m/ position d’écoute par rapport 5 pieds...
- Page 211 SL LEVEL SB DEC Règle le niveau gauche des SB MATRIX (niveau (décodeur enceintes surround (– 6dB à + SB AUTO surround arrière 6dB, incréments de 1dB). SB OFF gauche) surround) Pour plus de détails, voir « Sélection du mode de SR LEVEL Règle le niveau droit des décodage surround arrière »...
-
Page 212: Configuration Rapide Et Réinitialisation Du Système
Remarques Configuration rapide et • Quand vous sélectionnez [REINITIALISATION], tous les réglages par défaut sont rétablis. réinitialisation du • Quand vous mettez la chaîne sous tension après une réinitialisation, le message de guidage s’affiche sur système l’écran du téléviseur. Pour exécuter la configuration rapide (page 33), appuyez sur ENTER, afin de (REGLAGE) revenir à... -
Page 213: Informations Complémentaires
[SORTIE COMPOSANTE] sur remédier au problème. Si le problème persiste, [INTERLACE] (page 89). consultez votre revendeur Sony le plus proche. • Lorsque [PROGRESSIVE] est sélectionné sous [REGLAGE DE L’ECRAN], aucun signal n’est Alimentation reproduit à... - Page 214 Le caisson des graves ne reproduit aucun Aucun son ou un son très faible uniquement son. est diffusé par les enceintes surround. • Vérifiez les réglages et les raccordements des • Vérifiez les raccordements et les réglages de enceintes (pages 35, 92). l’enceinte.
- Page 215 Le témoin POWER/ON LINE vire Impossible de lire le fichier image JPEG. momentanément au rouge. • Le CD de données n’est pas enregistré au format • Le témoin vire momentanément au rouge pendant JPEG conformément aux normes ISO9660 la lecture d’un disque MP3 ou DVD, ou encore Niveau 1/Niveau 2 ou Joliet.
- Page 216 • Le DVD ne permet pas de changer les angles. Impossible d’éjecter un disque et « LOCKED » apparaît sur l’affichage du panneau frontal. • Contactez votre revendeur Sony ou un centre de service après-vente Sony agréé. « C-32 » apparaît sur l’affichage du panneau frontal.
-
Page 217: Spécifications
Partie amplificateur Spécifications Système Système de synthétiseur numérique à boucle à verrouillage de phase à CARACTERISTIQUES DE PUISSANCE quartz AUDIO PUISSANCE DE SORTIE ET DISTORSION HARMONIQUE TOTALE Partie tuner FM Gamme de syntonisation 87,5 – 108,0 MHz Avec charge de 4 ohms, les deux canaux étant excités, de 20 à... - Page 218 Enceintes Caractéristiques générales Avant/Surround (R) Chaîne Enceintes Bass reflex à deux voies Alimentation électrique 120 V CA, 60 Hz Haut-parleur 70 mm (2 pouces) dia. Consommation électrique 90 W type conique, 25 mm (1 Dimensions (approx.) 430 × 70 × 398 mm pouce) dia.
-
Page 219: Glossaire
Un CD VIDEO peut contenir 6 fois plus Pour que ceux-ci puissent être diffusés sans être d’informations audio que les CD classiques. déformés, Sony a développé une technologie de Il existe 2 versions de CD VIDEO. transmission infrarouge des signaux audio •... - Page 220 Nom générique du son surround produit par la enregistrements musicaux stéréo et fournit un technologie de traitement des signaux espace sonore large et profond. numériques développée par Sony. Contrairement aux champs acoustiques Dolby Surround Pro Logic surround précédents qui sont essentiellement Il s’agit de l’une des méthodes de décodage...
- Page 221 Les données vidéo utilisent le format MPEG 2, Index (Super Audio CD, CD) / Index vidéo (CD VIDEO) l’une des normes internationales appliquées pour la technologie de compression numérique. Il s’agit d’un nombre divisant une plage en Les données vidéo sont compressées environ sections pour localiser facilement l’endroit de 40 fois en moyenne.
- Page 222 Super Audio CD • Super Audio CD à 2 canaux + multi-canal Ce disque est constitué d’une zone de lecture à Un Super Audio CD peut reproduire des sons 2 canaux et d’une zone de lecture multi-canal. extrêmement fidèles à ceux d’origine grâce à l’emploi de la technologie DSD (Direct Stream Zone de lecture Digital).
-
Page 223: Index Des Composants Et Des Commandes
Index des composants et des commandes Pour plus de détails, reportez-vous aux pages indiquées entre parenthèses. Panneau frontal A Interrupteur [/1 (alimentation)/Témoin F VOLUME +/– (36, 94) STANDBY (veille) (36) G ./> (37, 40) B Témoins DISC1-5 (éjection)/témoins H x (arrêt) (37) (36) (lecture/pause) (36) (capteur de télécommande) (13) - Page 224 Affichage du panneau frontal Pendant la lecture d’un DVD Mode de lecture Statut de lecture Numéro du chapitre en cours Effet sonore en cours DISC S TITLE CHAP NIGHT DSGX REP 1 D EX DTS –ES Numéro du titre Effet sonore Mode en cours Durée de lecture en cours...
- Page 225 Pendant la lecture d’un JPEG Mode de lecture Numéro du fichier en cours DISC S JPEG Statut de lecture...
- Page 226 Panneau arrière VIDEO S VIDEO OPTICAL (DVD ONLY) DIGITAL IN AUDIO IN SPEAKER FM 75 COAXIAL FRONT R CENTER FRONT L DIR-T1 COMPOMEMT VIDEO OUT SURROUND BACK AUDIO IN VIDEO MONITOR OUT WOOFER WOOFER A Prises SPEAKER (enceinte) (16) F Bornes AM (21) G Prise FM 75 Ω...
- Page 227 Q TUNER MENU (menu Tuner) (81, 83) R TV [/1 (mise sous tension/veille) (76) S "/1 (veille) (33, 36, 81, 82) T SONY TV DIRECT (78) U TUNER/BAND (tuner/bande) (81, 82, 83) V FUNCTION (fonction) (33, 36, 79, 82, 83) W m/M/ SLOW, TUNING –/+...
-
Page 228: Liste Des Codes De Langue
Liste des codes de langue L’orthographe des langues est conforme à la norme ISO 639 : 1988 (E/F). Code Langue Code Langue Code Langue 1027 Afar 1245 Inupiak 1489 Russian 1028 Abkhazian 1248 Indonesian 1491 Kinyarwanda 1032 Afrikaans 1253 Icelandic 1495 Sanskrit 1039... -
Page 229: Liste Des Paramètres Du Menu De Configuration Dvd
Liste des paramètres du menu de configuration DVD Vous pouvez régler les paramètres suivants avec le menu d’installation DVD. L’ordre des paramètres affichés peut être différent de l’affichage réel. CHOIX DE LA LANGUE REGLAGE DE L’ECRAN ECRANS (Sélectionne la langue de TYPE TV 4:3 LETTER votre choix à... - Page 230 REGLAGE H-P TAILLE AVANT CENTRE NEANT SURROUND DERRIERE COTE NEANT SURROUND NEANT ARRIERE EXTR. GRAVES DISTANCE AVANT 1,0 m – 7,0 m/3 pieds – 23 pieds CENTRE 1,0 m – 7,0 m/3 pieds – 23 pieds* SURROUND 1,0 m – 7,0 m/3 pieds – 23 pieds* SURROUND 1,0 m –...
-
Page 231: Liste Du Menu Amp
Liste du menu AMP Vous pouvez régler les paramètres suivants avec le menu AMP à partir de la télécommande. SP SETUP CUSTOMIZE CENTER SP CENTER Y DUAL MONO MAIN CENTER N MAIN+SUB SURR SP SURR Y MAIN/SUB SURR N SL SR REV SURR B N SURR B SP SURR B Y... -
Page 232: Index
Index Chiffres 16:9 88 ECONOMISEUR D’ECRAN Panneau arrière 112 4:3 LETTER BOX 88 Panneau frontal 109 4:3 PAN SCAN 88 Ecoute de la radio 82 Piles 13 Ecran de menu PLAGE 54 Affichage du menu de Plage 7, 42, 107 commande 11 PLAY MODE 46, 47, 49 Affichage du panneau frontal... -
Page 236: Référence Rapide Pour La Télécommande
R Met le téléviseur sous et hors tension. S Met l’appareil sous et hors tension. T Met sous tension le téléviseur et la chaîne Sony, puis bascule vers la source d’entrée du téléviseur. U Sélectionne la bande AM ou FM.