Beurer BY 110 Mode D'emploi
Masquer les pouces Voir aussi pour BY 110:
Table des Matières

Publicité

Les langues disponibles
  • FR

Les langues disponibles

  • FRANÇAIS, page 44

Liens rapides

DE Video-Babyphone
Gebrauchsanweisung �������2
EN Video baby monitor
Instructions for use ���������23
FR Babyphone vidéo
Mode d'emploi ���������������44
ES Vigilabebés con vídeo
Instrucciones de uso ������66
IT
Babyphone video
Istruzioni per l'uso ����������88
TR Görüntülü bebek telsizi
Kullanım kılavuzu ����������109
RU Видеоняня
Инструкция по при-
менению�����������������������129
PL Elektroniczna niania wideo
Instrukcja obsługi �������� 152
BY 110

Publicité

Table des Matières
loading

Sommaire des Matières pour Beurer BY 110

  • Page 1 BY 110 DE Video-Babyphone Babyphone video Gebrauchsanweisung �������2 Istruzioni per l’uso ����������88 EN Video baby monitor TR Görüntülü bebek telsizi Instructions for use ���������23 Kullanım kılavuzu ����������109 FR Babyphone vidéo RU Видеоняня Mode d’emploi ���������������44 Инструкция по при- менению�����������������������129 ES Vigilabebés con vídeo Instrucciones de uso ������66...
  • Page 2 DEUTSCH Lesen Sie diese Gebrauchsanweisung sorgfäl- tig durch, bewahren Sie sie für den späteren Gebrauch auf, machen Sie sie anderen Benut- zern zugänglich und beachten Sie die Hinweise. WARNUNG • Das Gerät ist nur für den Einsatz im häuslichen/priva- ten Umfeld bestimmt, nicht im gewerblichen Bereich� •...
  • Page 3: Zum Kennenlernen

    Unser Name steht für hochwertige und eingehend geprüfte Qualitätsprodukte aus den Bereichen Wärme, Sanfte Therapie, Blutdruck/Diagnose, Gewicht, Massage, Beauty, Baby und Luft� Mit freundlicher Empfehlung Ihr Beurer-Team� Zum Kennenlernen Funktionen des Gerätes Dieses Video-Babyphone ermöglicht Ihnen, Ihr Baby bei Tag und Nacht zu sehen�...
  • Page 4: Table Des Matières

    Inhaltsverzeichnis 1. Lieferumfang ........4 7�7 Timer ����������������������������������������13 2. Zeichenerklärung........5 7�8 Kamera hinzufügen ������������������14 3. Warn- und Sicherheitshinweise ..6 7�9 Kamera löschen ������������������������14 4. Bestimmungsgemäßer Gebrauch ..8 7�10 Kamera-Übertragungsbild 5. Gerätebeschreibung ......8 wählen �������������������������������������15 5�1 Kamera „Baby“ �����������������������������8 7�11 Geräuschempfindlichkeits- 5�2 Elterneinheit „Monitor“ �����������������9 einstellung ��������������������������������15 5�3 Displaybeschreibung ������������������10 7�12 Frequenz wählen ���������������������16...
  • Page 5: Zeichenerklärung

    2. Zeichenerklärung Auf dem Gerät, in der Gebrauchsanweisung, auf der Verpackung und auf dem Typschild des Geräts werden folgende Symbole verwendet: WARNUNG Warnhinweis auf Verletzungsgefahren oder Gefahren für Ihre Gesundheit ACHTUNG Sicherheitshinweis auf mögliche Schäden am Gerät/Zubehör Hinweis Hinweis auf wichtige Informationen Gebrauchsanweisung lesen Entsorgung gemäß...
  • Page 6: Warn- Und Sicherheitshinweise

    3. Warn- und Sicherheitshinweise WARNUNG • Platzieren Sie die Kamera und die Zuleitung nie in Reichweite des Kin- des! Durch die Zuleitung kann es zu Strangulation und Verletzungen des Kindes kommen. • Halten Sie Kleinteile außerhalb der Reichweite von Kindern� • Halten Sie Kinder vom Verpackungsmaterial fern (Erstickungsgefahr)� •...
  • Page 7 • Die Kamera, die Elterneinheit und die Steckernetzteile dürfen nicht mit hei- ßen Oberflächen oder scharfkantigen Gegenständen in Berührung kommen� • Verwenden Sie keine Zusatzteile, die nicht vom Hersteller empfohlen bzw� als Zubehör angeboten werden� Hinweis • Prüfen Sie vor jeder Reklamation erst den Akku der Elterneinheit und wech- seln Sie diesen ggf�...
  • Page 8: Bestimmungsgemäßer Gebrauch

    4. Bestimmungsgemäßer Gebrauch WARNUNG • Verwenden Sie das Gerät nur zum Überwachen Ihres Babys, wenn Sie Ihr Baby nicht direkt beaufsichtigen können� Es ist kein Ersatz für Ihre persön- liche, verantwortungsvolle Aufsicht! • Jeder unsachgemäße Gebrauch kann gefährlich sein� • Das Video-Babyphone ist nur für den Einsatz im häuslichen/privaten Um- feld bestimmt, nicht im gewerblichen Bereich�...
  • Page 9: 5�2 Elterneinheit „Monitor

    5.2 Elterneinheit „Monitor“ 1� EIN / AUS-Taste 9� Display 2� Menü-Taste / Richtungstaste oben 10� Lautstärke lauter 3� Mikrofon 11� Lautstärke leiser 4� Gegensprechfunktion / 12� Batteriefachabdeckung Bildschirmhelligkeit erhöhen 5� OK-Taste 13� Anschluss für Steckernetzteil 6� Akkustandanzeige grün = Akku vollständig geladen / Elterneinheit über Stecker- 14�...
  • Page 10 5.3 Displaybeschreibung 1� Signalstärke 10� Timer-Menü 2� Raumtemperatur-Anzeige 11� Kamera hinzufügen 3� Timer 12� Kamerawechsel-Menü 4� Energiesparmodus 13� Geräuschempfindlichkeitseinstellung 5� Gegensprechfunktion 14� Frequenzeinstellung 6� Kameranummer 15� Energiesparmodus 7� Akkustand 16� Temperatur-Menü 8� Zoomeinstellung 17� Bewegungssensoreinstellung 9� Schlaflieder-Menü 18� Auf Werkseinstellung zurücksetzen...
  • Page 11: Inbetriebnahme

    6. Inbetriebnahme 6.1 Gerät für den ersten Gebrauch vorbereiten Vor der ersten Anwendung sollten die Akkus vollständig geladen werden� Der Ladevorgang dauert ca� 4 Stunden� Das Gerät bietet danach eine Betriebs- dauer von etwa 8 Stunden� Sie erhalten eine maximale Kapazität des Akkus, wenn Sie den Akku mindestens einmal alle 6 Monate entladen�...
  • Page 12: Steckernetzteil

    3� Schließen Sie die Batteriefachabdeckung auf der Rückseite der Elternein- heit wieder, bis sie hör- und spürbar fest einrastet� 4� Um die Elterneinheit einzuschalten, halten Sie die EIN / AUS-Taste der Oberseite ca� 3 Sekunden lang gedrückt� Wenn die Kamera bereits eingeschaltet ist, erscheint auf dem Bildschirm automatisch das Übertra- gungsbild der Kamera�...
  • Page 13: 7�5 Zoom-Funktion

    • Um in das Einstellungs-Menü zu gelangen, schalten Sie die Elterneinheit ein und drücken Sie die ( ) -Taste� Am unteren Bildschirmrand der Elter- neinheit erscheint das folgende Einstellungs-Menü: Mit der ( ) und ( ) -Taste können Sie durch das Menü navigieren� Um das Einstellungs-Menü...
  • Page 14: 7�8 Kamera Hinzufügen

    • Wählen Sie mit den Richtungstasten ( ) / ( ) den Menüpunkt � • Wählen Sie mit den Richtungstasten ( ) / ( ) Ihre gewünschte Alarmzeit ( 2 H, 3 H, 4 H oder 5 H)� • Bestätigen Sie mit der ( OK )-Taste� Kamera hinzufügen Sie können eine Elterneinheit mit bis zu vier Kameras verbinden�...
  • Page 15: 10 Kamera-Übertragungsbild

    7.10 Kamera-Übertragungsbild wählen Wenn Sie das Übertragungsbild einer Kamera auswählen wollen, gehen Sie wie folgt vor: • Drücken Sie die ( ) -Taste� • Wählen Sie mit den Richtungstasten ( ) / ( ) den Menüpunkt � • Bestätigen Sie mit der ( OK ) -Taste� Auf dem Bildschirm erscheint 1, 2, 3, 4 oder (wechselndes Kamera-Übertragungsbild)�...
  • Page 16: 12 Frequenz Wählen

    7.12 Frequenz wählen Die Babyeinheit kann wahlweise mit 50 Hz oder 60 Hz an die Elterneinheit senden� Voreingestellt ist die in Europa übliche Frequenz von 50 Hz� Die kor- rekte Wahl der Frequenz kann helfen das Bildschirm-Flimmern bei künstlicher Beleuchtung zu reduzieren� Um die Frequenz zu ändern, gehen Sie wie folgt vor: •...
  • Page 17: 15 Temperaturalarm Einstellen

    7.15 Temperaturalarm einstellen Zusätzlich können Sie einen Temperaturalarm mit Ober- und Untergrenze einstellen� Sollte die aktuelle Umgebungstemperatur der Kamera die einge- stellte Ober- oder Untergrenze über- bzw� unterschreiten, beginnt die Elter- neinheit zu piepsen� Um die Ober- und Untergrenzen für den Temperaturalarm einzustellen, ge- hen Sie wie folgt vor: •...
  • Page 18: 17 Auf Werkseinstellung

    7.17 Auf Werkseinstellung zurücksetzen Um die Elterneinheit wieder auf die Werkseinstellung zurückzusetzen, ge- hen Sie wie folgt vor: • Drücken Sie die ( ) -Taste� • Wählen Sie mit den Richtungstasten ( ) / ( ) den Menüpunkt � • Wählen Sie mit den Richtungstasten ( ) / ( ) das Feld „YES“�...
  • Page 19: Zubehör- Und Ersatzteile

    • Reinigen Sie die Kamera / Elterneinheit mit einem weichen, trockenen Tuch� Verwenden Sie keine scheuernden Reinigungsmittel� 10. Zubehör- und Ersatzteile Für Nachkauf- / Zusatzartikel besuchen Sie www�beurer�com oder wenden Sie sich an die jeweilige Serviceadresse in Ihrem Land (laut Serviceadresse)� Die Nachkauf-/ Zusatzartikel sind zusätzlich im Handel erhältlich�...
  • Page 20: Entsorgung

    • Befindet sich ein anderes technisches Gerät Signal ist schwach, die Ver- (wie zum Beispiel eine Mikrowelle) im Pfad zwi- bindung bricht immer wie- schen Kamera und Elterneinheit, entfernen Sie der ab oder Störungen tre- das technische Gerät oder schalten Sie es aus� ten auf�...
  • Page 21: Technische Angaben

    13. Technische Angaben Digitales Empfangsgerät Anzahl Kanäle 21 Kanäle Frequenz 2,4 - 2,483 GHz Sendeleistung 13,01 dBm Display 2,8“ LCD Übertragungstechnik Infrarottechnik mit ECO⁺ modus Maße Kamera 7,4 x 7,0 x 10,0 cm Maße Elterneinheit 13,0 x 2,1 x 7,2 cm Gewicht Kamera 114 g Gewicht Elterneinheit...
  • Page 22: Garantie

    Wir bestätigen hiermit, dass dieses Produkt der europäischen RED Richtli- nie 2014/53/EU entspricht� Die CE-Konformitätserklärung zu diesem Produkt finden Sie unter: https://www�beurer�com/web/we-landingpages/de/cedeclarationofconfor- mity�php 14. Garantie Nähere Informationen zur Garantie und den Garantiebedingungen finden Sie im mitgelieferten Garantie-Faltblatt�...
  • Page 23 ENGLISH Read these instructions for use carefully and keep them for later use. Make them accessible to other users and note the information they contain. WARNING • The device is only intended for domestic/private use, not for commercial use� • This device may be used by children over the age of 8 and by people with reduced physical, sensory or men- tal skills or a lack of experience or knowledge, provided that they are supervised or have been instructed on...
  • Page 24: Getting To Know Your Device

    With kind regards, Your Beurer team� Getting to know your device Functions of the device This video baby monitor allows you to keep an eye on your baby during the day and at night�...
  • Page 25: Included In Delivery

    Table of contents 1. Included in delivery ......25 7�8 Adding a camera ���������������������35 2. Signs and symbols ......26 7�9 Deleting a camera ���������������������35 3. Warnings and safety notes ....27 7�10 Selecting camera transmission 4. Intended use ........29 image ���������������������������������������36 5. Device description ......29 7�11 Noise sensitivity setting �����������36 5�1 “Baby”...
  • Page 26: Signs And Symbols

    2. Signs and symbols The following symbols are used on the device, in these instructions for use, on the packaging and on the type plate for the device: WARNING Warning notice indicating a risk of injury or damage to health IMPORTANT Safety note indicating possible damage to the device/ accessories...
  • Page 27: Warnings And Safety Notes

    3. Warnings and safety notes WARNING • Always position the camera and power cord out of the reach of chil- dren. The power cord may cause strangulation or injury to children. • Keep small parts out of reach of children� •...
  • Page 28 Note • Before making a claim, please check the battery in the parent unit and re- place it if necessary� • Repairs must only be carried out by Customer Services or authorised re- tailers� Under no circumstances should you open or repair the camera or parent unit yourself, as faultless functionality can no longer be guaranteed thereafter�...
  • Page 29: Intended Use

    4. Intended use WARNING • Only use the device to monitor your baby when you cannot mind your baby directly� It is not a substitute for your own personal, responsible supervision! • Any form of improper use can be dangerous� •...
  • Page 30: 5�2 "Monitor" Parent Unit

    5.2 “Monitor” parent unit 1� ON/OFF button 9� Display 2� Menu button/up direction button 10� Increase volume 3� Microphone 11� Decrease volume 4� Intercom function/increase 12� Battery compartment lid screen brightness 5� OK button 13� Connection for mains part plug 6�...
  • Page 31: 5�3 Display Description

    5.3 Display description 1� Signal strength 10� Timer menu 2� Room temperature display 11� Add camera 3� Timer 12� Camera change menu 4� Energy saving mode 13� Noise sensitivity setting 5� Intercom function 14� Frequency setting 6� Camera number 15� Energy saving mode 7�...
  • Page 32: Initial Use

    6. Initial use 6.1 Preparing the device for first time use Before the first use, the batteries should be fully charged� The charging pro- cess lasts for approx� 4 hours� The device then offers an operating time of approx� 8 hours� You will get the maximum capacity from your battery if you run down the battery at least once every 6 months�...
  • Page 33: Usage

    4� To switch on the parent unit, press and hold the ON/OFF button on the top for approx� 3 seconds� If the camera is already switched on, the trans- mission image from the camera will automatically appear on the screen� If the camera is still switched off, an acoustic signal is emitted and pears on the display�...
  • Page 34: 7�5 Zoom Function

    • To access the settings menu, switch the parent unit on and press the ( button� The following settings menu appears at the bottom edge of the parent unit screen: You can navigate through the menu using the ( ) and the ( ) button�...
  • Page 35: 7�8 Adding A Camera

    • Confirm using the ( OK ) button� Adding a camera You can connect one parent unit with up to four cameras� To add a camera to the parent unit, proceed as follows: • Press the ( ) button� • Use the direction buttons ( ) / ( ) to select menu item �...
  • Page 36: 10 Selecting Camera Transmission

    7.10 Selecting camera transmission image If you wish to select the transmission image of a camera, proceed as follows: • Press the ( ) button� • Use the direction buttons ( ) / ( ) to select menu item � •...
  • Page 37: 12 Selecting The Frequency

    7.12 Selecting the frequency The baby unit can either transmit to the parent unit at 50 Hz or 60 Hz� The frequency which is most common in Europe (50 Hz) has been preset� Choos- ing the correct frequency can help to reduce screen flickering with artificial lighting�...
  • Page 38: 15 Setting The Temperature Alarm

    7.15 Setting the temperature alarm Additionally, you can set a temperature alarm with an upper and lower limit� If the current ambient temperature of the camera exceeds or falls short of the set upper or lower limit, the parent unit will begin beeping� To set the upper and lower limits for the temperature alarm, proceed as follows: •...
  • Page 39: Useful Information About The Baby Monitor

    • Use the direction buttons ( ) / ( ) to select the “YES” field� • Confirm using the ( OK ) button� 8. Useful information about the baby monitor • Operating the parent unit with the battery minimises electrosmog from electrical and magnetic alternating fields�...
  • Page 40: Accessories And Replacement Parts

    10. Accessories and replacement parts For replacement parts and additional items visit www�beurer�com or con- tact the corresponding service address in your country (according to the service address list)� Replacement parts and additional items are also available from retailers� Replacement parts and additional items...
  • Page 41: Disposal

    • If another technical device such as a micro- The signal is weak, the wave is in the area between the camera and connection keeps failing or the parent unit, remove the technical device there is interference� or switch it off� •...
  • Page 42: Technical Specifications

    13. Technical specifications Type Digital receiver Number of channels 21 channels Frequency 2�4 – 2�483 GHz Transmission power 13�01 dBm Display 2�8” LCD Transmission Infrared technology with ECO⁺ mode technology Camera dimensions 7�4 x 7�0 x 10�0 cm Parent unit 13�0 x 2�1 x 7�2 cm dimensions Camera weight...
  • Page 43: Warranty

    We hereby confirm that this product complies with the European RED Directive 2014/53/EU� The CE Declaration of Conformity for this product can be found under: https://www�beurer�com/web/we-landingpages/de/cedeclarationofconformity� 14. Warranty Further information on the warranty and warranty conditions can be found in the warranty leaflet supplied�...
  • Page 44 FRANÇAIS Lisez attentivement ce mode d’emploi, con- servez-le pour un usage ultérieur, mettez-le à disposition des autres utilisateurs et suivez les consignes qui y figurent. AVERTISSEMENT • L’appareil ne doit être utilisé que dans un environne- ment domestique/privé et non dans un cadre profes- sionnel�...
  • Page 45 Sincères salutations, Votre équipe Beurer� Familiarisation avec l’appareil Fonctions de l’appareil Ce babyphone vidéo vous permet de voir votre bébé jour et nuit� Que vous fassiez des activités dans d’autres pièces ou dans le jardin ou pendant votre...
  • Page 46 Table des matières 1. Contenu ..........46 7�10 Sélectionner l’image retransmise 2. Symboles utilisés ......47 par la caméra ���������������������������57 3. Consignes d’avertissement et de mi- 7�11 Réglage de la sensibilité au se en garde........48 bruit �����������������������������������������58 4. Utilisation conforme aux 7�12 Sélectionner la fréquence ��������58 recommandations ......50 7�13 Mode économie d'énergie ������59 5.
  • Page 47: Symboles Utilisés

    2. Symboles utilisés Les symboles suivants sont utilisés sur le mode d’emploi, sur l’emballage et sur la plaque signalétique de l’appareil : AVERTISSEMENT Ce symbole vous avertit des risques de blessures ou des dan- gers pour votre santé ATTENTION Ce symbole vous avertit des éventuels dommages au niveau de l’appareil ou d’un accessoire Remarque Indication d’informations importantes...
  • Page 48: Consignes D'avertissement Et De Mise En Garde

    3. Consignes d’avertissement et de mise en garde AVERTISSEMENT • Ne laissez jamais la caméra et l'alimentation à portée des enfants ! Le câble d'alimentation peut étrangler ou blesser l'enfant. • Gardez les petites pièces hors de portée des enfants� • Conservez l’emballage hors de portée des enfants – Risque d’étouffement� •...
  • Page 49 Remarque • Avant toute réclamation, vérifiez d'abord l’état de la batterie de l'unité pa- rents et changez-la le cas échéant� • Seul le service client ou un opérateur autorisé peut procéder à une répa- ration� Vous ne devez en aucun cas ouvrir ou réparer la caméra ou l'unité parents vous-même ;...
  • Page 50: Utilisation Conforme Aux Recommandations

    4. Utilisation conforme aux recommandations AVERTISSEMENT • N’utilisez l’appareil que pour surveiller votre bébé lorsque vous ne pouvez pas le voir direc tement� Il ne remplace pas votre surveillance en personne de manière responsable ! • Toute utilisation inappropriée peut être dangereuse� •...
  • Page 51: 5�2 Unité Parents « Moniteur

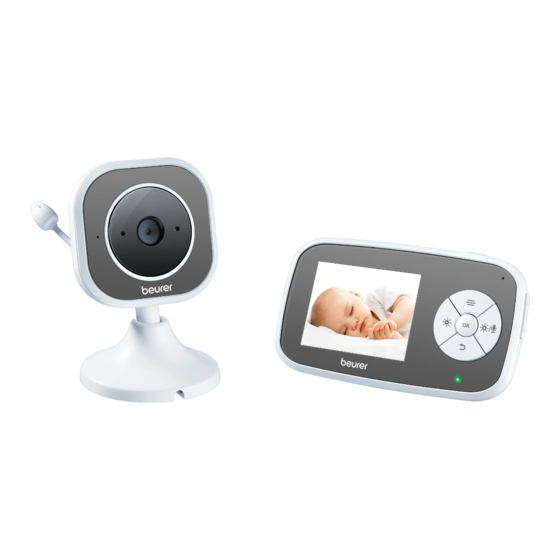
    5.2 Unité parents « moniteur » 1� Touche MARCHE/ARRÊT 9� Écran 2� Touche menu / touche direction- 10� Monter le volume nelle vers le haut 3� Microphone 11� Baisser le volume 4� Fonction interphone / augmenter 12� Couvercle du compartiment à la luminosité de l’écran piles 5�...
  • Page 52: 5�3 Description De L'affichage

    5.3 Description de l’affichage 1� Puissance du signal 10� Menu de minuterie 2� Affichage de la température ambiante 11� Ajouter une caméra 3� Minuteur 12� Menu de changement de la caméra 4� Mode économie d'énergie 13� Réglage de la sensibilité au bruit 5�...
  • Page 53: Mise En Service

    6. Mise en service 6.1 Préparer l’appareil pour la première utilisation Les accus doivent être complètement chargés avant la première utilisation� Le processus de charge dure environ 4 heures� L'appareil offre ensuite une durée de fonctionnement d'environ 8 heures� Vous obtenez une capacité maximale des accus lorsque vous les déchargez au moins une fois tous les 6 mois�...
  • Page 54: Utilisation

    3� Refermez le couvercle du compartiment à piles à l'arrière de l'unité parents, jusqu'à entendre et sentir qu'il s'enclenche� 4� Pour allumer l’unité parents, maintenez la touche MARCHE/ARRÊT le dessus enfoncée pendant 3 secondes environ� Si la caméra est déjà al- lumée, l'image retransmise par la caméra apparaît automatiquement à...
  • Page 55: 7�5 Fonction Zoom

    • Pour accéder au menu de réglage des paramètres, allumez l'unité parents et appuyez sur la touche ( )� Le menu des paramètres suivant s'affiche sur le bord inférieur de l’unité parents : Avec les touches ( ) et ( ) , vous pouvez parcourir le menu� Pour quitter le menu de réglage, appuyez sur la touche retour�...
  • Page 56: 7�8 Ajouter Une Caméra

    Minuteur Sur l'unité parents, vous pouvez régler une minuterie qui retentit après 2, 3, 4 ou 5 heures� À la fin du temps réglé, l’unité parents commence à bipper� Procédez comme suit pour activer une minuteur : • Appuyez sur la touche ( )�...
  • Page 57: 7�9 Supprimer Une Caméra

    Supprimer une caméra Procédez comme suit si vous voulez supprimer la connexion avec une ca- méra : • Appuyez sur la touche ( )� • Avec les touches directionnelles ( ) / ( ), sélectionnez le point de menu � • Avec les touches directionnelles ( ) / ( ), sélectionnez le Moins —�...
  • Page 58: 11 Réglage De La Sensibilité Au

    7.11 Réglage de la sensibilité au bruit Le réglage de la sensibilité au bruit de l’unité bébé indique ce que vous entendez sur l’unité parents� Si vous réglez le niveau de sensibilité sur élevé (H), vous entendez même les bruits très légers sur l'unité parents� Si vous réglez le niveau de sensibilité...
  • Page 59: 13 Mode Économie D'énergie

    7.13 Mode économie d'énergie L'unité parents comprend un mode économie d'énergie� Quand vous acti- vez le mode économie d'énergie, l'écran s'éteint automatiquement après 2, 5 ou 10 minutes, au choix� Procédez comme suit pour régler le mode d’économie d’énergie : • Appuyez sur la touche ( )�...
  • Page 60: 16 Régler L'alarme De Mouvement

    • Avec les touches directionnelles ( ) / ( ), sélectionnez le point de me- � • Confirmez avec la touche ( )� • Avec la touche directionnelle ( ), sélectionnez la limite supérieure ou inférieure� « 20 » pour régler la limite inférieure (plage 10 - 20 °C)� « 40 »...
  • Page 61: Tout Ce Qu'il Faut Savoir À Propos Du Babyphone

    8. Tout ce qu'il faut savoir à propos du babyphone • Si vous utilisez l'unité parents sur batterie, ceci réduit la pollution électro- magnétique par les champs alternatifs électriques et magnétiques� • Vous pouvez augmenter la portée d'un babyphone en plaçant la caméra à...
  • Page 62: Accessoires Et Pièces De Rechange

    10. Accessoires et pièces de rechange Pour commander des consommables/articles supplémentaires, rendez-vous sur le site www�beurer�com ou contactez le service après-vente concerné dans votre pays (cf� la liste des adresses du service après-vente)� Les consommables et les articles supplémentaires sont disponibles dans le commerce�...
  • Page 63: Élimination

    • Si un autre appareil technique (comme un mi- Le signal est faible, la cro-ondes) se trouve sur la trajectoire entre la connexion est régulière- caméra et l'unité parents, retirez l'appareil ou ment interrompue ou éteignez-le� des perturbations survi- ennent� •...
  • Page 64: Caractéristiques Techniques

    13. Caractéristiques techniques Type Récepteur numérique Nombre de canaux 21 canaux Fréquence 2,4 - 2,483 GHz Puissance d’émission 13,01 dBm Écran LCD 2,8“ Technique de trans- Technique infrarouge avec mode ECO⁺ mission Dimensions de la 7,4 x 7,0 x 10,0 cm caméra Dimensions de l’unité...
  • Page 65: Garantie

    Nous garantissons par la présente que ce produit est conforme à la direc- tive européenne RED 2014/53/EU� Vous pouvez trouver la déclaration de conformité CE de ce produit à l’adresse suivante : https://www�beurer�com/web/we-landingpages/de/cedeclarationofconfor- mity�php 14. Garantie Pour plus d’informations sur la garantie et les conditions de garantie, veuillez...
  • Page 66 ESPAÑOL Lea atentamente estas instrucciones de uso, consérvelas para su futura utilización, pónga- las a disposición de otros usuarios y respete las indicaciones. ADVERTENCIA • Este aparato se ha diseñado exclusivamente para su uso privado o en el hogar y no para uso industrial� •...
  • Page 67: Información General

    ámbito de aplicación de calor, tratamiento suave, presión arterial/diagnós- tico, peso, masaje, belleza, bebés y aire� Atentamente, El equipo de Beurer� Información general Funciones del aparato Este vigilabebés con vídeo le permite ver a su bebé día y noche� Estará siem- pre conectado con su bebé, tanto si está...
  • Page 68: Artículos Suministrados

    Índice 1. Artículos suministrados ....68 7�10 Seleccionar imagen de cámara 79 2. Explicación de los símbolos ....69 7�11 Ajuste de sensibilidad al ruido �80 3. Indicaciones de advertencia y de se- 7�12 Seleccionar frecuencia ������������80 guridad ..........70 7�13 Modo de ahorro de energía ����80 4.
  • Page 69: Explicación De Los Símbolos

    2. Explicación de los símbolos En el aparato, en las instrucciones de uso, en el embalaje y en la placa de características del aparato se utilizan los siguientes símbolos: ADVERTENCIA Indicación de advertencia sobre peligro de lesiones u otros pe- ligros para la salud ATENCIÓN Indicación de seguridad sobre posibles daños en el aparato o...
  • Page 70: Indicaciones De Advertencia Y De Seguridad

    3. Indicaciones de advertencia y de seguridad ADVERTENCIA • ¡Coloque siempre la cámara y el cable fuera del alcance del niño! De lo contrario, podría lesionarse o estrangularse con él. • Mantenga las piezas pequeñas fuera del alcance de los niños� •...
  • Page 71 • No utilice piezas adicionales no recomendadas por el fabricante ni ofreci- das como accesorio� Nota • Antes de hacer una reclamación, compruebe el estado de la batería de la unidad para padres y cámbiela si es necesario� • Las reparaciones únicamente deben ser realizadas por el servicio de aten- ción al cliente o por distribuidores autorizados�...
  • Page 72: Uso Correcto

    4. Uso correcto ADVERTENCIA • Utilice el aparato para vigilar a su bebé únicamente cuando no pueda hacerlo directamente� En ningún caso es un sustituto de su tarea como padre o madre� • Todo uso inadecuado puede ser peligroso� • Este vigilabebés con vídeo ha sido diseñado exclusivamente para su uso privado o en el hogar y no para uso industrial�...
  • Page 73: 5�2 Unidad Para Padres "Monitor

    5.2 Unidad para padres "Monitor" 1� Tecla de encendido y apagado 9� Pantalla 2� Tecla de menú/tecla de dirección 10� Volumen más alto arriba 3� Micrófono 11� Volumen más bajo 4� Función de intercomunicación/ 12� Tapa del compartimento de la aumentar la luminosidad de la batería pantalla...
  • Page 74: 5�3 Descripción De La Pantalla

    5.3 Descripción de la pantalla 1� Intensidad de la señal 10� Menú de temporizador 2� Indicación de la temperatura ambiente 11� Agregar cámara 3� Temporizador 12� Menú de cambio de cámara 4� Modo de ahorro de energía 13� Ajuste de sensibilidad al ruido 5�...
  • Page 75: Puesta En Funcionamiento

    6. Puesta en funcionamiento 6.1 Preparar el aparato para el primer uso Es necesario cargar las baterías completamente antes de utilizar el aparato por primera vez� El proceso de carga dura aproximadamente 4 horas� Una vez recargada la batería, el aparato tiene una autonomía de unas 8 horas� Conseguirá...
  • Page 76: 6�3 Puesta En Funcionamiento De La Unidad Para Padres Con

    6.3 Puesta en funcionamiento de la unidad para padres con batería 1� Deslice hacia un lado la tapa del compartimento de la batería situado en parte trasera de la unidad para padres� 2� Inserte la batería suministrada en su comparti- mento con la superficie +/- dorada hacia ade- lante y con el lado rotulado hacia arriba, como se muestra en la figura�...
  • Page 77: 7�3 Función De Intercomunicación

    7.3 Función de intercomunicación La unidad para padres dispone de una función de intercomunicación� Para activarla, mantenga pulsada la tecla ( ) de la unidad para padres y hable� Las palabras que pronuncie se escucharán en la cámara� Para desactivar la función de intercomunicación, vuelva a soltar la tecla ( )�...
  • Page 78: 7�8 Agregar Cámara

    • Confirme con la tecla ( )� • Para modificar el volumen de las nanas, pulse la tecla lateral (–) o (+) � Temporizador En la unidad para padres puede ajustar un temporizador que sonará tras 2, 3, 4 o 5 horas, según desee� Una vez transcurrido el tiempo ajustado, la unidad para padres empieza a pitar�...
  • Page 79: 7�9 Eliminar Cámara

    Eliminar cámara Si desea volver a eliminar la conexión con una cámara, proceda del siguien- te modo: • Pulse la tecla ( )� • Seleccione con las teclas de dirección ( ) la opción de menú � • Seleccione con las teclas de dirección ( ) el signo menos —�...
  • Page 80: 11 Ajuste De Sensibilidad Al Ruido

    7.11 Ajuste de sensibilidad al ruido El ajuste de sensibilidad al ruido de la unidad para bebés indica lo que se oye en la unidad para padres� Si ajusta el nivel de sensibilidad a alto (H), escuchará incluso sonidos muy bajos en la unidad para padres� Si ajusta el nivel de sensibilidad a medio (M), escuchará...
  • Page 81: 14 Seleccionar Unidad De

    • Seleccione con las teclas de dirección ( ) la duración tras la que la unidad para padres cambiará automáticamente al modo de ahorro de energía ( 2, 5 o 10 minutos )� Confirme con la tecla ( )� 7.14 Seleccionar unidad de temperatura Puede seleccionar que la temperatura ambiente se muestre en grados Cel- sius (ºC) o en grados Fahrenheit (ºF)�...
  • Page 82: 16 Ajustar Alarma De Movimiento

    7.16 Ajustar alarma de movimiento El vigilabebés dispone de una alarma de movimiento� La alarma de movimiento funciona de la siguiente manera: en cuanto la cámara de la unidad para bebés registra un movimiento, la unidad para padres empieza a emitir un pitido cada 40 segundos� Para activar la alarma de movimiento, proceda del siguiente modo: •...
  • Page 83: Limpieza Y Cuidado

    • Limpie la cámara/la unidad para padres con un paño suave seco� No use productos abrasivos� 10. Accesorios y piezas de repuesto Para adquirir artículos de reposición y complementos visite www�beurer�com o diríjase a la dirección de servicio técnico de su país (indicada en la lista de direcciones de servicio técnico)�...
  • Page 84: Resolución De Problemas

    11. Resolución de problemas La unidad para padres no Compruebe si se enciende� • el bloque de alimentación está bien insertado, • la batería está insertada correctamente, • la batería está totalmente cargada o si es ne- cesario cargarla o si está dañada� En la unidad para padres Compruebe si suena una señal acústica�...
  • Page 85: Eliminación

    Cuando no se puede rea- 1� Encienda la cámara y la unidad para padres� lizar ninguna transmisión, 2� En el menú de la unidad para padres elimine tiene la posibilidad de vol- la cámara y vuelva a configurarla como se ver a sincronizar digital- describe en "Agregar cámara"�...
  • Page 86 (según el estado de la batería, la temperatura am- biente, el modo y la frecuencia de carga de la ba- tería, etc�) Garantizamos que este producto cumple la Directiva europea RED 2014/53/ EU� Encontrará la declaración de conformidad CE de este producto en: https://www�beurer�com/web/we-landingpages/de/cedeclarationofconfor- mity�php...
  • Page 87: Garantía

    14. Garantía Encontrará más información sobre la garantía y las condiciones de la misma en el folleto de garantía suministrado�...
  • Page 88 ITALIANO Leggere attentamente le presenti istruzioni per l'uso, conservarle per impieghi futuri, ren- derle accessibili ad altri utenti e attenersi alle indicazioni. AVVERTENZA • L'apparecchio è destinato solo a uso domestico/privato e non commerciale� • Questo apparecchio può essere utilizzato da ragazzi di età...
  • Page 89 Beauty, Baby e aria� Cordiali saluti Il team Beurer Introduzione Funzioni dell'apparecchio Questo babyphone video consente di vedere il bambino di giorno e di notte�...
  • Page 90 Indice 1. Fornitura ..........90 7�10 Selezione dell'immagine 2. Spiegazione dei simboli ....91 trasmessa dalla telecamera ���101 3. Avvertenze e indicazioni di 7�11 Impostazione della sensibilità ai sicurezza ...........92 rumori ������������������������������������101 4. Uso conforme ........94 7�12 Selezione della frequenza ������102 5. Descrizione dell'apparecchio ..94 7�13 Modalità...
  • Page 91: Spiegazione Dei Simboli

    2. Spiegazione dei simboli I seguenti simboli sono utilizzati nelle istruzioni per l'uso, sull'imballo e sulla targhetta dell'appa recchio: AVVERTENZA Avvertimento di pericolo di lesioni o di pericoli per la salute ATTENZIONE Indicazione di sicurezza per possibili danni all'apparecchio/agli accessori Indicazione Indicazione di informazioni importanti Leggere le istruzioni per l'uso...
  • Page 92: Avvertenze E Indicazioni Di Sicurezza

    3. Avvertenze e indicazioni di sicurezza AVVERTENZA • Tenere la telecamera e l'alimentatore fuori dalla portata del bambino! Per evitare il rischio di strangolamento e lesioni. • Tenere le parti piccole fuori dalla portata dei bambini� • Tenere lontani i bambini dal materiale d'imballaggio (pericolo di soffoca- mento)�...
  • Page 93 • Non utilizzare moduli aggiuntivi non raccomandati dal produttore o non offerti come accessori� Indicazione • Prima di inoltrare eventuali reclami, testare la batteria ricaricabile dell'unità genitore e se necessario sostituirla� • Le riparazioni possono essere effettuate solo dal Servizio clienti o da ri- venditori autorizzati�...
  • Page 94: Uso Conforme

    4. Uso conforme AVVERTENZA • Utilizzare l'apparecchio solo per sorvegliare il bambino quando non è pos- sibile controllarlo direttamente� La responsabilità ultima della supervisione del bambino spetta in ogni caso ai genitori� • Qualsiasi uso non conforme comporta un pericolo� •...
  • Page 95: 5�2 Unità Genitore "Monitor

    5.2 Unità genitore "Monitor" 1� Pulsante ON / OFF 9� Display 2� Pulsante menu/pulsante di direzi- 10� Aumento del volume one superiore 3� Microfono 11� Abbassamento del volume 4� Funzione parla/ascolta / aumento 12� Coperchio del vano batterie della luminosità del display 5�...
  • Page 96: 5�3 Descrizione Del Display

    5.3 Descrizione del display 1� Forza del segnale 10� Menu Timer 2� Indicatore della temperatura ambiente 11� Aggiunta di una telecamera 3� Timer 12� Menu di commutazione telecamera 4� Modalità di risparmio energetico 13� Impostazione della sensibilità ai rumori 5� Funzione parla/ascolta 14�...
  • Page 97: Messa In Funzione

    6. Messa in funzione 6.1 Preparazione dell'apparecchio per il primo utilizzo Prima del primo utilizzo, caricare completamente la batterie ricaricabili� La carica dura circa 4 ore� L'autonomia dell'apparecchio è di circa 8 ore� Per sfruttare al meglio la capacità delle batterie ricaricabili, scaricarle almeno una volta ogni 6 mesi�...
  • Page 98: Utilizzo

    3� Richiudere il coperchio del vano batteria sul retro dell'unità genitore finché non scatta in posizione� 4� Per accendere l'unità genitore, tenere premuto il pulsante ON / OFF lato superiore per circa 3 secondi� Se la telecamera è già accesa, sul di- splay viene visualizzata automaticamente l'immagine trasmessa�...
  • Page 99: 7�5 Funzione Zoom

    • Per aprire il menu delle impostazioni, accendere l'unità genitore e premere il pulsante ( )� Nella parte inferiore del display dell'unità genitore viene visualizzato il seguente menu delle impostazioni: Con i pulsanti ( ) e ( ) è possibile navigare nel menu� Per uscire dal menu delle impostazioni, tenere premuto a lungo il pulsante indietro�...
  • Page 100: 7�8 Aggiunta Di Una Telecamera

    • Con i pulsanti di direzione ( ) / ( ) selezionare la voce di menu � • Con i pulsanti direzione ( ) / ( ) selezionare l'orario sveglia desiderato ( 2 H, 3 H, 4 H o 5 H)� •...
  • Page 101: 10 Selezione Dell'immagine Trasmessa Dalla Telecamera

    • Con i pulsanti di direzione ( ) / ( ) selezionare il numero della teleca- mera che si intende cancellare� • Confermare con il pulsante ( )� 7.10 Selezione dell'immagine trasmessa dalla telecamera Se si desidera selezionare l'immagine trasmessa di una telecamera, proce- dere nel seguente modo: •...
  • Page 102: 12 Selezione Della Frequenza

    7.12 Selezione della frequenza L'unità bambino può trasmettere all'unità genitore con una frequenza di 50 Hz o 60 Hz� La frequenza comunemente predefinita in Europa è di 50 Hz� Selezionare correttamente la frequenza può aiutare a ridurre la sfarfallio dello schermo in caso di illuminazione artificiale�...
  • Page 103: 15 Impostazione Dell'allarme

    7.15 Impostazione dell'allarme temperatura Inoltre, è possibile impostare un allarme temperatura con un limite superiore e uno inferiore� Se l'attuale temperatura ambiente della telecamera oltrepas- sa il limite superiore o scende al di sotto di quello inferiore, l'unità genitore inizia a emettere un segnale acustico� Per impostare i limiti superiore e inferiore dell'allarme temperatura, proce- dere nel seguente modo: •...
  • Page 104: 17 Ripristino Delle Impostazioni Di

    7.17 Ripristino delle impostazioni di fabbrica Per riportare l'unità genitore all'impostazione di fabbrica, procedere nel se- guente modo: • Premere il pulsante ( ) � • Con i pulsanti di direzione ( ) / ( ) selezionare la voce di menu �...
  • Page 105: Accessori E Ricambi

    • Pulire la telecamera e l'unità genitore con un panno asciutto e morbido� Non utilizzare detergenti abrasivi� 10. Accessori e ricambi Per articoli di postvendita/aggiuntivi visitare www�beurer�com o rivolgersi all'Assistenza clienti del proprio Paese (consultare l'elenco con gli indirizzi)� Gli articoli di postvendita/aggiuntivi sono disponibili anche in commercio�...
  • Page 106: Smaltimento

    Il segnale è debole, il col- • Se tra la telecamera e l'unità genitore si trova legamento si interrompe un altro apparecchio (come ad esempio un sempre o ci sono interfe- microonde), allontanare l'apparecchio o spe- renze� gnerlo� • Verificare se tra la telecamera e l'unità genitore ci sono altri elementi di disturbo, come ad es�...
  • Page 107: Dati Tecnici

    13. Dati tecnici Tipo Ricevitore digitale Numero canali 21 canali Frequenza 2,4 - 2,483 GHz Potenza di trasmis- 13,01 dBm sione Display LCD da 2,8" Tecnica di trasmis- Tecnologia a infrarossi con modalità ECO⁺ sione Dimensioni tele- 7,4 x 7,0 x 10,0 cm camera Dimensioni unità...
  • Page 108: Garanzia

    Con la presente confermiamo che il prodotto è conforme alla direttiva europea RED 2014/53/EU� La Dichiarazione di Conformità relativa al presente prodotto è reperibile su: https://www�beurer�com/web/we-landingpages/de/cedeclarationofconfor- mity�php 14. Garanzia Per ulteriori informazioni sulla garanzia e sulle condizioni di garanzia, con-...
  • Page 109 TÜRKÇE Bu kullanım kılavuzunu dikkatle okuyun, ileri- de gerekebileceği için saklayın, diğer kullanı- cıların erişebilmesini sağlayın ve içindeki yöner gelere uyun. UYARI • Cihaz ticari kullanım için değil, yalnızca evde/kişisel amaçlarla kullanılmak üzere tasarlanmıştır� • Bu cihaz, 8 yaş ve üzeri çocuklar ve fiziksel, algısal ve akli becerileri kısıtlı...
  • Page 110: Ürün Özellikleri

    ürünlerimiz, dünyanın her tarafında tercih edilmektedir� Yeni cihazınızı iyi günlerde kullanmanızı dileriz Beurer Ekibiniz� Ürün özellikleri Cihazın fonksiyonları Bu görüntülü bebek telsizi, bebeğinizi gündüz ve gece boyunca görebilmenize olanak sağlar�...
  • Page 111: Teslimat Kapsamı

    İçindekiler 1. Teslimat kapsamı ......111 7�9 Kamera silme ��������������������������121 2. İşaretlerin açıklaması .....112 7�10 Kamera aktarım görüntüsünü 3. Uyarılar ve güvenlik yönergeleri ..113 seçme ������������������������������������121 4. Amacına uygun kullanım ....115 7�11 Ses hassasiyeti ayarı �������������122 5. Cihaz açıklaması ......115 7�12 Frekansı seçme ����������������������122 5�1 "Bebek"...
  • Page 112: İşaretlerin Açıklaması

    2. İşaretlerin açıklaması Cihazın üzerinde, kullanım kılavuzunda, ambalajında ve model etiketinde aşağıdaki simgeler kullanılmıştır: UYARI Yaralanma tehlikelerine veya sağlığınızla ilgili tehlikelere yöne- lik uyarı DİKKAT Cihazda/aksesuarlarda oluşabilecek hasarlara yönelik güven- lik uyarısı Önemli bilgilere yönelik not Kullanım kılavuzunu okuyun Elektrikli ve elektronik atık cihazlarla ilgili AB direktifine (WE- EE - Waste Electrical and Electronic Equipment) uygun şekilde bertaraf edilmelidir Bu ürün geçerli Avrupa Birliği yönergelerinin ve ulusal yönerge-...
  • Page 113: Uyarılar Ve Güvenlik Yönergeleri

    3. Uyarılar ve güvenlik yönergeleri UYARI • Kamerayı ve bağlantı kablosunu asla çocukların ulaşabileceği yerlerde bulundurmayın! Bağlantı kablosu çocukların boğulmasına veya yara- lanmasına yol açabilir. • Küçük parçaları çocukların ulaşamayacağı bir yerde saklayın� • Çocukları ambalaj malzemesinden uzak tutun (boğulma tehlikesi)� •...
  • Page 114 • Üretici tarafından tavsiye edilmeyen veya aksesuar olarak sunulmayan ek parçalar kullan mayın� • Her reklamasyon öncesinde ebeveyn ünitesinin şarj edilebilir pilini kontrol edin ve gerekirse değiştirin� • Onarım yalnızca müşteri hizmetleri veya yetkili satıcılar tarafından yapılabilir� Kameranın veya ebeveyn ünitesinin içini kesinlikle açmayın veya onarmaya çalışmayın, aksi halde kusursuz çalışması...
  • Page 115: Amacına Uygun Kullanım

    4. Amacına uygun kullanım UYARI • Cihazı yalnızca bebeğinizi doğrudan denetleyemediğiniz durumlarda kontrol etmek için kullanın� Cihaz, kişisel sorumluluğunuzla kendi yaptığınız dene- timin yerini tutmaz! • Usulüne uygun olmayan her türlü kullanım tehlikeli olabilir� • Görüntülü bebek telsizi ticari kullanım için değil, yalnızca evde/kişisel amaç- larla kullanılmak üzere tasarlanmıştır�...
  • Page 116: 5�2 "Monitör" Ebeveyn Ünitesi

    5.2 "Monitör" ebeveyn ünitesi 1� Açma/kapatma tuşu 9� Ekran 2� Menü tuşu/yukarı yön tuşu 10� Ses seviyesi yükseltme 3� Mikrofon 11� Ses seviyesi alçaltma 4� Cevap verme fonksiyonu/Ekran 12� Pil bölmesi kapağı parlaklığını arttırma 5� Tamam tuşu 13� Fişli elektrik adaptörü bağlantısı 6�...
  • Page 117: 5�3 Ekran Açıklaması

    5.3 Ekran açıklaması 1� Sinyal gücü 10� Zamanlayıcı menüsü 2� Oda sıcaklığı göstergesi 11� Kamera ekleme 3� Zamanlayıcı 12� Kamera değiştirme menüsü 4� Enerji tasarruf modu 13� Ses hassasiyeti ayarı 5� Cevap verme fonksiyonu 14� Frekans ayarı 6� Kamera numarası 15�...
  • Page 118: İlk Çalıştırma

    6. İlk çalıştırma 6.1 Cihazın ilk kullanım için hazırlanması İlk kullanımdan önce şarj edilebilir piller tamamen şarj edilmelidir� Şarj işle- mi yaklaşık 4 saat sürer� Ardından cihaz yaklaşık 8 saat süreyle kullanılabi- lir� En az 6 ayda bir şarj edilebilir pili tamamen boşaltırsanız, maksimum pil kapasitesini elde edersiniz�...
  • Page 119: Kullanım

    4� Ebeveyn ünitesini açmak için üst taraftaki açma/kapatma tuşunu yakl� 3 saniye basılı tutun� Kamera açılmışsa, otomatik olarak ekranda kameradan aktarılan görüntü görünür� Kamera henüz kapalıysa sesli bir sinyal duyulur ve ekranda görünür� 6.4 Ebeveyn ünitesini elektrik adaptörüyle ilk çalıştırma 5�...
  • Page 120: 7�5 Yakınlaştırma Fonksiyonu

    ) ve ( ) tuşu ile menü içerisinde gezinebilirsiniz� Ayarlar menüsün- den çıkmak için uzun bir süre geri tuşuna basın� Yakınlaştırma fonksiyonu Ebeveyn ünitesinde, aktarılan görüntüyü büyütmek için yakınlaştırma fonk- siyonu vardır� Yakın laştırma fonksiyonunu etkinleştirmek için şunları yapın: • ( ) tuşuna basın�...
  • Page 121: 7�9 Kamera Silme

    • ( ) tuşuna basın� • ( ) / ( ) yön tuşlarıyla menü öğesini seçin� • ( ) / ( ) yön tuşlarıyla artı + simgesini seçin� • ( ) tuşuyla onaylayın� • Ekranda 1,2,3,4 görünür� • ( ) / ( ) yön tuşlarıyla bir numara seçin ve ( ) tuşu ile onaylayın�...
  • Page 122: 11 Ses Hassasiyeti Ayarı

    Birden çok kamera bağladığınızda " = Değişken kamera görüntüsü" fonksiyonunu kullana bilirsiniz� Bu fonksiyon etkin olduğunda, ebeveyn ünitesine bağlı kameralardan akta rılan görüntüler, ekranda 5 saniyede de- ğişerek görünür� 7.11 Ses hassasiyeti ayarı Bebek ünitesinin ses hassasiyeti ayarı, ebeveyn ünitesinden duyacakları- nız belirler�...
  • Page 123: 14 Sıcaklık Birimini Seçme

    Enerji tasarruf modunu ayarlamak için şunları yapın: • ( ) tuşuna basın� • ( ) / ( ) yön tuşlarıyla menü öğesini seçin� • ( ) / ( ) yön tuşlarıyla, ebeveyn ünitesinin otomatik olarak enerji tasar- ruf moduna geçeceği süreyi ( 2, 5 veya 10 dakika ) ayarlayın� ( ) tuşuyla onaylayın�...
  • Page 124: 16 Hareket Alarmını Ayarlama

    7.16 Hareket alarmını ayarlama Bebek telsizinde bir hareket alarmı mevcuttur� Hareket alarmı şu şekilde çalışır: Bebek ünitesinin kamerası bir hareket algıladığında ebeveyn ünitesinden her 40 saniyede bir bip sesi duyulur� Hareket alarmını etkinleştirmek için şunları yapın: • ( ) tuşuna basın� •...
  • Page 125: Temizlik Ve Bakım

    • Kamerayı/ebeveyn ünitesini yumuşak ve kuru bir bezle temizleyin� Aşındırıcı temizlik maddeleri kullanmayın� 10. Aksesuarlar ve yedek parçalar Sonradan satın alınabilecek/ilave ürünler için www�beurer�com adresini zi- yaret edin veya ülkenizdeki ilgili servis adresine başvurun (servis adreslerinin listesine göre)� Sonradan satın alınabilecek/ilave ürünleri mağazalarda da bulabilirsiniz�...
  • Page 126 Şunları kontrol edin: Ebeveyn ünitesinden akus- tik bir sinyal duyuluyor� • Maksimum kapsama mesafesi aşıldı mı? • Kameranın fişli adaptörü doğru şekilde takıl- mış mı? • Kamera açık mı? • Ebeveyn ünitesinin şarj edilebilir pili boşal- mış mı? • Ebeveyn ünitesinde istediğiniz ses seviyesini Ebeveyn ünitesi açık an- ayarlamak için işletim sırasında yandaki ( –...
  • Page 127: Bertaraf Etme

    12. Bertaraf etme Şarj edilebilir piller özel işaretli toplama kutularına atılarak, özel çöp alma yer- lerine veya elektrikli cihaz satıcılarına teslim edilerek bertaraf edilmelidir� Şarj edilebilir pillerin bertaraf edilmesi, yasal olarak sizin sorumluluğunuzdadır� Kullanım ömrü sona eren cihazlar, çevrenin korunması için evsel atıklar ile birlikte atılmamalıdır�...
  • Page 128: Garanti

    şarj edildiği vb� gibi faktörlere bağlıdır) Bu ürünün 2014/53/AB sayılı Avrupa RED direktifine uygun olduğunu onaylarız� Bu ürünle ilgili CE uyumluluk beyanını şu konumda bulabilirsiniz: https://www�beurer�com/web/we-landingpages/de/cedeclarationofconfor- mity�php 14. Garanti Garanti ve garanti koşulları ile ilgili ayrıntılı bilgileri cihazla birlikte verilen...
  • Page 129 РУССКИЙ Внимательно прочтите инструкцию по при- ме нению, храните ее для после дующего ис- пользования в доступном для других поль- зователей месте и следуйте ее указаниям. ПРЕДУПРЕЖДЕНИЕ • Прибор предназначен только для домашнего/инди- видуального использования, использование прибо- ра в коммерческих целях запрещено� •...
  • Page 130 лия для обогрева, легкой терапии, измерения артериального давления/ диагностики, измерения массы, а также для массажа, косметологии, ухода за детьми и очистки воздуха� С наилучшими пожеланиями, компания Beurer Ознакомительная информация Функции прибора С видеоняней Вы сможете присматривать за ребенком днем и ночью� Даже занимаясь делами в других комнатах и в саду или ложась спать, Вы...
  • Page 131: Комплект Поставки

    Содержание 1. Комплект поставки .......131 7�9 Отключение соединения 2. Пояснения к символам ....132 с видеокамерой ��������������������143 3. Предупреждения и указания 7�10 Выбор изображения, по технике безопасности ....133 передаваемого с  4. Использование по назначению ..135 видеокамеры ������������������������143 5. Описание прибора ......136 7�11 Настройка чувствительности 5�1 Видеокамера «Ребенок» ��������136 к шуму...
  • Page 132: Пояснения К Символам

    • 1 литий-ионный аккумулятор для блока родителей • 1 инструкция по применению 2. Пояснения к символам На приборе, в инструкции по применению, на упаковке и фирменной табличке прибора используются следующие символы� ПРЕДУПРЕЖДЕНИЕ Предупреждает об опасности травмирования или нанесе- ния вреда здоровью ВНИМАНИЕ! Указывает на возможность повреждения прибора/принад- лежностей Указание...
  • Page 133: Предупреждения И Указания По Технике Безопасности

    Класс энергоэффективности 6 3. Предупреждения и указания по технике безопасности ПРЕДУПРЕЖДЕНИЕ • Держите камеру и провода в недоступном для детей месте! Прово- да являются потенциальным источником травм для детей и даже опасности удушения. • Храните мелкие предметы в недоступном для детей месте� • Не давайте упаковочный материал детям (опасность удушения)� •...
  • Page 134 • Не тяните, не перекручивайте и не перегибайте сетевой кабель� • Извлекайте сетевой адаптер при возникновении сбоев в работе, пе- ред очисткой прибора, после каждой подзарядки, или если Вы не используете прибор� • Не допускайте контакта камеры, блока родителей и сетевых адаптеров с...
  • Page 135: Использование По Назначению

    • Используйте только те зарядные устройства, которые указаны в ин- струкции по применению� • Перед использованием аккумуляторы необходимо правильно заря- дить� Для правильной зарядки необходимо всегда соблюдать указа- ния изготовителя и указания из данной инструкции по применению� • Перед первым использованием полностью зарядите аккумулятор (см� главу...
  • Page 136: Описание Прибора

    5. Описание прибора 5.1 Видеокамера «Ребенок» 1� Микрофон 5� Кнопка ВКЛ�/ВЫКЛ� 2� Объектив видеокамеры 6� Кнопка синхронизации с бло- ком родителей 3� Датчик освещенности 7� Разъем для сетевого адап- (функция ночного видения) тера 4� Индикатор функционирования Зеленый цвет = камера готова к ра- 8�...
  • Page 137 5.2 Блок родителей «Монитор» 1� Кнопка ВКЛ�/ВЫКЛ� 9� Дисплей 2� Кнопка меню/верхняя кнопка 10� Увеличение громкости навигации 3� Микрофон 11� Уменьшение громкости 4� Функция двусторонней связи/ 12� Крышка отсека для батареек увеличение яркости дисплея 5� Кнопка OK 13� Разъем для сетевого адаптера 6�...
  • Page 138: Описание Дисплея

    5.3 Описание дисплея 1� Интенсивность сигнала 10� Меню таймера 2� Индикатор температуры в поме- 11� Добавление видеокамеры щении 3� Таймер 12� Меню выбора камеры 4� Режим экономии энергии 13� Настройка чувствительности к шуму 5� Функция двусторонней связи 14� Настройка частоты 6� Номер видеокамеры 15�...
  • Page 139: Подготовка Видеокамеры К Работе

    6. Подготовка к работе 6.1 Подготовка прибора к первому использованию Перед первым использованием аккумуляторы должны быть полностью заряженными� Процесс зарядки продолжается около 4 часов� После этого прибор может работать примерно 8 часов� Аккумулятор будет работать с максимальной емкостью, если его разряжать полностью не реже...
  • Page 140: Подготовка Блока Родителей К Работе От Аккумулятора

    6.3 Подготовка блока родителей к работе от аккумулятора 1� Сдвиньте крышку отсека для батареек на задней стенке блока роди- телей в сторону� 2� Вставьте входящий в комплект поставки ак- кумулятор золотой контактной поверхностью +/– вперед и стороной с напечатанным тек- стом вверх в отсек для батареек, как пока- зано...
  • Page 141 7.2 Регулировка яркости Блок родителей имеет пять уровней яркости� • Для изменения яркости используйте кнопки ( ) и ( )� 7.3 Функция двусторонней связи Блок родителей оснащен функцией двусторонней связи� Для включения функции двусторонней связи нажмите и удерживайте нажатой кнопку ( ) на блоке...
  • Page 142 Колыбельные Через блок родителей можно выбрать одну из четырех колыбельных, которая будет воспроизводиться через динамик видеокамеры� Чтобы включить колыбельную, выполните следующие действия� • Нажмите кнопку ( )� • При помощи кнопок навигации ( ) / ( ) выберите пункт меню � •...
  • Page 143 • При помощи кнопок навигации ( ) / ( ) выберите номер видеока- меры и подтвердите ввод нажатием кнопки ( )� На экране появится , и начнется поиск видеокамеры� • Теперь нажмите и удерживайте нажатой кнопку синхронизации на обратной стороне видеокамеры, пока не раздастся звуковой сигнал и...
  • Page 144 Указание При подключении нескольких видеокамер можно включить функцию « = меняющееся изображение с видеокамер»� После включения этой функции изображения с подсоединенных видеокамер будут транслироваться на дисплей блока родителей циклически, по 5 се- кунд каждое� 7.11 Настройка чувствительности к шуму Настройка чувствительности детского блока к шуму определяет, что Вы...
  • Page 145: Выбор Единицы Измерения Температуры

    7.13 Режим экономии энергии На блоке родителей можно выбрать режим экономии энергии� При ак- тивации режима экономии энергии дисплей автоматически отключается через 2, 5 или 10 мин� Для настройки режима экономии энергии выполните следующие дей- ствия� • Нажмите кнопку ( )� • При помощи кнопок навигации ( ) / ( ) выберите...
  • Page 146: Возвращение К Заводским Настройкам

    • Нажмите кнопку ( )� • При помощи кнопок навигации ( ) / ( ) выберите пункт меню � • При помощи кнопок навигации ( ) / ( ) выберите пункт меню � • Подтвердите выбор нажатием кнопки ( )� •...
  • Page 147: Полезная Информация О Видеоняне

    8. Полезная информация о видеоняне • Использование аккумуляторной батареи для питания блока родителей уменьшает электросмог, возникающий из-за электрических и магнит- ных переменных полей� • Вы можете увеличить радиус действия видеоняни: для этого установи- те видеокамеру рядом с дверью или окном максимально высоко� При этом...
  • Page 148: Принадлежности И Запасные Детали

    • Очищайте видеокамеру/блок родителей мягкой сухой салфеткой� Не используйте абразивные чистящие средства� 10. Принадлежности и запасные детали Расходные материалы и принадлежности, приобретаемые дополни- тельно, можно заказать на сайте www�beurer�com или через сервисную службу в Вашей стране (см� адрес сервисной службы)� Расходные материалы и принадлежности также можно приобрести у розничного продавца�...
  • Page 149 Блок родителей отклю- • Подзарядите аккумуляторную батарею чается� блока родителей� • Возможно, прибор работает в режиме эко- номии энергии� Проверьте, не выбрали ли Вы в меню энергосберегающий режим, и при необходимости отключите его� Сигнал слишком слабый, • Если между видеокамерой и блоком для ро- связь...
  • Page 150: Технические Характеристики

    согласно директиве ЕС по отходам электрического и электронного обо- рудования — WEEE (Waste Electrical and Electronic Equipment)� При возникновении вопросов обращайтесь в местную коммунальную службу, ответственную за утилизацию отходов� 13. Технические характеристики Тип Цифровой приемник Количество ка- 21 канал налов Частота 2,4–2,483 ГГц Мощность пере- 13,01 дБм датчика Дисплей...
  • Page 151 Настоящим подтверждаем, что данное изделие соответствует требо- ваниям европейской директивы RED 2014/53/EU� С декларацией о соответствии директивам ЕС для данного устрой- ства можно ознакомиться, перейдя по ссылке: https://www�beurer�com/web/we-landingpages/de/cedeclarationofconfor- mity�php 14. Гарантия Более подробная информация по гарантии/сервису находится в гарантийном/сервисном талоне, который входит в комплект поставки�...
  • Page 152 POLSKI Należy dokładnie przeczytać niniejszą instruk- cję obsługi, zachować ją i przechowywać w miejscu dostępnym dla innych użytkowni- ków oraz przestrzegać podanych w niej wska- zówek. OSTRZEŻENIE • Urządzenie jest przeznaczone wyłącznie do użytku do- mowego/prywatnego, a nie do celów komercyjnych� •...
  • Page 153: Informacje Ogólne

    łagodnej terapii, pomiaru ciśnienia i badania krwi, pomiaru ciężaru ciała, masażu, ogrzewania i nawilżania powietrza, do pie- lęgnacji urody i ułatwiających opiekę nad dziećmi� Z poważaniem Zespół Beurer� Informacje ogólne Funkcje urządzenia Niniejsza elektroniczna niania wideo pozwala na kontakt wizualny z dzieckiem w dzień...
  • Page 154: Zawartość Opakowania

    Spis treści 1. Zawartość opakowania ....154 7�8 Dodawanie kamery ����������������164 2. Objaśnienie symboli .......155 7�9 Usuwanie kamery �������������������164 3. Ostrzeżenia i wskazówki dotyczące 7�10 Wybieranie kamery przekazującej bezpieczeństwa ......156 obraz �������������������������������������165 4. Użytkowanie zgodne z przeznacze- 7�11 Ustawienie czułości niem ..........158 dźwięków �������������������������������165 5.
  • Page 155: Objaśnienie Symboli

    2. Objaśnienie symboli Na urządzeniu, w instrukcji obsługi, na opakowaniu i tabliczce znamionowej urządzenia zastosowano następujące symbole: OSTRZEŻENIE Ostrzeżenie przed niebezpieczeństwem utraty zdrowia lub od- niesienia obrażeń ciała UWAGA Uwaga dotycząca bezpieczeństwa wskazująca na możliwość uszkodzenia urządzenia lub akcesoriów Wskazówka Ważne informacje Należy przeczytać...
  • Page 156: Ostrzeżenia I Wskazówki Dotyczące Bezpieczeństwa

    3. Ostrzeżenia i wskazówki dotyczące bezpieczeństwa OSTRZEŻENIE • Nie wolno umieszczać kamery ani przewodu zasilającego w miejscu dostępnym dla dzieci! Przewód zasilający może być przyczyną udu- szenia lub zranienia dziecka. • Drobne elementy należy trzymać z dala od dzieci� • Opakowanie przechowywać w miejscu niedostępnym dla dzieci (niebez- pieczeństwo uduszenia)�...
  • Page 157 • Kamera, jednostka rodziców oraz zasilacz nie mogą mieć kontaktu z gorą- cymi powierzchniami ani z przedmiotami o ostrych krawędziach� • Nie stosować żadnych dodatkowych elementów, które nie są zalecane ani oferowane przez producenta jako akcesoria� Wskazówka • Przed złożeniem reklamacji należy zawsze sprawdzić akumulator w jedno- stce rodziców i w razie potrzeby wymienić...
  • Page 158: Użytkowanie Zgodne Z Przeznaczeniem

    • Przed pierwszym użyciem należy całkowicie naładować akumulator (patrz rozdział 6�1)� • Aby zapewnić możliwie długi czas eksploatacji akumulatora, należy go całkowicie naładować co najmniej 2 razy w roku� 4. Użytkowanie zgodne z przeznaczeniem OSTRZEŻENIE • Urządzenie należy stosować wyłącznie do nadzorowania dziecka w przy- padku, gdy nie można być...
  • Page 159: 5�2 „Monitor" - Jednostka Rodziców

    5.2 „Monitor” – jednostka rodziców 1� Przycisk włączania/wyłączania 9� Wyświetlacz 2� Przycisk menu / przycisk kierun- 10� Zwiększenie głośności ku w górę 3� Mikrofon 11� Zmniejszenie głośności 4� Interkom / zwiększenie jasności 12� Pokrywa komory baterii ekranu 5� Przycisk OK 13�...
  • Page 160: 5�3 Opis Wyświetlacza

    5.3 Opis wyświetlacza 1� Moc sygnału 10� Menu minutnika 2� Wskazanie temperatury w pomiesz- 11� Dodawanie kamery czeniu 3� Minutnik 12� Menu zmiany kamery 4� Tryb oszczędzania energii 13� Ustawienie czułości dźwięków 5� Funkcja interkomu 14� Ustawienie częstotliwości 6� Numer kamery 15�...
  • Page 161: Uruchomienie

    6. Uruchomienie 6.1 Przygotowanie urządzenia do pierwszego użycia Przed pierwszym użyciem należy w pełni naładować akumulatory� Ich na- ładowanie trwa ok� 4 godzin� Urządzenie może następnie pracować przez ok� 8 godzin� Maksymalną pojemność akumulatorów można uzyskać, roz- ładowując je całkowicie co najmniej raz na 6 miesięcy� W tym celu należy odłączyć...
  • Page 162: Uruchomienie Jednostki Rodziców Przy Wykorzystaniu Zasilacza

    3� Zamknąć osłonę komory baterii na tylnej stronie jednostki rodziców, aż nastąpi słyszalne i wyczuwalne zatrzaśnięcie� 4� Aby włączyć jednostkę rodziców, należy przytrzymać wciśnięty przez 3 se- kundy przycisk włączania/wyłączania , który znajduje się na górze urzą- dzenia� Po włączeniu kamery na ekranie automatycznie pojawia się trans- mitowany obraz z kamery�...
  • Page 163: Funkcja Zoom

    bór kamery, czułość dźwięku, częstotliwość, tryb oszczędzania energii, jednostka temperatury i alarm temperatury, alarm aktywowany ruchem i ustawienia fabryczne. • W celu przejścia do menu ustawień należy włączyć jednostkę rodziców, a następnie wcisnąć przycisk ( )� Na dolnej krawędzi ekranu jednostki rodziców pojawia się...
  • Page 164: 7�9 Usuwanie Kamery

    Na jednostce rodziców można ustawić minutnik z alarmem, który rozlegnie się po 2, 3, 4 lub 5 godzinach z jednostki rodziców� Po upływie ustawionego czasu jednostka rodziców zacznie emitować sygnał dźwiękowy� Aby akty- wować minutnik, należy wykonać następujące czynności: • Nacisnąć przycisk ( )�...
  • Page 165 • Nacisnąć przycisk ( )� • Za pomocą przycisków kierunkowych ( ) należy wybrać opcję menu � • Za pomocą przycisków kierunkowych ( ) wybrać minus –� • Należy potwierdzić przyciskiem ( )� • Na ekranie pojawią się numery 1,2,3,4� •...
  • Page 166: 12 Wybór Częstotliwości

    zostanie ustawiony na niski (L), w jednostce rodziców słychać tylko bardzo głośne dźwięki� Aby zmienić poziom czułości, należy wykonać następujące czynności: • Nacisnąć przycisk ( )� • Za pomocą przycisków kierunkowych ( ) należy wybrać opcję menu � • Za pomocą przycisków kierunkowych ( ) należy wybrać...
  • Page 167: 14 Wybór Jednostki Temperatury

    • Za pomocą przycisków kierunkowych ( ) należy wybrać czas, po którym jednostka rodziców automatycznie przełącz się w tryb oszczędzania energii (2, 5 lub 10 minut )� Należy potwierdzić przyciskiem ( )� 7.14 Wybór jednostki temperatury Temperatura powietrza może być wyświetlana w stopniach Celsjusza (°C) lub Fahren heita (°F)�...
  • Page 168: 16 Ustawianie Alarmu Aktywowanego Ruchem

    • Za pomocą przycisków kierunkowych ( ) należy ustawić wybraną górną lub dolną wartość progową� • Za pomocą przycisków kierunkowych ( ) wybrać haczyk √� • Należy potwierdzić przyciskiem ( )� 7.16 Ustawianie alarmu aktywowanego ruchem Elektroniczna niania jest wyposażona w alarm aktywowany ruchem� Alarm aktywowany ruchem działa w następujący sposób: Jeśli kamera jednostki dziecka rejestruje ruch, jednostka rodziców emituje sygnał...
  • Page 169: Czyszczenie I Konserwacja

    ściereczki� Nie należy używać środków czyszczących do szorowania� 10. Akcesoria i części zamienne W celu zakupienia produktów uzupełniających/dodatkowych można odwie- dzić stronę inter netową www�beurer�com lub zwrócić się do serwisu w danym kraju (zgodnie z listą adresów serwisów)� Produkty dodatkowe i uzupełniające są również dostępne w sklepach�...
  • Page 170: Postępowanie W Przypadku Problemów

    11. Postępowanie w przypadku problemów Nie można włączyć jed- Należy sprawdzić, czy: nostki rodziców� • zasilacz jest prawidłowo podłączony, • akumulator jest prawidłowo podłączony, • akumulator jest naładowany lub czy akumu- lator wymaga naładowania, albo jest uszko- dzony� Jednostka rodziców gene- Należy sprawdzić, czy: ruje sygnał...
  • Page 171: Utylizacja

    Jeśli transmisja nie jest 1� Należy włączyć kamerę i jednostkę rodziców, w żaden sposób możliwa, 2� W menu jednostki rodziców należy usunąć można ponownie cyfrowo kamerę i ponownie ja dodać zgodnie z opi- dostroić sygnały urządzeń sem w punkcie „Dodawanie kamery”� (parowanie)�...
  • Page 172 Wymiary jed- 13,0 x 2,1 x 7,2 cm nostki rodzi- ców Masa kamery: 114 g Masa jednostki 95 g rodziców (bez akumulatorów) Masa akumu- 38 g latora Eksploatacja Zasilacz jednostki rodziców (USB 5 V / 1,5 A) Zasilacz jednostki dziecka (USB 5 V / 1,0 A) Bateria litowo-jonowa (1800 mAh) Eksploatacja Zasilacz jednostki rodziców...
  • Page 173: Gwarancja

    14. Gwarancja Szczegółowe informacje na temat gwarancji i warunków gwarancji znajdują się w załączonej ulotce gwarancyjnej�...
  • Page 174 Beurer GmbH • Söflinger Straße 218 • 89077 Ulm, Germany www�beurer�com • www�beurer-gesundheitsratgeber�com www�beurer-healthguide�com...

Table des Matières