TechniSat TECHNIRADIO SOLAR Mode D'emploi

TechniSat TECHNIRADIO SOLAR Mode D'emploi

Radio solaire fm/dab+ portative
Table des Matières

Publicité

Les langues disponibles
  • FR

Les langues disponibles

  • FRANÇAIS, page 57

Liens rapides

TECHNIRADIO SOLAR
Portables DAB+/UKW-Solar-Radio

Publicité

Table des Matières
loading

Sommaire des Matières pour TechniSat TECHNIRADIO SOLAR

  • Page 1 TECHNIRADIO SOLAR Portables DAB+/UKW-Solar-Radio...
  • Page 2 CONTENTS DEUTSCH..................3-28 ENGLISH..................29-53 FRANÇAIS ..................55-79 ITALIANO ..................81-105 NEDERLANDS ................107-131 POLSKE ..................134-157 ČEŠTINA ..................159-183...
  • Page 3 Bedienungsanleitung TECHNIRADIO SOLAR Portables DAB+/UKW-Solar-Radio...
  • Page 4 1 Abbildungen...
  • Page 5: Beschreibung

    1.1 Beschreibung Teleskopantenne Display Ein/Standby Kurz drücken: Einschalten, Kurz drücken: Ausschalten Next Kurz drücken im DAB-Modus: Nächster Sender. Im FM-Modus: Frequenz um 0,05Mhz erhöhen. Gedrückt halten im FM-Modus: Sendersuchlauf. Im Menü: Durch die Menüoptionen navigieren. Mode Mehrmals drücken: Quellenwahl DAB+, FM. Prev.
  • Page 6: Table Des Matières

    3.2.3 Rechtliche Hinweise ......................... 12 3.2.4 Servicehinweise...........................13 Aufstellen des Gerätes....................13 Beschreibung des TECHNIRADIO SOLAR ............14 Der Lieferumfang ........................14 Die besonderen Eigenschaften des TECHNIRADIO SOLAR ........14 TECHNIRADIO SOLAR zum Betrieb vorbereiten ............14 5.3.1 Teleskopantenne ausrichten ....................14 5.3.2 Akku aufladen ..........................15 5.3.3 Kopfhörer benutzen ........................15...
  • Page 7 FM (UKW)-Betrieb ....................20 UKW-Radiobetrieb einschalten ..................20 FM (UKW)-Empfang mit RDS-Informationen .............. 20 Automatische Sendersuche ....................20 Manuelle Sendersuche ......................21 Suchlauf-Einstellung ........................ 21 UKW-Sender auf einem Speicherplatz ablegen ............21 UKW-Sender von einem Speicherplatz abrufen ............21 Überschreiben/Löschen einer Programmplatz-Speicherung....... 21 Systemeinstellungen und weitere Funktionen ..........22 Sleep-Timer ..........................22 Uhrzeit- und Datumseinstellungen ...................22...
  • Page 8: Vorwort

    Hinweis auf den entsprechenden Punkt der Anleitung. 3.2.1 Sicherheit Zu Ihrem Schutz sollten Sie die Sicherheitsvorkehrungen sorgfältig durchlesen, bevor Sie Ihr TECHNIRADIO SOLAR in Betrieb nehmen. Der Hersteller übernimmt keine Haftung für Schäden, die durch unsachgemäße Handhabung und durch Nichteinhaltung der Sicherheitsvorkehrungen entstanden sind.
  • Page 9 Setzen Sie das Gerät nicht Heizquellen aus, die das Gerät zusätzlich zum normalen Gebrauch erwärmen. Bei Gewitter sollten Sie das Gerät von der Stromversorgung trennen. Überspannung kann das Gerät beschädigen. Bei auffälligem Gerätedefekt, Geruchs- oder Rauchentwicklung, erheblichen Fehlfunktionen, Beschädigungen an Gehäuse das Gerät ausschalten und den Service verständigen.
  • Page 10: Entsorgung

    Das TECHNIRADIO SOLAR ist mit einem eingebauten Akku ausgestattet. Laden Sie den Akku vor der erstmaligen Nutzung vollständig auf. Wenn Sie das TECHNIRADIO SOLAR längere Zeit nicht nutzen, laden Sie zuerst den Akku vollständig auf. Ein leerer Akku kann bei längerer Lagerung schaden nehmen.
  • Page 11 Entsorgungshinweise: Entsorgung der Verpackung: Ihr neues Gerät wurde auf dem Weg zu Ihnen durch die Verpackung geschützt. Alle eingesetzten Materialien sind umweltverträglich und wieder verwertbar. Bitte helfen Sie mit und entsorgen Sie die Verpackung umweltgerecht. Über aktuelle Entsorgungswege informieren Sie sich bei Ihrem Händler oder über Ihre kommunale Entsorgungseinrichtung.
  • Page 12: Rechtliche Hinweise

    Richtlinie 2014/53/EU entspricht. Der vollständige Text der EU- Konformitätserklärung ist unter der folgenden Internetadresse verfügbar: http://konf.tsat.de/?ID=22311 TechniSat ist nicht für Produktschäden auf Grund von äußeren Einflüssen, Verschleiß oder unsachgemäßer Handhabung, unbefugter Instandsetzung, Modifikationen oder Unfällen haftbar. Änderungen und Druckfehler vorbehalten. Stand 07/19.
  • Page 13: Servicehinweise

    Staub. > Beachten Sie, dass die Gerätefüße u. U. farbige Abdrücke auf bestimmten Möbeloberflächen hinterlassen könnten. Verwenden Sie einen Schutz zwischen Ihren Möbeln und dem Gerät. > Halten Sie das TECHNIRADIO SOLAR von Geräten fern, die starke Magnetfelder erzeugen.
  • Page 14: Beschreibung Des Techniradio Solar

    1x Micro USB-Kabel 1x Bedienungsanleitung 5.2 Die besonderen Eigenschaften des TECHNIRADIO SOLAR Das TECHNIRADIO SOLAR besteht aus einem DAB+/UKW-Empfänger, mit folgend aufgeführten Funktionen: Sie können bis zu 20 DAB+ und 20 UKW-Sender speichern. Das Radio empfängt auf den Frequenzen UKW 87,5–108 MHz (analog) und DAB+ 174,9–239,2 MHz (digital).
  • Page 15: Akku Aufladen

    Antenne ganz aus. Beachten Sie hierzu auch Punkt 5.3.1. > Bereiten Sie das TECHNIRADIO SOLAR zunächst wie unter Punkt 5.3.1 und 5.3.2 beschrieben, zum Betrieb vor. > Durch Drücken der Taste Power (3), schalten Sie das TECHNIRADIO SOLAR ein.
  • Page 16: Gerät Ausschalten

    5.4.2 Gerät ausschalten > Durch erneutes Drücken der Taste Power (3), schalten Sie das TECHNIRADIO SOLAR wieder aus. 5.4.3 Quellenwahl > Mit der Taste Mode kann zwischen den Quellen DAB+ (Digital Radio) und FM (UKW) umgeschaltet werden. 5.4.4 Lautstärke einstellen >...
  • Page 17: Menübedienung

    6 Menübedienung Über das Menü gelangen Sie zu allen Funktionen und Einstellungen des TECHNIRADIO SOLAR. Die Menü-Navigation erfolgt mit dem Tasten Menu, Next, Prev. und Select. Das Menü ist aufgeteilt in Untermenüs und enthält je nach gewählter Quelle unterschiedliche Menüpunkte bzw. aktivierbare Funktionen.
  • Page 18: Audio Stream

    Dies führt zur Datenreduzierung des zu übertragenden Datenstroms, ohne einen wahrnehmbaren Klangunterschied für den Hörer (HE AAC v2 - Verfahren als ergänzendes Kodierungsverfahren für DAB+). 7.1.2 Audio Stream Audiostreams sind bei Digital Radio kontinuierliche Datenströme, die MPEG 1 Audio Layer 2 Frames enthalten und damit akustische Informationen darstellen. Damit lassen sich gewohnte Radioprogramme übertragen und auf der Empfängerseite anhören.
  • Page 19: Dab+ -Sender Von Einem Speicherplatz Abrufen

    7.2.4 DAB+ -Sender von einem Speicherplatz abrufen > Um einen Sender abzurufen, den Sie zuvor im Favoritenspeicher abgelegt haben, drücken Sie kurz die Taste Preset und wählen Sie mit Next/Prev. einen Favoritenspeicher (1...10). Drücken Sie Select zur Wiedergabe des Senders. Ist kein Sender auf dem gewählten Programmplatz gespeichert, erscheint im Display [(leer)].
  • Page 20: Inaktive Sender Löschen

    7.2.8 Inaktive Sender löschen Dieser Menüpunkt dient der Entfernung alter und nicht mehr empfangbarer Sender aus der Senderliste. > Halten Sie die Taste Menu gedrückt und wählen Sie mit Next/Prev. den Eintrag [Inaktive Sender löschen]. > Drücken Sie Select. Es erfolgt die Abfrage [Löschen?], ob die inaktiven Sender gelöscht werden sollen. >...
  • Page 21: Suchlauf-Einstellung

    Das Display zeigt die Frequenz in Schritten von 0,05 MHz an. Next erhöht die Sendefrequenz, Prev. verringert sie. 8.5 Suchlauf-Einstellung In diesem Menüpunkt kann die Empfindlichkeit des Suchlaufs eingestellt werden. > Halten Sie die Taste Menu gedrückt und wählen Sie mit Next/Prev. den Eintrag [Suchlauf-Einstellung].
  • Page 22: Systemeinstellungen Und Weitere Funktionen

    9 Systemeinstellungen und weitere Funktionen Alle unter diesem Punkt erläuterten Einstellungen gelten für alle Quellen gleichermaßen. 9.1 Sleep-Timer Durch den Sleep-Timer schaltet das TECHNIRADIO SOLAR nach der eingestellten Zeit automatisch AUS. > Halten Sie die Taste Menu gedrückt und wählen Sie mit Next/Prev. den Eintrag [System].
  • Page 23: Zeitaktualisierung

    9.2.2 Zeitaktualisierung In diesem Untermenü können Sie festlegen, ob die Zeitaktualisierung automatisch über DAB+ oder FM (UKW) erfolgen soll oder ob Sie sie manuell eingeben möchten (Punkt 9.2.1). > Halten Sie die Taste Menu gedrückt und wählen Sie mit Next/Prev. den Eintrag [System].
  • Page 24: Displayhelligkeit

    Zurücksetzen auf Werkseinstellungen können Sie in diesem Fall alle gespeicherten Sender löschen, um anschließend einen neuen Sendersuchlauf zu starten. > Verbinden Sie das TECHNIRADIO SOLAR mit der USB-Stromversorgung. > Halten Sie die Taste Menu gedrückt und wählen Sie mit Next/Prev. den Eintrag [System].
  • Page 25: Sw-Version

    Alle zuvor gespeicherten Sender und Einstellungen werden gelöscht. Das Gerät befindet sich nun im Auslieferungszustand. > Im Display erscheint [Neustart...] und das Gerät startet mit der Sprachauswahl [Sprache]. Wählen Sie mit Next/Prev. eine der zur Verfügung stehenden Sprachen und bestätigen Sie die Auswahl durch Drücken von Select. Anschließend führt das Gerät automatisch einen vollständigen Suchlauf im DAB-Modus durch.
  • Page 26: Fehler Beseitigen

    Empfang über DAB+/FM ist Ziehen Sie die Antenne ganz aus. Ändern schlecht. Sie die Position der Antenne oder des TECHNIRADIO SOLAR. Gerät lässt sich nicht bedienen. Gerät vom Stromnetz trennen und Gerät wieder mit Strom versorgen. Wenn Sie die Störung auch nach den beschriebenen Überprüfungen nicht beheben können, nehmen Sie bitte Kontakt mit der technischen Hotline auf.
  • Page 27: Notizen

    13 Notizen...
  • Page 29 Instruction Manual TECHNIRADIO SOLAR Portable DAB+ / FM solar radio...
  • Page 30 1 Illustrations...
  • Page 31 1.1 Description Telescopic antenna Display On/Standby Press briefly: turn on Press briefly: turn off Next Press briefly in DAB mode: next station In FM mode: adjust frequency by 0.05MHz Keep pressed in FM mode: search stations In the menu: navigate through the menu options. Mode Press several times: source selection DAB+, FM.
  • Page 32: Contents

    Setting up the device .....................39 Description of the TECHNIRADIO SOLAR ............40 Scope of delivery ........................40 Special features of the TECHNIRADIO SOLAR ............40 Preparing the TECHNIRADIO SOLAR for operation ..........40 5.3.1 Aligning the telescopic antenna ..................40 5.3.2 Charging the battery........................
  • Page 33 FM mode ........................46 Switching on FM radio mode ..................... 46 FM reception with RDS information ................46 Automatic station scan ......................46 Manual station scan ........................ 46 Scan setting ..........................47 Saving FM stations to a memory slot ................47 Retrieving FM stations from a memory slot ..............47 Overwriting/deleting a station memory slot ..............47 System settings and other features ..............48 Sleep timer ..........................
  • Page 34: Preface

    3.2.1 Safety For your protection, read the safety precautions carefully before operating your TECHNIRADIO SOLAR. The manufacturer accepts no liability for damage caused by inappropriate handling, or by non-compliance with the safety precautions. Do not open the device under any circumstances! Touching live parts can be fatal! Any required intervention may only be performed by qualified staff.
  • Page 35 Do not expose the device to heat sources which could heat it up more than normal use will. In the case of a thunderstorm, unplug the device from the mains. Overvoltage can damage the device. If you detect a device defect, odour or smoke, considerable malfunctions, or damage to the housing, switch off the device and inform the Service Department.
  • Page 36: Disposal

    The TECHNIRADIO SOLAR is equipped with a built-in rechargeable battery. Fully charge the battery before using it for the first time. If you have not used the TECHNIRADIO SOLAR for a long time, first charge the battery completely. An empty battery can cause damage during prolonged storage.
  • Page 37 Disposal instructions: Disposal of packaging: Your new device was protected by packaging on its way to you. All materials used are environmentally-friendly and recyclable. Please collaborate and dispose of the packaging in an environmentally-friendly way. Ask for information from your dealer regarding current disposal means or your local disposal facility.
  • Page 38: Legal Notices

    Directive 2014/53/EU. The complete text of the EU Declaration of Conformity is available at the following web address: http://konf.tsat.de/?ID=22311 TechniSat accepts no liability for product damage as a result of external influences, wear or improper handling, unauthorised repairs, modifications or accidents.
  • Page 39: Service Instructions

    Please note that the device footings could leave coloured marks on some types of furniture surfaces in certain situations. Place a protective layer between your furniture and the device. > Keep the TECHNIRADIO SOLAR away from devices which emit intense magnetic fields.
  • Page 40: Description Of The Techniradio Solar

    1 x micro USB cable 1 x instruction manual 5.2 Special features of the TECHNIRADIO SOLAR The TECHNIRADIO SOLAR is comprised of a DAB+/FM receiver with the following functions: You can store up to 20 DAB+ and 20 FM stations.
  • Page 41: Charging The Battery

    To ensure good DAB+ / FM reception, unplug the antenna completely. To do so, please refer to Section 5.3.1. > First prepare the TECHNIRADIO SOLAR for use as described in Sections 5.3.1 and 5.3.2. > Switch on the TECHNIRADIO SOLAR by pressing the Power(3) button.
  • Page 42: Switching Off The Device

    5.4.2 Switching off the device > To switch off the TECHNIRADIO SOLAR press the Power(3) button once again. 5.4.3 Source selection > Using the Mode button, it is possible to switch between DAB+ (digital radio) and FM. 5.4.4 Adjusting the volume >...
  • Page 43: Menu Operation

    6 Menu operation You can access all functions and settings for the TECHNIRADIO SOLAR via the menu. Menu navigation takes place using the Menu, Next, Prev. and Select buttons. The menu is divided into submenus and, depending on the selected source (DAB+ or FM), contains different menu items or functions which can be enabled.
  • Page 44: Audio Stream

    7.1.2 Audio stream With digital radio, audio streams are continuous data streams which contain the MPEG 1 audio layer 2 frames and thereby represent acoustic information. This enables standard radio channels to be broadcast and listened to on the receiver side.
  • Page 45: Retrieving Dab+ Stations From A Memory Slot

    7.2.4 Retrieving DAB+ stations from a memory slot > To retrieve a station that you have stored in the FAV memory, briefly press the Preset button and select a station slot (1-10) using the Next/Prev. button. Press Select to play the station. If no station is saved on the selected station slot, [(empty)] appears on the display.
  • Page 46: Deleting Inactive Stations

    7.2.8 Deleting inactive stations This menu item is for removing old stations and those no longer being received from the station list. > Keep the Menu button depressed and use the Next/Prev. button to select the item [Delete inactive stations]. >...
  • Page 47: Scan Setting

    The display shows the frequency in steps of 0,05 MHz. Next increases the transmission frequency, Prev reduces it. 8.5 Scan setting In this menu item it is possible to set the sensitivity of the scan. > Keep the Menu button pressed and use the Next/Prev. button to select the item [Search settings].
  • Page 48: System Settings And Other Features

    9 System settings and other features All settings explained in this section apply equally to all sources. 9.1 Sleep timer The sleep timer automatically switches the TECHNIRADIO SOLAR OFF after the set time. > Keep the Menu button pressed and use the Next/Prev. button to select the item [System].
  • Page 49: Time Update

    9.2.2 Time update In this submenu, you can determine whether the time update should be done automatically via DAB+ or FM, or whether you wish to enter it manually (Section 9.2.1). > Keep the Menu button pressed and use the Next/Prev. button to select the item [System].
  • Page 50: Display Brightness

    In this case you can reset the device to factory settings to delete all the saved stations and then launch a new scan. > Connect the TECHNIRADIO SOLAR to the USB power supply. > Keep the Menu button pressed and use the Next/Prev. button to select the item [System].
  • Page 51: Software Version

    All previously stored stations and settings will now be deleted. The device is now in the same status as when delivered. > The display will show [Restart ...] and the device will start with the language selection [Language]. Using the Next/Prev. button, select one of the available languages and confirm by pressing the Select button.
  • Page 52: Troubleshooting

    Disconnect the device from the power supply and then reconnect it. Poor reception via DAB+/FM. Extend the antenna. Change the position of the antenna or the TECHNIRADIO SOLAR. The device cannot be operated. Disconnect the device from the power supply and then reconnect it.
  • Page 53: Notes

    13 Notes...
  • Page 55 Mode d'emploi TECHNIRADIO SOLAR Radio solaire FM/DAB+ portative...
  • Page 56 1 Illustrations...
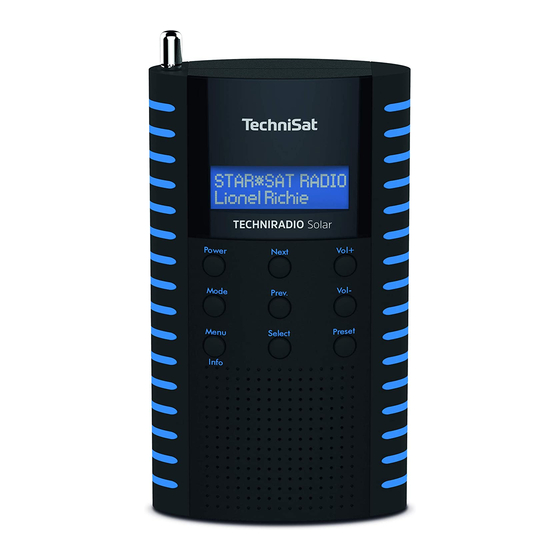
  • Page 57 1.1 Description Antenne télescopique Écran Marche/Veille Brève pression : mise en marche, Brève pression : arrêt Next Brève pression en mode DAB : station suivante. En mode FM : augmenter la fréquence de 0,05 Mhz. Maintenir la pression en mode FM : recherche de station.
  • Page 58: Sommaire

    Description de la TECHNIRADIO SOLAR ............66 Contenu de la livraison ......................66 Caractéristiques spécifiques de la TECHNIRADIO SOLAR ........66 Préparation de la TECHNIRADIO SOLAR au fonctionnement ......66 5.3.1 Orientation de l’antenne télescopique ................66 5.3.2 Recharger la batterie .......................67 5.3.3 Utilisation des écouteurs .......................67...
  • Page 59 Mode FM ........................72 Mise en marche du mode radio FM .................72 Réception FM avec informations RDS ................72 Recherche automatique des stations ................72 Recherche manuelle des stations ..................72 Réglage de la recherche ......................73 Mémorisation d'une station FM sur un emplacement mémoire......73 Accès à...
  • Page 60: Avant-Propos

    3 Avant-propos Ce mode d’emploi vous aide à utiliser votre poste de radio, ci-après nommé TECHNIRADIO SOLAR ou appareil, de manière sûre et conforme à sa destination. 3.1 Groupe cible de ce mode d’emploi Ce mode d’emploi s’adresse à toutes les personnes qui installent, utilisent, nettoient ou mettent l’appareil au rebut.
  • Page 61 N'exposez pas l'appareil à des sources de chaleur qui peuvent faire chauffer l'appareil au-delà de son utilisation normale. En cas d’orage, il est conseillé de séparer l’appareil de l'alimentation électrique. Une surtension peut endommager l’appareil. Si l’appareil semble défectueux, s’il produit des odeurs ou fumées, s’il présente des dysfonctionnements importants, si le boîtier est endommagé, arrêtez immédiatement l’appareil et contactez l’assistance technique.
  • Page 62: Élimination

    La TECHNIRADIO SOLAR est équipée d'une batterie intégrée. Chargez entièrement la batterie avant la première utilisation. Si vous n'utilisez pas la TECHNIRADIO SOLAR pendant une période prolongée, rechargez d'abord entièrement la batterie. Une batterie vide peut être endommagée en cas de stockage prolongé.
  • Page 63 Consignes de mise au rebut : Mise au rebut de l’emballage : Votre nouvel appareil a été protégé par son emballage lors de son expédition. Tous les matériaux utilisés sont écologiques et recyclables. Merci d’apporter votre concours au respect de l’environnement en éliminant l’emballage de manière adaptée.
  • Page 64: Mentions Légales

    3.2.3 Mentions légales Par la présente, TechniSat déclare que le type d’installation radio TECHNIRADIO SOLAR est conforme à la directive 2014/53/UE. Le texte intégral de la déclaration de conformité européenne est disponible à l’adresse suivante : http://konf.tsat.de/?ID=22311 La société TechniSat ne peut être tenue pour responsable des dommages causés au produit dans le cas d’influences extérieures, d’une usure, d’une...
  • Page 65: Consignes D'entretien

    Tenez compte du fait que les pieds de l’appareil risquent de laisser des traces colorées sur certaines surfaces de meubles. Utilisez une protection entre vos meubles et l’appareil. > Tenez la TECHNIRADIO SOLAR éloignée d’appareils produisant des champs magnétiques puissants. > Ne posez pas d'objets lourds sur l'appareil.
  • Page 66: Description De La Techniradio Solar

    1 x câble micro-USB 1 x mode d’emploi 5.2 Caractéristiques spécifiques de la TECHNIRADIO SOLAR La TECHNIRADIO SOLAR se compose d’un récepteur DAB+/FM doté des fonctions suivantes : Vous pouvez mémoriser jusqu’à 20 stations DAB+ et 20 stations FM. La radio capte les fréquences FM 87,5 - 108 MHz (analogiques) et DAB+ 174,9 - 239,2 MHz (numériques).
  • Page 67: Recharger La Batterie

    Pour garantir une bonne réception FM/DAB+, veuillez déployer entièrement l'antenne. Pour ce faire, reportez-vous également au point 5.3.1. > Préparez d’abord la TECHNIRADIO SOLAR au fonctionnement comme décrit aux points 5.3.1 et 5.3.2. > En appuyant sur la touche Power (3), vous mettez la TECHNIRADIO SOLAR en marche.
  • Page 68: Arrêt De L'appareil

    5.4.2 Arrêt de l’appareil > En appuyant à nouveau sur la touche Power (3), vous éteignez à nouveau la TECHNIRADIO SOLAR. 5.4.3 Choix de la source > La touche Mode permet de basculer entre les sources DAB+ (radio numérique) et FM et inversement.
  • Page 69: Commande Du Menu

    6 Commande du menu Via le menu, vous accédez à tous les réglages et fonctions de la TECHNIRADIO SOLAR. La navigation dans le menu s'effectue avec les touches Menu, Next, Prev. et Select. Le menu est divisé en sous-menus et comporte, en fonction de la source choisie différentes options de menu ou fonctions activables.
  • Page 70: Flux Audio

    Ceci entraîne une réduction des données du flux de données à transmettre, sans différence sonore perceptible pour l’auditeur (méthode HE AAC v2 - en tant que méthode de codage complémentaire pour DAB+). 7.1.2 Flux audio Les flux audio de la radiodiffusion numérique sont des flux de données continus, qui contiennent des trames MPEG 1 Audio Layer 2 et illustrent ainsi les informations acoustiques.
  • Page 71: Accès À Une Station Dab+ À Partir D'un Emplacement Mémoire

    7.2.4 Accès à une station DAB+ à partir d’un emplacement mémoire > Pour accéder à une station mémorisée précédemment dans la mémoire des favoris, appuyez brièvement sur la touche Preset et sélectionnez avec Next/ Prev. un emplacement mémoire (1...10). Appuyez sur Select pour diffuser la station.
  • Page 72: Suppression Des Stations Inactives

    7.2.8 Suppression des stations inactives Cette option de menu sert à supprimer de la liste de stations des stations anciennes qui ne peuvent plus être captées. > Maintenez la touche Menu enfoncée et sélectionnez avec Next/Prev. l’entrée [Supprimer les stations inactives]. >...
  • Page 73: Réglage De La Recherche

    L’écran affiche la fréquence par paliers de 0,05 MHz. Next augmente la fréquence des stations, Prev. la diminue. 8.5 Réglage de la recherche La sensibilité de la recherche peut être réglée dans cette option de menu. > Maintenez la touche Menu enfoncée et sélectionnez avec Next/Prev. l’entrée [Réglage de la recherche].
  • Page 74: Réglages Système Et Autres Fonctions

    Tous les réglages expliqués sous ce point s'appliquent de la même manière pour toutes les sources. 9.1 Minuterie de mise en veille Grâce à la minuterie de mise en veille, la TECHNIRADIO SOLAR s'éteint automatiquement après la durée réglée. >...
  • Page 75: Actualisation De L'heure

    9.2.2 Actualisation de l’heure Ce sous-menu vous permet de définir si l’actualisation de l’heure doit avoir lieu automatiquement via DAB+ ou FM ou si vous souhaitez l’effectuer manuellement (point 9.2.1). > Maintenez la touche Menu enfoncée et sélectionnez avec Next/Prev. l’entrée [Système].
  • Page 76: Luminosité De L'écran

    > Connectez la TECHNIRADIO SOLAR à l'alimentation électrique USB. > Maintenez la touche Menu enfoncée et sélectionnez avec Next/Prev. l’entrée [Système].
  • Page 77: Version Logicielle

    L'ensemble des stations et réglages précédemment enregistrés est supprimé. L’appareil se trouve maintenant à l'état de livraison. > [Redémarrage...] s'affiche à l'écran et l'appareil démarre avec le choix de la langue [Langue]. Sélectionnez à l’aide de Next/Prev. une des langues disponibles et confirmez la sélection en appuyant sur Select.
  • Page 78: Dépannage

    11 Dépannage Si l'appareil ne fonctionne pas comme prévu, vérifiez-en le fonctionnement à l'aide des tableaux suivants. Symptôme Cause possible/résolution Impossible de mettre l'appareil en L'appareil n'est pas alimenté en électricité. marche. Branchez correctement l'alimentation électrique ou chargez la batterie. Absence de son.
  • Page 79: Notes

    13 Notes...
  • Page 81 Istruzioni per l'uso TECHNIRADIO SOLAR Radio solare DAB+/FM portatile...
  • Page 82 1 Immagini...
  • Page 83 1.1 Descrizione Antenna telescopica Display ON/STANDBY Breve pressione: accensione, Breve pressione: spegnimento Avanti Breve pressione in modalità DAB: emittente successiva. In modalità FM: aumentare la frequenza di 0,05 Mhz. Tenere premuto in modalità FM: ricerca emittenti. Nel menu: navigare tra le opzioni del menu. Modo Pressione multipla: selezione sorgente DAB+, FM.
  • Page 84: Indice

    3.2.4 Note per l'assistenza ........................ 91 Posizionamento dell’apparecchio ..............91 Descrizione di TECHNIRADIO SOLAR ..............92 Entità della fornitura ....................... 92 Le funzionalità speciali di TECHNIRADIO SOLAR ............92 Preparare TECHNIRADIO SOLAR al funzionamento..........92 5.3.1 Orientare l’antenna telescopica ..................92 5.3.2 Caricare la batteria ........................93...
  • Page 85 Modalità FM ......................98 Attivare la modalità radio FM ....................98 Ricezione FM con informazioni RDS .................98 Ricerca automatica di emittenti ..................98 Ricerca manuale di emittenti ....................98 Impostazione di ricerca automatica ................99 Salvare l’emittente FM su uno slot di memoria............99 Apertura dell’emittente FM da uno slot di memoria ..........
  • Page 86: Introduzione

    3.2.1 Sicurezza Per la propria sicurezza, leggere attentamente le norme di sicurezza prima di mettere in funzione TECHNIRADIO SOLAR. Il produttore declina ogni responsabilità per danni derivanti da un uso non conforme e dalla mancata osservanza delle misure di sicurezza.
  • Page 87 Non esporre l'apparecchio a fonti di calore che riscaldano l'apparecchio oltre il normale utilizzo. Durante un temporale staccare l'apparecchio dall'alimentazione elettrica. La sovratensione può danneggiare l'apparecchio. In caso di evidenti difetti all’apparecchio, produzione di odori o fumo, malfunzionamenti gravi, danneggiamenti all’alloggiamento, spegnere l’apparecchio e contattare il servizio di assistenza.
  • Page 88: Smaltimento

    Uso di batterie/accumulatori La TECHNIRADIO SOLAR è dotata di una batteria integrata. Caricare la batteria completamente prima del primo utilizzo. Se non si utilizza TECHNIRADIO SOLAR per lungo tempo, prima caricare la batteria completamente. Una batteria scarica può danneggiarsi in caso di conservazione prolungata.
  • Page 89 Note per lo smaltimento: Smaltimento dell'imballaggio: Nel trasporto verso l'utente, il nuovo apparecchio è stato protetto con l'imballaggio. Tutti i materiali impiegati sono rispettosi dell'ambiente e riciclabili. Chiediamo cortesemente all'utente di collaborare e di smaltire l'imballaggio nel rispetto dell'ambiente. Informarsi sulle modalità di smaltimento attualmente utilizzate presso il rivenditore o gli enti comunali di smaltimento.
  • Page 90: Note Legali

    3.2.3 Note legali Con la presente TechniSat dichiara che il modello di impianto radio TECHNIRADIO SOLAR è conforme alla direttiva 2014/53/UE. Il testo completo della dichiarazione di conformità UE è disponibile al seguente indirizzo Internet: http://konf.tsat.de/?ID=22311 TechniSat non è responsabile dei danni del prodotto causati da azioni esterne, usura o da un utilizzo inappropriato, una riparazione non autorizzata, modifiche o incidenti.
  • Page 91: Note Per L'assistenza

    Tenere presente che in determinate circostanze i piedi dell’apparecchio possono lasciare impronte di colore sulle superfici dei mobili. Utilizzare una protezione tra i mobili e l’apparecchio. > Tenere TECHNIRADIO SOLAR lontano da apparecchi che generano forti campi magnetici. > Non collocare oggetti pesanti sull’apparecchio.
  • Page 92: Descrizione Di Techniradio Solar

    1 manuale di istruzioni per l’uso 5.2 Le funzionalità speciali di TECHNIRADIO SOLAR TECHNIRADIO SOLAR possede un ricevitore DAB+/FM con le seguenti funzioni: È possibile memorizzare fino a 20 emittenti DAB+ e 20 FM. La radio riceve alle frequenze FM 87,5–108 MHz (analogiche) e DAB+ 174,9–239,2 MHz (digitali).
  • Page 93: Caricare La Batteria

    > Per garantire una buona ricezione DAB+/FM, estrarre l'antenna interamente. A tal fine osservare anche il punto 5.3.1. > Preparare TECHNIRADIO SOLAR al funzionamento come descritto nel punto 5.3.1 e 5.3.2. > Premendo il tasto Power(3), si accende TECHNIRADIO SOLAR.
  • Page 94: Spegnere L'apparecchio

    5.4.2 Spegnere l'apparecchio > Premendo nuovamente il tasto Power(3), si spegne TECHNIRADIO SOLAR. 5.4.3 Selezione della fonte > Con il tasto Modo è possibile cambiare tra le sorgenti DAB+ (Digital Radio) e 5.4.4 Impostazione del volume > Regolare il volume premendo i tasti VOL+/VOL- sull'apparecchio.
  • Page 95: Uso Del Menu

    6 Uso del menu Mediante il menu si accede a tutte le funzioni e impostazioni di TECHNIRADIO SOLAR. Per navigare nel menu utilizzare i tasti Menu, Avanti, Prec. e Seleziona. Il menu è suddiviso in sottomenu e contiene diverse voci e funzioni attivabili che possono cambiare in base alla sorgente selezionata.
  • Page 96: Stream Audio

    Ne deriva una riduzione di dati del flusso di dati trasmessi senza che per l'ascoltatore vi sia una differenza sonora percettibile (processo HE AAC v2 che funge da codifica di integrazione per il DAB+). 7.1.2 Stream audio Nelle Digital Radio gli stream audio sono flussi continui di dati che contengono frame MPEG 1 Audio Layer 2 e che rappresentano quindi informazioni sonore.
  • Page 97: Apertura Dell'emittente Dab+ Da Uno Slot Di Memoria

    7.2.4 Apertura dell’emittente DAB+ da uno slot di memoria > Per aprire un’emittente precedentemente salvata nella memoria preferiti, premere brevemente il tasto Preset e selezionare una memoria emittenti (1...10) con i tasti Avanti/Prec.. Premere Seleziona per la riproduzione dell'emittente. Se sul numero di canale selezionato non è stata memorizzata alcuna emittente, sul display compare [(vuoto)].
  • Page 98: Cancellazione Emittenti Non Attive

    7.2.8 Cancellazione emittenti non attive Questa voce del menu consente di rimuovere dall’elenco le emittenti vecchie e non più ricevute. > Tenere premuto il tasto Menu e selezionare la voce [Eliminare emittenti non attive] con i tasti Avanti/Prec. > Premere Seleziona. Con [Cancella?] viene chiesto se si intendono cancellare davvero le emittenti non attive.
  • Page 99: Impostazione Di Ricerca Automatica

    Il display mostra la frequenza ad intervalli di 0,05 MHz. Avanti aumenta la frequenza dell'emittente, Prec. la riduce. 8.5 Impostazione di ricerca automatica Da questa voce del menu è possibile impostare la sensibilità della ricerca. > Tenere premuto il tasto Menu e selezionare la voce [Impostazione ricerca] con i tasti Avanti/Prec..
  • Page 100: Impostazioni Di Sistema E Altre Funzioni

    Con Avanti/Prec. selezionare la voce [Sleep] e premere Seleziona. > Con i tasti Avanti/Prec. selezionare il tempo al termine del quale si spegnerà la TECHNIRADIO SOLAR. È possibile scegliere tra OFF, 15, 30, 45, 60 e 90 minuti. > Per salvare l'impostazione premere Seleziona.
  • Page 101: Aggiornare L'ora

    9.2.2 Aggiornare l’ora In questo sottomenu è possibile stabilire se l’aggiornamento dell’ora deve avvenire automaticamente tramite DAB+ o FM o se si desidera aggiornare l'ora manualmente (punto 9.2.1). > Tenere premuto il tasto Menu e selezionare la voce [Sistema] con i tasti Avanti/Prec..
  • Page 102: Luminosità Del Display

    Impostazioni di fabbrica è possibile cancellare tutte le emittenti memorizzate ed avviare quindi una nuova ricerca delle emittenti. > Collegare TECHNIRADIO SOLAR all'alimentazione USB. > Tenere premuto il tasto Menu e selezionare la voce [Sistema] con i tasti Avanti/Prec..
  • Page 103: Versione Sw

    Tutte le emittenti e le impostazioni precedentemente salvate vengono cancellate. L’apparecchio ritorna allo stato di consegna. > Sul display compare [Riavvio...] e l'apparecchio si riavvia con la selezione della lingua [Lingua]. Selezionare una delle lingue a disposizione con i tasti Avanti/ Prec.
  • Page 104: Risoluzione Di Errori

    11 Risoluzione di errori Se l’apparecchio non funziona come previsto, consultare la seguente tabella. Sintomo Possibile causa/rimedio L'apparecchio non si accende. L'apparecchio non è alimentato da corrente. Collegare l'alimentazione di tensione correttamente o la batteria. Non si sente alcun suono. Alzare il volume.
  • Page 105: Note

    13 Note...
  • Page 107 Handleiding TECHNIRADIO SOLAR Draagbare DAB+/FM-radio op zonne-energie...
  • Page 108 1 Afbeeldingen...
  • Page 109 1.1 Beschrijving Uitschuifbare antenne Display Aan/Stand-by Kort indrukken: aanzetten Kort indrukken: uitzetten Next Kort indrukken in de DAB-modus: volgende station. In de FM-modus: frequentie met 0,05 Mhz verhogen. Ingedrukt houden in FM-modus: zenders zoeken. In het menu: door menuopties navigeren. Mode Herhaaldelijk indrukken: bron DAB+, FM kiezen.
  • Page 110: Inhoudsopgave

    3.2.4 Service-instructies ........................117 Apparaat installeren ....................117 Beschrijving van de TECHNIRADIO SOLAR ............. 118 Bij de levering is inbegrepen ....................118 De bijzondere kenmerken van de TECHNIRADIO SOLAR ........118 TECHNIRADIO SOLAR gereedmaken voor gebruik ...........118 5.3.1 Uitschuifbare antenne richten ...................118 5.3.2 Accu opladen ..........................119 5.3.3 Koptelefoon gebruiken ......................
  • Page 111 FM-modus ........................124 FM-modus inschakelen......................124 FM-ontvangst met RDS- informatie ................124 Automatische zenderkeuze ....................124 Handmatige zenderkeuze ....................124 Scaninstelling ..........................125 FM-zenders opslaan in het geheugen ................125 FM-station vanuit het favorietengeheugen opvragen ...........125 Overschrijven/verwijderen van een opgeslagen programmageheugen ..125 Systeeminstellingen en andere functies ............126 Sleeptimer ..........................
  • Page 112: Voorwoord

    3 Voorwoord Deze handleiding helpt u uw radiotoestel (hierna TECHNIRADIO SOLAR of apparaat genoemd) op beoogde en veilige wijze te gebruiken. 3.1 Doelgroep van deze handleiding De handleiding is bedoeld voor iedereen die het apparaat installeert, bedient, schoonmaakt of afdankt.
  • Page 113 Stel het apparaat niet bloot aan warmtebronnen die het apparaat behalve door normaal gebruik nog verder kunnen verwarmen. Sluit het apparaat van het lichtnet af wanneer het onweert. Overspanning kan het apparaat beschadigen. Zet bij een in het oog springend defect van het apparaat, het waarnemen van geur of rook, aanzienlijke functionele storingen of schade aan de behuizing, het apparaat uit en neem contact op met de serviceafdeling.
  • Page 114: Afvalverwijdering

    Omgang met batterijen/accu's De TECHNIRADIO SOLAR is uitgerust met een ingebouwde accu. Laad de accu voor het eerste gebruik helemaal op. Laad de accu eerst helemaal op wanneer u de TECHNIRADIO SOLAR lange tijd niet zult gebruiken. Een lege accu kan als gevolg van langdurige opslag beschadigd raken.
  • Page 115 Aanwijzingen voor verwijdering: Afvoer van de verpakking: Uw nieuwe apparaat werd tijdens het transport naar u toe beschermd door de verpakking. Alle gebruikte materialen zijn milieuvriendelijk en recyclebaar. Help mee en voer de verpakking op een milieuvriendelijke manier af. Informatie over de huidige afvalverwijderingsmethoden vindt u bij uw plaatselijke dealer of bij de gemeentelijke afvalverwerking.
  • Page 116: Juridische Informatie

    2014/53/EU. De volledige tekst van de EU- conformiteitsverklaring is beschikbaar op de volgende website: http://konf.tsat.de/?ID=22311 TechniSat is niet aansprakelijk voor productschade als gevolg van externe invloeden, slijtage of onjuiste behandeling, ongeoorloofde reparatie, veranderingen of ongelukken. Wijzigingen en drukfouten voorbehouden. Laatst gewijzigd 07/19.
  • Page 117: Service-Instructies

    Houd er rekening mee dat de poten van het apparaat mogelijk gekleurde afdrukken op bepaalde meubeloppervlakken kunnen achterlaten. Gebruik bescherming tussen uw meubels en het apparaat. > Houd de TECHNIRADIO SOLAR uit de buurt van apparaten die sterke magnetische velden produceren. > Plaats geen zware voorwerpen op het apparaat.
  • Page 118: Beschrijving Van De Techniradio Solar

    1x Micro USB-kabel 1x handleiding 5.2 De bijzondere kenmerken van de TECHNIRADIO SOLAR De TECHNIRADIO SOLAR bestaat uit een DAB+/FM-ontvanger met de volgende functies: U kunt maximaal 20 DAB+ en 20 FM-stations opslaan. De radio ontvangt op de frequenties FM 87,5-108 MHz (analoog) en DAB+ 174,9–239,2 MHz (digitaal).
  • Page 119: Accu Opladen

    Trek voor een goede DAB+/FM-ontvangst de antenne helemaal uit. Zie hiervoor ook punt 5.3.1. > Maak eerst de TECHNIRADIO SOLAR klaar voor gebruik zoals beschreven onder punt 5.3.1 en 5.3.2. > Druk op de Power-knop(3) om de TECHNIRADIO SOLAR aan te zetten.
  • Page 120: Apparaat Uitzetten

    5.4.2 Apparaat uitzetten > Druk nogmaals op Power(3) om de TECHNIRADIO SOLAR weer uit te zetten. 5.4.3 Bron selecteren > Met de knop Mode kunt u tussen de bronnen DAB+ (Digital Radio) en FM wisselen. 5.4.4 Volume instellen > Regel het volume met de knoppen VOL+/VOL- van het apparaat.
  • Page 121: Menubediening

    6 Menubediening Via het menu komt u bij alle functies en instellingen van de TECHNIRADIO SOLAR. De menunavigatie gebeurt met de knoppen Menu, Next, Prev. en Select. Het menu is onderverdeeld in submenu's en bevat, afhankelijk van de geselecteerde bron, verschillende menuopties of activeerbare functies.
  • Page 122: Audiostream

    Dit leidt tot datareductie van de te verzenden datastream, zonder dat er een merkbaar verschil in geluid voor de luisteraar is (HE AAC v2-procedure als aanvullende coderingsmethode voor DAB+). 7.1.2 Audiostream Audiostreams zijn bij digitale radio continue gegevensstromen die MPEG 1 Audio Layer 2-frames bevatten en daarmee audio-informatie aanbieden.
  • Page 123: Dab+ Station Vanaf Een Favorietengeheugen Opvragen

    7.2.4 DAB+ station vanaf een favorietengeheugen opvragen > Om een zender op te vragen die u eerder in het favorietengeheugen hebt opgeslagen, drukt u kort op Preset en selecteert u met Next/Prev. een zendergeheugen (1...10). Druk op Select om de zender af te spelen. Als er geen station op het geselecteerde kanaal is opgeslagen, wordt op het display [(leeg)] weergegeven.
  • Page 124: Niet-Actieve Stations Verwijderen

    7.2.8 Niet-actieve stations verwijderen Met deze menuoptie kunt u oude en niet langer te ontvangen stations uit de zenderlijst verwijderen. > Houd de knop Menu ingedrukt en selecteer [Inactieve zenders wissen] met behulp van de knoppen Next/Prev.. > Druk op Select. De vraag [Wissen?] volgt om te bevestigen dat de inactieve zenders moeten worden verwijderd.
  • Page 125: Scaninstelling

    Het display toont de frequentie in stappen van 0,05 MHz. Next verhoogt de zendfrequentie, Prev verlaagt hem. 8.5 Scaninstelling In deze menuoptie kunt u de gevoeligheid van de scanfunctie instellen. > Houd de knop Menu ingedrukt en selecteer[Instellingen zenderscan] met behulp van de knoppen Next/Prev..
  • Page 126: Systeeminstellingen En Andere Functies

    Alle instellingen die onder dit punt worden genoemd zijn op alle bronnen van toepassing. 9.1 Sleeptimer Door middel van de sleeptimer gaat de TECHNIRADIO SOLAR na de ingestelde tijdsduur automatisch UIT. > Houd de knop Menu ingedrukt en selecteer [Systeem] met behulp van de knoppen Next/Prev..
  • Page 127: Tijd Bijwerken

    9.2.2 Tijd bijwerken In dit submenu kunt u aangeven of de tijd automatisch via DAB+ of FM moet worden bijgewerkt of u deze handmatig wilt gelijkzetten (punt 9.2.1). > Houd de knop Menu ingedrukt en selecteer [Systeem] met behulp van de knoppen Next/Prev..
  • Page 128: Helderheid Van Het Scherm

    > Sluit de TECHNIRADIO SOLAR op de USB-voeding aan. > Houd de knop Menu ingedrukt en selecteer [Systeem] met behulp van de knoppen Next/Prev.. Druk op Select.
  • Page 129: Sw-Versie

    Alle eerder opgeslagen stations worden verwijderd. Het apparaat bevindt zich nu in de leveringstoestand. > Het display toont [Herstart...] en het apparaat begint met de taalkeuze [Language]. Kies met de knoppen Next/Prev. een van de beschikbare talen en druk op Select om uw keuze te bevestigen. Vervolgens voert het apparaat automatisch een volledige scan uit in de DAB-modus.
  • Page 130: Storingen Verhelpen

    11 Storingen verhelpen Als het apparaat niet werkt zoals bedoeld, controleer het dan met behulp van de volgende tabellen. Symptoom Mogelijke oorzaak/oplossing Ik kan het apparaat niet aanzetten. Het apparaat krijgt geen stroom. Sluit de voeding correct aan of laad de accu op. Ik hoor niets.
  • Page 131: Opmerkingen

    13 Opmerkingen...
  • Page 133 Instrukcja obsługi TECHNIRADIO SOLAR Przenośne radio solarne DAB+/UKF...
  • Page 134 1 Ilustracje...
  • Page 135 1.1 Opis Antena teleskopowa Wyświetlacz Włączenie/czuwanie Krótkie naciśnięcie: włączenie; Krótkie naciśnięcie: wyłączenie Next Krótkie naciśnięcie w trybie DAB: kolejna stacja. W trybie UKF: zwiększenie częstotliwości o 0,05 Mhz. Przytrzymanie naciśniętego przycisku w trybie UKF: wyszukiwanie stacji. W menu: nawigacja przez opcje menu. Mode Kilkakrotne naciśnięcie: wybór źródła DAB+, FM.
  • Page 136: Spis Treści

    3.2.4 Wskazówki serwisowe ......................143 Ustawianie urządzenia ..................143 Opis urządzenia TECHNIRADIO SOLAR ............144 Zakres dostawy ........................144 Szczególne cechy użytkowe modelu TECHNIRADIO SOLAR ......144 Przygotowanie TECHNIRADIO SOLAR do uruchomienia ........144 5.3.1 Ustawianie anteny teleskopowej ..................144 5.3.2 Ładowanie akumulatora ......................145 5.3.3 Korzystanie ze słuchawek ....................145...
  • Page 137 Tryb FM ........................150 Uruchamianie trybu UKF ....................150 Odbiór FM (UKF) z informacjami RDS ................150 Automatyczne wyszukiwanie stacji ................150 Ręczne wyszukiwanie stacji ....................150 Ustawienia wyszukiwania .....................151 Przyporządkowanie stacji UKF do określonego miejsca w pamięci ....151 Wywoływanie stacji UKF z określonego miejsca w pamięci ........151 Nadpisywanie/usuwanie zawartości pamięci stacji radiowych ......151 Ustawienia systemu i dalsze funkcje ...............
  • Page 138: Wstęp

    3 Wstęp Instrukcja obsługi zawiera informacje umożliwiające zapewnienie bezpieczeństwa eksploatacji odbiornika radiowego, zwanego dalej także urządzeniem lub TECHNIRADIO SOLAR, oraz jego zastosowanie zgodne z przeznaczeniem. 3.1 Grupa docelowa instrukcji obsługi Instrukcja obsługi jest skierowana do każdej osoby ustawiającej, obsługującej, czyszczącej lub utylizującej urządzenie.
  • Page 139 Nie poddawaj urządzenia działaniu wysokiej temperatury, która mogłaby je nagrzać powyżej temperatury osiąganej w trakcie eksploatacji. W czasie burz odłączaj urządzenie od źródła zasilania. Przepięcie może uszkodzić urządzenie. W przypadku widocznego uszkodzenia urządzenia, pojawienia się nietypowego zapachu lub dymu, poważnej usterki lub uszkodzenia obudowy natychmiast wyłącz urządzenie i skontaktuj się...
  • Page 140: Utylizacja

    Obsługa baterii/akumulatorów TECHNIRADIO SOLAR jest wyposażone we wbudowany akumulator. Przed pierwszym użyciem należy całkowicie naładować akumulator. Jeśli TECHNIRADIO SOLAR nie będzie używane przez dłuższy czas, najpierw należy w pełni naładować akumulator. Pusty akumulator może ulec uszkodzeniu w razie dłuższego przechowywania.
  • Page 141 Wskazówki dotyczące utylizacji: Utylizacja opakowania: Nowe urządzenie jest przesyłane do klienta w chroniącym je opakowaniu. Wszystkie zastosowane materiały są przyjazne dla środowiska naturalnego i nadają się do ponownego wykorzystania. Prosimy o współpracę i utylizację opakowania w sposób przyjazny dla środowiska naturalnego. Informacje dotyczące aktualnych metod utylizacji dostępne są...
  • Page 142: Wskazówki Prawne

    Powielanie i rozpowszechnianie dozwolone wyłącznie za zgodą wydawcy. Aktualna wersja instrukcji może zostać pobrana w formacie PDF z obszaru pobierania witryny internetowej firmy TechniSat www.technisat.de. TECHNIRADIO SOLAR oraz TechniSat to zastrzeżone znaki towarowe firmy TechniSat Digital GmbH TechniPark Julius-Saxler-Straße 3 D-54550 Daun/Eifel www.technisat.de...
  • Page 143: Wskazówki Serwisowe

    Stopy urządzenia mogą w pewnych warunkach pozostawić kolorowe ślady na niektórych powierzchniach mebli. Zastosuj materiał ochronny pomiędzy urządzeniem a powierzchnią mebla. > Nie zbliżaj urządzenia TECHNIRADIO SOLAR do urządzeń generujących silne pole magnetyczne. > Nie stawiaj na urządzeniu żadnych ciężkich przedmiotów.
  • Page 144: Opis Urządzenia Techniradio Solar

    1 x kabel USB 1 x instrukcja obsługi 5.2 Szczególne cechy użytkowe modelu TECHNIRADIO SOLAR Urządzenie TECHNIRADIO SOLAR składa się z odbiornika DAB+/UKF wyposażonego w następujące funkcje: Możliwy jest zapis do 20 stacji DAB+ oraz 20 stacji UKF. Radio odbierające sygnał w paśmie UKF 87,5–108 MHz (analogowy) oraz DAB+ 174,9–239,2 MHz (cyfrowy).
  • Page 145: Ładowanie Akumulatora

    5.4 Ogólne funkcje urządzenia 5.4.1 Włącz urządzenie > Aby zagwarantować dobry odbiór DAB+/FM(UKF) należy całkowicie wysunąć antenę. Uwzględnij treść punktu 5.3.1. > Przygotuj TECHNIRADIO SOLAR do eksploatacji w sposób opisany w punktach 5.3.1 i 5.3.2. > Naciśnięcie przycisku Power(3) spowoduje włączenie TECHNIRADIO SOLAR.
  • Page 146: Wyłączanie Urządzenia

    5.4.2 Wyłączanie urządzenia > Ponowne naciśnięcie przycisku Power(3) spowoduje wyłączenie TECHNIRADIO SOLAR. 5.4.3 Wybór źródła dźwięku > Przycisk Mode umożliwia przełączanie między źródłami DAB+ (Digital Radio) oraz FM (UKF). 5.4.4 Ustawianie głośności > Ustaw głośność, naciskając przyciski VOL+/VOL- na urządzeniu. - VOL+ –...
  • Page 147: Obsługa Menu

    6 Obsługa menu W menu można uruchamiać wszystkie funkcje i opcje urządzenia TECHNIRADIO SOLAR. Nawigacja po menu odbywa się za pomocą przycisków Menu, Next, Prev. i Select. Menu jest podzielone na podmenu i obejmuje różne punkty i dostępne funkcje zależne od wybranego źródła. >...
  • Page 148: Strumień Audio

    Umożliwia to zmniejszenie ilości danych bez słyszalnej utraty jakości dźwięku (HE AAC v2 — dodatkowy algorytm kodowania dla formatu DAB+). 7.1.2 Strumień Audio Strumień audio to w przypadku cyfrowego radia ciągły strumień danych zawierających pakiety MPEG 1 Audio Layer 2, pozwalające na odtwarzanie informacji akustycznych.
  • Page 149: Wywoływanie Stacji Dab+ Z Określonego Miejsca W Pamięci

    7.2.4 Wywoływanie stacji DAB+ z określonego miejsca w pamięci > Aby rozpocząć odtwarzanie stacji zapisanej uprzednio w pamięci ulubionych, należy krótko nacisnąć przycisk Preset i za pomocą przycisku Next/Prev. wybrać miejsce w ulubionych (1...10). Nacisnąć przycisk Select, aby zacząć odtwarzać stację. Jeżeli pod wybranym numerem nie jest zapisana żadna stacja, na wyświetlaczu pojawi się...
  • Page 150: Usuwanie Nieaktywnych Stacji

    7.2.8 Usuwanie nieaktywnych stacji Ten punkt menu służy do usuwania z listy kanałów starych i niesłuchanych stacji radiowych. > Naciśnij i przytrzymaj przycisk Menu i za pomocą przycisku Next/Prev. wybierz pozycję [Inaktive Sender löschen] [Usuń nieaktywne stacje]. > Naciśnij przycisk Select. Pojawi się...
  • Page 151: Ustawienia Wyszukiwania

    Na wyświetlaczu pojawi się częstotliwość zmieniana co 0,05 MHz. Przycisk Next zwiększa częstotliwość stacji, a przycisk Prev. ją zmniejsza. 8.5 Ustawienia wyszukiwania Ten punkt menu pozwala na ustawienie czułości operacji wyszukiwania. > Naciśnij i przytrzymaj przycisk Menu i za pomocą przycisku Next/Prev. wybierz pozycję...
  • Page 152: Ustawienia Systemu I Dalsze Funkcje

    Za pomocą przycisku Next/Prev. wybierz pozycję [Sleep] [Drzemka] i naciśnij przycisk Select. > Za pomocą przycisku Next/Prev. ustaw czas, po którym TECHNIRADIO SOLAR się wyłączy. Możliwy jest wybór opcji wył., 15, 30, 45, 60 i 90 minut. > W celu zatwierdzenia naciśnij przycisk Select.
  • Page 153: Aktualizacja Czasu

    9.2.2 Aktualizacja czasu To podmenu pozwala na ustalenie, czy aktualizacja czasu będzie dokonywana automatycznie za pomocą sygnału DAB+ lub FM (UKF), czy też ręcznie (punkt 9.2.1). > Naciśnij i przytrzymaj przycisk Menu i za pomocą przyciskuNext/Prev. wybierz pozycję [System]. Naciśnij przycisk Select. >...
  • Page 154: Jasność Ekranu

    Przywrócenie Ustawień fabrycznych pozwala na usunięcie wszystkich zapisanych stacji radiowych oraz uruchomienie operacji wyszukiwania stacji. > Podłącz TECHNIRADIO SOLAR do zasilania USB. > Naciśnij i przytrzymaj przycisk Menu i za pomocą przyciskuNext/Prev. wybierz pozycję [System]. Naciśnij przycisk Select.
  • Page 155: Wersja Oprogramowania

    Wszystkie zapisane stacje radiowe i ustawienia zostaną usunięte. Urządzenie skonfigurowane będzie tak, jak w momencie dostawy. > Na wyświetlaczu pojawi się komunikat [Ponowne uruchomienie...] i urządzenie przejdzie do wyboru wersji językowej [Wersja językowa]. Za pomocą przycisku Next/Prev. wybierz jedną z dostępnych wersji językowych i potwierdź...
  • Page 156: Usuwanie Usterek

    Wyświetlacz nie włącza się. Odłącz urządzenie od zasilania i ponownie włącz zasilanie urządzenia. Zła jakość odbioru DAB+/FM. Całkowicie wyciągnij antenę. Zmień pozycję anteny lub urządzenia TECHNIRADIO SOLAR. Obsługiwanie urządzenia nie jest Odłącz urządzenie od zasilania i ponownie możliwe. włącz zasilanie urządzenia.
  • Page 157: Notatki

    13 Notatki...
  • Page 159 Návod k obsluze TECHNIRADIO SOLAR Přenosné solární rádio DAB+/FM...
  • Page 160 1 Vyobrazení...
  • Page 161 1.1 Popis Teleskopická anténa Displej Zapnout/Standby Krátce stisknout: zapnout Krátce stisknout: vypnout Další Krátce stisknout v režimu DAB: další stanice. V režimu FM: zvýšit frekvenci o 0,05 MHz. Přidržet stisknuté v režimu FM: vyhledávání stanic. V nabídce: procházení možnostmi menu. Mode Několikrát stisknout: výběr zdroje DAB+, FM.
  • Page 162: Obsah

    3.2.4 Pokyny pro servis ........................167 Instalace přístroje ....................169 Popis přístroje TECHNIRADIO SOLAR .............. 170 Obsah dodávky ........................170 Zvláštní vlastnosti přístroje TECHNIRADIO SOLAR ...........170 Příprava přístroje TECHNIRADIO SOLAR k provozu ..........170 5.3.1 Nasměrování teleskopické antény ...................170 5.3.2 Nabíjení akumulátoru ......................171 5.3.3 Používání sluchátek .........................171 Obecné...
  • Page 163 Režim FM (VKV) ..................... 176 Zapnutí režimu rádia FM .....................176 Příjem FM s informacemi RDS ..................176 Automatické vyhledávání stanic ..................176 Manuální vyhledávání stanic ....................176 Nastavení vyhledávání ......................177 Uložení vysílací stanice FM do paměti................177 Vyvolání vysílací stanice FM (VKV) z paměti .............. 177 Přepsání/smazání...
  • Page 164: Úvod

    3 Úvod Tento návod k obsluze vám pomůže se správným a bezpečným používáním vašeho rádia, které je dále označováno jako TECHNIRADIO SOLAR nebo přístroj. 3.1 Pro koho je tento návod k obsluze určen Návod k obsluze je určen každé osobě, která přístroj instaluje, ovládá, čistí nebo likviduje.
  • Page 165 Přístroj nevystavujte zdrojům tepla, které by jej zahřály nad rámec běžného používání. Při bouřce přístroj odpojte od napájení. Přepětí může přístroj poškodit. Při zřejmé poruše přístroje, vzniku zápachu nebo kouře, podstatném chybném fungování či poškození krytu přístroj vypněte a obraťte se na servis. Přístroj se smí...
  • Page 166: Likvidace

    TECHNIRADIO SOLAR je vybaven vestavěným akumulátorem. Před prvním použití akumulátor zcela nabijte. Pokud TECHNIRADIO SOLAR nebudete delší dobu používat, akumulátor před tím zcela dobijte. Vybitý akumulátor může při delším skladování utrpět škodu. Při likvidaci přístroje dodržujte místní předpisy pro likvidaci přístrojů s věstavěnými akumulátory.
  • Page 167: Pokyny Pro Servis

    Pokyny k likvidaci: Likvidace obalu: Váš nový přístroj byl pro cestu k vám chráněn obalem. Všechny použité materiály jsou šetrné k životnímu prostředí a recyklovatelné. Zapojte se prosím i vy a zlikvidujte obal ekologicky. O aktuálních způsobech likvidace se prosím informujte u svého obchodníka nebo u společnosti svážející...
  • Page 168: Právní Upozornění

    3.2.3 Právní upozornění Společnost TechniSat tímto prohlašuje, že rádiové zařízení typu TECHNIRADIO SOLAR splňuje požadavky směrnice 2014/53/EU. Úplný text prohlášení o shodě EU je k dispozici na této internetové adrese: http://konf.tsat.de/?ID=22311 Společnost TechniSat nenese odpovědnost za poškození výrobku způsobená vnějšími vlivy, opotřebením nebo nesprávnou manipulací, neoprávněnými opravami, změnami nebo nehodami.
  • Page 169: Pokyny Pro Servis

    > Pamatujte, že nožičky přístroje by mohly např. zanechat barevné otisky na některých površích nábytku. Mezi nábytek a přístroj vkládejte ochranu. > Přístroj TECHNIRADIO SOLAR uchovávejte z dosahu přístrojů, které vytvářejí silné magnetické pole.
  • Page 170: Popis Přístroje Techniradio Solar

    1x mikro USB kabel 1x návod k obsluze 5.2 Zvláštní vlastnosti přístroje TECHNIRADIO SOLAR Součástí přístroje TECHNIRADIO SOLAR je přijímač DAB+/VKV s dále uvedenými funkcemi: Můžete uložit až 20 DAB+ a 20 FM stanic. Rádio přijímá na frekvencích VKV FM 87,5–108 MHz (analogově) a DAB+ 174,9–239,2 MHz (digitálně).
  • Page 171: Nabíjení Akumulátoru

    5.4.1 Zapnutí přístroje > Pro zajištění dobrého příjmu DAB+/FM (VKV) anténu vytáhněte úplně. Viz také bod 5.3.1. > Přístroj TECHNIRADIO SOLAR nejprve připravte k používání podle popisu v bodech 5.3.1 a 5.3.2. > Stisknutím tlačítka Power (3) přístroj TECHNIRADIO SOLAR zapněte.
  • Page 172: Vypnutí Přístroje

    5.4.2 Vypnutí přístroje > Opakovaným stisknutím tlačítka Power (3) přístroj TECHNIRADIO SOLAR opět vypněte. 5.4.3 Výběr zdroje > Pomocí tlačítka Mode (Režim) je možné přepínat mezi zdroji DAB+ (digitální rádio) a FM (VKV). 5.4.4 Nastavení hlasitosti > Hlasitost nastavte stisknutím tlačítek VOL+/VOL- na přístroji.
  • Page 173: Obsluha Pomocí Menu

    6 Obsluha pomocí menu Přes menu se dostanete ke všem funkcím a nastavením přístroje TECHNIRADIO SOLAR. Navigace v menu se provádí tlačítky Menu, Next (Další), Prev. (Předch.) a Select. Menu je rozděleno do vnořených nabídek a podle zvoleného zdroje obsahuje různé...
  • Page 174: Audio Stream

    To vede ke snížení objemu přenášeného datového toku, aniž by posluchač zaznamenal nějaký zvukový rozdíl (proces HE AAC v2 jako doplňující způsob kódování pro DAB+). 7.1.2 Audio Stream Audio streamy jsou u digitálního rádia nepřetržité datové toky, které obsahují rámce MPEG 1 Audio Layer 2 a představují...
  • Page 175: Vyvolání Stanice Dab+ Z Paměti

    7.2.4 Vyvolání stanice DAB+ z paměti > Pokud chcete spustit rozhlasovou stanici, kterou jste předtím uložili do paměti pro oblíbené, stiskněte krátce tlačítko Preset a pomocí tlačítek Next/Prev. vyberte paměť pro oblíbené (1...10). Stiskněte tlačítko Select pro přehrávání stanice. Pokud není na zvoleném místě v paměti uložena žádná stanice, na displeji se zobrazí...
  • Page 176: Odstranění Neaktivních Stanic

    7.2.8 Odstranění neaktivních stanic Tato položka nabídky se používá k odstranění starých a již nevysílaných stanic ze seznamu. > Přidržte tlačítko Menu stisknuté a pomocí tlačítek Next/Prev. zvolte položku [Inaktive Sender löschen] (Smazat neaktivní stanice). > Stiskněte Select. Zobrazí se dotaz [Löschen?] (Smazat?), zda se mají neaktivní stanice odstranit. >...
  • Page 177: Nastavení Vyhledávání

    Na displeji se zobrazuje frekvence po stupních 0,05 MHz. Next vysílací frekvenci zvýší, Prev. ji sníží. 8.5 Nastavení vyhledávání V tomto bodu nabídky je možné nastavit citlivost vyhledávání. > Přidržte tlačítko Menu stisknuté a pomocí tlačítek Next/Prev. zvolte položku [Suchlauf-Einstellung] (Nastavení vyhledávání). Stiskněte Select. >...
  • Page 178: Systémová Nastavení A Další Funkce

    Pomocí tlačítek Next/Prev. zvolte položku [Sleep] (Spánek) a stiskněte tlačítko Select. > Pomocí tlačítek Next/Prev. zvolte dobu, po které se má TECHNIRADIO SOLAR vypnout. Na výběr máte možnosti Aus (Vyp), 15, 30, 45, 60 a 90 minut. > Pro převzetí nastavení stiskněte tlačítko Select.
  • Page 179: Aktualizace Času

    9.2.2 Aktualizace času V této vnořené nabídce můžete nastavit, zda se má aktualizace času provádět automaticky přes DAB+ nebo FM, nebo zda jej chcete zadávat manuálně (bod 9.2.1). > Přidržte tlačítko Menu stisknuté a pomocí tlačítek Next/Prev. zvolte položku [System] (Systém). Stiskněte Select. >...
  • Page 180: Jas Displeje

    Obnovením na tovární nastavení můžete v takovém případě všechny uložené stanice odstranit a pak spustit nové vyhledávání stanic. > Připojte TECHNIRADIO SOLAR k napájení přes USB. > Přidržte tlačítko Menu stisknuté a pomocí tlačítek Next/Prev. zvolte položku [System] (Systém). Stiskněte Select.
  • Page 181: Verze Sw

    Všechny dříve uložené stanice a nastavení budou odstraněny. Přístroj se nyní nachází ve stavu při dodání. > Na displeji se zobrazí [Neustart...] (Restart...) a přístroj začne výběrem jazyka [Sprache] (Jazyk). Pomocí tlačítek Next/Prev. zvolte některý z dostupných jazyků a volbu potvrďte stisknutím tlačítka Select. Přístroj následně automaticky provede kompletní...
  • Page 182: Odstraňování Chyb

    Odpojte přístroj od elektrické sítě a přístroj opět připojte k napájení. Příjem přes DAB+/FM je špatný. Zcela vytáhněte anténu. Změňte polohu antény nebo přístroje TECHNIRADIO SOLAR. Přístroj nelze ovládat. Odpojte přístroj od elektrické sítě a přístroj opět připojte k napájení.
  • Page 183: Poznámky

    13 Poznámky...
  • Page 184 m000/3931...

Ce manuel est également adapté pour:

0000/39310002/39310001/3931

Table des Matières