
Manuels Connexes pour La San Marco 20/20 CLASSIC Serie


Sommaire des Matières pour La San Marco 20/20 CLASSIC Serie
- Page 1 20/20 CLASSIC IT – USO E MANUTENZIONE EN – USE AND MAINTENANCE FR – EMPLOI ET ENTRETIEN DE – BEDIENUNG UND WARTUNG...
- Page 2 USO E MANUTENZIONE SERIE 20/20 CLASSIC Istruzioni originali...
-
Page 3: Table Des Matières
Indice 1. Istruzioni di sicurezza ......... . . PAG. 3 1.1 Consultazione del manuale . -
Page 4: Istruzioni Di Sicurezza
Non far funzionare la macchina o eseguire la manutenzione ordinaria prima di aver letto questo manuale. La San Marco S.p.A. si riserva di effettuare modifiche tecniche alla macchina qualora lo ritenesse necessario senza preavviso. 1.2.1 Installazione - Istruzioni di sicurezza riservati a personale addestrato. -
Page 5: Utilizzo - Istruzioni Di Sicurezza
dell’impianto di distribuzione elettrica non sia differente da quella indicata nei dati tecnici e nella targhetta identificativa applicata alla macchina stessa. Se la tensione dovesse risultare differente non collegare la macchina, ciò potrebbe essere pericoloso e potrebbe danneggiare l’apparecchio. ne, devono essere presenti adeguati strumenti di disconnessione categoria III di sovratensione, nel caso di macchina alimentata in monofase prima di accedere alle parti in tensione della macchina stessa, por- tare l’interruttore generale in posizione 0 e quindi scollegare il cavo di alimentazione elettrica a monte della macchina. -
Page 6: Manutenzione - Istruzioni Di Sicurezza
La San Marco. biuli, ecc., durante i lavori di manutenzione o riparazione. non originali fa decadere le certificazioni di conformità e la garanzia che accompagnano la macchina. -
Page 7: Caratteristiche Tecniche
2. Caratteristiche tecniche 2020 2020 2020 2020 20/20 Modelli CLASSIC CLASSIC CLASSIC CLASSIC SPACE Capacità caldaia 12 L 19 L 25 L Peso netto 35 Kg 49 Kg 59 Kg 68 Kg 96 Kg Larghezza 380 mm 570 mm 720 mm 960 mm 1200 mm Altezza... -
Page 8: Descrizione Della Macchina
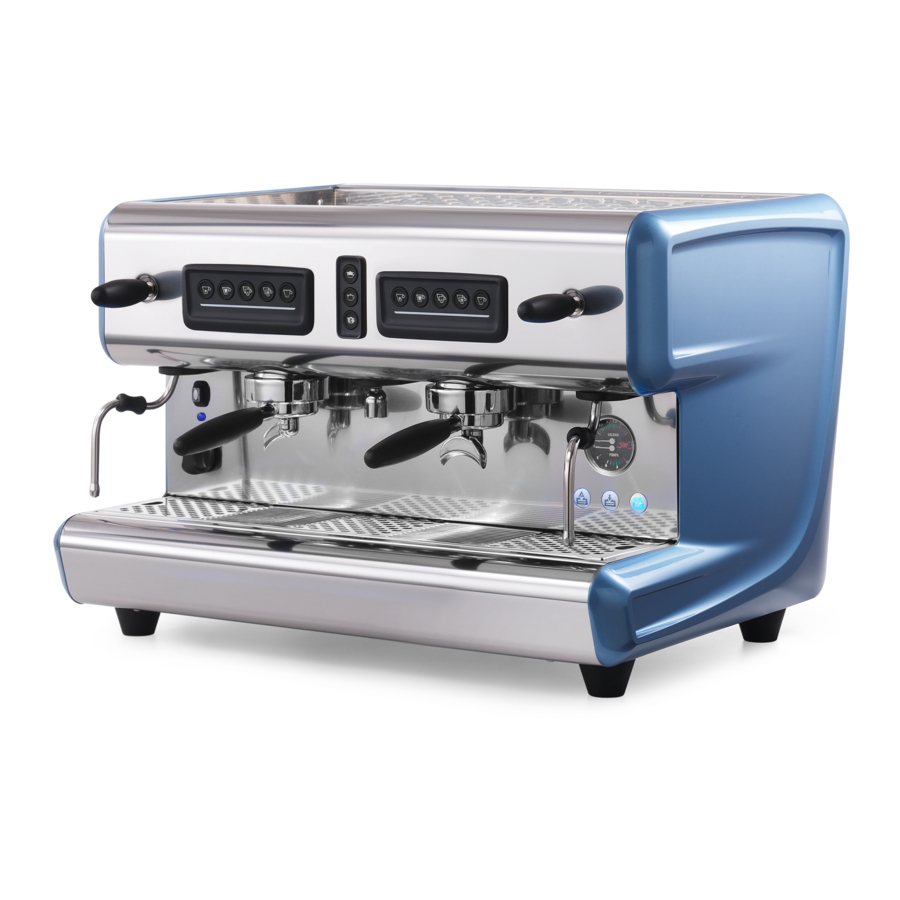
2.1 Descrizione della macchina 1) Interruttore generale 2) Spia luminosa interruttore generale 3) Interruttore scaldatazze (opzionale) 4) Vaschetta appoggia tazzine superiore 5) Pulsantiera gruppo d’erogazione 6) Pulsantiera erogazione acqua calda 7) Leva rubinetto prelievo vapore 8) Manometro doppia scala 9) Guaina antiscottature 10) Livello elettronico 11) Lancia prelievo vapore 12) Piedino... -
Page 9: Schema Generale Del Sistema Idraulico
2.2 Schema generale del sistema idraulico... -
Page 10: Legenda Dello Schema Del Sistema Idraulico
2.3 Legenda dello schema del sistema idraulico: 1) Addolcitore d’acqua 2) Valvola di uscita dell’addolcitore d’acqua 3) Valvola di entrata dell’addolcitore d’acqua 4) Collegamento dell’alimentazione dell’addolcitore d’acqua 5) Pompa del motore elettrico 6) Manometro (pressione pompa) 7) Valvola di non ritorno e di sicurezza 8) Rubinetto autolivello 9) Filtro 10) Elettrovalvola autolivello... -
Page 11: Installazione
3. Installazione San Marco. tiene la macchina e i relativi accessori, il manuale d’uso e la dichiarazione di conformi- al costruttore. macchina. al di sopra del pavimento, con un spazio attorno sufficiente per smaltire il calore pro- dotto durante il funzionamento. eseguita con getti d’acqua. -
Page 12: Installazione Impianto Idraulico
Allacciare il tubo di scarico alla vaschetta raccogli fondi e collegarlo al pozzetto di scarico della rete di smal- timento acque bianche. 3.5 Collegamento elettrico Disposizioni per un corretto collegamento elettrico della macchina per caffè espresso: zione. corrente deve essere dotata di un efficace impianto di messa a terra. LA SAN MARCO... -
Page 13: Collegamento Al Morsetto Equipotenziale
Collegare solo cavi di sezione da 2,5 mm a 6 mm con capicorda ad occhiello per vite M8. Il collegamento al morsetto equipotenziale deve essere eseguito da personale tecnico qualificato e autorizzato LA SAN MARCO SPA. Per eseguire il collegamento rimuovere la vaschetta inferiore. Sulla parte laterale sinistra del telaio, segnalato dal simbolo di equipotenzialità... -
Page 14: Avviamento
4. Avviamento L’avviamento della macchina per caffè deve essere eseguito dal personale tecnico qua- lificato e autorizzato LA SAN MARCO SPA. la macchina per caffè espresso seguendo con attenzione le seguenti procedure al fine di non recare danni all’apparecchio. 4.1 Carico acqua in caldaia Controllare che l’interruttore generale della macchina si trovi in posizione 0 (zero). -
Page 15: Regolazioni
5. Regolazioni Le eventuali regolazioni della macchina per caffè espresso deve essere avviata da personale tecnico qualificato autorizzato da LA SAN MARCO SPA. 5.1 Regolazione della sonda del livello dell’acqua della caldaia La sonda del livello è normalmente collocata in una posizione standard. Tuttavia, se il cliente lo desidera, la quantità... -
Page 16: Regolazione Temperatura Gruppi Di Erogazione
5.4 Regolazione temperatura gruppi di erogazione regolare la temperatura di erogazione del caffè espresso mantenendo inalte- rata la pressione interna della caldaia. In testa al gruppo d’erogazione è po- sizionata una valvola (variatore di portata) che regola il fl usso d’acqua calda re, togliendo la griglia appoggia tazze. -
Page 17: Prelievo Vapore
il tasto selezionato nel caso in cui si desiderasse interrompere l’erogazione programmata prima del raggiungi- mento della dose prevista. Premendo uno dei tasti dose continua il LED relativo al tasto selezionato lampeggerà per tutta la durata dell’e- rogazione caffè, gli altri tasti rimangono accesi fi ssi durante tutta la durata dell’erogazione. Per interrompere l’erogazione in modalità... -
Page 18: Pre-Infusione
Alla fine del ciclo di lavaggio il gruppo di erogazione ritorna nelle normali condizioni di funzionamento. Ripetere il ciclo per tutti gli altri gruppi nello stesso modo. 6.5 Pre-infusione Attivazione della pre-infusione: del primo gruppo. Il tasto si accende per indicare che la pre-infusione è abilitata. Spegnere e riaccendere la macchina per ripristinare il normale funzionamento con pre-infusione durante l’erogazione del caffè. -
Page 19: Manutenzione Ordinaria
Per visualizzare i caffè parziali erogati dal primo gruppo, accendere la macchina mantenendo premuto il tasto della pulsantiera del secondo gruppo. Rilasciare il tasto nel momento in cui rimane acceso il tasto primo gruppo. Per visualizzare i caffè parziali erogati dal secondo gruppo, accendere la macchina mantenendo premuto il tasto della pulsantiera del secondo gruppo. -
Page 20: Pulizia Di Vaschetta E Griglia Appoggia Tazzine
8.2 Pulizia di vaschetta e griglia appoggia tazzine è sufficiente pulirla con una spugna o un panno umido. Alla fine della giornata di lavoro bisogna pulire la va- schetta e la griglia anche nelle zone interne usando acqua calda e un detergente neutro. 8.3 Pulizia della lancia vapore Pulire la lancia di prelievo vapore con una spugna o un panno umido alla fine della giornata di lavoro per togliere le tracce di latte o altro che inevitabilmente si formano durante il normale utilizzo della macchina. -
Page 21: Informazione Agli Utenti
2. Per garanzia s’intende la sostituzione a titolo gratuito delle parti componenti della macchina, riconosciuti tali da La San Marco S.p.A., difettosi per vizi di fabbricazione. La garanzia si applica unicamente per i componenti originali, e viene a decadere in caso di utilizzo di componenti non originali sia per i compo- nenti che per la macchina stessa. -
Page 22: Problemi E Soluzioni
13. Se, a seguito di verifica da parte de La San Marco S.p.A., il componente reso non dovesse risultare difetto- so, al Cliente saranno addebitati gli eventuali costi di gestione, controllo tecnico ed eventuali test. Saranno inoltre addebitate le spese di spedizione per la restituzione del materiale. - Page 23 DIFETTO CAUSA SOLUZIONE La macchina è stata avviata correttamente o non è alimentata. girato in posizione 2. ma non scalda l’acqua in caldaia posizione 1. deve controllare i cavi elettrici che forniscono la resistenza. Inoltre ha bisogno di verificare se il termostato è...
- Page 24 DIFETTO CAUSA SOLUZIONE programmare le quantità centralina elettronica o dei controllare il cablaggio elettrico tra di dosaggio sull’unità 1 e misuratori di portata. la centralina e i misuratori di flusso copiarle sulle altre unità. e vedere se è necessario sostituire i misuratori di portata.
- Page 25 DIFETTO CAUSA SOLUZIONE Dalla terminale vaporizzatore esce una vapore usurata. valutare se sostituire la guarnizione piccola quantità di gocce se necessario o regolare la valvola a d’acqua anche se in regolata. vapore. posizione chiusa. Dalla bocca dell’acqua calda esce una piccola dell’acqua calda usurata.
- Page 26 DIFETTO CAUSA SOLUZIONE Crema chiara (il caffè a) Macinazione a grana grossa. a) Ridurre la macinatura del caffè. scorre velocemente fuori b) Pressione di pressatura b) Aumentare la pressione del caffè dall’ erogatore). bassa. macinato. c) Piccola quantità di caffè c) Aumentare la quantità...
- Page 27 Presenza di depressioni nel terreno di caffè parzialmente intasato. erogazione usando la tazza con il (guardando all’interno filtro cieco o sostituire il filtro. della coppa del filtro). Nota: gersi al centro di assistenza tecnica autorizzato LA SAN MARCO SPA.
- Page 28 USE AND MAINTENANCE 20/20 CLASSIC SERIES Draft of the original instructions...
- Page 29 Index 1. Safety instructions ..........pag. 29 1.1 Using the manual .
-
Page 30: Safety Instructions
“Commercial and technical documentation”, or on request in pdf format on cd. 1.2 Safety instructions La San Marco S.p.A. reserves the right to make any technical changes on the machine consid- ered necessary without advance notice. 1.2.1 Installation - Safety instructions personnel. -
Page 31: Use Of The Machine - Safety Instructions
sure heat dissipation. differ from that indicated in the technical data and on the machine’s identification plate. If the voltage is different, do not connect the machine, this could be dangerous and could damage the machine. There must be suitable category III overvoltage disconnection devices. In case of single phase powered machines, before accessing energized parts of the machine itself, move the main switch to 0 and then disconnect the power cord upstream of the machine. -
Page 32: Maintenance - Safety Instructions
It is therefore necessary to use safety gloves, aprons, etc., during maintenance or repair operations. request original La San Marco spare parts. The use of any other than original spare parts voids the con- formity certifications and the warranty that accompany the machine. -
Page 33: Technical Characteristics
2. Technical characteristics 2020 2020 2020 2020 20/20 Models CLASSIC CLASSIC CLASSIC CLASSIC SPACE Boiler capacity 12 L 19 L 25 L 35 Kg 49 Kg 59 Kg 68 Kg 96 Kg Width 380 mm 570 mm 720 mm 960 mm 1200 mm Height 470 mm... -
Page 34: Machine Description
2.1 Machine description 1) Main switch 2) Main switch luminous indicator light 3) Cup warmer switch (optional) 4) Upper cup support tray 5) Brewing group keypad 6) Hot water dispensing keypad 7) Steam valve lever 8) Double scale pressure gauge 9) Anti-burn sheath 10) Electronic level 11) Steam wand... -
Page 35: General Water System Diagram
2.2 General water system diagram... -
Page 36: Water System Diagram Key
2.3 Water system diagram key: 1) Water softener 2) Water softener outlet valve 3) Water softener inlet valve 4) Connection of water softener supply 5) Electric motor pump 6) Pressure gauge (pump pressure) 8) Autolevel valve 9) Filter 10) Automatic level solenoid valve 11) Autolevel valve 12) Boiler water manual filling valve 14) Boiler hot water and steam drain valve... -
Page 37: Installation
3. Installation personnel. contains the machine and its accessories, the user manual and the declaration of con- formity. After opening the packaging, check the condition of the coffee machine and its machine. with a space around it sufficient to dispose of the heat produced during operation.. splashing water. -
Page 38: Electrical Connection
3.3 Water system installation 1) Use the tube a (900 mm, provided with the machine) to connect the cut-off valve of the mains to the tap 1 for water inlet to the water softener (figure 1). 2) Connect the tube b of the internal pump suction, with the tap 2 of the water softener (figure 2). Figure 1 Figure 2 1) Use the tube a (900 mm, provided with the machine) to connect the cut-off valve of the mains to the tap... -
Page 39: Connection To Equipotential Clamp
Connect the power cable of the coffee machine to the power supply according to the attached diagram: 230V BLUE BLUE 20/20 CLASSIC YE / GR YE / GR 220-230-240V 1N 400V-3N THREE-PHASE BLUE BLUE BLUE 20/20 CLASSIC BLACK BLACK BLACK GREY GREY GREY... -
Page 40: Adjustments
Figure 8 Figure 9 Figure 10 2) Open the water supply on-off valve. 3) Lower the lever of a steam valve to allow the exit of the air in the boiler filling phase. 4) Reinstall the cup support tray and grate in their place. 5) Turn the knob of the main switch to position 1 so as to carry out automatic filling of the boiler with water. -
Page 41: Boiler Steam Pressure Regulation
As indicated in the following figure, depending on the ADJUSTMENT SCREW pump model supplied with the machine, this screw can be adjusted in three different ways: - Adjust the screw only - Adjust the screw and lock it with the lock nut - Unscrew the cap nut and adjust the screw. -
Page 42: Drawing Steam
After inserting the portafi lter in the brewing group, press one of the fi ve buttons for the desired coffee dose, for the group to be used: Single programmed short dose Single programmed long dose Double programmed short dose Double programmed long dose Continuous manual dose PROGRAMMED DOSE By pressing one of the two programmed dose keys, the LED linked to the key of the selected dose fl ashes whi-... -
Page 43: Automatic Washing System
Short programmed dose Long programmed dose Continuous manual dose 6.4 Automatic washing system The automatic washing system allows the cleaning of coffee brewing groups. Insert the portafi lter with blind fi lter in the brewing group. To start the washing cycle press the continuous dose key together with the short coffee single dose key for a few seconds. -
Page 44: Brewed Coffee Count Display
7.3 Brewed coffee count display To view the total coffees brewed, turn the machine on by simultaneously pressing and holding keys of the second group’s keypad. When the keys of the first group light up fixed, release the keys. To identify the coffee number it is necessary to count the number of flashes of the keys of the second group according to the following logic: is linked to the groups, key to the tens, key... -
Page 45: Cup Support Tray And Grate Cleaning
Note: 8.2 Cup support tray and grate cleaning an it with a sponge or a moist cloth. At the end of the working day, clean the tray and grate also in the internal areas using warm water and neutral detergent. 8.3 Steam wand cleaning Clean the steam spout with a sponge or a moist cloth at the end of the working day to remove all traces of milk or other substances that inevitably form during the normal operation of the machine. -
Page 46: Information For Users In The European Community
2. For warranty the free substitution of the components of the machine are intended, which have to be reco- gnized by La San Marco to have manufacturing defects. The warranty applies only to the original compo- nents, and it falls in case of the use of unoriginal components or of an the machine itself. -
Page 47: Troubleshooting
Marco , travel and added costs relative to the reparation or substitution of the defective components of the machine. 13. If, after an examination of La San Marco the returned component proves not to be defective, the client shall be charged any costs for management, technical inspections and possible tests. Also the charges for the shipping and the restitution of the material will be charged. - Page 48 DEFECT CAUSE SOLUTION The machine was started properly but one or more brewing group is defective or position 2. brewing group boilers not connected. does not warm up. groups are set to OFF. OFF. must check the electrical wires powering the heating element. Moreover, it is important to check whether the thermostat tripped the heating element safety and to check...
- Page 49 DEFECT CAUSE SOLUTION Autolevel alarm. water circuit. valve is open. is closed. must inspect the automatic level water circuit and check the operation valve is defective. of the solenoid, and replace it if necessary. Overfill alarm. malfunction, the filling solenoid must check the correct operation of is always open.
- Page 50 DEFECT CAUSE SOLUTION The portafilter unhooks from the brewing group. portafilter. portafilter. must check the gasket, and replace it if necessary. When coffee is brewed, part of it spills out from the edge portafilter. portafilter. of the portafilter. must check the gasket, and replace it if necessary.
- Page 51 DEFECT CAUSE SOLUTION Coffee grounds in the a) Coffee grinding too fine. a) Increase coffee grinding size. cup. b) Grinders of coffee grinder b) Replace grinders (this operation can worn. only be performed by authorized c) Pump pressure above 9 bar. qualified technicians).
-
Page 52: Emploi Et Entretien Série 20/20 Classic
EMPLOI ET ENTRETIEN SÉRIE 20/20 CLASSIC Traduction des instructions originales... - Page 53 Index ......... pag. 53 1.1 Consultation du manuel .
-
Page 54: Instructions De Sécurité
Ne pas faire fonctionner la machine et ne pas effectuer la maintenance courante avant d’avoir lu ce manuel. La San Marco S.p.A. se réserve le droit d’apporter des modifications techniques à la machine si elle le juge nécessaire, sans préavis. - Page 55 d’eau. la dissipation de cette chaleur. impropre de la machine. l’appareil. suffisante.
- Page 56 des conditions normales d’utilisation de la machine machine. des brûlures dues au contact accidentel avec la peau. Il faut donc utiliser des gants, porter un tablier, etc. garantie qui accompagnent la machine. constructeur pour toute demande d’information, de pièces de rechange ou d’accessoires. mentation en eau de la machine et en faisant sortir l’eau des groupes jusqu’à...
-
Page 57: Caractéristiques Techniques
2. Caractéristiques techniques 2020 2020 2020 2020 20/20 Modèles CLASSIC CLASSIC CLASSIC CLASSIC SPACE 12 L 19 L 25 L Poids net 35 Kg 49 Kg 59 Kg 68 Kg 96 Kg Largeur 380 mm 570 mm 720 mm 960 mm 1200 mm Hauteur 470 mm... -
Page 58: Description De La Machine
2.1 Description de la machine 3) Interrupteur chauffe-tasses (en option) 5) Panneau de commande groupe de distribution 6) Bouton de distribution d’eau chaude 7) Levier du robinet vapeur 9) Gaine anti-brûlure 11) Buse vapeur 12) Pied 15) Bac avec grille pose-tasses 16) Buse à... - Page 60 1) Adoucisseur d’eau 2) Vanne de sortie de l’adoucisseur d’eau 4) Raccordement de l’alimentation de l’adoucisseur d’eau 6) Manomètre (pression pompe) 8) Robinet de niveau automatique 9) Filtre 10) Électrovanne niveau automatique 11) Robinet de niveau automatique 12) Vanne de remplissage manuel de l’eau dans la chaudière 13) Clapet anti-retour 14) Robinet de vidange de la chaudière eau chaude plus vapeur 19) Chaudière eau chaude et vapeur...
-
Page 61: Installation
3. Installation Marco. contient la machine et ses accessoires, le manuel d’utilisation et la déclaration de con- de ses composants est correcte. En cas de doute, ne pas utiliser l’appareil et s’adresser au constructeur. machine. dessus du sol, avec un espace autour suffisant pour dissiper la chaleur produite durant le fonctionnement. -
Page 62: Installation Du Système Hydraulique
Remarque : de la machine à expresso. Si le client n’a prévu aucun système de décalcification, il convient de le faire afin de garantir l’efficacité, les performances et la durée des composants de la machine à expresso. 3.3 Installation du système hydraulique 1) Utiliser le tuyau a d’eau robinet 1 2) Connecter le tuyau b de l’aspiration de la pompe interne, avec le robinet 2 de l’adoucisseur. -
Page 63: Mise En Service De La Machine À Café
L’interrupteur omnipolaire doit se découpler du réseau avec une ouverture de contact d’au moins 3 mm. entièrement. effectué par un personnel autorisé et qualifié de La San Marco S.p.A. 230V BLEU BLEU 20/20 CLASSIC JA / VE JA / VE 220-230-240V 1N 400V-3N TRIPHASÉ... -
Page 64: Remplissage De L'eau Dans La Chaudière
Ne jamais mettre la machine à café en marche en tournant l’interrupteur général sur 2 (les résistances électriques doivent toujours être plongées dans l’eau pour pouvoir fonctionner). 5. Réglages Les éventuels réglages de la machine à café doivent être effectués par le personnel technique qualifié et autorisé LA SAN MARCO SPA. -
Page 65: Instructions Pour Le Fonctionnement
ces commencent à chauffer l’eau). à dosage automatique, de manière à ce que l’eau sorte du groupe correspon- Comme l’indique la figure suivante, en fonction du VIS DE RÉGLAGE manomètre indique au contraire la pression de fonctionnement de la pompe. Sur les modèles 2020 CLASSIC (sauf les modèles 2020 CLASSIC DTC), ile 2-3-4-5 Figure 14... - Page 66 Dose continue manuelle secondes. s’est pas déroulé correctement, voir le chapitre «PROBLÈMES ET SOLUTIONS».
-
Page 67: Système De Lavage Automatique
L’utilisation du vaporisateur demande de l’attention; le contact direct de la peau avec le tuyau d’instructions. Remarque : éventuels résidus présents à l’intérieur du tuyau. etc. manuelles). Dose continue manuelle 6.4 Système de lavage automatique Pour lancer le cycle de lavage, appuyer sur la touche dose continue courte simple quement. -
Page 68: Programmation De La Machine
7. Programmation de la machine du premier B. Programmation Programmer les 4 doses du 1er groupe comme suit : Monter le porte-filtre sur le 1er groupe. Placer la tasse sous le bec du porte-filtre. le 1er groupe, il suffit d’appuyer sur le bouton de chaque panneau de commande des autres groupes, C. -
Page 69: Entretien Ordinaire
8. Entretien ordinaire le filtre aveugle ( sans trous ) fourni avec la machine . Remarque : Le filtre est inséré à l’intérieur de la pression de coupe , pour enlever suffisamment de force sur les côtés , puis retirez-le. Ne pas retirer l’anneau élastique à l’intérieur du porte-filtre. 4) Monter le porte-filtre et sans l’accrocher complètement, appuyer sur le bouton de distribution continue. -
Page 70: Périodes D'arrêt
10. Dispositifs de sécurité Le réarmement du thermostat de sécurité doit être effectué par le technicien autorisé LA SAN MARCO SPA, qui En cas de déclenchement de la soupape de sécurité, éteindre la machine et contacter immédiatement le technicien autorisé LA SAN MARCO SPA. -
Page 71: Information Pour Les Usagers De La Communauté Européenne
11. Information pour les usagers de la communauté européenne 12. Conditions générales de garantie 1. La garantie est valable 12 mois à partir de la date figurant sur la facture de vente. 2. Par garantie, nous entendons le remplacement gratuit des pièces composant de la machine, pièces re- tant pour les composants que pour la machine. -
Page 72: Problèmes Et Solutions
13. Problèmes et solutions DÉFAUT CAUSE SOLUTION La chaudière est pleine automatique reste tout le temps ouverte. la vanne manuelle de remplissage. l’interrupteur d’alimentation sur 0 la vapeur. Le manomètre indique la pression de la 1,8 bar. pression dans la chaudière l’interrupteur du système de contrôle correctement mise en marche, mais ne... - Page 73 DÉFAUT CAUSE SOLUTION correctement mise en marche mais une ou plusieurs chaudières ne chauffent pas. Aucune distribution distribution. distribution ne s’ouvre pas car et leurs vannes. niveau de la pompe. sont pas constantes ou distribution. les distributeurs d’eau. Il est impossible de programmer les...
- Page 74 DÉFAUT CAUSE SOLUTION Alarme des compteurs pas. Alarme niveau Circuit d’eau de niveau automatique. automatique sans eau. principal de l’eau soit ouvert. d’alimentation de l’eau est contrôler le circuit hydraulique du du niveau automatique Alarme trop plein. remplissage est tout le temps ouverte.
- Page 75 DÉFAUT CAUSE SOLUTION sifflement après la clapet anti-retour. clapet à 12 bar. pompe. Étalonner la pompe à 9 bar. Le porte-filtre se porte-filtre. distribution. remplacer. Lors de la distribution du porte-filtre. dehors du bord du porte- filtre. remplacer. Fuite d’eau de distribution.
- Page 76 DÉFAUT CAUSE SOLUTION descend du distributeur b) Haute pression de pressage. trop lentement). moulu. distribution. e) Augmenter la pression de la pompe e) Pression de la pompe f) Les trous de filtration de distribution en utilisant le porte filtre g) Les trous du filtre sont avec le filtre borgne ou remplacer le filtre.
- Page 77 DÉFAUT CAUSE SOLUTION La surface du marc distribution en utilisant le porte filtre (quand on l’observe à avec le filtre borgne ou remplacer le filtre. Remarque : ctionnements, contacter le centre d’assistance agréé La San Marco S.p.A.
-
Page 78: Bedienung Und Wartung
BEDIENUNG UND WARTUNG SERIE 20/20 CLASSIC Übersetzung der Original-Anleitungen... - Page 79 Inhalt 1. Sicherheitsanweisungen ........PAG. 79 1.1 Konsultation des Handbuchs .
-
Page 80: Sicherheitsanweisungen
1. Sicherheitsanweisungen leitungen. 1.1 Konsultation des Handbuchs der Kaffeemaschine notwendig sind. werden. 1.2 Sicherheitsanweisungen 1.2.1 Installation - Sicherheitsanweisungen werden. Personal vorbehalten ist. − Kaffeestopfer für Pulverkaffee, − Mit Edelstahlgeflecht ummantelter Gummischlauch für den Wasseranschluss (Wassernetz - Wasse − Gummischlauch mit Stahlspirale für Brauchwasserabfluss, −... -
Page 81: Verwendung - Sicherheitsanweisungen
schließen. Steckdose des Stromversorgungssystems nicht von der in den technischen Daten und auf dem Typen- gnete Trennvorrichtungen der Überspannungskategorie III vorhanden sein, bei einphasig gespeisten Ma- lung 0 drehen und dann das Stromversorgungskabel vor der Maschine abtrennen.. 1.2.2 Verwendung - Sicherheitsanweisungen wurde. -
Page 82: Verwendung Der Kaffeemaschine
Personal vorbehalten, das vom Kunden auf dessen Verantwortung damit betraut wird. Personal durchgeführt werden. durchgeführt werden. ge Wartung durch von der Firma La San Marco autorisiertes Personal zu beachten ist. Hautkontakt Verbrennungen verursachen. Bei Wartungs- oder Reinigungsarbeiten im Bereich der Kaffee- ausgabe sind daher Handschuhe, Schürzen, etc. zu tragen. -
Page 83: Technische Eigenschaften
2. Technische Eigenschaften 2020 2020 2020 2020 20/20 Modelle CLASSIC CLASSIC CLASSIC CLASSIC SPACE Fassungsvermögen des 12 L 19 L 25 L Kessels 35 Kg 49 Kg 59 Kg 68 Kg 96 Kg Breite 380 mm 570 mm 720 mm 960 mm 1200 mm Höhe... -
Page 84: Beschreibung Der Maschine
2.1 Beschreibung der Maschine 1) Hauptschalter 2) Kontrollleuchte Hauptschalter 4) Obere Tassenablage 5) Bedienfeld Brühgruppe 6) Bedienfeld Heisswasserbrühen 7) Hebel Dampfhahn 8) Druckmesser mit doppelter Skala 9) Ummantelung zum Schutz vor Verbrennungen 10) Elektronischer Füllstand 11) Dampfhahnlanze 12) Fuß 14) Brühgruppe Espresso 15) Schale mit Tassenabstellrost 16) Heißwasserlanze... -
Page 85: Allgemeiner Wasseranschlussplan
2.2 Allgemeiner Wasseranschlussplan... - Page 86 5) Pumpe des Elektromotors 6) Druckmesser (Druck der Pumpe) 7) Rückschlag- und Sicherheitsventil 8) Hahn Füllstandsautomatik 9) Filter 10) Magnetventil Füllstandsautomatik 11) Hahn Füllstandsautomatik 12) Ventil für manuelle Befüllung des Kessels 13) Rückschlagventil 14) Ablasshahn Kessel Heißwasser plus Dampf 18) Elektrischer Widerstand Heißwasserkessel und Dampfkessel 19) Heißwasser- und Dampfkessel 21) Sicherheitsthermostat Heißwasser- und Dampfkessel 23) Dampfhahn...
-
Page 87: Installation
3. Installation tauchen. Wenn die Spannung verschieden ist, die Maschine nicht anschließen. Dies könnte gefährlich sein und das Gerät beschädigen. 3.1 Vorbereitung des Wassernetzes montieren Sie ein Absperrventil (vorzugsweise ein Kugelventil 3/8”), das ein schnelles Öffnen und Schließen ermöglicht. Die Maschine muss mit dem mitgelieferten Schlauch an das Wassersystem angeschlossen wer- den. -
Page 88: Installation Der Hydraulikanlage
Anmerkung: 3.3 Installation der Hydraulikanlage 1) Verwenden Sie den Schlauch a (900 mm, im Lieferumfang der Maschine), um das Absperrventil des Wassernetzes mit dem Hahn 1 2) Den Schlauch b der Ansaugleitung der internen Pumpe mit dem Hahn 2 2) verbinden. Abbildung 1 Abbildung 2 1) Verwenden Sie den Schlauch a (900 mm, im Lieferumfang der Maschine), um das Absperrventil des... -
Page 89: Anschluss An Die Gleichpotentialklemme
dem Stromversorgungssystem zu installieren, der entsprechend den auf dem Typen- men entsprechen. 230V BLAU BLAU 20/20 CLASSIC GE/GR GE/GR 220-230-240V 1N 400V-3N DREIPHASIG BLAU BLAU BLAU 20/20 CLASSIC ÜBRIGE MODELLE GRAU GRAU GRAU GE/GR GE/GR GE/GR 230V-3N DREIPHASIG BLAU BLAU * Die Leistungsaufnahme der elektrischen GRAU... -
Page 90: Inbetriebnahme
4. Inbetriebnahme 4.1 Einfüllen von Wasser in den Kessel 1) Entfernen Sie die Schale mit dem Tassenabstellrost und prüfen Sie: a) Der Ablasshahn des Kessels a muss geschlossen sein (Abbildung 8). Abbildung 8 Abbildung 9 Abbildung 10 2) Öffnen Sie das Absperrventil des Wassernetzes. 3) Senken Sie den Hebel eines Dampfventils, damit die Luft beim Füllen des Kessels entweichen kann. -
Page 91: Regulierung Des Füllstandssensors Im Kessel
5.1 Regulierung des Füllstandssensors im Kessel de es jedoch wünscht, kann die Wassermenge im Inneren des Kessels erhöht oder verringert werden, indem der Füllstandssensor wie in der Abbildung gezeigt eingestellt wird. 5.2 Regulierung des Ausgabedrucks der Pumpe b) Die Dauerlauftaste 18 für die elektronischen Maschinen mit automatischer Do- c) Auf der unteren Skala des Druckmessers 10 den Wert des Wasserdrucks able- Die Einstellung des Druckes auf den gewünschten Wert erzielt man durch Einwirken auf die Schraube der Pumpe, wobei durch Einschrauben der Druck erhöht und durch... -
Page 92: Hinweise Zum Betrieb
6. Hinweise zum Betrieb Jede Brühgruppe besitzt ein Bedienfeld mit 5 Tasten (vier für die programmierten Dosen des Kaffees, eine für die manuellen Dosen von Kaffee). Sicherstellen, dass die Ausgabe in die Tasse auf die gewünschte Art erfolgte. Wenn die Ausgabe nicht auf die korrekte Art erfolgte, das Kapitel “Probleme und Lösungen“... -
Page 93: Dampfentnahme
6.2 Dampfentnahme tritt aus der Dampfspritze aus, wenn wie folgt vorgegangen wird: durch Heben oder Senken des Hebels Dampfstrahls muss der Hebel wieder in die Ausgangsstellung gebracht werden). Bei seitlichem Verschieben des Hebels wird ein reduzierter Dampffl uss bewirkt (der Hebel arretiert nicht und kehrt beim Loslassen in die ursprüngliche Position zurück). -
Page 94: Programmierung Der Maschine
7. Programmierung der Maschine 7.1 Programmierung der Kaffeemengen Taste An diesem Punkt blinkt die dem gerade losgelassenen Taster entsprechende LED und gleichzeitig blinken die gleichen der anderen Gruppen. Die Maschine befindet sich unter diesen Bedingungen in der Program- mierungsphase. B. Programmierung Die 4 Dosierungen der 1. -
Page 95: Normale Wartung
8. Normale Wartung Blindfilter (ohne Löcher) aus dem Lieferumfang der Maschine ersetzen. 2) Vor der Reinigung der Gruppe den Schutz auf den Einsatz, wie im Foto dargestellt, montieren. Anmerkung: gen. 4) Den Einsatz in die Gruppe einsetzen und, ohne sie vollkommen einzurasten, die Dauerlauftaste drücken. nigt). -
Page 96: Austausch Des Wassers Im Kessel
Das Sicherheitsventil ist oben am Kessel im Bereich der Dampfzone montiert. Es spricht an, wenn im Kessel der Druck erheblich ansteigt. Das Ventil erlaubt ein wiederholtes Absenken des Dampfdrucks durch Ablassen von Dampf nach außen (Auslösung bei 1,9 bar). Der Wasserdampf wird bei Auslösung des Ventils zurückge- der LA SAN MARCO SPA kontaktieren. -
Page 97: Information Für Die Benutzer Innerhalb Der Europäischen Gemeinschaft
11. Information für die benutzer innerhalb der europäischen gemeinschaft packung bedeutet, dass dieses Produkt am Ende seiner Lebensdauer nicht mit dem Hausmüll, sondern getrennt gesammelt werden muss. in Verbindung setzen und das vom Hersteller angenommene System befolgen, um eine mögliche negative Auswirkungen auf Umwelt und Gesundheit zu vermeiden und die stehen, zu fördern. -
Page 98: Probleme Und Lösungen
Darüber hinaus umfasst die Garantie der La San Marco S.p.A. keinen Arbeitsaufwand, keine Reisespesen 13. Wenn sich nach der Überprüfung durch die La San Marco S.p.A. herausstellen sollte, dass der zurückge- sendete Teil keinen Defekt aufweist, werden dem Kunden eventuell für die Verwaltung, die technische Kosten für die Rücksendung des Materials. - Page 99 DEFEKT URSACHE LÖSUNG Die Maschine wurde korrekt gestartet, heizt defekt oder wird nicht versorgt. 2 gedreht werden. aber das Wasser im Kessel nicht auf. sich auf Position 1. muss die elektrischen Kabel, die die Außerdem muss geprüft werden, ob das Thermostat die Sicherung des Widerstands ausgelöst hat, und die korrekte Funktionsweise kontrolliert werden.
- Page 100 DEFEKT URSACHE LÖSUNG Die programmierten Dosen des Espressos sind nicht elektronischen Steuereinheit getrennt programmieren. konstant oder variieren oder der Durchflussmesser. bei den verschiedenen den Durchflussmesser der Gruppe Brüheinheiten. Magnetventils der Brüheinheit. kontrollieren und gegebenenfalls austauschen. Das Magnetventil ist verstopft. zu kontrollieren und gegebenenfalls auszutauschen.
- Page 101 DEFEKT URSACHE LÖSUNG Die Maschine gibt Wasser aus einer Brüheinheit und/oder der muss die elektronische Platine oder Brühgruppe ab, auch Pumpe wird nicht auf den Touchscreen kontrollieren. Die wenn keine Taste zur kontinuierliche Art gespeist. Funktionsweise der elektronischen Dosierung von Kaffee Platine oder des Touchscreens gedrückt wurde.
- Page 102 DEFEKT URSACHE LÖSUNG Helle Creme (der Kaffee a) Grobkörniges Mahlen. b) Wenig Druck beim Pressen. verringern. Auslauf). c) Kleine Menge an b) Das Pressen des gemahlenen gemahlenem Kaffee. c) Die Menge an gemahlenem Kaffee Wassertemperatur. erhöhen. e) Druck der Pumpe über 9 bar. d) Die Temperatur der Brüheinheit f) Man erweitert die Löcher des erhöhen.
- Page 103 DEFEKT URSACHE LÖSUNG Kaffeesatz in der Tasse. a) Kaffeemahlung zu fein. a) Erhöhen Sie die Kaffeemühle. b) Abgenutzte Mühlsteine. b) Ersetzen Sie die Schleifmaschinen c) Pumpendruck über 9 bar. (dieser Vorgang kann nur von einem d) Die Filterlöcher an der autorisierten qualifizierten Techniker Ausgabeeinheit sind verstopft.
- Page 104 UNI EN ISO 9001 UNI EN ISO 14001 UNI ISO 45001 La San Marco spa Via Padre e Figlio Venuti, 10 - 34072 GRADISCA D’ISONZO (GO) - ITALY Ph. (+39) 0481 967111 Fax: (+39) 0481 960166 www.lasanmarco.com...