Publicité

Les langues disponibles
  • FR

Les langues disponibles

  • FRANÇAIS, page 11

Liens rapides

Radio Controlled Alarm Clock
Funkwecker
186381
"Dual USB"
Operating Instructions
Bedienungsanleitung
Mode d'emploi
Instrucciones de uso
Istruzioni per l'uso
Gebruiksaanwijzing
Instrukcja obs ugi
Használati útmutató
Návod k použití
Návod na použitie
Manual de instruções
Instrukcja obs ugi
Bruksanvisning
Käyttöohje
00
GB
D
F
E
RUS
I
NL
GR
PL
H
CZ
SK
P
RO
S
FIN
BG

Publicité

Table des Matières
loading

Sommaire des Matières pour Hama 00186381

  • Page 1 186381 “Dual USB” Radio Controlled Alarm Clock Funkwecker Operating Instructions Bedienungsanleitung Mode d‘emploi Instrucciones de uso Istruzioni per l‘uso Gebruiksaanwijzing Instrukcja obs ugi Használati útmutató Návod k použití Návod na použitie Manual de instruções Instrukcja obs ugi Bruksanvisning Käyttöohje...
  • Page 2 15 16 17 18 19 20...
  • Page 3: Warning - Batteries

    G Operating instruction Controls and Displays • Do not operate the product outside the power limits given in the speci cations. Display • Do not use the product in areas where the use of electronic Day of the week devices is not permitted. USB charge indicator 1A/2A •...
  • Page 4: Getting Started

    4. Getting Started 5.1. Basic and manual settings Automatic setting using the DCF signal Warning After inserting the batteries or connecting the power supply unit, • Connect the product only to a socket that has been approved the radio-controlled alarm clock will automatically start the search for the device.
  • Page 5: Alarm Clock

    Setting the alarm time Note – Time zone • Press the ALARM button (17) to display the alarm time. • The DCF signal can be received over long distances, but • While the alarm is displayed, press the SET button (19) to always transmits the current Central European Time in activate or deactivate the alarm.
  • Page 6: Backlight

    5.4 12- or 24-hour format 8. Warranty Disclaimer Press the + button (15) to switch between the 12 and 24-hour Hama GmbH & Co KG assumes no liability and provides no formats. warranty for damage resulting from improper installation/mounting, improper use of the product or from failure to observe the operating 5.5 Backlight...
  • Page 7 D Bedienungsanleitung Bedienungselemente und Anzeigen Überhitzung und verwenden Sie es nur in trockenen Umgebungen. Display • Betreiben Sie das Produkt nicht in unmittelbarer Nähe Wochentag der Heizung, anderer Hitzequellen oder in direkter Ladeanzeige USB 1A/2A Sonneneinstrahlung. USB-Anschluss 1A • Dieses Produkt gehört, wie alle elektrischen Produkte, nicht in Raumtemperatur Kinderhände! USB-Anschluss 2A...
  • Page 8: Batterien Wechseln

    5. Betrieb Warnung – Batterien • Schließen Sie die Batterien nicht kurz. Hinweis • Laden Sie Batterien nicht. • Halten Sie die + - Taste (15) oder die – - Taste (16) gedrückt, • Werfen Sie Batterien nicht ins Feuer. um die Werte schneller auswählen zu können.
  • Page 9 • Drücken Sie direkt die SET-Taste (19), um den angezeigten • Drücken und halten Sie die ALARM-Taste (17) für ca. 3 Einstellungswert zu übernehmen und zu überspringen. Sekunden, um die Weckzeit des angezeigten Alarms einzustellen. • Erfolgt 20 Sekunden keine Eingabe, wird der Einstellungsmodus Die Stundenanzeige beginnt zu blinken.
  • Page 10: Konformitätserklärung

    5.4 12- oder 24 Stundenformat 8. Haftungsausschluss Drücken Sie die + – Taste (15), um zwischen dem 12- oder Die Hama GmbH & Co KG übernimmt keinerlei Haftung oder 24-Stundenformat zu wechseln. Gewährleistung für Schäden, die aus unsachgemäßer Installation, Montage und unsachgemäßem Gebrauch des Produktes oder 5.5 Hintergrundbeleuchtung...
  • Page 11: Risque D'électrocution

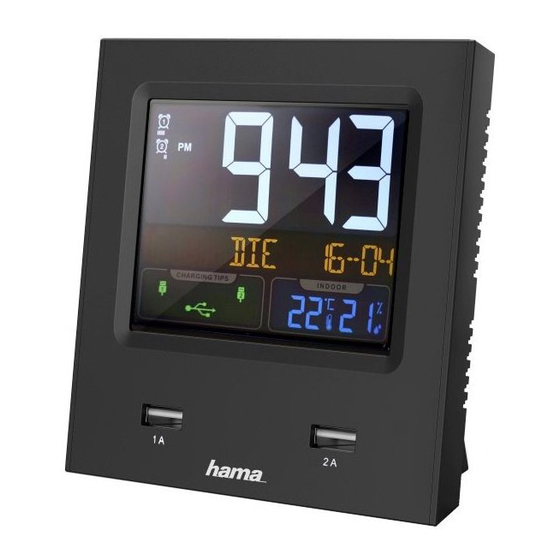
    F Mode d‘emploi Éléments de commande et d'affichage • Protégez le produit de toute saleté, humidité, surchauffe et utilisez-le uniquement dans des environnements secs. Écran • N’utilisez pas le produit à proximité immédiate d‘un chauffage, Jour de la semaine d’autres sources de chaleur ou exposé aux rayons directs du Niveau de charge USB 1 A/2 A soleil.
  • Page 12: Fonctionnement

    5. Fonctionnement Avertissement – concernant les piles • Ne tentez pas d‘ouvrir les piles, faites attention à ne pas les Remarque endommager, les jeter dans l’environnement et à ce que des • Maintenez la touche + (15) ou la touche - (16) enfoncée a n petits enfants ne les avalent pas.
  • Page 13: Remarque - Concernant La Fonction De Répétition De L'alarme

    • Appuyez directement sur la touche SET (19) a n d’adopter la “Week-end” : l’alarme sonnera uniquement le valeur a chée et passer au réglage suivant. week-end (samedi et dimanche) • Le mode de paramétrage s'interrompt automatiquement si vous n'appuyez sur aucune touche pendant plus de 20 secondes. Réglage de l’heure de réveil Remarque –...
  • Page 14: Caractéristiques Techniques

    • Appuyez sur n'importe quelle touche pour arrêter la minuterie 8. Exclusion de garantie de sieste. La société Hama GmbH & Co KG décline toute responsabilité en cas 5.4 Format horaire 12 heures / 24 heures de dommages provoqués par une installation, un montage ou une Appuyez sur la touche + (15) a n de commuter entre l’a chage de...
  • Page 15 E Instrucciones de uso Elementos de manejo e indicadores • No opere el producto en las inmediaciones de la calefacción, de otras fuentes de calor o bajo la radiación directa del sol. Pantalla • Este aparato, como todos los aparatos eléctricos, no debe estar Día de la semana en manos de los niños.
  • Page 16: Cambio De Las Pilas

    5.1. Ajustes básicos y ajustes manuales Aviso – Pilas • Retire y deseche de inmediato las pilas gastadas del producto. Ajuste automático según la señal DCF • Evite el almacenamiento, la carga y el uso en condiciones de Después de insertar las pilas o de conectar la fuente de temperatura extrema.
  • Page 17: Activación/Desactivación Del Despertador

    Ajuste de la hora del despertador Nota – Zona horaria • Pulse la tecla ALARM (17) para visualizar la hora de alarma • La señal DCF puede recibirse a gran distancia, del despertador. correspondiéndose siempre con la HCE vigente en Alemania. •...
  • Page 18: Mantenimiento Y Cuidado

    • En el funcionamiento con pilas, la pantalla se ilumina durante 8. Exclusión de responsabilidad aprox. 10 segundos. Hama GmbH & Co KG no se responsabiliza ni concede garantía por los daños que surjan por una instalación, montaje o Nota - Retroiluminación continua manejo incorrectos del producto o por la no observación de las...
  • Page 19 • • USB 1 A/2 A • USB 1 • • USB 2 • • • 12. AM/PM (12 -/24- • • «+» = (12- «–» = • ALARM = • NAP = SET = • LIGHT/SNOOZE = • (+ -). •...
  • Page 20 5.1. • DCF. (9). • • • — 4.1. • (13) • «–» (16), • • (14), – • • • • 4.2. 01:00 05:00). • • • «–» (16), • • «–» (16), DCF. • «+» (15) «–» (16). •...
  • Page 21 – • • ALARM (17). • SET (19), • ALARM (17), • • «+» (15) «–» (16) ALARM (17), • • – • (German), (English) (Espanol) • ALARM (17) • – • • – SET (19). • SNOOZE/ LIGHT (20). –...
  • Page 22 • NAP (18) • «+» (15) «–» (16). NAP (18). • • «+» (15) Hama GmbH & Co KG • LIGHT/SNOOZE (20), • • LIGHT/SNOOZE . 100–240 0,8 A, 50/60 (20). . 5,0 3,5 A +50° C • 25 % - 95 % •...
  • Page 23 I Istruzioni per l‘uso Elementi di comando e indicazioni • Proteggere il prodotto da sporcizia, umidità e surriscaldamento e utilizzarlo solo in luoghi asciutti. Display • Evitare di mettere in esercizio il prodotto in prossimità di Giorno della settimana riscaldamento, altre fonti di calore o la luce diretta del sole. Indicazione di carica USB 1A/2A •...
  • Page 24: Inserimento Delle Batterie/ Alimentazione Elettrica

    5.1. Impostazioni di base e manuali Attenzione – Batterie • Conservare le batterie al di fuori della portata dei bambini. Impostazione automatica secondo il segnale DCF • Non aprire, danneggiare, ingerire o disperdere mai Dopo avere inserito le batterie e aver effettuato il collegamento nell’ambiente le batterie.
  • Page 25: Attivare/ Disattivare La Sveglia

    Impostazione ora sveglia Nota – Fuso orario • Per visualizzare l’orario della sveglia, premere il tasto ALARM • Il segnale DCF può essere ricevuto in tutto il mondo ma (17). corrisponde sempre al CET vigente in Germania. Nei paesi con •...
  • Page 26: Dichiarazione Di Conformità

    8. Esclusione di garanzia Premere il tasto + (15), per passare tra i formati 12 e 24 ore. Hama GmbH & Co KG non si assume alcuna responsabilità per i danni derivati dal montaggio o l‘utilizzo scorretto del prodotto, 5.5 Retroilluminazione nonché...
  • Page 27 N Gebruiksaanwijzing Bedieningselementen en weergaven • Gebruik het product niet in de onmiddellijke nabijheid van een verwarming of andere warmtebronnen en stel het niet bloot aan Display directe zonnestralen. Dag van de week • Elektrische apparaten dienen buiten het bereik van kinderen Weergave laadtoestand USB 1A/2A gehouden te worden! USB-aansluiting 1A...
  • Page 28: Batterij Vervangen

    5.1. Basisinstellingen en handmatige instellingen Waarschuwing – batterijen • Batterijen nooit openen, beschadigen, inslikken of in het Automatische instelling aan de hand van het DCF-signaal milieu terecht laten komen. Zij kunnen giftige en zware Na het plaatsen van de batterijen resp. aansluiten van de metalen bevatten die schadelijk zijn voor het milieu.
  • Page 29 -toets (15) of de - -toets (16) en bevestig de selectie door op de Aanwijzing – tijdzone ALARM-toets (17) te drukken. De weergave van de minuten • Het DCF-tijdsignaal kan over een enorme gebied worden begint te knipperen. ontvangen, het komt echter te allen tijde overeen met de •...
  • Page 30: Achtergrondverlichting

    15W • Neem de aanwijzingen in de bedieningsinstructies van uw 10. Conformiteitsverklaring eindtoestel in acht. Hierbij verklaar ik, Hama GmbH & Co KG, dat het type radioapparatuur [00186381] conform is met Richtlijn Aanwijzing 2014/53/EU. De volledige tekst van de...
  • Page 31 • • USB 1A/2A USB 1A • USB 2A • • • 12. AM/PM ( • • • ‘ ALARM = • NAP = • SET = SNOOZE/LIGHT = • • • – • • • • "Dual-USB" • • •...
  • Page 32 – • • • • + (15) - (16). 5.1. • • DCF. (9). • – • – • - (16) DCF. • – 4.1. • • (13) • • • • (14), • 01:00 05:00) DCF, • • - (16) DCF.
  • Page 33 • " ": °C / °F • + (15) - (16) SET (19). • SET (19) • ALARM (17), • • SET (19) – • ALARM (17) • DCF, (CET) • + (15) - (16), • ALARM (17). • • •...
  • Page 34 • LIGHT/SNOOZE (20), . 5,0 V 3,5 A 0°C 50°C • 25 % - 95 % • • / Hama GmbH & Co KG, [00186381] 2014/53/ . • USB (4/6) www.hama.com -> 00186381 -> Downloads. USB. "HELLO". • 77.5 kHz...
  • Page 35 P Instrukcja obs ugi Elementy obs ugi i sygnalizacji • Chroni produkt przed zanieczyszczeniem, wilgoci i przegrzaniem oraz stosowa go tylko w suchym otoczeniu. Wy wietlacz • Nie u ywa produktu w bezpo redniej blisko ci ogrzewania, Dzie tygodnia innych róde ciep a ani nie wystawia go na bezpo rednie Wska nik na adowania USB 1A/2A promieniowanie s oneczne.
  • Page 36: Wymiana Baterii

    5.1. Ustawienia podstawowe i konfiguracja r czna Ostrze enie – baterie • Nie otwiera , nie uszkadza ani nie po yka baterii, a tak e Automatyczne ustawianie wg sygna u czasowego DCF chroni je przed kontaktem ze rodowiskiem. Mog one Po w o eniu baterii lub pod czeniu zasilacza budzik radiowy zawiera toksyczne i szkodliwe dla rodowiska metale ci kie.
  • Page 37 Ustawianie czasu budzenia Wskazówki – strefa czasowa • Nacisn przycisk ALARM (17), aby wy wietli czas budzenia. • Sygna czasowy DCF mo e by odbierany na bardzo rozleg ym • W trakcie wy wietlania czasu budzenia wcisn przycisk SET obszarze, jednak e odpowiada on zawsze stre e czasu (19), aby w czy lub wy czy alarm.
  • Page 38 8. Wy czenie odpowiedzialno ci Nacisn przycisk + (15), aby prze czy mi dzy formatem 12- lub Hama GmbH & Co KG nie udziela gwarancji ani nie odpowiada 24-godzinnym zegara. za szkody wskutek niew a ciwej instalacji, monta u oraz nieprawid owego stosowania produktu lub nieprzestrzegania 5.5 Pod wietlenie ekranu...
  • Page 39 H Használati útmutató Kezel elemek és kijelz k • Óvja meg a terméket szennyez dést l, nedvességt l és túlmelegedést l, és kizárólag zárt környezetben használja. Kijelz • A terméket ne használja a f tés és egyéb h források közelében, A hét napja vagy közvetlen napsütésnek kitéve.
  • Page 40 5.1. Alapbeállítások és kézi beállítások Figyelmeztetés – Elemek • Az elemeket gyermekek számára elzárt helyen tárolja. DCF-jel szerinti automatikus beállítás • Az akkumulátorokat és elemeket soha ne nyissa fel, károsítsa, Az elemek behelyezése vagy a tápegység csatlakoztatása után az nyelje le vagy juttassa a környezetbe. Mérgez és környezetre ébreszt automatikusan elindítja a DCF-jel keresését.
  • Page 41 • Nyomja meg, és kb. 3 mp-ig tartsa lenyomva az ALARM gombot Hivatkozás – id zóna (17) a kijelzett riasztás ébresztési idejének beállításához. A • A DCF-jel szélesen fogható, azonban minden esetben a kijelzett óra villogni kezd. Németországban érvényes CET (Közép-európai id ) szerinti •...
  • Page 42 8. Szavatosság kizárása Nyomja meg a + gombot (15) a 12 és 24 órás id formátum közötti A Hama GmbH & Co KG semmilyen felel sséget vagy szavatosságot váltáshoz. nem vállal a termék szakszer tlen telepítéséb l, szereléséb l és szakszer tlen használatából, vagy a kezelési útmutató...
  • Page 43 C Návod k použití Ovládací prvky a indikace • Výrobek nepoužívejte v blízkosti zdroj tepla, ani nevystavujte p sobení p ímého slune ního zá ení. Displej • Výrobek nepat í do rukou d tem, stejn jako i všechny elektrické Den v týdnu p ístroje.
  • Page 44 5.1. Základní nastavení a manuální nastavení Upozorn ní – Baterie • Vyhn te se skladování, nabíjení a používání p i extrémních Automatické nastavení podle signálu DCF teplotách. Po vložení baterií nebo p ipojení sí ového napájecího zdroje spustí rádiový budík automatické vyhledávání signálu DCF. B hem 4.
  • Page 45 Nastavení asu buzení Poznámka – asové pásmo • K zobrazení asu buzení stiskn te tla ítko ALARM (17). • Signál DCF m že být p ijímán i ve velkých vzdálenostech, • K aktivaci nebo deaktivaci alarmu stiskn te p i zobrazení asu ale vždy odpovídá...
  • Page 46 5.4 12hodinový nebo 24hodinový formát 8. Vylou ení záruky K p epínání mezi 12hodinovým a 24hodinovým formátem stiskn te Hama GmbH & Co KG nep ebírá žádnou odpov dnost nebo záruku tla ítko + (15). za škody vzniklé neodbornou instalací, montáží nebo neodborným použitím výrobku nebo nedodržováním návodu k použití...
  • Page 47 Q Návod na použitie Ovládacie a indika né prvky • Výrobok nepoužívajte v blízkosti zdrojov tepla, ani nevystavujte pôsobeniu priameho slne ného žiarenia. Displej • Výrobok nepatrí do rúk de om, rovnako ako všetky elektrické De v týždni prístroje. Indikácia nabíjania cez USB 1 A/2 A •...
  • Page 48: Výmena Batérií

    4. Uvedenie do prevádzky 5.1. Základné a manuálne nastavenia Upozornenie Automatické nastavenie pod a signálu DCF • Výrobok používajte pripojený iba k schválenej zásuvke. Po vložení batérií, resp. pripojení sie ového adaptéra za ne budík Zásuvka musí by umiestnená v blízkosti výrobku a synchronizovaný...
  • Page 49 Nastavenie asu budenia Poznámka – asové pásmo • Ak chcete zobrazi as budenia, stla te tla idlo ALARM (17). • Signál DCF môže by prijímaný na ve kú vzdialenos , ale vždy • Na aktiváciu, resp. deaktiváciu alarmu stla te po as zobrazenia zodpovedá...
  • Page 50 5.4 12- alebo 24-hodinový formát 8. Vylú enie záruky Ak chcete prepína medzi 12-hodinovým a 24-hodinovým formátom Firma Hama GmbH & Co KG neru í/nezodpovedá za škody zobrazenia asu, stla te tla idlo + (15). vyplývajúce z neodbornej inštalácie, montáže alebo neodborného používania výrobku alebo z nerešpektovania návodu na používanie...
  • Page 51 O Manual de instruções Elementos de comando e indicadores • Não utilize o produto perto de aquecedores, outras fontes de calor ou directamente exposto à luz solar. Visor • Este aparelho não pode ser manuseado por crianças, tal como Dia da semana qualquer aparelho eléctrico! Indicador de carga USB 1 A/2 A •...
  • Page 52: Substituir As Pilhas

    5.1. Definições básicas e definições manuais Aviso – Pilhas • Evite guardar, carregar e utilizar a bateria sob temperaturas Definição automática de acordo com o sinal DCF extremas. Após a colocação das pilhas e ligação da fonte de alimentação, o rádio despertador começa automaticamente a procurar um sinal 4.
  • Page 53 Configuração da hora de despertar Nota – Fuso horário • Prima o botão ALARM (17) para visualizar a hora de despertar. • O sinal DCF pode ser recebido numa ampla área, no entanto, • Durante a apresentação da hora de despertar, prima o botão corresponde sempre à...
  • Page 54 5.4 Formato de 12 ou 24 horas 8. Exclusão de garantia Prima o botão + (15) para alternar entre o formato de 12 ou 24 A Hama GmbH & Co KG não assume qualquer responsabilidade horas. ou garantia por danos provocados pela instalação, montagem ou manuseamento incorrectos do produto e não observação do das...
  • Page 55: M Manual De Utilizare

    M Manual de utilizare Elemente de comand i afi aje • Evita i folosirea produsului în imediata apropiere a sistemului de înc lzire, a altor surse de c ldur sau în radia ia solar direct . Display • Acest aparat, ca de altfel toat aparatura electronic , nu are ce Zi a s pt mânii c uta în mâinile copiilor! A aj înc rcare USB 1A/2A...
  • Page 56 5.1. Set ri de baz i set ri manuale Avertizare – Baterii • Evita i depozitarea, înc rcarea i utilizarea la temperaturi Setare automat conform semnalului DCF extreme. Dup introducerea bateriilor respectiv conectarea elementului de re ea, de tept torul începe automat c utarea semnalului DCF. 4.
  • Page 57: Timer Nap

    Setare or de teptare Instruc iune – Fus orar • Pentru a area orei de de teptare ap sa i tasta ALARM (17). • Semnalul DCF poate recep ionat pe spa ii vaste, corespunde • Pentru activarea respectiv dezactivarea alarmei, ap sa i tasta îns întotdeauna CET care este valabil în Germania Ave i SET în timpul a rii orei de de teptare.
  • Page 58 8. Excludere de garan ie Pentru a alterna între formatul de 12 sau 24 de ore ap sa i tasta Hama GmbH & Co KG nu î i asum nici o r spundere sau garan ie + (15). pentru pagube cauzate de montarea, instalarea sau folosirea necorespunz toare a produsului sau nerespectarea instruc iunilor 5.5 Iluminare de fundal...
  • Page 59 S Bruksanvisning Manöverelement och indikeringar • Använd inte produkten alldeles intill elementet, andra värmekällor eller i direkt solsken. Display • Precis som alla elektriska apparater ska även denna förvaras Veckodag utom räckhåll för barn! Laddningsindikering USB 1A/2A • Använd inte produkten utöver de effektgränser som anges i den USB-anslutning 1 A tekniska datan.
  • Page 60: Byta Batteri

    5.1. Grundinställningar och manuella inställningar Varning – Batterier • Undvik lagring, laddning och användning vid extrema Automatisk inställning efter DCF-signal temperaturer. När batterierna har lagts in och nätadaptern anslutits börjar den fjärrstyrda väckarklockan automatiskt söka efter DCF-signalen. 4. Idrifttagning Under sökningen blinkar radiosymbolen (9). Varning Indikering Sökning efter DCF-signal...
  • Page 61 Inställning av väckningstid Hänvisning – tidszon • Tryck på ALARM-knappen(17) för att visa väckningstiden. • DCF-signalen kan tas emot på långt håll, men motsvarar alltid • Tryck på SET-knappen (19) medan väckningstiden visas för att MEZ, som gäller i Sverige. Observera därför tidsförskjutningen aktivera eller inaktivera larmet.
  • Page 62 5.4 12- eller 24-timmars format 8. Garantifriskrivning Tryck på + – knappen (15) för att växla mellan 12- eller 24-timmars Hama GmbH & Co KG övertar ingen form av ansvar eller garanti formatet för skador som beror på olämplig installation, montering och olämplig produktanvändning eller på...
  • Page 63 L Käyttöohje Käyttöelementit ja näytöt • Tämä laite kuten muutkaan sähkölaitteet eivät kuulu lasten käsiin! Näyttö • Älä käytä tuotetta sen teknisissä tiedoissa ilmoitettujen Viikonpäivä suorituskykyrajojen ulkopuolella. Latausnäyttö USB 1A/2A • Älä käytä tuotetta alueilla, joilla elektroniikkalaitteet eivät ole USB-liitäntä 1A sallittuja.
  • Page 64: Pariston Vaihtaminen

    4. Käyttöönotto 5.1. Perusasetukset ja manuaaliset asetukset Varoitus Automaattinen asetusten teko DCF-signaalin mukaan • Ota tuotteeseen virta ainoastaan sallitusta pistorasiasta. Radioherätyskello aloittaa DCF-signaalin haun automaattisesti, Pistorasian tulee olla asennettu tuotteen lähelle sekä helposti kun paristot on asetettu sisään ja/tai verkkolaite on liitetty. saavutettavissa Radioaaltosymboli (9) syttyy palamaan haun aikana.
  • Page 65 Herätysajan asetukset Ohje – aikavyöhyke • Paina ALARM-painiketta (17) herätysajan näyttämiseksi. • DCF-signaali voidaan vastaanottaa pitkän matkan päästä. • Paina herätysajan näytön aikana SET-painiketta (19) Signaali vastaa aina kuitenkin MEZ-aikaa, joka pätee aktivoidaksesi/deaktivoidaksesi hälytyksen. Saksassa. Siksi on huomattava, että kellonaika on asetettava •...
  • Page 66: Vastuun Rajoitus

    5.4 12 tai 24 tunnin formaatti 8. Vastuun rajoitus Paina +-painiketta (15) vaihtaaksesi 12 tai 24 tunnin formaatin Hama GmbH & Co KG ei vastaa millään tavalla vahingoista, jotka välillä. johtuvat epäasianmukaisesta asennuksesta tai tuotteen käytöstä tai käyttöohjeen ja/tai turvaohjeiden vastaisesta toiminnasta.
  • Page 67 • • USB 1A/2A • • • • 12. AM/PM ( 12/24 • 15. + • 16. - • ALARM = • NAP = • SET = LIGHT/SNOOZE = • • • – • + -) • • • • „Dual-USB“...
  • Page 68 5. Betrieb – • • • + (15) - (16), • • 5.1. • • • – • • - (16) • – 4.1. • • (13) • • • • (14), • AAA, 01:00 05:00 • - (16) • •...
  • Page 69 • SET (19), • ALARM (17), • • SET (19), – • DCF • ALARM (17) • + (15) - (16), • ALARM (17). • • – • • ALARM (17), (German), (English) (Espanol). • – • – • SET (19), °C °F.
  • Page 70 : 5,0 V . 3,5 A 50 °C • 25 % – 95 % • 15 W. • Hama GmbH & Co KG [00186381] 2014/53/ . • www.hama.com -> 00186381 -> Downloads. (4/6) „HELLO“. 77.5 kHz • • • (3). •...
  • Page 71: Service & Support

    Hama GmbH & Co KG 86652 Monheim / Germany Service & Support www.hama.com +49 9091 502-115 www.hama.com/nep All listed brands are trademarks of the corresponding companies. Errors and omissions excepted, and subject to technical changes. Our general terms of delivery and payment are applied.

Table des Matières