
Manuels Connexes pour John Bean b 9200


Sommaire des Matières pour John Bean b 9200
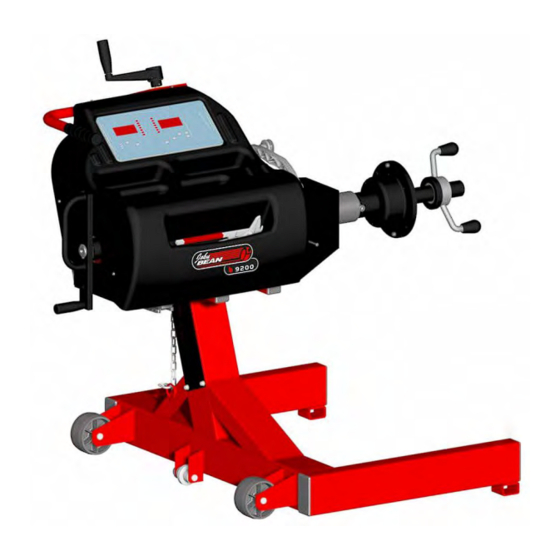
- Page 1 COMPUTERIZED WHEEL BALANCER Operator’s Manual Betriebsanleitung Manuel d’Utilisation P/N ZEEWB524A03 January 2012...
- Page 2 O original está contida em Lista de peças) - FACSIMILE - b 9200 All Information in this manual has been supplied by the indicated Snap-on Technical Department: Toutes les informations figurant dans le présent manuel ont été fournies par le Bureau Technique indiqué: Alle in diesem Handbuch enthaltenen Informationen wurden durch das angegebene Technische Büro von Snap-on geliefert:...
- Page 3 Contenuto in SP Contenu dans SP Integradas en SP Teil der SP Conteúdos em SP EC DECLARATION DICHIARAZIONE CE DECLARATION CE DECLARACIÓN CE CE KONFORMITÄTSERKLÄRUNG DECLARAÇÃO CE Wiring Diagram Schema Elettrico Schéma électrique Esquema Eléctrico Schaltplan Esquema Eléctrico John Bean b9200...
-
Page 4: Gewährleistungs- Und Haftungsausschluss
Gewährleistungs GEWÄHRLEISTUNGS- UND UPDATING REPORTS HAFTUNGSAUSSCHLUSS Die Informationen in dieser Bedienungsanleitung wurden Release C-________________ - January 2012 gewissenhaft und sorgfältig zusammengestellt. Der Inhalt oder Teile des Inhalts dieser Bedienungsanleitung: Text added on Chapter 5.3.3 at page 44 haben keinen Einfluß auf die Allgemeinen Geschäftsbedingungen des Kaufvertrages, Leasingvertrages oder Mietvertrages auf dessen Grundlage das in dieser Bedienungsanleitung... - Page 5 Warranties Garantie DISCLAIMER OF WARRANTIES LIMITES D’APPLICATION DE LA GARANTIE ET AND LIMITATIONS OF LIABILITIES LIMITATIONS DE LA GARANTIE W h i l e t h e a u t h o r s h a v e ta k e n c a r e i n t h e Bien que les auteurs aient accordé...
- Page 6 WARNING: STRESSES THAT THE FOLLOWING ACTION MAY CAUSE (SEVERE) INJURY TO THE OPERATOR OR OTHERS. P/N: EAZ0033G02A Bulleted list: • indicates that action must be taken by the operator before being able to enter the next step in the sequence. Operator’s Manual b 9200...
- Page 7 • • • • • Indique que l’opérateur doit effectuer une action avant • zeigen an, dass der Bediener Maßnahmen de pouvoir passer à l’étape suivante de la séquence. durchführen muss, bevor er zum nächsten Schritt des Vorgangs übergehen kann. b 9200 Manuel d’Utilisation b 9200 Betriebsanleitung...
- Page 8 Dimensions: Weight Shipping weight Dimensions (hxdxw) 1120x1185x910 Shipping dimensions 1115x1100x1060 Miscellaneous: Noise level <70 db(A) Conditions During use or long-term storage, the conditions should never exceed: Temperature range 0-50 °C Humidity range 10-90 %, non condensing Operator’s Manual b 9200...
- Page 9 Lors d’une utilisation ou un stockage prolongé les dürfen die folgenden Werte nicht überschritten werden. conditions ne doivent jamais dépasser : Temperaturbereich 0-50 °C Plage de températures 0-50 °C Luftfeuchtigkeitsbereich 10-90 % nicht kondensierend Plage d’humidité 10-90 %,sans condensation Betriebsanleitung b 9200 Manuel d’Utilisation b 9200...
- Page 10 Operator’s Manual (Chapter 1 – 8) The operator must be familiar with it. Service Manual (Chapter 10 and up) Manual for use by service personnel only. Installation instructions. The installation instruction are in Chapter 9, “Ap- pendices”. Operator’s Manual b 9200...
- Page 11 Instructions pour l’installation. vertraut sein. Les instructions pour l’Installation se trouvent au Ch. 9 “Annexes“. Wartungshandbuch (ab Kapitel 10) Dieses Handbuch wird Wartungspersonal benötigt. Installationsanweisungen Die Installationsanweisungen finden Sie in Abschnitt 9, “Anhänge”. b 9200 Manuel d’Utilisation b 9200 Betriebsanleitung...
-
Page 12: Accessories
Centering cone 270-286,5mm EAA0260D37A Hexagon socket head key SW14 8-01350A Hexagon socket head key SW8 8-01450A Hexagon socket head key SW5 8-03550A 10 Weight pliers EAA0247G22A 11 User Calibration weight EAM0005D40A 12 Truck Kaliper 8-00391A 3.1-1 Operator’s Manual b 9200... -
Page 13: Accessoires
Clef SW8 8-01450A Innensechskantschlüssel SW5 8-03550A Clef SW5 8-03550A 10 Gewichtzange EAA0247G22A 10 Pince à masses EAA0247G22A 11 Benutzerkalibriergewicht EAM0005D40A 11 Masse de Calibration utilisateur EAM0005D40A 12 Meßlehre.Truck 8-00391A 12 Calibre largeur jantes 8-00391A b 9200 Manuel d’Utilisation b 9200 Betriebsanleitung... -
Page 14: Optional Accessories
CTCFA 318 10 Battery CTB 312 Accessories available include battery packs and the battery charger, for machine use as a mobile balancer. Refer to the Price List for information about all the available optional accessories. 3.1-2 Operator’s Manual b 9200... -
Page 15: Zubehör Auf Anforderung
Maschine als mobile Auswuchtmaschine verwenden la machine comme équilibreuse mobile. möchten. Voir les Price List pour connaître toutes les options Bitte lesen Sie sich die Preislisten durch, um alle disponibles. erhältlichen Optionals kennenzulernen. b 9200 Manuel d’Utilisation b 9200 Betriebsanleitung... - Page 16 5. Stub shaft with hub nut 6. Weight pliers compartments 4.0-1 7. Lift crank Refer to Figure 4.0-2. 1. Socket for transformer output plug (A). 2. Socket for power from rechargeable battery (B-C), available on request. 4.0-2 Operator’s Manual b 9200...
- Page 17 1. Prise pour la fiche de sortie du transformateur Transformators (A). (A). 2. Steckdose für die Versorgung über aufladbare 2. Prise pour alimenter la machine avec une Batterien (B-C), auf Anfrage erhältlich. batterie rechargeable (B-C), disponible sur demande b 9200 Manuel d’Utilisation b 9200 Betriebsanleitung...
- Page 18 WAP indicator for this plane lights up. 9,10,11 Weight Position Indicator. Apply a stick-on weight to the rim at the position indicated when the WAP indicator for this plane lights up. 11 12 4.1-2 Operator’s Manual b 9200...
-
Page 19: Das Display
Indicateur de position des masses. Gewichtanbringungspositionsanzeige. Poser une masse adhésive à la position de jante Befestigen Sie ein Klebegewicht an der angegebenen indiquée quand l’indicateur “WAP” de ce plan Felgenposition, wenn die WAP-Anzeige dieser s’allume. Ebene aufleuchtet. b 9200 Manuel d’Utilisation b 9200 Betriebsanleitung... -
Page 20: The Input Panel
Fine i.e. 10 grams (0.5oz) regardless of the registered value. The unit will beep. Release the key to return to normal accuracy. F+Fine key activates the car wheel optimisation and minimisation operation. Operator’s Manual b 9200... -
Page 21: Das Eingabefeld
Wenn man F und danach die Feinanzeige-Taste En pressant F suivi de la touche Fin, on active la drückt, wird die Funktion zum Optimieren und fonction pour l'optimisation des roues pour Minimieren von Pkw-Rädern aktiviert. automobiles. b 9200 Manuel d’Utilisation b 9200 Betriebsanleitung... - Page 22 F+Vehicle; allows you to change the unit of measurement according to the size of the wheel. Switches from millimetres to inches and vice versa. 13.START key. Starts the machine again from the Standby (Energy Saving) condition. 4.2-1 Operator’s Manual b 9200...
- Page 23 13. Touche START Mit dieser Taste aktiviert man die Maschine wieder, Cette touche fait redémarrer la machine quand elle nachdem sie im Energiesparzustand (Stand-by) war. est en standby, c'est-à-dire en mode économie d'énergie. b 9200 Manuel d’Utilisation b 9200 Betriebsanleitung...
- Page 24 • • • • • Make sure that the shaft is aligned with the centre of the wheel, using the Handle (2) if necessary, then remove the clamping nut and other clamping devices. • • • • • Pull the unit out of the wheel using the Handle (2). Operator’s Manual b 9200...
-
Page 25: Opération
• • • • • Tirer la machine hors de la roue avec la poignée (2). einstellen - und dann die Mutter und die übrigen Spannmittel abnehmen. • • • • • Das Gerät mithilfe des Griffes (2) aus dem Rad herausziehen. b 9200 Manuel d’Utilisation b 9200 Betriebsanleitung... -
Page 26: Clamping A Truck Wheel
Note For perfect balancing results the adaptors must always be kept clean and stored correctly when not in use. Operator’s Manual b 9200... -
Page 27: Aufspannen Eines Lkw-Rades
Für ein gutes Auswuchtergebnis ist es wichtig, die propres et de les stocker comme il se doit quand ils ne Spannmittel immer sauberzuhalten und sie sachgerecht sont pas utilisés. aufzubewahren, wenn sie nicht gebraucht werden. b 9200 Manuel d’Utilisation b 9200 Betriebsanleitung... -
Page 28: Clamping A Car Wheel
This clamping adaptor is also capable of clamping centre bore located wheels when suitable centring rings are used. 1 Rim 2 Quick–clamping nut 3 Centring ring for centre bore located car wheels (optional extra) 5.1-5 Operator’s Manual b 9200... -
Page 29: Aufspannen Eines Pkw-Rades
Aufspannen von mittenzentrierten PKW- 2 Frette à serrage rapide Rädern verwendet werden. 3 Anneau de centrage pour roues de voitures à centrage 1 Felge centra! (accessoire facultatif) 2 Schnellspannmutter 3 Zentrierring für mittenzentrierte PKW-Räder (Zubehör) b 9200 Manuel d’Utilisation b 9200 Betriebsanleitung... -
Page 30: Preparation
• • • • • Press the STOP key (1) to apply the electronic brake. In the event of an emergency stop due to an unexpected action by the unit, rethink the steps that were performed: 5.2.2-1 Operator’s Manual b 9200... -
Page 31: Arrêt D'urgence
Après un arrêt d’urgence causé par une action imprévue des Geräts eine Notabschaltung durchgeführt haben, de la machine, réfléchissez aux étapes effectuées : versuchen Sie sich an die Schritte zu erinnern, die Sie davor vorgenommen haben: b 9200 Manuel d’Utilisation b 9200 Betriebsanleitung... -
Page 32: Shutting Down
Chapter 5.3.2. The default unit of measurement indicated at power up is grams and inches, but the unit saves the ounces and/or millimetres setting selected before switch off in the memory. To change, see 5.2.4.1 and 5.2.4.2. Operator’s Manual b 9200... - Page 33 Chapitres 5.2.4.1 et 5.2.4.2. Geräts ist Gramm und Zoll; es bleibt aber die Einstellung in Unzen und/oder Millimeter, die vor dem Abschalten vorgenommen wurde. Um die Einstellung zu ändern, siehe Kapitel 5.2.4.1 bzw. 5.2.4.2. b 9200 Manuel d’Utilisation b 9200 Betriebsanleitung...
-
Page 34: Changing The Weight Unit
5.3-2. Two LEDs light up and flash. Used for small wheels that are not balanced dynamically, e.g.: small moped wheels. No “left” or “right” weight is calculated. Clamp the wheel according to Chapter 5.1 and select the correct weight mode. Operator’s Manual b 9200... -
Page 35: Umschaltung Der Gewichtseinheit
"gauche" ou "droite" n'a lieu. berechnet. Montieren Sie das Rad nach der Anleitung im Kapitel Installer la roue en suivant les instructions rubrique 5.1 5.1 und wählen Sie den richtigen Gewichtsmodus. et sélectionner le bon mode Masse. b 9200 Manuel d’Utilisation b 9200 Betriebsanleitung... -
Page 36: Rim Data Input
Chapter 5.3.2. These measurements are always taken at the same time as that of the diameter. If you need to repeat the operation. • Proceed as described above for the rim diameter. 5.3.1-3 Operator’s Manual b 9200... -
Page 37: Eingabe Der Felgendaten
Cette donnée est toujours simultanément saisie au • Gemäß obiger Beschreibung für diamètre. En cas de nécessité, répéter la prise de Felgendurchmesser vorgehen. mesure. • Procéder comme décrit ci-dessus pour le diamètre de la jante. b 9200 Manuel d’Utilisation b 9200 Betriebsanleitung... - Page 38 • Position the gauge arm correctly as described above in the "Rim Diameter" phase of the Automatic Data Obtain operation • Read the arm extraction value on the arm graduated scale. • Enter the value read previously using the appropriate keys. Operator’s Manual b 9200...
- Page 39 • Lire sur l'échelle graduée de la jauge la valeur Den zuvor abgelesenen Wert mit den entsprechenden Tasten eingeben correspondant à l'extraction de la jauge elle-même. • Introduire la valeur précédemment relevée en sélectionnant les touches à cet effet. b 9200 Manuel d’Utilisation b 9200 Betriebsanleitung...
-
Page 40: Alu Weight Modes
Refer to Figure 5.3.2.2-6. • After entering the dimensions, spin the wheel. • Apply the clip-on/stick-on weights at the indicated 12 o’clock positions. • Perform a check spin when done. 5.3.2.2-6 Operator’s Manual b 9200... -
Page 41: Normaler Gewichtsmodus
• Appliquer les poids à clip/adhésifs aux positions • Befestigen Sie die Klemm-/Klebegewichte an den indiquées, à 12 heures. angegebenen Stellen in der 12-Uhr-Position. • Faire un • lancement de contrôle à la fin. Führen Sie danach einen Kontrolllauf durch. b 9200 Manuel d’Utilisation b 9200 Betriebsanleitung... -
Page 42: Alu2P And Alu3P (Hwm) Mode
Width. If the rim width is ≤ 3”, enter 3”. Offset of the reference point. • After entering the dimensions, spin the wheel. • Apply the stick-on or clip-on weight at the 12 o’clock position. • Perform a check spin when done. 5.3.2.4-2 Operator’s Manual b 9200... -
Page 43: Statische Auswuchtung
• Führen Sie danach einen Kontrolllauf durch. lancement de la roue. • Appliquer la masse à clip ou adhésive aux positions indiquées (position midi). • À la fin, effectuer un lancement de contrôle. b 9200 Manuel d’Utilisation b 9200 Betriebsanleitung... -
Page 44: Spinning The Wheel
The measurement is completed as soon as the direction indicators light up. The unit beeps. The brake will be applied automatically. The weight(s) to be applied will be shown on the display. 5.3.3-1 For higher precision, select Fine. Operator’s Manual b 9200... -
Page 45: Equilibrage Interne
Wählen Sie “Fein”, um eine höhere Genauigkeit zu pour le plan de gauche. erreichen. La/les masses à poser est/sont indiquée(s) sur l'affichage. Pour un affichage au gramme près, appuyer sur la touche Fin. b 9200 Manuel d’Utilisation b 9200 Betriebsanleitung... -
Page 46: Weight Application
• Clip-on weights must always be applied in the 12 o’clock position. • The lip should rest on the rim edge. Use the weight pliers to position it. In STATIC mode only the left hand display is used. 5.3.4-4 Operator’s Manual b 9200... -
Page 47: Pose Des Masses
• Le clip devrait poser sur le bord de la jante. Utiliser Im “STATIC”-Modus wird nur das linke Display benutzt. la pincette pour contrepoids pour le placer correctement. Dans le mode STATIQUE seul l’afficheur de gauche doit être utilisé. b 9200 Manuel d’Utilisation b 9200 Betriebsanleitung... - Page 48 When this happens, the appropriate weight and a variable number appear on the other display to indicate the direction in which the gauge arm must be moved in order to find the correct weight application position. 5.3.4-7 Operator’s Manual b 9200...
- Page 49 Stange des Messarms bewegen d’application de la masse. muss, um die richtige Stelle zur Anbringung des Gewichts zu finden. b 9200 Manuel d’Utilisation b 9200 Betriebsanleitung...
-
Page 50: Check Spin
• Rotate the wheel to the left plane WAP position and apply the weight. • Rotate the wheel to the right plane WAP position and apply the weight. • Perform a check spin Operator’s Manual b 9200... -
Page 51: Neuberechnung Der Ergebnisse
• Faites tourner la roue dans la position WAP du plan gungsposition der rechten Ebene und bringen Sie das Gewicht an. de droite et placer la masse. • • Effectuer un lancement de contrôle. Führen Sie einen Kontrolllauf durch. b 9200 Manuel d’Utilisation b 9200 Betriebsanleitung... -
Page 52: Special Modes
For optimisation the tyre is mounted relative to the rim in a position selected according to the results of various measurements. This normally further reduces any radial and axial run-out as well as lateral and radial forces, making the wheel run as silently as possible. Operator’s Manual b 9200... -
Page 53: Besondere Modi
Auswuchten notwendige Masse (Ausgleichsgewicht) la force radiale et de la force latérale, si présentes, en reduziert werden. optimisant la réduction du bruit de la roue. b 9200 Manuel d’Utilisation b 9200 Betriebsanleitung... - Page 54 If after the measuring run the imbalance in the left or right correction plane and/or the static imbalance is more than 30 grams, perform optimisation immediately after the measuring run. Activate the function by pressing the "F" key (1) then the PRO-MATCH (2) key. Operator’s Manual b 9200...
- Page 55 à 30 durchzuführen. Aktivieren Sie diese Funktion durch grammes, il est conseillé d'effectuer immédiatement Drücken der Taste „F” (1) und danach der Taste l'optimisation après la lancée. Activer la PROMATCH (2). b 9200 Manuel d’Utilisation b 9200 Betriebsanleitung...
- Page 56 Each time the position of the tyre is changed on the rim, inflate the tyre to overpressure (approx. 3.5 bar) then deflate to correct tyre pressure. Make sure the centring line is correctly positioned on the tyre bead. Operator’s Manual b 9200...
- Page 57 à une pression supérieure à celle normale (env. 3,5 bars) et la réduire alors à la pression d'exercice. Auf korrekten Verlauf der Wulstzentrierlinie achten. Vérifier que la ligne de centrage du talon est positionnée correctement. b 9200 Manuel d’Utilisation b 9200 Betriebsanleitung...
- Page 58 OP.7 - === Proceed with the OP program. It is recommended that the tyre be readjusted on the rim. Optimum condition has been achieved and cannot be improved. Operator’s Manual b 9200...
- Page 59 Procéder avec le programme OP. Il est conseillé de turner le pneu sur la jante. Der optimale Zustand ist bereits erreicht und kann nicht L'état optimal a été rejoint et il n'est plus possible de verbessert werden. l'améliorer. b 9200 Manuel d’Utilisation b 9200 Betriebsanleitung...
- Page 60 Option 3: Abort optimisation • Press the STOP key (3) to exit the OP program and return to the balancing program The imbalance on the wheel is shown on the readout. • Balance the wheel according to the readings. Operator’s Manual b 9200...
- Page 61 STOP (3). • Durch Drücken der STOP-Taste (3) aus dem OP– Le balourd de la roue est affiché. Programm Auswuchtprogramm zurückschalten. Es wird die im Rad vorhandene Unwucht angezeigt. b 9200 Manuel d’Utilisation b 9200 Betriebsanleitung...
- Page 62 Silent wheel running cannot be improved. However, it is possible to achieve weight minimisation (readings with code Un.). Option 1: Weight minimisation • Press the F key to continue the program. As a result reading is === - Un.7 or Un.7 - === Operator’s Manual b 9200...
- Page 63 (Anzeige mit Kennung Un.) zu erreichen. • Passer au programme en appuyant sur la touche F. Wahlmöglichkeit 1: Gewichteminimierung durchführen L'indication ===- Un.7 ou Un.7 -=== est affichée • Durch Drücken der F–Taste im Programm weiterschalten. b 9200 Manuel d’Utilisation b 9200 Betriebsanleitung...
- Page 64 - Clamp the wheel on the balancer and readjust it so that the valve is exactly perpendicular to the main shaft. - Press the PRO-MATCH key (2) to acquire the valve position. Reading Un.6 appears. - Perform the run. Operator’s Manual b 9200...
- Page 65 Anzeige Un.6. exactement perpendiculaire à l'arbre principal. • • Appuyer sur la touche PRO-MATCH (2) pour saisir la Den Messlauf durchführen. position de la valve. L'indication Un.6 est affichée. • Effectuer la lancée. b 9200 Manuel d’Utilisation b 9200 Betriebsanleitung...
- Page 66 Option 2: Do not turn the tyre over on the rim - Press the F key. The result is recalculated. Reading Un.7 - = = = or H0 appears - To return to === - Un.7 (turning over the tyre) press the Fine key again. Operator’s Manual b 9200...
- Page 67 Es erscheint die Anzeige Un.7 - = = = • Pour revenir à === - Un.7 (inversion), appuyer à oder H0. • nouveau sur la touche Fin. Um wieder zurück in === - Un.7 (Wenden) zu schalten, Feinanzeige–Taste nochmal drücken. b 9200 Manuel d’Utilisation b 9200 Betriebsanleitung...
- Page 68 - Balance the wheel according to the readings. Reading H0 The optimum minimisation condition has been achieved and cannot be improved. - Press the STOP key to return to the balancing program and continue according to the readings. Operator’s Manual b 9200...
- Page 69 Der optimale Zustand der Gewichteminimierung ist sur la touche STOP et procéder sur la base de bereits erreicht und kann nicht verbessert werden. l'indication. • Durch Drücken der STOP–Taste in das Auswuchtprogramm zurückschalten und gemäß Anzeige fortfahren. b 9200 Manuel d’Utilisation b 9200 Betriebsanleitung...
-
Page 70: User Calibration
The base operating picture appears. • At the end of the calibration procedure unscrew the calibration weight from the clamping device and put it back in its place. You can now proceed with normal balancing operations. Operator’s Manual b 9200... -
Page 71: Etalonnage Utilisateur
• Après l'étalonnage utilisateur, dévisser la masse Nun können Sie mit den normalen Auswuchttätigkeiten fortfahren. étalon du corps de l'outil et la ranger en lieu sûr. Il est maintenant possible de procéder aux opérations normales d'équilibrage. b 9200 Manuel d’Utilisation b 9200 Betriebsanleitung... -
Page 72: Selecting The Operating Mode
ON they are already set until they are changed again. Note: Code C4. Clamping device compensation. This code cannot be saved permanently. The editing codes and the key combinations for entering them are listed below. Operator’s Manual b 9200... -
Page 73: Auswahl Des Betriebsmodus
Hier in der Folge finden Sie die möglichen Ci-dessous sont reportés les différents codes de Veränderungscodes und die entsprechenden modification possibles et les combinaisons de touches Tastenkombinationen, um sie einzugeben. correspondantes pour leur entrée. b 9200 Manuel d’Utilisation b 9200 Betriebsanleitung... - Page 74 Figure 5.6-6 Selecting the unit of measure for indicating the imbalance (grams/oz) activated after the machine has come on. 5.6-6 Value in grams Value in oz The operating mode selected can be obtained from the permanent memory. *=preset by the manufacturer Operator’s Manual b 9200...
- Page 75 Indication en grammes 1 = Anzeige in Unzen Indication en onces Le mode d'exploitation sélectionné peut être saisi dans Der ausgewählte Betriebsmodus kann in den la mémoire permanente. permanenten Speicher übertragen werden. *=préconfiguration du constructeur b 9200 Manuel d’Utilisation b 9200 Betriebsanleitung...
- Page 76 - loud) preset by the manufacturer at 50*. Example: Change volume to 60. To confirm the volume change, exit the function by pressing the C key. The operating mode selected can be obtained from the 5.6-9 permanent memory. Operator’s Manual b 9200...
- Page 77 C-Taste zum Beenden der Funktion gedrückt hat. Le mode d'exploitation sélectionné peut être saisi dans la mémoire permanente. Der ausgewählte Betriebsmodus kann in den permanenten Speicher übertragen werden. b 9200 Manuel d’Utilisation b 9200 Betriebsanleitung...
- Page 78 The measuring cycles performed while the machine is running are saved in the permanent memory and totalled every time the machine is turned OFF. Counter totals cannot be deleted. Operator’s Manual b 9200...
- Page 79 Mal, wenn die Maschine ausgeschaltet wird, sont transférés dans la mémoire permanente et ajoutés à chaque fois que la machine est éteinte. Le total du b 9200 Manuel d’Utilisation b 9200 Betriebsanleitung...
- Page 80 For the 2nd step press the C key. • Press and hold down the Fine key, spin the wheel and set the relevant code: = Do not delete the error memory = Delete the error memory Operator’s Manual b 9200...
- Page 81 Code einstellen: code désiré: 0 = Den Fehlerspeicher nicht löschen. = Ne pas effacer la mémoire erreurs 1 = Den Fehlerspeicher löschen. = Effacer la mémoire erreurs b 9200 Manuel d’Utilisation b 9200 Betriebsanleitung...
-
Page 82: Changing The Main Fuse
• Replace the fuse with an identical rated one. • Fit all parts to return the unit back to its original state. 6.2-1 Operator’s Manual b 9200... -
Page 83: Entretien
• Ersetzen Sie die Sicherung durch eine Sicherung intensité. der gleichen Stärke. • Remonter toutes les pièces. • Bauen Sie alle Teile wieder ein, um das Gerät wieder in seinen Ausgangszustand zu versetzen. Betriebsanleitung b 9200 Manuel d’Utilisation b 9200... - Page 84 Display appears to freeze or lock up. 1. The unit may be in a program, waiting for a specific action. • Finish the program currently in use. • Switch off the unit. Wait for 20 seconds, switch on the unit. Proceed. Operator’s Manual b 9200...
-
Page 85: Dépannage
2. L’alimentation de la machine a peut-être été coupée. • Eteindre la machine. Warten Sie 20 Sekunden und schalten Sie das Gerät dann wieder an. Fahren Sie mit der Arbeit fort. Attendre 20 secondes, allumer la machine. Continuer. Betriebsanleitung b 9200 Manuel d’Utilisation b 9200... - Page 86 A mode, display segment or indicator is continuously shown on the display. 1. A power dip may have occurred. • Switch off the unit. • Wait for 20 seconds, switch on the unit. • Call service team. Operator’s Manual b 9200...
- Page 87 Displaysegment oder eine Anzeige abgebildet. 1. Es kann ein Spannungsabfall aufgetreten sein. • Schalten Sie das Gerät aus. • Warten Sie 20 Sekunden und schalten Sie das Gerät dann wieder an. • Rufen Sie den Kundendienst. Betriebsanleitung b 9200 Manuel d’Utilisation b 9200...
-
Page 88: System Messages
1. Wheel was not exactly centred on clamping means for at least one run. 2. Tyre was not centred on rim for at least one run. 3. Valve position was not set and acquired correctly at least once. Operator’s Manual b 9200... -
Page 89: Messages Du Système
Felge zentriert. 2. Le pneu était excentrique par rapport à la jante au 3. Die Ventilposition wurde mindestens einmal falsch moins une fois pendant les lancées. eingegeben und übernommen. Betriebsanleitung b 9200 Manuel d’Utilisation b 9200... - Page 90 The gauge arm for measuring the offset and diameter is faulty. • Call service team. • As long as the gauge arm is defective, set the offset and rim dimensions using the menu key and turning the wheel (Chapter 2.3.3). Operator’s Manual b 9200...
- Page 91 Abstandsmaß und die Felgenabmessungen über die nominales de jante au moyen de la touche de fonction Menütaste und durch Drehen des Rades ein (siehe correspondante et en tournant la roue (§ 2.3.3). Kapitel 2.3.3). Betriebsanleitung b 9200 Manuel d’Utilisation b 9200...
- Page 92 H26 -Figure 7.1.1- The gauge arm was moved too quickly. • Return the gauge arm to the starting position and 7.1.1-3 repeat the operation, making it approach the weight application point slowly. 7.1.1-4 7.1.1-5 7.1.1-6 Operator’s Manual b 9200...
- Page 93 Messarm zurück in die Ausgangsposition bewegen • Remettre la pige en position de repos et l'approcher dann nochmals langsam de nouveau lentement au point de palpage du Gewichteplatzierung heranführen. positionnement des masses d'équilibrage. Betriebsanleitung b 9200 Manuel d’Utilisation b 9200...
- Page 94 7.1.1-9 The self-test was disturbed (e.g.: by turning the wheel). The message is displayed for 3 seconds, then the measurement is: • repeated (max. 10 times) or 7.1.1-8 • aborted by pressing the “STOP” key. 7.1.1-9 Operator’s Manual b 9200...
- Page 95 Wird 3 Sekunden angezeigt. Danach muss: • la mesure se répète (10 fois maximum), ou bien • Die Messung wiederholt (max. 10 mal) oder • abandonner en appuyant sur la touche “STOP”. • Mit der “STOP”-Taste abgebrochen werden. Betriebsanleitung b 9200 Manuel d’Utilisation b 9200...
-
Page 96: Disposing Of The Unit
This chapter contains additional information about the unit. If reference is made to the exact configuration of the unit, please note that the exact configuration may be different in your country. Consult the order confirmation for details. Operator’s Manual b 9200... -
Page 97: Anleitung Zur Entsorgung In Eu- Mitgliedsstaaten
Konfiguration des Geräts in Ihrem Land unterschiedlich exacte peut différer dans votre pays. Se reporter au bon sein kann. Nähere Angaben finden Sie auf der de commande pour de plus amples renseignements. Auftragsbestätigung. Betriebsanleitung b 9200 Manuel d’Utilisation b 9200... - Page 98 Blank Page b 9200 Operator’s Manual Betriebsanleitung Manuel d’Utilisation...
- Page 99 Appendix: Installation Instructions Anhang: Installationsanweisungen Annexe: Instructions d’installation Operator’s Manual Betriebsanleitung Manuel d’Utilisation b 9200...
- Page 100 Refer to Chapter 2 of the Operator’s Manual for mains power requirements. WARNING: ENSURE THAT AN APPROVED WALL MAINS OUTLET IS AVAILABLE. WARNING: NEVER GUIDE POWER SUPPLY CABLES OVER THE FLOOR, UNLESS PROTECTED BY AN APPROVED COVER. Appendix b 9200...
- Page 101 D’ALIMENTATION SUR LE SOL, SAUF SI ZUGELASSENE UND MIT DEM STROMNETZ PROTEGES PAR UNE COUVERTURE AGREEE. VERBUNDENE WANDSTECKDOSE VERFÜGUNG STEHT. WARNUNG: VERLEGEN SIE STROMKABEL NIEMALS ÜBER DEM BODEN, AUSSER SIE WERDEN DURCH EINE ZUGELASSENE SCHUTZABDECKUNG GESCHÜTZT. Anhang b 9200 Annexe b 9200...
- Page 102 This makes the operator’s work much easier. Note: When handling the wheel balancer only ii-3 use the handles A and B, keeping the balancer at an angle so that it runs on the three wheels as illustrated. Appendix b 9200...
- Page 103 Maschine ausschließlich die Griffe A und B maintenant la machine inclinée de manière und halten Sie die Maschine schräg, sodass à ce qu’elle roule sur ses trois roues, voir sie auf den drei Rädern läuft, wie gezeigt. dessin. Anhang b 9200 Annexe b 9200...
- Page 104 • Fit the wheel adaptor onto the main shaft support cone so that the cylindrical headed screw at the end of the cone is inserted in one of the slots on the basic clamping adaptor. • Fasten the wheel adaptor by tightening the securing screw. Appendix b 9200...
- Page 105 Ende des Konus angeschraubt ist, sich in • Serrer le moyen de serrage moyennant la vis de eine der Rillen einfügt, auf der fixation. Grundzentriervorrichtung vorhanden sind. • • • • • Befestigen Sie den Radadapter mit der Befestigungsschraube. Anhang b 9200 Annexe b 9200...
- Page 106 • Show and explain the Safety Booklet. • Explain to the operator how to switch on and off the unit. • Explain how to perform an emergency stop. • Explain how to select a weight mode, enter data and apply a weight. Appendix b 9200...
- Page 107 • Expliquer comment effectuer un arrêt d’urgence. wird. • Erklären Sie, wie der Radtyp, ausgewählt wird, Daten • Expliquer comment sélectionner un type de roue, eingegeben werden und ein Gewicht angebracht wird. entrer les données et poser un poids. Anhang b 9200 Annexe b 9200...
- Page 108 Notice: The information contained in this document is subject to change without notice. John Bean makes no warranty with regard to this material. John Bean shall not be liable for errors contained herein or for incidental consequential damages in connection with furnishings, performance, or use of this material.