Table des Matières

Publicité

Les langues disponibles
  • FR

Les langues disponibles

  • FRANÇAIS, page 103

Liens rapides

seca 635

Publicité

Table des Matières
loading

Sommaire des Matières pour Seca 635

  • Page 1 635...
  • Page 2 Bedienungsanleitung und Garantieerklärung ..3 Instruction manual and guarantee ....53 Mode d’emploi et garantie ......103 Manuale di istruzioni e garanzia .
  • Page 3: Table Des Matières

    Deutsch Deutsch INHALTSVERZEICHNIS 1. Mit Brief und Siegel ... . 5 5. Bevor es richtig los geht… ..19 2. Gerätebeschreibung ... 6 5.1 Lieferumfang .
  • Page 4 7.1 Einführung ....37 seca Funkgruppen ..37 13. Optionales Zubehör ..50 Kanäle .
  • Page 5: Mit Brief Und Siegel

    Deutsch 1. MIT BRIEF UND SIEGEL Mit seca Produkten kaufen Sie nicht nur über ein Jahr- hundert ausgereifte Technik, sondern auch eine behördlich, gesetzlich und durch Institute bestätigte Qualität. seca Produkte entsprechen den europäischen Richtlinien, Normen und den nationalen Gesetzen. Mit seca kaufen Sie Zukunft.
  • Page 6: Gerätebeschreibung

    635 haben Sie ein hochpräzises und gleichzeitig robustes Gerät erworben. Seit über 170 Jahren stellt seca seine Erfahrung in den Dienst der Gesundheit und setzt als Marktführer in vielen Ländern der Welt mit innovativen Entwicklungen für das Wiegen und Messen immer neue Maßstäbe.
  • Page 7: Anwenderqualifikation

    2.4 Anwenderqualifikation Montage Geräte, die teilmontiert ausgeliefert werden, dürfen ausschließlich von ausreichend qualifizierten Personen z. B. Fachhändler, Krankenhaustechniker oder dem seca service montiert werden. Bedienung Das Gerät darf ausschließlich von medizinischem Fachpersonal bedient werden. 3. SICHERHEITSINFORMATIONEN 3.1 Sicherheitshinweise in dieser Gebrauchsanweisung GEFAHR! Kennzeichnet eine außergewöhnlich große...
  • Page 8: Grundlegende Sicherheitshinweise

    3.2 Grundlegende Sicherheitshinweise Umgang mit dem Gerät • Beachten Sie die Hinweise in dieser Gebrauchs- anweisung. • Bewahren Sie die Gebrauchsanweisung sorgfältig auf. Die Gebrauchsanweisung ist Bestandteil des Gerätes und muss jederzeit verfügbar sein. GEFAHR! Explosionsgefahr Setzen Sie das Gerät nicht in einer mit folgenden Gasen angereicherten Umgebung ein: –...
  • Page 9: Vermeidung Eines Elektrischen

    Deutsch von einem autorisierten seca Servicepartner durchführen. Den Servicepartner in Ihrer Nähe finden Sie unter www.seca.com oder senden Sie eine E-Mail an service@seca.com. • Verwenden Sie ausschließlich Originalzubehör und -ersatzteile von seca. Andernfalls gewährt seca keinerlei Garantie. VORSICHT! Patientengefährdung, Fehlfunktion •...
  • Page 10: Vermeidung Von Infektionen

    Vermeidung von WARNUNG! Infektionen Infektionsgefahr • Bereiten Sie das Gerät in regelmäßigen Abständen hygienisch auf, wie im ent- sprechenden Abschnitt in diesem Dokument beschrieben. • Stellen Sie sicher, dass der Patient keine ansteckenden Krankheiten hat. • Stellen Sie sicher, dass der Patient keine offenen Wunden oder infektiösen Hautver- änderungen hat, die mit dem Gerät in Berüh- rung kommen können.
  • Page 11: Vermeidung Von Geräteschäden

    Deutsch Vermeidung von ACHTUNG! Geräteschäden Geräteschaden • Achten Sie darauf, dass niemals Flüssigkeiten in das Innere des Gerätes gelangen. Diese können die Elektronik zerstören. • Schalten Sie das Gerät aus, bevor Sie das Netzgerät aus der Steckdose ziehen. • Wenn Sie das Gerät längere Zeit nicht benut- zen, ziehen Sie das Netzgerät aus der Steckdose.
  • Page 12: Umgang Mit Messergebnissen

    Datenverlust • Bevor Sie mit diesem Gerät erfasste Mess- werte speichern und weiterverwenden (z. B. in der PC-Software oder in seca analytics einem Krankenhausinformationssystem), stellen Sie sicher, dass die Messwerte plausi- bel sind. • Wenn Messwerte an die PC-Software seca analytics oder an ein Krankenhausinfor- mationssystem übertragen worden sind,...
  • Page 13: Umgang Mit Batterien Und

    Sie die Batterien/Akkus. So kann keine Säure in das Gerät laufen. – Sollte Säure in das Gerät eingedrungen sein, verwenden Sie es nicht weiter. Lassen Sie das Gerät durch einen autorisierten seca- Servicepartner prüfen und falls notwendig reparieren. Sicherheitsinformationen • 13...
  • Page 14: Übersicht

    4. ÜBERSICHT 4.1 Bedienelemente Bedienelement Funktion • Zentrales Bedien- und Anzeigeelement Anzeige- • Kann auf einer Arbeitsfläche aufgestellt oder an einer gehäuse Wand montiert werden Ein- und Ausschalten der Waage Pfeil-Taste • Während des Wiegens: - Kurzes Drücken: Hold-Funktion aktivieren - Langes Drücken: Tare-Funktion aktivieren tare •...
  • Page 15: Symbole Im Display

    Deutsch Bedienelement Funktion Enter-Taste • Während des Wiegens (wenn Funknetzwerk eingerichtet): - Kurzes Drücken: Messergebnis an empfangsbereite Geräte (PC mit USB-Funkadapter) senden - Langes Drücken: Messergebnis ausdrucken (Funkdrucker) • Im Menü: - Ausgewählten Menüpunkt bestätigen - Eingestellten Wert speichern Anzeigeelement für Messergebnisse und zur Display Konfiguration des Gerätes Batteriefach...
  • Page 16: Kennzeichen Am Gerät Und Auf Dem Typenschild

    • x-y V: benötigte Versorgungspannung • max xxx mA: maximale Stromaufnahme x-y V max. xxx mA • : Polung des Gerätesteckers beachten use compatible seca adapter only • : Gerät mit Gleichstrom betreiben Gerät nicht im Hausmüll entsorgen 16 •...
  • Page 17: Kennzeichen Auf Der Verpackung

    Deutsch 4.4 Kennzeichen auf der Verpackung Vor Nässe schützen Pfeile zeigen zur Oberseite des Produktes Aufrecht transportieren und lagern Zerbrechlich Nicht werfen oder fallen lassen Zulässige min. und max. Temperatur für Transport und Lagerung Zulässige min. und max. Luftfeuchtigkeit für Transport und Lagerung Verpackungsmaterial kann über Recycling-Programme entsorgt werden.
  • Page 18: Menü-Struktur

    ‹ on AClear ‹ off seca 360° wireless *Funknetzwerk ‹ on Send ‹ off Gruppe (ID): Max. drei seca Funkgruppen: 0, 1, 2 ‹ H Maximal-Konfiguration pro Funk- ‹ M Print gruppe: ‹ HM *Funknetzwerk seca 360° Wireless: - 1 Babywaage ‹...
  • Page 19: Bevor Es Richtig Los Geht

    Deutsch 5. BEVOR ES RICHTIG LOS GEHT… 5.1 Lieferumfang Komponente Stck. Wägeplattform Wandhalter Winkeladapter Schrauben, 3 x 35 mm Dübel Ø 5 mm Batterien Typ AA/LR6, 1,5 V Anzeigegehäuse mit Verbindungskabel Gebrauchsanweisung, o. Abb. Bevor es richtig los geht… • 19...
  • Page 20: Anzeigegehäuse Betriebsbereit Machen (Tischanzeige)

    5.2 Anzeigegehäuse betriebsbereit machen (Tischanzeige) ACHTUNG! Geräteschaden Der Winkeladapter kann nach der Montage nicht wieder gelöst werden. – Vergewissern Sie sich vor der Montage, dass das Anzeigegehäuse auf einem Tisch aufgestellt werden soll. Winkeladapter montieren Click! => => 1. Setzen Sie den Winkeladapter in der gezeigten Position am Anzeigegehäuse an.
  • Page 21: Anzeigegehäuse Betriebsbereit Machen (Wandanzeige)

    Deutsch 2. Schließen Sie das Verbindungskabel an der Elektronikbox der Waage an. ACHTUNG! Fehlmessung durch Kraftnebenschluss Wenn das Kabel des Anzeigegehäuses die Wägeplattform berührt, kann das Gewicht des Patienten nicht korrekt gemessen werden. – Verlegen Sie das Kabel so, dass es die Wägeplattform nicht berühren kann.
  • Page 22: Verbindungskabel An Plattform Anschließen

    Verbindungskabel an Plattform anschließen HINWEIS: Beachten Sie bei der Wahl des Aufstellungs- ortes die Länge des Verbindungskabels, sodass Sie das Anzeigegehäuse auf den Wandhalter setzen können. 1. Legen Sie die Waage auf eine feste und ebene Fläche. 2. Schließen Sie das Verbindungskabel an der Elektronikbox der Waage an.
  • Page 23: Wandhalter Montieren

    Deutsch Wandhalter montieren Wählen Sie eine ausreichend tragfähige Wand als Montagestelle. Für die Montage an massivem Mauer- werk sind Standarddübel im Lieferumfang enthalten. Für andere Wandbeschaffenheiten empfehlen wir, ent- sprechende Spezialdübel zu verwenden. HINWEIS: Beachten Sie bei der Wahl der Montagehöhe die Länge des Verbindungskabels.
  • Page 24: Stromversorgung Herstellen

    Spannung liefern, als auf ihnen angegeben ist. Die Waage kann überhitzen, in Brand geraten, schmelzen oder kurzgeschlossen werden. – Verwenden Sie ausschließlich Original- Steckernetzgeräte von seca mit 9-Volt- Ausgangsspannung oder geregelter 12-Volt- Ausgangsspannung. 1. Stecken Sie, falls notwendig, den für Ihre Stromver- sorgung notwendigen Netzstecker auf das Netzgerät.
  • Page 25: Waage Aufstellen

    Deutsch 2. Stecken Sie den Gerätestecker des Netzgerätes in die Anschlussbuchse der Waage. 3. Stecken Sie das Netzgerät in eine Netzsteckdose. 5.5 Waage aufstellen Waage ausrichten ACHTUNG! Fehlmessung durch Kraftnebenschluss Wenn die Waage mit dem Gehäuse aufliegt, z. B. auf einem Handtuch, wird das Gewicht nicht korrekt gemessen.
  • Page 26: Bedienung

    Waage zu stellen. Waage einschalten Drücken Sie die Start-Taste. Alle Elemente des Displays werden kurz angezeigt, dann erscheint SECA im Display. Die Waage ist betriebsbereit, wenn 0.0 im Display erscheint. Wird die Waage mit einem Netzgerät betrieben, erscheint das Symbol in der Anzeige.
  • Page 27: Zusatzgewicht Austarieren (Tare)

    Deutsch Zusatzgewicht Mit der Funktion TARE können Sie vermeiden, dass ein austarieren (TARE) Zusatzgewicht (z. B. ein Handtuch oder eine Auflage auf der Wiegefläche) das Wiegeergebnis beeinflusst. ACHTUNG! Fehlmessung durch Kraftnebenschluss Wenn ein Zusatzgewicht z. B. ein großes Hand- tuch die Fläche berührt, auf dem die Waage steht, wird das Gewicht nicht korrekt gemes- sen.
  • Page 28: Body-Mass-Index Ermitteln Und Bewerten (Bmi)

    Die Anzeige blinkt, bis ein stabiles Gewicht gemes- sen wird. Dann wird der Gewichtswert dauerhaft angezeigt. Das - Symbol (nicht eichfähige Funk- tion) und die Meldung „HOLD“ werden angezeigt. 5. Um die HOLD-Funktion zu deaktivieren, drücken Sie kurz die Pfeil-Taste (hold/tare). tare - Symbol und die Meldung „HOLD“...
  • Page 29 Deutsch 6. Sie können die angezeigte Körpergröße über- nehmen oder mit den Pfeil-Tasten eine andere tare Körpergröße einstellen. 7. Bestätigen Sie Ihre Einstellung mit der Enter-Taste (send/print). Die eingegebene Körpergröße wird gespeichert und steht für die nächste BMI-Berechnung wieder zur Verfügung.
  • Page 30: Messergebnisse An Funkempfänger Senden

    HINWEIS: Vorraussetzung für diese Funktion ist, dass die Geräte zusammen in einer Funkgruppe angemeldet sind (siehe „Das Funknetzwerk seca 360° wireless” auf Seite 37). 1. Führen Sie die Längenmessung durch. 2. Drücken Sie kurz die Enter-Taste (send/print) des Längenmessstabes. Der Messwert wird an den Funkdrucker gesendet, aber nicht ausgedruckt.
  • Page 31: Waage Ausschalten

    Deutsch Entlasten Sie die Waage vollständig. Der Wägebereich 1 ist wieder aktiv. Waage ausschalten Drücken Sie die Start-Taste. HINWEIS: Im Batteriebetrieb schaltet sich die Waage nach 5 Minuten automatisch aus, wenn sie nicht belastet wird. 6.2 Weitere Funktionen (Menü) Im Menü der Waage stehen Ihnen weitere Funktionen zur Verfügung.
  • Page 32: Im Menü Navigieren

    Im Menü navigieren 1. Schalten Sie die Waage ein. 2. Halten Sie die Pfeil-Taste (bmi/menu) gedrückt, bis das Menü aufgerufen wird. Der zuletzt gewählte Menüpunkt erscheint im Display (hier: Autohold „Ahold“). 3. Drücken Sie eine der Pfeil-Tasten so oft, bis der gewünschte Menüpunkt im Display erscheint (hier: tare Dämpfung „Fil“).
  • Page 33: Zusatzgewicht Dauerhaft

    Deutsch Zusatzgewicht Mit der Pre-Tara Funktion können Sie ein Zusatz- dauerhaft gewicht dauerhaft speichern und automatisch von einem Messergebnis abziehen lassen. Sie können zum speichern (Pt) Beispiel ein Pauschalgewicht für Schuhe und Kleidung speichern, und immer dann vom Messergebnis abziehen lassen, wenn ein Patient vollständig bekleidet gewogen wird.
  • Page 34: Autohold-Funktion Aktivieren (Ahold)

    8. Um die Funktion zu deaktivieren, wählen Sie im Menü erneut den Punkt „Pt“ aus. 9. Bestätigen Sie Ihre Auswahl. Die Funktion ist deaktiviert. Das Menü wird automatisch verlassen. HINWEIS: Wenn Sie die Waage ausschalten, wird die Funktion abgeschaltet. Die Meldung „Pt“ wird beim Wiedereinschalten nicht mehr im Display angezeigt.
  • Page 35: Dämpfung Einstellen (Fil)

    Deutsch 4. Bestätigen Sie Ihre Auswahl. Die aktuelle Einstellung wird angezeigt. 5. Wählen Sie die gewünschte Einstellung: – On – Off 6. Bestätigen Sie Ihre Auswahl. Das Menü wird automatisch verlassen. 7. Wenn Sie auch für die zweite Funktion die Signal- töne aktivieren wollen, wiederholen Sie den Vor- gang.
  • Page 36 HINWEIS: Bei der Wiederherstellung der Werksein- stellungen wird das Funkmodul abgeschaltet. Informationen über bestehende Funkgruppen bleiben erhalten. Funkgruppen müssen nicht wieder neu eingerichtet werden. 1. Wählen Sie im Menü den Punkt „Reset“ aus. 2. Bestätigen Sie die Auswahl. Das Menü wird automatisch verlassen. 3.
  • Page 37: Das Funknetzwerk Seca 360° Wireless

    Gegebenheiten, z. B. Dicke und Beschaffenheit von Wänden, können die Reichweite verringern. Pro Funkgruppe ist folgende Gerätekombination möglich: • 1 Babywaage • 1 Personenwaage • 1 Längenmessstab • 1 seca Funkdrucker • 1 PC mit seca USB-Funkadapter Das Funknetzwerk seca 360° wireless • 37...
  • Page 38: Kanäle

    Display der Waage als Module (z. B. „MO 3“) angezeigt. Die Ziffern haben folgende Bedeutung: • 1: Personenwaage • 2: Längenmessstab • 3: Funkdrucker • 4: PC mit seca USB-Funkadapter • 7: Babywaage • 5, 6 und 8-12: Reserviert für Systemerweiterung 38 •...
  • Page 39: Waage In Einer Funkgruppe Betreiben (Menü)

    Deutsch 7.2 Waage in einer Funkgruppe betreiben (Menü) Alle Funktionen, die Sie benötigen, um das Gerät in einer seca Funkgruppe zu betreiben, befinden sich im Untermenü „rF“. Informationen zum Navigieren im Menü finden Sie auf Seite 32. …… • Channel 1 (C1)
  • Page 40 3. Wählen Sie im Menü den Punkt „rF“ aus. 4. Bestätigen Sie die Auswahl. 5. Wählen Sie im Untermenü „rF“ den Menüpunkt „Lrn“ (learn). 6. Bestätigen Sie die Auswahl. Die aktuell eingestellte Funkgruppe (hier: Funk- gruppe 0 „Id 0“) wird angezeigt. Wenn die Funkgruppe „0“...
  • Page 41: Automatische Übertragung Aktivieren (Asend)

    Sie sicher, dass als Druckoption nicht „Off“ eingestellt ist (siehe „Druckoption wählen (APrt)” auf Seite 42). 1. Schalten Sie das Gerät ein. 2. Wählen Sie im Untermenü „rF“ den Menüpunkt „ASEnd“ aus und bestätigen Sie die Auswahl. Das Funknetzwerk seca 360° wireless • 41...
  • Page 42: Druckoption Wählen (Aprt)

    (APrt) angemeldeten Funkdrucker ausgedruckt werden. HINWEIS: Diese Funktion ist nur zugänglich, wenn über die „learn“-Funktion ein seca Funkdrucker in die Funkgruppe integriert wurde. 1. Schalten Sie das Gerät ein. 2. Wählen Sie im Untermenü „rF“ den Menüpunkt „APrt“ aus und bestätigen Sie die Auswahl.
  • Page 43: Hygienische Aufbereitung

    Deutsch 4. Stellen Sie die korrekte Jahreszahl ein. 5. Bestätigen Sie die Auswahl. 6. Wiederholen Sie die Schritte 3. und 5. ent- sprechend für „Monat“ (Mon), „Tag“ (dAy), „Stunde“ (hour) und „Minute“ (Min). 7. Bestätigen Sie jeweils Ihre Auswahl. Nach dem Bestätigen der Einstellung für Minute wird das Menü...
  • Page 44: Reinigung

    8.1 Reinigung Reinigen Sie die Oberflächen des Gerätes bei Bedarf mit einem weichen Tuch, das Sie mit einer milden Seifenlauge anfeuchten. 8.2 Desinfektion ACHTUNG! Geräteschaden Sichtscheiben auf Skalen und Displays bestehen aus Acrylglas. Acrylglasscheiben können reißen oder eintrüben, wenn ungeeignete Desinfektionsmittel verwendet werden.
  • Page 45: Funktionskontrolle

    Abweichungen feststellen, die nicht mit Hilfe des Kapitels „Was tun, wenn…?” ab Seite 45 behoben werden können, dürfen Sie das Gerät nicht verwenden. – Lassen Sie das Gerät durch den seca service oder einen autorisierten Servicepartner reparieren. – Beachten Sie den Abschnitt „Wartung/Nacheichung”...
  • Page 46 - Ca. 15 Minuten warten, bis sich die Waage an die Umgebungstemperatur angepasst hat • Das Gerät konnte keine Messergebnisse an den Funkempfänger (seca Funkdrucker bzw. PC mit seca USB-Funkadapter) senden. - Stellen Sie sicher, dass die Waage in das Funknetzwerk integriert ist.
  • Page 47: Wartung/Nacheichung

    Wir empfehlen, vor der Nacheichung des Gerätes eine Wartung durchführen zu lassen. ACHTUNG! Fehlmessungen durch unsachgemäße Wartung – Lassen Sie Wartungen und Reparaturen ausschließlich durch den seca Service oder einen autorisierten Servicepartner durchführen. – Den Servicepartner in Ihrer Nähe finden Sie unter www.seca.com oder senden Sie eine email an service@seca.com.
  • Page 48: Eichzählerinhalt Prüfen

    Sicherungsmarken verletzt sind oder der Eichzählerinhalt nicht mit der Zahl auf der gültigen Eichzählermarke übereinstimmt. Wenn Sicherungsmar- ken verletzt sind, wenden Sie sich direkt an den seca service. 11.2 Eichzählerinhalt prüfen Diese seca Waage ist geeicht. Eichungen dürfen nur durch autorisierte Stellen erfolgen.
  • Page 49: Technische Daten

    Deutsch 12.TECHNISCHE DATEN 12.1 Allgemeine Technische Daten Allgemeine Technische Daten seca 635 Abmessungen Waage • Tiefe 600 mm • Breite 640 mm • Höhe 46 mm Abmessungen Wiegeplattform • Tiefe 600 mm • Breite 600 mm • Höhe 46 mm Eigengewicht ca.
  • Page 50: Wägetechnische Daten

    274 • länderspezifische Varianten seca 264 Funkdrucker • länderspezifische Varianten seca 360° wireless printer 465 • seca 360° wireless printer advanced 466 länderspezifische Varianten PC-Software • anwendungsspezifische seca analytics 115 Lizenzpakete 456-00-00-009 seca 360° wireless USB adapter 456 50 •...
  • Page 51: Ersatzteile

    Gerät muss sachgerecht als Elektronikschrott entsorgt werden. Beachten Sie Ihre jeweiligen nationalen Bestimmungen. Für weitere Auskünfte wenden Sie sich an unseren Service unter: service@seca.com 15.2 Batterien und Akkus Werfen Sie verbrauchte Batterien und Akkus nicht in den Hausmüll, unabhängig davon, ob diese Schad- stoffe enthalten oder nicht.
  • Page 52: Gewährleistung

    Es besteht keine Gewährleistung, wenn das Gerät durch Personen geöffnet wird, die hierzu nicht aus- drücklich von seca autorisiert worden sind. Kunden im Ausland bitten wir, sich im Gewährleis- tungsfall direkt an den Verkäufer des jeweiligen Landes zu wenden.
  • Page 53 English English TABLE OF CONTENTS 1. Signed and sealed ... . 55 5. Before you really get started… . 69 2. Device description ... 56 5.1 Scope of delivery .
  • Page 54 7.1 Introduction ....86 12.1 General technical data ..98 seca wireless groups ..86 12.2 Technical data, weighing . . . 99 Channels .
  • Page 55: Signed And Sealed

    Scales bearing this symbol comply with European Directive 2009/23/EC applicable to non-automatic scales. seca scales with this symbol meet the stringent quality and technical requirements placed on scales which can be calibrated. Scales bearing this symbol meet the strict requirements of Class III calibration and can be used for medical measurements subject to control by the Weights &...
  • Page 56: Device Description

    635 have purchased a highly precise and simultaneously robust device. For over 170 years, seca has used its experience in the service of healthcare and, as a market leader, it has always set standards in many countries of the world with innovative developments in weighing and measur- ing.
  • Page 57: User Qualification

    English 2.4 User qualification Assembly Devices that are shipped partially assembled may only be mounted by sufficiently qualified persons such as specialist dealers, hospital technicians or seca service technicians. Operation The device may only be operated by healthcare professionals. 3. SAFETY INFORMATION 3.1 Safety information in these instructions for use...
  • Page 58: Basic Safety Instructions

    The device does not contain any parts for servicing by the user. Only have ser- vicing and repairs performed by an authorized seca service partner. You can find service partners in your area at www.seca.com or by sending an e-mail to service@seca.com. 58 •...
  • Page 59: Preventing Electric Shock

    English • Only use original seca accessories and spare parts, otherwise seca will not grant any war- ranty. CAUTION! Patient hazard, malfunction • Keep other electrical medical devices, e.g. high-frequency surgical devices, a minimum distance of approx. 1 meter away to prevent incorrect measurements or wireless transmis- sion interference.
  • Page 60: Avoiding Injuries

    Avoiding injuries WARNING! Risk of falling • Ensure that the device is positioned firmly and level. • Route the mains cable so that there is no risk of tripping for the patient or user. • Make sure that the patient does not step onto the weighing platform directly at the edges.
  • Page 61: Handling Measuring Results

    • Before you save measurements aquired with this device and process them for further use (e.g. in the PC software or in a seca analytics hospital information system), make sure the measurement values are plausible. • If measurement values are transmitted to the...
  • Page 62: Handling Packaging Material

    Handling packaging WARNING! material Risk of suffocation Packaging material made of plastic foil (bags) is a choking hazard. – Keep packaging material out of reach of children. – In the event that the original packing material may not be available anymore, only use plastic bags with security holes in order to reduce the risk of suffocation.
  • Page 63 (incl. rechargeable batteries). This prevents acid from leaking into the device. – If acid leaked into the device, discontinue use. Have the device checked by an authorised seca service partner and repaired if necessary. Safety information • 63...
  • Page 64: Overview

    4. OVERVIEW 4.1 Controls Control Function • Central control and display element Display housing • Can be set up on a work surface or fitted to a wall Switch scale on and off Arrow key • During weighing: - press briefly: activate hold function - press and hold: activate tare function tare •...
  • Page 65: Symbols In The Display

    English Control Function Enter key • During weighing (if wireless network is set up): - press briefly: send measuring result to devices ready to receive it (PC with USB wireless adapter) - press and hold: print out measuring result (wireless printer) •...
  • Page 66: Marking On The Device And On The Rating Plate

    • max xxx mA: maximum current consumption x-y V max. xxx mA • : note polarity of device plug use compatible seca adapter only • : operate device with direct current Do not dispose of device with household waste 66 •...
  • Page 67: Marking On The Packaging

    English 4.4 Marking on the packaging Protect from moisture Arrows indicate top of product. Transport and store in an upright position. Fragile Do not throw or drop. Permitted min. and max. temperature for transport and storage Permitted min. and max. moisture for transport and storage Packaging material can be disposed of through recycling programs.
  • Page 68: Menu Structure

    *Funknetzwerk seca 360° Wireless: wireless group ‹ Man Raum (ID): - 1 baby scale ‹ Year Max. drei seca Funkräume: 0, 1, 2 - 1 personal scale ‹ Month - 1 length measuring rod Maximal-Konfiguration pro Funkraum: ‹ Day Time...
  • Page 69: Before You Really Get Started

    English 5. BEFORE YOU REALLY GET STARTED… 5.1 Scope of delivery Component Pcs. Weighing platform Wall bracket Angle adapter Screws, 3 x 35 mm Wall plugs Ø 5 mm Batteries, type AA/LR6, 1.5 V Display housing with connecting cable Instructions for use, not shown Before you really get started…...
  • Page 70: Making Display Housing Ready For Use (Desktop Display)

    5.2 Making display housing ready for use (desktop display) ATTENTION! Damage to device The angle adapter cannot be removed once fitted. – Ensure before fitting that the display housing is to be set up on a desktop. Fitting the angle adapter Click! =>...
  • Page 71: For Use (Wall-Mounted Display)

    English ATTENTION! Incorrect measurement due to force shunts If the cable of the display housing contacts the weighing platform, the patient's weight cannot be measured correctly. – Route the cable in such a way that it cannot contact the weighing platform. 3.
  • Page 72: Connecting The Connecting Cable To The Platform

    Connecting the connecting cable to the platform NOTE When selecting the setup location, take account of the length of the connecting cable so that you can place the display housing on the wall bracket. 1. Place the scales on a firm, level surface. 2.
  • Page 73: Installing The Wall Bracket

    English Installing the wall Choose an adequately strong load-bearing wall to bracket mount the device. Standard wall plugs are supplied for installation on solid brick walls. We recommend use of appropriate special wall plugs for other types of wall. NOTE When selecting mounting height, take account of the length of the connecting cable.
  • Page 74: Establishing Power Supply

    The scale may overheat, catch fire, melt or short-circuit. – Use only original seca plug-in power packs with a 9 V or controlled 12 V output voltage. 1. If required, insert the power supply connector nec- essary for your power supply into the power pack.
  • Page 75: Setting Up The Scale

    English 2. Insert the connector of the power pack into the connecting socket of the scale. 3. Plug the power pack into a power supply socket. 5.5 Setting up the scale Aligning the scale ATTENTION! Incorrect measurement due to force shunts If the scale and housing is in contact with some- thing, e.g.
  • Page 76: Operation

    Switching on the scale Press the Start key. All the elements of the display are shown briefly, then SECA appears in the display. The scale is operational when 0.0 appears in the display. If the scale is operated with a power pack, the sym- appears in the display.
  • Page 77: Taring Off Extra Weight

    English Taring off extra weight Using the TARE function, you can prevent any extra (TARE) weight (e.g. a towel or a support on the weighing plat- form) from affecting the weighing result. ATTENTION! Incorrect measurement due to force shunts If an extra weight, e.g. a large towel, contacts the surface on which the scale is placed, weight will not be measured correctly.
  • Page 78: Determining And Rating Body Mass Index (Bmi)

    The display flashes until a stable weight is meas- ured. The weight is then continuously displayed. symbol (non-calibratable function) and the message "HOLD" are displayed. 5. To deactivate the HOLD function, briefly press the (hold/tare) arrow key. tare symbol and the "HOLD" message are no longer displayed.
  • Page 79: Sending Measurement Results To Wireless Receivers

    If in doubt, seek the advice of a consultant. Sending measurement If the scale is integrated in a net- seca 360° wireless work, you can send the measurement results to results to wireless devices ready to receive them (e.g. wireless printer, PC receivers with USB wireless adapter) at the touch of a button.
  • Page 80: Calculating And Printing Out Bmi Automatically

    NOTE The prerequisite for this function is that the devices are registered together in one wireless group (see "The seca 360° wireless network" on page 86). 1. Perform the height measurement. 2. Briefly press the Enter key (send/print) of the length measuring rod.
  • Page 81: Other Functions (Menu)

    English 6.2 Other functions (menu) Other functions are available to you in the menu for the scale. This enables you to configure the scale to suit your conditions of use perfectly. …. Reset Sto 1 (Weight) Sto 2 (Weight) Net Weight Sto 3 (Weight) •...
  • Page 82: Deleting Saved Values Automatically (Aclr)

    5. To amend the setting or call up a different sub- menu, press one of the arrow keys until the desired tare setting (in this case: level "2") is displayed. 6. Confirm the setting with Enter (send/print). You exit the menu automatically. 7.
  • Page 83: Activating The Auto Hold (Ahold) Function

    English 1. Select the item "Pt" from the menu. The message "Pt" appears. 2. Confirm your selection. The last memory used is displayed. 3. You can adopt the memory displayed or select a different memory. 4. Confirm your selection. Arrows flash in the display. The additional weight saved to the selected mem- ory is displayed.
  • Page 84: Activating Beeps (Beep)

    1. Select the item "Ahold" from the menu. 2. Confirm your selection. The current setting is displayed. 3. Select the desired setting: – On – Off 4. Confirm your selection. You exit the menu automatically. Activating beeps You can set whether a beep is heard every time a key (BEEP) is pressed and when a stable weight value is achieved.
  • Page 85: Restoring Factory Settings (Reset)

    English 3. Select a filtering level. – 0: no filtering – 1: moderate filtering – 2: high filtering 4. Confirm your selection. You exit the menu automatically. Restoring factory You can restore the factory settings for the functions below. settings (RESET) Function Factory setting Auto hold (Ahold")
  • Page 86: The Seca 360° Wireless Network

    The following combination of devices is possible for each wireless group: • 1 baby scale • 1 personal scale • 1 length measuring rod • 1 seca wireless printer • 1 PC with seca USB wireless adapter 86 •...
  • Page 87: Channels

    • 1: personal scale • 2: length measuring rod • 3: wireless printer • 4: PC with seca USB wireless adapter • 7: baby scale • 5, 6 and 8-12: reserved for system expansion The seca 360° wireless network • 87...
  • Page 88: Operating The Scale In A Wireless Group (Menu)

    7.2 Operating the scale in a wireless group (menu) All the functions you need to operate the device in a seca wireless group can be found in the "rF" submenu. Information for navigating in the menu can be found on page 81.
  • Page 89 On some devices, a special switch-on proce- dure has to be followed if they are going to be integrated in a wireless group. Follow the instructions for use for the device in question. The seca 360° wireless network • 89...
  • Page 90: Activating Automatic Send (Asend)

    11. Switch on the device, e.g. a wireless printer, you want to integrate in the wireless group. When the wireless printer is detected, you will hear a beep. NOTE As soon as you have integrated a wireless printer in the wireless group, you then have to select a print option (Menu\rF\APrt) and set the time (Menu\rF\time).
  • Page 91: Selecting Print Option (Aprt)

    NOTE This function is only accessible if a seca wireless printer has been integrated in the wireless group via the "learn" function. 1. Switch on the device. 2. Select the "APrt" menu item from the "rF" submenu and confirm your selection.
  • Page 92: Hygiene Treatment

    7. Confirm each of your selections. After confirming the setting for minute, you automatically exit the menu. The settings are automatically transmitted to the wireless printer. The wireless printer automatically adds a date and time to every printout. NOTE Follow the instructions for use for the wireless printer for further information about operating it.
  • Page 93: Disinfecting

    English 8.2 Disinfecting ATTENTION! Damage to device The viewing windows of scales and displays are made of acrylic glass. Acrylic glass windows can crack or become cloudy if unsuitable disin- fectants are used on them. – Only use disinfectants suitable for sensitive surfaces.
  • Page 94: Troubleshooting

    "Troubleshooting" from page 94, you may not use the device. – Have the device repaired by seca service or by an authorized service partner. – Please see the section entitled "Servicing/recalibration"...
  • Page 95 Cause / Solution • The device was unable to send measurement results to the wireless receiver (seca wireless printer or PC with seca USB wireless adapter). – Ensure that the scale is integrated in the wireless network. – Ensure that the receiver is switched on.
  • Page 96: Servicing/Recalibration

    Incorrect measurements as a result of poor servicing – Have servicing and repairs carried out exclusively by seca service or by an authorized service partner. – You can find service partners in your area at www.seca.com or by sending an e-mail to service@seca.com.
  • Page 97: Checking The Content Of The Calibration Counter

    If the sticker and the calibration counter do not match, the scale must be recalibrated. Please contact your service partner or seca service. Once the scale has been recalibrated, a new, updated calibration counter sticker is used to identify the status of the calibration counter.
  • Page 98: Technical Data

    12.TECHNICAL DATA 12.1 General technical data General technical data seca 635 Dimensions of scale • Depth 600 mm • Width 640 mm • Height 46 mm Dimensions of weighing platform • Depth 600 mm • Width 600 mm • Height...
  • Page 99: Technical Data, Weighing

    Country-specific versions seca 264 Wireless printers • Country-specific versions seca 360° wireless printer 465 • Country-specific versions seca 360° wireless printer advanced 466 PC software • Application-specific license seca analytics 115 packages seca 360° wireless USB adapter 456 456-00-00-009 Optional accessories • 99...
  • Page 100: Spare Parts

    The device must be disposed of properly as electronic waste. Comply with the national provisions applicable in your country. For further information contact our ser- vice department at: service@seca.com 15.2 Batteries and rechargeable batteries Spent (rechargeable) batteries should not be discarded with household waste, regardless of whether they contain harmful substances or not.
  • Page 101: Warranty

    The warranty shall become null and void where the device is opened by persons not expressly authorised to do so by seca. We ask customers based abroad to contact their local sales agent direct in the case of warranty claims.
  • Page 103 Français Français TABLE DES MATIÈRES 1. Toutes les garanties de qualité 105 5. Avant de commencer… ..120 2. Description de l'appareil ..106 5.1 Éléments livrés ... 120 5.2 Montage de l'unité...
  • Page 104 ....127 seca Groupes en réseau . . . 139 Pesée du patient ..127 Canaux .
  • Page 105: Toutes Les Garanties De Qualité

    également une qualité certifiée conforme aux normes et aux lois, ainsi que par les instituts. Les produits seca satisfont aux exigences des directives et normes européennes ainsi qu'à celles des lois nationales. En achetant les produits seca, vous achetez des produits d'avenir.
  • Page 106: Description De L'appareil

    , vous avez fait l'acquisition d'un appareil à la seca 635 fois robuste et de grande précision. Depuis plus de 170 ans, seca met son expérience au service de la santé et fait figure de leader dans de nom- breux pays grâce à de constantes innovations en matière de pesage et de mesure.
  • Page 107: Qualification De L'utilisateur

    Le réseau sans fil permet de trans- seca 360° wireless mettre les résultats de mesure via une connexion sans fil à une imprimante en réseau seca ou à un ordinateur équipé du logiciel et de l'adaptateur seca analytics réseau sans fil USB seca.
  • Page 108: Informations Relatives À La Sécurité

    3. INFORMATIONS RELATIVES À LA SÉCURITÉ 3.1 Consignes de sécurité de ce mode d'emploi DANGER ! Désigne une situation de danger exceptionnelle. Le non-respect de cette indication entraîne des blessures irréversibles ou mortelles. AVERTISSEMENT ! Désigne une situation de danger exceptionnelle. Le non-respect de cette indication peut entraî- ner des blessures irréversibles ou mortelles.
  • Page 109 S.A.V. le plus proche, rendez-vous sur www.seca.com ou envoyez un e-mail à service@seca.com. • Utilisez exclusivement des accessoires et pièces de rechange seca d'origine. Sinon, seca n'offre aucune garantie. PRUDENCE ! Mise en danger du patient, dysfonctionnement • Avec les autres appareils médicaux élec- triques, comme par ex.
  • Page 110: Éviter Les Décharges Électriques

    • La puissance d'émission réelle des appareils HF peut requérir des distances minimales supérieures à 1 mètre. Plus de détails sous www.seca.com. Éviter les décharges AVERTISSEMENT ! électriques Décharge électrique •...
  • Page 111: Éviter Les Blessures

    Français Éviter les blessures AVERTISSEMENT ! Risque de chute • Assurez-vous que l'appareil repose sur une surface solide et plane. • Posez le câble de raccordement de sorte que l'utilisateur et le patient ne puissent pas trébu- cher dessus. • Assurez-vous que le patient ne se tient pas directement sur le bord de la plateforme de pesage.
  • Page 112: Utilisation Des Résultats De Mesure

    • Avant d'enregistrer les valeurs mesurées avec cet appareil en vue d'une exploitation ulté- rieure (par ex. avec le logiciel seca analytics ou dans un système d'information hospitalier), assurez-vous qu'elles sont plausibles. • Si des valeurs de mesures du logiciel PC ont été...
  • Page 113: Utilisation Du Matériel D'emballage

    Français Utilisation du matériel AVERTISSEMENT ! d'emballage Risque d’asphyxie Le matériel d'emballage sous film plastique (sacs) représente un risque d'asphyxie. – Conservez le matériel d'emballage à l'abri des enfants. – Si l'emballage d'origine n'est plus disponible, utilisez exclusivement des sacs plastique munis de perforations de sécurité...
  • Page 114 Cela permet d'éviter tout écoulement d'acide dans l'appareil. – Si de l'acide a pénétré dans l'appareil, ne continuez pas à l'utiliser. Faites contrôler l'appareil par un partenaire S.A.V. seca agréé et faites-le réparer si nécessaire. 114 •...
  • Page 115: Aperçu

    Français 4. APERÇU 4.1 Éléments de commande Élément de N° Fonction commande • Élément de commande et d'affichage central Unité • Peut être posé sur une surface de travail ou fixé au d'affichage Mise sous et hors tension de la balance Touche fléchée •...
  • Page 116: Symboles Sur L'afficheur

    Élément de N° Fonction commande Touche fléchée • Pendant la pesée : - Pression brève : Activer la fonction BMI - Pression longue : appeler le menu • Dans le menu : - Sélectionner un sous-menu, sélectionner un point de menu - Réduire la valeur Touche Enter •...
  • Page 117: Marquages Sur L'appareil Et Sur La Plaque Signalétique

    Français Symbole Signification Emplacement de mémoire actuellement utilisé Étendue de pesage actuellement utilisée voir « Caractéristiques techniques » à la page 152 4.3 Marquages sur l'appareil et sur la plaque signalétique Texte/Symbole Signification Modell Numéro de modèle Ser. No. Numéro de série Respecter le mode d'emploi Appareil électromédical, type B Appareil à...
  • Page 118: Marquages Sur L'emballage

    V • : respecter la polarité du connecteur max. xxx mA d'alimentation use compatible seca adapter only • : l'appareil doit fonctionner uniquement avec du courant continu Ne pas jeter l'appareil avec les ordures ménagères 4.4 Marquages sur l'emballage Protéger de l'humidité...
  • Page 119: Structure Du Menu

    ‹ HM *Funknetzwerk seca 360° Wireless: réseau : ‹ Man Raum (ID): - 1 pèse-bébé ‹ Year Max. drei seca Funkräume: 0, 1, 2 - 1 pèse-personne ‹ Month - 1 toise de mesure Maximal-Konfiguration pro Funkraum: ‹ Day Time - 1 imprimante en réseau - 1 Babywaage ‹...
  • Page 120: Avant De Commencer

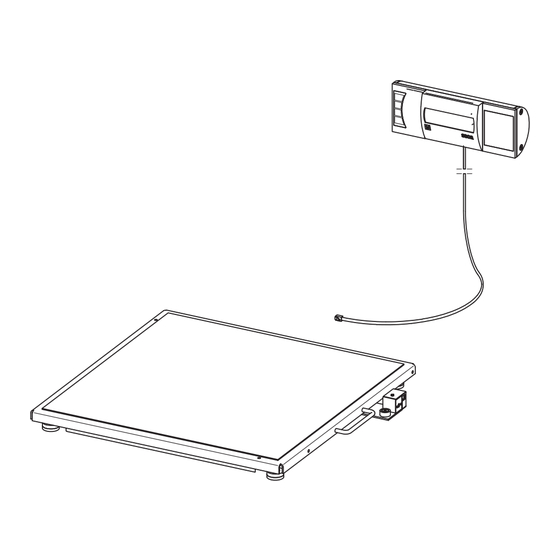
    5. AVANT DE COMMENCER… 5.1 Éléments livrés N° Composant Pièce Plateforme de pesée Fixation murale Support d'inclinaison Vis, 3 x 35 mm Cheville Ø 5 mm Piles type AA/LR6, 1,5 V Unité d'affichage avec câble de raccordement Mode d'emploi, non illustré 120 •...
  • Page 121: Montage De L'unité D'affichage (Afficheur De Table)

    Français 5.2 Montage de l'unité d'affichage (afficheur de table) ATTENTION ! Dommages matériels Le support d'inclinaison ne peut plus être détaché après montage. – Assurez-vous avant le montage que l'unité d'affichage sera bien posée sur une table. Montage du support d'inclinaison Click! =>...
  • Page 122: Montage De L'unité D'affichage (Afficheur Mural)

    2. Raccordez le câble de raccordement au boîtier électronique de la balance. ATTENTION ! Mesure faussée due à une dérivation de force Si le câble de l'unité d'affichage touche la plate- forme de pesée, il n'est pas possible de mesu- rer le poids du patient correctement. –...
  • Page 123: Brancher Le Câble De Raccordement Sur La Plateforme

    Français Brancher le câble de raccordement sur la plateforme REMARQUE : Au moment de choisir l'endroit où vous allez installer la balance, assurez-vous que le câble de raccordement est assez long pour que l'unité d'affichage puisse être fixée au mur. 1. Placez la balance sur une surface dure et plane. 2.
  • Page 124: Montage De La Fixation Murale

    Montage de la fixation Choisissez un mur d'une résistance suffisante comme emplacement d'installation. Des chevilles standard murale sont fournies pour le montage sur des murs massifs. Pour les autres types de mur, nous vous recomman- dons d'utiliser des chevilles spécialement adaptées. REMARQUE : Avant de décider de la hauteur de montage, vérifiez la longueur du câble de raccordement.
  • Page 125: Établissement De L'alimentation Électrique

    à celle indiquée sur l'appareil. La balance risque de surchauffer, de prendre feu, de fondre ou de court-circuiter. – Utilisez exclusivement des adaptateurs secteur enfichables seca d'origine avec une tension de 9 V ou une tension de sortie régulée de 12  V. Avant de commencer… • 125...
  • Page 126: Installation De La Balance

    1. Enfichez, si nécessaire, la fiche secteur requise dans l'adaptateur secteur. 2. Insérez le connecteur d'alimentation de l'adaptateur secteur dans la prise de la balance. 3. Enfichez l'adaptateur secteur dans une prise secteur. 5.5 Installation de la balance Réglage horizontal de la ATTENTION ! Mesure faussée due à...
  • Page 127: Utilisation

    Mise de la balance sous tension Appuyez sur la touche Start. Tous les éléments de l'afficheur apparaissent brièvement, SECA apparaît ensuite sur l'afficheur. La balance est prête à fonctionner lorsque 0.0 apparaît sur l'afficheur. Si la balance est utilisée avec un adaptateur secteur, le symbole apparaît à...
  • Page 128: Compensation Du Poids Supplémentaire (Tare)

    Compensation du poids La fonction TARE permet d'éviter qu'un poids supplé- supplémentaire (TARE) mentaire (par ex. une serviette ou un appui quelconque sur la surface de pesage) n'influence le résultat de mesure. ATTENTION ! Mesure faussée due à une dérivation de force Le poids mesuré...
  • Page 129: Calcul Et Évaluation De L'indice De Masse Corporelle (Body Mass Index, Bmi)

    Français 4. Appuyez brièvement sur la touche fléchée (hold/tare). tare L'affichage clignote jusqu'à ce qu'un poids stable soit mesuré. La valeur du poids est ensuite affichée en permanence. Le symbole (Fonction non éta- lonnable) et le message « HOLD » s'affichent. 5. Pour désactiver la fonction HOLD, appuyez sur la touche fléchée (hold/tare).
  • Page 130 La dernière taille enregistrée sur l'emplacement de mémoire sélectionné s'affiche. 6. Vous pouvez reprendre la taille affichée ou régler une autre taille avec les touches fléchées. tare 7. Confirmez votre réglage avec la touche Enter (send/print). La taille entrée est enregistrée et disponible pour le calcul de l'indice de masse corporelle suivant.
  • Page 131: Envoi Des Résultats De Mesure Au Récepteur Radio

    Pour utiliser cette fonction, il est nécessaire de raccorder les appareils en réseau au préalable dans un groupe en réseau (voir « Le réseau sans fil seca 360° wireless » à la page 139). 1. Effectuez la mesure de la taille. 2. Appuyez brièvement sur la touche Enter (send/print) de la toise de mesure.
  • Page 132: Changement Automatique D'étendue De Pesage

    Changement La balance dispose de deux étendues de pesage. automatique d'étendue Dans l'étendue de pesage 1 ( ), vous bénéficiez d'une graduation plus précise de l'affichage du poids de pesage pour une capacité de charge réduite. Dans l'étendue de pesage 2 ( ), vous pouvez utiliser la capacité...
  • Page 133: Autres Fonctions (Menu)

    Français 6.2 Autres fonctions (menu) D'autres fonctions sont disponibles dans le menu de la balance. Vous pouvez ainsi configurer la balance de manière optimale en fonction de vos conditions d'utilisation. …. Reset Sto 1 (Weight) Sto 2 (Weight) Net Weight Sto 3 (Weight) •...
  • Page 134: Suppression Automatique Des Valeurs Enregistrées (Aclr)

    4. Confirmez votre sélection avec la touche Enter (send/print). Le réglage actuel pour le point de menu ou un sous-menu s'affichent (ici : Niveau « 0 »). 5. Pour modifier le réglage ou pour appeler un autre sous-menu, appuyez sur l'une des touches flé- tare chées jusqu'à...
  • Page 135 Français L'appareil dispose de trois emplacements de mémoire pour les valeurs de poids. Vous pouvez enregistrer dif- férentes valeurs de poids et les appeler séparément selon la situation de départ pour pouvoir les déduire automatiquement du résultat de mesure. Sto 1 (Weight) Sto 2 (Weight) Sto 3 (Weight) Net Weight...
  • Page 136: Activation De La Fonction Autohold (Ahold)

    Activation de la fonction Si vous activez la fonction Autohold, le résultat de Autohold (Ahold) mesure reste affiché à chaque pesée après retrait de la charge de la balance. Il n'est donc plus nécessaire d'activer manuellement la fonction Hold pour chaque pesage.
  • Page 137: Réglage De L'atténuation (Fil)

    Français 7. Si vous souhaitez activer également les signaux sonores pour la deuxième fonction, répétez la procédure. Réglage de L'atténuation (Fil = Filtre) vous permet de réduire les perturbations lors du calcul du poids (dues par ex. aux l'atténuation (Fil) mouvements du patient).
  • Page 138 1. Dans le menu, sélectionnez le point « Reset ». 2. Confirmez la sélection. Le programme quitte le menu automatiquement. 3. Éteignez la balance. Les réglages d'usine sont rétablis et sont dispo- nibles lorsque la balance est remise en marche. 138 •...
  • Page 139: Le Réseau Sans Fil Seca 360° Wireless

    à des fins d'évaluation et de documentation. Les données peuvent être transmises aux appareils suivants : • seca Imprimante en réseau • Ordinateur avec seca adaptateur réseau sans fil USB seca Groupes en Le réseau sans fil fonctionne avec seca 360° wireless des groupes en réseau.
  • Page 140: Canaux

    • 1 : Pèse-personne • 2 : Toise de mesure • 3 : Imprimante en réseau • 4 : Ordinateur avec seca adaptateur réseau sans fil • 7 : Pèse-bébé • 5, 6 et 8-12 : Réservé pour une extension du système...
  • Page 141: Utilisation De La Balance Dans Un Groupe En Réseau (Menu)

    7.2 Utilisation de la balance dans un groupe en réseau (menu) Toutes les fonctions requises pour utiliser l'appareil dans un groupe en réseau seca se trouvent dans le sous-menu « rF ». Vous trouverez de plus amples infor- mations sur la navigation dans le menu à la page 133.
  • Page 142: Configuration D'un Groupe En Réseau (Lrn)

    Configuration d'un Pour configurer un groupe en réseau, procédez comme suit : groupe en réseau (Lrn) 1. Mettez l'appareil sous tension. 2. Appelez le menu. 3. Dans le menu, sélectionnez le point « rF ». 4. Confirmez la sélection. 5. Dans le sous-menu « rF », sélectionnez le point de menu « Lrn »...
  • Page 143 été reconnus par la balance. 15. Quittez le menu à l'aide de la touche Enter ou at- tendez que le programme le quitte automatique- ment. Le réseau sans fil seca 360° wireless • 143...
  • Page 144: Activation De La Transmission Automatique (Asend)

    REMARQUE : Cette fonction est accessible uniquement si une imprimante en réseau seca a été intégrée au groupe en réseau via la fonction « learn ». 1. Mettez l'appareil sous tension. 2. Dans le sous-menu « rF », sélectionnez le point de menu « APrt »...
  • Page 145: Réglage De L'heure (Time)

    Les réglages sont transmis automatiquement à l'imprimante en réseau. L'imprimante en réseau ajoute automatiquement la date et l'heure à chaque impression. REMARQUE : Pour plus d'informations sur l'utilisation de l'imprimante en réseau, reportez-vous à son mode d'emploi. Le réseau sans fil seca 360° wireless • 145...
  • Page 146: Traitement Hygiénique

    8. TRAITEMENT HYGIÉNIQUE AVERTISSEMENT ! Décharge électrique L'appareil n'est pas hors tension si le bouton marche/arrêt est enfoncé et si l'écran tactile s'éteint. Si des liquides sont utilisés sur l'appa- reil, il existe un risque de décharge électrique. – Pour mettre l'appareil hors tension, retirez la fiche d'alimentation avant chaque traitement hygiénique.
  • Page 147: Stérilisation

    Français 1. Respecter les consignes du mode d'emploi du désinfectant. 2. Désinfectez l'appareil régulièrement à l'aide d'un chiffon doux imprégné de désinfectant approprié. 3. Observez les délais suivants : Délai Composant Avant chaque mesure avec Plateforme de pesage un contact cutané direct Après chaque mesure avec Plateforme de pesage un contact cutané...
  • Page 148: Que Faire Si

    « Que faire si… » à partir de la page 148 ne permettent pas de corriger, n'utili- sez pas l'appareil. – Envoyez l'appareil à réparer au S.A.V. seca ou à un partenaire S.A.V. homologué. – Respectez les indications de la section « Maintenance/Réétalonnage »...
  • Page 149 (Lrn) » à la page 142)..le point « rF » ne • Le module de connexion sans fil de la balance s'affiche pas après est défectueux. ouverture du menu ? - Informer le service après-vente de seca. Que faire si… • 149...
  • Page 150 Incident Cause/Solution La charge se trouvant sur la balance est trop éle- vée ou la balance a été trop chargée sur un coin. … l'indication « Er:X:11 » - Enlever la charge sur la balance ou répartir le apparaît ? poids de manière plus uniforme. - Redémarrer la balance.
  • Page 151: Maintenance/Réétalonnage

    ATTENTION ! Mesures erronées dues à une maintenance incorrecte – Les entretiens et réparations doivent être exclusivement confiés au S.A.V. seca ou à un partenaire S.A.V. autorisé. – Pour connaître le partenaire SAV le plus proche, rendez-vous sur le site www.seca.com ou envoyez un e-mail à...
  • Page 152: Caractéristiques Techniques

    Si ce n'est pas le cas, un rééta- lonnage doit être effectué. Pour cela, adressez-vous à votre partenaire S.A.V. ou au service après-vente de seca. Une nouvelle marque de réétalonnage actualisée est utilisée au terme de réétalonnage pour caractériser l'état du compteur d'étalonnage. Cette marque est fixée par un sceau supplémentaire apposé...
  • Page 153: Caractéristiques De Pesage

    Français Caractéristiques techniques générales seca 635 Humidité de l'air • Fonctionnement 30 % - 80 % sans condensation • Stockage 0 % - 95 % sans condensation • Transport 0 % - 95 % sans condensation Hauteur des chiffres 25 mm...
  • Page 154: Accessoires Optionnels

    264 Imprimante en réseau • Variantes spécifiques au pays seca 360° wireless printer 465 • Variantes spécifiques au pays seca 360° wireless printer advanced 466 Logiciel pour ordinateur • Licences globales spécifiques à seca analytics 115 l'application 456-00-00-009 seca 360° wireless USB adapter 456 14.PIÈCES DE RECHANGE...
  • Page 155: Mise Au Rebut

    Pour de plus amples informations à ce sujet, veuillez contacter notre service après-vente à cette adresse : service@seca.com 15.2 Piles et piles rechargeables Ne jetez pas les piles et accus usagés avec les ordures ménagères, qu'ils contiennent ou non des substances toxiques.
  • Page 156: Garantie

    Aucun cas de garantie ne peut être invoqué si l'appareil est ouvert par des personnes qui ne sont pas explicite- ment autorisées par seca. Nous prions nos clients à l'étranger de bien vouloir contacter directement le revendeur de leur pays respectif pour les cas de garantie.
  • Page 157 Italiano Italiano INDICE 1. Con lettera e sigillo ..159 5. Prima di cominciare veramente… ....173 2. Descrizione dell'apparecchio . 160 5.1 Dotazione .
  • Page 158 7.1 Introduzione ... . . 191 Accensione della bilancia . . . 180 Gruppi radio seca ..191 Pesatura del paziente ..180 Canali .
  • Page 159: Con Lettera E Sigillo

    I prodotti seca sono conformi alle direttive e alle norme europee, nonché alle leggi nazionali. Con seca acquistate il futuro.
  • Page 160: Descrizione Dell'apparecchio

    635 avete acquistato un apparecchio di grande precisione e al contempo robusto. Da oltre 170 anni, seca mette al servizio della salute la propria esperienza e, in quanto leader di mercato in molti paesi del mondo, stabilisce sempre nuovi stan- dard per la pesatura e la misurazione grazie a prodotti innovativi.
  • Page 161: Qualifica Dell'utilizzatore

    Montaggio Gli apparecchi forniti parzialmente montati devono essere montati esclusivamente da persone con adeguata qualifica, ad es. rivenditori specializzati, tecnici ospedalieri o dal servizio di assistenza seca. Utilizzo L'apparecchio deve essere utilizzato esclusivamente da personale medico. 3. INFORMAZIONI SULLA SICUREZZA 3.1 Indicazioni per la sicurezza utilizzate nelle presenti...
  • Page 162: Indicazioni Basilari Per La Sicurezza

    • Non è ammesso apportare modifiche tecni- che all'apparecchio. L'apparecchio non con- tiene componenti che possono essere riparati dall'utilizzatore. Fare eseguire i lavori di manu- tenzione e di riparazione solo da partner di seca assistenza autorizzati. Il partner di assi- 162 •...
  • Page 163: Come Evitare Scosse Elettriche

    Italiano stenza più vicino è reperibile su www.seca.com oppure inviando una e-mail all’indirizzo service@seca.com. • Utilizzare esclusivamente accessori e ricambi originali seca. In caso contrario, seca non for- nisce alcuna garanzia. CAUTELA! Pericolo di lesioni per il paziente e malfunzionamento •...
  • Page 164: Come Evitare Infezioni

    Come evitare infezioni AVVERTENZA! Pericolo di infezioni • Sottoporre regolarmente l'apparecchio a trat- tamento igienico, come descritto nel corri- spondente paragrafo di questo documento. • Assicurarsi che il paziente non abbia alcuna malattia infettiva. • Assicurarsi che il paziente non abbia ferite aperte o alterazioni cutanee infettive che potrebbero entrare in contatto con l'apparec- chio.
  • Page 165: Utilizzo Dei Risultati Delle Misurazioni

    Italiano • Non fare cadere l'apparecchio. • Non esporre l’apparecchio a forti urti o vibrazioni. • Effettuare a intervalli regolari un controllo del funzionamento, come descritto nel corrispon- dente paragrafo di questo documento. Non utilizzare l'apparecchio se non funziona cor- rettamente o è...
  • Page 166: Utilizzo Del Materiale Di Imballaggio

    • Prima di salvare e riutilizzare i valori di misura rilevati con l'apparecchio (ad es. nel software o in un sistema informatico seca analytics ospedaliero), assicurarsi che i valori di misura siano plausibili. • Prima di trasmettere i valori di misura a un sof-...
  • Page 167: Utilizzo Di Batterie E Accumulatori

    In questo modo l'acido non può penetrare nell'apparecchio. – In caso di penetrazione di acido nell'apparecchio, sospenderne l'utilizzo. Fare controllare l'apparecchio da un partner di seca assistenza autorizzato ed incaricarlo eventualmente della riparazione. Informazioni sulla sicurezza • 167...
  • Page 168: Panoramica

    4. PANORAMICA 4.1 Elementi di comando Elemento di Funzione comando • Elemento di comando e di visualizzazione centrale Alloggiamento • Può essere posizionato su un piano di lavoro o display montato alla parete Accensione e spegnimento della bilancia Tasto freccia •...
  • Page 169: Simboli Sul Display

    Italiano Elemento di Funzione comando Tasto freccia • Durante la pesatura: - breve pressione: attivazione della funzione BMI - lunga pressione: apertura del menu • Nel menu: - selezione del sottomenu, selezione della voce di menu - riduzione del valore Tasto Invio •...
  • Page 170: Indicazioni Sull'apparecchio

    Simbolo Significato Campo di pesatura attualmente utilizzato vedere "Dati tecnici" a pagina 204 4.3 Indicazioni sull'apparecchio e sulla targhetta del modello Testo/Simbolo Significato Modell Numero modello Ser. No. Numero di serie Rispettare le istruzioni per l'uso Apparecchio elettromedicale, tipo B Apparecchio con isolamento di protezione, classe di protezione II Marchio di conformità...
  • Page 171: Indicazioni Sull'imballaggio

    • : rispettare la polarità della spina dell'apparecchio use compatible • : utilizzare l'apparecchio solo con corrente seca adapter only continua Non smaltire l'apparecchio nei rifiuti domestici 4.4 Indicazioni sull'imballaggio Proteggere dall'umidità Frecce indicanti il lato superiore del prodotto...
  • Page 172: Struttura Del Menu

    AClear ‹ off seca 360° wireless *Rete radio ‹ on Send ‹ off Gruppo (ID): Max. tre gruppi radio seca: 0, 1, 2 ‹ H Configurazione max. per gruppo ‹ M Print radio: ‹ HM *Funknetzwerk seca 360° Wireless: - 1 pesaneonati ‹...
  • Page 173: Prima Di Cominciare Veramente

    Italiano 5. PRIMA DI COMINCIARE VERAMENTE… 5.1 Dotazione Componente Piattaforma di pesatura Supporti per parete Adattatore angolare Viti, 3 x 35 mm Tasselli Ø 5 mm Batterie tipo AA/LR6, 1,5 V Alloggiamento del display con cavo di collegamento Istruzioni per l'uso, senza figura Prima di cominciare veramente…...
  • Page 174: Predisposizione Al Funzionamento Dell'alloggiamento Del Display (Su Tavolo)

    5.2 Predisposizione al funzionamento dell'alloggiamento del display (su tavolo) ATTENZIONE! Danni all'apparecchio Una volta montato, l'adattatore angolare non può più essere rimosso. – Accertarsi prima del montaggio che l'alloggiamento del display debba essere installato su un tavolo. Montaggio dell'adattatore angolare Click! =>...
  • Page 175: Predisposizione Al Funzionamento Dell'alloggiamento Del Display (A Parete)

    Italiano 1. Collocare la bilancia su una superficie solida e piana. 2. Connettere il cavo di collegamento alla alla scatola dell'elettronica della bilancia. ATTENZIONE! Misurazione errata a seguito di accoppiamento Se il cavo dell'alloggiamento del display tocca la piattaforma di pesatura, il peso rilevato potrebbe non essere corretto.
  • Page 176: Connessione Del Cavo Di Collegamento Alla Piattaforma

    Connessione del cavo di collegamento alla piattaforma INDICAZIONE: selezionare il luogo di installazione tenendo conto della lunghezza del cavo di collegamento in modo da poter installare l'alloggiamento del display presso il supporto per parete. 1. Collocare la bilancia su una superficie solida e piana.
  • Page 177: Montaggio Del Supporto Per

    Italiano Montaggio del supporto Scegliere come punto di montaggio una parete con per parete portata sufficiente. Per il montaggio su muratura mas- siccia, utilizzare i tasselli standard in dotazione. Per pareti con altre caratteristiche utilizzare i tasselli speciali corrispondenti. INDICAZIONE: calcolare l'altezza di montaggio considerando la lunghezza del cavo di collegamento.
  • Page 178: Predisposizione Alimentazione Elettrica

    La bilancia può surriscaldarsi, incen- diarsi, fondere o andare in cortocircuito. – Utilizzare esclusivamente alimentatori a spina originali seca da 9 V o con tensione di uscita regolata a 12 Volt. 1. Se necessario innestare nell'alimentatore la spina di rete necessaria per l'alimentazione elettrica.
  • Page 179: Installazione Della Bilancia

    Italiano 2. Innestare la spina dell'apparecchio dell'alimentatore nella presa della bilancia. 3. Inserire l'alimentatore in una presa di rete. 5.5 Installazione della bilancia Allineamento della ATTENZIONE! Misurazione errata a seguito di accoppiamento bilancia Se la bilancia viene posata con il rispettivo allog- giamento ad es.
  • Page 180: Utilizzo

    Accensione della bilancia Premere il tasto Start. Tutti gli elementi del display vengono mostrati brevemente, quindi sul display compare SECA. La bilancia è pronta all'uso quando sul display compare 0.0. Se la bilancia viene utilizzata con un alimentatore, compare il simbolo Pesatura del paziente 1.
  • Page 181: Taratura Del Peso Supplementare (Tare)

    Italiano Taratura del peso La funzione TARE fa sì che un peso supplementare (ad supplementare (TARE) es. un asciugamano o un supporto sul piano di pesa- tura) non influenzi il risultato di pesatura. ATTENZIONE! Misurazione errata a seguito di accoppiamento Se un peso supplementare, ad es.
  • Page 182: Determinazione E Valutazione Del Body Mass Index (Bmi)

    L'indicazione lampeggia finché non viene misurato un peso stabile. Quindi il valore del peso viene visualizzato in modo permanente. Il simbolo (funzione non tarabile) e il messaggio "HOLD" ven- gono visualizzati. 5. Per disattivare la funzione HOLD, premere brevemente il tasto freccia (hold/tare). tare Il simbolo e il messaggio "HOLD"...
  • Page 183 Italiano 6. È possibile accettare la statura visualizzata o impostare un'altra statura con i tasti freccia. tare 7. Confermare l'impostazione con il tasto Invio (send/print). Viene memorizzata la statura inserita ed è nuova- mente disponibile per il prossimo calcolo del BMI. INDICAZIONE: annotarsi la posizione di memoria per poter richiamare la statura per un nuovo calcolo del...
  • Page 184: Invio Dei Risultati Di Misura Al Destinatario Radio

    BMI. INDICAZIONE: requisito per questa funzione è che gli apparec- chi siano collegati insieme in un gruppo radio (vedere "Rete radio seca 360° wireless" a pagina 191). 1. Eseguire la misurazione della statura. 2. Premere brevemente il tasto Invio (send/print) dell'altimetro.
  • Page 185: Spegnimento Della Bilancia

    Italiano Scaricare completamente la bilancia. Il campo di pesatura 1 è di nuovo attivo. Spegnimento della bilancia Premere il tasto Start. INDICAZIONE: con il funzionamento a batterie, la bilancia si spegne automaticamente dopo 5 minuti se non viene caricata. 6.2 Altre funzioni (menu) Nel menu della bilancia sono disponibili altre funzioni.
  • Page 186: Navigazione Nel Menu

    Navigazione nel menu 1. Accendere la bilancia. 2. Tenere premuto il tasto freccia (bmi/menu) finché non si apre il menu. Viene visualizzata sul display l'ultima voce di menu selezionata (qui: Autohold "Ahold"). 3. Premere uno dei tasti freccia finché non compare sul display la voce di menu desiderata (qui: attenua- tare zione "Fil").
  • Page 187: Memorizzazione Permanente Del Peso Supplementare (Pt)

    Italiano Memorizzazione Con la funzione Pre-Tara è possibile memorizzare in permanente del peso modo permanente un peso supplementare e detrarlo automaticamente da un risultato di misura. È possibile supplementare (Pt) ad esempio memorizzare un peso forfetario per scarpe e vestiti e detrarlo quindi dal risultato di misura quando un paziente viene pesato completamente vestito.
  • Page 188: Attivazione Funzione Autohold (Ahold)

    9. Confermare la selezione. La funzione è disattivata. Il menu si chiude automaticamente. INDICAZIONE: se la bilancia viene spenta, la funzione viene disattivata. Il messaggio "PT" non viene più visualizzato sul display alla riaccensione. Attivazione funzione Se si attiva la funzione Autohold, il valore di misura con- Autohold (Ahold) tinua a essere visualizzato ad ogni pesata dopo aver scaricato la bilancia.
  • Page 189: Impostazione Dell'attenuazione (Fil)

    Italiano L'impostazione attuale viene visualizzata. 5. Selezionare l'impostazione desiderata: – On – Off 6. Confermare la selezione. Il menu si chiude automaticamente. 7. Se si desiderano attivare i segnali acustici anche per la seconda funzione, ripetere la procedura. Impostazione Con la funzione Attenuazione (Fil = Filtro) è possibile ridurre le anomalie durante la determinazione del peso dell'attenuazione (Fil) (ad es.
  • Page 190 INDICAZIONE: durante il ripristino delle impostazioni di fab- brica, il modulo radio viene spento. Le informa- zioni sui gruppi radio esistenti vengono conservate. I gruppi radio non devono essere riconfigurati. 1. Selezionare nel menu la voce "Reset". 2. Confermare la selezione. Il menu si chiude automaticamente.
  • Page 191: Rete Radio Seca 360° Wireless

    Per gruppo radio è possibile la seguente combinazione di apparecchi: • 1 pesaneonati • 1 pesapersone • 1 asta di misurazione della statura • 1 stampante radio seca • 1 PC con seca adattatore radio USB Rete radio seca 360° wireless • 191...
  • Page 192: Canali

    "MO 3"). I numeri hanno il seguente significato: • 1: Bilancia pesapersone • 2: Asta di misurazione della statura • 3: Stampanti radio • 4: PC con seca adattatore radio USB • 7: Pesaneonati • 5, 6 e 8-12: riservati per ampliamento del sistema 192 •...
  • Page 193: Utilizzo Della Bilancia In Un Gruppo Radio (Menu)

    Italiano 7.2 Utilizzo della bilancia in un gruppo radio (menu) Tutte le funzioni necessarie per utilizzare l'apparecchio in un gruppo radio seca si trovano nel sottomenu "rF". Informazioni sulla navigazione all'interno del menu si trovano a pagina 186. …… •...
  • Page 194 3. Selezionare nel menu la voce "rF". 4. Confermare la selezione. 5. Selezionare nel sottomenu "rF" la voce di menu "Lrn" (learn). 6. Confermare la selezione. Viene visualizzato il gruppo radio attualmente impostato (qui: gruppo radio 0 "Id 0"). Se il gruppo radio "0" esiste già, selezionare con i tasti freccia un altro ID (qui: gruppo radio 1 "Id 1").
  • Page 195: Attivazione Trasmissione Automatica (Asend)

    INDICAZIONE: questa funzione è accessibile solo se una stam- pante radio seca è stata integrata nel gruppo radio mediante la funzione "learn". Rete radio seca 360° wireless • 195...
  • Page 196: Impostazione Dell'ora (Time)

    INDICAZIONE: questa funzione è accessibile solo se una stam- pante radio seca è stata integrata nel gruppo radio mediante la funzione "learn". 1. Accendere l'apparecchio. 2. Selezionare nel sottomenu "rF" la voce di menu "tIME".
  • Page 197: Trattamento Igienico

    Italiano INDICAZIONE: Per ulteriori informazioni sull'utilizzo della stam- pante radio, consultare le rispettive istruzioni per l'uso. 8. TRATTAMENTO IGIENICO AVVERTENZA! Scossa elettrica L'apparecchio non è collegato alla corrente elettrica quando si preme il tasto ON/OFF e il display si spegne. L'utilizzo di liquidi sull'appa- recchio può...
  • Page 198: Disinfezione

    8.2 Disinfezione ATTENZIONE! Danni all'apparecchio I vetri protettivi delle scale e dei display sono in vetro acrilico. Gli schermi protettivi in vetro acri- lico sono soggetti a crepe e alla perdita di tra- sparenza se puliti con disinfettanti non adatti. –...
  • Page 199: Controllo Del Funzionamento

    "Cosa fare, se…" da pagina 200, non utilizzare l'apparecchio. – Fare riparare l'apparecchio dal servizio di assistenza seca o da un partner di assistenza autorizzato. – Rispettare le indicazioni di cui al paragrafo "Manutenzione/ripetizione della verifica metrologica"...
  • Page 200: Cosa Fare, Se

    10.COSA FARE, SE… Anomalia Causa/eliminazione … a bilancia carica non La bilancia non è collegata alla corrente. appare alcuna indica- - Verificare che la bilancia sia accesa. zione del peso? - Controllare che le batterie siano inserite. La bilancia è stata caricata prima dell'accensione. …...
  • Page 201 Anomalia Causa/eliminazione • L'apparecchio non è stato in grado di inviare alcun risultato di misura al destinatario radio (stampante radio seca o PC con adattatore radio USB seca). - Accertarsi che la bilancia sia integrata nella rete radio. - Accertarsi che il destinatario sia acceso.
  • Page 202: Manutenzione/Ripetizione Della Verifica Metrologica

    – Fare eseguire i lavori di manutenzione e di riparazione solo dal servizio di assistenza seca o da un partner di assistenza autorizzato. – Il partner di assistenza più vicino a voi lo trovate sul sito www.seca.com oppure potete inviare una e-mail all’indirizzo...
  • Page 203: Controllo Del Contenuto Del Contatore Di Taratura

    è necessario effettuare una ritaratura. Rivolgersi al partner di assistenza o al servizio tecnico assistenza clienti seca. Se è avvenuta la ripetizione della verifica metrologica, viene utilizzato un nuovo bollo metrico del contatore di taratura aggiornato per contrassegnare lo stato del contatore di taratura.
  • Page 204: Dati Tecnici

    12.DATI TECNICI 12.1 Dati tecnici generali Dati tecnici generali seca 635 Dimensioni bilancia • Profondità 600 mm • Larghezza 640 mm • Altezza 46 mm Dimensioni piattaforma di pesatura • Profondità 600 mm • Larghezza 600 mm • Altezza 46 mm...
  • Page 205: Dati Di Pesatura Tecnici

    Italiano Dati tecnici generali seca 635 EN 60601-1: • Apparecchio con isolamento di protezione, classe di protezione II • Apparecchio elettromedicale, tipo B Trasmissione radio • Banda di frequenza 2,433 GHz - 2,480 GHz • Potenza di trasmissione < 10 mW •...
  • Page 206: Accessori Opzionali

    264 Stampanti radio • Varianti specifiche per paese seca 360° wireless printer 465 • Varianti specifiche per paese seca 360° wireless printer advanced 466 Software PC • Pacchetti di licenza specifici per seca analytics 115 applicazione 456-00-00-009 seca 360° wireless USB adapter 456 14.PARTI DI RICAMBIO...
  • Page 207: Garanzia

    Conservare pertanto tutte le parti dell'imballo. Non sussiste alcuna garanzia se l'apparecchio viene aperto da persone non espressamente autorizzate da seca. I clienti all'estero devono rivolgersi, per i casi coperti da garanzia, direttamente al venditore del rispettivo paese. Garanzia • 207...
  • Page 209 Español Español ÍNDICE 1. Calidad garantizada ..211 5. Antes de empezar… ..225 2. Descripción del aparato ..212 5.1 Volumen de suministro .
  • Page 210 (RESET) ..241 del contador ... 255 7. La red inalámbrica seca 360° 12. Datos técnicos ... . 256 wireless .
  • Page 211: Calidad Garantizada

    También desde el sector oficial se reconoce la profe- sionalidad de seca. La TÜV Süd Product Service, la ofi- cina competente en productos sanitarios confirma con un certificado que seca cumple de forma consecuente los estrictos requisitos legales como fabricante de pro- ductos sanitarios.
  • Page 212: Descripción Del Aparato

    Desde hace más de 170 años, por su experiencia en el servicio de la salud y, siendo líder del mercado en numerosos países, con sus desarrollos innovadores para el pesaje y la medición, seca sienta cada vez nue- vas bases. 2.2 Uso previsto La báscula electrónica multifuncional...
  • Page 213: Cualificación Del Usuario

    El montaje de los aparatos que se entregan parcialmente montados solo puede encomendarse a personal suficientemente cualificado, p. ej., distribuido- res, técnicos de su hospital o al servicio técnico de seca. Manejo El aparato solo puede ser manejado por personal médico especializado.
  • Page 214: Indicaciones De Seguridad Básicas

    3.2 Indicaciones de seguridad básicas Manejo del aparato • Tenga en cuenta las indicaciones de estas instruc- ciones de uso. • Guarde cuidadosamente las instrucciones de uso. Las instrucciones de uso forman parte del aparato y deben estar disponibles en todo momento. ¡PELIGRO! Peligro de explosión No utilice el aparato en un ambiente enrique-...
  • Page 215: Prevención De Descargas Eléctricas

    Español seca autorizado. El equipo de servicio más cercano lo encontrará en www.seca.com o enviando un correo electrónico a service@seca.com. • Utilice únicamente accesorios y piezas de recambio seca originales. De lo contrario, seca no asume ningún tipo de garantía.
  • Page 216: Prevención De Infecciones

    ¡ADVERTENCIA! Peligro de resbalamiento • Cerciórese de que la plataforma de pesaje está seca antes de que suba el paciente. • Cerciórese de que el paciente tenga los pies secos antes de subir a la plataforma de pesaje.
  • Page 217: Manejo De Los Resultados De La Medición

    Español • Retire la fuente de alimentación de la toma de corriente si no utilizará el aparato durante un tiempo prolongado. Solo así está asegurado que el aparato esté sin corriente. • No deje que el aparato se caiga. • Evite impactos fuertes o vibraciones en el aparato.
  • Page 218: Manejo Del Material De Embalaje

    (por ejemplo en el software de PC o en un sistema de informa- seca analytics ción del hospital), asegúrese de que los valo- res de medición son plausibles. • Cuando se han transmitido valores de medi- ción al software de PC...
  • Page 219: Manejo Con Pilas Y Baterías

    Así se evita que entre ácido en el aparato. – Si hubiera penetrado ácido en el aparato, no vuelva a utilizarlo. Haga comprobar y, en caso necesario, reparar el aparato por un equipo de servicio seca autorizado. Información de seguridad • 219...
  • Page 220: Vista General

    4. VISTA GENERAL 4.1 Elementos de mando Elemento de Núm. Función mando • Elemento central de mando y visualización Caja del • Se puede colocar en una superficie de trabajo o indicador montar en una pared Encender y apagar la báscula Tecla de cursor •...
  • Page 221: Símbolos En El Visor

    Español Elemento de Núm. Función mando Tecla de cursor • Durante el pesaje: - Pulsación breve: activar la función BMI - Pulsación larga: acceder al menú • En el menú: - Seleccionar submenú, seleccionar punto del menú - Reducir el valor Tecla Enter •...
  • Page 222: Indicaciones En El Aparato Y

    Símbolo Significado Memoria utilizada actualmente Margen de pesaje utilizado actualmente véase “Datos técnicos” en la página 256 4.3 Indicaciones en el aparato y en la placa de identificación Texto/símbolo Significado Modell Número de modelo Ser. No. Número de serie Tener en cuenta las instrucciones de uso Aparato electromédico, tipo B Aparato con aislamiento de protección, clase de protección Marca de conformidad según la Directiva 2009/23/CE rela-...
  • Page 223: Indicación En El Embalaje

    V max. xxx mA • : observar la polaridad de la clavija del aparato use compatible seca adapter only • : utilizar el aparato con corriente continua No eliminar el aparato con la basura doméstica 4.4 Indicación en el embalaje Protegerlo de la humedad Las flechas señalan la parte superior del producto...
  • Page 224: Estructura Del Menú

    *Funknetzwerk seca 360° Wireless: Configuración máxima por grupo ‹ Man Raum (ID): inalámbrico: ‹ Year Max. drei seca Funkräume: 0, 1, 2 - 1 báscula para bebés ‹ Month - 1 báscula para personas Maximal-Konfiguration pro Funkraum: ‹ Day Time...
  • Page 225: Antes De Empezar

    Español 5. ANTES DE EMPEZAR… 5.1 Volumen de suministro N.º Componente Uds. Plataforma de pesaje Soporte de pared Adaptador angular Tornillos, 3 x 35 mm Taco Ø 5 mm Pilas tipo AA/LR6, 1,5 V Caja del indicador con cable de conexión Instrucciones de uso, sin figura Antes de empezar…...
  • Page 226: Preparar La Caja Del Indicador Para El Servicio (Indicador De Sobremesa)

    5.2 Preparar la caja del indicador para el servicio (indicador de sobremesa) ¡ATENCIÓN! Daños en el aparato El adaptador angular no se puede volver a soltar después del montaje. – Cerciórese antes del montaje de que la caja del indicador se coloque encima de una mesa.
  • Page 227: Preparar La Caja Del Indicador Para El Servicio

    Español 2. Conecte el cable de conexión a la caja de electrónica de la báscula. ¡ATENCIÓN! Medición errónea por transmisión parcial de fuerza Si el cable de la caja del indicador toca la plata- forma de la báscula puede ocurrir que se mida incorrectamente el peso del paciente.
  • Page 228: Conectar El Cable De Conexión A La Plataforma

    Conectar el cable de conexión a la plataforma NOTA: A la hora de elegir el lugar de instalación, tenga en cuenta la longitud del cable de conexión, de manera que pueda colocar la caja del indicador en el soporte de pared. 1.
  • Page 229: Montar Los Soportes De Pared

    Español Montar los soportes de Elija una pared suficientemente estable como lugar de pared montaje. Para el montaje en mampostería maciza, el volumen de suministro incluye tacos estándar. Para paredes de otras características recomendamos utilizar los tacos especiales correspondientes. NOTA: A la hora de elegir la altura de montaje, tenga en cuenta la longitud del cable de conexión.
  • Page 230: Establecer El Suministro De Corriente

    La báscula se puede sobrecalentar, incendiar, fundir o poner en cor- tocircuito. – Utilice exclusivamente equipos de alimentación originales de seca con 9 V o tensión de salida regulada de 12 V. 230 •...
  • Page 231: Colocar La Báscula

    Español 1. En caso necesario, enchufe en el equipo de alimen- tación la clavija necesaria para su suministro de corriente. 2. Enchufe la clavija del equipo de alimentación en el zócalo de conexión de la báscula. 3. Enchufe el equipo de alimentación a una toma de corriente de la red.
  • Page 232: Manejo

    Encender la báscula Pulse la tecla Start. Todos los elementos del visor se muestran brevemente, luego aparece SECA en el visor. La báscula está operativa cuando aparece 0.0 en el visor. Si la báscula está funcionando con un equipo de alimentación, en el visor aparece el símbolo...
  • Page 233: Tarar Peso Adicional (Tare)

    Español Tarar peso adicional Con la función TARE puede evitar que un peso adicio- (TARE) nal (p. ej. una toalla o una capa sobre la superficie de pesaje) influya en el resultado del pesaje. ¡ATENCIÓN! Medición errónea por transmisión parcial de fuerza Si un peso adicional, p.
  • Page 234: Calcular Y Valorar El Índice De Masa Corporal (Bmi)

    La indicación parpadea hasta que se mide un peso estable. Después se indica el valor de peso de forma continuada. Se muestran el símbolo (función no calibrable) y la indicación “HOLD”. 5. Para desactivar la función HOLD, pulse brevemente la tecla de cursor (hold/tare). tare Desaparecen el símbolo y la indicación “HOLD”.
  • Page 235 Español 6. Puede adoptar la estatura indicada o ajustar otra estatura con las teclas de cursor. tare 7. Confirme su ajuste con la tecla Enter (send/print). La estatura introducida se guarda y está disponible de nuevo para el siguiente cálculo de BMI. NOTA: Anótese la memoria, a fin de poder volver a acceder a la estatura para un nuevo cálculo de...
  • Page 236: Enviar Los Resultados De La Medición A Receptores Inalámbricos

    NOTA: Un requisito para esta función es que los apara- tos estén registrados juntos en un grupo ina- lámbrico (véase “La red inalámbrica seca 360° wireless” en la página 243). 1. Realice la medición de la longitud. 2. Pulse brevemente la tecla Enter (send/print) del metro de longitudes.
  • Page 237: Desconectar La Báscula

    Español Para volver al margen de pesaje 1 proceda de la siguiente manera: Retire todo el peso de la báscula. El margen de pesaje 1 vuelve a estar activo. Desconectar la báscula Pulse la tecla Start. NOTA: Cuando funciona con pilas, la báscula se des- conecta automáticamente al cabo de 5 minutos si no se coloca ningún peso sobre ella.
  • Page 238: Navegar Por El Menú

    Navegar por el menú 1. Encienda la báscula. 2. Mantenga pulsada la tecla de cursor (bmi/menu) hasta acceder al menú. El punto del menú seleccionado por última vez aparece en el visor (en este caso: Autohold “Ahold”). 3. Pulse una de las teclas de cursor tantas veces co- mo sea necesario hasta que en el visor aparezca el tare punto del menú...
  • Page 239: Almacenar De Forma Continuada El Peso Adicional (Pt)

    Español Almacenar de forma Con la función Pre-Tara puede almacenar de forma continuada el peso continuada un peso adicional y restarlo automática- mente del resultado de una medición. Por ejemplo, adicional (Pt) puede almacenar un peso global para calzado y ropa, y siempre restarlo del resultado de la medición cuando un paciente se pese completamente vestido.
  • Page 240: Activar La Función Autohold (Ahold)

    NOTA: Si apaga la máquina, la función se desconecta. En el visor ya no aparece el aviso “Pt” al volver a encender la máquina. Activar la función Si activa la función Autohold, en cada pesaje el resul- tado de la medición se sigue indicando después de Autohold (Ahold) retirar el peso de la báscula.
  • Page 241: Ajustar Filtrado (Fil)

    Español 7. Si también desea activar los tonos de señal para la segunda función, repita el proceso. Ajustar filtrado (Fil) Con el filtrado (Fil = Filter) puede reducir las interferen- cias a la hora de calcular el peso (por ejemplo las debi- das a movimientos del paciente).
  • Page 242 1. Seleccione en el menú el punto “Reset”. 2. Confirme la selección. El menú desaparece del visor automáticamente. 3. Apague la báscula. La configuración de fábrica se restablece y estará disponible cuando la báscula se vuelva a encender. 242 •...
  • Page 243: La Red Inalámbrica Seca 360° Wireless

    • 1 báscula para bebés • 1 báscula para personas • 1 metro para longitudes • 1 seca Impresora inalámbrica • 1 PC con adaptador USB inalámbrico seca La red inalámbrica seca 360° wireless • 243...
  • Page 244: Canales

    “MO 3”). Los números tienen el siguiente significado: • 1: Báscula para personas • 2: Metro de longitudes • 3: Impresora inalámbrica • 4: PC con adaptador USB inalámbrico seca • 7: Báscula para bebés • 5, 6 y 8-12: Reservados para una ampliación del sistema...
  • Page 245: Utilizar La Báscula Dentro De Un Grupo Inalámbrico (Menú)

    7.2 Utilizar la báscula dentro de un grupo inalámbrico (menú) Todas las funciones que necesita para utilizar el apa- rato dentro de un grupo inalámbrico seca se encuen- tran en el submenú “rF”. Puede encontrar información de cómo navegar por el menú en página 238.
  • Page 246: Establecer El Grupo Inalámbrico (Lrn)

    Establecer el grupo Para establecer un grupo inalámbrico, proceda de la inalámbrico (Lrn) siguiente manera: 1. Encienda el aparato. 2. Acceda al menú. 3. Seleccione en el menú el punto “rF”. 4. Confirme la selección. 5. Seleccione en el submenú “rF” el punto del menú “Lrn”...
  • Page 247: Activar La Transmisión Automática (Asend)

    "Off" (véase “Seleccionar opción de impresión (APrt)” en la página 248). 1. Encienda el aparato. 2. Seleccione en el submenú “rF” el punto del menú “ASEnd” y confirme la selección. La red inalámbrica seca 360° wireless • 247...
  • Page 248: Seleccionar Opción De Impresión (Aprt)

    NOTA: Esta función solo es accesible si a través de la función “learn” se ha integrado una impresora inalámbrica seca en el grupo inalámbrico. 1. Encienda el aparato. 2. Seleccione en el submenú “rF” el punto del menú “APrt” y confirme la selección.
  • Page 249: Preparación Higiénica

    Español 4. Ajuste el número de año correcto. 5. Confirme la selección. 6. Repita los pasos 3. y 5. de acuerdo al “Mes” (Mon), “Día” (dAy), “Hora” (hour) y “Minuto” (Min). 7. Confirme cada una de sus selecciones. Después de confirmar el ajuste de los minutos el menú...
  • Page 250: Limpieza

    8.1 Limpieza Si es necesario, limpie la superficie del aparato con un paño suave, humedecido en su caso con una lejía jabonosa suave. 8.2 Desinfección ¡ATENCIÓN! Daños en el aparato Los cristales de las escalas y los visores son de vidrio acrílico.
  • Page 251: Control Del Funcionamiento

    “¿Qué hacer cuando…” a partir de la página 252, deberá abstenerse de utilizar el aparato. – Haga reparar el aparato por el servicio técnico de seca o un servicio postventa autorizado. – Tenga en cuenta la sección “Mantenimiento/recalibrado” en la página 254.
  • Page 252: Qué Hacer Cuando

    10.¿QUÉ HACER CUANDO… Avería Causa/solución … al colocar un peso no La báscula no tiene alimentación eléctrica. aparece ninguna indica- - Comprobar que la báscula esté conectada. ción de peso? - Comprobar que se han puesto las pilas. El peso se colocó antes de encender la báscula. …...
  • Page 253 AF y los emisores y recep- dos tonos de señal? tores dentro de la red inalámbrica seca. La potencia efectiva de transmisión de los apa- ratos AF puede requerir distancias mínimas de más de 1 metro.
  • Page 254: Mantenimiento/Recalibrado

    Mediciones erróneas en caso de mantenimiento inadecuado – Los trabajos de mantenimiento y las reparaciones deben ser realizados únicamente por el Servicio técnico seca o un equipo de servicio autorizado. – El equipo de servicio más cercano lo encontrará en www.seca.com o enviando un correo electrónico a service@seca.com.
  • Page 255: Comprobar El Contenido Del Contador

    Si el sello y el contador no coinciden, se debe reali- zar un recalibrado. Diríjase a su oficina de servicio posventa o al servicio al cliente de seca. Si se ha reali- zado el recalibrado se utiliza un nuevo sello del conta- dor, actualizado, para identificar el contador.
  • Page 256: Datos Técnicos

    12.DATOS TÉCNICOS 12.1 Datos técnicos generales Datos técnicos generales seca 635 Dimensiones báscula • Fondo 600 mm • Ancho 640 mm • Alto 46 mm Dimensiones plataforma de pesaje • Fondo 600 mm • Ancho 600 mm • Alto 46 mm Peso propio aprox.
  • Page 257: Datos Técnicos De Pesaje

    Impresora inalámbrica • Variantes específicas de cada país seca 360° wireless printer 465 • Variantes específicas de cada país seca 360° wireless printer advanced 466 Software del PC • Paquetes de licencia específicos seca analytics 115 para cada aplicación 456-00-00-009 seca 360°...
  • Page 258: Piezas De Recambio

    Tenga en cuenta las disposiciones nacionales de su país. Para más información, diríjase a nuestro servicio: service@seca.com 15.2 Pilas y baterías No deposite las pilas ni las baterías usadas en la basura doméstica, independientemente de si conti- enen o no materiales nocivos.
  • Page 259: Garantía

    La garantía no tiene validez cuando el aparato haya sido abierto por personas que no estén autorizadas para ello expresamente por seca. A los clientes residentes en el extranjero les rogamos se dirijan directamente al vendedor de su país corres- pondiente para casos relacionados con la garantía.
  • Page 261 Português Português ÍNDICE 1. Certificado ....263 5. Antes de iniciar a utilização deve..... . . 277 2.
  • Page 262 ....309 rádio seca ....295 Canais ....296 13.
  • Page 263: Certificado

    Português 1. CERTIFICADO Com os produtos seca, está a comprar não só uma téc- nica amadurecida há mais de um século como também uma qualidade certificada e regulamentada e compro- vada por institutos. Os produtos seca estão em confor- midade com as diretivas europeias, normas e legisla- ções nacionais.
  • Page 264: Descrição Do Aparelho

    Há mais de 170 anos que a seca coloca a sua experi- ência ao serviço da saúde, afirmando-se como líder de mercado em muitos países do mundo, graças às suas inovações na área da metrologia.
  • Page 265: Qualificação Do Utilizador

    Montagem Os aparelhos fornecidos parcialmente montados só podem ser montados por pessoas com as devidas qualificações, p. ex. representante, técnico do hospital ou da assistência seca. Utilização O aparelho só pode ser operado por pessoal médico. 3. INFORMAÇÕES DE SEGURANÇA 3.1 Instruções de segurança neste manual de instruções...
  • Page 266: Instruções Básicas De Segurança

    • Não são permitidas alterações técnicas no aparelho. O aparelho não contém partes para manutenção pelo utilizador. Os trabalhos de manutenção e reparação devem ser executa- dos apenas por um seca serviço de pós- 266 •...
  • Page 267: Eliminação Do Risco De Choque Elétrico

    Em alternativa, envie um e-mail para ser- vice@seca.com. • Utilize exclusivamente acessórios e peças sobressalentes originais seca. Caso contrário, a seca não garante o direito à garantia. CUIDADO! Perigo para o paciente, anomalia • Na utilização de aparelhos médicos elétricos, como p.
  • Page 268: Eliminação Do Risco De Infeção

    AVISO! Perigo de escorregamento • Certifique-se de que a plataforma de pesa- gem está seca antes da subida do paciente. • Certifique-se de que o paciente tem os pés secos antes de subir para a plataforma de pesagem. • Certifique-se de que o paciente sobe para a plataforma de pesagem de forma lenta e segura.
  • Page 269: Eliminação Do Risco De Danos No Aparelho

    Português Eliminação do risco de ATENÇÃO! danos no aparelho Danos do aparelho • Certifique-se de que nunca entram líquidos para dentro do aparelho. Estes podem preju- dicar a parte eletrónica. • Desligue o aparelho antes de retirar o alimen- tador da tomada. •...
  • Page 270: Uso Dos Resultados De Medição

    • Antes de guardar e de reutilizar os valores medidos com este aparelho (p. ex. no sof- tware para PC ou num sis- seca analytics tema de informação hospitalar), certifique-se da sua plausibilidade. • Se os valores de medição tiverem sido trans-...
  • Page 271: Manuseamento De Pilhas E Acumuladores

    Deste modo, não sairá ácido para o aparelho. – Não volte a usar o aparelho se tiver entrado ácido nele. Leve o aparelho a um serviço de pós-venda autorizado seca para ser verificado e, se necessário, reparado. Informações de segurança • 271...
  • Page 272: Vista Geral

    4. VISTA GERAL 4.1 Elementos de comando Elemento de N.º Função comando • Elemento de comando e de indicação central Caixa do • Pode ser colocado sobre uma superfície de trabalho mostrador ou montado numa parede Ligar e desligar a balança Tecla de seta •...
  • Page 273: Símbolos No Display

    Português Elemento de N.º Função comando Tecla de seta • Durante a pesagem: - Breve pressão: ativar a função BMI (IMC) - Longa pressão: chamar o menu • No menu: - Selecionar o submenu, selecionar o item de menu - Reduzir o valor Tecla Enter •...
  • Page 274: Símbolos No Aparelho E Na Placa De Características

    Símbolo Significado Gama de pesagem atualmente utilizada ver "Dados técnicos" na página 308 4.3 Símbolos no aparelho e na placa de características Texto/Símbolo Significado Modell N.º do modelo Ser. No. Número de série Respeitar o manual de instruções de utilização Aparelho eletromedicinal, tipo B Aparelho isolado, classe de proteção II Marca de conformidade segundo a Diretiva 2009/23/CE...
  • Page 275: Símbolos Na Embalagem

    • : ter atenção à polaridade correta da ficha do use compatible aparelho seca adapter only • : Operar o aparelho com corrente contínua Não colocar o aparelho no lixo doméstico 4.4 Símbolos na embalagem Proteger da humidade As setas apontam para a parte superior do produto Transportar e armazenar na posição vertical...
  • Page 276: Estrutura Do Menu

    ‹ Man Raum (ID): - 1 balança para bebés ‹ Year Max. drei seca Funkräume: 0, 1, 2 - 1 balança para adultos ‹ Month - 1 escala de medição da altura Maximal-Konfiguration pro Funkraum: Time ‹...
  • Page 277: Antes De Iniciar A Utilização Deve

    Português 5. ANTES DE INICIAR A UTILIZAÇÃO DEVE... 5.1 Escopo de fornecimento N.º Componente Unid. Plataforma de pesagem Suporte de parede Adaptador angular Parafusos, 3 x 35 mm Buchas Ø 5 mm Pilhas tipo AA/LR6, 1,5 V Caixa do mostrador com cabo de ligação Manual de instruções de utilização, não ilustrado Antes de iniciar a utilização deve...
  • Page 278: Preparar A Caixa Do Mostrador Para O Funcionamento (Mostrador De Mesa)

    5.2 Preparar a caixa do mostrador para o funcionamento (mostrador de mesa) ATENÇÃO! Danos do aparelho Após a montagem, o adaptador angular não pode voltar a ser retirado. – Certifique-se, antes da montagem, de que a caixa do mostrador deve ser colocada sobre uma mesa.
  • Page 279: Preparar A Caixa Do Mostrador Para O Funcionamento (Mostrador De Parede)

    Português 1. Coloque a balança sobre uma superfície segura e plana. 2. Conecte o cabo de ligação à caixa eletrónica da balança. ATENÇÃO! Medição errada devido a derivação de força Se o cabo da caixa do mostrador tocar na pla- taforma de pesagem, não é...
  • Page 280: Conectar O Cabo De Ligação À Plataforma

    Conectar o cabo de ligação à plataforma NOTA: Ao escolher o local de instalação tenha em atenção o comprimento do cabo de ligação, para que a caixa do mostrador possa ser colo- cada no suporte de parede. 1. Coloque a balança sobre uma superfície segura e plana.
  • Page 281: Montar Os Suportes De Parede

    Português Montar os suportes de Escolha uma parede com capacidade de carga ade- parede quada para a montagem. Para a montagem em alve- naria maciça, são fornecidas buchas standard. Para paredes de outro tipo de constituição, recomendamos a utilização de buchas especiais adequadas. NOTA: Ao escolher a altura de montagem tenha em atenção o comprimento do cabo de ligação.
  • Page 282: Providenciar A Alimentação De Energia

    A balança pode sobreaquecer, incendiar- se, derreter ou fazer curto-circuito. – Utilize exclusivamente alimentadores originais seca de 9 V ou uma tensão de saída regulada de 12 V. 1. Se necessário, insira a ficha necessária para a sua alimentação de energia no alimentador.
  • Page 283: Montar A Balança

    Português 2. Insira a ficha do alimentador na tomada de ligação da balança. 3. Ligue o alimentador a uma tomada de rede. 5.5 Montar a balança Alinhamento da ATENÇÃO! Medição errada devido a derivação de força balança Se a caixa da balança estiver colocada, p. ex. sobre uma toalha, o peso não será...
  • Page 284: Utilização

    Ligar a balança Prima a tecla Start (Iniciar). Todos os elementos do display são indicados bre- vemente, a seguir aparece SECA no display. A balança está operacional quando aparecer a indi- cação 0.0 no display. Se a balança for operada com um alimentador, surge o símbolo...
  • Page 285: Tarar O Peso Adicional (Tare)

    Português Tarar o peso adicional A função TARE permite evitar que um peso adicional (TARE) (por exemplo uma toalha ou um apoio na superfície de pesagem) influencie o resultado da pesagem. ATENÇÃO! Medição errada devido a derivação de força Quando um peso adicional, p. ex. uma toalha grande, toca na superfície em que está...
  • Page 286: Determinar E Avaliar O Índice De Massa Corporal (Imc)

    A indicação permanece intermitente até que seja aferido um peso estável. A seguir, o valor do peso é exibido de forma permanente. O símbolo (fun- ção não calibrável) e a mensagem "HOLD" surgem no mostrador. 5. Para desativar a função HOLD, prima brevemente a tecla de seta (hold/tare).
  • Page 287 Português 6. Pode aceitar a estatura indicada ou selecionar uma outra estatura com as teclas de seta. tare 7. Confirme a sua seleção com a tecla Enter (send/print). A estatura introduzida é memorizada e fica nova- mente disponível para o próximo cálculo do IMC. NOTA: Anote o local de memória para poder voltar a chamar a estatura para um novo cálculo do...
  • Page 288: Enviar Resultados De Medição Para O Recetor De Rádio

    É condição prévia para esta função que os apa- relhos estejam registados em conjunto num grupo de comunicação via rádio (ver "A rede sem fios seca 360° wireless" na página 295). 1. Efetue a medição da altura. 2. Prima brevemente a tecla Enter (send/print) da es- cala de medição da altura.
  • Page 289: Desligar A Balança

    Português Para comutar novamente para a gama de pesagem 1, proceda do seguinte modo: Esvazie completamente a balança. A gama de pesagem 1 está novamente ativa. Desligar a balança Prima a tecla Start (Iniciar). NOTA: No funcionamento a pilhas, a balança desliga- se automaticamente após 5 minutos depois de estar vazia.
  • Page 290: Navegar No Menu

    Navegar no menu 1. Ligue a balança. 2. Mantenha a tecla de seta (bmi/menu) premida, até que apareça o menu. O item de menu selecionado por último aparece no display (aqui: autohold "Ahold"). 3. Prima uma das teclas de seta as vezes necessárias até...
  • Page 291: Peso Adicional (Pt)

    Português Guardar A função de pré-taragem permite guardar um peso permanentemente o adicional de forma permanente e subtraí-lo automati- camente de um resultado de medição. Pode guardar peso adicional (Pt) por exemplo um peso aproximado para os sapatos e roupas e subtraí-lo do resultado de medição, sempre que um paciente é...
  • Page 292: Ativar A Função Autohold (Ahold)

    NOTA: Se desligar a balança, a função é desligada. Ao ligar novamente, a mensagem "Pt" já não apa- rece no display. Ativar a função Quando ativa a função Autohold, o resultado da medi- ção continua a ser indicado em cada processo de Autohold (Ahold) pesagem, depois de a balança ser esvaziada.
  • Page 293: Ajustar O Amortecimento (Fil)

    Português 6. Confirme a sua seleção. A saída do menu é feita automaticamente. 7. Se desejar ativar o sinal acústico também para a segunda função, repita o processo. Ajustar o Com o amortecimento (Fil = filtro) pode reduzir as falhas na determinação do peso (p. ex. devido aos amortecimento (Fil) movimentos do paciente).
  • Page 294 NOTA: No restabelecimento das definições de fábrica o módulo de rádio é desligado. As informações relativas aos grupos de comunicação via rádio mantêm-se. Os grupos de comunicação via rádio não têm de ser novamente configurados. 1. No menu, selecione o item "Reset". 2.
  • Page 295: A Rede Sem Fios Seca 360° Wireless

    • 1 balança para bebés • 1 balança para adultos • 1 escala de medição da altura • 1 impressora sem fios seca • 1 PC com módulo de rádio USB seca A rede sem fios seca 360° wireless • 295...
  • Page 296: Canais

    • 1: Balança para adultos • 2: Escala de medição da altura • 3: Impressora sem fios • 4: PC com módulo de rádio USB seca • 7: Balança para bebés • 5, 6 e 8-12: Reservado para ampliação do sistema...
  • Page 297: Operar A Balança Num Grupo De Comunicação Via Rádio (Menu)

    A saída do menu é feita automaticamente. Configurar um grupo de Para configurar um grupo de comunicação via rádio, proceda do seguinte modo: comunicação via rádio (Lrn) 1. Ligue o aparelho. 2. Chame o menu. A rede sem fios seca 360° wireless • 297...
  • Page 298 3. No menu, selecione o item "rF". 4. Confirme a seleção. 5. Selecione no submenu "rF" o item "Lrn" (learn). 6. Confirme a seleção. É indicado o grupo de comunicação via rádio defi- nido atualmente (aqui: grupo de comunicação via rádio 0 "Id 0").
  • Page 299: Ativar A Transmissão Automática (Asend)

    1. Ligue o aparelho. 2. Selecione no submenu "rF" o item "ASEnd" e confirme a seleção. 3. Selecione a definição "On" e confirme a seleção. A saída do menu é feita automaticamente. A rede sem fios seca 360° wireless • 299...
  • Page 300: Selecionar A Opção De Impressão (Aprt)

    NOTA: Esta função só está disponível se tiver sido inte- grada uma impressora sem fios seca através da função "learn" no grupo de comunicação via rádio. 1. Ligue o aparelho.
  • Page 301: Tratamento Higiénico

    Português 6. Repita os passos 3. e 5. respetivamente para "Mês" (Mon), "Dia" (dAy), "Hora" (hour) e "Minuto" (Min). 7. Confirme a sua seleção. Após a confirmação da definição dos minutos a saída do menu é feita automaticamente. As definições são transmitidas automaticamente à impressora sem fios.
  • Page 302: Limpeza

    8.1 Limpeza Em caso de necessidade, limpe as superfícies do aparelho com um pano macio humedecido com água de sabão suave. 8.2 Desinfeção ATENÇÃO! Danos do aparelho Os vidros de visualização nas escalas e dis- plays são compostos por vidro acrílico. Os vidros acrílicos podem quebrar-se ou ficar tur- vos, caso sejam utilizados desinfetantes inade- quados.
  • Page 303: Controlo Do Funcionamento

    "O que fazer quando...?" a partir da página 304, não deve utilizar o aparelho. – Mande reparar o aparelho pelo serviço técnico da seca ou por um serviço de pós- venda autorizado. – Observe a secção "Manutenção/ Recalibração" na página 306.
  • Page 304: O Que Fazer Quando

    10.O QUE FAZER QUANDO...? Falha Causa/Eliminação ... com carga não apa- A balança não tem alimentação de energia. rece nenhuma indica- - Verificar se a balança está ligada. ção do peso? - Verificar se as pilhas estão colocadas. Foi colocada carga na balança antes de esta ser …...
  • Page 305 Falha Causa/Eliminação • O aparelho não conseguiu enviar resultados de medição aos recetores de rádio (impressora sem fios seca ou PC com módulo de rádio USB seca). - Certifique-se de que a balança está integrada na rede sem fios. - Certifique-se de que o recetor está ligado.
  • Page 306: Manutenção/ Recalibração

    Erros de medição devido a uma manutenção incorreta – Os trabalhos de manutenção e reparação devem ser executados apenas pelo serviço técnico da seca ou por um serviço de pós- venda autorizado. – Em www.seca.com encontra o serviço de pós-venda mais próximo de si. Em alternativa, envie um e-mail para service@seca.com.
  • Page 307: Verificar O Índice Do Contador De Calibração

    11.2 Verificar o índice do contador de calibração Esta balança seca está calibrada. As calibragens só podem ser efetuadas por postos autorizados. Para o assegurar, a balança está equipada com um contador de calibração que fixa todas as alterações dos dados...
  • Page 308: Dados Técnicos

    12.DADOS TÉCNICOS 12.1 Dados técnicos gerais Dados técnicos gerais seca 635 Dimensões da balança • Profundidade 600 mm • Largura 640 mm • Altura 46 mm Dimensões da plataforma de pesagem • Profundidade 600 mm • Largura 600 mm • Altura 46 mm Peso próprio...
  • Page 309: Dados Da Técnica De Pesagem

    Impressora sem fios • variantes específicas do país seca 360° wireless printer 465 • variantes específicas do país seca 360° wireless printer advanced 466 Software para PC • pacotes de licença específicos da seca analytics 115 utilização 456-00-00-009 seca 360°...
  • Page 310: Peças Sobressalentes

    Respeite as respetivas disposições nacio- nais. Para mais informações, contacte os nossos servi- ços em: service@seca.com 15.2 Pilhas e acumuladores Não deite as pilhas e os acumuladores usados no lixo doméstico, independentemente de estes conterem substâncias nocivas ou não.
  • Page 311: Garantia

    O direito à garantia é anulado se o aparelho tiver sido aberto por pessoas sem autorização expressa da seca. Para os clientes que se encontram no estrangeiro, pedimos que no caso de reivindicação do direito à...
  • Page 313 Polski Polski SPIS TREŚCI 1. Gwarancja jakości ..315 5. Przed rozpoczęciem użytkowania....329 2. Opis urządzenia ... . . 316 5.1 Dostarczone elementy .
  • Page 314 (RESET) ..346 legalizacji ....359 7. Sieć bezprzewodowa seca 360° 12. Dane techniczne ... 360 wireless .
  • Page 315: Gwarancja Jakości

    Nabywając produkty firmy seca, nabywają Państwo nie tylko dojrzałą, dopracowywaną przez ponad 100 lat technikę, ale także potwierdzoną urzędowo, prawnie i przez niezależne instytuty jakość. Produkty marki seca spełniają dyrektywy i normy europejskie oraz przepisy krajowe. Kupując seca, kupują Państwo przyszłość.
  • Page 316: Opis Urządzenia

    635 inwestycja w bardzo precyzyjne, a jednocześnie wytrzymałe urządzenie. Od ponad 170 lat firma seca wykorzystuje swoje doświadczenie w służbie zdrowia. Jako lider rynku w wielu krajach świata, seca dysponuje licznymi innowa- cyjnymi rozwiązaniami w zakresie ważenia i mierzenia, ciągle definiując nowe standardy jakościowe.
  • Page 317: Kwalifikacje Użytkownika

    2.4 Kwalifikacje użytkownika Montaż Urządzenia dostarczane w stanie częściowo zmonto- wanym muszą być montowane przez dostatecznie wykwalifikowany personel, np. sprzedawcę, technika szpitalnego czy serwis seca. Obsługa Urządzenie może obsługiwać wyłącznie personel medyczny. 3. BEZPIECZEŃSTWO 3.1 Zasady bezpieczeństwa w instrukcji obsługi NIEBEZPIECZEŃSTWO!
  • Page 318: Podstawowe Zasady Bezpieczeństwa

    • Techniczne modyfikacje urządzenia są zabro- nione. Urządzenie nie zawiera żadnych części wymagających konserwacji przez użytkow- nika. Konserwacje i naprawy zlecać wyłącznie autoryzowanemu serwisowi seca. Adres 318 •...
  • Page 319: Unikanie Porażenia Prądem Elektrycznym

    • Stosować wyłącznie oryginalne akcesoria i części zamienne firmy seca. W innym przy- padku firma seca nie udziela gwarancji. ZACHOWAJ OSTROŻNOŚĆ! Zagrożenie pacjenta, nieprawidłowe działanie • Stosując elektryczne urządzenia medyczne, np.
  • Page 320: Unikanie Infekcji

    Unikanie infekcji OSTRZEŻENIE! Niebezpieczeństwo infekcji • Urządzenie należy preparować higienicznie w regularnych odstępach czasu zgodnie z opisem zawartym w odpowiednim rozdziale tego dokumentu. • Upewnić się, że pacjent nie choruje na cho- roby zakaźne! • Upewnić się, że pacjent nie ma otwartych ran ani zakaźnych zmian skórnych, które mogą...
  • Page 321: Obchodzenie Się Z Wynikami Pomiaru

    Polski • Jeżeli urządzenie nie będzie używane przez dłuższy czas, odłączyć zasilacz od gniazda sieciowego. Tylko w tym stanie urządzenie będzie pewnie odłączone od źródła prądu. • Nie upuszczać urządzenia. • Nie narażać urządzenia na silne uderzenia i wibracje. • Działanie urządzenia należy kontrolować w regularnych odstępach czasu zgodnie z opisem zawartym w odpowiednim rozdziale tego dokumentu.
  • Page 322: Postępowanie Z Materiałami Opakowaniowymi

    • Przed zapisaniem i dalszym wykorzystaniem wyników pomiaru uzyskanych przy użyciu tego urządzenia (np. w aplikacji komputerowej lub w szpitalnym systemie seca analytics informatycznym) należy się upewnić, że war- tości pomiarowe są wiarygodne. • Jeżeli wartości pomiarowe zostały przekazane do aplikacji komputerowej...
  • Page 323: Postępowanie Z Bateriami I Akumulatorami

    – Jeżeli urządzenie nie będzie używane przez dłuższy czas, należy wyjąć baterie/akumulatory. W ten sposób nie dojdzie do wycieku elektrolitu wewnątrz urządzenia. – Jeżeli do urządzenia dostał się elektrolit, zaprzestać używania urządzenia. Zlecić sprawdzenie i ewentualną naprawę urządzenia autoryzowanemu partnerowi serwisowemu seca. Bezpieczeństwo • 323...
  • Page 324: Przegląd

    4. PRZEGLĄD 4.1 Elementy obsługowe Element Funkcja obsługowy • Centralny element obsługowo-wskaźnikowy Wyświetlacz • Można go ustawiać na blacie roboczym albo montować na ścianie Włączanie i wyłączanie wagi Przycisk kierunkowy • W trakcie ważenia: - Krótkie naciśnięcie: włączanie funkcji Hold - Długie naciśnięcie: włączanie funkcji Tara tare •...
  • Page 325: Symbole Na Wyświetlaczu

    Polski Element Funkcja obsługowy Przycisk kierunkowy • W trakcie ważenia: - Krótkie naciśnięcie: włączanie funkcji BMI - Długie naciśnięcie: otwieranie menu • W menu: - wybór podmenu, wybór punktu menu - zmniejszanie wartości Przycisk Enter • W trakcie ważenia (gdy jest skonfigurowana sieć bezprzewodowa): - Krótkie naciśnięcie: wysyłanie wyniku pomiaru do aktywnych urządzeń...
  • Page 326: Oznaczenia Na Urządzeniu I Na Tabliczce Znamionowej

    Symbol Znaczenie Aktualnie używany zakres ważenia patrz „Dane techniczne” na stronie 360 4.3 Oznaczenia na urządzeniu i na tabliczce znamionowej Tekst/Symbol Znaczenie Modell Numer modelu Ser. No. Numer seryjny Przestrzegać instrukcji obsługi Urządzenie elektromedyczne, typ B Urządzenie z izolacją ochronną, klasa ochrony II Znak zgodności według dyrektywy 2009/23/WE w sprawie wag nieautomatycznych Wartość...
  • Page 327: Oznaczenia Na Opakowaniu

    V • : zwracać uwagę na biegunowość wtyczki urzą- max. xxx mA dzenia use compatible seca adapter only • : urządzenia może być zasilane tylko prądem sta- łym Nie wyrzucać urządzenia do zwykłych odpadów domowych 4.4 Oznaczenia na opakowaniu Chronić...
  • Page 328: Struktura Menu

    *Funknetzwerk seca 360° Wireless: jednej grupy urządzeń ‹ Man bezprzewodowych: Raum (ID): - 1 waga dla niemowląt ‹ Year Max. drei seca Funkräume: 0, 1, 2 ‹ Month - 1 waga osobowa Maximal-Konfiguration pro Funkraum: Time ‹ Day - 1 wzrostomierz - 1 Babywaage ‹...
  • Page 329: Przed Rozpoczęciem Użytkowania

    Polski 5. PRZED ROZPOCZĘCIEM UŻYTKOWANIA... 5.1 Dostarczone elementy Komponent Szt. platforma ważąca uchwyt ścienny adapter kątowy śruby, 3 x 35 mm kołki, Ø 5 mm baterie typu AA/LR6, 1,5 V wyświetlacz z kablem instrukcja obsługi, b. ilustracji Przed rozpoczęciem użytkowania... • 329...
  • Page 330: Przygotowywanie Wyświetlacza (Wyświetlacz Blatowy)

    5.2 Przygotowywanie wyświetlacza (wyświetlacz blatowy) UWAGA! Uszkodzenie urządzenia Po zamocowaniu adaptera kątowego nie będzie już można odłączyć. – Przed montażem należy uzyskać pewność, że wyświetlacz ma być ustawiony na blacie. Montaż adaptera kątowego Click! => => 1. Przyłożyć adapter kątowy w pokazanej pozycji do wyświetlacza.
  • Page 331: Przygotowywanie Wyświetlacza (Wyświetlacz Ścienny)

    Polski UWAGA! Ryzyko błędnego pomiaru wskutek nieprawidłowego ustawienia wagi Jeżeli kabel wyświetlacza dotyka platformy ważącej, pomiar masy ciała pacjenta może być nieprawidłowy. – Ułożyć kabel tak, by nie mógł dotykać platformy ważącej. 3. Ustawić wyświetlacz na blacie roboczym. 5.3 Przygotowywanie wyświetlacza (wyświetlacz ścienny) UWAGA! Uszkodzenie urządzenia Po zamocowaniu adaptera kątowego nie...
  • Page 332: Podłączanie Kabla Do Platformy

    Podłączanie kabla do platformy WSKAZÓWKA: Przy wyborze miejsca ustawienia uwzględnić długość kabla, aby umożliwić zamocowanie wyświetlacza na uchwycie ściennym. 1. Ustawić wagę na stabilnej i równej powierzchni. 2. Podłączyć kabel do modułu elektronicznego wagi. UWAGA! Ryzyko błędnego pomiaru wskutek nieprawidłowego ustawienia wagi Jeżeli kabel wyświetlacza dotyka platformy ważącej, pomiar masy ciała pacjenta może być...
  • Page 333: Montaż Uchwytów Ściennych

    Polski Montaż uchwytów Na miejsce montażu należy wybrać wystarczająco ściennych wytrzymałą ścianę. W zakres dostawy wchodzą stan- dardowe kołki służące do montażu urządzenia na masywnej ścianie murowanej. Do montażu na ścianach innego typu zaleca się użycie odpowiednich kołków specjalnych. WSKAZÓWKA: Przy określaniu wysokości montażu należy uwzględnić...
  • Page 334: Podłączanie Układu Zasilania

    Może wskutek tego dojść do przegrzania, zapalenia, stopienia lub zwarcia wagi. – Należy stosować wyłącznie oryginalne zasilacze firmy seca z zintegrowaną wtyczką, o napięciu wyjściowym 9 V lub regulowanym napięciu wyjściowym 12 V. 1. W razie potrzeby podłączyć wtyczkę odpowiadają- cą...
  • Page 335: Ustawianie Wagi

    Polski 2. Podłączyć wtyczkę zasilacza do złącza zasilania wagi. 3. Podłączyć zasilacz do gniazda sieciowego. 5.5 Ustawianie wagi Poziomowanie wagi UWAGA! Ryzyko błędnego pomiaru wskutek nieprawidłowego ustawienia wagi Ustawienie wagi z obudową leżącą na jakimś przedmiocie, np. na ręczniku, spowoduje błędny pomiar masy ciała.
  • Page 336: Obsługa

    Włączanie wagi Nacisnąć przycisk Start. Widać krótko wszystkie elementy wyświetlacza, a następnie na wyświetlaczu pojawia się słowo SECA. Waga jest gotowa do pracy, gdy na wyświetlaczu pojawi się wskazanie 0.0. Jeśli waga jest podłączona do zasilacza, to na wyświetlaczu widać symbol Ważenie pacjenta...
  • Page 337: Tarowanie Dodatkowej Masy

    Polski Tarowanie dodatkowej Dzięki funkcji TARE można wyeliminować wpływ masy (TARA) dodatkowego ciężaru (np. ręcznika czy nakładki na wagę) na wynik ważenia. UWAGA! Ryzyko błędnego pomiaru wskutek nieprawidłowego ustawienia wagi Jeśli dodatkowy przedmiot, np. duży ręcznik dotyka powierzchni, na której stoi waga, spo- woduje to błędny pomiar masy ciała.
  • Page 338: Pomiar I Interpretacja Wskaźnika Body Mass Index (Bmi)

    Wskazanie miga do momentu ustabilizowania się pomiaru masy ciała. Następnie wartość pomiaru jest wyświetlana ciągle. Pojawia się symbol (funkcja nieobjęta zakresem legalizacji) i komunikat „HOLD”. 5. Aby wyłączyć funkcję HOLD, należy krótko nacisnąć przycisk (hold/tare). tare Symbol i komunikat „HOLD” znikają. WSKAZÓWKA: Przy włączonej funkcji Autohold wartość...
  • Page 339 Polski 6. Można zaakceptować wyświetlony wzrost lub ustawić inny wzrost przyciskami kierunkowymi. tare 7. Potwierdzić ustawienie przyciskiem Enter (send/print). Wprowadzony wzrost zostaje zapisany i będzie dostępny przy następnym pomiarze wskaźnika BMI. WSKAZÓWKA: Zanotować pozycję pamięci, aby móc wykorzy- stać wprowadzony wzrost przy następnym pomiarze współczynnika BMI.
  • Page 340: Przesyłanie Wyników Pomiaru

    WSKAZÓWKA: Warunkiem korzystania z tej funkcji jest podłą- czenie tych urządzeń do grupy urządzeń bezprzewodowych (patrz „Sieć bezprzewo- dowa seca 360° wireless” na stronie 347). 1. Przeprowadzić pomiar wzrostu. 2. Nacisnąć krótko przycisk Enter (send/print) wzrostomierza. Wartość pomiaru zostaje przekazana do drukarki bezprzewodowej, ale nie zostaje wydrukowana.
  • Page 341: Wyłączanie Wagi

    Polski Aby ponownie przejść na zakres ważenia 1, należy wykonać następujące czynności: Całkowicie zwolnić wagę. Zakres ważenia 1 jest znowu aktywny. Wyłączanie wagi Nacisnąć przycisk Start. WSKAZÓWKA: W trybie zasilania z baterii waga wyłącza się automatycznie po 5 minutach, jeżeli w tym czasie nie zostanie obciążona.
  • Page 342: Nawigacja Po Menu

    Nawigacja po menu 1. Włączyć wagę. 2. Nacisnąć i przytrzymywać przycisk (bmi/menu) do chwili otwarcia menu. Ostatnio wybrany punkt menu pojawia się na wyświetlaczu (tutaj: Autohold „Ahold”) 3. Naciskać przyciski kierunkowe odpowiednią ilość razy, aż żądany punkt menu pojawi się na wyświet- tare laczu (tutaj: Filtrowanie „Fil”).
  • Page 343: Trwałe Zapisywanie W Pamięci Ciężaru Dodatkowego (Pt)

    Polski 4. Potwierdzić wybór. Menu zostaje automatycznie zamknięte. Trwałe zapisywanie w Dzięki funkcji Pre-Tara można zapisać w pamięci dodatkowy ciężar, który będzie zawsze automatycznie pamięci ciężaru odliczany od wyniku pomiaru. Można np. zapisać dodatkowego (Pt) znany ciężar butów i odzieży, który będzie zawsze odli- czany od wyniku pomiaru, jeśli pacjent w trakcie waże- nia będzie ubrany.
  • Page 344: Włączanie Funkcji Autohold (Ahold)

    8. Aby wyłączyć tę funkcję, należy ponownie wybrać w menu punkt „Pt”. 9. Potwierdzić wybór. Funkcja jest wyłączona. Menu zostaje automatycznie zamknięte. WSKAZÓWKA: Wyłączenie wagi powoduje wyłączenie tej funk- cji. Po ponownym włączeniu urządzenia komu- nikat „Pt” nie będzie już wyświetlany. Włączanie funkcji Po włączeniu funkcji Autohold wynik każdego ważenia będzie dalej wyświetlany po zwolnieniu wagi.
  • Page 345: Ustawianie Funkcji Filtrowania (Fil)

    Polski Aktualne ustawienie pojawia się na wyświetlaczu. 5. Wybrać żądane ustawienie: – On – Off 6. Potwierdzić wybór. Menu zostaje automatycznie zamknięte. 7. Aby włączyć sygnały dźwiękowe także dla drugiej funkcji, należy powtórzyć powyższe czynności. Ustawianie funkcji Dzięki funkcji filtrowania (Fil = filtr) można zmniejszyć wpływ zakłóceń...
  • Page 346: Przywracanie Ustawień

    Przywracanie ustawień Ustawienia fabryczne można przywrócić dla fabrycznych (RESET) następujących funkcji: Ustawienie Funkcja fabryczne Autohold (Ahold) zależnie od modelu Sygnał dźwiękowy (Press) Sygnał dźwiękowy (Hold) Filtrowanie (Fil) Autoclear (Aclear) zależnie od modelu Pre-Tara (Pt) 0 kg Wzrost dla wskaźnika 170 cm Body Mass Index (BMI) Moduł...
  • Page 347: Sieć Bezprzewodowa Seca

    W jednej grupie urządzeń bezprzewodowych możliwe jest łączenie następujących urządzeń: • 1 waga dla niemowląt • 1 waga osobowa • 1 wzrostomierz • 1 drukarka bezprzewodowa seca • 1 komputer z bezprzewodową kartą sieciową USB seca Sieć bezprzewodowa seca 360° wireless • 347...
  • Page 348: Kanały

    Po zdefiniowaniu przy użyciu wagi grupy urządzeń bezprzewodowych waga zaczyna szukać innych urządzeń aktywnych urządzeń systemu seca 360° wireless Rozpoznane urządzenia są wyświetlane się wyświetla- czu wagi jako moduły (np. „MO 3”). Cyfry mają nastę- pujące znaczenie: • 1: waga osobowa •...
  • Page 349: Używanie Wagi W Grupie Urządzeń Bezprzewodowych (Menu)

    Podczas pracy urządzenia w sieci bezprzewodowej zalecamy zasilanie urządze- nia z zasilacza. 1. Włączyć urządzenie. 2. W podmenu „rF” wybrać punkt menu „SYS”. 3. Potwierdzić wybór. 4. Wybrać ustawienie „On”. 5. Potwierdzić wybór. Menu zostaje automatycznie zamknięte. Sieć bezprzewodowa seca 360° wireless • 349...
  • Page 350: Definiowanie Grupy Urządzeń

    Definiowanie grupy W celu zdefiniowania grupy urządzeń urządzeń bezprzewodowych należy wykonać następujące czynności: bezprzewodowych (Lrn) 1. Włączyć urządzenie. 2. Otworzyć menu. 3. Wybrać w menu punkt „rF”. 4. Potwierdzić wybór. 5. W podmenu „rF” wybrać punkt „Lrn” (learn). 6. Potwierdzić wybór. Pojawia się...
  • Page 351: Włączanie Funkcji

    Urządzenie można skonfigurować tak, by wyniki pomiaru były przesyłane automatycznie do wszystkich automatycznego aktywnych urządzeń odbiorczych podłączonych do tej przesyłania (ASend) samej grupy urządzeń bezprzewodowych (np. drukarki bezprzewodowej, komputera z bezprzewodową kartą sieciową USB). Sieć bezprzewodowa seca 360° wireless • 351...
  • Page 352: Wybór Opcji Wydruku (Aprt)

    (APrt) bezprzewodowej podłączonej do grupy urządzeń bezprzewodowych. WSKAZÓWKA: Funkcja ta jest dostępna tylko, jeżeli drukarka bezprzewodowa seca została podłączona do grupy urządzeń bezprzewodowych przy użyciu funkcji „learn”. 1. Włączyć urządzenie. 2. W podmenu „rF” wybrać punkt „APrt” i potwierdzić wybór.
  • Page 353: Ustawianie Godziny (Time)

    Ustawienia zostaną automatycznie przekazane do drukarki bezprzewodowej. Drukarka bezprzewodowa będzie automatycznie dodawać datę i godzinę do każdego wydruku. WSKAZÓWKA: W ramach dalszego korzystania z drukarki bez- przewodowej należy się stosować do instrukcji obsługi drukarki bezprzewodowej. Sieć bezprzewodowa seca 360° wireless • 353...
  • Page 354: Preparacja Higieniczna

    8. PREPARACJA HIGIENICZNA OSTRZEŻENIE! Porażenie prądem elektrycznym Urządzenie nie jest pozbawione zasilania po wyłączeniu włącznika-wyłącznika i zgaśnięciu wyświetlacza. Przy używaniu płynów przy urzą- dzeniu może dojść do porażenia prądem elek- trycznym. – Aby całkowicie odłączyć urządzenie od źródła prądu elektrycznego, przed każdą preparacją...
  • Page 355: Dezynfekcja

    Polski 8.2 Dezynfekcja UWAGA! Uszkodzenie urządzenia Szybki podziałek i wyświetlaczy są wykonane ze szkła akrylowego. Szybki ze szkła akrylo- wego mogą pękać albo matowieć wskutek sto- sowania nieodpowiednich środków dezynfekcyjnych. – Stosować wyłączne środki dezynfekcyjne przystosowane do wrażliwych powierzchni. Odpowiednie środki dezynfekcyjne są dostępne w handlu specjalistycznym.
  • Page 356: Kontrola Działania

    W razie stwierdzenia podczas kontroli błędów albo niezgodności, których nie można usunąć na podstawie rozdziału „Co robić, jeżeli…?” od strony 356, urządzenia nie wolno używać. – Zlecić naprawę urządzenia serwisowi seca albo autoryzowanemu partnerowi serwisowemu. – Przestrzegać zasad podanych w rozdziale „Konserwacja/legalizacja ponowna”...
  • Page 357 - Zaczekać ok. 15 minut, aż waga dopasuje się do temperatury otoczenia. • Urządzenie nie mogło przesłać wyników pomiaru do bezprzewodowego urządzenia odbiorczego (drukarka bezprzewodowa seca lub komputer z bezprzewodową kartą sieciową USB seca) - Upewnić się, że waga jest zintegrowana z siecią...
  • Page 358 ...po wyświetleniu menu • Moduł sieci bezprzewodowej wagi jest nie jest wyświetlany uszkodzony. punkt „rF”? - Zawiadomić serwis seca. Waga jest obciążona za bardzo lub nierówno … pojawia się symbol - Zwolnić wagę lub rozłożyć równo ciężar „Er:X:11“? - Uruchomić ponownie wagę.
  • Page 359: Konserwacja/Legalizacja Ponowna

    11.2 Sprawdzanie stanu licznika legalizacji Ta waga seca jest wagą legalizowaną. Legalizacji mogą dokonywać tylko autoryzowane jednostki. W celu zapewnienia zgodności z prawem waga została wypo- sażona w licznik legalizacji, który rejestruje każdą...
  • Page 360: Dane Techniczne

    Jeśli cecha legalizacyjna nie zgadza się z licz- nikiem legalizacji, konieczne jest przeprowadzenie legali- zacji ponownej. Zwrócić się do partnera serwisowego albo serwisu seca. Po przeprowadzeniu legalizacji ponownej stan licznika legalizacji jest oznaczany nową, zaktualizowaną cechą legalizacyjną. Cecha ta jest zabezpieczona dodatkową...
  • Page 361: Parametry Ważenia

    Polski Ogólne dane techniczne seca 635 Wilgotność powietrza • Praca 30 % - 80 % niekondensująca • Przechowywanie 0 % - 95 % niekondensująca • Transport 0 % - 95 % niekondensująca Wysokość cyfr 25 mm Zasilanie Baterie, opcjonalny zasilacz Pobór prądu...
  • Page 362: Akcesoria Opcjonalne

    Drukarka bezprzewodowa • warianty zgodne z wymogami seca 360° wireless printer 465 kraju użytkowania • warianty zgodne z wymogami seca 360° wireless printer advanced 466 kraju użytkowania Aplikacja PC • pakiety licencyjne zależne od seca analytics 115 zastosowania 456-00-00-009 seca 360°...
  • Page 363: Utylizacja

    Przestrzegać obowiązujących przepisów krajowych. Więcej informacji udziela nasz serwis dostępny pod adresem: service@seca.com 15.2 Baterie i akumulatory Zużytych baterii i akumulatorów nie należy wyrzucać do zwykłych odpadów domowych, niezależnie od tego, czy zawierają substancje szkodliwe, czy nie. Każdy użytkownik jest ustawowo zobowiązany do oddawania...
  • Page 364 Otwarcie urządzenia przez osoby, które nie posiadają wyraźnej autoryzacji producenta, skutkuje wygaśnię- ciem wszelkich roszczeń z tytułu gwarancji. Klienci zagraniczni dochodzą roszczeń gwarancyjnych bezpośrednio u sprzedawcy w danym kraju. 364 •...
  • Page 365 • This device must accept any interference received, including interference that may cause undesired operation. NOTE Changes or modifications made to this equip- ment not expressly approved by seca may void the FCC authorization to operate this equip- ment. NOTE Radiofrequency radiation exposure Information:...
  • Page 366 Konformitätserklärung Declaration of conformity Certificat de conformité Dichiarazione di conformità Declaratión de conformidad Overensstemmelsesattest Försäkran om överensstämmelse Konformitetserklæring Vaatimuksenmukaisuusvakuutus Verklaring van overeenkomst Declaração de conformidade Δήλωση Συμβατότητας Prohlášení o shodĕ Vastavusdeklaratsioon Megfelelőségi nyilatkozat Atitikties patvirtinimas Atbilstības apliecinājums Oświadczenie o zgodności Izjava o skladnosti Vyhlásenie o zhode Onay belgesi...
  • Page 367 Neautomatinòs buitinòs svarstyklòs Manuālie (neautomātiskie) personālsvari Nieautomatyczna waga osobowa Neavtomatska osebna tehtnica Nesamostatná osobná váha Otomatik olmayan yetiflkin tartısı Model: 635-70-21-004 EG-Bauartzulassung D00-09-010 EC type approval D00-09-010 Homologation CE D00-09-010 Omologazione del tipo costruttivo CEE D00-09-010 Homologación CE D00-09-010 EF-typegodkendelse D00-09-010...
  • Page 368 … entspricht dem in der Bescheinigung über die Bau- ... svarer til det typemønster, som er beskrevet i atte- artzulassung beschriebenen Baumuster. sten over typegodkendelsen. Die Waage erfüllt die geltenden Anforderungen folgen- Vægten opfylder de gældende krav fra følgende direk- der Richtlinien: tiver: 2009/23/EG über nichtselbsttätige Waagen,...
  • Page 369 93/42/EGK irányelv az orvo- Frederik Vogel stechnikai termékekről. CEO Development and Manufacturing Ezen kívül többek között a következő normák alkalmaz- seca gmbh & co. kg. hatók: Hammer Steindamm 9-25 EN 45501 a nem automatikus működésű mérlegek 22089 Hamburg méréstechnikai követelményei és vizsgálata;...

Table des Matières