Télécharger Imprimer la page
Qlima EOR 2015 Manuel D'utilisation
Masquer les pouces Voir aussi pour EOR 2015:

Publicité

Les langues disponibles
  • FR

Les langues disponibles

  • FRANÇAIS, page 16

Liens rapides

D
Dieses Produkt ist nur für gut isolierte Räume oder für den
gelegentlichen Gebrauch geeignet.
DK
Dette produkt er kun egnet til godt isolerede rum eller lejlighedsvis
brug.
ES
Este producto está indicado únicamente en lugares abrigados o para
una utilización puntual.
FIN
Tämä tuote soveltuu ainoastaan hyvin eristettyihin tiloihin tai
satunnaiseen käyttöön.
F
Ce produit ne peut être utilisé que dans des locaux bien isolés ou de
manière occasionnelle.
GB
This product is only suitable for well insulated spaces or occasional use.
I
Il presente prodotto è adatto solo a ambienti correttamente isolati o
ad un uso occasionale.
5
3
4
>
1
9
y
EOR 2015
N
NL
P
PL
S
SLO
MANUAL DE FUNCIONAMIENTO
MANUEL D'UTILISATION
OPERATING MANUAL
ISTRUZIONI D'USO
GEBRUIKSAANWIJZING
MANUAL DE INSTRUÇÕES
PRIROČNIK ZAUPORABO
Dette produktet er bare egnet for velisolerte rom eller sporadisk bruk.
Dit product is uitsluitend geschikt voor goed geïsoleerde plaatsen of
voor incidenteel gebruik.
Este produto é adequado apenas para espaços bem isolados espaços
ou utilização ocasional.
Ten produkt jest odpowiedni tylko do sporadycznego użytku lub do
stosowania w dobrze izolowanych pomieszczeniach.
Denna produkt är endast lämpad för välisolerade utrymmen eller
sporadisk användning.
Tento výrobok je určený iba do dobre izolovaných priestorov alebo na
príležitostné použitie
2
16
33
48
64
80
96

Publicité

loading

Sommaire des Matières pour Qlima EOR 2015

  • Page 1 EOR 2015 Dieses Produkt ist nur für gut isolierte Räume oder für den Dette produktet er bare egnet for velisolerte rom eller sporadisk bruk. gelegentlichen Gebrauch geeignet. Dit product is uitsluitend geschikt voor goed geïsoleerde plaatsen of Dette produkt er kun egnet til godt isolerede rum eller lejlighedsvis voor incidenteel gebruik.
  • Page 2 Estimado Señor / Señora, Queremos felicitarle por la compra del calefactor doméstico portátil. Usted ha adquirido un producto de calidad que le será útil durante muchos años. Esto, por supuesto, siempre que lo use correctamente. Por favor, lea primero las instrucciones de uso, para garantizar la máxima vida útil de su calefactor.
  • Page 3 COMPONENTES BELANGRIJKE ONDERDELEN PRINCIPALES Ruedas Bedieningspaneel giratorias (2) Uitlaat van droge lucht Botón de encendido Uitneembaar waterreservoir Cubierta frontal Inlaat van vochtige lucht Aletas del radiador Luchtfilter Guardacable Afvoertuit (ø 13 mm) met dop Tuercas de Zwenkwieltje mariposa (2) Stekker en snoer Escuadras con forma de arco Handvat...
  • Page 4 MEDIDAS DE SEGURIDAD La instalación deberá responder por completo a las disposiciones, reglamentos y normas locales en vigor. El aparato está indicado para utilizarlo exclusivamen- te en el hogar. Compruebe si la tensión de red es la correcta. El aparato se debe utilizar exclusivamente en un deshumificador con toma de tierra, voltaje 220- 240 V / ~50 Hz.
  • Page 5 IMPORTANTE El aparato debe estar conectado siempre con una toma a tierra. En caso de que la corriente eléctrica no esté provista de una toma a tierra, está absolutamente prohibido conectar el mismo. Cuando el aparato esté conectado, el acceso a la clavija tendrá que poder hacerse sin que haya obstáculos por medio.
  • Page 6 • Previo el transporte del aparato, vacíe siempre el depósito de agua. • Procure que el aparato no entre nunca en contacto con productos químicos. • Procure que el aparato no entre nunca en contacto con agua. No limpie nunca el aparato pulverizán- dolo ni sumergiéndolo en agua.
  • Page 7 • Cuando el cable de alimentación está averiado, deberá evitar situaciones peligrosas haciéndolo sustituir por un centro de servicio autorizado por Qlima o por personas de similar competencia. ¡ATENCIÓN! • Nunca use el aparato en caso de que el cable o el enchufe esté dañado. Procure que el cable no quede atrapado y que no entre en contacto con objetos cortantes.
  • Page 8 INSTALACIÓN DEL CALEFACTOR 1. Retire con cuidado su calefactor de la caja y compruebe el contenido. A d e m á s d e l c a l e f a c t o r , t a m b i é n necesitará: - ruedas giratorias - tuercas de mariposa...
  • Page 9 5. Apriete las dos ruedas giratorias en el radiador atornillando dos tuercas de mariposa en cada pie. 6. Gire el radiador en posición vertical después de ajustar el montaje de las ruedas giratorias. FUNCIONAMIENTO PRECAUCIÓN: Use el radiador solo en posición vertical con las ruedas giratorias provistas en la parte inferior de la unidad, cualquier otra posición puede...
  • Page 10 AJUSTE DE TEMPERATURA P R O T E C C I Ó N C O N T R A SOBRECALENTAMIENTO Este aparato tiene dos niveles de protec- ción: 1. Desconexión térmica automática Apague el calefactor en caso de sobreca- lentamiento o avería y reinicie una vez que la temperatura descienda al nivel normal 2.
  • Page 11 ALMACENAMIENTO Y MANTENIMIENTO Deje que el producto se enfríe completamente antes de manipularlo o limpiarlo. Asegúrese de que el producto está en la posición de APAGADO “O” y el cable desenchufado de la toma eléctrica antes de limpiar el aparato. •...
  • Page 12 ESPECIFICACIONES TÉCNICAS Modelo EOR 2015 Calefacción Máxi- 1500 Capacidad 3 (Auto = Ajustes de cale- 600 W / 900 facción W / 1500 W) Gama termostáti- °C 13 - 30 Corriente V / Hz / Red eléctrica 220-240/50/1 Peso Dimensiones...
  • Page 13 CONDICIONES DE LA GARANTÍA El aparato cuenta con una garantía de 24 meses, a contar a partir de la fecha de compra. Todos los materiales y defectos de fabrica- ción se repararán o reemplazarán sin car- gos durante dicho periodo. Se aplican las normas siguientes: 1.
  • Page 14 Le recomendamos que siempre consulte prime- ro las instrucciones de uso a fin de evitar gastos innecesarios. Lleve el aparato a su distribuidor para su reparación en el caso de que estas ins- trucciones no le proporcionen una solución. La eliminación de aparatos eléctricos no se des- echarán junto con los residuos domésticos.
  • Page 16 à condition de l’utiliser de façon responsable et correcte. Pour assurer à votre produit de chauffage Qlima une durée de vie et une sécurité d’utilisation maximum, lisez attentivement ce manuel avant utilisation et conservez-le pour pouvoir le consulter ultérieurement.
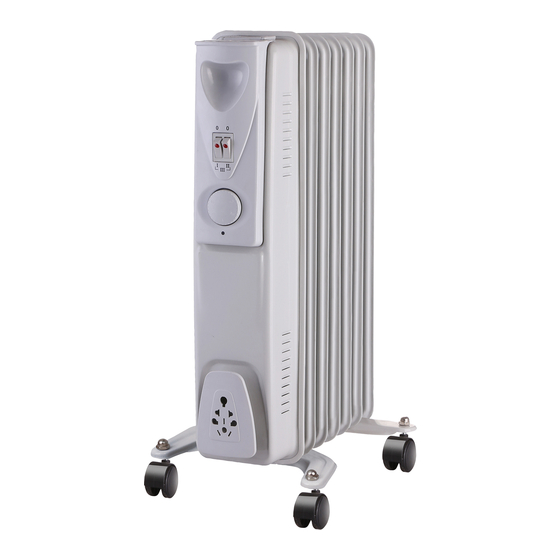
  • Page 17 PRINCIPAUX BELANGRIJKE ONDERDELEN ÉLÉMENTS Roues pivo- Bedieningspaneel tantes (2) Uitlaat van droge lucht Bouton d'alimentation Uitneembaar waterreservoir Capot avant Inlaat van vochtige Ailettes du lucht radiateur Luchtfilter Rangement du Afvoertuit cordon d'ali- (ø 13 mm) met dop mentation Zwenkwieltje Ecrous papillons (2) Stekker en snoer Handvat...
  • Page 18 PRESCRIPTIONS DE SÉCURITÉ Lisez attentivement ce manuel d’utilisation avant d’utiliser l’appareil et conservez-le pour toute référence ultérieure. Installez cet appareil uniquement s’il est conforme à la législation, aux ordonnances et aux normes locales et nationales. Ce produit a été conçu pour être utilisé comme déshumi- dificateur dans des maisons résidentielles, et il doit être utilisé...
  • Page 19 IMPORTANT L’appareil DOIT toujours être branché sur une prise de terre. Si l’alimentation électrique n’est pas connectée à la terre, l’appareil ne doit absolument pas être branché. La fiche électrique doit toujours être facilement accessible lorsque l’appareil est branché.Lisez soigneusement ce manuel et suivez les instructions;...
  • Page 20 de sécurité CE. Soyez cependant prudent lors de l’utilisation comme avec tout autre appareil électrique. • Ne jamais recouvrir la grille d’entrée et de sortie d’air. • Videz le réservoir d’eau avant de dépla- cer l’appareil. • Ne mettez jamais l’appareil en contact avec des produits chimiques.
  • Page 21 • Si le cordon électrique est endommagé, faitesman le remplacer pour éviter tout danger. Pour cela, contactez un centre de répa- rations agréé par Qlima ou un technicien aux qualifications comparables. ATTENTION! • N’utilisez jamais l’appareil avec un cordon ou une fiche électrique endommagés.
  • Page 22 INSTALLATION DE L’APPAREIL 1. Retirez avec precaution votre appareil du carton et verifiez-en le contenu. En plus de l’appareil, vous devez dispo- ser: - Roues pivotantes - Ecrous papillons - Pattes en forme d'arc - Manuel d’utilisation Conservez le carton et l’emballage (fig. A) a des fins d’entreposage et/ou de transport.
  • Page 23 5. Fixer solidement le deux roues pivo- tantes sur le radiateur, en vissant deux écrous papillon sur chaque pied. 6. Mettre le radiateur en position verticale une fois les roulettes installées. L’UTILISATION ATTENTION: N'utiliser le radiateur qu'en position verticale droite, les roulettes installées en bas de l'appareil, car toute autre position pourrait être dangereuse 1.
  • Page 24 RÉGLAGE DE LA TEMPÉRATURE POWER MAINTENANCE ET STOCKAGE Laisser le produit refroidir complètement, avant de le manipuler ou de le nettoyer. S'assurer que l'appareil soit sur la position Arrêt "O", et que le cordon d'alimentation soit débranché de la prise électrique, avant de le nettoyer.
  • Page 25 • Ne pas utiliser de nettoyants abrasifs ou de solvants, car ils pourraient endomma- ger l'appareil. • Ranger l'appareil dans un endroit propre et sec, lorsqu'il n'est pas utilisé. SPÉCIFICATION TECHNIQUES Model EOR 2015 Puissance de 1500 chauffage Nombre de 3 (Auto = niveaux de...
  • Page 26 DÉCLARATION DE CONFORMITÉ CE L’appareil est conçu, fabriqué et distribué conformément aux directives de sécurité 2006/95/CE Matériel à basse tension 2004/108/CE CEM 93/68/CEE Marquage CE L’appareil est uniquement destiné à une utilisation domestique et doit être exclusi- vement utilisé dans le but pour lequel il a été...
  • Page 27 5. La garantie s’applique uniquement sur présentation de la preuve d’achat d’origine datée et sans aucun rature ni modification. 6. La garantie ne s’applique pas aux dégâts causés par la négligence de l’uti- lisateur ou par le non respect du pré- sent mode d’emploi.
  • Page 28 Dear Sir, Madam, Congratulations with your purchase of a portable domestic heater. You have purchased a quality product, which will serve you for many years to come. This, of course, provided you use the heater correctly. Please read these Directions for Use first, to ensure maximum lifetime for your heater.
  • Page 29 MAIN BELANGRIJKE ONDERDELEN COMPONENTS Castor Bedieningspaneel wheels (2) Uitlaat van droge lucht Power button Uitneembaar waterreservoir Front cover Inlaat van vochtige lucht Radiator fins Luchtfilter Cord Afvoertuit (ø 13 mm) met dop storage Zwenkwieltje Wing nuts Stekker en snoer Arc-shaped Handvat brackets (2) Thermostat...
  • Page 30 SAFETY INSTRUCTIONS Read this user manual carefully before using the appliance and keep it for future reference. Install this device only when it complies with local/national leg- islation, ordinances and standards. This product is intended to be used as a dehumidifier in residential houses and is only suitable for use in dry locations, in normal household conditions, indoors in living room, kitchen and garage.
  • Page 31 Before connecting the unit, check the following: • The voltage supply must correspond with the mains voltage stated on the rating label. • The socket and power supply must be suitable for the current stated on the rating label. • The plug on the cable of the device must fit into the wall socket.
  • Page 32 • Cleaning and user maintenance shall not be made by children without supervision. • If the mains cord is damaged, you must have it replaced by a service centre authorised by Qlima or similarly qualified persons in order to avoid a haz- ard.
  • Page 33 INSTALLING THE HEATER 1. Carefully remove your heater from the box and check the contents. In addition to the heater, you also need to have: - castor wheels - wing nuts - arc-shaped brackets - these directions for use Keep the box and the packaging materials for storage and/or transportation.
  • Page 34 5. Securely fasten the two Castor Wheels onto the radiator by screwing two Wing Nuts onto each Foot. 6. Turn the radiator in upright position after the Castor Wheel Assembly fitted. OPERATION CAUTION: Only operate the radiator in normal upright position with Castor Wheel Assemblies attached to the bottom of the unit, any other position could create a hazardous situation.
  • Page 35 TEMPERATURE SETTING POWER OVERHEAT PROTECTION This appliance has two levels of overheat protection: 1. Automatic thermal cut-off Switches off the heater in the event of overheating or malfunction and resets once the temperature drops to a normal level 2. Thermal fuse In the event that the automatic thermal cut-off fails to operate, the heater has a further safety device.
  • Page 36 MAINTENANCE AND STORAGE Allow the product to completely cool before handling or cleaning it. Ensure the product is in the “O” OFF position and the Power Cord is unplugged from the electrical outlet before cleaning the product. • Always ensure the product’s housing is intact and completely assembled before each use.
  • Page 37 TECHNICAL SPECIFICATIONS Model EOR 2015 Max. heating 1500 capacity 3 (Auto = 600 W / Heating settings 900 W / 1500 W) Thermostatic 13 - 30 ºC range Current V / Hz / 220-240/50/1 Mains Weight Dimensions 330x240x545 (w x d x h) Room size m³...
  • Page 38 GUARANTEE CONDITIONS The appliance is supplied with a 24-month guarantee, commencing on the date of purchase. All material and manufacturing defects will be repaired or replaced free of charge within this period. The following rules apply: 1. We expressly refuse all further damage claims, including claims for collateral damage.
  • Page 39 8. Damage caused by not using suitable spare parts is not covered by the guar- antee. To prevent unnecessary expense, we rec- ommend that you always first carefully consult the instructions for use. Take the appliance to your dealer for repairs if these instructions do not provide a solu- tion.
  • Page 40 Egregio Signore, Gentile Signora, Ci congratuliamo con Lei per l'acquisto di una stufa portatile. Lei ha acquistato un prodotto di qualità, da cui trarrà grande soddisfazione per molti anni, naturalmente sempre a patto che Lei adoperi la stufa in modo corretto. Per tale motivo, al fine di garantire la massima durata delle stufe portatili, Le consigliamo di leggere con attenzione le istruzioni prima dell'uso.
  • Page 41 COMPONENTI BELANGRIJKE ONDERDELEN PRINCIPALI Ruote Bedieningspaneel basculanti (2) Uitlaat van droge lucht Pulsante di accensione Uitneembaar waterreservoir Coperchio Inlaat van vochtige anteriore lucht Alette del Luchtfilter radiatore Afvoertuit (ø 13 mm) met dop Stoccaggio cavi Zwenkwieltje Dadi ad alette Stekker en snoer Handvat Staffe a forma di arco...
  • Page 42 ISTRUZIONI PER LA SICUREZZA Prima di usare l’apparecchiatura, leggere attenta- mente il presente manuale e conservarlo come rife- rimento futuro. Installare questo dispositivo soltanto quando è conforme con la legislazione, le ordinan- ze e gli standard locali/nazionali. Questo prodotto è destinato a essere usato come deumidificatore nelle case ad uso residenziale ed è...
  • Page 43 IMPORTANTE L’apparecchio DEVE essere collegato ad un impianto elettrico dotato di messa a terra. Se tale tipo di collegamento non è disponibile, è vietato collegare l‘apparecchio alla rete di alimentazione. E’ inoltre opportuno assicurare un agevole accesso alla spina elettrica. Si consiglia di leggere accuratamente le presenti istruzioni e di attenersi alle indicazioni fornite;...
  • Page 44 te istruzioni per l’uso dell’apparecchio da parte di persone responsabili della sicurezza degli utenti. • Questo apparecchio è stato prodotto in conformi- tà alla normativa CE sulla sicurezza. Ciò nonostan- te è necessaria la massima cautela nell’uso, come è d’obbligo per tutte le apparecchiature elettriche •...
  • Page 45 • Nel caso in cui il cavetto elettrico risulti danneggia- to e onde evitare qualsiasi rischio provvedere alla sua sostituzione rivolgendosi ad un centro di assi- stenza autorizzato Qlima o ad un riparatore quali- ficato. ATTENZIONE! • Non usare mai l’apparecchio se il cordone elettrico o la spina sono danneggiati.
  • Page 46 INSTALLAZIONE DELLA STUFA 1. Estrarre con cautela la stufa dalla scatola e controllare il contenuto. Oltre alla stufa, devono essere presenti i seguenti componenti: - Ruote basculanti - Dadi ad alette - Staffe a forma di arco - Le istruzioni d'uso Conservare la scatola ed il materiale d'imballaggio per l'immagazzinaggio e/o il trasporto.
  • Page 47 5. S e r r a r e s a l d a m e n t e l e d u e r u o t e basculanti sul radiatore avvitando due dadi ad alette su ogni piede. 6. Mettere in piedi il radiatore dopo aver posizionato il gruppo Ruota basculante.
  • Page 48 IMPOSTAZIONE DELLA TEMPERATURA POWER PROTEZIONE ANTI-SURRISCALDAMENTO Questo apparecchio dispone di due livelli di protezione anti-surriscaldamento: 1. Interruttore a soglia termica Questo dispositivo spegne la stufa nel caso rilevi casi di surriscaldamento o malfunzionamento, per poi ripristinar- la nuovamente quando la temperatura scende a livelli standard.
  • Page 49 MANUTENZIONE E STOCCAGGIO Lasciar raffreddare completamente il prodotto prima di maneggiarlo o pulirlo. Verificare che il prodotto si trovi in p o s i z i o n e O F F " 0 " e c h e i l c a v o d i alimentazione sia scollegato dalla presa di corrente prima di pulire il prodotto.
  • Page 50 SPECIFICHE TECNICHE Modello EOR 2015 Capacita di riscal- 1500 damento max.) 3 (Auto = Livelli di potenza 600 W / 900 W / 1500 W) Temperatura di ºC 13 - 30 esercizio Amperaggio V / Hz / Tensione di rete...
  • Page 51 do si ha diritto alla riparazione gratuita di tutti i difetti di materiale ed i vizi di fab- bricazione o alla sostituzione gratuita di componenti difettate. La presente garan- zia e disciplinata dalla seguenti condizioni: 1. Decliniamo esplicitamente qualsiasi responsabilita per altri reclami in garan- zia relativi a danni, ad inclusione dei danni derivati e conseguenti.
  • Page 52 Onde evitare un’inutile spesa consigliamo di leggere innanzitutto le presenti istru- zioni per l’uso con accuratezza. Qualora esse non offrano alcun rimedio all’even- tuale problema, far riparare l’apparecchio dal punto di vendita. I prodotti o i componenti elettrici non devono essere smaltiti come comuni rifiuti domestici.
  • Page 53 >...
  • Page 54 Geachte mevrouw / mijnheer, Van harte gefeliciteerd met de aankoop van uw elektrische kachel. U heeft een kwaliteitsproduct aangeschaft waar u nog vele jaren plezier van zult hebben, mits u het apparaat verantwoord gebruikt. Lees daarom eerst deze gebruiksaanwijzing voor een optimale levensduur van uw kachel.
  • Page 55 KERNCOM- BELANGRIJKE ONDERDELEN PONENTEN Zwenkwielen Bedieningspaneel Uitlaat van droge Aan- en uit lucht knop Uitneembaar Voorpaneel waterreservoir Inlaat van vochtige Radiator- lucht ribben Luchtfilter Opbergvak voor snoer Afvoertuit (ø 13 mm) met dop Vleugel- Zwenkwieltje moeren (2) Stekker en snoer Boogvormige beugels (2) Handvat...
  • Page 56 VEILIGHEIDSVOORSCHRIFTEN Lees deze gebruikershandleiding aandachtig alvorens het toestel te gebruiken en bewaar het voor later. Installeer dit toestel enkel wanneer het voldoet aan de lokale/nationale wetgeving, regelgeving en nor- men. Dit product is bedoeld om gebruikt te worden als een luchtontvochtiger in woningen en is alleen geschikt voor gebruik binnenshuis in woonkamers, keukens en garages op droge plaatsen, in normale huishoudelijke omstandigheden.
  • Page 57 BELANGRIJK Het apparaat MOET altijd geaard worden aangesloten. Als de stroomvoorziening niet geaard is, mag u het apparaat absoluut niet aansluiten. De stekker moet altijd makkelijk toegankelijk zijn als het apparaat is aangesloten. Lees deze gebruiksinstructie zorgvuldig en volg de aanwijzingen. Controleer voor het aansluiten van het apparaat of: •...
  • Page 58 • Leeg het waterreservoir voordat u het apparaat verplaatst. • Breng het apparaat nooit in contact met chemica- liën. • Het apparaat nooit in contact brengen met water, met water besproeien of in water onderdompelen. • Steek geen voorwerpen in de openingen van het apparaat.
  • Page 59 • Als het netsnoer is beschadigd, moet u het om gevaar te voorkomen laten vervangen door een door Qlima erkend servicecentrum of door verge- lijkbaar bevoegde personen. LET OP! • Gebruik het apparaat nooit met een beschadigd snoer of stekker.
  • Page 60 - Boogvormige beugels - Deze gebruiksaanwijzing Bewaar de doos en het verpakkingsmate- riaal (fig. A) voor opslag en/of transport. 2. Verwijder de verpakking van de zwenk- wielen en de boogvormige beugels. 3. Draai de radiator ondersteboven op een krasvrije en stabiele ondergrond en dek de vloer af om eventuele schade te voor- komen.
  • Page 61 INGEBRUIKNAME WAARSCHUWING: Gebruik de radiator enkel in de gebruikelijke verticale positie met de zwenkwielen aan de onderzijde van het apparaat bevestigd. Een andere positie kan een gevaarlijke situatie veroorzaken. 1. Steek de stekker in het stopcontact. 2. Druk op de -knop B om de verwarming in te schakelen.
  • Page 62 Wanneer deze niet-her- stelbare schakelaar zijn werk heeft gedaan dient het apparaat geretour- neerd worden naar een door Qlima geautoriseerde dealer. Indien oververhitting of storingen zich blij- ven voordoen, breng het apparaat retour bij een door Qlima geautoriseerde dealer.
  • Page 63 Zorg ervoor dat het product in de "O" OFF positie is en het netsnoer is verwijderd uit het stopcontact alvorens met de reinigings- werkzaamheden te beginnen. • Zorg er altijd voor dat de behuizing van het product intact is en volledig in elkaar gezet voor elk gebruik.
  • Page 64 TECHNISCHE SPECIFICATIES Model EOR 2015 Verwarmings- 1500 capaciteit (max.) 3 (Auto = Aantal verwar- 600 W / 900 mingsniveaus W / 1500 W) Temperatuurran- ºC 13 - 30 Ampère V / Hz / Voltage 220-240/50/1 Gewicht Afmetingen (L x B...
  • Page 65 GARANTIEVOORWAARDEN Het apparaat wordt geleverd met een garantie van 24 maanden die ingaat op de aankoopdatum. Alle materiaal- of pro- ductiefouten worden binnen deze periode gratis gerepareerd of vervangen. De vol- gende regels gelden: 1. Wij wijzen uitdrukkelijk alle schade- claims af, inclusief indirecte schade.
  • Page 66 Om onnodige kosten te vermijden, raden we u aan eerst de instructies zorgvuldig te raadplegen voor u het apparaat gebruikt. Breng het apparaat naar uw verkooppunt als de instructies geen oplossing bieden. Elektrische afvalproducten dienen niet weg- gegooid te worden met het huishoudafval. Recycle alstublieft indien zulke voorzienin- gen aanwezig zijn.
  • Page 68 Caro utilizador, Parabéns pela compra de um aquecedor doméstico portátil. Comprou um produto de qualidade do qual usufruirá durante muitos anos. Isto se utilizar o aquecedor corretamente. Leia as instruções de utilização primeiro para garantir uma vida útil máxima do aquecedor. O aquecedor é...
  • Page 69 COMPONENTES BELANGRIJKE ONDERDELEN PRINCIPAIS Rodízios (2) Bedieningspaneel Uitlaat van droge lucht Botão de alimentação Uitneembaar waterreservoir Tampa frontal Inlaat van vochtige lucht Aletas do radiador Luchtfilter Armazenamento Afvoertuit (ø 13 mm) met dop do cabo Zwenkwieltje Porcas de orelhas Stekker en snoer Suportes em Handvat forma de arco (2)
  • Page 70 INSTRUÇÕES DE SEGURANÇA Leia atentamente este manual do utilizador antes de utilizar o aparelho e guarde-o para referência futura. Instale este dispositivo apenas quando estiver em conformidade com a legislação, normas e normas locais/nacionais. Este produto destina-se a ser utilizado como um desumidificador em casas residenciais e adequado apenas para ser utiliza- do em locais secos, em condições domésticas nor- mais, no interior na sala de estar, cozinha e gara-...
  • Page 71 IMPORTANTE O dispositivo TEM de ter sempre uma ligação à terra. Não pode ligar o dispositivo se a fonte de alimentação não estiver ligada à terra. A ficha tem de ser sempre de fácil acesso quando o dispositivo está ligado. Leia estas instruções atentamente e siga as indicações.
  • Page 72 • Não cubra a grelha de entrada e saída de ar. • Esvazie o reservatório de água antes de mover a unidade. • Nunca deixe o dispositivo entrar em contacto com produtos químicos. • Nunca pulverize ou submerja a unidade com água.
  • Page 73 • A limpeza e a manutenção do utilizador não devem ser feitas por crianças sem supervisão. • Se o cabo de alimentação estiver danificado, deve ser substituído por um centro de assistên- cia autorizado pela Qlima ou por um equipa igualmente qualificadas para evitar situações de perigo. ATENÇÃO! •...
  • Page 74 INSTALAÇÃO DO AQUECEDOR 1. Retire cuidadosamente o aquecedor da caixa e verifique o conteúdo. A l é m d o a q u e c e d o r , t a m b é m é necessário ter: — rodízios —...
  • Page 75 5. Aperte bem os dois rodízios no radiador ao aparafusar duas porcas de orelhas em cada pé. 6. Coloque o radiador na vertical depois de instalar os rodízios. OPERAÇÃO CUIDADO: Utilize o radiador apenas na vertical com os rodízios fixados na parte inferior da unidade.
  • Page 76 DEFINIÇÃO DE TEMPERATURA POTÊNCIA R O T E Ç Ã O C O N T R A SOBREAQUECIMENTO Este aparelho tem dois níveis de prote- ção contra sobreaquecimento: 1. Corte térmico automático Desliga o aquecedor no caso de sobrea- quecimento ou avaria e reinicia assim que a temperatura estiver a um nível normal 2.
  • Page 77 MANUTENÇÃO E ARMAZENAMENTO Deixe o produto arrefecer completamente antes de o manusear ou limpar. Certifique-se de que o produto está na posição desligada "O" e o cabo de alimentação está desligado da tomada elétrica antes de limpar o produto. • C e r t i f i q u e - s e s e m p r e d e q u e o compartimento do produto está...
  • Page 78 ESPECIFICAÇÕES TÉCNICAS Modelo EOR 2015 Capacidade máx. aquecimen- 1500 3 (Auto = Definições de 600 W / 900 aquecimento W / 1500 W) Intervalo termos- °C 13 - 30 tático Corrente V/Hz/ Rede elétrica 220-240/50/1 Fase Peso Dimensões 330x240x545 (l x p x a) Tamanho da divi- m³...
  • Page 79 CONDIÇÕES DA GARANTIA O aparelho é fornecido com uma garantia de 24 meses, a partir da data de compra. Todos os defeitos de material e fabrico serão reparados ou substituídos gratuita- mente dentro deste período. Aplicam-se as seguintes regras: 1. Recusamos expressamente todas as reclamações de danos adicionais, incluindo reclamações de danos colate- rais.
  • Page 80 7. Os custos de transporte e os riscos envolvidos durante o transporte do aparelho ou componentes do aparelho devem ser sempre por conta do compra- 8. Os danos causados pela não utilização de peças sobressalentes adequadas não são abrangidos pela garantia. Para evitar gastos desnecessários, reco- mendamos que consulte sempre primeiro cuidadosamente as instruções de utiliza-...
  • Page 82 Spoštovana gospa, spoštovani gospod, Čestitamo vam ob nakupu prenosnega hišnega grelca. Kupili ste kakovosten izdelek, ki vam bo služil mnoga leta. Seveda to velja samo, če boste izdelek uporabljali pravilno. Da bi zagotovili čim daljšo življenjsko dobo vašega grelca, najprej preberite navodila za uporabo Vaš...
  • Page 83 GLAVNI BELANGRIJKE ONDERDELEN SESTAVNI DELI Kolesca (2) Bedieningspaneel Uitlaat van droge Gumb za lucht napajanje Uitneembaar Sprednja waterreservoir maska Inlaat van vochtige lucht Rebra radiatorja Luchtfilter Predal za Afvoertuit (ø 13 mm) met dop kabel Zwenkwieltje Krilata matica (2) Stekker en snoer Lokasti Handvat nosilci (2)
  • Page 84 VARNOSTNA NAVODILA Ta priročnik za namestitev pozorno preberite preden namestite izdelek. To napravo namestite samo, če je skladna s krajevnimi/državnimi zakoni, uredbami in standardi. Ta izdelek je namenjen za uporabo kot razvlaževalnik v stanovanjskih hišah in je primeren samo za uporabo na suhih mestih, v vsakdanjih pogojih, v notranjih prostorih v dnevni sobi, kuhinji in garaži.
  • Page 85 Preden enoto priključite, preverite naslednje: • Napetost električnega napajanja mora ustrezati omrežni napetosti, navedeni na oznaki nazivnih vrednosti. • Vtičnica in električno napajanje morata biti primerna za tok, ki je naveden na oznaki nazivnih vrednosti. • Vtič na kablu naprave se mora prilegati v stens- ko vtičnico.
  • Page 86 • S to napravo se otroci ne smejo igrati. • Čiščenje in uporabniško vzdrževanje lahko izva- jajo samo otroci, ki se jih nadzoruje. • Če je omrežni električni kabel poškodovan, ga mora popraviti servisni center, ki ga pooblasti družba Qlima, ali podobno usposobljene osebe, da se prepreči tveganje.
  • Page 87 POZOR! • Naprave nikoli ne uporabljajte s poškodovanim električnim kablom, vtičem, omarico ali upravljalno ploščo. Električnega kabla nikoli ne postavite pod druge predmete ali pustite, da bi prišel v stik z ostrimi robovi. • Če navodil ne upoštevate, lahko pride do izničenja garancije na to napravo.
  • Page 88 2. Iz embalaže izdelka vzemite kolesca in lokaste nosilce. 3. Radiator obrnite na glavo in položite na stabilno površino, ki ni groba, da preprečite poškodbe barvnega premaza ali lesenih tal. 4. Na radiator namestite kolesca, tako da najprej med najbolj zunanja rebra na vsaki strani radiatorja namestite lokaste nosilce.
  • Page 89 1. Vtič vstavite v električno vtičnico. 2. Za vklop grelca vklopite napajalno stikalo 2 nato pa pritisnite gumb. (I=600Watt, II=900Watt, I+II=1500Watt). Grelec začne delovati z največjo močjo. Na zaslonu je prikazano . Grelec deluje s polno močjo, dokler se napajanja ne izklopi ročno ali če temperatura prostora presega 30 °C.
  • Page 90 ZAŠČITA PRED PREGREVANJEM Naprava ima dve stopnji zaščite pred pregrevanjem: 1. Samodejni toplotni odklop Grelnik se v primeru pregrevanja ali okvare izklopi in se ponastavi, ko se tem- peratura zniža na običajno. 2. Toplotna varovalka Če se samodejni toplotni odklop ne spro- ži, ima grelnik še eno varnostno napra- vo.
  • Page 91 • Ne uporabljajte razjedljivih čistil ali topil, ker poškodujejo izdelek. • Kadar izdelek ni v uporabi, ga shranjujte na čistem, suhem mestu. TEHNIČNI PODATKI Model EOR 2015 Maks. kapaciteta 1500 ogrevanja 3 (Auto = Nastavitve gretja 600 W / 900...
  • Page 92 ES IZJAVA O SKLADNOSTI Naprava je bila zasnovana, oblikovana in distribuirana v skladu z varnostnimi pred- pisi direktiv ES. Naprava je namenjena samo za uporabo v običajnem gospodinjskem okolju in za opi- sane namene. POGOJI ZA GARANCIJO Aparat je dobavljen s 24-mesečno garanci- jo, ki začne veljati na dan nakupa.
  • Page 93 7. Stroški transporta in tveganja, ki se pojavijo med transportom naprave ali komponent naprave, gredo vedno na strošek kupca. 8. Poškodbe, ki jih povzroči uporaba neo- riginalnih rezervnih delov, niso zajete v garancijo. Za preprečitev nepotrebnih stroškov pripo- ročamo, da si vedno najprej pozorno pre- berete navodila za uporabo.
  • Page 95 Information requirement for the electric local space heaters Model identifier(s): EOR 1515 LCD Item Symbol Value Unit Item Unit Heat output Type of heat input, for electric storage local space heaters only (select one) Nominal heat output Pnom 1,50 manual heat charge control, with integrated thermostat Minimum heat output (indicative) Pmin 0,60...
  • Page 96 FIN Jos haluat huoltoapua, lisätietoja tai laitteen kanssa tulee ongelmia, tutustu verkkosivustoon osoitteessa www.qlima.com tai kysy neuvoa PVG kuluttajapalvelukeskuksesta (www.qlima.com). GB If you need information or if you have a problem, please visit the our website (www.qlima.com) or contact our sales support (you find its phone number on www.qlima.com) I Per informazioni e in caso di problemi, visitate il sito Web www.qlima.com oppure contattate...