Chapitres
Table des Matières
Dépannage

Manuels Connexes pour Zippie Salsa M2 Mini


Sommaire des Matières pour Zippie Salsa M2 Mini
- Page 1 Powered Wheelchair Fauteuil roulant électrique Elektrische rolstoel Instructions for Use Manuel d'utilisation Zippie Salsa M Mini Gebruikershandleiding 000690714.01...
-
Page 2: Wheelchair Components
SUNRISE MEDICAL heeft het ISO 13485 certificaat toegekend gekregen, een bewijs van de kwaliteit van onze processen in elk stadium, van- af het onderzoek en de ontwikkeling tot de productie. Deze producten voldoen aan de vereisten in overeenstemming met Europese richtlijnen. Getoonde opties en accessoires zijn tegen betaling verkrijgbaar. ZIPPIE SALSA M Mini Rev.C... -
Page 3: Important
• Persons who are mentally and physically able to control an input device to operate the wheelchair and its functions in a safe way. Dealer signature and stamp Rev.C ZIPPIE SALSA M Mini... -
Page 4: Table Des Matières
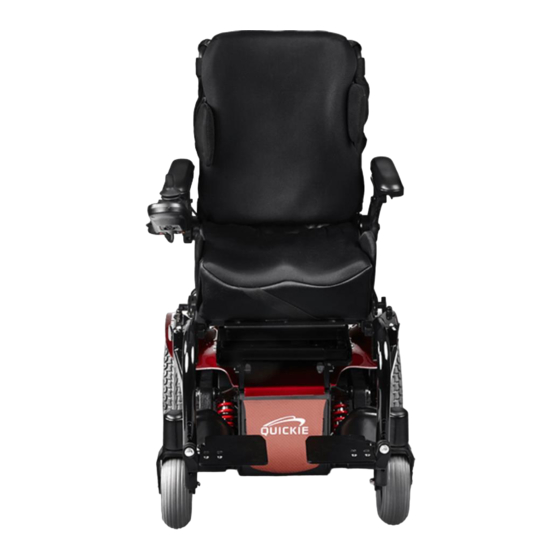
(EN 12184 & ISO 7176-15) 6.14 Powered Seating 7.0 Control System 15.0 Service History 7.0 R-net control system information 16.0 Disposal 7.1 VR2 control system information 7.2 VR2-L, (Lights). 17.0 Battery Wiring Diagram 7.3 VR2 Dual control unit ZIPPIE SALSA M Mini Rev.C... - Page 5 Zippie Mini Armrest Cushion Controller Legrest Drive wheel Footplate Front castor Backrest Side Guard Rear castors Batteries Rev.C ZIPPIE SALSA M Mini...
-
Page 6: Your Wheelchair
Sunrise Medical DY5 2LD service agent, work under the “Warranty Conditions” will Phone: 0845 605 66 88 be carried out by any other service agent designated by Fax: 0845 605 66 89 the manufacturer. www.SunriseMedical.co.uk ZIPPIE SALSA M Mini Rev.C... -
Page 7: Label Explantation / Word Definitions
The wheelchair or part having been damaged by neglect, accident or improper use. c) The wheelchair or part having been altered from the manufacturer’s specifications, or repairs having been attempted prior to the service agent being notified. Rev.C ZIPPIE SALSA M Mini... -
Page 8: Label Explanations
The serial number and information label is located on the front right hand Indicates battery charge point side of the main frame. Crash Tested / Tie down points WARNING – Do Not Touch - Static may damage equipment ZIPPIE SALSA M Mini Rev.C... - Page 9 Changing the fitted position of the module can reduce the stability of the product, therefore do not change this setting Left Leg Rest Right Leg Rest Both Leg Rests WARNING: When the seat is raised you must always use the seat stay Rev.C ZIPPIE SALSA M Mini...
-
Page 10: General Safety Warning And User Tips
• Do not attempt to climb or descend a series of steps. It is unsafe to do so and could cause personal injury or damage the wheelchair. The Zippie M Mini is a mid-wheel drive, (MWD), wheelchair and has been designed to climb one single step or kerb at a time. -
Page 11: Emc - Radio Transmitting Devices
Full speed turns should not be attempted. If you need to turn sharply you must reduce your speed with the joystick or speed setting. This is particularly important when travelling across or down a slope. Disregarding this advice could lead to your wheelchair tipping over. Rev.C ZIPPIE SALSA M Mini... -
Page 12: Weight Limit
WARNING! 4.13 Hot surfaces Not only the motors can get hot during the operation of the wheelchair, but also the upholstery material and armrests when standing in the sun. ZIPPIE SALSA M Mini Rev.C... -
Page 13: Adverse Conditions
Always approach the ramp head-on and exercise caution. CAUTION! Please ensure your ramp is suitable for the product you are transporting. Rev.C ZIPPIE SALSA M Mini... -
Page 14: Use On A Slope
• Always ensure the wheelchair is in drive mode when front wheels to lift. using passenger lift (wheels locked not in freewheel mode). ZIPPIE SALSA M Mini Rev.C... -
Page 15: Creep Mode
Skin - Wash skin with plenty of water Eyes - Immediately flood the eye with plenty of water for at least 5 minutes holding the eye open. Ingestion - Drink lots of water - Seek medical attention immediately. Rev.C ZIPPIE SALSA M Mini... -
Page 16: Rear View Mirror
Do not leave lit cigarettes or other heat sources on the Fig. 4.4 Fig. 4.5 tray as this could cause the tray to deform and mark. • Ensure that all extremities and clothing are free when positioning the tray for use. ZIPPIE SALSA M Mini Rev.C... -
Page 17: Lap Belt (Standard Seat)
Inspect the lap belt at regular intervals for any signs of fray or damage and replace as necessary. • When servicing, check for correct operation of the release buckle and for any signs of wear on the material or plastic brackets. Rev.C ZIPPIE SALSA M Mini... - Page 18 Fig. 4.9 • Lap straps are not suitable for transit purposes, approved occupant restraint systems must be used. Fig. 4.6 Fig. 4.10 Fig. 4.7 Fig. 4.11 Fig. 4.12 ZIPPIE SALSA M Mini Rev.C...
-
Page 19: Vr2 Controller (Fig. 4.13)
Turn the control system off Fig. 5.5 at once and consult your Sunrise approved dealer. R-net Control Please refer to your R-net Owner’s Manual for details. Rev.C ZIPPIE SALSA M Mini... -
Page 20: Re-Assembling
When the power wheelchair is functioning normally, the brake release should only be used to park or store the unoccupied wheelchair . • Never push the occupied power wheelchair up or down a slope with the Brake release in operation. ZIPPIE SALSA M Mini Rev.C... -
Page 21: Drive Wheel Suspension Salsa
5.5 Drive wheel suspension Salsa engage the release levers – Failure to do so will increase The Zippie M2 Mini has an effective and adjustable drive the force needed to push the wheelchair. wheel suspension system as a standard feature. To... -
Page 22: Control Joystick Unit Position
Check that the maximum speed is set to a level which suits you, (B). • Push the joystick to control the speed and direction of the wheelchair , (C). NOTE: Please refer to Section 7 ZIPPIE SALSA M Mini Rev.C... -
Page 23: Armrests
6. Retighten the 6mm rotation bolts on both armrests, (C). (Fig.5.14). Use 20 Nm or 177 in/lb of torque. WARNING! Check all bolts periodically for tightness. If loose the armpad could slip down when pressed. Fig. 5.14 Fig. 5.15 Rev.C ZIPPIE SALSA M Mini... - Page 24 9. Follow steps, 2 to 8 in the previous section 5.8.2. WARNING! Check all bolts periodically for tightness. If loose the armpad could slip down when pressed. Fig. 5.18 Fig. 5.19 Fig. 5.16 Fig. 5.20 Fig. 5.21 ZIPPIE SALSA M Mini Rev.C...
- Page 25 170mm min. 205mm max. 200mm min. 8º 275mm max. min. max. 170mm min. 215mm max. 210mm min. 12º 275mm max. min. max. 170mm min. 225mm max. 215mm min. 16º 275mm max. min. Fig. 5.22 max. Rev.C ZIPPIE SALSA M Mini...
- Page 26 Use 10 Nm or 88.5 in/lb of torque, (Fig.5.23). WARNING! Ensure screws are fully tightened prior to use, especially when transporting your wheelchair . CAUTION! Please check that the new arm rest position does not Fig. 5.24 interfere with any seat positioning settings. ZIPPIE SALSA M Mini Rev.C...
-
Page 27: Leg Rests
To refit: • Line up the holes and studs, (Fig.5.28). • Drop the leg rest into the receiver. • Push the leg rest inwards until it clicks shut, (Fig.5.29). Fig.5.27 Fig.5.26 Fig.5.28 Fig.5.29 Fig. 5.25 Rev.C ZIPPIE SALSA M Mini... - Page 28 Remove both sets of 5mm hanger depth adjustment bolts. • Slide both hanger receivers to the desired location. • Replace both sets of depth adjustment bolts. • Use 20Nm of torque. Fig. 5.30 Fig. 5.31 Fig. 5.32 ZIPPIE SALSA M Mini Rev.C...
-
Page 29: Foot Plates
Remove the bolt on the foot rest plate as shown in (A-Fig. 5.34), • Adjust the length to suit. • Refit bolt. • Ensure the bolts/screws are firmly located and tighten ed prior to use. Fig.5.35 LEVER Rev.C ZIPPIE SALSA M Mini... -
Page 30: Seating
The seat covers are all fully removable using zips or Velcro Once brackets are removed seat covers can be ®. removed. The zip for the backrest is located on the under- side of the cushion. Fig.6.3 ZIPPIE SALSA M Mini Rev.C... -
Page 31: Backrest Upholstery (Fig 6.4)
JAY backrest, which is available as an optional extra. WARNING! You must ensure all 4 screws are securely tightened and the backrest is correctly and firmly in position prior to using your wheelchair. Fig. 6.4 Fig. 6.6 Rev.C ZIPPIE SALSA M Mini... -
Page 32: Seat Height Adjustment
Close the seat, refit & tighten the hand wheels, (fig.6.7). Fig. 6.9 Fig. 6.7 3. Replace both sets of depth adjustment bolts. Use 20 Nm or 177 in/lb of torque, (Fig.6.10). Fig. 6.10 Fig. 6.10 ZIPPIE SALSA M Mini Rev.C... -
Page 33: Backrest Angle Adjustment
(Fig.6.12). 3. Reinsert and tighten both backrest bracket index bolts and bracket bolts (A & B). Use 20 Nm or 177 in/lb of torque, (Fig.6.13). NOTE: Figure 6.13 represent the 8°angle. Fig. 6.11 Fig. 6.13 Rev.C ZIPPIE SALSA M Mini... -
Page 34: Back Height Adjustment
6. Replace the backpost adjustment screws. Use 10 Nm or 88.5 in/lb of torque, (Fig.6.19). 3. Remove the top upholstery screws. The upholstery can now be moved and vertically compressed to provide access to Fig. 6.19 the hidden Phillips-head bolts, (Fig.6.16). Fig. 6.16 ZIPPIE SALSA M Mini Rev.C... -
Page 35: Manual Setting Of The Seat Angle
7. Replace both top upholstery bolts. Ensure the bolts thread through the top upholstery eyelets, (Fig.6.20). Fig. 6.21 3° 8. Retighten the upholstery straps, (Fig.6.21). Fig. 6.22 6° 9. Reattach the upholstery cover, (Fig.6.22). 9° Rev.C ZIPPIE SALSA M Mini... -
Page 36: Jay Backrests
To adjust the headrest angle, loosen the screws at the headrest upholstery, position the headrest as required and tighten the screws securely. (Fig.6.24). ZIPPIE SALSA M Mini Rev.C... -
Page 37: Powered Seating
VR2 Control, in the same way. Please see the section, “To operate the Actuators”, below. NOTE: The seat can lift up to 300 mm by operating it through your control system. Fig. 6.25 Rev.C ZIPPIE SALSA M Mini... - Page 38 Once the seat is fully raised or fully down, do not hold the joystick in its operating position as this could damage the actuator R-net Control Please refer to your R-net Owner’s Manual for details. Fig.6.26 1.5m ZIPPIE SALSA M Mini Rev.C...
-
Page 39: Control System
Battery gauge: The battery gauge shows you that the wheelchair is If your Zippie Salsa M2 Mini is fitted with the R-net switched on. It also indicates the status of the wheelchair control system, a Gyro Module with the latest GYRO . - Page 40 Please refer to your R-net Owner’s Manual for for drive profile operation, the selected drive profile. This details. gauge also indicates if the speed of the wheelchair is being limited or if the control system is locked. ZIPPIE SALSA M Mini Rev.C...
-
Page 41: Vr2-L, (Lights)
All common controls can be found on the previous page. If the LED flashes rapidly either a total short circuit, a single lamp open circuit or a total open circuit in the entire indicator circuit has been detected Rev.C ZIPPIE SALSA M Mini... -
Page 42: Vr2 Dual Control Unit
Please refer to your R-net Owner’s Manual for Actuator button and LED: details. All VR2 dual attendant systems have an actuator button fitted as standard. NOTE: If the VR2 is programmed with no actuators then this button has no function. ZIPPIE SALSA M Mini Rev.C... - Page 43 ACTUATOR BUTTON SPEED/ PROFILE INCREASE BUTTON SPEED/PROFILE DECREASE BUTTON INDICATOR BUTTONS VR2 CONTROL PANEL LAYOUT VR2-L CONTROL PANEL LAYOUT JOYSTICK SPEED INDICATOR MAX. SPEED BUTTON CONTROL PANEL ACTUATOR BUTTON CONTROL BUTTON VR2 DUAL CONTROL UNIT Rev.C ZIPPIE SALSA M Mini...
-
Page 44: Troubleshooting Using The Vr2
Switch on the control system again and try to drive the wheelchair . WARNING! If the safety circuits operate again, switch off and do not try to use the wheelchair . Contact your Sunrise Medical Authorised Dealer. ZIPPIE SALSA M Mini Rev.C... -
Page 45: Fault Code
A=Actuator LED’s An actuator trip is indicated. If more than one actuator is fitted, check which actuator is not working. Check the actuator wiring. R-net Control Please refer to your R-net Owner’s Manual for details. Rev.C ZIPPIE SALSA M Mini... -
Page 46: Controller Mounts
Please refer to your R-net Owner’s Manual for • Always turn off the power to the controller when details. leaving the user in the wheelchair. (Fig.9.1). Fig.9.2 Fig.9.1 Attendant control Parallel swing-away control ZIPPIE SALSA M Mini Rev.C... -
Page 47: Centre Bar Mount Control (R-Net)
Fig. 9.3 Emergency stop button Centre bar mount with R-net Control Please refer to the R-net Owner’s Manual for details of R-net hand control functions. Adjustment knob Rev.C ZIPPIE SALSA M Mini... -
Page 48: Emergency Stop Button
Powered Swing-away with R-net Chin Control Sunrise Medical dealer for adaptation. Please refer to the R-net Owner’s Manual for details of R-net hand control functions Fig. 9.4 ZIPPIE SALSA M Mini Rev.C... -
Page 49: Speciality Controls
The fourth switch is the mode switch and it toggles the head array between forward and reverse and between driving the wheelchair and operating any ancillary devices (such as powered seating or augmentative communications systems). Fig. 10.2 Fig. 10.1 Rev.C ZIPPIE SALSA M Mini... -
Page 50: Sip And Puff Control And Buddy Buttons
Fig. 10.5 Fig. 10.6 R-net, Omni Plus control Please refer to the R-net Owner’s Manual for details of R-net, Omni Plus control functions ZIPPIE SALSA M Mini Rev.C... -
Page 51: Batteries And Charging
To fit the batteries please reverse the above process. WARNING! • The Salsa M2 Mini is fitted with two flexible straps that retain both of the handle screws, (A-Fig.11.5). These are fitted as a safety feature and should not be removed from the wheelchair . -
Page 52: Safety Cut-Outs
Return the batteries back to Sunrise Medical or directly to the battery manufacturer for recycling, when they no longer hold charge. ZIPPIE SALSA M Mini Rev.C... -
Page 53: General Charger Information
• When buying replacement batteries or charger always consult your Sunrise Medical service agent Rev.C ZIPPIE SALSA M Mini... -
Page 54: Common Battery Statements
• To reduce the risk of an electric shock, unplug the charger from the outlet before attempting any maintenance or cleaning. Turning off the controls will not reduce the risk. ZIPPIE SALSA M Mini Rev.C... -
Page 55: Transportation
Spill proof sealed batteries such as “gelled electrolyte” the wheelchair , all auxiliary equipment, for example, or “AGM” must be installed on powered wheelchairs Kerb climbers, Tray tables, Crutches & Loose when used in a motor vehicle. cushions. Fig. 12.2 Fig. 12.1 Rev.C ZIPPIE SALSA M Mini... -
Page 56: Occupant Restraint Instructions
Headrest should be positioned to support the back of the head fully and not rest in the nape of the neck. • Pelvic restraints should make full contact across the front of the body near the junction of the thigh and pelvis ZIPPIE SALSA M Mini Rev.C... -
Page 57: Crash Testing On The Salsa, All Models
The label shown in Fig 12.6 is used to identify the tie down points on all wheelchair models. Fig. 12.7 - 12.8 show the tie down label placements on the Salsa M2 Mini. Fig.12.9 - 12.10 shows the tie down straps front and aft. Fig.12.9 Fig.12.5... -
Page 58: Securing The Wheelchair Into The Vehicle
Docking Systems: Please note that the overall length of your wheelchair The Zippie Salsa M2 Mini is approved for use with may be greater than the available length of the Wheelchair Adapted Vehicles (WAV). Product prescribers “wheelchair ” space in the railway carriage. -
Page 59: Other Transport Requirements
Your Moisture resistance: IPx4. wheelchair can be secured by attaching suitable No restrictions on humidity and air pressure. restraints, (see section 12.5). WARNING! Do not sit in your wheelchair when it is transported as luggage. Rev.C ZIPPIE SALSA M Mini... -
Page 60: Maintenance And Cleaning
Tyres will need to be changed when such damage is evident or if the tread cannot be seen over the complete surface of the tyre. ZIPPIE SALSA M Mini Rev.C... - Page 61 Fig.13.1 Fig.13.2 Fig.13.3 Fig.13.4 Fig.13.6 Fig.13.5 Fig.13.7 Fig.13.8 Rev.C ZIPPIE SALSA M Mini...
-
Page 62: Removing The Castor Wheel
To refit, reverse above procedure taking care not to • force bolt through bearing spacer. • Gently move the wheel back and forth until bolt slips through. • Tighten to a torque of 19Nm. Fig.13.10 Fig.13.12 Fig.13.11 Fig.13.13 ZIPPIE SALSA M Mini Rev.C... -
Page 63: Inspection Of The Upholstery/Seating
Ensure surfaces are rinsed well with clean water and dried thoroughly. WARNING Do not use a hose or a pressure washer to clean your wheelchair. Rev.C ZIPPIE SALSA M Mini... -
Page 64: Cleaning Controls
• After connecting battery terminals and connectors its entirety. The individual LED’s cannot be replaced. ensure all wiring is tidy and cannot get entangled in any moving parts. ZIPPIE SALSA M Mini Rev.C... - Page 65 (hex wrench), to undo & remove the terminal bolt. Repeat for the other terminal/battery, (Fig.13.18). • On refitting, the battery terminals must be covered after connection with the caps provided on the cable, (Fig.13.19). Fig.13.18 Fig.13.14 Fig.13.19 Rev.C ZIPPIE SALSA M Mini...
-
Page 66: Controller Access
The annual full service must be performed by an approved Sunrise Medical authorised dealer. For a list of approved authorised dealers in your area please contact Sunrise Medical Customer Service at the address in section 1.0. ZIPPIE SALSA M Mini Rev.C... -
Page 67: Recommended Maintenance Routines
/ equipment during any service Make sure that all components of the control system are procedure pertaining to this or other Technical / securely mounted. Do not over-tighten any securing Workshop Manuals issued by Sunrise Medical. screws. Rev.C ZIPPIE SALSA M Mini... -
Page 68: Performance Checks
¯ Clean wheelchair upholstery ¯ Check battery terminals for tightness etc. Complete inspection, safety check and service should be made by a Sunrise Medical authorised dealer Daily = Before each use of the wheelchair . ZIPPIE SALSA M Mini Rev.C... -
Page 69: Specification Sheets (En 12184 & Iso 7176-15)
Brierley Hill Moisture resistance: IPx4 West Midlands No restrictions on humidity and air pressure DY5 2LD Phone: 0845 605 66 88 www.SunriseMedical.co.uk Model: Zippie Salsa M Mini ISO 7176-15 Comments Overall length (with legrest) 1000 mm (1 m) With 90º hangers... -
Page 70: Service History
Wear Forwards Pressure Reverse Bearings Emergency stop Wheel nuts Left turn Motors Right turn Wiring Up/Down slope Connections Over obstacles Noise Parking brake Brakes Note: Only use Sunrise Medical parts for service and Brushes repairs ZIPPIE SALSA M Mini Rev.C... -
Page 71: Disposal
• Do not attempt to open the batteries. • Batteries contain sulphuric acid. • Batteries should be returned to Sunrise Medical or your wheelchair dealer. • Alternatively, batteries should be recycled at a specific licensed disposal centre. Rev.C ZIPPIE SALSA M Mini... -
Page 72: Battery Wiring Diagram
17.0 Battery Wiring Diagram Fig.17.1 Fig.17.2 Charger Socket: Pin 1: Battery Positive Pin 2: Battery Negative Pin 3: Inhibit Fig.17.3 BATTERY CONNECTOR 100A YELLOW 100A BATTERY CONNECTOR 15 A BLACK BLACK AUXILIARY POWER CONNECTOR ZIPPIE SALSA M Mini Rev.C... -
Page 73: Informations Utilisateur
âgées ayant assez de force dans le haut du corps. • Personnes mentalement et physiquement capables d'utiliser une unité de commande pour manipuler en toute sécurité le fauteuil roulant et ses fonctions. Tampon et signature du revendeur Rev.C ZIPPIE SALSA M Mini... - Page 74 15.0 Révisions 7.0 Informations sur le système de commande R-net 7.1 Informations sur le système de commande VR2 16.0 Enlèvement 7.2 VR2-L (Feux). 17.0 Schéma de câblage de la batterie 7.3 Boîtier VR2 commande double ZIPPIE SALSA M Mini Rev.C...
- Page 75 Zippie Mini Accoudoir Coussin Boîtier de commande Repose-jambes Roue motrice Palette Roue avant Dossier Protège-vêtements Roues arrières Batteries Rev.C ZIPPIE SALSA M Mini...
-
Page 76: Votre Fauteuil
37170 Chambray-Lès-Tours désigné, le travail pourra, en vertu des conditions de Tel : + 33 (0) 247554400 garantie, être effectué par un autre service après-vente Fax : +30 (0) 247554403 désigné par le fabricant. www.sunrisemedical.fr ZIPPIE SALSA M Mini Rev.C... -
Page 77: Explication Des Étiquettes / Définitions
à une négligence, un accident ou une utilisation inadéquate. c) Le fauteuil, ou l’une de ses pièces, a été transformé ou une réparation a été entreprise avant d’en avoir notifié le service après-vente. Rev.C ZIPPIE SALSA M Mini... -
Page 78: Explication Des Étiquettes
L’étiquette d’information, qui indique également le numéro de série, est Indication du niveau de charge de la batterie apposée à l’avant droit du châssis. Essai de choc réalisé / Points d'arrimage AVERTISSEMENT – Ne pas toucher - L'électricité statique pourrait endommager le matériel ZIPPIE SALSA M Mini Rev.C... -
Page 79: Les Deux Repose-Jambes
Repose-jambe gauche Repose-jambe droit Les deux repose-jambes AVERTISSEMENT : Toujours utiliser la béquille lorsque le siège est surélevé Rev.C ZIPPIE SALSA M Mini... -
Page 80: Consignes Générales De Sécurité Et Conseils D'utilisation
ZIPPIE SALSA M Mini Rev.C... -
Page 81: Ecm - Dispositifs De Transmission
Avant de négocier un virage, réduisez la vitesse à l’aide de votre joystick ou commande de vitesses. Ceci est primordial surtout lorsque vous vous trouvez dans une pente. A défaut, vous risquez de faire basculer le fauteuil roulant. Rev.C ZIPPIE SALSA M Mini... -
Page 82: Charge Maximale
Traversez toujours les routes le plus rapidement possible. Fig. 4.2 AVERTISSEMENT ! 4.13 Surfaces chaudes Non seulement les moteurs peuvent chauffer pendant le fonctionnement du fauteuil, mais les toiles et les accoudoirs peuvent également devenir chauds au soleil. ZIPPIE SALSA M Mini Rev.C... -
Page 83: Conditions Défavorables
Changer la position réglée du module peut réduire la stabilité du produit, ne changer donc ATTENTION ! pas ce réglage. Veuillez vous assurer que votre rampe soit adaptée pour le produit que vous transportez. Rev.C ZIPPIE SALSA M Mini... -
Page 84: Utilisation En Pente
Vérifiez que le fauteuil est en mode Conduite avant redémarrez tout doucement. Si nécessaire, penchez- d'utiliser l'élévateur (les roues ne doivent pas être en vous vers l’avant afin de faire contrepoids et mode Roue libre). d’empêcher les roues avant de décoller. ZIPPIE SALSA M Mini Rev.C... -
Page 85: Mode Ralenti
Il doit être remplacé ou réparé dès que possible. Le fluide OKO n'est pas classé comme produit dangereux mais il peut entraîner une irritation de la peau après un contact prolongé. Rev.C ZIPPIE SALSA M Mini... -
Page 86: Rétroviseur
• Assurez-vous qu'aucune extrémité ou vêtements ne gêne le positionnement de la tablette pour l'utilisation. Fig. 4.4 Fig. 4.5 ZIPPIE SALSA M Mini Rev.C... -
Page 87: Avertissements
éventuel signe de déchirure ou d'endommagement. Remplacez la ceinture si nécessaire. • Lors des révisions, vérifiez le bon fonctionnement de la boucle d’ouverture et regardez s’il y a des signes d’usure sur la sangle ou les boucles en plastique. Rev.C ZIPPIE SALSA M Mini... - Page 88 • Les sangles sous-abdominales ne conviennent pas pour le transport ; un système de retenue homologué doit être utilisé à la place. Fig. 4.6 Fig. 4.10 Fig. 4.7 Fig. 4.11 Fig. 4.12 ZIPPIE SALSA M Mini Rev.C...
-
Page 89: Commande Vr2
Éteignez le manipulateur immédiatement et contactez votre revendeur agréé Sunrise Medical. Commande R-net Pour plus de détails, veuillez consulter le manuel d'utilisation R-net. Rev.C ZIPPIE SALSA M Mini... -
Page 90: Re-Montage
• Ne poussez jamais le fauteuil occupé en haut ou en bas d'une pente avec le débrayage de frein enclenché. ZIPPIE SALSA M Mini Rev.C... -
Page 91: Suspension Des Roues Motrices Salsa
5.5 Suspension des roues motrices Salsa avant d'actionner les leviers de débrayage, à défaut de Le fauteuil Zippie M2 Mini est doté d’un système de quoi il vous faudra plus de force pour faire avancer le suspension efficace et réglable, monté de série. Pour fauteuil. -
Page 92: Positionnement Du Joystick
• Vérifiez que la vitesse maximale est réglée à un niveau qui vous convient, (B). • Poussez le joystick pour contrôler la vitesse et la direction du fauteuil, (C). REMARQUE : Voir la Section 7. ZIPPIE SALSA M Mini Rev.C... -
Page 93: Accoudoirs
20 Nm ou 177 in/lb. AVERTISSEMENT ! Vérifiez régulièrement le serrage de toutes les vis. Si les vis sont desserrées, les manchettes pourraient glisser vers l'avant lorsque vous posez le bras. Fig. 5.14 Fig. 5.15 Rev.C ZIPPIE SALSA M Mini... - Page 94 AVERTISSEMENT ! Fig. 5.18 Vérifiez régulièrement le serrage de toutes les vis. Si les vis sont desserrées, les manchettes pourraient glisser vers l'avant lorsque vous posez le bras. Fig. 5.19 Fig. 5.16 Fig. 5.20 Fig. 5.21 ZIPPIE SALSA M Mini Rev.C...
-
Page 95: Angle D'inclinaison Position De La Bague Du Dossier
Max. 170 mm Min. 215 mm Max. 210 mm Min. 12º 275 mm Max. Min. N.A. Max. 170 mm Min. 225 mm Max. 215 mm Min. 16º 275 mm Max. Min. N.A. Fig. 5.22 Max. Rev.C ZIPPIE SALSA M Mini... -
Page 96: Réglage De L'emplacement Des Manchettes Standard
AVERTISSEMENT ! Assurez-vous d’avoir bien serré les vis avant d’utiliser votre fauteuil et surtout avant de le transporter. Fig. 5.24 ATTENTION ! Vérifiez que la nouvelle position des accoudoirs n'entrave pas le bon positionnement du siège. ZIPPIE SALSA M Mini Rev.C... -
Page 97: Remplacement Des Accoudoirs
Alignez les orifices et les goujons, (Fig. 5.28). • Insérez le repose-pied dans son tube de logement. • Repoussez le repose-pied vers l'intérieur jusqu'à ce qu'il s'enclenche, (Fig. 5.29). Fig. 5.27 Fig. 5.26 Fig. 5.28 Fig. 5.29 Fig. 5.25 Rev.C ZIPPIE SALSA M Mini... -
Page 98: Réglage De La Profondeur Des Repose-Jambes
Glissez les deux potences à la position désirée. • Replacez et serrez les deux jeux de vis de réglage de la profondeur. • Serrez au couple de 20 Nm. Fig. 5.30 Fig. 5.31 Fig. 5.32 ZIPPIE SALSA M Mini Rev.C... -
Page 99: Repose-Pieds Escamotable : Pour Régler La Longueur Des Repose-Pieds
à la Fig. 5.34. pièces mobiles du repose-jambes. • Réglez à la longueur désirée. • Replacez le boulon. • Vérifiez d’avoir bien resserré les boulons/vis avant de réutiliser votre fauteuil roulant. Fig. 5.35 LEVIER Rev.C ZIPPIE SALSA M Mini... -
Page 100: Assise
Les housses sont entièrement amovibles car elles sont munies de fermetures Éclair et de Velcro®. Une fois toutes les attaches retirées, vous pouvez enlever les housses. La fermeture Eclair du dossier se trouve en dessous du coussin. Fig. 6.3 ZIPPIE SALSA M Mini Rev.C... -
Page 101: Toile De Dossier
Un dossier Rehab permet l’installation d’un dossier JAY, disponible en option. AVERTISSEMENT ! Avant de réutiliser votre fauteuil, vérifiez que les 4 vis sont correctement serrées et que le dossier tient fermement en place. Fig. 6.4 Fig. 6.6 Rev.C ZIPPIE SALSA M Mini... -
Page 102: Réglage De La Hauteur Du Siège
Fig. 6.9 Fig. 6.7 3. Replacez et serrez les deux jeux de vis de réglage de la profondeur. Utilisez un couple de serrage de 20 Nm ou 177 in/lb, (Fig. 6.10). Fig. 6.10 Fig. 6.10 ZIPPIE SALSA M Mini Rev.C... -
Page 103: Réglage De L'angle D'inclinaison Du Dossier
(A et B). Utilisez un couple de serrage de 20 Nm ou 177 in/lb, (Fig. 6.13). REMARQUE : La figure 6.13 correspond à un angle d'inclinaison de 8 degrés. Fig. 6.11 Fig. 6.13 Rev.C ZIPPIE SALSA M Mini... -
Page 104: Réglage De La Hauteur Du Dossier
3. Retirez les vis de retenue de la toile. Vous pouvez un couple de serrage de 10 Nm ou 88,5 in/lb, (Fig. 6.19). maintenant relever la toile pour accéder aux vis cruciformes cachées, (Fig. 6.16). Fig. 6.19 Fig. 6.16 ZIPPIE SALSA M Mini Rev.C... -
Page 105: Réglage Manuel De L'angle D'assise
à travers les œillets de la toile, (Fig. 6.20). Fig. 6.21 3° 8. Resserrez les sangles de la toile, (Fig. 6.21). Fig. 6.22 6° 9. Remettez la toile en place, (Fig. 6.22). 9° Rev.C ZIPPIE SALSA M Mini... -
Page 106: Dossiers Jay
Resserrez fermement les vis. Pour régler l’angle d’inclinaison de l’appui-tête, desserrez les vis de la garniture de l’appui-tête, positionnez l’appui-tête dans la position souhaitée et resserrez les vis. (Fig. 6.24). ZIPPIE SALSA M Mini Rev.C... -
Page 107: Assise Électrique
électriques sont commandées par la commande VR2, de la même façon. Veuillez vous reporter à la section, “Pour activer les vérins” ci-dessous. REMARQUE : Le siège peut être surélevé de 300 mm grâce au système de commande. Rev.C ZIPPIE SALSA M Mini... -
Page 108: Assise Élévatrice Électrique
Pour reprendre la conduite du fauteuil, ramenez les pour éviter d’endommager le vérin options d'assise à leur position initiale. Commande R-net Pour plus de détails, veuillez consulter le manuel d'utilisation R-net. Fig. 6.26 1,5 m ZIPPIE SALSA M Mini Rev.C... -
Page 109: Système De Commande
Indicateur de batterie : L'indicateur de batterie indique que le fauteuil est sous Si votre fauteuil Zippie Salsa M2 Mini possède le système tension. Il indique également le statut du fauteuil. de commande R-net, il est possible de l'équiper d'un Reportez-vous au chapitre 8. - Page 110 Conduite il montre le profil de conduite sélectionné. Il indique également si la vitesse du fauteuil est limitée ou si le système de commande est verrouillé. ZIPPIE SALSA M Mini Rev.C...
-
Page 111: Vr2-L (Feux)
à la page précédente. Si le voyant LED clignote rapidement, cela indique qu'un court-circuit total, un circuit ouvert d'une lampe ou un circuit ouvert total dans le circuit des clignotants a été détecté. Rev.C ZIPPIE SALSA M Mini... -
Page 112: Boîtier Vr2 Commande Double
Bouton du vérin et voyant LED : d'utilisation R-net. Tous les systèmes VR2 commande double sont dotés d'un bouton de vérin installé de série. REMARQUE : Si le VR2 est programmé sans vérin, ce bouton ne sera associé à aucune fonction. ZIPPIE SALSA M Mini Rev.C... - Page 113 BOUTONS DES CLIGNOTANTS CONFIGURATION DU PANNEAU DE COMMANDE CONFIGURATION DU PANNEAU DE COMMANDE VR2-L INDICATEUR DE JOYSTICK VITESSE INDICATEUR DE VITESSE MAX PANNEAU DE COMMANDE BOUTON DU VÉRIN BOUTON DE COMMANDE BOÎTIER VR2 COMMANDE DOUBLE Rev.C ZIPPIE SALSA M Mini...
-
Page 114: Dépannage À L'aide De La Commande Vr2
• Rallumez le système de commande et essayez de faire avancer le fauteuil. AVERTISSEMENT ! Si les circuits de sécurité s'activent, éteignez le fauteuil et n'essayez plus de l'utiliser. Contactez votre revendeur agréé Sunrise Medical. ZIPPIE SALSA M Mini Rev.C... - Page 115 A = Voyant LED du vérin Problème de vérin. Si plusieurs vérins sont installés, vérifier lequel d'entre eux est défec- tueux. Vérifiez le câblage du vérin. Commande R-net Pour plus de détails, veuillez consulter le manuel d'utilisation R-net. Rev.C ZIPPIE SALSA M Mini...
-
Page 116: Éléments De Montage Du Boîtier De Commande
Pour plus de détails, veuillez consulter le manuel • Éteignez toujours votre boîtier de commande lorsque d'utilisation R-net. vous laissez l’utilisateur dans le fauteuil. (Fig. 9.1). Fig. 9.2 Fig. 9.1 Commande Accompagnateur Pantographe escamotable ZIPPIE SALSA M Mini Rev.C... -
Page 117: Commandes Montées Sur Barre Centrale (R-Net)
REMARQUE : Lorsque la commande est rabattue sous d’urgence la tablette, le fauteuil ne peut se déplacer. Commandes montées sur barre centrale Pour toute information sur les fonctions du système de commande R-net, reportez-vous au manuel R-net. Goupille de réglage Rev.C ZIPPIE SALSA M Mini... -
Page 118: Bouton D'arrêt D'urgence
Bras escamotable électrique avec commande au pour accompagnateur nécessite d'être modifiée, menton R-net contactez votre revendeur Sunrise Medical agréé. Pour toute information sur les fonctions du système de commande R-net, reportez-vous au manuel R-net. Fig. 9.4 ZIPPIE SALSA M Mini Rev.C... -
Page 119: Commandes Spéciales
Le quatrième contacteur est le contacteur de mode qui permute l'appui-tête entre le déplacement avant et arrière, et entre la conduite du fauteuil et l'utilisation de dispositifs auxiliaires (comme les systèmes d'assise électriques ou de communication augmentatifs). Fig. 10.2 Fig. 10.1 Rev.C ZIPPIE SALSA M Mini... -
Page 120: Contacteur Au Souffle Et Contacteurs Tash
être utilisé à l'extérieur. En cas d'inutilisation prolongée, un capuchon se place par-dessus. Fig. 10.5 Fig. 10.6 R-net, commande Omni Plus Pour toute information sur les fonctions du système de commande R-net, reportez-vous au manuel R-net. ZIPPIE SALSA M Mini Rev.C... -
Page 121: Batteries Et Recharge
Pour installer les batteries, inversez la procédure décrite ci-dessus. AVERTISSEMENT ! • Le fauteuil Salsa M2 Mini possède deux bandes flexibles destinées à maintenir les vis des deux Fig. 11.4 poignées (A - Fig. 11.5). Il s'agit d'un dispositif de sécurité... -
Page 122: Coupe-Circuit
être parcourues, vous procurant ainsi un plus grand confort. Renvoyez les batteries à Sunrise Medical ou au fabricant afin de les recycler, quand elles ne sont plus en état d’être chargées. ZIPPIE SALSA M Mini Rev.C... -
Page 123: Informations Générales Sur Le Chargeur
Ne l'utilisez pas à l’extérieur et ne l’exposez pas à la la clientèle. pluie, à la neige, à l’arrosage ni à l'humidité. • Si vous souhaitez acheter une batterie de rechange ou un chargeur, demandez conseil à votre service après-vente Sunrise Medical. Rev.C ZIPPIE SALSA M Mini... -
Page 124: Instructions Générales Pour La Batterie
électrocution ou provoquer un garantie. incendie. • Pour réduire les risques d’électrocution, débranchez le chargeur de la prise avant d’entreprendre toute opération d’entretien ou de nettoyage. Le mettre hors tension ne suffit pas. ZIPPIE SALSA M Mini Rev.C... -
Page 125: Transport
ISO 7176-19, ce qui doit être spécifiquement indiqué sur l'étiquette. • Les fauteuils utilisés à bord de véhicules motori- sés doivent être équipés de batteries hermétiques, comme les batteries à électrolyte gélifié ou les batte- ries AGM. Fig. 12.2 Fig. 12.1 Rev.C ZIPPIE SALSA M Mini... -
Page 126: Instructions Pour Le Système De Retenue De L'occupant
• Les systèmes de retenue pelvienne doivent être en contact avec la partie avant du corps, près de l'endroit où les cuisses et le bassin se rejoignent. ZIPPIE SALSA M Mini Rev.C... -
Page 127: Essais De Chocs Effectués Sur Le Salsa
12.3 Essais de chocs effectués sur le SALSA (Tous les Fig. 12.7 modèles). Un fauteuil de modèle Salsa M2 Mini a été testé conformément aux spécifications relatives à la performance dynamique de la norme ISO 7176-19 « Dispositifs de mobilité montés sur roues et destinés à... -
Page 128: Arrimage Du Fauteuil À Bord D'un Véhicule
12.6 Levage du fauteuil : (Fig. 12.9 - 12.10 à la page précédente) (Fig. 12.11) Le fauteuil Salsa M2 Mini peut être hissé, vide, à l'aide de sangles de levage suffisamment solides. AVERTISSEMENT ! Attachez les sangles aux quatre fixations d'arrimage du fauteuil. -
Page 129: Consignes Relatives Au Transport Du Véhicule À Travers D'autres Modes De Transport
Résistance à l’humidité : IPx4. points d'arrimage (voir section 12.5). Aucune restriction concernant l'humidité et la pression d'air. AVERTISSEMENT ! Ne restez pas assis dans votre fauteuil lorsqu'il est transporté en tant que bagage. Rev.C ZIPPIE SALSA M Mini... -
Page 130: Entretien Et Nettoyage
Le pneu bandage de la roue motrice du SALSA peut la surface du pneu. être enlevé et réparé/remplacé en suivant la procédure expliquant comment retirer la roue motrice, un peu plus haut. ZIPPIE SALSA M Mini Rev.C... - Page 131 Fig.13.1 Fig. 13.2 Fig. 13.3 Fig. 13.4 Fig. 13.6 Fig. 13.5 Fig. 13.7 Fig. 13.8 Rev.C ZIPPIE SALSA M Mini...
-
Page 132: Retrait De La Roue Avant
• Faites rouler lentement la roue vers l’avant et l’arrière jusqu’à ce que le boulon se glisse à travers. • Serrez avec un couple de serrage de 19 Nm. Fig. 13.12 Fig. 13.11 Fig. 13.13 ZIPPIE SALSA M Mini Rev.C... -
Page 133: Inspection De La Toile/Assise
Assurez-vous que les surfaces sont rincées avec de l'eau propre et entièrement séchées. AVERTISSEMENT Ne lavez jamais votre fauteuil avec un tuyau d'arrosage ou au jet d'eau à pression. Rev.C ZIPPIE SALSA M Mini... -
Page 134: Nettoyage Des Commandes
En cas de panne (suite à un impact, par exemple), l'unité des pièces mobiles. endommagée doit être remplacée intégralement. Les LED ne peuvent pas être remplacées individuellement. ZIPPIE SALSA M Mini Rev.C... - Page 135 Faites la même chose pour l'autre borne/batterie (Fig. 13.18). • Lors du remontage, pensez à recouvrir les bornes Fig. 13.18 des batteries avec les caches des câbles fournis (Fig. 13.19). Fig. 13.14 Fig. 13.19 Rev.C ZIPPIE SALSA M Mini...
-
Page 136: Accès Au Boîtier De Commande
La révision annuelle complète doit être effectuée par un revendeur agréé Sunrise Medical. Pour obtenir la liste des revendeurs agréés près de chez vous, veuillez contacter le centre-clients de Sunrise Medical. (Coordonnées fournies à la section 1.0.) ZIPPIE SALSA M Mini Rev.C... -
Page 137: Procédures D'entretien Recommandées
Vérifiez uniquement visuellement, ne manipulez pas le soufflet. Montage : Assurez-vous que tous les composants du système de commande sont montés correctement. Ne serrez pas excessivement les vis de sécurité. Rev.C ZIPPIE SALSA M Mini... -
Page 138: Vérifications De Performance
¯ Vérifiez que les bornes des batteries sont bien serrées, etc. Inspection complète, contrôle de sécurité et révision effectués par un revendeur agréé Sunrise Medical Tous les jours = Avant chaque utilisation du fauteuil roulant. ZIPPIE SALSA M Mini Rev.C... -
Page 139: Feuilles Produit (En 12184 Et Iso 7176-15)
Résistance à l’humidité : IPx4 West Midlands Aucune restriction concernant l'humidité et la pression DY5 2LD d'air Phone: 0845 605 66 88 www.SunriseMedical.co.uk Modèle : Zippie Salsa M Mini ISO 7176-15 Min. Max. Commentaires Longueur totale (avec repose-jambes) 1000 mm Avec potences de 90°... -
Page 140: Révisions
Écrous de roue Virage à gauche Moteurs Virage à droite Câblage Montée/Descente Connexions Franchissement d’obstacles Bruit Frein de stationnement Freins Remarque : N’utiliser que des pièces de rechange Balais Sunrise Medical pour les révisions et les réparations ZIPPIE SALSA M Mini Rev.C... -
Page 141: Enlèvement
• N'essayez pas d'ouvrir les batteries. • Les batteries contiennent de l'acide sulfurique. • Les batteries doivent être renvoyées à Sunrise Medical ou à votre revendeur. • Les batteries peuvent également être recyclées dans un centre de traitement agréé. Rev.C ZIPPIE SALSA M Mini... -
Page 142: Schéma De Câblage De La Batterie
Broche 1 : Batterie positive Broche 2 : Batterie négative Broche 3 : Blocage Fig. 17.3 CONNECTEUR DE BATTERIE 100 A ROUGE ROUGE JAUNE 100 A CONNECTEUR DE BATTERIE 15 A NOIR NOIR CONNECTEUR CIRCUIT AUXILIAIRE ZIPPIE SALSA M Mini Rev.C... - Page 143 • Personen die mentaal en fysiek in staat zijn een inputmodule te gebruiken om de rolstoel en de Stempel en handtekening dealer verschillende functies veilig te gebruiken. Rev.C ZIPPIE SALSA M Mini...
- Page 144 15.0 Onderhoudsgeschiedenis 6.12 JAY rugleuningen 6.13 Hoofdsteun 16.0 Verwijdering 6.14 Elektrisch zitsysteem 7.0 Bedieningssysteem 17.0 Diagram accubedrading 7.0 Informatie over het R-net bedieningssysteem 7.1 Informatie over het VR2 bedieningssysteem 7.2 VR2-L (Verlichting). 7.3 VR2 begeleider-bedieningssysteem ZIPPIE SALSA M Mini Rev.C...
- Page 145 Zippie Mini Armsteun Kussen Bediening Beensteun Aandrijfwiel Voetenplaat Zwenkwielen (voorzijde) Rugleuning Zijkanten Zwenkwielen (achterzijde) Accu's Rev.C ZIPPIE SALSA M Mini...
-
Page 146: Uw Rolstoel
Sunrise Medical B.V. “Garantievoorwaarden” uitgevoerd door een andere, door Groningenhaven 18-20 de fabriek aangewezen, dealer. 3433 PE NIEUWEGEIN The Netherlands T: +31 (0)30 – 60 82 100 F: +31 (0)30 – 60 55 880 E: info@sunrisemedical.nl www.SunriseMedical.nl ZIPPIE SALSA M Mini Rev.C... -
Page 147: Icoonuitleg/Woordbetekenis
De rolstoel of het onderdeel is beschadigd door nalatigheid, ongeval of onjuist gebruik. c) Verandering van de rolstoel of het onderdeel in afwijking van de specificaties van de fabrikant, of reparaties die geprobeerd zijn voordat de dealer op de hoogte werd gesteld. Rev.C ZIPPIE SALSA M Mini... -
Page 148: Icoonuitleg
Het label met daarop het serienummer en de productinformatie vindt u aan Geeft aan dat accu opgeladen moet worden de voorkant van het frame aan de rechterkant. Crashtest uitgevoerd/ Verankeringspunten WAARSCHUWING – Niet aanraken - Statische lading kan apparatuur beschadigen ZIPPIE SALSA M Mini Rev.C... - Page 149 Door de positie van de module te veranderen, kan de stabiliteit van het product verminderen. Verander de instelling dus niet. Linker beensteun Rechter beensteun Beide beensteunen WAARSCHUWING: Wanneer de zitting omhoog is geklapt, moet u altijd de zitsysteemvergrendeling gebruiken. Rev.C ZIPPIE SALSA M Mini...
-
Page 150: Algemene Veiligheidswaarschuwingen En Gebruikstips
• Probeer nooit een trap op- of af te gaan. Dit is niet veilig en kan leiden tot persoonlijk letsel en beschadiging van de rolstoel. De Zippie M Mini is een rolstoel met middenwielaandrijving (MWA) en hij is zodanig ontworpen dat de gebruiker één trede of stoeprand kan oprijden of afrijden. -
Page 151: Emc - Radiografische Apparatuur
Dit is vooral belangrijk wanneer u over of van een helling af rijdt. Negeren van dit advies kan tot gevolg hebben dat uw rolstoel kantelt. Rev.C ZIPPIE SALSA M Mini... -
Page 152: Gewichtsbeperking
WAARSCHUWING! 4.13 Hete oppervlaktes Niet alleen de motoren kunnen warm worden tijdens gebruik van de rolstoel. Ook het bekledingsmateriaal van de stoel en armsteunen kan zeer warm worden wanneer de rolstoel in de zon staat. ZIPPIE SALSA M Mini Rev.C... -
Page 153: Slechte Omstandigheden
Rij altijd voorwaarts en voorzichtig de oprijplaat op. van het product verminderen. Verander de instelling dus niet. OPGELET! Controleer altijd of de oprijplaat geschikt is voor het product dat u vervoert. Rev.C ZIPPIE SALSA M Mini... -
Page 154: Gebruik Op Een Helling
• Controleer altijd of de stoel in de rijmode staat wanneer men gebruik maakt van een passagierslift (wielen vergrendeld, niet in vrijloopmode). ZIPPIE SALSA M Mini Rev.C... -
Page 155: Kruipmodus
OKO vloeistof is slechts bedoeld als tijdelijke reparatie voor de band. De band moet zo snel mogelijk worden gerepareerd of vervangen. De OKO vloeistof is gekwalificeerd als een niet- gevaarlijke stof, maar kan huidirritatie veroorzaken bij langdurig contact met de huid. Rev.C ZIPPIE SALSA M Mini... -
Page 156: Achteruitkijkspiegel
• Let op dat handen, voeten en kledingstukken niet van de zwenkwielen. beklemd raken wanneer het werkblad voor gebruik op zijn plaats wordt gebracht. Fig. 4.4 Fig. 4.5 ZIPPIE SALSA M Mini Rev.C... -
Page 157: Heupgordel (Standaard Zitting)
• Tijdens de onderhoudsbeurt moet gecontroleerd worden of de gesp goed functioneert en of er sprake is van slijtage van het materiaal of de plastic beugels. Rev.C ZIPPIE SALSA M Mini... - Page 158 Fig. 4.9 beugels. • Heupgordels zijn niet geschikt als veiligheidsgordel tijdens transport. Hiervoor moeten goedgekeurde veiligheidsgordels worden gebruikt. Fig. 4.6 Fig. 4.10 Fig. 4.7 Fig. 4.11 Fig. 4.12 ZIPPIE SALSA M Mini Rev.C...
-
Page 159: Vr2 Controller (Fig. 4.13)
Schakel het bedieningssysteem direct uit en neem contact op met uw erkende Sunrise Medical dealer. R-net bediening Voor meer informatie over R-net wordt u verwezen naar de gebruikershandleiding. Rev.C ZIPPIE SALSA M Mini... -
Page 160: Opnieuw In Elkaar Zetten
• Duw de elektrisch aangedreven rolstoel met daarin een gebruiker nooit een helling op of af terwijl de rem- ontkoppeling geactiveerd is. ZIPPIE SALSA M Mini Rev.C... -
Page 161: Ophanging Salsa Aandrijfwielen
Controleer of de besturing (controller) uitgeschakeld is 5.5 Ophanging Salsa aandrijfwielen voordat de vrijloophendels worden gebruikt. Als u dit niet De Zippie M2 Mini beschikt standaard over een effectief, doet is er namelijk meer kracht nodig om de rolstoel te luchtgeveerd, verstelbaar wielophangingssysteem. -
Page 162: Plaatsing Van De Bedieningskast En Joystick
Controleer of de maximale snelheid is ingesteld op een niveau dat u prettig vindt, (B). • Gebruik de joystick om de snelheid en richting van de rolstoel te bepalen, (C). OPMERKING: Zie ook hoofdstuk 7. ZIPPIE SALSA M Mini Rev.C... -
Page 163: Armsteunen
(Fig. 5.14). Gebruik 20 Nm of 177 in/lb draaikracht. WAARSCHUWING! Controleer periodiek of alle schroeven nog goed aangedraaid zijn. Als de armsteun los zit, kan deze naar beneden glijden wanneer er druk op wordt uitgeoefend. Fig. 5.14 Fig. 5.15 Rev.C ZIPPIE SALSA M Mini... - Page 164 Fig. 5.18 WAARSCHUWING! Controleer periodiek of alle schroeven nog goed aangedraaid zijn. Als de armsteun los zit, kan deze naar beneden glijden wanneer er druk op wordt uitgeoefend. Fig. 5.19 Fig. 5.16 Fig. 5.20 Fig. 5.21 ZIPPIE SALSA M Mini Rev.C...
- Page 165 170 mm min. 215 mm max. 210 mm min. 12º 275 mm max. min. max. 170 mm min. 225 mm max. 215 mm min. 16º 275 mm max. min. Fig. 5.22 max. Rev.C ZIPPIE SALSA M Mini...
- Page 166 Controleer voor gebruik of de schroeven goed zijn aangedraaid. Dit is ook van belang wanneer uw rolstoel wordt vervoerd. Fig. 5.24 OPGELET! Controleer of de nieuwe positie van de armsteun geen belemmering vormt voor andere positioneringsinstellingen. ZIPPIE SALSA M Mini Rev.C...
-
Page 167: Beensteunen
Breng de gaten en moeren op een lijn, (Fig. 5.28). • Laat de beensteun in de stang zakken. • Duw de beensteun naar binnen totdat hij klikt en daarmee vergrendeld is (Fig. 5.29). Fig. 5.27 Fig. 5.26 Fig. 5.28 Fig. 5.29 Fig. 5.25 Rev.C ZIPPIE SALSA M Mini... - Page 168 Verwijder de beide 5mm stelbouten om de diepte van het hangmechanisme aan te passen. • Schuif beide stangen naar de gewenste positie. • Plaats de beide stelmoeren terug. • Gebruik 20Nm draaikracht. Fig. 5.30 Fig. 5.31 Fig. 5.32 ZIPPIE SALSA M Mini Rev.C...
- Page 169 A - Fig. 5.34. wordt gesteld. • Pas de lengte naar wens aan. • Plaats de bout terug en draai aan. • Controleer voor gebruik of de bouten/schroeven correct geplaatst zijn en goed aangedraaid zijn. Fig. 5.35 HENDEL Rev.C ZIPPIE SALSA M Mini...
-
Page 170: Zitting
De hoezen zijn helemaal te verwijderen dankzij ritsen of klittenband. Wanneer de beugels zijn verwijderd, kunnen de hoezen ook worden verwijderd. De rits voor de rugleuning bevindt zich aan de onderzijde van het kussen. Fig. 6.3 ZIPPIE SALSA M Mini Rev.C... -
Page 171: Spanbanden Rugleuning (Fig. 6.4)
Deze is beschikbaar als extra optie. WAARSCHUWING! Voordat u uw weer stoel gebruikt, moet u controleren of de vier schroeven weer stevig aangedraaid zijn en of de rugleuning correct en stevig vastzit. Fig. 6.4 Fig. 6.6 Rev.C ZIPPIE SALSA M Mini... -
Page 172: Aanpassing Zithoogte
Sluit de zitting, plaats de handwielen terug en draai deze weer aan (Fig. 6.7). Fig. 6.9 Fig. 6.7 3. Plaats de beide stelmoeren terug. Gebruik 20 Nm of 177 in/lb draaikracht, (Fig. 6.10). Fig. 6.10 Fig. 6.10 ZIPPIE SALSA M Mini Rev.C... -
Page 173: Aanpassing Hoek Rugleuning
3. Plaats de schroeven (A en B) terug en draai ze stevig aan. Gebruik 20 Nm of 177 in/lb draaikracht, (Fig. 6.13). OPMERKING: In afbeelding 6.13 wordt een hoek van 8 graden getoond. Fig. 6.11 Fig. 6.13 Rev.C ZIPPIE SALSA M Mini... -
Page 174: Aanpassing Hoogte Rugleuning
3. Verwijder de bovenste schroeven van de bekleding. Nu 6. Plaats de stelschroeven terug. Gebruik 10 Nm of 88.5 in/lb kan de bekleding omhoog of omlaag geschoven worden, draaikracht, (Fig. 6.19). waardoor de kruiskopschroeven zichtbaar worden, (Fig. 6.16). Fig. 6.19 Fig. 6.16 ZIPPIE SALSA M Mini Rev.C... -
Page 175: Handmatige Instelling Van De Zithoek
Controleer of de schroeven door de ogen gaan, bovenaan de bekleding (Fig. 6.20). Fig. 6.21 3° 8. Trek de spanbanden van de bekleding weer strak, (Fig. 6.21). Fig. 6.22 6° 9. Plaats de hoes van de bekleding terug, (Fig. 6.22). 9° Rev.C ZIPPIE SALSA M Mini... -
Page 176: Jay Rugleuningen
Om de hoek van de hoofdsteun aan te passen, draait u de schroeven bij de bekleding van de hoofdsteun los, zet de hoofdsteun in de gewenste positie en draait u de schroeven weer aan. (Fig. 6.24). ZIPPIE SALSA M Mini Rev.C... -
Page 177: Elektrisch Zitsysteem
VR2 Control bediend. Zie ook het hoofdstuk hieronder: Het bedienen van de actuators. OPMERKING: De zitting kan met behulp van uw bedieningssysteem maximaal 300 mm omhoog worden gebracht. Rev.C ZIPPIE SALSA M Mini... -
Page 178: Elektrisch Aangedreven Zitlift
Het vasthouden van de joystick kan van de stoel terug in uitgangspositie. schade toebrengen aan de actuator. R-net bediening Voor meer informatie over R-net wordt u verwezen naar de gebruikershandleiding. Fig. 6.26 1,5 m ZIPPIE SALSA M Mini Rev.C... -
Page 179: Bedieningssysteem
7.0.1 Gyro-module Accumeter: Als uw Zippi Salsa M2 Mini is uitgerust met een R-net bedieningssysteem, kan de meest recente GYRO- De accuspanningsmeter toont dat de rolstoel moduletechnologie worden gemonteerd. - Page 180 Deze meter geeft ook weer R-net bediening of de snelheid van de rolstoel wordt beperkt en of het Voor meer informatie over R-net wordt u bedieningssysteem wordt geblokkeerd. verwezen naar de gebruikershandleiding. ZIPPIE SALSA M Mini Rev.C...
-
Page 181: Vr2-L (Verlichting)
OPGELET! Wanneer de LED lampjes snel knipperen, is er kortsluiting, ofwel in het gehele circuit, ofwel in het gehele verlichtingscircuit, ofwel in het circuit van de linker of rechter richtingaanwijzer. Rev.C ZIPPIE SALSA M Mini... -
Page 182: Vr2 Begeleider-Bedieningssysteem
Met deze knop wordt van de ene naar de andere zen naar de gebruikershandleiding. bediening over geschakeld. Actuatorknop en LED lampje: Alle VR2 begeleidersbesturingen beschikken standaard over een actuatorknop. OPMERKING: Indien de VR2 niet geprogrammeerd is voor actuators, heeft deze knop geen functie. ZIPPIE SALSA M Mini Rev.C... - Page 183 OPLAAD- EN PROGRAMMEERPANEEL ACCUMETER AAN/UIT KNOP VERLICHTING KNOP KNIPPERLICHTEN CLAXONKNOP ACTUATORKNOP SNELHEIDSMETER/ RIJPROFIEL WEERGAVE SNELHEID/ PROFIEL RICHTINGAANWIJZER VERHOGEN SNELHEID/ RIJPROFIEL VERLAGEN SNELHEID/RIJPROFIEL RICHTINGAANWIJZERS VR2 BESTURINGSPANEEL VR2-L BESTURINGSPANEEL SNELHEIDSMETER JOYSTICK MAX. SNELHEIDSKNOP BEDIENINGSPANEEL ACTUATORKNOP BEDIENINGSKNOP VR2 BEGELEIDERSBESTURING Rev.C ZIPPIE SALSA M Mini...
-
Page 184: Probleem Oplossen Met Behulp Van De Vr2 Bedieningskast
WAARSCHUWING! Als de veiligheidsschakelingen weer aangaan, schakel dan de stoel uit en probeer de stoel niet weer te gebruiken. Neem contact op met uw plaatselijke erkende dealer van Sunrise Medical. ZIPPIE SALSA M Mini Rev.C... - Page 185 Er is een storing in de actuators. Indien er meerdere actuators zijn gemonteerd, controleer dan welke niet functioneert. Controleer de bekabeling van de actuator. R-net bediening Voor meer informatie over R-net wordt u verwezen naar de gebruikershandleiding. Rev.C ZIPPIE SALSA M Mini...
-
Page 186: Besturingsmogelijkheden
• Schakel altijd de stroom naar de controller uit wanneer u de gebruiker alleen in de rolstoel achterlaat. (Fig. 9.1). Fig. 9.2 Fig. 9.1 Bediening door begeleider Wegzwenkbare bedieningsarm ZIPPIE SALSA M Mini Rev.C... -
Page 187: Bediening Centraal Gemonteerd (R-Net)
R-net bediening op middenstang gemonteerd Voor meer informatie over het R-net Verstelknop handbedieningssysteem wordt verwezen naar de gebruikershandleiding voor het R-net. Rev.C ZIPPIE SALSA M Mini... -
Page 188: Noodstopknop
Als de bewegingsrichting van de forus Elektrische zwenkarm met R-net kinbediening begeleidersbediening veranderd moet worden, neem dan contact op met uw erkende Sunrise Medical dealer. Lees de R-net gebruikershandleiding voor informatie over de functies van de R-net handbediening. Fig. 9.4 ZIPPIE SALSA M Mini Rev.C... -
Page 189: Speciale Bedieningssystemen
De vierde schakelaar is de modeschakelaar. Hiermee wordt geschakeld tussen voorwaarts en achterwaarts en tussen het rijden met de rolstoel of met bijkomende apparaten (zoals elektrische zitfunctie of ondersteunende communicatiesystemen (AAC systemen)). Fig. 10.2 Fig. 10.1 Rev.C ZIPPIE SALSA M Mini... -
Page 190: Blaas- En Zuigbediening, En Buddyknoppen
Fig. 10.5 Fig. 10.6 R-net, Omni Plus control Lees de R-net gebruikershandleiding voor informatie over de functies van de R-net handbediening en de Omni Plus bedieningsfuncties. ZIPPIE SALSA M Mini Rev.C... -
Page 191: Accu's En Opladen
Om de accu's te plaatsen, draait u de hierboven beschreven procedure om. WAARSCHUWING! • De Salsa M2 Mini is uitgerust met twee flexibele banden die de beide schroeven van de hendel op hun plaats houden, (A-Fig. 11.5). Deze zijn bedoeld Fig. 11.4 als beveiliging en mogen niet van de rolstoel worden verwijderd. -
Page 192: Stroomonderbrekers
Lever de batterijen in bij Sunrise Medical of bij de fabrikant van de batterijen als ze niet langer voldoende opgeladen kunnen worden. ZIPPIE SALSA M Mini Rev.C... -
Page 193: Algemene Informatie Over Opladers
De oplader is uitsluitend voor gebruik binnenshuis. Stel de oplader niet bloot aan regen, sneeuw, of ander vocht. • Overleg voor het kopen van nieuwe accu's of een oplader altijd eerst met uw erkende Sunrise Medical dealer. Rev.C ZIPPIE SALSA M Mini... -
Page 194: Een Goed Gebruik Van De Accu
Haal de oplader uit het stopcontact voordat u onderhoud pleegt of de oplader schoonmaakt. Zo verkleint u het risico om een elektrische schok te krijgen. Het uitzetten van het bedieningssysteem is niet voldoende om het risico te verkleinen. ZIPPIE SALSA M Mini Rev.C... -
Page 195: Transport
ISO 7176-19. • Wanneer een elektrisch aangedreven rolstoel gebruikt wordt in een motorvoertuig, dient de rolstoel te be- schikken over lekvrije, verzegelde accu's van het type "gel elektrolyte" of "AGM". Fig. 12.2 Fig. 12.1 Rev.C ZIPPIE SALSA M Mini... -
Page 196: Instructies Voor Veiligheidsgordels
• De heupgordel moet volledig contact maken met het lichaam, ter hoogte van de hoek van dijbeen en bekken. ZIPPIE SALSA M Mini Rev.C... -
Page 197: De Salsa Crashtest, Alle Modellen
In afbeeldingen 12.7 - 12.8 worden de verankeringspunten op de Salsa M2 Mini getoond. In afbeeldingen 12.9 - 12.10 worden de verankeringspunten op voorzijde en achterzijde. Fig. 12.6 Fig. -
Page 198: Het Vastzetten Van De Rolstoel In Een Voertuig
45° liggen. Aankoppelsystemen: De Zippie Salsa M2 Mini is goedgekeurd voor gebruik in voertuigen die zijn aangepast voor rolstoeltransport. De persoon die de rolstoel voorschrijft of de gebruiker moet... -
Page 199: Overige Vereisten Voor Transport
Opslagtemperatuur: Min: -40ºC Max: 65ºC te bevestigen (zie hoofdstuk 12.5). Vochtweerstand: IPx4. Geen beperkingen op vochtigheid en luchtdruk. WAARSCHUWING! Blijf niet in uw rolstoel zitten wanneer deze als bagage wordt vervoerd. Rev.C ZIPPIE SALSA M Mini... -
Page 200: Onderhoud En Reiniging
Wanneer de rolstoel is voorzien van massieve banden, moet een wiel als een volledige set worden vervangen. Het massieve wiel van de SALSA kan worden verwijderd voor reparatie/vervanging door de procedure voor het aandrijfwiel te volgen, zoals hierboven omschreven. ZIPPIE SALSA M Mini Rev.C... - Page 201 Fig. 13.1 Fig. 13.2 Fig. 13.3 Fig. 13.4 Fig. 13.6 Fig. 13.5 Fig. 13.7 Fig. 13.8 Rev.C ZIPPIE SALSA M Mini...
-
Page 202: Verwijderen Van Het Zwenkwiel
Let daarbij op dat u de bout niet hardhandig door de lagerring duwt. • Beweeg het wiel zachtjes heen en weer tot de bout er doorheen gaat. • Draai aan met een draaikracht van 19Nm. Fig. 13.12 Fig. 13.11 Fig. 13.13 ZIPPIE SALSA M Mini Rev.C... -
Page 203: Controle Van De Bekleding/Zitting
Ook mag een desinfecterend middel worden gebruikt, verdund volgens de aanwijzigingen van de fabrikant. Zorg ervoor dat alle oppervlaktes met schoon water worden afgenomen en grondig worden gedroogd. WAARSCHUWING Reinig uw rolstoel nooit met een tuinslang of hogedrukreiniger. Rev.C ZIPPIE SALSA M Mini... -
Page 204: Reinigen Van Het Bedieningssysteem
Als een komen. lamp het niet meer doet (mogelijk als gevolg van een botsing), moet de hele lichtunit die beschadigd is, worden vervangen. De afzonderlijke LED-lampjes kunnen niet worden vervangen. ZIPPIE SALSA M Mini Rev.C... - Page 205 Herhaal dit voor de andere pool/accu (Fig. 13.18). Fig. 13.18 • Nadat andere accu's zijn aangebracht, moeten de accupolen na aansluiting worden afgedekt met de dopjes op de kabels (Fig. 13.19). Fig. 13.14 Fig. 13.19 Rev.C ZIPPIE SALSA M Mini...
-
Page 206: Toegang Tot De Bediening (Controller)
De jaarlijkse grote beurt moet worden uitgevoerd door een erkende Sunrise Medical dealer. Neem voor een overzicht van erkende dealers in uw omgeving contact op met de Sunrise Medical klantenservice. Het adres vindt u in hoofdstuk 1.0. ZIPPIE SALSA M Mini Rev.C... -
Page 207: Aanbevolen Onderhoud
Montage: tijdens een onderhoudsbeurt die volgens deze Controleer of alle onderdelen van het bedieningssysteem technische handleiding of de handleiding van de goed vastgemaakt zijn. Draai veiligheidsschroeven niet werkplaats moet plaatsvinden. overmatig vast aan. Rev.C ZIPPIE SALSA M Mini... -
Page 208: Prestatiechecks
Reinig bekleding van rolstoel ¯ Controleer of accupolen vast zitten, etc. Een volledige controle, veiligheidscontrole en servicebeurt dient uitgevoerd te worden door een erkende Sunrise Medical dealer. Dagelijks = voor ieder gebruik van de rolstoel ZIPPIE SALSA M Mini Rev.C... -
Page 209: Specificatie (En 12184 En Iso 7176-15)
Opslagtemperatuur: -40°C tot 65°C Brierley Hill Vochtweerstand: IPx4 West Midlands Geen beperkingen op vochtigheid en luchtdruk DY5 2LD Tel: 0845 605 66 88 www.SunriseMedical.co.uk Model: Zippie Salsa M Mini ISO 7176-15 Min. Max. Opmerkingen Totale lengte (met beensteun) 1000 mm (1 m) Met 90°... -
Page 210: Onderhoudsgeschiedenis
Verbindingen Wielen Testrit Slijtage Vooruit Druk Achteruit Lagers Noodstop Wielmoeren Links draaien Motoren Rechts draaien Bedrading Helling op/af Verbindingen Over obstakels Lawaai Parkeerrem Remmen Opmerking: Gebruik uitsluitend Sunrise Medical Borstels onderdelen voor onderhoud en reparaties. ZIPPIE SALSA M Mini Rev.C... -
Page 211: Verwijdering
Accu's en elektrische artikelen: WAARSCHUWING! • Probeer de accu's nooit te openen. • Accu's bevatten zwavelzuur. • Accu's moeten worden teruggebracht naar Sunrise Medical of naar uw rolstoelverkoper. • Ook kunnen accu's worden gerecycled bij een gecertificeerd afvalverwerkingsbedrijf. Rev.C ZIPPIE SALSA M Mini... -
Page 212: Diagram Accubedrading
17.0 Diagram accubedrading Fig. 17.1 Fig. 17.2 Stopcontact acculader: Pin 1: Accu positief Pin 2: Accu negatief Pin 3: Blokkade Fig. 17.3 ACCUVERBINDINGSTUK 100 A ROOD ROOD GEEL 100 A ACCUVERBINDINGSTUK 15 A ZWART ZWART VERBINDINGSSTUK HULPSTROOM ZIPPIE SALSA M Mini Rev.C... - Page 213 ZIPPIE SALSA M Mini Rev.C...
- Page 214 ZIPPIE SALSA M Mini Rev.C...
- Page 215 ZIPPIE SALSA M Mini Rev.C...
- Page 216 Sunrise Medical S.r.l. Sunrise Medical GmbH Via Riva, 20 – Montale Kahlbachring 2-4 29122 Piacenza 69254 Malsch/Heidelberg Italia Deutschland Tel.: +39 0523 573111 Tel.: +49 (0) 7253/980-0 Fax: +39 0523 570060 Fax: +49 (0) 7253/980-222 www.SunriseMedical.it www.SunriseMedical.de Sunrise Medical AG Sunrise Medical Erlenauweg 17 Thorns Road...