
Manuels Connexes pour z21 Roco FLEISCHMANN WLAN-MULTIMAUS WLANmaus

Sommaire des Matières pour z21 Roco FLEISCHMANN WLAN-MULTIMAUS WLANmaus
- Page 1 WLAN-MULTIMAUS ® ▶ Benutzerhandbuch ▶ User Manual ▶ Manuel d'utilisation 8010813920.indd 1 13.07.2017 10:27:31...
- Page 2 Kurzübersicht / Overview / en un clin d'oeil WLANmaus Kurzübersicht / Overview / en un clin d'oeil 2. Sprache AAA (Micro) Language Langue 4. Text Fahren | Driving | Circulation Nothalt Licht Lokauswahl Emerg. Stop Light Loco selection Arrêt d'urgence Luce Sélection de locomtives Funktionen | Functions | Fonctions...
-
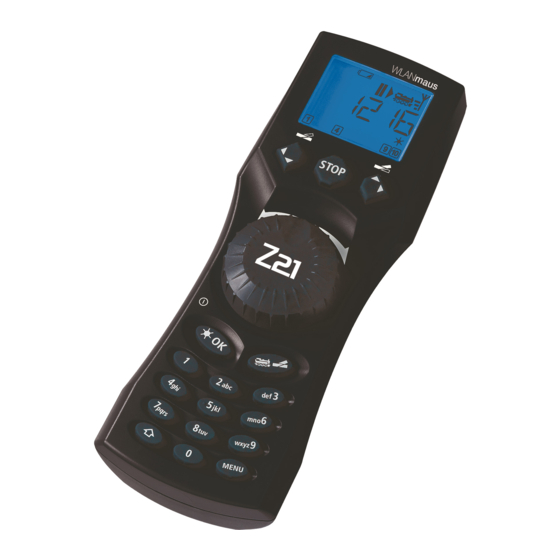
Page 3: Fahrregler Control Knob Bouton Régulateur
Kurzübersicht / Overview / en un clin d'oeil LC-Display Stop-Taste LC display Stop Key Écran touche »Stop« Pfeiltaste (links) Pfeiltaste (rechts) Arrow Key (left) Arrow key (right) touche »flèche« touche »flèche« (à droite) (à gauche) Fahrregler control knob Licht / OK-Taste bouton régulateur Light / OK Key touche »feux / OK«... -
Page 4: Table Des Matières
Inhaltsverzeichnis Inhaltsverzeichnis WLANmaus Kurzübersicht ........................2 Die Evolution der ROCO Lokmaus — die WLANmaus ................. 5 Die WLANmaus im Überblick ........................5 Teil 1 ▪ Grundlagen – Lernen Sie die WLANmaus kennen 1.1 Verbinden der WLANmaus ....................... 6 1.2 Erklärungen zur Zeicheneingabe bei der SSID- und Passworteingabe ..........7 1.3 WLANmaus: Das Display ........................ -
Page 5: Die Evolution Der Roco Lokmaus - Die Wlanmaus
Wir wünschen Ihnen viel Spaß bei der Lektüre dieses Handbuches und natürlich mit der WLANmaus. Ihre Modelleisenbahn GmbH Info: "Z21" in der Bedienungsanleitung meint sowohl die Z21 (schwarz) als auch z21 (weiß) und z21start (weiß) mit WLAN-Package. Die WLANmaus im Überblick Das Konzept ▪... -
Page 6: Verbinden Der Wlanmaus
▪ Z21-WLAN-Router oder einen eigenen WLAN-Router für die Z21 konfiguriert. Welche Geräte Sie noch an die Z21 anschließen können finden Sie in der Z21-Bedienungsanleitung. Bitte beachten Sie vor Beginn der Anschlussarbeiten unbedingt die folgenden Hinweise: Bei der Verwendung von Fremdkomponenten zusammen mit ROCO- und /oder Fleischmann-Komponen- ten besteht keine Gewährleistung bei Beschädigungen oder Fehlfunktionen. -
Page 7: Erklärungen Zur Zeicheneingabe Bei Der Ssid- Und Passworteingabe
Grundlagen Grundlagen Taste ab. Die manuelle Netzwerkeingabe finden Sie im Kapitel 3.6.1, Seite 31 Wählen Sie mit den Pfeiltasten Ihr gewünschtes WLAN-Netz aus und bestätigen Sie mit der OK- Taste. Weiter mit OK-Taste. Display-Anzeige „PWD?“ Geben Sie das WLAN-Passwort ein Weiter mit OK-Taste. -
Page 8: Wlanmaus: Das Display
Antennensymbol + blinkende Pfeile/Pause: WLAN-Verbindung ok, jedoch keine Kom- munikation mit der Z21. ursachen: ▪ Z21 ist nicht eingeschaltet. ▪ Z21 ist nicht richtig am WLAN-Router angeschlossen. ▪ Z21-IP nicht korrekt, (siehe Teil 3 Kapitel 3.6.3, Seite 31). 8010813920.indd 8 13.07.2017 10:27:36... -
Page 9: Wlanmaus: Die Tasten
Grundlagen Grundlagen 1.4 Die Tasten Zu dem übersichtlichen Konzept der WLANmaus gehört die Reduzierung der Tasten auf eine sinnvolle Anzahl. Alle für den Spielbetrieb notwendigen Funktionen sind überwiegend direkt über die jeweiligen Tasten abrufbar, die wir Ihnen hier vorstellen wollen. Beachten Sie dazu auch Fig. 1 auf Seite 5. Hinweise: ▪... - Page 10 Grundlagen Tasten und Bezeichnung Funktion ▪ umschalten zwischen Lok- und Weichen-Mous Lok / Weichen in Kombination mit ▪ wechseln zwischen Bibliotheks- und Lokadress-Modus Shift im Fahrbetrieb: … ▪ schaltet die Lokfunktionen F1–F10 direkt ein- oder aus. Die Lokfunktionen F11–F20 werden über die Tasten 1–10 in Verbindung mit der -Taste Funktionstasten geschaltet.
-
Page 11: Teil 2 ▪ Betrieb -Fahren Und Schalten
Betrieb — Fahren und Schalten ▪ Teil 2 Betrieb – Fahren und Schalten Trotz ihrer vielen Möglichkeiten ist die WLANmaus leicht und intuitiv bedienbar. Ein Konzept, das von ROCO schon mit den Lokmäusen der ersten, zweiten und dritten Generation erfolgreich eingeführt und mit der WLANmaus fortgesetzt wurde. -
Page 12: Neueintragung Einer Lok
Betrieb — Fahren und Schalten Aufrufen von anderen, bereits in die Bibliothek aufgenommenen Loks („Blättern“) Die Sortierung der Loks in der Bibliothek erfolgt in der Reihenfolge der Eingabe. Sie können diese Reihe- folge selbstverständlich ändern: Lok auswählen oder Diese Tastenkombinationen (gleichzeitig drücken) verschieben die Lok in der Bibliothek nach oben oder unten. - Page 13 Betrieb — Fahren und Schalten Display Eingabe Bemerkung Bestätigen Sie mit OK-Taste. Danach wechselt die WLANmaus auf die Lok adresse. Angezeigt wird ein Vorschlags- wert, hier „3“. oder Verändern Sie den Vorschlagswert entweder mit Hilfe der -Taste und einer Pfeiltaste …...
-
Page 14: Der Lokadress-Modus
Betrieb — Fahren und Schalten 2.2.3 Der Lokadress-Modus Die WLANmaus bietet Ihnen auch die Möglichkeit, Ihre Loks einfach nur über die Decoder-Adresse zu steuern. Das Display zeigt Ihnen dabei die Lokadresse mit voran gestelltem „L“ – hier die Lokadresse 36, das Lok- symbol sowie die ausgewählten Funktionen. -
Page 15: Die Nothalt-Funktionen
Anlage wird unterbrochen. Ein erneuter Druck schaltet die Anlage wieder ein. 2.4.1 Nothalt Durch Drücken der STOP-Taste wird sofort die Spannung am Gleis unterbrochen, das STOP-Symbol im Display und die blaue LED an der Z21 blinken. Durch nochmaliges Drücken der STOP-Taste wird die Anlage wieder mit Spannung versorgt. Stop Fahren 8010813920.indd 15... -
Page 16: Selektiver Nothalt
Betrieb — Fahren und Schalten 2.4.2 Selektiver Lokhalt Der Selektive Lokhalt stoppt nur die gerade von der WLANmaus gesteuerte Lok. Eingabe Display Bemerkung Drücken Sie die -Taste und STOP-Taste gleich- zeitig. Die Lok stoppt sofort, im Display wird das Stillstands-Symbol „II“ (und die letzte Fahrtrichtung) angezeigt. - Page 17 Betrieb — Fahren und Schalten Die Weiche wird in dem Moment umgeschaltet, in dem Sie eine der Pfeiltasten drücken. Die Einstel- lung der Weiche wird damit ebenfalls gespeichert. Zur Bestätigung werden die ersten freien Ziffern nach dem „W“ als „0“ gesetzt (natürlich nur bei 1-, 2- oder 3-stelligen Weichenadressen). Die Anzeige der Weichenstellung im Display bedeutet keinesfalls eine Rückmeldung des Weichen- antriebes.
- Page 18 Betrieb — Fahren und Schalten Drei nützliche Hilfsmittel der WLANmaus für den Weichen-Modus Toggle-Betrieb Sie können im Weichen-Modus durch Drücken der OK-Taste zwischen der aktuellen und der zuletzt aufgerufenen Weiche wechseln. So haben Sie einen schnellen Zugriff auf zwei Weichen, die z. B. hin- tereinander in einer Fahrstraße liegen.
-
Page 19: Schnellprogrammierung Von Loks Und Decodern
Betrieb — Fahren und Schalten 2.6 Schnellprogrammierung von Loks und Decodern Die für den Fahrbetrieb wichtigsten Einstellungen – Konfigurationsvariablen, genannt CVs – eines Decoders können Sie über die Kombination MENu - + Funktionstaste vornehmen. CV Funktion Tasten Adresse Hinweis: Eine Veränderung des Wertes wirkt sich direkt auf den Deco- der, aber nicht auf die Lokbibliothek aus. -
Page 20: Kurzschluss Und Überlastung
B. durch einen entgleisten Waggon oder Zug, beseitigen Sie die Störung. Mit einem Druck auf die STOP-Taste der WLANmaus oder der Taste STOP-Taste der Z21 wird die An- lage mit einer Verzögerung von etwa einer Sekunde wieder eingeschaltet. Liegt der Fehler nicht in einem Kurzschluss, kann die ursache eine Überlastung der Anlage durch z. B. -
Page 21: Die Menü-Funktionen Der Wlanmaus
Die Menüs ▪ Teil 3 Die Menüs Die Menü-Funktionen der WLANmaus Die WLANmaus verfügt über drei Haupt-Menüs, mit denen Sie sowohl umfangreich programmieren, als auch die Grundeinstellungen der WLANmaus verändern können. Diese Menüebene erreichen Sie durch zwei Tastenkombinationen: ca. 5 Sekunden Drücken nur der MENu-Taste (Dauer ist einstellbar im Menü „EINSTELLuNGEN“), prak- ▪... - Page 22 Die Menüs Zum Verlassen der Menü-Ebene haben Sie zwei Möglichkeiten: ▪ Drücken der STOP-Taste. Dies ist eventuell mehrmals notwendig, je nachdem, in welchem unter-Menü Sie sich befinden. Jeder Druck auf STOP bringt Sie eine Ebene weiter zurück. ▪ -Taste) bringt Sie aus allen Ebenen sofort in den Lok- oder Drücken der MENu-Taste (mit oder ohne Weichen-Modus zurück.
- Page 23 Die Menüs CV AENDERN Menü 1: Menü 2: PROGRAMMIEREN LANGE ADRESSE BEARBEITEN RICHTuNG VERTAuSCHEN 28 FAHRSTuFEN LOESCHEN ANALOG FAHREN NMRA-BIDI GESCHWINDIGKEITS- TABELLE LANGE ADRESSE CVBIT AENDERN SuCHEN SENDEN MODuS EMPFANGEN ADRESSE BIBLIOTHEK 8010813920.indd 23 13.07.2017 10:27:41...
- Page 24 DISPLAy Menü 3: LICHTZEIT EINSTELLUNGEN IMMER AN SPRACHE MENuETASTENZEIT BEDIENuNG MOMENTFuNKTIONEN KINDERSICHERuNG ABBRECHEN SySTEMEINSTELLuNGEN ZuRuECKSETZEN LOKBIBLIOTHEK ALLES KALIBRIEREN STOPTASTE MAuS-VERSION (SOFTWARE) WLAN-VERSION (FuNKMODuL) SPRACHEN-VERSION BATTERIESPANNuNG SSID PASSWORT Z21-IP-ADRESSE GERAETENAME IP-MODuS IP-ADRESSE SuBNETZMASKE STD-GATEWAy MAC-ADRESSE RSSI AuSSCHALTZEIT 8010813920.indd 24 13.07.2017 10:27:42...
-
Page 25: Das „Lok" Menü
Die Menüs 1. Das „LOK“-Menü Im „Lok“-Menü werden alle Daten verwaltet, die für die Lok-Bibliothek und die Identifizierung einer Lok erforderlich sind. Auch können Sie hier die WLANmaus grundsätzlich auf Bibliotheks- oder Adress- Bedienung einstellen. „NEU“ In diesem Menüpunkt können Sie eine neue Lok in die Bibliothek aufnehmen. Der Ablauf ist ausführ- lich ab Seite 12 beschrieben und dargestellt. - Page 26 Die Menüs „SUCHEN“ Dies könnte zu einer wichtigen Funktion Ihrer WLANmaus werden. Mit diesem Menüpunkt können Sie eine Lokadresse der jeweiligen Lok in der Bibliothek zuordnen. Geben Sie einfach eine Lokadresse über die Funktionstasten ein und die WLANmaus sucht Ihnen die dazu gehörende Lok aus der Bibliothek heraus.
-
Page 27: Das „Programmieren" Menü
Die Menüs 2. Das Menü „PROGRAMMIEREN“ Sämtliche Werte eines Decoders (NMRA /DCC) sind in so genannten Konfigurations-Variablen hinterlegt, den CVs. Mit Hilfe des Menüs „PROGRAMMIEREN“ können Sie diese Werte Ihren Bedürfnissen anpassen. Beachten Sie dazu auch die Erläuterungen zum Thema „Bits und Bytes“ im „Glossar“. Von ROCO bereits in Lokomotiven eingebaute Decoder werden üblicherweise mit praxisgerechten Ein- stellungen ausgeliefert. - Page 28 Die Menüs „CV29“ Die CV29 ist eine der komplexesten CVs, in der die Basisinformationen für den Decoder gespeichert sind, die sich wiederum auf den Fahrbetrieb der Lok auswirken. Hier können Sie zahlreiche Funktio- nen ein- oder ausschalten, die in den einzelnen Bits der CV hinterlegt sind. Wir empfehlen diese Einstellmöglichkeiten nur Anwendern, die sich mit den umfangreichen Möglich- keiten eines Decoders sicher auskennen.
-
Page 29: Das „Einstellungen" Menü
Die Menüs 3. Das Menü „EINSTELLUNGEN“ Das umfangreichste Menü der WLANmaus enthält alle Daten, die für die grundsätzliche Bedienung der WLANmaus praktisch, sinnvoll oder manchmal auch notwendig sind. Auch hier möchten wir darauf hin- weisen, dass die WLANmaus werkseitig schon mit allen erforderlichen Einstellungen versehen wurde, so dass Sie dieses Hauptmenü... - Page 30 Die Menüs Den gewünschten Zustand „EIN“ oder „AuS“ wählen Sie über die Pfeiltasten aus. Werkseinstellung: AuS ▪ Bestätigen Sie mit der OK-Taste. Sie kommen auf die Ausgangsebene „MOMENTFuNKTI- ONEN“ zurück. 3.2.4 Die WLANmaus verfügt über eine mehrstufig einstellbare „KINDERSICHERUNG“, die Sie nach Aufrufen des Menüpunktes über die Pfeiltasten aktivieren können.
- Page 31 Erklärungen zur Zeicheneingabe Seite 7). 3.6.3 „Z21-IP-ADRESSE“ Hier ist die Eingabe der IP-Adresse der Z21 möglich, das heißt „Wohin schickt die Maus ihre Befehle?“. Die Voreinstellung der WLANmaus stimmt mit der Voreinstellung Ihrer Z21 überein: „192.168.0.111“. Nur im Fall, dass Sie die IP Ihrer Z21 manuell geändert haben, müssen Sie auch die Z21-IP in der WLANmaus anpassen.
- Page 32 Die Menüs 3.6.4 „GERAETENAME“ Hier können Sie Ihrer WLANmaus einen Netzwerknamen zuordnen. um Namensgleichheit im Netzwerk zu verhindern wird dieser automatisch um die letzten sechs Stellen der MAC- Adresse der WLANmaus ergänzt. Beispiel: „WLANmaus_A1B2C3“ (Hexadezimal). 3.6.5 „IP-MODuS“ Auswahlmöglichkeiten: „DyNAMISCH (voreingestellt) oder „STATISCH“. Auswahl: Über die Pfeiltasten, Bestätigung durch OK-Taste Abbruch durch STOP-Taste.
-
Page 33: Teil 4 ▪ Anhang
Erfahrung voraussetzt, da falsch eingestellte CVs das Verhalten des Decoders beeinträchtigen können. Decoder um die digitalen Steuersignale von der WLANmaus und der Z21 der „konventionellen“ Technik einer Lok verständlich zu machen, braucht es einen „Übersetzer“ – den Decoder. Er ersetzt keines der in analogen Gleichstrom-Loks befindlichen Bauteile, sondern ist eine notwendige Ergänzung und muss im Lokgehäuse... -
Page 34: Mac-Adresse
„Nullen“ und „Einsen“ bestehen, sind sie abgestuft. Je kleiner die Stufen – Fahrstufen – sind, umso feiner lässt sich die Lok regeln. Die NMRA /DCC-Norm, nach der WLANmaus und der Z21 arbeiten, kennt 14, 27, 28 oder 128 Fahrstufen. - Page 35 Anhang POM-Modus: Programmierung wird bestä- ▪ Decoder benötigt einen Reset: Schalten Sie die tigt, der Decoder reagiert aber nicht auf Gleisspannung mit der STOP-Taste (Nothalt) ab und einen geänderten Wert. wieder ein. Beachten Sie dazu auch die Decoder- Anleitung. Ein „Zurücksetzen“ (Teil 3, Kapitel 3.3, Seite ▪...
-
Page 36: Programmierhilfe Lokmaus 2 /R3 - Wlanmaus
Anhang 4.3.1 Programmierhilfe Lokmaus 2 /R3 – WLANmaus In den bisher ausgelieferten Anleitungen zu ROCO-Digitalartikeln (wie z. B. dem Weichenantrieb 42624) wurde nur der Standardprogrammiermodus mit der Lokmaus 2 /R3 beschrieben. Im folgenden finden Sie eine Tabelle, die die Programmierprozedur der Lokmaus 2 /R3 mit der Schnellprogrammierung (siehe Kapi- tel 2.6 auf Seite 19) der WLANmaus gegenüberstellt. - Page 37 “/” in the diagrams stands for a selection of one of the two keys mentioned. The red triangle „▶“ in the diagrams symbolizes an electrical disconnect of the track. unless otherwise mentioned, the term "Z21" refers to all different Z21 variants (Z21, z21, z21start). 8010813920.indd 37...
-
Page 38: The Evolution Of The Roco Lokmaus - The Wlanmaus
The evolution of the ROCO Lokmaus — the WLANmaus The WLANmaus is the optimal addition to your Z21. The WLANmaus brings together the functionality of the legendary Lokmaus with the comfort of a fully digital central control unit. Whether you use the WLANmaus... -
Page 39: Connecting The Wlanmaus
Z21 WLAN router or your own router that is configured for the Z21. The Z21 instruction manual provides you with information on which other devices you can connect to the Z21. Please pay attention to the following instructions before starting to connect components: The warranty will be voided if you are using ROCO and/or Fleischmann components together with components from other companies. - Page 40 Basic Display screen “PWD?“ continue with the OK-key. continue with the OK-key. Enter the WLAN password The WLANmaus restarts and connects itself to your WLAN router. Information: The WLAN information can be changed at all times (see Chapter 3.6, page 64) 1.2 Explanations concerning the entering of characters when entering the SSID and password: The characters are entered using the keyboard similar to when writing a text message on a mobile telephone.
-
Page 41: Wlanmaus: The Display Screen
Antenna symbol + flashing arrow/pause: WLAN connection ok, but no communication with the Z21. Causes: ▪ Z21 is not switched on. ▪ Z21 is not correctly connected to the WLAN router. ▪ Z21-IP nicht korrekt, (Z21 IP incorrect, see Part 3, Chapter 3.6.3, page 64). 8010813920.indd 41 13.07.2017 10:27:45... -
Page 42: Wlanmaus: The Keys
Basic 1.4 The Keys The clear concept of the WLANmaus reduces the number of the keys to an expedient quantity. Functions needed for ordinary playing can mostly be called by the particular keys. These keys will be shown here. Please also note fig. 1 on page 5. Notes: ▪... - Page 43 Basic Keys Function ▪ Toggling between locomotive and turnout mode Loco / Turnout key in combination with ▪ Switching between library and locomotive address mode Shift In drive mode: … ▪ Activates and deactivates the locomotive functions F1–F10 direct. The loco- motive functions F11–F20 are activated using keys 1–10 together with Function keys -key.
-
Page 44: Start
Operation - Driving and Switching ▪ Part 2 Operation – Driving and Switching Despite its numerous options, operation of the WLANmaus is simple and intuitive. A concept which had already been successfully introduced for the Lokmaus models of the first and second generation. The fol- lowing shows you how to operate the WLANmaus based on practical examples. -
Page 45: Entering A New Locomotive
Operation - Driving and Switching Calling up other locomotives already entered in the library (“scrolling” Locomotives in the library are sorted in the order in which they were entered. you can of course change this order: Select locomotive These key combinations (press keys together) move the locomotive up or down in the library. you can check the new order for the library with the arrow keys. - Page 46 Operation - Driving and Switching Display Input Comment Confirm by pressing OK-key. The WLANmaus then switches to the loco- motive address. The suggested value is dis- played, in this case “3.” Change the suggested value by either using -key and one of the arrow keys or by …...
-
Page 47: Locomotive Address Mode
Operation - Driving and Switching 2.2.3 Locomotive Address Mode The WLANmaus also gives you the option of controlling your locomotives using the decoder address only. The display screen shows the locomotive address with the letter “L” before it (in this case, locomotive address 36), the locomotive symbol and all the selected functions. -
Page 48: The Emergency Stop Functions
Press the STOP-key to sever the voltage at the track at once. The "STOP" symbol then appears in the display and the blue LED flashes at the Z21. Press the STOP-key again to supply the system with volt- age again. -
Page 49: Selective Locomotive Stop
Operation - Driving and Switching 2.4.2 Selective Locomotive Stop The selective locomotive stop only stops the locomotive currently being controlled by the WLANmaus Input Display message Comment Press the -key and STOP-key at the same time. The locomotive stops immediately, the standstill symbol “II”... - Page 50 Operation - Driving and Switching Straight-on Branch-on The turnouts are switched over the moment you press on of the arrow keys. This also saves the turn- out setting. The first free numbers after the “T” are set as “0” as confirmation (of course, for 1, 2 or 3 digit turnout addresses only).
- Page 51 Operation - Driving and Switching Three useful WLANmaus aids for the turnout mode Toggle mode you can switch between the current turnout and the turnout last called up by pressing the OK-key. This provides you with quick access to two sets of turnouts which, for instance, are next to each other on a stretch of track.
-
Page 52: Quick Programming
Operation - Driving and Switching 2.6 Quick programming The most important decoder settings for drive mode, known as configuration variables CVs, can be made using the combination of MENu-key + function key. CV Function keys Locomotive address Note: A change to this value has a direct effect on the decoder but not on the locomotive library. -
Page 53: Short Circuit And Overload
If a system short circuit or overload occurs, the Z21-digital system indicates this in two different ways. Two symbols flash in the display of the WLANmaus, namely a lightning or thunderbolt symbol and the STOP sign. The red LED flashes on the Z21. The power supply to the system is disconnected at the same time. -
Page 54: The Menu Functions Of The Wlanmaus
Menus ▪ Part 3 Menus The Menu Functions of the WLANmaus The WLANmaus has three main menus with which you can both perform comprehensive programming and change the basic settings of the WLANmaus. This menu level can be accessed using two simple key combinations: Press the MENu-key alone for approximately 5 seconds (the duration can be set in the “SETTINGS”... - Page 55 Menus There are two ways to exit the menu level: ▪ Press the STOP-key. you may need to do this several times depending on the submenu which you are currently in. Each time you press STOP-key you go back one level. ▪...
- Page 56 Menus Menu 1: Menu 2: MODIFICATION LOCO PROGRAM LONG ADDRESS EDIT REVERSE DIRECTION 28 SPEED STEPS DELETE ANALOG DRIVING NMRA-BIDI SPEED TABLE LONG ADDRESS CVBIT AENDERN SAERCH SEND MODuS RECEIVE ADDRESS LIBRARy 8010813920.indd 56 13.07.2017 10:27:48...
- Page 57 LANGuAGE MENu-KEy-TIME uSERINTERFACE FuNCTION KEyS CHILD LOCK ABORT SETTINGS RESET LOCO-LIBRARy EVERyTHING CALIBRATION STOPKEy MAuS VERSION (SOFTWARE) WLAN-VERSION (RADIO MODuLE) LANGuAGE BATTERy VOLTAGE SSID PASSWORD Z21-IP-ADDRESS DEVICE NAME IP-MODE IP-ADDRESS SuBNETZMASK STD-GATEWAy MAC-ADDRESS RSSI TuRN-OFF TIME 8010813920.indd 57 13.07.2017 10:27:49...
-
Page 58: The "Loco" Menu
Menus 1. The “LOCO” Menu The WLANmaus uses the “LOCO” menu to manage all data which is required for the locomotive library and for identification of a locomotive. You can also use this menu to set the WLANmaus to library or address mode. - Page 59 Menus “SEARCH“ This could be one of the most important functions of your WLANmaus you can use this menu item to assign a locomotive address to the corresponding locomotive in the library. Simply enter a locomotive address using the function keys and the WLANmaus will find the corre- sponding locomotive in the library.
- Page 60 Menus 2. The Menu „PROGAM“ All the values of a decoder (NMRA /DCC) are stored in what are referred to as configuration variables, the CVs. using the “PROGRAM” menu you can adjust these values to your needs. Please consult the expla- nations about “bits and bytes”...
- Page 61 Menus “CV29“ The CV 29 is one of the most complex CVs used to store basic decoder information affecting the ope- ration of the locomotive. Numerous functions stored in the individual bits of the CV can be enabled or disabled. We recommend this configuration option only to advanced users familiar with the comprehensive possibilities of a decoder.
-
Page 62: The "Settings" Menu
Menus 3. The "SETTING“ Menu The most extensive WLANmaus menu contains all the data which is practical, useful or sometimes necessary for basic operation of the WLANmaus. We would also like to point out at this point that the WLANmausis provided with all the necessary settings in the factory so that you have to use this main menu either rarely or not at all. - Page 63 Menus 3.2.4 The WLANmaus has “CHILD LOCK” which can be set tomultiple levels and can be activated after calling up the menu item using the arrow keys. To block an area, you will need to enter a code which is comprised of 4 numbers (no letters!). The password is then always requested when you wish to call up a protected area of the WLANmaus.
- Page 64 (please refer to the explanations on the entering of characters, page 7). 3.6.3 „Z21-IP-ADDRESS“ The IP address of the Z21 can be entered here, this means „Where does the mouse send its commands to?“ The pre-setting of the WLANmaus is conform with the pre-setting in your Z21: “192.168.0.111“.
- Page 65 Menus 3.6.4 „DEVICE NAME“ you can allocate a network name to your WLANmaus here. In order to prevent the same na- mes in the network, this is automatically supplemented with the last six figures or the MAC address of the WLANmaus. For example: “WLANmaus_A1B2C3“ (Hexadecimal). 3.6.5 „IP-MODE“...
-
Page 66: Updating The Wlanmaus
– are stored in what are referred to as CVs. CV is the abbreviation for configuration variables. Since the WLANmaus and the Z21 are compatible with the NMRA/DCC standard, CVs between 1 – 1023 can be read and written. -
Page 67: Mac-Address
Appendix switch to the number of speed steps set in the locomotive controller (i.e. the WLANmaus and Z21) so that you do not need to make the setting in the decoder yourself. See the respective operating manual to determine whether your decoder is compatible with automatic speed step setting and which speed steps your decoder accepts. -
Page 68: Programming Help For Wlanmaus
Appendix ▪ The firmware update was unsuccessful or While the WLANmaus is switched off, press the left ar- was stopped: it is not possible to connect row key, the “6“ key and the “7“ key at the same time the WLANmaus to the router. and keep them pressed down and then confirm this with OK-key, in order to restart the original WLAN- maus firmware. - Page 69 «/» dans les croquis vous indique qu‘il ne faut presser que l‘une ou l‘autre des deux touches mentionnées. Le triangle rouge «▶» dans les croquis symbolise une déconnexion électrique des rails. Info : "Z21" dans le mode d’emploi signifie aussi bien les centrales Z21 (noir) que z21 (blanc) et z21start (blanc) avec WLAN-Package.
-
Page 70: L'évolution De La Loco-Souris De Roco - Wlanmaus
L’évolution de la loco-souris de ROCO — la WLANmaus La WLANmaus est le complément optimal de votre centrale Z21. Elle associe la fonctionnalité de la célèbre Lokmaus au confort d’une centrale numérique élaborée. Que vous utilisez la WLANmaus comme confortable régulateur de la marche de vos machines ou comme programmateur de vos décodeurs »traction«... -
Page 71: Chapitre 1 ▪ Les Bases
▪ Routeur WLAN Z21 ou un propre routeur WLAN configuré pour la Z21. Vous trouverez dans le mode d’emploi de la Z21 la liste des appareils qui peuvent être encore raccordés à la Z21. Avant de commencer le raccordement, il faut absolument observer les indications suivantes : un emploi hybride de composants numériques ROCO et/ou Fleischmann avec des composants d‘autres... -
Page 72: Explications Pour La Saisie De Caractères En Entrant De Mot De Passe Et Ssid
Les bases Continuez en cliquant sur « OK». affiche „PWD?“ Entrez le mot de passe WLAN Continuez en cliquant sur « OK». La WLANmaus redémarre et se connecte avec votre routeur WLAN.. Info : les informations WLAN peuvent être modifiées à tout moment (voir chapitre 3.6, page 94) 1.2 Explications pour la saisie de caractères en entrant de mot de passe et SSID La saisie de caractères par le clavier s’effectue comme la saisie de SMS sur les portables. -
Page 73: Wlanmaus: L'écran D'affichage
Symbole antenne + flèches clignotantes/pause : Connexion WLAN ok, mais aucune communication avec la Z21. Causes : ▪ Z21 n’est pas branchée. ▪ Z21 n’est pas correctement raccordée au routeur WLAN. ▪ IP Z21 pas correct, (chapitre 3.6.3, page 95). 8010813920.indd 73 13.07.2017 10:27:51... -
Page 74: Wlanmaus: Les Touches
Les bases 1.4 Les touches La conception claire de la WLANmaus se manifeste par la réduction des touches à un nombre raisonnable. Toutes les fonctions indispensables pour une exploitation normale sont presque toujours directement accessibles par les touches correspondantes que nous vous présentons ci-après. Voir aussi l’illustration n°... - Page 75 Les bases Touche[s] Fonction en régime «exploitation» : … ▪ Connecte ou déconnecte directement les fonctions locomotive F1–F10. Les fonctions locomotive fonctions F11–F20 sont activées sont activées par les touches 1–10 en association avec la touche « ». Les fonctions locomotive F21-F28 sont activées par les touches 1-8, une fois que le niveau F21-F28 a été...
-
Page 76: Chapitre 2 ▪ Exploitation - Marche Et Connexion
Exploitation —Marche et connexion ▪ Chapitre 2 Exploitation – Marche et connexion Dotée de nombreuses possibilités, la WLANmaus est néanmoins d’un maniement facile et intuitif. Cet esprit fut déjà appliqué par ROCO lors de la réalisation des loco-souris de première, deuxième et troisième générations. -
Page 77: Nouvel Enregistrement D'une Locomotive
Exploitation —Marche et connexion Appeler d’autres machines déjà mémorisées dans la bibliothèque («parcourir») : Le classement des machines dans la bibliothèque est fait dans l’ordre de leur enregistrement dans la base de données. Naturellement il y a possibilité de modifier cet ordre : Sélectionner la machine voulue Presser cette combinaison de touches simultanément, la machine se déplace dans la bibliothèque vers le... - Page 78 Exploitation —Marche et connexion Affichage correspon- Touches actionnées Remarque dant à l’écran pour saisir les données Une fois le nom composé et vérifié, confirmer par la touche « OK». Le nom confirmé, la WLANmaus passe à l’adresse de la machine. L’écran affiche alors une adresse «proposée», dans notre cas c’est oder l’adresse «3».
-
Page 79: Le Mode Adresse Locomotive
Exploitation —Marche et connexion 2.2.3 Le mode adresse locomotive La WLANmaus vous propose également la possibilité de commander vos machines par leurs adresses. Dans ce mode, l’écran affiche le numéro du décodeur, devancé par la lettre «L» – sur notre exemple l’adresse «36», complétée par le symbole «locomotive»... -
Page 80: Les Fonctions D'arrêt D'urgence
En pressant la touche «STOP»la tension de la voie est immédiatement interrompue, le symbole STOP sur l‘écran d‘affichage et la DEL jaune de la Z21 clignotent. En pressant encore une fois la touche «STOP», l‘installation est à nouveau alimentée en courant. -
Page 81: Arrêt D'urgence Sélectif
Exploitation —Marche et connexion 2.4.2 Arrêt d‘urgence sélectif L’arrêt d’urgence sélectif ne s’adresse qu’à la machine directement commandée par la WLANmaus. Touches à actionner L’écran affiche Remarque Pressez simultanément les touches « » et «STOP». La machine s’arrête immédiatement, l’écran affiche le symbole «II» (et le dernier sens de marche). - Page 82 Exploitation —Marche et connexion Les aiguilles changent de position au moment ou vous pressez une des deux touches «flèches». En même temps, la nouvelle position des aiguilles est mémorisée par la WLANmaus et confirmée par la mise à «0» des premiers chiffres libres suivant la lettre «A», si l’adresse du moteur n’a que trois chiffres maxi.
-
Page 83: Pro Sur Mode "Aiguillages"
Exploitation —Marche et connexion Trois petits »plus« bien utiles de la multiMAUS sur mode «aiguillages» : La bascule En pressant la touche « OK» vous passez de l’aiguillage actuellement affiché à l’écran à l’aiguillage commandé précédemment et vice-versa. C’est ainsi que vous avez un accès rapide à deux aiguillages; par exemple : deux aiguillages se suivant dans un itinéraire. -
Page 84: Court-Circuit Et Surcharge
S‘il s‘agit d‘un court-circuit, par ex. à cause d‘un wagon ou d‘un train qui a déraillé, éliminez la panne. En appuyant sur la touche «STOP» de la WLANmaus ou sur la touche blanche de la Z21, l‘installation est reconnectée avec un délai d‘une seconde. -
Page 85: Les Menus De La Wlanmaus Et Leurs Fonctions
Câblez un (autre) amplificateur complé- mentaire. Vous ne devez en aucun cas utiliser un transformateur normal directement à l‘alimentation en courant, la WLANmaus et la Z21 peuvent être détruites. Chapitre 3 Les menus ▪... - Page 86 Les menus Pour quitter le mode «MENU» vous avez également deux possibilités : ▪ Soit vous pressez la touche «STOP». Il sera peut-être nécessaire de la presser plusieurs fois, cela dépend du niveau actuel hiérarchique sur lequel vous vous trouvez à ce moment. Chaque action sur la touche «STOP»...
- Page 87 Les menus MODIFIER VARIABLE NOuVELLE Le menu 1: Le menu 2: LOCO PROGRAMMER ADRESSE LONGuE MODIFIER CHANGEMENT DE DIRECTION 28 CRANS DE EFFACER MARCHE MARCHE ANALOGIQuE NMRA-BIDI TABLEAu DES VITESSES CVBIT CHERCHER ADRESSE LONGuE VARIABLE PROGRAMMER EN LIGNE MODE-LECTuRE ENVOyER RECEVOIR ADRESSE BIBLIOTHEQuE...
- Page 88 MODE TOuCHE STOP VERSION MAuS (SOFTWARE) VERSION WIFI (MODuLE RADIO) VERSION LANGuE TENSION BATTERIE SSID MOT DE PASSE ADRESSE Z21-IP NOM D APPAREIL MODE IP ADRESSE IP MASQuE DE SOuS-RESEAu PASSERELLE STANDARD ADRESSE MAC TEMPS D ARRET RSSI 8010813920.indd 88...
-
Page 89: Le Menu «Loco
Les menus 1. Le menu «LOCO» Le menu «LOCO» vous permet de faire gérer par votre WLANmaus toutes les données indispensables pour la bibliothèque »matériel moteur« et pour l’identification d’un engin moteur. Ce menu vous permet également de préenclencher la WLANmaus aux modes »bibliothèque« ou «adresses machines». «NOUVELLE»... - Page 90 Les menus «CHERCHER» Il est possible que ce menu secondaire devienne pour vous, à la longue, une des fonctions les plus importantes de la WLANmaus. Ce menu secondaire vous permet de retrouver une machine dans la bibliothèque en ne connaissant que l’adresse. Composez tout simplement l’adresse de la machine par les touches des fonctions «1»...
-
Page 91: Le Menu «Programmer
Les menus 2. Le menu «PROGRAMMER» Toutes les valeurs modifiables d’un décodeur au format DCC /NMRA sont stockées dans des mémoires dites «Variables de configuration» (les CV). Le menu «PROGRAMMER» vous permet d’adapter ces valeurs à vos besoins. Tenez également compte des explications sur le thème »Bits et Bytes (octets)» dans le «Glossaire»... - Page 92 Les menus «CV29» La variable CV29 est une des plus complexes variables CV, dans laquelle sont enregistrées les infor- mations de base pour le décodeur, qui ont à nouveau un effet sur le régime exploitation de la loco- motive. Ici vous pouvez connecter ou déconnecter de nombreuses fonctions, qui sont mémorisées dans les bits de la variable CV.
-
Page 93: Le Menu «Reglages
Les menus 3. Le menu «REGLAGES» Ce menu principal de la WLANmaus englobe plus de menus secondaires que les deux autres menus principaux et gère toutes les données pratiques, avantageuses et parfois même indispensables pour un maniement aisé de la WLANmaus. Comme dans les cas précédents, permettez-nous de rappeler que les valeurs de la WLANmaus ont été... - Page 94 Les menus ▪ Confirmer la valeur choisie par la touche « OK». La WLANmaus retourne au départ du menu secondaire «DELAI TOuCHE MENu». 3.2.3 Le menu «FONCTION TOuCHE» détermine le caractère des fonctions «F1» à «F28» des ma- chines (le sifflet d’une locomotive sonorisée, par exemple, ou la commande d’un attelage à télécommande).
- Page 95 Veuillez noter que : dans le cas d’une interruption radio, vous ne pouvez plus déclencher de STOP par la touche STOP de la WLANmaus. Cela est seulement plus possible par la touche STOP de votre Z21. „INFOS“ une rubrique de menu, qui vous informe complètement sur le logiciel et la tension de pile de votre WLANmaus.
- Page 96 72). 3.6.3 „ADRESSE Z21-IP“ Ici l'adresse IP de la Z21 peut être entrée, ce qui veut dire „Où la souris envoie-t-elle ses ordres ?“. Le pré-réglage de la WLANmaus correspond au pré-réglage de votre Z21 : „192.168.0.111“.
-
Page 97: Chapitre 4 ▪ Annexe 4.1 Mises À Jour De La Wlanmaus
Annexe ▪ 4.1 Mise à jour de la WLANmaus Par l’outil PC "Maintenance Z21" et votre routeur, vous pouvez mettre à jour votre WLANmaus. Vous pouvez télécharger l’outil PC sur notre page d’accueil du site www.z21.eu 4.2 Glossaire «Bits» et «Bytes (Octets)»... - Page 98 – WLANmaus et Z21 –, de sorte à ne pas avoir besoin de régler le décodeur. Pour savoir si vos décodeurs sont équipés ou non de cette adaptation automatique et quels sont les regimes de crans de marche qu’ils connaissent, veuillez consulter les modes d’emploi des décodeurs.
-
Page 99: Astuces, Renseignements Et Petits Dépannages Rapides
▪ La WLANmaus est connectée, mais les sym- un court-circuit s‘est produit dans l‘installation (la boles court-circuit et STOP s‘allument. DEL rouge de la Z21 clignote). Pressez la touche «STOP». ▪ L‘alimentation en courant de la Z21 est interrompue. Contrôlez le transformateur ou le bloc d‘alimenta- tion. -
Page 100: Programmation De La Wlanmaus
Annexe Appuyez et maintenez appuyer, lorsque la WLAN- La mise à jour du firmware a échoué ou a ▪ maus est déconnectée, simultanément sur la touche été interrompue : impossible d’établir la flèche gauche „6“ et la touche „7“ et confirmez en- connexion entre la souris sans fil et le rou- suite avec la touche OK , pour démarrer la restau-... - Page 101 Notizen / Notes 8010813920.indd 101 13.07.2017 10:27:59...
- Page 102 Notizen / Notes 8010813920.indd 102 13.07.2017 10:27:59...
- Page 103 Notizen / Notes 8010813920.indd 103 13.07.2017 10:27:59...
- Page 104 Änderungen von Konstruktion und Ausführung vorbehalten! Alter/Age We reserve the right to change the construction and design! Bitte diese Beschreibung zum späteren Gebrauch aufbewahren! Please retain these instructions for further reference! Modelleisenbahn GmbH 5101 Bergheim Austria • • www.roco.cc 8010813920 VII / 2017 8010813920.indd 104 13.07.2017 10:28:00...