Publicité

Les langues disponibles

Les langues disponibles

Liens rapides

I N S T A L L A T I O N I N S T R U C T I O N S
I N S T R U C T I O N S D ' I N S T A L L A T I O N
M O N T A G E A N L E I T U N G
SSBU
SSMU
Universal Interface Brackets
Pattes de fixation d'interface universelles
Universalanschlussplatten
SSBU/SSMU

Publicité

Table des Matières
loading

Sommaire des Matières pour CHIEF SSBU

  • Page 1 I N S T R U C T I O N S D ' I N S T A L L A T I O N M O N T A G E A N L E I T U N G SSBU SSMU...
  • Page 2: Installation Instructions

    Milestone assumes no responsibility for accuracy, completeness or sufficiency of the information contained in this document. Chief® is a registered trademark of Milestone AV Technologies. All rights reserved. IMPORTANT SAFETY INSTRUCTIONS WARNING: A WARNING alerts you to the possibility of serious injury or death if you do not follow the instructions.
  • Page 3: Dimensions

    Installation Instructions SSBU/SSMU DIMENSIONS 369.4 117.4 14.54 R 4.62 UNIVERSAL UNIVERSAL ARM RANGE ARM RANGE 110.9 4.37 359.9 14.17 UNIVERSAL ARM RANGE (SSMU with RSM shown) 128.6 5.06 168.5 6.26 6.63 78.9 46.4 3.11 1.83 ADJUSTABLE...
  • Page 4 SSBU/SSMU Installation Instructions LEGEND Tighten Fastener Pencil Mark Apretar elemento de fijación Marcar con lápiz Befestigungsteil festziehen Stiftmarkierung Apertar fixador Marcar com lápis Serrare il fissaggio Segno a matita Bevestiging vastdraaien Potloodmerkteken Serrez les fixations Marquage au crayon Loosen Fastener Drill Hole Aflojar elemento de fijación...
  • Page 5: Tools Required For Installation

    E (2) F (4) T (1) R (4) 10-24 x 1/4" 8-32 x 3/8" S (4) 1/4" [SSBU Only] [SSBU Only] 1/4-20 [Universal Hardware Kit - Long Screws] H (1) G (4) 5/16-18 x 1/2" 10-24 x 3/8" [SSBU Only]...
  • Page 6: Assembly And Installation

    Remove Screw Adapters from SSBU/SSMU Legs NOTE: Only use washers (R) if using L or M screws to attach Press locking buttons on SSBU/SSMU leg (C) firmly and simultaneously push clip cover toward enclosed sliding stud screw adapters to projector.
  • Page 7 Make sure arm latch clips are in the unlocked position. Position sliding stud mount brackets and screws so that SSBU or SSMU main plate (A) can be evenly mounted to legs. (See Figure 6) and (See Figure 7) Secure SSBU/SSMU main plate to SSBU/SSMU legs by (C) x 3 or 4 installing 1/4-20"...
  • Page 8 Cable ties (not included) may be used instead of the security screws. Thread cable tie through both holes on On SSBU, partially install four thumb nuts (D) to SSBU main leg and secure cable tie. plate screws. (See Figure 8)
  • Page 9: Clauses De Non-Responsabilité

    ! Il est de la responsabilité de l'installateur de s'assurer que le poids total de tous les composants fixés au SSBU/SSMU ne dépasse pas 11,34 kg (25 lbs). AVERTISSEMENT : N'utiliser ce système de montage que pour l'usage prévu conformément à...
  • Page 10 SSBU/SSMU Installation Instructions DIMENSIONS (SSMU avec RSM représenté) (SSMU avec RSM représenté)
  • Page 11: Outils Nécessaires À L'installation

    E (2) F (4) T (1) R (4) S (4) 10-24 x 1/4" 1/4" 8-32 x 3/8" [SSBU uniquement] [SSBU uniquement] 1/4-20" [Kit de matériel universel - Vis longues] G (4) H (1) 5/16-18 x 1/2" 10-24 x 3/8" [SSBU uniquement]...
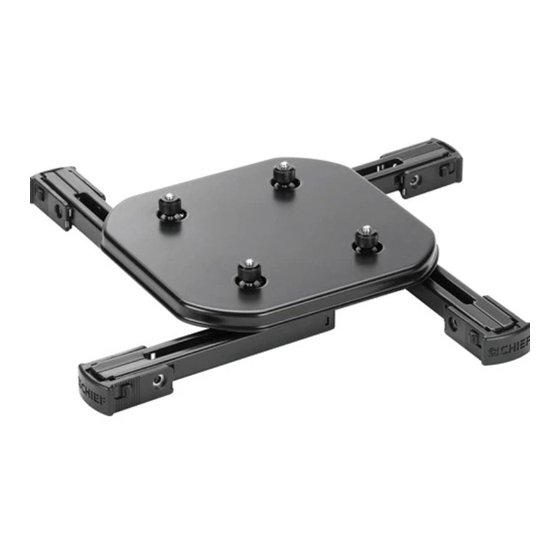
  • Page 12: Montage Et Installation

    L ou M pour fixer les Appuyez fermement sur les boutons de verrouillage situés sur le pied SSBU/SSMU (C) en poussant simultanément le adaptateurs à vis au projecteur. couvercle enclipsé vers la patte et la vis de fixation des montants coulissants fournis.
  • Page 13 Installation Instructions SSBU/SSMU Placez les pieds du SSBU/SSMU (C) sur les adaptateurs à vis Positionnez les pattes et les vis de fixation des montants et les écrous de réglage de la hauteur. (Voir la Figure 4) coulissants de manière à permettre un montage uniforme de la plaque principale SSBU ou SSMU (A) aux pieds.
  • Page 14 SSBU/SSMU. Sur le SSBU, installez en partie quatre écrous à ailettes (D) (Voir la Figure 10) aux vis de la plaque principale du SSBU. (Voir la Figure 8) REMARQUE : Plus de deux vis de sécurité peuvent être installées sur chaque pied.
  • Page 15: Wichtige Sicherheitshinweise

    Das Überschreiten der maximalen Tragkraft kann zu schweren Verletzungen oder Geräteschäden führen! Der Monteur ist dafür verantwortlich, sicherzustellen, dass das Gesamtgewicht aller Komponenten, die mit der SSBU/ SSMU verbunden sind, 11,34 kg (25 lbs) nicht überschreitet. WARNUNG: Verwenden Sie das Halterungssystem nur für den vorgesehenen, in der Anleitung beschriebenen Zweck.
  • Page 16 SSBU/SSMU Installation Instructions ABMESSUNGEN (SSMU mit RSM dargestellt)
  • Page 17 [Universal-Befestigungsmaterialpaket für Projektoranschlussplatten] D (4) [Flügelmutter] L (4) K (4) M (4) 8-32 x 1/4" M2,5 x 10 mm (nur SSBU) M3 x 10 mm C (4) [SSBU/SSMU-Bein] N (4) Q (4) P (4) M6 x 14 mm M4 x 10 mm...
  • Page 18: Montage Und Installation

    HINWEIS: Verwenden Sie die Unterlegscheiben (R) nur, wenn Sie L- oder M-Schrauben zur Befestigung der Drücken Sie fest auf die Feststellknöpfe am SSBU/SSMU- Schraubadapter am Projektor benutzen. Bein (C) und schieben Sie gleichzeitig die Clip-Abdeckung in Richtung der eingeschlossenen Schiebebalkenhalterplatte mit der Schraube.
  • Page 19 Projektors zeigen. (Siehe Abb. 6) und (Siehe Abb. 7) Positionieren Sie die Schiebebalkenhalterplatten mit den HINWEIS: Achten Sie darauf, dass die Armverschlussclips Schrauben so, dass die SSBU- oder SSMU-Hauptplatte (A) entsperrt sind. in ebener Lage auf die Beine montiert werden kann. (Siehe Abb. 6) und (Siehe Abb. 7) Befestigen Sie die SSBU/SSMU-Hauptplatte an den SSBU/SSMU-Beinen, indem Sie 1/4-20"-Inbusmuttern (S)
  • Page 20 Anbringen von Sicherheitsschrauben (optional) RSA oder RSM Montieren Sie Nr. 8-32 x 3/8"-Halbrundkopf- Sicherheitsschrauben (F) in die Sicherheitsbohrungen der Bei einer SSBU montieren Sie vier Flügelmuttern (D) SSBU/SSMU-Beine. (Siehe Abb. 10) ein Stück weit auf die Schrauben der SSBU-Hauptplatte. (Siehe Abb. 8) HINWEIS: Pro Bein können bis zu zwei Sicherheitsschrauben...
  • Page 21 Installation Instructions SSBU/SSMU...
  • Page 22 SSBU/SSMU Installation Instructions...
  • Page 23 Installation Instructions SSBU/SSMU...
  • Page 24 Europe A Franklinstraat 14, 6003 DK Weert, Netherlands P +31 (0) 495 580 852 F +31 (0) 495 580 845 Chief Manufacturing, a products division Asia Pacific A Office No. 1 on 12/F, Shatin Galleria of Milestone AV Technologies 18-24 Shan Mei Street...

Ce manuel est également adapté pour:

Ssmu

Table des Matières