Publicité

Les langues disponibles

Les langues disponibles

Liens rapides

I N S T A L L A T I O N I N S T R U C T I O N S
I N S T R U C T I O N S D ' I N S T A L L A T I O N
M O N T A G E A N L E I T U N G
HD Projector Mount
Support pour projecteur HD
HD-Projektorhalterung
VCM

Publicité

Table des Matières
loading

Sommaire des Matières pour CHIEF VCM

  • Page 1 I N S T A L L A T I O N I N S T R U C T I O N S I N S T R U C T I O N S D ' I N S T A L L A T I O N M O N T A G E A N L E I T U N G HD Projector Mount Support pour projecteur HD...
  • Page 2: Installation Instructions

    VCM does not exceed 250 lbs (113.4 kg). • The weight capacity of the VCM may be LIMITED to the lowest weight capacity of any other component located between the VCM and the supporting structure!
  • Page 3: Tools Required For Installation

    Chiave esagonale Zeskantsleutel Clé à tête hexagonale TOOLS REQUIRED FOR INSTALLATION 1/2" 5/32" 9/16" (included) PARTS D (1) [HB interface bracket] (EXAMPLE ONLY - Bracket varies dependent on projector model) B (1) 5/32" C (1) 5/16-18 x 3/8" A (1) [VCM]...
  • Page 4 NOTE: Ensure that long edge of VCM mount is located parallel to the screen. ((Siehe Abb. 1) Tighten the 5/16-18 x 3/8" set screw (C) into the VCM mount threaded collar to prevent movement of the VCM. ((Siehe Abb. 1)
  • Page 5 IMPROPER INSTALLATION CAN LEAD TO PROJECTOR FALLING RESULTING IN SERIOUS PERSONAL INJURY OR DAMAGE TO EQUIPMENT! Ensure that the VCM housing is seated in slots on HB bracket! Tighten the four 5/16" flange nuts. ((Siehe Abb. 3) Example Only (Interface bracket varies...
  • Page 6 Installation Instructions Pitch (Vertical Elevation) ((Siehe Abb. 6) Loosen two outside bolts on each end of the VCM mount. Tilt projector to desired direction. Securely tighten two outside bolts on each end of VCM mount. (Interface bracket and projector not...
  • Page 7: Clauses De Non-Responsabilité

    ! Il est de la responsabilité de l'installateur de s'assurer que le poids combiné de tous les composants situés entre la structure de support et le VCM ne dépasse pas 113,4 kg (250 lbs). •...
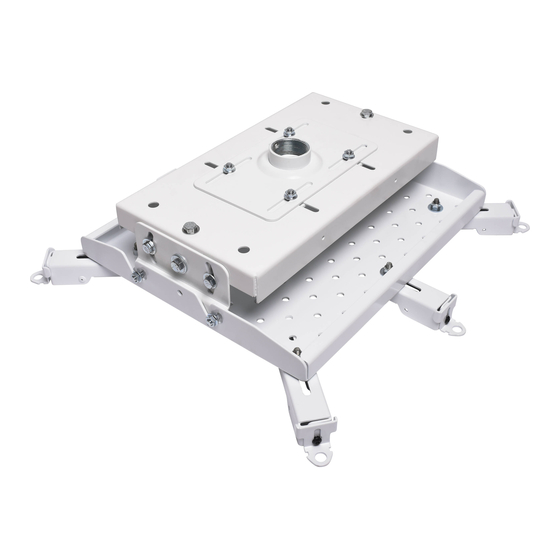
  • Page 8: Outils Nécessaires À L'installation

    épaisseur minimale de 0,154" – ASTM B221) (non inclus) a été correctement installé et est en place. Figure 1 Enfilez le support VCM (A) sur le tuyau NPT de 1-1/2" en serrant bien avec un minimum de quatre filets engagés. (Voir la Figure 1) Passez à...
  • Page 9: Installation Du Projecteur

    ENDOMMAGER CELUI-CI, VOIRE ENTRAÎNER DES BLESSURES CORPORELLES GRAVES ! Assurez-vous que le Installation de la patte de fixation d'interface boîtier du VCM est positionné dans les fentes du support HB ! Serrez les quatre écrous à embase 5/16". (Voir la Figure 3) AVERTISSEMENT :...
  • Page 10 Desserrez, mais NE retirez PAS, les quatre écrous maintenant d'interface le support coulissant supérieur sur le support VCM. et projecteur non Réglez le support VCM jusqu'à 38 mm (1-1/2") dans tous représentés) les sens. Serrez les écrous desserrés (à l'étape 1) sur le support coulissant supérieur.
  • Page 11: Wichtige Sicherheitshinweise

    Verletzungen oder Geräteschäden führen! Der Monteur ist dafür verantwortlich, sicherzustellen, dass das Gesamtgewicht aller Komponenten zwischen der tragenden Konstruktion und der VCM 113,4 kg (250 lbs) nicht überschreitet. • Die maximale Tragkraft der VCM ist auf die maximale...
  • Page 12: Montage

    Rohr mit 1-1/2"-NPT- oder NPSM-Gewinde (Schedule 40, 0,154" Mindestwandstärke aus Aluminium - ASTM B221) (nicht mitgeliefert) ordnungsgemäß montiert und fixiert worden ist. Schrauben Sie die VCM-Halterung (A) fest an das vorhandene 1-1/2"-NPT-Rohr, wobei mindestens vier Gewindegänge eingeschraubt werden müssen. (Siehe Abb. 1) Abb.
  • Page 13: Montage Des Projektors

    Befestigungsset befestigten Anschlussplatte Richten Sie den Projektor mit der daran befestigten Installieren Sie die VCM-Halterung (A) an einem LPK-1- Befestigungsset mit flachem Profil (nicht mitgeliefert) und Anschlussplatte so aus, dass er sich im rechten Winkel zur halten Sie sich dabei an die dem LPK-1-Befestigungsset Leinwand befindet.
  • Page 14 Anschlussplatte auf der VCM-Halterung fixieren, entfernen und Projektor nicht Sie sie jedoch NICHT. abgebildet) Nun können Sie die VCM-Halterung in jede Richtung bis zu 38 mm (1-1/2") verschieben. Ziehen Sie die (in Schritt 1) gelockerten Muttern auf der oberen, verschiebbaren Anschlussplatte fest.
  • Page 15 Installation Instructions...
  • Page 16 Europe A Franklinstraat 14, 6003 DK Weert, Netherlands P +31 (0) 495 580 852 F +31 (0) 495 580 845 Chief Manufacturing, a products division Asia Pacific A Office No. 1 on 12/F, Shatin Galleria of Milestone AV Technologies 18-24 Shan Mei Street...

Table des Matières