Table des Matières
Publicité
Les langues disponibles
Les langues disponibles
Liens rapides
Publicité
Chapitres
Table des Matières

Manuels Connexes pour Pioneer AVD-W8000


Sommaire des Matières pour Pioneer AVD-W8000
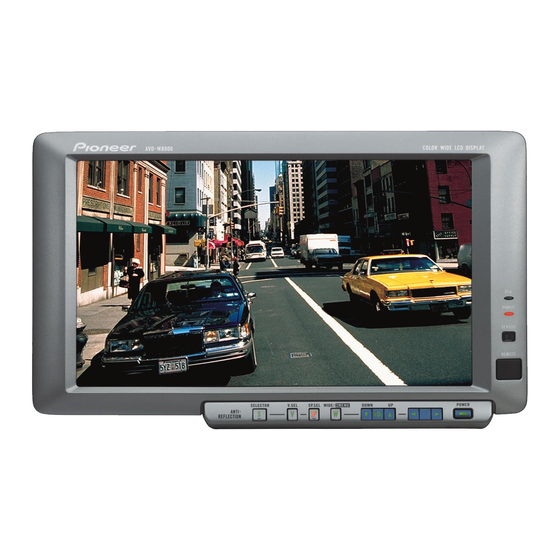
- Page 1 Color LCD Rear Display Écran Arriére à Cristaux Liquides Couleur Owner’s Manual AVD-W8000 Mode d’emploi This product conforms to CEMA cord colors. Le code de couleur des câbles utilisé pour ce produit est conforme à CEMA.
-
Page 2: Table Des Matières
About the Small Fluorescent Tube ....24 About Your Color Display ........ 3 Important ............3 Connecting the System ......25 After-sales Service for Pioneer Products ..3 Before Installing the Unit ........ 26 To Prevent Damage ........26 IMPORTANT SAFEGUARDS ....4... - Page 3 Selecting fine audio equipment such as the unit you’ve just purchased is only the start of your musical enjoyment. Now it’s time to consider how you can maximize the fun and excitement your equipment offers. This manufacturer and the Electronic Industries Association’s Consumer Electronics Group want you to get the most out of your equipment by playing it at a safe level.
-
Page 4: Important Information
Do not place the display in a position where it will impede the driver’s visibility or affect the operation of your vehicle’s air bags. • This product is a color display for Pioneer mobile navigation systems. Important • The serial number of this device is located on the rear of the unit. For your own security and convenience, be sure to record this number on the enclosed warranty card. -
Page 5: Important Safeguards
Use of this product is subject to any local laws regarding placement or use. PIONEER Corporation cannot accept any liability for any problems, damage or loss incurred as a result of the product being used with an incorrect setting or in... -
Page 6: Before Using This Product
Before Using This product This device senses whether the parking brake is on or off. When installed in the front, it is arranged so that video cannot be viewed while the vehicle is moving. The various settings and adjustments are also not possible while driving. (The following message will be dis- played on the screen while the vehicle is moving.) Stop the vehicle in a safe place, apply the parking brake, and wait for the message to be cleared before starting operation. -
Page 7: Using The Display
Using the Display CAUTION • To avoid unsafe conditions, do not adjust the LCD screen while driving. Component Parts and Features Display rear side 3 4 5 6 1 POWER indicator light 6 WIDE/MENU button This light comes on when the system Changes the method of enlarging 4:3 power is on. -
Page 8: Turn On Power
Using the Display Turn On Power First, turn on the power. Remember to switch on the car engine when turning on the power to preserve the battery life. POWER button 1. Switch on the car engine. 2. Turn on the system. Press the POWER button. -
Page 9: Setting The Display Mouting Location
Setting the Display Mouting Location When using the display for the first time after it was purchased, set its mounting location. 2/3 buttons VOLUME control (∞/5) buttons WIDE/MENU button 1. Display a menu screen. Press the WIDE/MENU button for 2 seconds or longer. The [PICTURE ADJUST] menu is displayed. - Page 10 Setting the Display Mouting Location 3. Choose item [LOCATION]. Press the VOLUME control (∞/5) buttons. 5: Choose upper items. ∞: Choose lower items. D I S P L A Y S E T T I N G M I X I N G LOCATION REAR S E L E C T...
- Page 11 Use of this product is subject to any local laws regarding placement or use. PIONEER Corporation cannot accept any liability for any problems, damage or loss incurred as a result of the product being used with an incorrect setting or in violation of...
-
Page 12: Selecting Audio And Video
Selecting Audio and Video Selecting Audio, Video, and Video Output Switches between the video that appears on the display and the audio that is output from the speaker. The items displayed can be selected when a second display is connected to this unit. -
Page 13: About The Selector Button
About the SELECTOR button The Icons Displayed in the Upper Left Corner of the Screen. External output mark (It indicates the video and audio output from the external output VCR 1 VCR 1 jack of the hide-away unit.) Built-in speaker mark (This mark is red because it is for future use.) Video mark VO L... -
Page 14: Switching The Video And Built-In Speaker Audio
Selecting Audio and Video Switching the Video and Built-in Speaker Audio SP.SEL button V.SEL button SELECTOR button Uncoupling the built-in speaker 1. Set so that only the built-in speaker audio can be switched. Press the SP.SEL button for 2 sec or more. With only the built-in speaker audio switched. -
Page 15: Volume Adjustment
2. Press the V.SEL button. Only the video will be switched between VCR1 and VCR2 when this button is pressed. Note: • Return to the setting for switching video, audio and external output at the same time. Press the SP.SEL or V.SEL button for 2 sec or more. The video and audio will be switched at the same VCR 1 time each time that the SELECTOR button is pressed. -
Page 16: Changing The Way The Wide Screen Enlarges
Selecting Audio and Video Changing the Way the Wide Screen Enlarges You can change the way in which normal video (aspect ratio 4:3) enlarges to wide video (16:9). Select wide modes to suit the kind of video you are viewing, such as news pro- grams and movies. -
Page 17: Wide Modes Available
Wide Modes Available FULL Video with an aspect ratio of 4:3 enlarges only horizontally. Enjoy viewing video widened without missing parts. JUST Video appears more extended hor- izontally as it gets closer to both edges of the screen. Because video appears in about the same size as regular video around the middle of the screen, enjoy viewing it with-... -
Page 18: Adjusting The Screen
Adjusting the screen Basic Operations on the Menu Screen This system offers a number of functionality and setup and adjustment features to make it easier to use. Customize the settings to suit your taste and environment. 2/3 buttons VOLUME control (∞/5) buttons WIDE/MENU button 1. - Page 19 3. Select an item. Press the VOLUME control (∞/5) buttons. 5: Choose upper items. ∞: Choose lower items. P I C T U R E A D J U S T BRIGHT S E L CONTRAST CONTRAST CONTRAST COLOR COLOR COLOR DIMMER DIMMER...
-
Page 20: Picture Adjust (Bright/Contrast/Color/Hue)
Adjusting the screen Picture Adjust (BRIGHT/CONTRAST/COLOR/HUE) You can change the brightness [BRIGHT] of black, contrast [CONTRAST], darkness of colors [COLOR], and the hue [HUE] of video to taste. Separate settings are stored for video from VCR1 and that from VCR2. 1. -
Page 21: Picture Adjust (Dimmer)
Picture Adjust (DIMMER) Viewing can become difficult after extended video viewing if the screen is too bright at night or when the ambient brightness becomes dark. This device automatically adjusts the brightness of the LCD screen in accordance with the ambient brightness (3-point intelli- gent dimmer). - Page 22 Adjusting the screen 3. Adjust brightness. Press the 2/3 buttons. 3: Brighten. 2: Darken. The more the yellow mark extends to the right, the brighter the screen appears. P I C T U R E A D J U S T BRIGHT BRIGHT BRIGHT...
-
Page 23: Input Setting (Vcr1/Vcr2)
Input Setting (VCR1/VCR2) To view videos by a VCR, TV, DVD player or any other kind of gear connected to the hide-away unit. 1. Display a menu screen (Refer to page 17). 2. Display [INPUT SETTING]. Press the WIDE/MENU button once. [VCR1] has already been selected. I N P U T S E T T I N G VCR1 VIDEO... -
Page 24: About The Display
• If you notice smoke, a strange noise or smell, or any other abnormal signs from the display, turn OFF the power immediately and consult your dealer or the nearest authorized PIONEER service facility. Using the unit in this condition may result in failure of the system. -
Page 25: About The Liquid Crystal Display (Lcd) Screen
* When the fluorescent tube reaches the end of its useful life, the screen will be dark and the image will no longer be projected. If this happens, consult your dealer or the nearest authorized PIONEER service facility. -
Page 26: Connecting The System
Connecting the System CAUTION • PIONEER does not recommend that you install or service your display your- self. Installing or servicing the product may expose you to risk of electric shock or other hazards. Refer all installation and servicing of your display to authorized Pioneer service personnel. -
Page 27: Before Installing The Unit
Before Installing the Unit • This unit is designed for vehicles with a 12-volt battery and negative grounding. Before installing the system (especially in a recreational vehicle, truck or bus), check the battery voltage. • Disconnect the negative (–) terminal of the battery to avoid the risk of a short circuit. To Prevent Damage •... -
Page 28: Names And Functions Of Connection Terminals
Connecting the System Names and Functions of Connection Terminals Hide-away Unit 1 2 3 4 5 6 Power cable 1 VCR1 RCA AUDIO INPUT 7 Reset button Resets the display microprocessor. (white, red) Press with the tip of a ballpoint pen or Receive stereo audio, as from a VCR or similar object. -
Page 29: Connecting The Power Cable
A Title (English) Connecting the Power Cable Hide-away Unit Note: • Cords for this product and those for other products may be different colors even if they have the same function. When connecting this product to another product, refer to the supplied installation manuals of both products and connect cords that have the same function. -
Page 30: Hooking Up The System
Connecting the System Hooking Up the System Display Unit Note: • This system has display mounting location [LOCATION] settings [FRONT/REAR]. Be sure to complete these setting after the system has been installed. (Refer to page 9) White Sold separately To AUDIO OUTPUT (R) To AUDIO OUTPUT (L) To VIDEO OUTPUT To S-VIDEO OUTPUT... - Page 31 Power cable (Refer to page 28) Hide-away Unit VCR1 INPUT VCR2 INPUT • It is necessary to set to [S-VIDEO] in the [INPUT- SETTING] when connecting to S-VIDEO (Refer to page To VCR1 or VCR2 22). • It is necessary to set [INPUT- SETTING] for VCR2 when audio or video is applied to Commercial RCA audio...
-
Page 32: Connecting Rca Audio And Video Output
Connecting the System Connecting RCA Audio and Video Output Hide-away Unit RCA AUDIO OUTPUT (white, red) Power cable (Refer to page 15 cm RCA VIDEO OUTPUT (yellow) Commercial RCA audio Commercial RCA video cable (white, red) cable (yellow) Sold separately To AUDIO INPUT Second display, To AUDIO INPUT... - Page 33 (iii) impair the driver’s ability to safely oper- ate the vehicle. • PIONEER does not recommend that you install or service your display your- self. Installing or servicing the product may expose you to risk of electric shock or other hazards.
-
Page 34: Installation
Installation Before Installing and Fixing • Make temporary connections first to check that the unit and system are working properly. Before affixing the adhesive tape • Make sure the surface is free of moisture, dust, grime, oil, etc. before affixing the tape. Installing the Hide-away unit Installation Precautions •... -
Page 35: Reset Button
Reset Button Use the reset button to reset the display microprocessor. Press the reset button in these sit- uations: • When a connection is completed • When the system seems to malfunction • When a display image is not displayed correctly The system is reset to its defaults when the reset button is pressed. - Page 36 INFORMATIONS IMPORTANTES .... 3 Choix de l’entrée (VCR1, VCR2) ....22 A propos de l’écran couleur ......3 Service après-vente des produits PIONEER ..3 Remarques à propos de l’écran .... 23 Maniement de l’écran ........23 IMPORTANTES MESURES DE A propos de l’écran à...
-
Page 37: Cher Client
Cher Client : La sélection d’un équipement audio de qualité comme l’unité que vous venez d’acheter n’est que le début de votre plaisir musical. Maintenant, il est temps de penser à la manière de profiter au maximum des plaisirs que vous offre votre équipement. Ce fabricant et le Groupe “Consumer Electronics Group”... -
Page 38: Informations Importantes
Veuillez contacter votre revendeur ou distributeur en ce qui concerne le service après- vente (et les conditions de garantie) ou tout autre information. En cas de nécessitée ou lorsque l’information recherchée n’est pas disponible, veuillez contacter Pioneer aux adresses suivantes;... -
Page 39: Importantes Mesures De Securite
[ REAR ]. L’utilisation de cet appareil est soumise aux lois en vigueur en ce qui concerne son emplacement ou son utilisation. PIONEER Corporation ne saurait être tenu pour responsable en cas de problème, de dommage ou de perte financière subis suite à... -
Page 40: Avant De Vous Servir De Cet Appareil
Avant de vous servir de cet appareil Ce dispositif détecte si le frein de parking est ou n’est pas tiré. Lorsqu’il est installé à l’avant la vidéo ne peut pas être vue lorsque le véhicule est en mouvement. Les différents réglages et mises au point ne peuvent pas non plus être effectués pendant la conduite. -
Page 41: Utilisation De L'écran
Utilisation de l’écran ATTENTION • Pour éviter tout risque d’accident, n’ajustez jamais l’écran Cristaux en conduisant. Composants et particularités Face arrière de l’écran 3 4 5 6 1 Indicateur d’alimentation allumé 6 Touche WIDE/MENU Ce témoin lumineux s’allume quand le Change le mode d’agrandissement de système est alimenté. -
Page 42: Mise Sous Tension
Utilisation de l’écran Mise sous tension Pour commencer, mettez l’appareil sous tension. N’oubliez pas de démarrer le moteur de la voiture pour économiser la batterie. Touche d’alimentation 1. Démarrez le moteur de la voiture. 2. Allumez le système. Appuyez sur la touche d’alimentation. Cette touche permet d’allumer et d’éteindre le système. -
Page 43: Configuration De L'emplacement De L'écran
Configuration de l’emplacement de l’écran Lors de la première utilisation de l’écran, définissez l’endroit où il est installé. Touches 2/3 Touches de réglage du VOLUME (∞/5) Touche WIDE/MENU 1. Affichez un écran de menu. Appuyez sur la touche WIDE/MENU pendant 2 secondes ou plus. Le menu [PICTURE ADJUST] s’affiche. - Page 44 Configuration de l’emplacement de l’écran 3. Choisissez l’option [LOCATION]. Appuyez sur les touches de réglage du VOLUME (∞/5). 5: pour choisir les options précédentes. ∞: pour choisir les options suivantes. D I S P L A Y S E T T I N G M I X I N G LOCATION REAR...
- Page 45 AVERTISSEMENT Si cet appareil est installé à un endroit où le conducteur peut le voir, il FAUT toujours régler le paramètre d’affichage [ DISPLAY SETTING ] sur [ FRONT ]. Sinon, des images risquent de perturber le conducteur s’il y a une possibilité qu’il les voit pendant qu’il conduit.
-
Page 46: Comment Sélectionner L'audio Et La Vidéo
Comment sélectionner l’audio et la vidéo Sélection du son, de la vidéo et de la sortie vidéo La touche de sélection de la source permet de basculer entre la vidéo qui s’affiche à l’écran et le son qui sort du haut-parleur. Il est possible de choisir les éléments affichés si un deuxième écran est branché... -
Page 47: Quelques Mots Concernant La Touche De Selector (Sélection)
Quelques mots concernant la touche de SELECTOR (sélection) Réglez le volume de la sortie sonore en provenance du haut-parleur incorporé. Symbole de sortie externe (il indique la VCR 1 sortie audio et vidéo en provenance de la VCR 1 prise de sortie externe de l’appareil caché.) Symbole du haut-parleur incorporé. -
Page 48: Commutation De La Vidéo Et Du Son Du Haut-Parleur Incorporé
Comment sélectionner l’audio et la vidéo Commutation de la vidéo et du son du haut-parleur incorporé Touche SP.SEL Touche V.SEL Touche de SELECTOR Comment débrancher le haut-parleur incorporé 1. Faites en sorte que seul le son du haut-parleur incorporé puisse être commuté. -
Page 49: Réglage Du Volume
2. Appuyez sur la touche V.SEL. Seule la vidéo sera commutée entre VCR1 et VCR2 lorsque vous appuierez sur cette touche. Remarque : • Pour revenir à la commutation simultanée de la vidéo, du son interne et du son externe : Appuyez sur la touche SP.SEL ou V.SEL pendant 2 secondes ou plus. -
Page 50: Changement Du Mode D'agrandissement De L'écran
Comment sélectionner l’audio et la vidéo Changement du mode d’agrandissement de l’écran Vous pouvez changer la manière dont la vidéo normale (rapport 4:3) s’agrandit pour offrir un format plus large (16:9). Sélectionnez les modes d’agrandissement en fonction du type de vidéo que vous regardez, par exemple des bulletins d’information ou des films. Touche WIDE/MENU 1. -
Page 51: Modes D'agrandissement Disponibles
Modes d’agrandissement disponibles FULL (Remplir) La vidéo au format 4:3 est agrandie uniquement dans le sens de la largeur (horizontalement). Vous bénéficiez alors d’une zone d’image plus large, sans perdre aucune donnée. JUST (Juste) L’image semble davantage agrandie en largeur au fur et à mesure qu’on approche des bords de l’écran. -
Page 52: Comment Mettre Au Point L'écran
Comment mettre au point l’écran Opérations de base dans l’écran de menu Ce système offre un certain nombre de fonctions et d’options de configuration et de réglage destinées à faciliter son utilisation. Réglez les paramètres en fonction de vos goûts personnels et des conditions d’utilisation. - Page 53 3. Sélectionnez une option. Appuyez sur les touches de réglage du VOLUME (∞/5). 5: pour choisir les options précédentes ∞: pour choisir les options suivantes. P I C T U R E A D J U S T BRIGHT S E L CONTRAST CONTRAST CONTRAST...
-
Page 54: Réglage De L'image (Bright/Contrast/Color/Hue)
Comment mettre au point l’écran Réglage de l’image (BRIGHT/CONTRAST/COLOR/HUE) Vous pouvez changer la luminosité [BRIGHT] du noir, le contraste [CONTRAST], l’obscurcissement des couleurs [COLOR] et la teinte [HUE] de la vidéo. Des paramètres différents sont stockés pour la vidéo de provenance RVB, celle issue de VCR1 et celle issue de VCR2. -
Page 55: Réglage De L'image (Dimmer)
Réglage de l’image (DIMMER) La vision peut devenir difficile la nuit lorsque vous agrandissez la vision de la vidéo si l’écran est trop lumineux ou si la luminosité ambiante s’assombrit. Le dispositif met automatiquement au point la luminosité de l’écran à cristaux liquides en fonction de la luminosité... - Page 56 Comment mettre au point l’écran 3. Réglez la luminosité. Appuyez sur les touches 2/3. 3: Eclaircir 2: Assombrir Plus le symbole jaune s’étend vers la droite, plus l’écran s’éclaircit. P I C T U R E A D J U S T BRIGHT BRIGHT BRIGHT...
-
Page 57: Choix De L'entrée (Vcr1, Vcr2)
Choix de l’entrée (VCR1, VCR2) Pour voir les vidéos avec un magnétoscope VCR, TV ou DVD ou avec une autre système branché sur l’unité d’escamotage. 1. Affichez un écran de menu (voir page 17). 2. Affichez [INPUT SETTING]. Appuyez une fois sur la touche WIDE/MENU. [VCR1] est déjà sélectionné. I N P U T S E T T I N G VCR1 VIDEO... -
Page 58: Remarques À Propos De L'écran
• Si de l’humidité ou un corps étranger devait s’infiltrer dans l’unité, mettez-la immédiatement hors tension (OFF) et consultez votre concessionnaire ou un centre de service PIONEER agréé. Utiliser l’unité sans vérification pourrait provoquer un incendie, une électrocution ou d’autres problèmes. -
Page 59: A Propos De L'écran À Cristaux Liquides (Lcd)
(Notez qu’une utilisation par basse température réduit la durée de service du tube fluorescent.) * Lorsque le tube fluorescent atteint la fin de sa vie utile, l’écran s’assombrit et les images n’y sont plus visibles. Dans ce cas, consultez votre concessionnaire ou un centre de service PIONEER agréé. -
Page 60: Branchement Du Système
Branchement du système ATTENTION • PIONEER ne vous recommande pas d’installer ou d’entretenir vous-même cet écran, car ces travaux peuvent présenter un risque d’électrocution ou d’autres dangers. Confiez tous les travaux d’installation et d’entretien de votre écran au personnel de service Pioneer agréé. -
Page 61: Avant D'installer L'unité
Avant d’installer l’unité • Cette unité est conçue pour des véhicules à batterie de 12 volts et mise à la masse négative. Avant d’installer le système (surtout dans un véhicule tout-terrain, camion ou bus), vérifiez la tension de la batterie. •... -
Page 62: Noms Et Fonctions Des Prises De Raccordement
Branchement du système Noms et fonctions des prises de raccordement Appareil caché 1 2 3 4 5 6 Cordon d’alimentation 1 Entrée audio Cinch VCR1 (blanc, 7 Touche de réinitialisation Réinitialise le microprocesseur de rouge) l’écran. Appuyez avec la pointe d’un Reçoit le son stéréo comme depuis un stylo ou un objet de même type. -
Page 63: Branchement Du Cordon D'alimentation
Branchement du cordon d’alimentation Appareil caché Remarque: • Les cordons de cet appareil et ceux d'autres produits peuvent être de couleur différente même s'ils ont la même fonction. Lors du raccordement de cet appareil à un autre, consultez le mode d'emploi de chacun d'eux et branchez les cordons qui ont la même fonction. -
Page 64: Raccordement Du Système
Branchement du système Raccordement du système Ecran Remarque: • Ce système propose des paramètres d’emplacement de montage, [LOCATION] : [FRONT/REAR]. N’oubliez pas de régler ce paramètre après l’installation du système.(Consultez la page 9). Blanc Uendu Séparément Vers SORTIE AUDIO (DROITE) Vers SORTIE AUDIO (GAUCHE) Vers SORTIE VIDEO... - Page 65 Cordon d’alimentation (voir page 28). Appareil caché Entrée VCR1 Entrée VCR2 • Il est nécessaire de régler [INPUT-SETTING] sur [S-VIDEO] pour effectuer une connexion S-VIDEO Vers VCR1 ou VCR2 (Consultez la page 22). • Il est necessaire de régler sur [INPUT-SETTING] pour VCR2 pour effectuer une Câble audio Cinch, vendu dans le...
-
Page 66: Connexions Audio Cinch Et Sortie Vidéo
Branchement du système Connexions audio Cinch et sortie vidéo Appareil caché SORTIE AUDIO Sortie (blanc, rouge) Cordon d’alimentation (Consultez la page 28) 15 cm SORTIE VIDEO Sortie (jaune) Câble audio Cinch, vendu dans Câble vidéo Cinch, vendu le commerce (blanc, rouge) dans le commerce (jaune) Uendu Séparément... - Page 67 [ REAR ] (arrière). L’utilisation de cet appareil est soumise aux lois en vigueur en ce qui concerne son emplacement ou son utilisation. PIONEER Corporation ne saurait être tenu pour responsable en cas de problème, de dommage ou de perte financière subis suite à...
-
Page 68: Installation
Installation Avant l’installation et la fixation • Effectuez d’abord des connexions temporaires afin de vérifier si l’unité et le système fonctionnent correctement. Avant d’employer le ruban adhésif • Afin de fixer le ruban adhésif, assurez-vous que l’endroit n’est ni humide ni souillé par de la poussière ou de l’huile, etc. -
Page 69: Touche De Réinitialisation
Touche de réinitialisation Utilisez la touche de réinitialisation pour réinitialiser le microprocesseur de l’écran, dans les situations suivantes : • Lorsqu’une connexion est terminée • Lorsque le système semble ne pas fonctionner correctement • Lorsqu’une image ne s’affiche pas correctement Le système est réinitialisé... - Page 70 300 Allstate Parkway, Markham, Ontario L3R 0P2, Canada Published by Pioneer Corporation. TEL: (905) 479-4411 Copyright © 2000 by Pioneer Corporation. PIONEER ELECTRONICS DE MEXICO, S.A. de C.V. All rights reserved. San Lorenzo Num 1009 3er piso Desp. 302 Publication de Pioneer Corporation.