AEG S73200CNS1 Notice D'utilisation

AEG S73200CNS1 Notice D'utilisation

Réfrigérateur/congélateur
Table des Matières

Publicité

Les langues disponibles

Les langues disponibles

Liens rapides

S73200CNS1
S73200CNW1
NL KOEL-VRIESCOMBINATIE
EN FRIDGE FREEZER
FR RÉFRIGÉRATEUR/
CONGÉLATEUR
GEBRUIKSAANWIJZING
USER MANUAL
NOTICE D'UTILISATION
2
22
42

Publicité

Table des Matières
loading

Sommaire des Matières pour AEG S73200CNS1

  • Page 1 S73200CNS1 NL KOEL-VRIESCOMBINATIE GEBRUIKSAANWIJZING EN FRIDGE FREEZER USER MANUAL S73200CNW1 FR RÉFRIGÉRATEUR/ NOTICE D'UTILISATION CONGÉLATEUR...
  • Page 2: Table Des Matières

    INHOUD 4 VEILIGHEIDSINFORMATIE 7 BESCHRIJVING VAN HET PRODUCT 8 BEDIENINGSPANEEL 9 DAGELIJKS GEBRUIK 11 NUTTIGE AANWIJZINGEN EN TIPS 12 ONDERHOUD EN REINIGING 14 PROBLEEMOPLOSSING 16 MONTAGE 19 TECHNISCHE GEGEVENS 20 GELUIDEN MILIEUBESCHERMING Recycle de materialen met het symbool . Gooi de verpakking in een geschikte verzamelcontainer om het te recyclen.
  • Page 3: Accessoires En Verbruiksartikelen

    ACCESSOIRES EN VERBRUIKSARTIKELEN In de AEG webshop vindt u alles wat u nodig heeft om al uw apparaten van AEG mooi te houden en perfect te laten functioneren. Ook vindt u hier een groot aantal accessoires die zijn ontworpen en gebouwd volgens de hoge kwaliteitsnormen die u verwacht, van speciaal kookgerei tot bestekmandjes en van flessenhouders tot waszakken…...
  • Page 4: Veiligheidsinformatie

    VEILIGHEIDSINFORMATIE In het belang van uw veiligheid en om • Als dit apparaat, dat voorzien is van een een correct gebruik te kunnen waarbor- magnetische deursluiting, een ouder gen is het van belang dat u, alvorens het apparaat vervangt, dat voorzien is van...
  • Page 5: Installatie

    NEDERLANDS WAARSCHUWING! • Bewaar voorverpakte diepvriesproduc- Alle elektrische onderdelen (net- ten volgens de aanwijzingen van de fa- snoer, stekker, compressor) mo- brikant. gen om gevaar te voorkomen uit- • U dient zich strikt te houden aan de sluitend worden vervangen door aanbevelingen van de fabrikant van het een erkende onderhoudsdienst of apparaat met betrekking tot het bewa-...
  • Page 6: Bescherming Van Het Milieu

    BESCHERMING VAN HET met betrekking tot de installatie opvol- gen. MILIEU • De achterkant dient zo mogelijk tegen Dit apparaat bevat geen gassen een muur geplaatst te worden, tenein- die de ozonlaag kunnen beschadi- de te voorkomen dat hete onderdelen...
  • Page 7: Beschrijving Van Het Product

    NEDERLANDS BESCHRIJVING VAN HET PRODUCT 9 10 MaxiBox-laden Glazen plateau Glazen plateau Glazen plateau Flessenrek Glazen plateau Bedieningseenheid Boterschap Deurplateau Deurplateau Flessenrek Vriesmand Maxibox-mandje Frostfree-mandje Koudemodule Typeplaatje...
  • Page 8: Bedieningspaneel

    BEDIENINGSPANEEL Temperatuurweergave LED • de hoeveelheid voedsel die wordt be- waard Fast Freeze-indicatielampje • de plek van het apparaat Deursensor Fast Freeze-toets FAST FREEZE-FUNCTIE IN EN Temperatuurregelaar INSCHAKELEN U kunt de Fast Freeze-functie inschakelen door te drukken op de Fast Freeze-knop.
  • Page 9: Dagelijks Gebruik

    NEDERLANDS DAGELIJKS GEBRUIK HET BEWAREN VAN ONTDOOIEN INGEVROREN VOEDSEL Diepgevroren of ingevroren voedsel kunt, voordat het gebruikt wordt, in het koelvak Als u het apparaat voor het eerst of na of op kamertemperatuur laten ontdooien, een periode dat het niet gebruikt is in- afhankelijk van de hoeveelheid tijd die schakelt, het apparaat minstens 2 uur op hiervoor nodig is.
  • Page 10: Vriesmandjes Uit De Vriezer Verwijderen

    10 www.aeg.com HET PLAATSEN VAN DE DEURPLATEAUS Om het bewaren van voedselpakketten van verschillende afmetingen mogelijk te maken, kunnen de schappen op verschil- lende hoogtes worden geplaatst. Om deze aanpassingen uit te voeren, gaat u als volgt te werk: trek het schap geleidelijk in de richting...
  • Page 11: Nuttige Aanwijzingen En Tips

    NEDERLANDS NUTTIGE AANWIJZINGEN EN TIPS NORMALE Vlees (alle soorten) in plastic zakken ver- pakken en op het glazen schap leggen, BEDRIJFSGELUIDEN boven de groentelade. Bewaar het, voor de veiligheid, slechts • U kunt een zwak gorgelend en borre- een of maximaal twee dagen op deze ma- lend geluid horen wanneer het koel- nier.
  • Page 12: Onderhoud En Reiniging

    12 www.aeg.com ONDERHOUD EN REINIGING DE BINNENKANT • spoel ze af en maak ze grondig droog. SCHOONMAKEN Trek niet aan leidingen en/of ka- bels aan de binnenkant van de Voordat u het apparaat voor de eerste kast en verplaats of beschadig ze keer gebruikt, wast u de binnenkant en de niet.
  • Page 13: Het Ontdooien Van De Koelkast

    NEDERLANDS HET ONTDOOIEN VAN DE KOELKAST Rijp wordt elke keer als de compressor- motor tijdens normale werking stopt, au- tomatisch van de verdamper van het koel- vak verwijderd. Het dooiwater loopt via een afvoergaatje in een speciale opvang- bak aan de achterkant van het apparaat, boven de compressormotor, waar het ver- dampt.
  • Page 14: Probleemoplossing

    14 www.aeg.com PROBLEEMOPLOSSING LET OP! Tijdens een normale gebruik Voordat u problemen oplost, trekt hoort u geluiden (compressor, u eerst de stekker uit het stopcon- koelmiddelcirculatie). tact. Alleen een gekwalificeerd elektri- cien of een bevoegde persoon mag problemen oplossen die niet in deze handleiding beschreven zijn.
  • Page 15: De Deur Sluiten

    NEDERLANDS Probleem Mogelijke oorzaak Oplossing Er loopt water over De dooiwaterafvoer loopt Maak de dooiwaterafvoer de vloer. niet in de verdamperbak vast op de verdamperbak. boven de compressor. De temperatuur in De temperatuurregelaar is Stel een hogere/lagere het apparaat is te niet goed ingesteld.
  • Page 16: Montage

    16 www.aeg.com MONTAGE ELEKTRISCHE AANSLUITING WAARSCHUWING! Lees voor uw eigen veiligheid en Zorg er vóór het aansluiten voor dat het correcte werking van het apparaat voltage en de frequentie op het typepla- eerst de "veiligheidsinformatie" tje overeenkomen met de stroomtoevoer aandachtig door, alvorens het ap- in uw huis.
  • Page 17: Omkeerbaarheid Van De Deur

    NEDERLANDS AFSTANDHOUDERS ACHTERKANT U vindt de twee afstandhouders in de zak van de gebruikershandleiding. Volg deze stappen om de afstandhouders te installeren: Draai de schroef los. Plaats de afstandhouder onder de schroef. Draai de afstandshouder in de juiste positie. Draai de schroeven opnieuw aan. NIVELLERING Zorg ervoor dat het apparaat waterpas staat wanneer u het plaatst.
  • Page 18 18 www.aeg.com • Verwijder, met behulp van een gereed- schap, het deksel (A). Schroef het on- derste scharnier (B) en het afstandsstuk (C) los en monteer ze aan de andere kant. • Monteer het deksel (1) op de andere kant.
  • Page 19: Technische Gegevens

    NEDERLANDS • Verwijder de afdekkingen (B). Verwijder de afdekpennen (A). • Schroef de handgrepen (C) los en be- vestig ze aan de tegenovergestelde zij- • Zet de pennen (A) terug aan de andere kant. Voer een eindcontrole uit en verzeker u ervan dat: •...
  • Page 20: Geluiden

    20 www.aeg.com GELUIDEN Tijdens normaal gebruik hoort u geluiden (compressor, koelmiddelcirculatie). HISSS! BRRR! BRRR! BRRR! BLUBB! BLUBB!
  • Page 21 NEDERLANDS HISSS! HISSS! SSSRRR! SSSRRR! CRACK! CRACK!
  • Page 22 22 www.aeg.com CONTENTS 24 SAFETY INFORMATION 27 PRODUCT DESCRIPTION 28 CONTROL PANEL 29 DAILY USE 31 HELPFUL HINTS AND TIPS 32 CARE AND CLEANING 34 TROUBLESHOOTING 36 INSTALLATION 39 TECHNICAL DATA 40 NOISES ENVIRONMENT CONCERNS Recycle the materials with the symbol .
  • Page 23: Accessories And Consumables

    ENGLISH FOR PERFECT RESULTS Thank you for choosing this AEG product. We have created it to give you impeccable performance for many years, with innovative technologies that help make life simpler – features you might not find on ordinary appliances. Please spend a few minutes reading to get the very best from it.
  • Page 24: Safety Information

    24 www.aeg.com SAFETY INFORMATION In the interest of your safety and to ensure Keep ventilation openings, in the appli- the correct use, before installing and first ance enclosure or in the built-in structure, using the appliance, read this user manual clear of obstruction.
  • Page 25 ENGLISH Do not pull the mains cable. • Do not use sharp objects to remove frost from the appliance. Use a plastic If the power plug socket is loose, scraper. do not insert the power plug. There is a risk of electric shock or fire. •...
  • Page 26: Environment Protection

    26 www.aeg.com • This product must be serviced by an au- thorized Service Centre, and only genu- ine spare parts must be used. ENVIRONMENT PROTECTION This appliance does not contain gasses which could damage the ozone layer, in either its refriger- ant circuit or insulation materials.
  • Page 27: Product Description

    ENGLISH PRODUCT DESCRIPTION 9 10 Maxibox drawers Glass shelf Glass shelf Glass shelf Bottle rack Glass shelf Control unit Butter shelf Door shelf Door shelf Bottle shelf Freezer basket Maxibox basket Frostfree basket Cold module Rating plate...
  • Page 28: Control Panel

    28 www.aeg.com CONTROL PANEL FAST FREEZE FUNCTION Temperature indicator LED Fast Freeze indicator You can activate the Fast Freeze function Door sensor by pressing the Fast Freeze button. The LED corresponding to the symbol Fast Freeze button Fast Freeze indicator lights up.
  • Page 29: Daily Use

    ENGLISH DAILY USE STORAGE OF FROZEN FOOD THAWING When first starting-up or after a period Deep-frozen or frozen food, prior to be- out of use, before putting the products in ing used, can be thawed in the refrigera- the compartment let the appliance run at tor compartment or at room temperature, least 2 hours on the higher settings.
  • Page 30: Positioning The Door Shelves

    30 www.aeg.com POSITIONING THE DOOR SHELVES To permit storage of food packages of various sizes, the door shelves can be placed at different heights. To make these adjustments proceed as follows: gradually pull the shelf in the direction of the arrows until it comes free, then reposi- tion as required.
  • Page 31: Helpful Hints And Tips

    ENGLISH HELPFUL HINTS AND TIPS NORMAL OPERATING Meat (all types) : wrap in polythene bags and place on the glass shelf above the SOUNDS vegetable drawer. For safety, store in this way only one or • You may hear a faint gurgling and a two days at the most.
  • Page 32: Care And Cleaning

    32 www.aeg.com CARE AND CLEANING CLEANING THE INTERIOR • rinse and dry thoroughly. Do not pull, move or damage any Before using the appliance for the first pipes and/or cables inside the time, wash the interior and all internal ac- cabinet.
  • Page 33: Defrosting Of The Freezer

    ENGLISH DEFROSTING OF THE FREEZER The freezer compartment of this model, on the other hand, is a "no frost" type. This means that there is no buildup of frost when it is in operation, neither on the internal walls nor on the foods. The absence of frost is due to the contin- uous circulation of cold air inside the compartment, driven by an automatically...
  • Page 34: Troubleshooting

    34 www.aeg.com TROUBLESHOOTING CAUTION! There are some sounds during Before troubleshooting, discon- normal use (compressor, refriger- nect the power supply. ant circulation). Only a qualified electrician or competent person must do the troubleshooting that is not in this manual. Problem...
  • Page 35: Replacing The Control Unit

    ENGLISH Problem Possible cause Solution Water flows on the The melting water outlet Attach the melting water ground. does not flow in the evap- outlet to the evaporative orative tray above the tray. compressor. The temperature in The temperature regulator Set a higher/lower temper- the appliance is too is not set correctly.
  • Page 36: Installation

    36 www.aeg.com INSTALLATION ELECTRICAL CONNECTION WARNING! Read the "Safety Information" Before plugging in, ensure that the volt- carefully for your safety and cor- age and frequency shown on the rating rect operation of the appliance plate correspond to your domestic power before installing the appliance.
  • Page 37: Rear Spacers

    ENGLISH REAR SPACERS You can find the two spacers in the bag with documentation. Do these steps to install the spacers: Release the screw. Engage the spacer below the screw. Turn the spacer to the right position. Tighten again the screws. LEVELLING When placing the appliance ensure that it stands level.
  • Page 38 38 www.aeg.com • Remove using a tool the cover (A). Un- screw the lower hinge pivot (B) and the spacer (C) and place them on the oppo- site side. • Re-insert the cover (1) on the opposite side. • Remove the plugs on the upper side of...
  • Page 39: Technical Data

    ENGLISH • Remove the covers (B). Remove the cover pins (A). • Unscrew the handles (C) and fix them on the opposite side. • Re-insert the cover pins (A) on the op- posite side. Do a final check to make sure that: •...
  • Page 40: Noises

    40 www.aeg.com NOISES There are some sounds during normal running (compressor, refrigerant circula- tion). HISSS! BRRR! BRRR! BRRR! BLUBB! BLUBB!
  • Page 41 ENGLISH HISSS! HISSS! SSSRRR! SSSRRR! CRACK! CRACK!
  • Page 42 42 www.aeg.com SOMMAIRE 44 CONSIGNES DE SÉCURITÉ 47 DESCRIPTION DE L'APPAREIL 48 BANDEAU DE COMMANDE 49 UTILISATION QUOTIDIENNE 51 CONSEILS UTILES 52 ENTRETIEN ET NETTOYAGE 54 EN CAS D'ANOMALIE DE FONCTIONNEMENT 56 INSTALLATION 59 CARACTÉRISTIQUES TECHNIQUES 60 BRUITS EN MATIÈRE DE PROTECTION DE L'ENVIRONNEMENT Recyclez les matériaux portant le symbole...
  • Page 43: Pour Des Résultats Parfaits

    ACCESSOIRES ET CONSOMMABLES Dans la boutique en ligne d'AEG, vous trouverez tout ce qu'il vous faut pour que vos appareils AEG fonctionnent parfaitement. Sans oublier une vaste gamme d'accessoires conçus et fabriqués selon les critères de qualité les plus élevés qui soient, des articles de cuisine spécialisés aux range-couverts, des porte-bouteilles...
  • Page 44: Consignes De Sécurité

    44 www.aeg.com CONSIGNES DE SÉCURITÉ Pour votre sécurité et garantir une utilisa- Ceci afin d'éviter aux enfants de s'en- tion correcte de l'appareil, lisez attentive- fermer dans l'appareil et de mettre ain- ment cette notice, y compris les conseils si leur vie en danger.
  • Page 45 FRANÇAIS AVERTISSEMENT • Un produit décongelé ne doit jamais Les éventuelles réparations ou in- être recongelé. terventions sur votre appareil, ain- • Conservez les aliments emballés con- si que le remplacement du câble formément aux instructions de leur fa- d'alimentation, ne doivent être ef- bricant.
  • Page 46: Protection De L'environnement

    46 www.aeg.com surchauffe. Pour assurer une ventilation suffisante, respectez les instructions de la notice (chapitre Installation). • Placez l'appareil dos au mur pour éviter tout contact avec le compresseur et le condenseur (risque de brûlure). • Placez de préférence votre appareil loin...
  • Page 47: Description De L'appareil

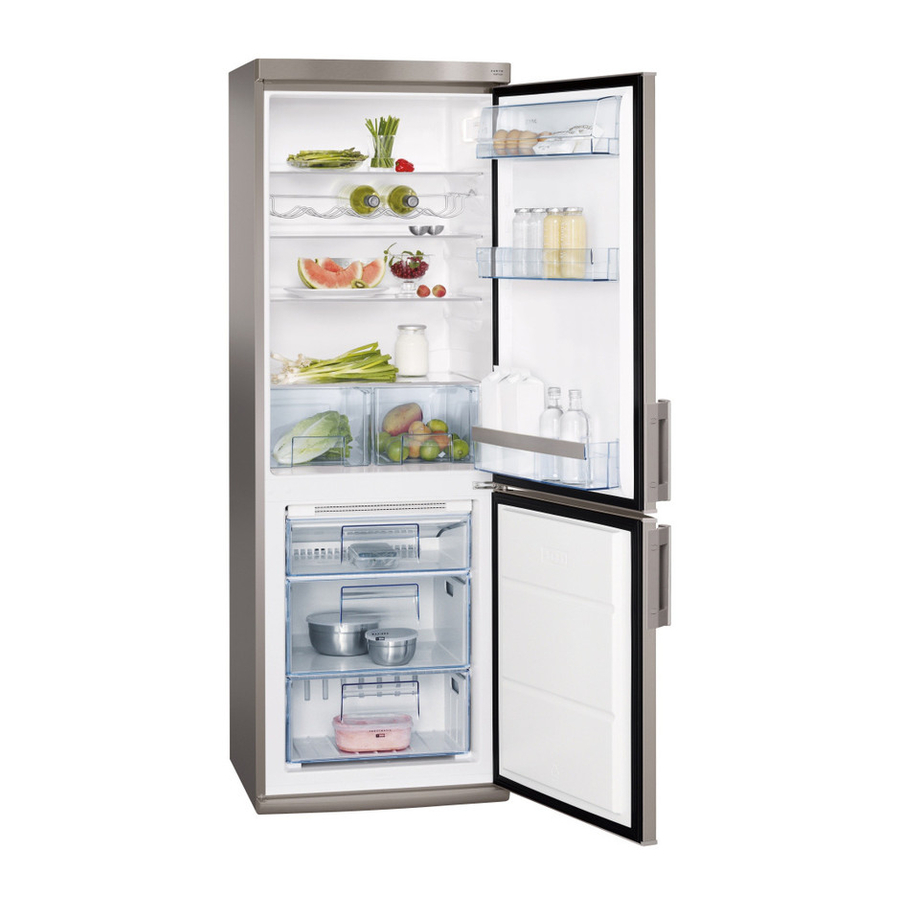
    FRANÇAIS DESCRIPTION DE L'APPAREIL 9 10 Bacs Maxibox Clayette en verre Clayette en verre Clayette en verre Porte-bouteilles Clayette en verre Unité de commande Compartiment à beurre Balconnet de porte Balconnet de porte Compartiment à bouteilles Panier de congélation Bac Maxibox Bac Frostfree Module de refroidissement Plaque signalétique...
  • Page 48: Bandeau De Commande

    48 www.aeg.com BANDEAU DE COMMANDE Indicateur de température LED • la fréquence d'ouverture de la porte • la quantité de denrées entreposées Voyant Fast Freeze • l'emplacement de l'appareil. Capteur de porte Touche Fast Freeze FONCTION FAST FREEZE Thermostat Pour activer la fonction Fast Freeze, ap- puyez sur la touche Fast Freeze.
  • Page 49: Utilisation Quotidienne

    FRANÇAIS UTILISATION QUOTIDIENNE CONSERVATION DES LA DÉCONGÉLATION ALIMENTS CONGELÉS Les aliments surgelés ou congelés peu- vent être décongelés dans le comparti- À la mise en service ou après un arrêt pro- ment réfrigérateur ou à température am- longé, placez le thermostat sur la position biante, avant d'être utilisés, en fonction Max pendant 2 heures environ, avant d'in- du temps disponible pour cette opéra-...
  • Page 50: Retrait Des Bacs De Congélation Du Congélateur

    50 www.aeg.com METTEZ EN PLACE LES BALCONNETS DE LA PORTE. En fonction de la taille des emballages des aliments conservés, les balconnets de la porte peuvent être positionnés à diffé- rentes hauteurs. Pour les ajuster, procédez comme suit : tirez progressivement sur le balconnet dans le sens des flèches pour le dégager,...
  • Page 51: Conseils Utiles

    FRANÇAIS CONSEILS UTILES BRUITS DE • Placez les aliments pour que l'air puisse circuler librement autour. FONCTIONNEMENT NORMAUX CONSEILS POUR LA RÉFRIGÉRATION • Le liquide de refroidissement qui passe dans le circuit d'évaporation peut pro- Conseils utiles : duire un bruit de gargouillis ou de Viande (tous les types) : enveloppez-la bouillonnement.
  • Page 52: Entretien Et Nettoyage

    52 www.aeg.com ENTRETIEN ET NETTOYAGE NETTOYAGE INTÉRIEUR • Rincez et séchez soigneusement. Ne pas tirer, déplacer ou endom- Avant d'utiliser l'appareil pour la première mager les tuyaux et/ou câbles qui fois, nettoyez l'intérieur et tous les acces- se trouvent à l'intérieur de l'appa- soires internes avec de l'eau tiède savon-...
  • Page 53: Dégivrage Du Congélateur

    FRANÇAIS DÉGIVRAGE DU CONGÉLATEUR Le compartiment congélateur de ce mo- dèle est "sans givre". Cela signifie qu'il n'y a aucune formation de givre pendant son fonctionnement, ni sur les parois in- ternes si sur les aliments. L'absence de givre est due à la circulation continuelle de l'air froid à...
  • Page 54: En Cas D'anomalie De Fonctionnement

    54 www.aeg.com EN CAS D'ANOMALIE DE FONCTIONNEMENT ATTENTION L'appareil émet certains bruits Avant toute intervention sur l'ap- pendant son fonctionnement pareil, débranchez-le. (compresseur, circuit frigorifique). La résolution des problèmes non mentionnés dans la présente noti- ce doit être exclusivement confiée à...
  • Page 55: Remplacement De L'unité De Commande

    FRANÇAIS Problème Cause possible Solution Des produits empêchent Assurez-vous que les pro- l'eau de s'écouler dans le duits ne touchent pas la réservoir d'eau. plaque arrière. De l'eau coule sur le Le tuyau d'évacuation de Fixez le tuyau d'évacuation sol. l'eau de dégivrage ne de l'eau au bac d'évapora- s'écoule pas dans le bac...
  • Page 56: Installation

    56 www.aeg.com INSTALLATION BRANCHEMENT ÉLECTRIQUE AVERTISSEMENT Pour votre sécurité et le bon fonc- Contrôlez, avant de brancher l'appareil, si tionnement de l'appareil, veuillez la tension et la fréquence indiquées sur la lire attentivement les "Consignes plaque signalétique correspondent à cel- de sécurité"...
  • Page 57: Entretoises Arrière

    FRANÇAIS ENTRETOISES ARRIÈRE Vous trouverez deux entretoises dans le même sachet que la notice d'utilisation. Pour installer les entretoises, procédez comme suit : Desserrez la vis. Faites glisser l'entretoise sous la vis. Tournez l'entretoise en position cor- recte. Resserrez la vis. MISE DE NIVEAU Lorsque vous installez l'appareil, veillez à...
  • Page 58 58 www.aeg.com • Retirez le cache (A) à l'aide d'un outil. Dévissez le gond de la charnière infé- rieure (B) et l'entretoise (C) et placez-les du côté opposé • Réinsérez le cache (1) du côté opposé • Enlevez les caches situés sur l'arête su- périeure des deux portes et placez-les...
  • Page 59: Caractéristiques Techniques

    FRANÇAIS • Retirez les caches (B). Retirez les goupil- les du cache (A). • Dévissez les poignées (C) et remontez- les sur le côté opposé. • Réinsérez les goupilles du cache (A) sur le côté opposé. Faites une dernière vérification pour vous assurer que : •...
  • Page 60: Bruits

    60 www.aeg.com BRUITS L'appareil émet certains bruits pendant son fonctionnement (compresseur, circuit frigorifique). HISSS! BRRR! BRRR! BRRR! BLUBB! BLUBB!
  • Page 61 FRANÇAIS HISSS! HISSS! SSSRRR! SSSRRR! CRACK! CRACK!
  • Page 62 62 www.aeg.com...
  • Page 63 FRANÇAIS...
  • Page 64 210622304-A-472011...

Ce manuel est également adapté pour:

S73200cnw1

Table des Matières