
Manuels Connexes pour SilverCrest SKMK 1200 A1


Sommaire des Matières pour SilverCrest SKMK 1200 A1
- Page 1 MONSIEUR CUISINE ÉDITION PLUS SKMK 1200 A1 MONSIEUR CUISINE MONSIEUR CUISINE ÉDITION PLUS ÉDITION PLUS Mode d’emploi Operating instructions IAN 277740...
- Page 2 Français ................... 2 English ................... 36...
-
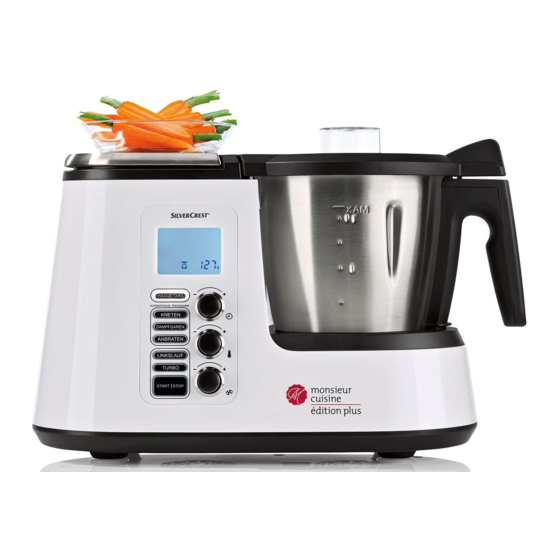
Page 3: Aperçu De L'appareil / Overview
Aperçu de l'appareil / Overview TEMPS TEMP. VITESSE SENS. INV. BALANCE/TARE PROG. AUTO. MALAXER CUISS. VAP. SAISIR SENS INV. TURBO MARCHE ARRÊT... -
Page 4: Table Des Matières
Sommaire 1. Aperçu de l'appareil ................ 4 2. Affichages sur l'écran ..............5 3. Récapitulatif des fonctions ............... 6 4. Utilisation conforme ................. 7 5. Consignes de sécurité ............... 8 6. Éléments livrés ................11 7. Déballage de l'appareil et mise en place ........12 8. - Page 5 14. Saisir ..................... 26 14.1 Informations générales sur le programme ..........26 14.2 Démarrer le programme ...............26 15. Nettoyage et entretien de l'appareil ..........27 15.1 Nettoyage de l'appareil de base ............27 15.2 Nettoyage au lave-vaisselle ..............27 15.3 Nettoyage des accessoires ..............28 15.4 Nettoyer, vérifier et remplacer les joints ..........28 15.5 Détartrage ..................29 15.6 Rangement ..................29...
-
Page 6: Aperçu De L'appareil
1. Aperçu de l'appareil Couvercle des paniers vapeur Panier vapeur plat Panier vapeur profond Joint du panier vapeur profond (respecter la position correcte) Bol mixeur Interrupteur principal Câble de raccordement avec fiche secteur Prise d'alimentation Logement pour le bol mixeur (avec couronne dentée) Trop-plein Système de verrouillage Appareil de base... -
Page 7: Affichages Sur L'écran
2. Affichages sur l'écran TEMPS TEMP. VITESSE SENS. INV. Affichage du temps (de 1 seconde à 90 minutes) Le bol mixeur n'est pas placé correctement ou n'est pas bien fermé La vitesse sélectionnée (1 - 4) est adaptée au batteur Température des aliments dans le bol mixeur Affichage du poids en grammes jusqu'à... -
Page 8: Récapitulatif Des Fonctions
3. Récapitulatif des fonctions Bouton/Outil Fonction Remarques Pesage au gramme près avec la fonc- Jusqu'à 5 kg BALANCE/TARE 23 / tion de tare (régler sur 0 pour peser Balance 14 des ingrédients supplémentaires) Mélange délicat d'aliments qui ne SENS INV. 19 doivent pas être broyés Cette fonction est blo- Commuter brièvement sur la vitesse... -
Page 9: Symboles Sur L'appareil
Merci beaucoup pour 4. Utilisation conforme votre confiance ! Le robot Monsieur Cuisine sert à mixer, fouet- ter, battre, mélanger, broyer, réduire en purée, Nous vous félicitons pour l'acquisition de émulsionner, cuire à la vapeur, mijoter, ma- votre nouveau robot ménager avec fonction laxer, saisir, cuire et peser des aliments et ingré- de cuisson «... -
Page 10: Consignes De Sécurité
5. Consignes de sécurité Avertissements Les avertissements suivants sont utilisés si nécessaire dans le présent mode d'emploi : DANGER ! Risque élevé : le non-respect de l'avertissement peut provoquer des blessures graves, voire la mort. AVERTISSEMENT ! Risque moyen : le non-respect de l'avertissement peut provoquer des blessures ou des dommages matériels graves. -
Page 11: Danger Pour Les Enfants
Le couteau hachoir et le batteur continuent à tourner après l'arrêt de l'appareil. Attendez l'arrêt complet avant de déverrouiller le bol mixeur et d'ouvrir le couvercle. Cet appareil n'est pas conçu pour être utilisé avec une minuterie ex- terne ou un système de commande à distance séparé. Si le câble de raccordement de cet appareil est endommagé, il faut le faire remplacer par le fabricant, son service après-vente ou une personne ayant une qualification similaire pour éviter les mises en... - Page 12 Évitez toute détérioration du câble de rac- N'approchez jamais les doigts de la cordement par des arêtes vives ou des sur- lame rotative. N’approchez pas de cuil- faces brûlantes. N'enroulez pas le câble ler ou d’objets similaires des pièces en de raccordement autour de l'appareil.
-
Page 13: Éléments Livrés
pourrait s'accumuler dans l'appareil et N’utilisez aucun détergent acide ou dé- s'échapper brusquement à l'ouverture. capant. Si vous voulez ouvrir le couvercle des L'appareil est équipé de pieds à ven- paniers vapeur, commencez par ouvrir touses antidérapants en plastique. Étant légèrement l'arrière du couvercle pour donné... -
Page 14: Déballage De L'appareil Et Mise En Place
7. Déballage de 8. Balance l'appareil et mise en La balance intégrée vous permet de peser place au gramme près, jusqu'à 5 kg. La balance 14 est facile à utiliser et prête à Lors de la fabrication, de nombreuses pièces fonctionner si aucune opération n'est en sont recouvertes d'une fine couche d'huile, cours. -
Page 15: Commande De L'appareil
9.2 Mise en marche et arrêt 5. Ajoutez le nouvel ingrédient à peser aux aliments se trouvant déjà sur la ba- de l'appareil lance. • Commutez l'interrupteur principal 6 si- Le poids du nouvel ingrédient à peser tué à l'arrière de l'appareil sur I : s'affiche en grammes sur l'affi- - Tous les boutons s'allument briève- chage 25. -
Page 16: Utiliser Les Boutons
9.4 Utiliser les boutons Éclairage / clignote- Situation Fonction du bouton ment du/des bouton(s) Les réglages ont été effectués Appuyez sur le bouton pour MARCHE/ARRÊT 17 cli- et une opération peut démar- démarrer une opération. gnote. rer. MARCHE/ARRÊT 17 est L'opération est en cours. -
Page 17: Réglage Du Temps
9.5 Réglage du temps 9.6 Régler la température Réglez la durée de la cuisson ou de prépa- Réglez la température de cuisson en tour- ration en tournant le bouton de réglage du nant le bouton de réglage de la température temps 24 : 15 :... -
Page 18: Régler La Vitesse
9.7 Régler la vitesse Démarrage progressif Afin d'éviter la projection du jus des ali- Réglez la vitesse en tournant le bouton de ré- ments à cuire chauds hors du bol mixeur 5 glage de la vitesse 16 : ou le déséquilibrage de l'appareil, un dé- La vitesse peut être réglée sur 10 ni- marrage progressif est prévu pour tous les veaux :... -
Page 19: Fonction Turbo
9.9 Fonction turbo 9.10 Trop-plein Un trop-plein 10 est prévu dans le logement pour le bol mixeur 9. ATTENTION : Lorsque vous mélangez des liquides, il ne peut y avoir plus de 1 litre de liquide au maximum dans le bol mixeur 5 sinon le liquide risque d'être projeté... -
Page 20: Utiliser Le Bol Mixeur
10. Utiliser le bol mixeur REMARQUE : • Il ne doit pas y avoir trop peu de liquide dans le bol mixeur 5 pour certaines pré- REMARQUE : ce mode d'emploi décrit les parations pour assurer le parfait fonc- fonctions essentielles : mixer, hacher, broyer tionnement de l'appareil. -
Page 21: Mettre Le Bol Mixeur En Place
2. Appuyez sur le levier de déverrouillage 34 se trouvant REMARQUES : en dessous du bol mixeur 5 de • Si le bol mixeur 5 ne peut pas être pres- sorte qu'il pointe vers le sym- sé vers le bas, vous devez le faire bole du cadenas ouvert. -
Page 22: Mettre En Place Le Couvercle Du Bol Mixeur
10.5 Mettre en place le cou- • Si le couvercle 32 n'est pas correctement mis en place, le vercle du bol mixeur symbole de droite s'affiche Le couvercle du bol mixeur 32 ne peut être sur l'affichage 25. mis en place qu'à condition que le bol mixeur 5 soit correctement en place. -
Page 23: Utiliser Une Spatule
10.8 Utiliser une spatule REMARQUE : Veillez à ce que le niveau de La spatule 30 sert à mélanger des ingré- remplissage ne dépasse pas le repère MAX. dients et à retirer le panier de cuisson 28. 3. Placez le panier de cuisson 28 dans le ATTENTION : bol mixeur 5. -
Page 24: Cuisson À La Vapeur
11. Cuisson à la vapeur 11.2 Préparation des paniers de cuisson à la vapeur 1. Placez le bol mixeur 5 dans le loge- DANGER ! Risque de brûlures ! ment 9. De la vapeur d'eau chaude peut 2. Versez 1 l d'eau dans le bol mixeur 5. s'échapper à... -
Page 25: Démarrer La Cuisson À La Vapeur
4. Un signal bref retentit après 10 minutes. Le bouton CUISS. VAP. 21 est allumé. REMARQUES : • Si le panier vapeur 3 n'est pas correctement mis en place, le symbole de droite TEMP. s'affiche sur l'affichage 25. • Pour faciliter la mise en place du panier REMARQUE : pour démarrer le programme de cuisson à... -
Page 26: Vérifier Le Point De Cuisson
11.4 Vérifier le point de cuisson 11.5 Cuire à la vapeur avec le panier de cuisson Veuillez à ne pas cuire trop longtemps les aliments pour éviter de les dénaturer : lé- gumes ramollis, viande et poisson dessé- REMARQUE : vous pouvez aussi utiliser le chés et fibreux. -
Page 27: Conseils Pour La Cuisson À La Vapeur
12. Conseils pour la 13. Malaxer cuisson à la vapeur La machine permet de pétrir 500 g de farine au maximum. Le programme ne peut se dé- La cuisson d'aliments à la vapeur est l'une rouler qu'avec le couteau hachoir 27. des méthodes de cuisson les plus saines. -
Page 28: Marche/Arrêt 17 Et Saisir
6. Après l'écoulement du temps réglé, un 5. Appuyez sur le bouton SAISIR 20. Le signal sonore retentit, les boutons bouton SAISIR 20 est allumé et les va- MARCHE/ARRÊT 17 et leurs du programme s'affichent sur l'affi- MALAXER 22 s'assombrissent et chage 25. -
Page 29: Nettoyage Et Entretien De L'appareil
15. Nettoyage et 15.1 Nettoyage de l'appareil de base entretien de l'appareil 1. Nettoyez l'appareil de base 12 avec un chiffon humide. Vous pouvez aussi utiliser un peu de produit vaisselle. DANGER ! Risque 2. Essuyez avec un chiffon propre humidi- d'électrocution ! fié... -
Page 30: Nettoyage Des Accessoires
15.3 Nettoyage des acces- Couteau hachoir 1. Retirez le couteau hachoir 27 du bol soires mixeur 5 (voir « Mettre en place et reti- 1. Lavez le bol mixeur 5 à l'eau chaude et rer le couteau hachoir » à la page 18). jetez l'eau. -
Page 31: Détartrage
15.5 Détartrage 15.6 Rangement Du tarte peut se déposer sur les pièces utili- • Rangez l'appareil dans un endroit pro- tégé contre la poussière et la saleté et sées, en particulier dans le bol mixeur 5, inaccessible aux enfants. lors de la cuisson à la vapeur avec de l'eau calcaire. -
Page 32: Anomalies, Cause, Solution
16. Anomalies, cause, solution 16.1 Dysfonctionnements Anomalie Cause Solution Mettre le bol mixeur 5 correcte- Le bol mixeur 5 n'est pas cor- ment en place (voir « Mettre le bol rectement en place mixeur en place » à la page 19). Le couvercle 32 ou le panier Mettre le couvercle 32 ou le pa- L'appareil ne démarre... -
Page 33: Messages De Défaut Sur L'affichage
Anomalie Cause Solution Certains aliments ou certaines épices (comme le curry) Des pièces de l'appa- Il n'est pas nécessaire d'intervenir peuvent décolorer le plas- reil se décolorent. car cela n'est pas nocif. tique. Ce n'est pas un défaut de l'appareil Il n'est pas possible de sélectionner un niveau Une température est réglée. -
Page 34: Mise Au Rebut
17. Mise au rebut 18. Caractéristiques techniques Ce produit est soumis aux exigences de la directive Modèle : SKMK 1200 A1 2012/19/UE. Le symbole Tension secteur : 230 V ~50/60 Hz de la poubelle sur roues bar- rée signifie que, dans l’Union Classe de protection : I européenne, le produit doit... -
Page 35: Garantie De Hoyer Handel Gmbh
20. Garantie de Article L217-5 du Code de la consommation HOYER Handel GmbH Le bien est conforme au contrat : Chère cliente, cher client, 1. S´il est propre à l‘usage habituellement Vous obtenez pour cet appareil une garantie attendu d‘un bien semblable et, le cas de 3 ans à... -
Page 36: Conditions De Garantie
Conditions de garantie les interrupteurs, batteries, sources d'éclairage ou d'autres pièces en Le délai de garantie commence à la date verre. d’achat. Conservez le ticket de caisse d’ori- gine. Ce document sert de justificatif d’achat. Cette garantie est perdue si l’appareil n’a Si au cours des trois années suivant la date pas été... -
Page 37: Centre De Service
Centre de service Service France Tel.: 0800 919270 E-Mail: hoyer@lidl.fr IAN : 277740 Fournisseur Attention ! L’adresse suivante n’est pas une adresse de service. Contactez d’abord le centre de service cité plus haut. HOYER Handel GmbH Tasköprüstraße 3 DE-22761 Hamburg ALLEMAGNE... - Page 38 Contents 1. Overview ..................38 2. Display screens ................39 3. Functions in an overview ............... 40 4. Intended purpose ................41 5. Safety instructions ................. 42 6. Items supplied ................45 7. Unpacking und setting up .............. 46 8. Scale ..................... 46 9.
- Page 39 14. Browning ..................60 14.1 General programme information ............60 14.2 Starting the program................60 15. Cleaning and servicing the device ..........60 15.1 Cleaning the base unit ................. 61 15.2 Cleaning in the dishwasher ..............61 15.3 Cleaning the accessories ..............61 15.4 Cleaning, checking and replacing seals ..........
-
Page 40: Overview
1. Overview Lid for the steamer baskets Steamer basket, shallow Steamer basket, deep Seal of the deep steamer basket (ensure the correct position) Blender jug Main switch Power cable with mains plug Mains power socket Holder for blender jug (with gear ring) Overflow hole Locking system Base unit... -
Page 41: Display Screens
2. Display screens TEMPS TEMP. VITESSE SENS. INV. Time display (1 second to 90 minutes) Blender jug has not been positioned or closed correctly Selected speed (1 - 4) is suited for the mixer attachment Temperature of the food in the blender jug Display of the weight in grams up to 5,000 g Display of the speed 1 - 10 Set to anti-clockwise / active... -
Page 42: Functions In An Overview
3. Functions in an overview Button/Component Function Notes Weighing accurately to the gram up to 5 kg BALANCE/TARE 23 / with tare function (set to 0 to Scale 14 weigh additional ingredients) Gentle mixing of food not to be SENS INV. 19 chopped Function is blocked if the Briefly switch to the highest... -
Page 43: Intended Purpose
Thank you for your trust! 4. Intended purpose Monsieur Cuisine is used to mix, whisk, beat, Congratulations on the purchase of your stir, chop, mash, emulsify, steam, stew, knead, new “Monsieur Cuisine Édition Plus” food brown, cook and weigh food. processor with cooking function. -
Page 44: Safety Instructions
5. Safety instructions Warnings If necessary, the following warnings will be used in these user instructions: DANGER! High risk: failure to observe this warning may result in injury to life and limb. WARNING! Moderate risk: failure to observe this warning may result in injury or serious material damage. - Page 45 After being switched off, the blade assembly and the mixer attach- ment will continue to rotate for a while. Please wait until all parts have come to a standstill before unlocking the blender jug and opening the lid. This device is not intended to be operated using an external timer clock or a separate remote control system.
- Page 46 Even after it has been switched off, the device has not been completely discon- FIRE HAZARD nected from the mains. In order to fully Before turning the device on, place it on disconnect it, pull out the mains plug. a level, stable, dry, heat-resistant sur- Ensure that the power cable never de- face.
-
Page 47: Items Supplied
6. Items supplied The button TURBO must not be used when using the mixer attachment. 1 food processor with cooking function Use the blender jug exclusively with the “Monsieur Cuisine Édition Plus“, lid in place, otherwise liquid might be base unit 12 ejected. -
Page 48: Unpacking Und Setting Up
7. Unpacking und 8. Scale setting up The installed kitchen scales allows accurate weighing to the gram up to 5 kg. During production, a thin film of oil is ap- The scale 14 is easy to operate and ready plied to protect many components. Prior to for use unless another cycle is in operation. -
Page 49: Operating The Device
9.2 Switching the device on 5. Add the new object to be weighed to the existing object to be weighed. and off On the display 25 the weight of the • Set the main switch 6 on the rear to I: added object to be weighed is shown in - All buttons light up briefly. -
Page 50: Operating The Buttons
9.4 Operating the buttons Illumination/Flashing of Situation Function of the button the button(s) MARCHE/ARRÊT 17 flash- Settings were performed, Press the button to start a cy- and a cycle can be started. cle. MARCHE/ARRÊT 17 lights The cycle is in operation. Press the button to stop a cy- cle. -
Page 51: Setting The Time
9.5 Setting the time 9.6 Setting the temperature Turn the timer 24 to set the time of the Turn the temperature controller 15 to set cooking process or the processing: the cooking temperature: • Turn the timer 24 in the direction “-”: The adjustable temperature ranges from reduce time 37 °C to 130 °C. -
Page 52: Setting The Speed
9.7 Setting the speed Soft start In order to avoid that during sudden acceler- Turn the speed controller 16 to set the ation of hot food liquid is ejected from the speed: blender jug 5 or the device starts wobbling, The speed can be adjusted in 10 incre- a soft start is provided for all settings except ments:... -
Page 53: Turbo Function
9.9 Turbo function 9.10 Overflow In the holder of the blender jug 9 there is an overflow hole 10. CAUTION: When mixing liquids, the blender jug 5 must not contain more than 1 litre, since otherwise liquid might be ejected. Never use this function when the mixer attachment 29 is used. -
Page 54: Using The Blender Jug
10. Using the blender NOTE: • For some applications, the blender jug 5 should not contain an insufficient amount of liquid, so that the device can NOTE: these user instructions describe the function properly. Thus, for whipping basic functions such as mixing, chopping cream, for instance, you should use at and steaming. -
Page 55: Insert Blender Jug
10.3 Insert blender jug 2. Press the unlocking lever 34 on the underside of the blender 1. Place the blender jug 5 into the holder jug 5 so that it points to the for the blender jug 9. open lock symbol. 2. -
Page 56: Put On The Lid Of The Blender Jug
10.5 Put on the lid of the 10.6 Use the lid for the filler blender jug opening The lid for the blender jug 32 can only be Simultaneously, the measuring beaker 33 is placed on if the blender jug 5 was inserted used to close the lid of the blender jug 5 and correctly. -
Page 57: Using The Spatula
10.8 Using the spatula 5. Use the main switch 6 to switch on the device. The spatula 30 is used to stir the ingredients 6. Use the timer 24 to set the desired and to remove the cooking pot 28. time. -
Page 58: Steaming
11. Steaming DANGER! Risk of injury through scalding! When opening the lid 1 or 32 during operation, hot steam may escape. NOTE: these user instructions describe the basic functions such as mixing, chopping and steaming. For information on the prepa- ration of special dishes, refer to the recipe 3. -
Page 59: Starting The Steaming Process
• In order to facilitate the attaching of the steamer attachment 3 somewhat, put a NOTE: in order to start the programme before few drops of oil on a cloth and rub it on the 10 minutes elapsed, press the flashing but- the seal 4. -
Page 60: Steaming With The Cooking Pot
11.6 Overheating protection 3. Check the condition of the food to be cooked with a longer stick or a fork: The device has an overheating protection - Once the food to be cooked is done, system. As soon as there is no water left in press button MARCHE/ARRÊT 17 the blender jug 5 thus causing the device to and then the main switch 6 to switch... -
Page 61: Kneading
13. Kneading 6. After the time set elapsed, a short signal sounds, the buttons MARCHE/ The appliance can be used to process up to ARRÊT 17 and MALAXER 22 go off max. 500 g of flour. The programme is only and the display 25 shows all values operated with the blade assembly 27. -
Page 62: Browning
14. Browning 6. Press the flashing button MARCHE/ ARRÊT 17. With this programme, you can slightly The programme is started. The time set is brown up to 200 g meat, fish, vegetables, counted down on the display 25. The e.g. to release roasting flavours. Large piec- button SAISIR 20 lights up. -
Page 63: Cleaning The Base Unit
15.3 Cleaning the accessories CAUTION: Never use any abrasive, corrosive or 1. Rinse the blender jug 5 with warm wa- scratching cleaning agents. These might ter and dump the water. damage the device. 2. Remove the blade assembly 27 (see NOTE: “Using and removing the blade assem- •... -
Page 64: Descaling
Major limescale deposits 3. Insert the cleaned seal or a new one. 4. Before using the device again, reinsert the blade assembly 27. CAUTION: Do not use commercially available des- Deep steamer basket caling agent, not even glacial acetic 1. Pull seal 4 off the underside of the deep acid or vinegar essence. -
Page 65: Malfunctions, Cause, Remedy
16. Malfunctions, Cause, Remedy 16.1 Malfunctions during operation Malfunction Cause Remedy Blender jug 5 is not posi- Insert blender jug 5 correctly (see tioned correctly “Insert blender jug” on page 53). Lid 32 or deep steamer bas- ket 3 have not been placed Place lid 32 or deep steamer bas- Device does not start. -
Page 66: Error Messages On The Display
16.2 Error messages on the display Display Cause Remedy • The appliance can be used to pro- The device is overloaded. cess up to max. 500 g of flour. Odour / smoke may devel- • Let the device cool down completely. Afterwards, it is ready for use again. -
Page 67: Disposal
When disposing of the packaging, make sure you comply with the environmental reg- ulations applicable in your country. 18. Technical specifications Model: SKMK 1200 A1 Mains voltage: 230 V ~ 50/60 Hz Protection class: Power rating: 1,200 watt Blender: 800 watt... -
Page 68: Warranty Of The Hoyer Handel Gmbh
20. Warranty of the Excluded from the warranty are wear parts subject to normal wear HOYER Handel GmbH and damages to fragile parts, e.g. Dear Customer, switches, batteries, lamps or other your device is provided with a 3 year war- parts manufactured from glass. -
Page 69: Service Centre
Service Centre Service France Tel.: 0800 919270 E-Mail: hoyer@lidl.fr IAN: 277740 Supplier Please note that the following address is no service address. First contact the afore- mentioned Service Centre. HOYER Handel GmbH Tasköprüstraße 3 DE-22761 Hamburg GERMANY... - Page 70 HOYER HANDEL GMBH Tasköprüstraße 3 22761 Hamburg Germany Version des informations · Status of information: 05/2016 · Ident.-Nr.: SKMK 1200 A1 IAN 277740...