
Manuels Connexes pour Sage the Risotto Plus


Sommaire des Matières pour Sage the Risotto Plus
- Page 1 Risotto Plus ™ BRC600/SRC600 QUICK GUIDE KURZANLEITUNG GUIDE RAPIDE SNELSTARTGIDS GUIDA RAPIDA GUÍA RÁPIDA MANUAL RÁPIDO...
-
Page 2: Table Des Matières
At Sage we are very safety ® of this Risotto Plus ™ conscious. We design and • Do not place the Risotto Plus ™ manufacture consumer near the edge of a bench products with the safety of or table during operation. -
Page 3: We Recommend Safety First
™ Plus™ housing, only into the • Do not touch hot surfaces. removable cooking bowl. Use the handle for lifting and • Do not leave the Risotto Plus ™ carrying the Risotto Plus ™ unattended when in use. • Do not use chemicals, steel wool, •... - Page 4 Plus™ is cleaned and that the with the appliance. appliance inlet must be dried • Do not use the appliance if before the Risotto Plus™ is power cord, power plug or used again. appliance becomes damaged • To prevent damage to the in any way.
-
Page 5: Important
Sage • Do not place this appliance on Customer Service or go to or near a heat source, such as sageappliances.com... - Page 6 WE RECOMMEND SAFETY FIRST The symbol shown indicates that this appliance should not be disposed of in normal household waste. It should be taken to a local authority waste collection centre designated for this purpose or to a dealer providing this service. For more information, please contact your local council office.
-
Page 7: Getting To Know Your New Appliance
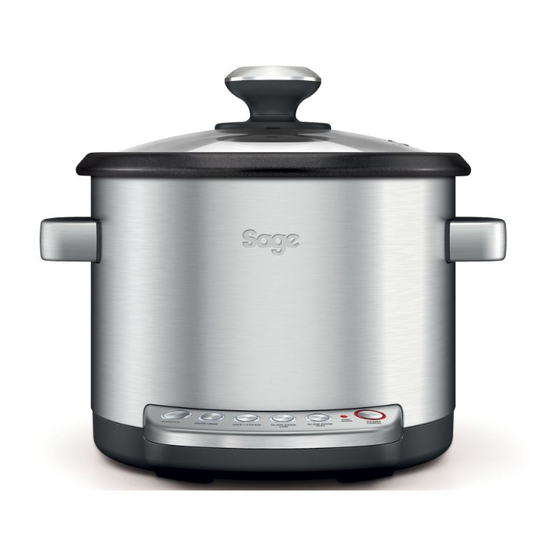
GETTING TO KNOW YOUR NEW APPLIANCE A. Tempered domed glass lid H. LOW SLOW COOK setting B. Removable non-stick cooking bowl I. HIGH SLOW COOK setting C. Cool-touch handles J. KEEP WARM D. Removable power cord (not shown) K. START / CANCEL button E. -
Page 8: Operating Your New Appliance
HOW TO MAKE RISOTTO illuminate red and cooking will commence. SAUTÉ / SEAR setting Allow to cook until the ready beeps sound and the Risotto Plus automatically ™ Ensure exterior of the removable cooking switches to the KEEP WARM setting. - Page 9 The START / CANCEL button surround will illuminate red and cooking will commence. WARNING When cooking is complete, the ready beeps will sound and the Risotto Plus will ™ Before removing the non-stick automatically switch to the KEEP WARM cooking bowl from housing, setting for up to 5 hours.
-
Page 10: Slow Cooking
Slow Cook Settings section below. Allow to cook until the ready beeps sound. The unit then automatically switches Slow Cook Settings to KEEP WARM setting. The Risotto Plus has two slow cook settings: ™ The Risotto Plus will remain on the ™... -
Page 11: Care & Cleaning
Allow all parts to cool before removing the removable cooking bowl. Wash the removable The appliance connector must be cooking bowl, stainless steel steaming tray removed before the Risotto Plus ™ and glass lid in hot, soapy water, rinse is cleaned and that the appliance and dry thoroughly. -
Page 12: Troubleshooting
TROUBLESHOOTING PROBLEM WHAT TO DO The Risotto Plus suddenly • Ensure power plug is connected properly ™ switches off. to the appliance and to power outlet. • The appliance has been stressed or has overheated due to cooking conditions. Push the desired cooking button and then the START / CANCEL button to reset and continue cooking. -
Page 13: Guarantee
GUARANTEE 2 YEAR LIMITED GUARANTEE Sage Appliances guarantees this product for domestic use in specified territories for 2 years from the date of purchase against defects caused by faulty workmanship and materials. During this guarantee period Sage Appliances will repair, replace, or refund any defective product (at the sole discretion of Sage Appliances). -
Page 14: Sage ® Empfiehlt: Sicherheit Geht Vor
Bitte wenden Sie sich SICHERHEIT bei etwaigen Bedenken an Ihren örtlichen Stromversorger. GEHT VOR • Vor dem ersten Gebrauch alle Verpackungsmaterialien und Wir bei Sage sind sehr ® Werbeaufkleber vom Gerät sicherheitsbewusst. abnehmen und sicher entsorgen. Beim Design und bei der •... -
Page 15: Wir Empfehlen: Sicherheit Geht Vor
WIR EMPFEHLEN: SICHERHEIT GEHT VOR • Deckel so positionieren, dass en, Stahlwolle oder scheuernden das Dampfventil von Ihnen weg Topfreiniger oder Reinigungs- zeigt. Deckel vorsichtig anhe- mittel verwenden, da diese das ben und abnehmen, um Verbrü- Gehäuse oder die Beschichtung hungen durch entweichenden der Kochschüssel beschä- Dampf zu vermeiden. - Page 16 WIR EMPFEHLEN: SICHERHEIT GEHT VOR • Wasser vom Deckel nicht ins • Dampfventil im Deckel immer Gehäuse des Risotto Plus von Ihnen weg richten, um Ver- ™ tropfen lassen, nur in die ab - brühungen durch entweichen- nehmbare Kochschüssel. den Dampf zu vermeiden. •...
- Page 17 Steckdose, Netzste- Wenden Sie sich bei Schäden cker ziehen und das Netzkabel oder zur Wartung (außer Reini- vom Gerät abnehmen, sofern gung) bitte an den Sage-Kun- möglich. Alle Geräteteile ab- dendienst oder besuchen Sie kühlen lassen. sageappliances.com •...
- Page 18 Stellen Sie bei jeglichen den Reinigungsanweisungen. Schäden oder bei erforderlichen Wartungsarbeiten (außer Rei- nigung) sofort den Gebrauch des Geräts ein und wenden Sie sich an den Sage-Kun- dendienst oder besuchen Sie sageappliances.com DIESE ANLEITUNG AUFBEWAHREN...
-
Page 19: Lernen Sie Ihr Neues Gerät Kennen
LERNEN SIE IHR NEUES GERÄT KENNEN A. Gewölbter Domdeckel H. LOW SLOW COOK (Einstellung für aus Temperglass NIEDRIG LANGSAM KOCHEN) B. Herausnehmbare Kochschüssel mit I. HIGH SLOW COOK (Einstellung für Antihaftbeschichtung HOCH LANGSAM KOCHEN) C. Wärmeisolierte Cool-Touch-Griffe J. KEEP WARM (WARM HALTEN) D. -
Page 20: Bedienung Ihres Neuen Geräts
BEDIENUNG IHRES NEUEN GERÄTS VOR DER ERSTBENUTZUNG der Reis die gesamte Flüssigkeit absorbiert und der Alkohol sich verflüchtigt hat. Vor der Erstbenutzung das gesamte 11. START / CANCEL-Taste drücken, Verpackungsmaterial und Werbeetiketten um die Einstellung SAUTÉ / SEAR entfernen, dann die herausnehmbare (ANSCHWITZEN / ANBRATEN) Kochschüssel mit Antihaftbeschichtung, den zu beenden. - Page 21 BEDIENUNG IHRES NEUEN GERÄTS 10. Öffnen Sie den Deckel und drehen Sie den VORSICHT! Abb. 1 Reis mit dem mitgelieferten Servierlöffel um. Den Deckel auflegen und den Reis 1. Vor dem Kochen, den Boden des Innentopfs 10–15 Minuten vor dem Servieren stehen und die Oberfläche der Heizplatte reinigen.
-
Page 22: Slow Cooking (Langsames Kochen)
PAGE HEADER..SLOW COOKING (LANGSAMES KOCHEN) SEAR (ANBRATEN-EINSTELLUNG) Einstellung der Kochdauer LOW (NIEDRIG): 6 – 7 Stunden 1. Vergewissern Sie sich, dass die herausnehmbare Kochschüssel sauber ist, HIGH (HOCH): 3 – 4 Stunden bevor sie in das Gehäuse eingesetzt wird Als Richtlinie für Fleisch wie Huhn oder kleine (so ist der korrekte Kontakt mit der inneren Fleischstücke erzielen Sie die besten Ergebnisse... -
Page 23: Pflege Und Reinigung
(START / ABBRECHEN) drücken, um neu zu starten und weiter zu kochen. Das Gerät benötigt einige Minuten zum Aufwärmen und Weiterkochen. The Risotto Plus™ • START / CANCEL-Taste für Neustart drücken, dann die gewünschte schaltet sich auf Kochmethode zum Weiterkochen auswählen. -
Page 24: Jahre Beschränkte Garantie
GARANTIE 2 JAHRE BESCHRÄNKTE GARANTIE Sage Appliances gibt auf dieses Produkt für den häuslichen Gebrauch in bestimmten Gebieten eine Garantie über 2 Jahre ab Kaufdatum für Mängel, die durch fehlerhafte Verarbeitung und Materialien verursacht wurden. Während dieser Garantiezeit wird Sage Appliances jedes fehlerhafte Produkt reparieren, ersetzen oder das Geld zurückerstatten (nach eigenem... - Page 25 Risotto Plus ™ GUIDE RAPIDE...
- Page 26 • Retirez et jetez en lieu sûr les emballages et les étiquettes AVANT TOUT promotionnelles avant d'utiliser l'appareil pour la première fois. Chez Sage , la sécurité est ® • Pour éviter tout risque une priorité. Nous concevons d'étouffement pour les jeunes et fabriquons des produits enfants, retirez et éliminez...
-
Page 27: Nous Recommandons La Sécurité Avant Tout
NOUS RECOMMANDONS LA SÉCURITÉ AVANT TOUT • Positionnez le couvercle afin car cela risque d'endommager que la vapeur soit évacuée loin le conteneur ou le revêtement de vous. Soulevez et retirez le de la cuve. couvercle délicatement pour • Veillez à ce que le Risotto éviter de vous brûler avec la Plus reste propre. -
Page 28: Mesures Importantes De Sécurité Pour Tous Les Appareils Électriques
NOUS RECOMMANDONS LA SÉCURITÉ AVANT TOUT • Il convient d'être très vigilant • Le connecteur de l'appareil quand le Risotto Plus contient doit être retiré avant de nettoyer ™ des aliments ou des liquides le Risotto Plus et l'entrée de ™... - Page 29 éteint, débranché service client Sage ou consultez au niveau de la prise électrique le site sageappliances.com et retirez le cordon d'alimenta- tion, si détachable, de l'appareil •...
-
Page 30: Important
Sage ou consultez le site instructions de nettoyage. sageappliances.com IMPORTANT Déroulez entièrement le cordon d'alimentation avant utilisation. -
Page 31: Découverte De Votre Nouvel Appareil
DÉCOUVERTE DE VOTRE NOUVEL APPAREIL A. Couvercle bombé en verre H. Réglage LOW SLOW COOK (cuisson lente faible) B. Cuve amovible antiadhésive Réglage HIGH SLOW COOK C. Poignées froides (cuisson lente élevée) D. Cordon d'alimentation amovible J. KEEP WARM (maintien au chaud) (non illustré) K. -
Page 32: Fonctionnement De Votre Nouvel Appareil
FONCTIONNEMENT DE VOTRE NOUVEL APPAREIL AVANT LA PREMIÈRE UTILISATION 10. Versez du vin (si besoin) et cuisez sans le couvercle jusqu'à ce que le riz ait absorbé Avant la première utilisation, retirez tout l'em- tout le liquide et que l'alcool soit évaporé, ballage ainsi que les étiquettes promotionnelles, en mélangeant fréquemment. - Page 33 FONCTIONNEMENT DE VOTRE NOUVEL APPAREIL 10. Soulevez le couvercle et remuez le riz avec Fig. 1 la cuillère de service fournie. Replacez le ATTENTION ! couvercle et laissez le riz reposer pendant 1. Avant de commencer à cuisiner, nettoyez le bas du 10 à...
-
Page 34: Cuisson Lente
CUISSON LENTE RÉGLAGE SEAR (SAISIR) Réglage du temps de cuisson LOW : 6 à 7 heures 1. Vérifiez que l'extérieur de la cuve amovible est propre avant de la mettre dans le conteneur HIGH : 3 à 4 heures (cela garantira un bon contact avec la surface Par exemple, la viande comme le poulet ou de cuisson intérieure). -
Page 35: Entretien Et Nettoyage
ENTRETIEN ET NETTOYAGE Débranchez le cordon d'alimentation de la prise AVERTISSEMENT électrique. Laissez toutes les pièces refroidir avant de retirer Le connecteur de l'appareil la cuve amovible. Lavez la cuve amovible antiad- doit être retiré avant de nettoyer hésive, le panier vapeur en acier inoxydable et le le Risotto Plus et l'entrée de ™... -
Page 36: Garantie Limitée 2 Ans
GARANTIE GARANTIE LIMITÉE 2 ANS Sage Appliances garantit ce produit pour un usage domestique sur les territoires spécifiés pendant 2 ans à compter de la date d’achat, contre les défauts de fabrication et de matériaux. Au cours de cette période de garantie, Sage Appliances s’engage à... - Page 37 Risotto Plus ™ SNELSTARTGIDS...
-
Page 38: Sage ® Stelt Veiligheid Voorop
VEILIGHEID bels en gooi ze op een veilige manier weg voordat u het appa- VOOROP raat voor het eerst gebruikt. Bij Sage gaan we veilig- • Gooi het beschermkapje op ® heidsbewust te werk. Bij het de stekker van de Risotto Plus ™... -
Page 39: We Stellen Veiligheid Voorop
WE STELLEN VEILIGHEID VOOROP • Gebruik de uitneembare Alleen de uitneembare kookpan is geschikt voor kookpan die bij de Risotto Plus ™ etenswaren en vloeistoffen. wordt geleverd. Gebruik geen andere pan in de Risotto Plus • Gebruik de Risotto Plus ™... - Page 40 Risotto Plus te voorkomen. ™ service van Sage of ga Gebruik een zachte doek en naar sageappliances.com een mild reinigingsmiddel. als er sprake is van schade • Laat het glazen deksel altijd...
- Page 41 • Plaats dit apparaat niet op of in gebruik van het apparaat de buurt van een warmtebron en neem contact op met de zoals een kookplaat, oven of klantenservice van Sage of verwarming. ga naar sageappliances.com...
- Page 42 WE STELLEN VEILIGHEID VOOROP Het weergegeven BELANGRIJK symbool geeft aan dat Wikkel het netsnoer volledig dit apparaat niet met het af voordat u het gebruikt. normale huishoudelijk Zorg ervoor dat het apparaat afval mag worden weggegooid. volledig is afgekoeld voordat Het moet naar een geschikt u het netsnoer in de uitneem- plaatselijk afvalverwerkings-...
-
Page 43: Uw Nieuwe Apparaat Leren Kennen
UW NIEUWE APPARAAT LEREN KENNEN A. Deksel van gehard glas H. Instelling SLOW COOK LOW B. Uitneembare kookpan met antiaanbaklaag Instelling SLOW COOK HIGH C. Cool-touch-handvaten J. KEEP WARM D. Verwijderbaar netsnoer (niet afgebeeld) K. Knop START/CANCEL E. Instelling RISOTTO L. -
Page 44: Uw Nieuwe Apparaat Gebruiken
UW NIEUWE APPARAAT GEBRUIKEN VOOR HET EERSTE GEBRUIK Instelling RISOTTO 1. Volg stap 1-11 van de bovenstaande Verwijder voor het eerste gebruik instelling SAUTÉ/SEAR. het verpakkingsmateriaal en eventuele promotielabels en was de uitneembare 2. Voeg bouillon of water toe en schep goed om. kookpan, de roestvrijstalen stoompan Dek af met het deksel, druk op de RISOTTO en het glazen deksel af in warm zeepsop,... - Page 45 UW NIEUWE APPARAAT GEBRUIKEN 4. Doe de gespoelde rijst in de uitneembare OPMERKING kookpan. Zorg dat de rijst gelijkmatig over de bodem van de pan is verdeeld en niet Haal het glazen deksel niet van de pan aan één kant op een hoopje ligt. voordat u klaar bent om het eten op te dienen (behalve om rijst om te scheppen 5.
-
Page 46: Slowcooking
SLOWCOOKING INSTELLING SEAR Voor de beste resultaten moet vlees zoals kip of suddervlees doorgaans 3-4 uur lang op een 1. Zorg ervoor dat de buitenkant van de hoge temperatuur wordt gegaard. Bij grotere uitneembare kookpan schoon is voordat stukken vlees zoals lamsbout worden de beste u deze in het apparaat plaatst (dit zorgt voor resultaten bereikt als ze 6-7 uur lang op een een goed contact met het kookoppervlak). -
Page 47: Onderhoud En Reiniging
ONDERHOUD EN REINIGING Haal de stekker uit het stopcontact. WAARSCHUWING Laat alle onderdelen afkoelen voordat u de uitneembare kookpan verwijdert. Was Ontkoppel het netsnoer voordat de uitneembare kookpan, de roestvrijstalen u de Risotto Plus reinigt en zorg ™ stoompan en het glazen deksel af in warm dat de ingang van het apparaat zeepsop, spoel en droog daarna grondig af. -
Page 48: Garantie
GARANTIE BEPERKTE GARANTIE VAN 2 JAAR Sage Appliances biedt een garantie op dit product voor huishoudelijk gebruik in genoemde gebieden gedurende 2 jaar vanaf de datum van aankoop tegen defecten veroorzaakt door gebrekkige afwerking en materialen. Gedurende deze garantieperiode zal Sage... - Page 49 Risotto Plus ™ BRC600 GUIDA RAPIDA...
- Page 50 Risotto Plus ™ Inoltre, invitiamo i clienti • Non posizionare the Risotto a prestare molta attenzione...
-
Page 51: Il Nostro Consiglio: La Sicurezza Prima Di Tutto
Sollevare e rimuovere con • Non azionare the Risotto Plus ™ cura il coperchio tenendolo sul pianale del lavello. a distanza per evitare ustioni • Evitare il contatto con le super- dovute alla fuoriuscita di fici calde. - Page 52 • Assicurarsi che il recipiente prima dell'uso. rimovibile sia posizionato • Collegare solo a una presa di correttamente nella base di the Risotto Plus prima corrente da 220-240 V. ™ di iniziare la cottura. • Evitare che il cavo di alimenta- •...
- Page 53 Servizio clienti Sage o visitare vibile, e lasciare raffreddare tutti il sito Web sageappliances.com i componenti. • Questo apparecchio è desti- nato esclusivamente all'uso •...
-
Page 54: Conservare Queste Istruzioni
Servizio clienti Sage o visitare il sito Web sageappliances.com IMPORTANTE Svolgere completamente il cavo prima dell'uso. Assicurarsi che l'apparecchio si sia comple-... -
Page 55: Componenti Del Nuovo Apparecchio
COMPONENTI DEL NUOVO APPARECCHIO A. Coperchio a cupola in vetro temperato H. Impostazione LOW SLOW COOK (cottura lenta bassa) B. Recipiente antiaderente rimovibile Impostazione HIGH SLOW COOK C. Maniglie cool-touch (cottura lenta alta) D. Cavo di alimentazione rimovibile J. Impostazione KEEP WARM (mantieni caldo) (non mostrato) K. -
Page 56: Utilizzo Del Nuovo Apparecchio
3. Lasciare cuocere fino a quando non viene emesso il segnale acustico che indica 3. Premere il pulsante SAUTÉ / SEAR, che il risotto è pronto. The Risotto Plus ™ il bordo del pulsante si illumina di bianco. passa automaticamente all'impostazione Premere il pulsante START / CANCEL KEEP WARM. - Page 57 1 misurino per riso di the Risotto Plus è pari a 150 g di riso crudo e 180 ml di acqua. In caso ™ di perdita o smarrimento del mestolo dosatore per riso di the Risotto Plus , utilizzare un'altra ™...
-
Page 58: Slow Cooking
KEEP tempo di cottura e la temperatura. WARM (mantieni caldo). Una regola generale per la maggior parte 5. The Risotto Plus rimarrà sull'impostazione ™ KEEP WARM per mantenere caldo il cibo delle ricette a base di carne e verdure cotte è... -
Page 59: Manutenzione E Pulizia
Lavare il recipiente deve essere rimosso prima di proce- antiaderente rimovibile, il cestello per la cottura dere alla pulizia di the Risotto Plus ™ a vapore in acciaio inossidabile e il coperchio di e la presa dell'apparecchio deve vetro in acqua calda e sapone;... -
Page 60: Garanzia
GARANZIA GARANZIA LIMITATA DI 2 ANNI Sage Appliances offre una garanzia per l’utilizzo domestico di questo prodotto in specifiche aree geografiche, per 2 anni dalla data di acquisto. La garanzia copre eventuali malfunzionamenti causati da difetti di fabbricazione o dei materiali. - Page 61 NOTE...
- Page 62 NOTE...
- Page 63 Risotto Plus ™ GUÍA RÁPIDA...
-
Page 64: Medidas De Seguridad Importantes
Risotto Plus ™ clientes, como tú. También • No coloques the Risotto Plus ™ te rogamos que actúes cerca del borde de una encimera cuidadosamente al usar o mesa durante el funciona- cualquier electrodoméstico... - Page 65 RECOMENDAMOS SEGURIDAD ANTE TODO • Coloca la tapa de manera que • Mantén limpio the Risotto Plus ™ la salida de vapor no se dirija Sigue las instrucciones de hacia ti. Levanta y retira la tapa limpieza indicadas en esta con cuidado para evitar escalda- publicación.
- Page 66 Risotto Plus y la ™ • Los niños deben ser supervi- entrada del electrodoméstico sados para asegurarse de que debe secarse antes de volver no jueguen con el electrodo- a utilizar the Risotto Plus ™ méstico.
- Page 67 Sage o visita de alimentación (si es extraíble) sageappliances.com del electrodoméstico y deja que • Este electrodoméstico es solo se enfríen todas las piezas.
- Page 68 Sage en contacto con la pieza, a menos o visita sageappliances.com que se recomiende en las instruc- ciones de limpieza.
-
Page 69: Conoce Tu Nuevo Electrodoméstico
CONOCE TU NUEVO ELECTRODOMÉSTICO Tapa abovedada de vidrio templado Ajuste LOW SLOW COOK Bol de cocción antiadherente extraíble Ajuste HIGH SLOW COOK Asas de tacto frío KEEP WARM Cable de alimentación extraíble Botón START / CANCEL (no mostrado) Bandeja de cocción al vapor de acero Ajuste RISOTTO inoxidable Ajuste SAUTÉ... -
Page 70: Manejo De Tu Nuevo Electrodoméstico
CÓMO HACER RISOTTO iniciará la cocción. 3. Deja que se cocine hasta que suenen los Ajuste SAUTÉ / SEAR pitidos de listo y the Risotto Plus se cambie ™ 1. Asegúrate de que el exterior del bol de cocción automáticamente al ajuste KEEP WARM. - Page 71 1 vaso medidor de arroz de the Risotto Plus equivale a 150 g de arroz sin cocer y 180 ml de agua. ™ Si pierdes o no encuentras el vaso medidor de arroz de the Risotto Plus , usa otro medidor, ™...
-
Page 72: Cocción Lenta
™ KEEP WARM. lenta: Low y High. Usa las pautas recomendadas a continuación para determinar el tiempo de 5. The Risotto Plus permanecerá en el ajuste ™ cocción y los ajustes de calor. KEEP WARM durante 5 horas antes de apagarse. -
Page 73: Cuidado Y Limpieza
Risotto Plus ™ the Risotto Plus se laven en un lavavajillas ™ Para evitar dañar the Risotto Plus ya que los detergentes fuertes y las temperaturas ™ elevadas del agua pueden manchar o deformar no uses agentes de limpieza el bol de cocción extraíble y los accesorios. -
Page 74: Resolución De Problemas
RESOLUCIÓN DE PROBLEMAS PROBLEMA QUÉ HACER The Risotto Plus se apaga repentinamente. • Asegúrate de que el enchufe esté conectado ™ correctamente al electrodoméstico y a la toma de corriente. • El electrodoméstico se ha sobrecargado o se ha sobrecalentado debido a las condicio- nes de cocción. -
Page 75: Garantía Limitada De 2 Años
GARANTÍA GARANTÍA LIMITADA DE 2 AÑOS La garantía de Sage Appliances cubre este producto para uso doméstico en territorios específicos durante 2 años a partir de la fecha de compra contra fallos causados por mano de obra y materiales defectuosos. Durante el plazo de la garantía, Sage Appliances reparará... - Page 76 NOTAS...
- Page 77 Risotto Plus ™ BRC600/SRC600 MANUAL RÁPIDO...
-
Page 78: Cuidados Importantes
ÍNDICE CUIDADOS A Sage recomenda a segurança ® como máxima prioridade IMPORTANTES Introdução ao aparelho 11 Cozedura lenta LEIA TODAS AS INSTRUÇÕES ANTES DE 11 Vapor UTILIZAR E GUARDE-AS 12 Cuidados e limpeza PARA CONSULTA FUTURA 13 Resolução de problemas 14 Garantia •... - Page 79 RECOMENDAMOS QUE CONSIDERE A SEGURANÇA COMO MÁXIMA PRIORIDADE • Posicione a tampa de maneira • Não use substâncias químicas, que a abertura de saída do vapor palha de aço, esfregões metá- não esteja direcionada para si. licos ou produtos de limpeza Levante e remova a tampa abrasivos para limpar o exterior cuidadosamente para evitar...
- Page 80 RECOMENDAMOS QUE CONSIDERE A SEGURANÇA COMO MÁXIMA PRIORIDADE • Não permita que a água da Posicione sempre a abertura tampa escorra para o invólucro de saída do vapor na direção da arrozeira Risotto Plus oposta a si para evitar ™ essa água só...
- Page 81 Contacte o serviço de elétrica quando não estiver atendimento ao cliente da Sage em utilização. ou aceda a sageappliances.com • Antes de limpar, desligue se o aparelho estiver danificado sempre o aparelho (interruptor ou for necessária qualquer...
- Page 82 Sage ou aceda a sageappliances.com se • O aparelho pode ser utilizado o aparelho estiver danificado por crianças com mais de...
- Page 83 O símbolo apresentado indica que este aparelho não deve ser eliminado juntamente com os resíduos domésticos normais. Deve ser encaminhado para um centro de recolha de resíduos da autoridade local designado para este fim ou um revendedor que forneça este serviço. Contacte a Câmara Municipal local para obter mais informações.
-
Page 84: Introdução Ao Aparelho
INTRODUÇÃO AO APARELHO A. Tampa de vidro temperado oval H. Definição LOW SLOW COOK (Cozedura Lenta Baixa) B. Cuba de cozedura amovível antiaderente I. Definição LOW SLOW COOK (Cozedura Lenta Alta) C. Pegas seguras ao toque J. KEEP WARM (Manter Quente) D. -
Page 85: Antes Da Primeira Utilização
INTRODUÇÃO AO APARELHO ANTES DA PRIMEIRA UTILIZAÇÃO Definição RISOTTO (Risoto) Cumpra os passos 1–11 na secção relativa Antes da primeira utilização, remova todo o material à definição SAUTÉ / SEAR (Saltear/Selar) da embalagem e etiquetas promocionais e lave acima. a cuba de cozedura amovível antiaderente, Adicione caldo ou água e mexa bem. - Page 86 INTRODUÇÃO AO APARELHO Adicione o arroz lavado à cuba de cozedura NOTA amovível, certificando-se de que o arroz é espalhado uniformemente no fundo da A tampa de vidro só deve ser removida para cuba e não fica acumulado num dos lados. servir (exceto para mexer o arroz quando Adicione água utilizando as seguintes pronto ou conforme indicado nas receitas).
-
Page 87: Cozedura Lenta
COZEDURA LENTA DEFINIÇÃO SEAR (SELAR) Definir o tempo de cozedura LOW (Baixa): 6–7 horas Certifique-se de que o exterior da cuba de cozedura amovível está limpo antes HIGH (Alta): 3–4 horas de a colocar no invólucro (isto irá assegurar Normalmente, as carnes, como frango ou o contacto apropriado com a superfície pequenos bocados de outras carnes têm melhor de cozedura interior). -
Page 88: Cuidados E Limpeza
CUIDADOS E LIMPEZA Remova a ficha do cabo de alimentação AVISO da tomada elétrica. Deve remover o conector do aparelho Permita que todas as peças arrefeçam antes antes de limpar a arrozeira Risotto de remover a cuba de cozedura amovível. Lave a cuba de cozedura amovível, o tabuleiro de aço Plus e a tomada do aparelho deve... -
Page 89: Resolução De Problemas
RESOLUÇÃO DE PROBLEMAS PROBLEMA O QUE FAZER A arrozeira Risotto Plus desliga-se • Certifique-se de que a ficha está devidamente ™ subitamente. conectada ao aparelho e à tomada elétrica. • O aparelho foi sujeito a tensão excessiva ou sobreaqueceu devido às condições de cozedura. -
Page 90: Garantia
GARANTIA GARANTIA LIMITADA DE 2 ANOS A Sage Appliances fornece uma garantia para este produto para uso doméstico nos territórios especificados de 2 anos a partir da data de compra contra avarias provocadas por defeitos na mão- de-obra e de materiais. Durante este período da garantia, a Sage Appliances irá... - Page 91 NOTAS...
- Page 92 Switzerland +41 (0)800 009 933 Sage Appliances GmbH Campus Fichtenhain 48, 47807 Krefeld, Deutschland Deutschland: +49 (0)8005053104 Österreich: +43 (0)800 80 2551 Belgium +32 (0)800 54 155 Luxembourg +352 (0)800 880 72 Spain +34 (0)900 838 534 Portugal +351 (0)800 180 243 www.sageappliances.com...