Publicité
Les langues disponibles
Les langues disponibles
Liens rapides
(T)Box G2
INSTRUCTION MANUAL
MODE D'EMPLOI
FOR YOUR OWN SAFETY, PLEASE READ THIS INSTRUCTION MANUAL
CAREFULLY BEFORE YOU INITIALLY START-UP
POUR VOTRE SÉCURITÉ, MERCI DE LIRE ATTENTIVEMENT
CE MODE D'EMPLOI AVANT D'UTILISER VOTRE PRODUIT
V1.2 11/2021
Publicité

Manuels Connexes pour OXO (T)Box G2


Sommaire des Matières pour OXO (T)Box G2
- Page 1 (T)Box G2 INSTRUCTION MANUAL MODE D’EMPLOI FOR YOUR OWN SAFETY, PLEASE READ THIS INSTRUCTION MANUAL CAREFULLY BEFORE YOU INITIALLY START-UP POUR VOTRE SÉCURITÉ, MERCI DE LIRE ATTENTIVEMENT CE MODE D’EMPLOI AVANT D’UTILISER VOTRE PRODUIT V1.2 11/2021...
- Page 3 ENGLISH [T]BOX G2 - USER INSTRUCTION Page 1. In the box 2. Instructions 3. Features 4. Technical specifications 5. Overview 6. Installation 7. Set Up and Operation 8. Control Mode 9. Battery use 10. Maintenance 11. Troubleshooting 12. No Response to DMX/RDM 13.
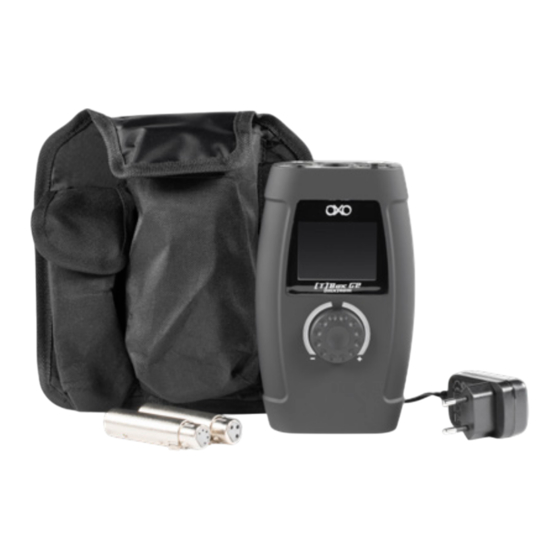
- Page 26 1. Dans la boîte • 1 (T)Box G2 • 1 Adaptateur AC-DC 9V 1200mA, • 1 Adaptateur DMX XLR3 à 5 et XLR5 à 3 • 1 Sac 2. Instructions AVERTISSEMENT Lisez attentivement et complètement les instructions de ce manuel, car elles donnent des informations importantes concernant la sécurité...
- Page 27 Arrêtez immédiatement d’utiliser l’appareil en cas de problème de fonctionnement grave et contactez votre revendeur local pour une vérification ou contactez-nous directement. Ne PAS démonter ou modifier l’unité. En cas de doute, ne l’utilisez pas et contactez un revendeur agréé. Cet appareil ne doit être utilisé...
- Page 28 5. Vue d’ensemble 1. Écran LCD 2. Roue de jogging 3. Adaptateur d’alimentation 9V DC IN 4. Indicateurs LED d’avertissement de tension 5. Fente micro SD 6. Indicateur LED d’alimentation 7. Interrupteur d’alimentation ON/OFF 8. Connecteur de signal DMX/RDM à 5 broches OUT 9.
- Page 29 7. Mise en place et fonctionnement Suivez les instructions ci-dessous, en fonction de votre mode de fonctionnement préféré. Avant de brancher l’appareil, assurez-vous toujours que l’alimentation électrique correspond à la tension spécifiée pour le produit. N’essayez pas de faire fonctionner un produit de spéci- fication 120V sur une alimentation 230V, ou vice versa.
- Page 30 8. Mode de contrôle 1 DMX-512 Ce menu vous permet de surveiller le paquet DMX total de l’appareil et de tester le signal de données DMX reçu de l’appareil DMX connecté ou de l’envoyer à l’appareil DMX connecté. • Tournez la roue de jogging pour sélectionner le test DMX-512 dans le menu principal. •...
- Page 31 • Sélectionnez Quitter pour revenir au sous-menu précédent. Appuyez sur la roue de jogging pour confirmer. 1,2 DMX 512 Rx • Tournez la roue de jogging pour sélectionner DMX 512 Rx dans le menu de test DMX-512. • Appuyez sur la roue de jogging pour ouvrir le sous-menu. •...
- Page 32 1.3. DMX 512 Tx • Tournez la roue de jogging pour sélectionner DMX 512 Tx dans le menu de test DMX-512. • Appuyez sur la roue de jogging pour ouvrir le sous-menu. • L’écran affiche : • Sélectionnez l’un des 4 modes de diffusion, Mode mono-canal, Mode multi-canal, Démo couleur •...
- Page 33 • La plage de réglage du niveau du canal (niveau de sortie) est comprise entre 0 et 255. l l l) La plage de réglage de la vitesse est comprise entre le niveau O et le niveau l O. • Sélectionnez Quitter pour revenir au sous-menu précédent. Appuyez sur la roue de jogging pour confirmer.
- Page 34 • Dans ce mode, vous pouvez régler le type de pixel, le canal de départ, le niveau principal, le niveau de vitesse ou le temps de fondu. - Type de pixel : Vous pouvez sélectionner un appareil 8 bits ou 16 bits (chacun composé de 9 couleurs).
- Page 35 2. RDM Ce menu vous permet d’obtenir des informations sur l’appareil connecté et vous pouvez éga- lement contrôler l’appareil. • Tournez la roue de jogging pour sélectionner RDM Data Test dans le menu principal. • Appuyez sur la roue de jogging pour ouvrir le menu. •...
- Page 36 • Si un appareil n’est pas détecté, l’écran s’affiche : • Si aucun luminaire n’est détecté, veuillez vérifier les câbles et les connexions. • Si un appareil est détecté, l’écran s’affiche : • L’écran affiche des informations en temps réel sur l’appareil. •...
- Page 37 • Sélectionnez Get Parameter et appuyez sur la roue de jogging, l’écran s’affiche : • Sélectionnez Fresh pour mettre à jour les informations ou Exit pour revenir au sous-menu précédent. • Appuyez sur la roue de jogging pour confirmer. • Sélectionnez Set Parameter et appuyez sur la roue de jogging, l’écran affiche par exemple : •...
- Page 38 • Pour obtenir des informations sur l’appareil connecté, sélectionnez le paramètre Device lnfo, que l’écran affiche par exemple : • Tournez la roue de jogging pour sélectionner le paramètre Get. • Appuyez sur la roue de jogging pour confirmer, l’écran s’affiche : •...
- Page 39 • Sélectionnez Fresh pour mettre à jour les informations ou Exit pour revenir au sous-menu précédent. • Appuyez sur la roue de jogging pour confirmer. • Sélectionnez Set Parameter et appuyez sur la roue de jogging, l’écran s’affiche : • Sélectionnez Mêmes mfrs : seuls les mêmes luminaires du même fabricant seront sé- lectionnés.
- Page 40 2.2 Mise à jour du dispositif RDM Note : La mise à jour doit être effectuée par un technicien qualifié et autorisé. • Tournez la roue de jogging pour sélectionner «Update RDM Oevice» dans le menu principal de RDM. • Appuyez sur la roue de jogging, l’écran s’affiche : •...
- Page 41 • Insérez une Micro SD dans la fente (5). Sélectionnez le fichier du microprogramme de l’appareil connecté. • Tournez la roue du jogging pour sélectionner Envoyer : Appareil unique, l’écran affiche : • Appuyez sur la roue de jogging pour confirmer l’envoi : Appareil unique. •...
- Page 42 • Si l’appareil est détecté et qu’un signal MIDI est reçu, l’écran s’affiche • Sélectionnez Quitter pour revenir au menu principal. Appuyez sur la roue de jogging pour confirmer. 4. Test de câble Avec ce menu, vous pouvez vérifier si le câblage est endommagé. •...
- Page 43 • Après le test, vous pouvez sélectionner Réessayer ou Quitter. • Si vous sélectionnez Réessayer, le test sera répété. • Sélectionnez Quitter pour revenir au menu principal. Appuyez sur la roue de jogging pour confirmer 5. Configuration du système Ce menu vous permet de régler les paramètres de l’appareil. •...
- Page 44 - Format 16 bits : Cette fonction peut être choisie si vous sélectionnez un appareil 16 bits en mode Démo Couleur ou Démo Chase. Vous pouvez choisir entre deux types de contrôle, MSB d’abord ou LSB d’abord. MSB : Most Significant Bit (grossier en premier) et LSB : Least Significant Bit (fin en premier). - Format : Sélectionnez le format d’affichage, Décimal, Pourcents, BAR (carré) ou Hexadé- cimal.
- Page 45 9. Utilisation des piles • Le TBox G2 vous permet d’utiliser des piles rechargeables 4x AAA type 1.5V 1100mA que vous pouvez charger avec un adaptateur 9V. • Pour mettre la batterie, il suffit d’utiliser le panneau à l’arrière du TBox G2 •...
- Page 46 12. Aucune réponse au DMX/RDM Soupçonnez le câble ou les connecteurs DMX, un dysfonctionnement du contrôleur, un mau- vais fonctionnement de la carte DMX à effet de lumière. • Vérifiez le réglage du DMX. Assurez-vous que les adresses DMX sont correctes. •...
- Page 47 Mauvaise qualité des • Vérifier la qualité des données. données Si elle est inférieure à 100 %, le problème peut être dû à une mauvaise connexion de la liaison de données, à des câbles de mauvaise qualité ou cassés, à une fiche de terminaison manquante ou à...
- Page 48 13. Spécifications des produits Modèle : TBox G2 Alimentation électrique Adaptateur électrique 9V DC, 500mA Consommation d’énergie Dimensions 170 x 105 x 50 mm Poids 0,28 kg Détails À bord Écran LCD Protocoles Contrai DMX-512, RDM, MIDI Connexions Entrée et sortie XLR 5 broches, MIDI, fente Micro SD Logement Température ambiante max 35°c...
- Page 49 Mode d’emploi - [T]Box G2 V1.2 11/2021 49/52...