Singer 2808 Manuel D'instructions
Table des Matières
Les langues disponibles
Les langues disponibles
Table des Matières

Manuels Connexes pour Singer 2808


Sommaire des Matières pour Singer 2808
- Page 2 All manuals and user guides at all-guides.com Refer toillustrationforlocationofserialnumberonyourmachine. Consultezl'illustrationpourconnaitrel'emplacementdunumérodesériesurvotremachine. DearCustomer:We recommend Nous vous recommandons thatfor future reference you d'inscrire le numérode série de record the serial number ofyour votre machine à coudre dans sewingmachineinthespace l'espace à cet effet, cidessous provided (down).
-
Page 5: Félicitations
All manuals and user guides at all-guides.com Félicitations En tant que propriétaire d'une nouvelle machine à coudre SINGER, vous êtes à même d'initier une aventure en créativité. Dès le premier moment où vous utiliserez votre machine,voussaurezquevousêtesentrainde coudre sur une des machines de plus facile opération. -
Page 8: Instructions Importantes De Sécurité
All manuals and user guides at all-guides.com Instructions importantes de sécurité N'essayezpasd'ajusterlacourroiedumoteur.Aucasoù un ajustement serait nécessaire, demandez-le à un technicienduRéseaudesServicesAutorisésSINGER. Encouturant, maintenezvos doigts eloignés de toutes lespiècesenmouvement.Une précautionspécialeest nécessaire, pour éviter des dommages autour de l'aiguilleenmouvement. Nepastroptirezoupoussezletissuencouturant.Cela peutécarterl'aiguille,occasionnantsarupture. Jamais actionnez la machine avec les passages d'air bloqués.Maintenezlescouverturesdeventilationdela machine et du pédale contrôleur de vitesse dégagés d'accumulationd'éfilochesetpoussière. - Page 11 All manuals and user guides at all-guides.com Table des matières Faites connaissancede votre machine Sélecteur delongueurdepointpourcouture dezig-zag.............43 Pièces ............13 Sélectiondepoints..........43 Accessoires........... 15 Point invisible..........47 Branchementde lamachine.......17 Ourletdelacoquille........47 Miseenmarchedelamachine......17 Sélecteur delongueurdupoint......19 Boutonnièreet boutons Choisir etchangerl’aiguille......19 Coudredesboutons.........49 Commentchangerlaplaqueàaiguille....21 Boutonnière ..........
-
Page 15: Faites Connaissancede Votre Machine
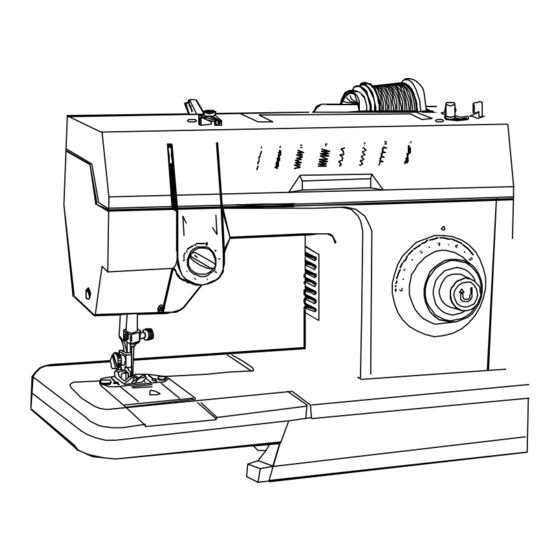
All manuals and user guides at all-guides.com Faites connaissance avec votre machine Pièces Volant 13. Visdefixationdel'aiguille Devidoir 14. Guide-fil Porte-bobine horizontal 15. Bouton demarche arrière Guide-fil 16. Sélecteurdelongueurdepoint Ressortdetensiondufil 17. Sélecteurdepoint Guide-fil 18. Releveurdupiedpresseur Releveurdefil 19. Coupe fil Plaquede face 20. -
Page 17: Accessoires
All manuals and user guides at all-guides.com Accessoires Lesaccessoiressuivantssontfournisavecvotremachine pourfaciliterlacoutureetaugmenterlespossibilitésde votremachine. Lalettre quevousvoyezillustréesetrouvesurlapièce elle-même e t vouspermetdesélectionnerrapidement l’accessoirecorrespondantàvosbesoins. 1. Bobines(3unités) 2. Grandétrier 3. Petitétrier(Q) 4. Couvre-griffes(F) 5. Assortimentd’aiguilles... -
Page 47: Modèles De Points
All manuals and user guides at all-guides.com Selectordebordados Prensatelas Aplicación PUNTO Cualquer Costurageneral Puntadarecta General posición Cosidoelástico Cualquer Puntozig-zag general,bordadosyojales General posición Cosidoelástico Puntozig-zag 1,5 a 2 , 5 generalybordados General Cosidoelástico Puntozig-zag 1,5 a 2 , 5 General general,bordadosyojales Puntada Acabadode 1,5 a 2 , 5... -
Page 49: Point Invisible
All manuals and user guides at all-guides.com Point invisible Le pointinvisible vouspermet de coudre lesourletsde tissus moyens épais et jersey. Coudre au point caché requiertunpeudepratique.Faitesunexercice. Réglagesrecommandés Sélecteur depoint:Pointcaché“E” Longueurdepoint:1,5a2,5 Piedpresseur: Universelavecleguidepourpointcaché. (Guidepourpointcaché:Disponibleenlesmagasinsde articlesdecouture). Préparez le pliage de l’ourlet etrepassezlégèrement. Mieux vaut bâtir l’ourlet pour le maintenir en place (comme illustré). -
Page 50: Attaching A Button
All manuals and user guides at all-guides.com Attaching a button Recommendedsettings StitchSelection: ZigZagStitch StitchWidth: Pattern“B”or“C”accordingtothebutton holesdistance. Foot: ButtonSewing(H)availableatyourlocalSewing Center. 1. Raisethebobbinthreadandpullboththreadstothe backofthepresserfoot(illustration1). 2. Place the fabric andbuttonunderthe presserfoot. Turn hand wheel toward your direction observing if needleintheleftsideofzig-zagentersthecenterof theleftholeofthebutton(illustration2),continueto turn the handwheel toward complete the stitchand continueobservingifneedleintherightsideofzig-zag enters the center of the right hole of the button (illustration3). -
Page 51: Coudredesboutons
All manuals and user guides at all-guides.com Coudre des boutons RéglagesRecommandés: Sélecteurdepoint:PointZigZag Largeurdepoint:"B"ou"C"selonladistancedelestrous Piedpresseur:Piedbouton(H)disponibleàvotrecentre àcoudre 1.Eleverlefildelacanetteettirerlesdeuxfilsenarrière dupiedpresseur(fig.1). 2. Placer le tissu et le bouton sous le pied presseur. Tournerlevolant versvotredirectionpourobserversi l'aiguilledanslecôtégauchedezig-zagentrelecentre dutrougauchedubouton(fig.2).Continueràtourner le volantverscomplète point zigzagenvérifiantsi l'aiguilledanslecôtédroitdezig-zagentrelecentre dutroudroitdubouton(fig.3). 3. Baissez le pied presseur et faites qualques points (fig.4). -
Page 52: Buttonhole
All manuals and user guides at all-guides.com Buttonhole Stitchwidth:(Seeillustration) Foot: specialpurpose(J) Stitchlength:between0and1 Note: Forbestresultsusethebuttonholefootavailable forpurchaseatyourlocalSewingCenter. 1. SideStitching:Selectpattern(B),positionneedlein fabric at point 1. Lower foot and stitch to end of marking at point 2, turn handwheel toward your directionuntiltheneedleisoutofthefabric.Select pattern(A),continuetoturnhadwheeluntilneedle infabricatpoint3.Leaveneedleinfabricatpoint3, Raise foot and pivot clockwise work on needle. Lowerfoot. -
Page 53: Boutonnière
All manuals and user guides at all-guides.com Boutonnière Largeurdepoint:(Voirl'illustration) Longueurdepoint:0à1 Piedpresseur:Spécial(J) Note: Pourlesmeilleursrésultatsutiliselepiedpour boutonnièredisponiblepourl'achatàvotrecentre àcoudre. 1. Couturedelepremièrecôté:Tournezleselecteurde points pour choisir la position (B). Placez l'aiguille dansletissuaupoint1.Descendezlepiedpresseuret brodezjusqu'àlepoint2.Tournezlevolantversvotre direction jusqu'à ce que l'aiguille est hors du tissu. Tournezleselecteurdepoints pourchoisirlaposition (A).Continueràtournerlevolantjusqu'àl'aiguillece justaupoint3.Laisserl'aiguilledansletissuàlepoint 3, relevez le piedpresseur et tournez le travail a la droite.Bassezlepiedpresseur. -
Page 54: Insertingazipper
All manuals and user guides at all-guides.com Inserting a zipper Recommendedsettings Pattern: Straightstitch(A) StitchLenght: 2-5 Foot: Zipper (E) - (Zipper foot - available at Sewing Centers) Adjustingthezipperfoot When the zipper teeth are to the left of the needle (illustration1): • Slidetheadjustingblock(A)acrosstotheright. •... -
Page 55: Posedúnefermetureglissière
All manuals and user guides at all-guides.com Pose d'une fermeture glissière Réglagesrecommandés Point: Couturedroite(A) Longueurdepoint: 2-5 Piedpresseur: Ganseur(E)(Piedganseur:Disponibleen lesmagasinsdearticlesdecouture). Fixation dupiedganseur Si les mailles de la fermeture sont à gauche de l'aiguille (fig.1): • Glissez la semelle du pied fermeture le long de la goupilleversladroite(A). -
Page 56: Applicationswithstraightstitching
All manuals and user guides at all-guides.com Applications with straight stitching Darning Recommendedsettings StitchSelection: Straight Stitch(A) StitchLenght: Anysettings Foot: Removefootandshank Attachfeedcover(page22). Frame:Notsupplied Reversestitchbutton Thereversestitchbutton,withthe( )symbol,islocated inthecenterofthestitchlengthselector(illustrarion1). • Forreversestitching,pushinthebuttonandholdin place.Themachinewillstitchinreverseonlyaslongas youkeepthebuttonpushedin. Sewinginreverse Toneatentheendofaseam,pushinthereversebuttonand backstitch 3-4 stitches (illustration 2). Raise needle and presserfootandremovefabricbydrawingittothebackand left.Cutthreadonthreadcutteronpresserbar. -
Page 57: Applicationsaveclepointdroit
All manuals and user guides at all-guides.com Applications avec le point droit Repriser Réglages recommandés Pointutilisé: Couturedroit(A) Longueurdepoint: N’importequelrèglage Piedpresseur: Retirezlepiedpresseuretlatige. Installezlaplaquecouvre-griffes(page23). Métieràbroder:Nonlivrée Marchearrière Latouche ( )aucentredusélecteurdelongueurde pointpermetdecoudreenmarchearrière(Fig.1). • Pourarrêterlescoutures,appuyezsurlebouton.Tant quevouslemaintiendrezenplace,lamachinecoudre enmarchearrière. Couture enmarchearrière Pourrenforcerlafindelacouture,appuyezsurlebouton demarchearrière(Fig.2).Relevezl'aiguilleetlepied presseuretdégagezletissuenletirantversl'arrièresur lagauche.Coupezlefilàl'aideducoupe-filencastréen labarredupiedpresseur. -
Page 58: Free-Armsewing
All manuals and user guides at all-guides.com Free-arm sewing Removingtheextension table Tochangemachineforfree-armsewing,liftrightedge(1)of extensiontable,slideittotheleftandoffthemachine(2). Toreplacetheextensiontable,slideittotherightkeepingit evenwiththefree-arm,untilthetabsontherightlockinto place. Fabric handling, when sewing tubular and hard reach garmentareas,issimplifiedandmadeeasierwhenyouuse thefree-armsewingcapabilityofyoursewingmachine. Applications Sleeves • Free-armsewingtakesthedifficultyoutoftopstitching, sleeves,finishing waistbands and trouser legs rotate smoothlyundertheneedle,aroundthearm,allowingyou toplaceyourstitchingaccurately. Buttons • Sewingbuttonsonacufforneckbandiseasywithfree- arm sewing.Thesewingarmallowsroomforcuffstoslip onto withoutbeingstretchedoutofshape,andyoucan alsosee andhandlethestitchingareamoreeasily. -
Page 59: Coutureaveclebras-Libre
All manuals and user guides at all-guides.com Couture avec le bras-libre Pour enlever l'extension de la base Pour transformer votre machine plateau e n m a c h i n e à bras-libre,soulevezleborddroit(1)duplateauetglissez verslagauchepourleretirer(2). Pour remettre en place le plateau, glissez-le vers la droitedepartetd’autredubras-librejusqu’àcequela pattededroitesoitenplace. -
Page 60: Monogramandembroidering
All manuals and user guides at all-guides.com Monogram and Embroidering You will be able to produce beautiful monograms and embroideringwithjustalittleofpractice,creativityanda frame (not supplied), giving a personal touch to your works. RECOMMENDEDSETTINGS Pattern: Zigzag(Monogram)and/or StraightStitch(Embroidering) Stitchlength:0-1 1. Draw the letters (Monograms) and drawings (for Embroidering)ontherightsideofthefabric. -
Page 61: Monogrammes Et Broderie
All manuals and user guides at all-guides.com Monogrammes et broderie Avecunpeud'habilité,decréativitéetuncerceau(non livrée), onpeutfairedebeauxmonogrammesetdes broderies,enpersonnifiant noscréations. AJUSTEMENTSRECOMMENDÉS Typedepoint: zigzag(monogramme)ou couturedroite (broderie) Longueurdupoint:0-1 1. Dessinezleslettres(pourunmonogramme)et les dessins (pourlabroderie)surlecôtédroitdutissu. 2. Enlevezlepiedpresseur. nstallezlaplaquecouvre-griffes(page 3. Placerletissudanslecerceau avecledessinoules lettresdans soncentre. 4. Avecdesmouvementscirculaires,etàunevitesse constante, remplissez les monogrammes et les dessins. -
Page 62: Removing Andreplacingbobbincase
All manuals and user guides at all-guides.com Removing and replacing bobbin case To remove bobbin case 1. Openslideplateandremovebobbin. 2.Removetheneedleplate. With a small screwdriver, turn and take hold of the bobbincaseretainingplatetotherearasfarasitwill go(illustration2). 4. Lifttheleftsideofthebobbincaseandslideitoutto theleftandoutfromthemachine(illustration1). 5. Loosenslightlythebobbincaseretainingplateuntilits initialposition(illustration4). Replacing the bobbin case With a small screwdriver, the bobbin case retaining platetothebackasfarasitwillgo(illustration2). -
Page 63: Retirer Etreplacerlesupportdebobine
All manuals and user guides at all-guides.com Retirer et replacer le support de bobine Pour retirer le support de bobine 1. Ouvrezlaplaque glissièreetenlevezlabobine. 2. Enlevéelaplaqueàaguille(pag. ). 3. A l'aide d'un petit tournevis, tournez et tenez le loquet du support de bobine totalement vers l'arrière(fig.2). -
Page 64: Cleaningthemachine
Take-uplever,threadguidesandneedlethreadten- siondial. Presserbarandneedlebar. Bobbincaseandneedleplatearea. Note: DONOTremovethepositioningplate .Ifarea under positioning plate needs cleaning, take your machine to an authorized Singer Service Center. YOUR MACHINE MUST BE PERIODICALLY CHECKED BY YOUR LOCAL SINGER AUTHORIZED SERVICE CENTERFORWEAR. -
Page 65: Nettoyagede Lamachine
Le support de la bobine et la région de plaque à aiguille. Ne retirez jamais la plaque de positionnement .Aucasoùlarégionsouscetteplaqueaurait besoin d'unnettoyage, confiez votre machine à un technicien du Réseau de Services Autorisés Singer. VOTREMACHINE DOIT ETRE REVISE PERIODI- QUEMENT PAR UN TECHNICIEN DU RESEAU DE SERVICES AUTORISES SINGER. -
Page 66: Changingthelightbulb
All manuals and user guides at all-guides.com Changing the light bulb BEFORECHANGINGLIGHTBULB,UNPLUGMACHINE FROMSOCKETOUTLET. UseoriginalSINGERlightbulbsonly( code988076 Removinglight bulb (illustration 2) 1. Remove screw (A) located on face plate andremove platepullingitdownandtotheright. 2. Donotattempttounscrewthelightbulb.Pushbulbup into the socket and at the same time, turn it to the direction indicated (clockwise) to unlock bulb pin (illustration2). -
Page 67: Changer L'ampoule
All manuals and user guides at all-guides.com Changer l'ampoule Utilisez seulement deslampes originelles Singer (code 988076). Enlever l'ampoule(fig.2) . Dévissez la vis de la plaque de face. Retirez la plaqueenlatirantparsonbordinférieur,verslebas etversla droite(fig.1). 2. N'essayez pas de dévisser l'ampoule. Poussez l'am- poule vers le haut dans la douille et, en même... -
Page 68: Lubricatingthemachine
Your sewing machineshallbelubricatedaccordingtothis useofwhereitisstored.Ifyouuseitafewtimesamonth, lubricatingthemachineonceayearisenough.Ifyouuseit frequently,lubricateitatleastonceamonth. When lubricating, apply only SINGER oil at the points shown. SINGER oil is specially prepared and does not contain harmful deposits that can interfere with the operationofprecisionparts. To determine which connections move and need lubrication,turnthehandwheelslowlybyhand,whileface placeisremoved. -
Page 69: Lubrification Delamachine
Si vous l'utilisez quelques fois par mois, il suffitdelalubrifierunefoisparan.Sivousl'utilisez fréquemment,lubrifiezaumoinsunefoisparmois. Pour la lubrification, utilisez seulement l'huile lubrifiant SINGER sur tous les endroits indiqués. L'huile SINGER est spécialement préparé n'ayant pas derésidusnocifspouvantinterférersurlemouvement despièces de précision. Pour déterminerquellespiècesontbesoindelubrifi- cation,retirezlaplaquedefaceettournezlentement levolantversvous. -
Page 70: Performance Checklist
All manuals and user guides at all-guides.com Performance checklist Needle does notmove Upperthreadbreaks Is machineconnectedtoelectricalsupply? Ismachine properly threaded? Is thepowerandlightswitchedon? Isthread freely unwinding from spool? Is speedcontrolpedalconnected? Isupperthreadtension tootight? Is thebobbinwindingindentengaged? Isbobbin caseproperlyinserted? Isbobbin rim freeofnicks? Needle moves butstitch is notformed Lowerthreadbreaks Is needledefective? Is needlefullyinsertedintoneedleclamp? - Page 71 All manuals and user guides at all-guides.com...
-
Page 72: Guide Pour La Vérification Des Problèmes
All manuals and user guides at all-guides.com Guide pour la vérification des problèmes L'aiguille ne bouge pas Le fil supérieur casse Avez-vousbranchezlamachine? Lamachineest-ellebienenfilée? L'intérrupteur est-il connecté? Lefilsedéroule-illibrementdelabobine? Lerhéostat est-il branché? Lagrosseurdel'aiguilleest-elleadaptéeàlagrosseur L'isolateurd'aiguille est-ilactionné? du fil utilisé? Latensiondufilsupérieurest-elletropélevée? Lesupportdecanetteest-ilbienenplace? L'aiguille bouge mais elle ne fait pas le point Les bordsdelabobineont-ilsdesbourres? L'aiguilleest-elleendommagée? L'aiguilleest-elleentièrementenplacedanslepince-...