Table des Matières

Publicité

Les langues disponibles
  • FR

Les langues disponibles

  • FRANÇAIS, page 24

Liens rapides

FITNESS-TRAININGSSTANGE / EXERCISE
BAR / BARRE D'ENTRAÎNEMENT FITNESS
FITNESS-TRAININGSSTANGE
Bedienungs- und Sicherheitshinweise
BARRE D'ENTRAÎNEMENT FITNESS
Instructions d'utilisation et consignes de sécurité
TYČ NA POSILOVÁNÍ
Pokyny pro obsluhu a bezpečnostní pokyny
BARRA DE EXERCÍCIO FITNESS
Instruções de utilização e de segurança
IAN 282674
EXERCISE BAR
Operation and Safety Notes
FITNESS-TRAININGSSTANG
Bedienings- en veiligheidsinstructies
BARRA DE ENTRENAMIENTO PARA FITNESS
Instrucciones de utilización y de seguridad

Publicité

Table des Matières
loading

Sommaire des Matières pour Crivit 282674

  • Page 1 Instructions d‘utilisation et consignes de sécurité Bedienings- en veiligheidsinstructies TYČ NA POSILOVÁNÍ BARRA DE ENTRENAMIENTO PARA FITNESS Pokyny pro obsluhu a bezpečnostní pokyny Instrucciones de utilización y de seguridad BARRA DE EXERCÍCIO FITNESS Instruções de utilização e de segurança IAN 282674...
  • Page 2 DE / AT / CH Bedienungs- und Sicherheitshinweise Seite GB / IE Operation and Safety Notes Page FR / BE Instructions d‘utilisation et consignes de sécurité Page NL / BE Bedienings- en veiligheidsinstructies Pagina 34 Pokyny pro obsluhu a bezpečnostní pokyny Strana 43 Instrucciones de utilización y de seguridad Página 52...
  • Page 5: Table Des Matières

    Einleitung ............................Seite Bestimmungsgemäße Verwendung ....................Seite Teilebeschreibung ..........................Seite Lieferumfang ............................Seite Technische Daten ..........................Seite Sicherheitshinweise ........................Seite Trainingsumgebung .......................Seite Produkt montieren ........................Seite Produkt befestigen .........................Seite Produkt an einer Tür befestigen ......................Seite Produkt an einer Säule oder einem Baum befestigen ...............Seite Produkt an einem Zaun befestigen ....................Seite Allgemeine Hinweise zu Übungen ................Seite Allgemeine Trainingsplanung...
  • Page 6: Einleitung

    Fitness-Trainingsstange Technische Daten Maße: Einleitung Stahl-Stange: ca. 108 cm (L) Elastisches Seil: ca. 150 cm (L) Wir beglückwünschen Sie zum Kauf Ihres neuen Gewicht: Produkts. Sie haben sich damit für ein hochwertiges Produkt entschieden. Machen Sie sich vor der ers- Multifunktions-Trainingsstange: ca.
  • Page 7: Trainingsumgebung

    VORSICHT! VERLETZUNGSGEFAHR VORSICHT! VERLETZUNGSGEFAHR! DURCH VERSCHLEISS! Verwenden Sie das Testen Sie immer die Zugbeständigkeit der Produkt nur, wenn es in einem einwandfreien Verbindungspunkte, um sicher zu gehen, dass Zustand ist. Prüfen Sie das Produkt vor jeder ausreichende Reserven vorhanden sind. An- Verwendung auf Verschleiß.
  • Page 8: Produkt Befestigen

    Produkt befestigen VORSICHT! VERLETZUNGSGEFAHR! Schließen Sie die Tür, an der Sie die Türveran- Wählen Sie eine Trainingsumgebung von etwa kerung befestigen, immer ab. Verwenden Sie 3,00 x 1,80 m (L x W) aus. immer das beiliegende Türschild, während Sie trainieren. Produkt an einer Hinweis: Stellen Sie sicher, dass die Tür, an der Tür befestigen...
  • Page 9: Allgemeine Hinweise Zu Übungen

    Allgemeine Hinweise zu - Wärmen Sie Ihre Muskelgruppen ausreichend Übungen auf, bevor Sie mit den Übungen beginnen. - Streck- und Dehnübungen werden vor Die folgenden Anleitungen sind nur Beispiele für Trainingsbeginn empfohlen. mögliche Übungen. Über weitere Übungsmöglich- keiten informieren Sie sich bitte in der einschlägigen Trainingsanleitungen Literatur.
  • Page 10: Ausgangspositionen

    2. Bewahren Sie Haltung. Wirbelsäulenhaltung wird Ihre Trainingseffizi- Halten Sie Ihre Wirbelsäule gerade. Achten enz erhöhen, Ihren Schwerpunkt zentriert hal- Sie darauf, Ihre Wirbelsäule nicht zu überdeh- ten und Unfallrisiken vermeiden. nen oder übermäßig zu beugen. Eine gerade Falsch Falsch Richtig Ausgangspositionen Bewegen Sie sich bei jeder Ausgangsposition...
  • Page 11: Wie Mache Ich Trainingsübungen Leichter Oder Schwerer

    Fußpositionen Parallelstand Schrittstand Ausfallschritt-Stand Handpositionen Standard-Handgriff Gedrehter Handgriff Wie mache ich Handposition Trainingsübungen leichter Je weiter Ihre Hände vom Widerstandsseil entfernt oder schwerer sind, desto schwerer wird die Übung. Körperhaltung Sie können den Schwierigkeitsgrad jeder Übung leicht anpassen, indem Sie Ihre Körper- Je weiter Sie sich vom Ankerpunkt entfernen, desto haltung, die Griffhaltung, die Geschwindigkeit schwieriger wird es.
  • Page 12: Übungsvorschläge

    Übungsvorschläge 3. Position: seitlich zum Ankerpunkt Greifen Sie die Trainingsstange mit dem Stan- Für die Übungen 1–5 (einseitigen Seilwi- dard-Handgriff, die linke Hand fasst oben an. derstand) befestigen Sie die Trainings- Das Widerstandsseil befindet sich auf der stange an einer Tür, einem Zaun oder rechten Seite.
  • Page 13: Pflege Und Aufbewahrung

    Für die Übungen 6–8 befestigen Sie die Für die Übungen 9–10 montieren Sie das Trainingsstange mittels der Türveranke- Produkt wie unter Kapitel „Produkt mon- rung . Wie in Kapitel „Produkt an einer tieren“ beschrieben. Tür befestigen“ (für beidseitigen Seilwi- derstand) beschrieben. 9.
  • Page 14: Entsorgung

    Entsorgung Die Verpackung besteht aus umweltfreundlichen Materialien, die Sie über die örtlichen Recycling- stellen entsorgen können. Möglichkeiten zur Entsorgung des ausgedienten Produkts erfahren Sie bei Ihrer Gemeinde- oder Stadtverwaltung. Garantie Das Produkt wurde nach strengen Qualitätsrichtlinien sorgfältig produziert und vor Anlieferung gewissen- haft geprüft.
  • Page 15 Introduction ...........................Page 16 Intended Use ............................Page 16 Parts Description ..........................Page 16 Scope of delivery ..........................Page 16 Technical Data ............................Page 16 Safety Notices ..........................Page 16 Exercise area ..........................Page 17 Product Assembly ........................Page 17 Attaching the product ......................Page 17 Attaching the product to a door ......................Page 17 Attaching the product to a column or tree ..................Page 18 Attaching the product to a fence......................Page 18 General exercise information...
  • Page 16: Introduction

    Exercise Bar Weight: Multifunction exercise bar: approx. 1930 g Elastic cord: approx. 232 g Introduction Anchor: approx. 19.5 g We congratulate you on the purchase of your new Stretch (cm): 140 160 185 225 product. You have chosen a high quality product. Force (N) 133 195 Familiarise yourself with the product before using it...
  • Page 17: Exercise Area

    Product Assembly Only use the product in areas where you can (see Fig. B, Step 1–7) maintain adequate distance from persons/ob- jects to avoid injuries and property damage. Do not use the product near steps or stairs. Screw the two parts of the exercise bar Always exercise on a flat, non-slip surface.
  • Page 18: Attaching The Product To A Column Or Tree

    Attaching the product Only secure the product to doors which open to a fence outward (away from you). Attach the door anchor at the middle of the door. For cord resistance at one end only Close the door. Hook the snap hook straight around the fence.
  • Page 19: Exercise Instructions

    1. Always use the safety strap. - Take a 30 second break after every set. - To build muscle you should use less reps and Place the (included) safety strap around your increase the intensity. wrist and pull tight. - For endurance training, use more reps and less intensity.
  • Page 20: Starting Positions

    Starting positions With every starting position, move away from the anchor point so you will have adequate resistance during the exercise. Posture Stand with the back to the Stand sideways to the Stand facing the anchor anchor point. anchor point. point.
  • Page 21: How Do I Make Exercises More Or Less Intense

    Hand positions Standard grip Rotated grip How do I make exercises more Suggested exercises or less intense For exercises 1–5 (cord resistance at one end), attach the exercise bar to a door, a You can easily adapt the intensity of each exer- fence or a tree as described under cise by changing your posture, grip, speed of movements or the type of resistance cord.
  • Page 22 Position 3: side to the anchor point Position 7: back to the anchor point Grab the exercise bar using a standard grip, Hold the exercise bar using a standard grip. the left hand at the top. The resistance cord is Take a walking stance with the right foot at the at the right.
  • Page 23: Care And Storage

    Care and Storage The warranty applies to defects in material or ma- nufacture. This warranty does not cover product Note: Routine maintenance and cleaning helps parts subject to normal wear, thus possibly conside- keep your product safe and ensures its longevity. red consumables (e.g.
  • Page 24 Introduction ...........................Page 25 Utilisation conforme ..........................Page 25 Descriptif des pièces ...........................Page 25 Contenu de la livraison ........................Page 25 Caractéristiques techniques ........................Page 25 Consignes de sécurité ......................Page 25 Environnement d‘entraînement ...................Page 26 Montage du produit .......................Page 26 Fixation du produit .........................Page 27 Fixation du produit à...
  • Page 25: Barre D'entraînement Fitness

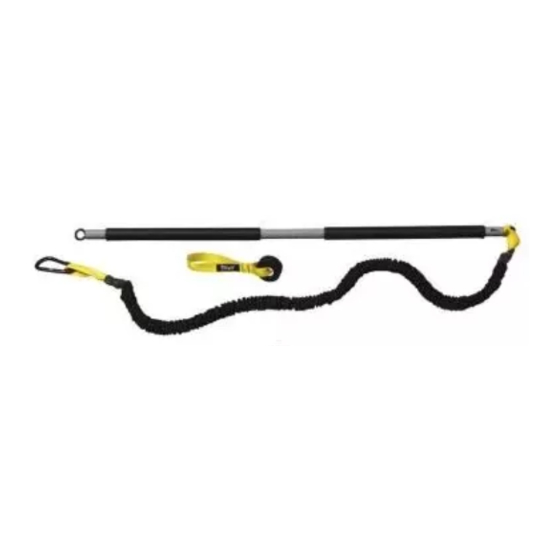
    Barre d’entraînement fitness Caractéristiques techniques Dimensions : Introduction Barre en acier : env. 108 cm (L) Corde élastique : env. 150 cm (L) Nous vous félicitons pour l‘achat de votre nouveau Poids : produit. Vous avez opté pour un produit de grande qualité.
  • Page 26: Environnement D'entraînement

    ATTENTION ! RISQUE DE BLESSURES ATTENTION ! RISQUE DE BLESSURE ! CAUSÉES PAR L‘USURE ! Utilisez unique- Testez toujours la résistance à la traction des ment le produit lorsqu‘il se trouve en parfait état. points de connexion, afin de vous assurer qu‘ils Avant chaque utilisation, vérifiez le produit pour disposent de réserves suffisantes.
  • Page 27: Fixation Du Produit

    Fixation du produit et peut supporter le poids de votre corps. Assurez-vous que l‘ancre de porte est bien fixée. Tirez à plu- Choisissez un environnement d‘entraînement sieurs reprises avec force sur la corde élastique d‘environ 3,00 x 1,80 m (L x l). afin de vous assurer de sa stabilité.
  • Page 28: Généralités Sur Les Exercices

    Généralités sur les exercices - Pour un entraînement d‘endurance, il convient de faire plus de mouvements, avec un niveau Les instructions suivantes sont juste des exemples de difficulté moins élevé. d‘exercices possibles. Vous trouverez d‘autres exer- Échauffez suffisamment vos groupes de muscles cices dans la littérature spécialisée.
  • Page 29: Positions De Départ

    Correct Positions de départ Lors de chaque position de départ, éloignez-vous du point d‘ancrage, afin d‘exercer une résis- tance suffisante lors de votre mouvement. Posture du corps Tournez-vous sur le côté Tournez le dos Tournez-vous face par rapport au point d'an- au point d'ancrage.
  • Page 30: Comment Diminuer Ou Augmenter Le Niveau De Difficulté Des Exercices

    Positions du pied Position de fente en Position parallèle Position de pas avant Positions de la main Poignée standard Poignée torsadée Comment diminuer ou Posture du corps augmenter le niveau de Plus vous vous éloignez du point d‘ancrage, plus difficulté des exercices l‘exercice est difficile.
  • Page 31: Propositions D'exercice

    Propositions d‘exercice Effectuez l‘ensemble des séries composant le déroulé de l‘exercice. Changez ensuite de côté. Pour les exercices 1–5 (résistance de corde unilatérale), fixez la barre d‘exercice à 4e position : tournez le dos au point une porte, une clôture ou un arbre, comme d‘ancrage décrit au chapitre „Fixation du produit“.
  • Page 32: Entretien Et Rangement

    7e position : tournez le dos au point 10e position : debout sur la corde de d‘ancrage résistance Attrapez la barre d‘exercice avec la poignée Attrapez la corde d‘exercice des deux mains standard. en les plaçant sous la poignée (les paumes Placez les pieds en position de pas, le pied vers le haut).
  • Page 33 de retourner ce produit au vendeur. La présente ga- rantie ne constitue pas une restriction de vos droits légaux. Ce produit bénéficie d‘une garantie de 3 ans à compter de sa date d’achat. La durée de garantie débute à la date d’achat. Veuillez conserver le ticket de caisse original.
  • Page 34 Inleiding ............................Pagina 35 Correct gebruik ..........................Pagina 35 Beschrijving van de onderdelen ..................... Pagina 35 Omvang van de levering ........................ Pagina 35 Technische gegevens ........................Pagina 35 Veiligheidsinstructies ......................Pagina 35 Trainingsomgeving ......................Pagina 36 Product monteren ........................ Pagina 36 Product bevestigen ......................
  • Page 35: Inleiding

    Fitness-trainingsstang Technische gegevens Afmetingen: Inleiding Stalen stang: ca. 108 cm (l) Elastiek: ca. 150 cm (l) Hartelijk gefeliciteerd met de aankoop van uw nieuwe product. U hebt voor een hoogwaardig product Gewicht: gekozen. Maak u voor de eerste ingebruikname Multifunctionele vertrouwd met het product.
  • Page 36: Trainingsomgeving

    VOORZICHTIG! KANS OP LETSEL ALS VOORZICHTIG! KANS OP LETSEL! Sluit GEVOLG VAN SLIJTAGE! Gebruik het pro- altijd de deur waaraan u de deurverankering duct alleen in onberispelijke staat. Controleer het bevestigt. product voor elk gebruik op slijtage. De veiligheid VOORZICHTIG! Gebruik altijd het meegele- van het product kan alleen worden gewaarborgd verde deurbordje als u traint.
  • Page 37: Product Aan Een Deur Bevestigen

    Product aan een deur Product aan een zuil of een bevestigen boom bevestigen Bevestig de deurverankering Alleen voor elastische weerstand aan één zijde Haak de karabijnhaak om het elastiek Voor elastische weerstand aan beide zijden (zie afb. BI / stap 6–7): Product aan een schutting Trek de lus van de deurverankering over...
  • Page 38: Algemeen Trainingsschema

    Trainingshandleidingen Train als beginner niet te intensief en overschat uzelf niet. Voer de intensiteit van de training langzaam op. In onderstaande vindt u handleidingen die een Voer alle oefeningen gelijkmatig uit. Vermijd veilige en efficiënte training waarborgen en die u snelle en plotselinge bewegingen.
  • Page 39: Uitgangsposities

    Uitgangsposities Beweeg u bij elke uitgangspositie bij het anker- punt vandaan, zodat u tijdens de beweging voldoende weerstand heeft. Lichaamshouding Sta met uw Sta met uw zij Sta tegenover het rug naar het ankerpunt. naar het ankerpunt. ankerpunt. Voetposities Stand voor zijwaartse Parallelle stand Stap-stand stap...
  • Page 40: Hoe Maak Ik Trainingsoefeningen Makkelijker Of Moeilijker

    Handposities Standaard handgreep Gedraaide handgreep Hoe maak ik boom zoals beschreven onder ‚Product trainingsoefeningen bevestigen‘. makkelijker of moeilijker 1e positie: met uw rug naar het ankerpunt U kunt de moeilijkheidsgraad van elke oefening Pak de trainingsstang met de standaard hand- eenvoudig aanpassen door uw lichaamshouding, greep vast.
  • Page 41 3e positie: zijwaarts ten opzichte van het Begin met uitgestoken armen. ankerpunt Trek uw armen in een gelijkmatige beweging Pak de trainingsstang met de standaard hand- naar uw borst toe. greep vast, met uw linkerhand bovenaan. Het Keer terug naar de uitgangspositie. elastiek bevindt zich aan de rechterkant.
  • Page 42: Onderhoud En Opslag

    10e positie: staande op het elastiek product. Deze wettelijke rechten worden door onze Pak de trainingsstang met beide handen in een hierna vermelde garantie niet beperkt. onderhandse greep vast (handpalmen naar boven). Op dit product verlenen wij 3 jaar garantie vanaf Zet uw voeten in de stap-stand, met uw voorste aankoopdatum.
  • Page 43 Úvod ..............................Strana 44 Použití ke stanovenému účelu......................Strana 44 Popis dílů ............................Strana 44 Obsah dodávky ..........................Strana 44 Technické údaje ..........................Strana 44 Bezpečnostní pokyny ......................Strana 44 Tréninkové prostředí ......................Strana 45 Montáž výrobku ........................Strana 45 Připevnění...
  • Page 44: Úvod

    Tyč na posilování Váha: Multifunkční tréninková tyč: cca 1930 g Pružné lano: cca 232 g Úvod Zakotvení: cca 19,5 g Blahopřejeme Vám ke koupi nového výrobku. Roz- Délka 140 160 185 225 hodli jste se pro kvalitní výrobek. Před prvním uve- natažení...
  • Page 45: Tréninkové Prostředí

    Montáž výrobku (viz obr. B, během cvičení nevolnost, indispozici nebo jiné kroky 1. až 7.) potíže, cvičení ihned přerušte. Používejte výrobek jen v prostorech, ve kterých máte dostatečný odstup od ostatních osob a Sešroubujte pouze rukama oba díly tréninkové předmětů, abyste předešli zranění a věcným tyče škodám.
  • Page 46: Připevnění Výrobku Na Sloup Nebo Strom

    Všeobecné pokyny ke cvičení Pro oboustranně držení lana (viz obr. BI/ kroky 6. až 8.): Přiložte zakotvení na střed dveří. Následující návody jsou jen příklady možných Zavřete dveře. cviků. O dalších možnostech cvičení se laskavě Zahákněte karabinku na konec lana informujte v příslušné...
  • Page 47: Návody K Tréninku

    Návody k tréninku V následujícím textu najdete návody k zajištění bez- pečného a efektivního tréninku, které Vám pomohou z tréninku dostatečně profitovat. Před začátkem nového tréninkového programu konzultujte Vašeho lékaře. 1. Používejte vždy bezpečnostní poutko. Prostrčte ruku (dodaným) bezpečnostním pout- kem a zatáhněte pásek kolem Vašeho zápěstí.
  • Page 48 Držení těla Stůjte zády Stůjte stranou Stůjte proti k zakotvení. k zakotvení. zakotvení. Polohy nohou Nohy paralelně Rozkročeně Nakročeně 48 CZ...
  • Page 49: Jak Mohu Udělat Tréninková Cvičení Lehčí Nebo Těžší

    Polohy rukou Standardní uchopení rukou Obrácené uchopení rukou Jak mohu udělat tréninková Rozkročte se, pravou nohu dozadu. cvičení lehčí nebo těžší Začněte s tréninkovou tyčí na hrudi. Natáhněte paže rovnoměrným pohybem od Stupeň obtížnosti každého cvičení můžete těla. snadno přizpůsobit změnou držení těla, držení Pohybujte pažemi do výchozí...
  • Page 50: Skladování A Ošetřování

    4. Poloha: zády k zakotvení Začněte pažemi ve výšce hlavy, lokty blízko u Uchopte tréninkovou tyč obracenou rukou, levá hlavy. ruka drží shora. Lano se nachází na pravé straně. Natáhněte předloktí rovnoměrným pohybem. Rozkročte se, pravou nohu dozadu. Vraťte se do výchozí polohy. Veďte pohyb přes hlavu, jako když...
  • Page 51: Záruka

    O možnostech likvidace vysloužilých zařízení se informujte u správy vaší obce nebo města. Záruka Výrobek byl vyroben s nejvyšší pečlivostí podle přísných kvalitativních směrnic a před odesláním prošel výstupní kontrolou. V případě závad máte možnost uplatnění zákonných práv vůči prodejci. Vaše práva ze zákona nejsou omezena naší...
  • Page 52 Introducción ..........................Página 53 Uso adecuado ..........................Página 53 Descripción de los componentes ....................Página 53 Contenido ............................Página 53 Características técnicas ........................Página 53 Indicaciones de seguridad .................... Página 53 Zona de entrenamiento ....................Página 54 Cómo montar el producto .....................
  • Page 53: Indicaciones De Seguridad

    Barra de entrenamiento Características técnicas para fitness Medidas: Barra de acero: aprox. 108 cm (L) Introducción Cuerda elástica: aprox. 150 cm (L) Peso: Enhorabuena por la adquisición de su nuevo pro- ducto. Ha elegido un producto de alta calidad. Barra de Familiarícese con el producto antes de la primera entrenamiento puesta en funcionamiento.
  • Page 54: Zona De Entrenamiento

    ¡CUIDADO! ¡PELIGRO DE LESIONES! cognitivo y corporal del niño lo permita. Este producto no es un juguete. Compruebe siempre la resistencia de tracción ¡CUIDADO! ¡RIESGO DE LESIONES POR de los puntos de unión para asegurarse de DESGASTE! El producto debe encontrarse en que dispone de suficientes reservas.
  • Page 55: Fijar El Producto

    Fijar el producto Asegúrese de que la fijación para puertas quede bien firme. Tire varias veces con fuerza de la correa Elija una zona de entrenamiento de aprox. elástica para asegurarse de su estabilidad. 3,00 x 1,80 m (L x An). Fijar el producto a una Fijar el producto a una puerta columna o a un árbol...
  • Page 56: Indicaciones Generales Sobre Los Ejercicios

    Indicaciones generales - Para realizar un entrenamiento de resistencia sobre los ejercicios es recomendable llevar a cabo más repeticiones de menor grado de intensidad. Las siguientes instrucciones son solo ejemplos de - Caliente bien los diferentes grupos musculares posibles ejercicios. Consulte bibliografía especiali- antes de iniciar los ejercicios.
  • Page 57: Posiciones Iniciales

    Incorrecto Incorrecto Correcto Posiciones iniciales Sepárese del punto de anclaje con cada posi- ción inicial, de forma que durante el movimiento disponga de suficiente resistencia. Postura corporal Coloque la espalda Colóquese de lado res- Colóquese de frente hacia el punto de anclaje. pecto al punto de anclaje.
  • Page 58: Cómo Atenuar O Intensificar Los Ejercicios De Entrenamiento

    Posiciones de los pies En paralelo Un pie adelantado Zancada Posiciones de las manos Agarre estándar Agarre girado Cómo atenuar o intensificar los Postura corporal ejercicios de entrenamiento Cuanto más se aleje del punto de anclaje, más difícil resultará el ejercicio. Puede ajustar ligeramente el grado de dificul- Velocidad de movimientos tad de cada ejercicio modificando la postura,...
  • Page 59: Recomendaciones De Ejercicios

    Recomendaciones de ejercicios Mantenga los brazos estirados y gire todo el cuerpo respecto al punto de anclaje. Para los ejercicios 1-5 (resistencia de la Vuelva a la posición inicial. correa a un solo lado) fije la barra de Realice una secuencia de ejercicios completa. entrenamiento a una puerta, una valla o A continuación trabaje el otro lado.
  • Page 60: Cuidado Y Conservación

    Vuelva a la posición inicial. Levante la barra de entrenamiento hacia la Cambie la posición de los pies cuando haya barbilla. realizado la mitad de la secuencia de ejercicios. Vuelva a la posición inicial. 7. Posición: con la espalda hacia el punto 10.
  • Page 61: Garantía

    Garantía El producto ha sido fabricado cuidadosamente siguiendo exigentes normas de calidad y ha sido probado antes de su entrega. En caso de defecto del producto, usted tiene derechos legales frente al vendedor del mismo. Nuestra garantía (abajo indi- cada) no supone una restricción de dichos derechos legales.
  • Page 62 Introdução ..........................Página 63 Utilização adequada ........................Página 63 Descrição das peças ........................Página 63 Material fornecido .......................... Página 63 Dados técnicos ..........................Página 63 Indicações de segurança ....................Página 63 Ambiente de treino ......................Página 64 Montar o produto ........................
  • Page 63: Introdução

    Barra de exercício Fitness Peso: Barra de exercício de multifunção: cerca de 1930 g Introdução Corda elástica: cerca de 232 g Suporte: cerca de 19,5 g Damos-lhe os parabéns pela aquisição do seu novo produto. Acabou de adquirir um produto de grande Comprimento 140 160 185 225...
  • Page 64: Ambiente De Treino

    Consulte o seu médico antes de utilizar o pro- atento para que esteja colocado no outro lado duto, se sofrer de algum problema de saúde, da porta e possa ser lida. de reações alérgicas ou se tiver algum ferimento. Utilize apenas peças de substituição originais. Pare os exercícios imediatamente se, durante Proteja o produto de temperaturas extremas, os exercícios, ocorrerem náuseas, mal-estar ou...
  • Page 65: Fixar O Produto Em Uma Coluna Ou Árvore

    Fixar o produto em uma coluna ou árvore Somente para resistência da corda unilateral Enganche o mosquetão em volta da corda elástica Para resistência em ambos os lados das cordas (veja Fig. BI / Passo 6.–7.): Puxe o laço do suporte para porta sobre o meio da corda elástica .
  • Page 66: Planejamento De Treinamento Geral

    Como iniciante, não treine de maneira muito - É recomendado fazer exercícios de alonga- intensiva e não exagere. Aumente vagarosa- mento antes de inciar o treino. mente a intensidade do treinamento. Faça todos os exercícios uniformemente. Evite Instruções de treinamento movimentos rápidos e brutos.
  • Page 67: Posições De Início

    Posições de início Movimente-se de toda posição de saída para longe do ponto de gancho para que durante o movimento exista uma resistência suficiente. Postura do corpo Fique de pé lateralmente Fique de pé com as costas Fique de pé em frente do em relação ao ponto de para o ponto de gancho.
  • Page 68: Como Eu Faço Unidades De Treinamento Mais Fáceis Ou Difíceis

    Posição da mão Pega de mão padrão Pega de mão virada Como eu faço unidades de 1. Posição: com as costas para o ponto treinamento mais fáceis ou de gancho difíceis Pegue na barra de exercício com as mãos de maneira padrão.
  • Page 69 3. Posição: lateralmente ao ponto de 6. Posição: de frente para o ponto de gancho gancho Pegue na barra de exercício com as mãos de Pegue na barra de exercício com as mãos de maneira padrão, a mão esquerda segura em maneira padrão.
  • Page 70: Conservação E Armazenamento

    Garantia 9. Posição: em pé na corda de resistência Pegue na barra de exercício com as mãos de maneira padrão. O producto foi cuidadosamente fabricado segundo Coloque os pés na posição de passo com o rigorosas directivas de qualidade e meticulosamente pé...
  • Page 72 Version: 12 / 2016 Stand der Informationen · Last Information Update · Version des informations · Stand van de informatie · Stav informací · Estado de las informaciones · Estado das informações: 01 / 2017 · Ident.-No.: HG02128B012017-8 IAN 282674...

Table des Matières