Table des Matières
Publicité
Les langues disponibles
Les langues disponibles
Liens rapides
ACS 863-OE
A/C service unit
de Schnellanleitung
en Quick start guide
es Guía de inicio rápido
fr Guide de démarrage rapide
it Guida rapida
pt Guia rápido
Klimaservicegerät
A/C service-unit
Aparato de servicios de aire acondicionado
Appareil de SAV pour climatiseur
Attrezzatura per assistenza climatizzatore
Aparelho de manutenção de sistemas de ar condicionado
Publicité
Table des Matières

Manuels Connexes pour Bosch ACS 863-OE


Sommaire des Matières pour Bosch ACS 863-OE
- Page 1 ACS 863-OE A/C service unit de Schnellanleitung Klimaservicegerät en Quick start guide A/C service-unit es Guía de inicio rápido Aparato de servicios de aire acondicionado fr Guide de démarrage rapide Appareil de SAV pour climatiseur it Guida rapida Attrezzatura per assistenza climatizzatore pt Guia rápido...
-
Page 3: Auspacken Und Installation
Auspacken und Installation | ACS 863-OE | 3 | Auspacken und Installation Falls die Service-Schlauchleitungen nicht gebraucht werden, können sie auf der Rückseite von Zubehörteile auspacken ACS 863-OE aufgewickelt werden. Ölbehälter und UV-Kontrastmittelbe- hälter anschließen Es dürfen nur UV-Kontrastmittel und Öle verwendet werden, die vom Fahrzeughersteller freigegeben sind. -
Page 4: Gerätebeschreibung
| 4 | ACS 863-OE | Gerätebeschreibung 6. Die Behälter im vorderen Teil von ACS 863-OE in der in der Abbildung gezeigten Reihenfolge un- terbringen. Um sie richtig zu befestigen, immer sicherstellen, dass sie jeweils zum entsprechenden Bügel/Anschluss ausgerichtet sind. Die einzelnen Behälter gradlinig zur ACS 863-OE eindrücken. -
Page 5: Sprache Wählen
2. Mit die Einstellung übernehmen. Abb. 7: Kontrolle des Ölstands der Vakuumpumpe 1 Öffnung auf der Rückseite von ACS 863-OE zur Kontrolle des Maßeinheit wählen Ölstands über das Kontrollfenster Eingabe der anzuzeigenden Maßeinheiten. Als Default- wert gelten die metrischen Maßeinheiten. - Page 6 Mit der Pfeiltaste kann der Cursor verstellt werden. teaktivierung wieder verwendet werden. Um einen Wert einzugeben, das Tastenfeld verwenden. 1. Hauptmenü aufrufen. 1. Auf ACS 863-OE werden die Felder angezeigt, über wählen. die die gewünschte Nachfüllmenge, die einfüllbare wählen. Menge und die aus der internen Kältemittelflasche 4.
-
Page 7: Unpacking And Installation
Unpacking and installation | ACS 863-OE | 7 | Unpacking and installation Install of oil and UV dye bottles Unpacking the accessories kit Only use UV contrast liquids and oils that are approved by the vehicle manufacturer. This prevents chemical incompatibility with the station internal components. -
Page 8: Description Of The Equipment
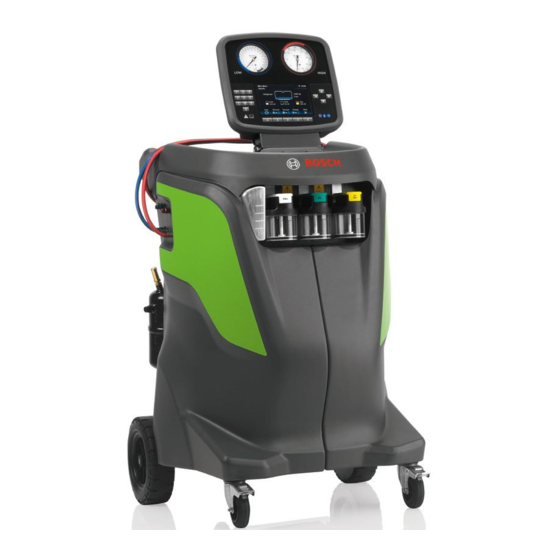
| 8 | ACS 863-OE | Description of the equipment Description of the equipment 1 2 3 Fig. 5: ACS 863-OE Fig. 6: ACS 863-OE 1 Low pressure (LP) gauge 1 N2H2 or N2 max input port 14 bar (1.4 MPa) -
Page 9: Initial Settings
Initial settings | ACS 863-OE | 9 | Initial settings Print header change The information loaded in Print header change will Turning on the station appear on each print. 1. Connect the power cable to the socket on the 1. Enter the text using the arrow buttons and the... -
Page 10: Tank Filling
| 10 | ACS 863-OE | Initial settings Tank filling Unit activation This procedure transfers refrigerant from an external Failure to register and activate the station within tank to the station internal tank. The operational 30 days of initial start-up causes the station to lock capacity of the internal tank is 17.4 kg. - Page 11 Desembalaje y instalación | ACS 863-OE | 11 | Desembalaje y instalación Instalación de los depósitos de aceite y líquido de contraste UV Desembalaje del kit de accesorios Utilizar sólo líquidos de contraste UV y aceites ho- mologados por el fabricante del vehículo. De esta manera se previene la incompatibilidad química...
-
Page 12: Descripción Del Aparato
| 12 | ACS 863-OE | Descripción del aparato 6. Colocar los depósitos en el área frontal de la esta- ción en el orden indicado en la figura. Para fijarlos asegurarse de la correcta alineación de cada uno con la respectiva brida y ejercer una leve presión rectilínea hacia la estación. -
Page 13: Ajustes Iniciales
Ajustes iniciales | ACS 863-OE | 13 | Ajustes iniciales Modificación del encabezamiento de impresión Encendido de la estación La información cargada en Modificación del encabeza- 1. Conectar el cable de alimentación a la toma en la miento de impresión aparece en todas las impresiones. -
Page 14: Llenado Del Depósito
| 14 | ACS 863-OE | Ajustes iniciales Llenado del depósito Activación unidad Con este procedimiento el refrigerante se transfiere de La falta de registro y activación de la estación en un depósito externo al depósito interno de la estación. -
Page 15: Déballage Et Installation
Déballage et installation | ACS 863-OE | 15 | Déballage et installation Installation des réservoirs d'huile et du liquide de contraste UV Déballage du kit d'accessoires Utiliser uniquement des liquides de contraste UV et des huiles homologués par le fabricant du véhicule. -
Page 16: Description De L'appareil
| 16 | ACS 863-OE | Description de l'appareil 6. Positionner les réservoirs dans la zone frontale de la station réservée à cet effet en respectant l'ordre indiqué sur la figure. Pour les fixer, vérifier que chacun est bien aligné sur la bride/le raccord correspondant et exercer une légère pression dans... -
Page 17: Réglages Initiaux
Réglages initiaux | ACS 863-OE | 17 | Réglages initiaux Modification de l'en-tête d'impression Les informations saisies dans « Modification de l'en-tête Allumage de la station d'impression » apparaîtront sur chaque impression. 1. Brancher le câble d'alimentation sur la fiche de 1. Saisir le texte à l'aide des touches flèches et de la station et sur une prise électrique dotée d'une... -
Page 18: Remise À Niveau Du Réservoir
| 18 | ACS 863-OE | Réglages initiaux Remise à niveau du réservoir Activation de la station Cette procédure transfère le réfrigérant d'un réservoir L'absence d'enregistrement et d'activation de la sta- tion dans les 30 jours suivant la mise en marche ini- externe au réservoir interne de la station. - Page 19 Disimballo e installazione | ACS 863-OE | 19 | Disimballo e installazione Installazione dei serbatoi dell'olio e del liquido di contrasto UV Disimballo del kit accessori Utilizzare solo liquidi di contrasto UV ed olii che sono omologati dal produttore del veicolo. In que- sto modo si impediscono incompatibilità...
-
Page 20: Descrizione Dell'apparecchio
| 20 | ACS 863-OE | Descrizione dell'apparecchio 6. Posizionare i serbatoi nell'apposita area frontale della stazione nell'ordine indicato in figura. Per fissarli assicurarsi del corretto allineamento di cia- scuno con la rispettiva staffa/raccordo ed effettua- re un leggera pressione in senso rettilineo verso la stazione. -
Page 21: Impostazioni Iniziali
Impostazioni iniziali | ACS 863-OE | 21 | Impostazioni iniziali Modifica intestazione stampa Le informazioni caricate in Modifica intestazione stam- Accensione della stazione pa compariranno su ogni stampata. 1. Collegare il cavo di alimentazione alla presa sulla 1. Inserire il testo utilizzando i pulsanti freccia e l'in-... - Page 22 | 22 | ACS 863-OE | Impostazioni iniziali Rabbocco del serbatoio Attivazione unità Questa procedura trasferisce refrigerante da un La mancata registrazione e attivazione della stazione serbatoio esterno al serbatoio interno della stazione. entro 30 giorni dall'avviamento iniziale causano La capacità operativa del serbatoio interno è di il bloccaggio della stazione e l'impossibilità...
- Page 23 Desembalar e instalação | ACS 863-OE | 23 | Desembalar e instalação Instalação dos depósitos do óleo e do líquido de contraste UV Desembalar o kit de acessórios Utilize apenas líquidos de contraste UV e óleos que sejam homologados pelo fabricante do veículo.
-
Page 24: Descrição Do Aparelho
| 24 | ACS 863-OE | Descrição do aparelho 6. Posicione os depósitos na respetiva área frontal da estação na ordem indicada na figura. Para os fixar, certifique-se do alinhamento correto de cada um deles com o respetivo suporte/união e exerça uma ligeira pressão em sentido retilíneo para a estação. -
Page 25: Definições Iniciais
Definições iniciais | ACS 863-OE | 25 | Definições iniciais Modificação do cabeçalho de impres- são Ligar a estação As informações carregadas na Modificação do cabeça- 1. Ligue o cabo de alimentação à tomada situada na lho de impressão aparecerão em cada impressão. -
Page 26: Ativação Da Unidade
| 26 | ACS 863-OE | Definições iniciais Enchimento do depósito Ativação da unidade Este procedimento transfere refrigerante de um depósito Não registar e ativar a estação no espaço de 30 dias externo ao depósito interno da estação. A capacidade após o arranque inicial causa o bloqueio da estação e operativa do depósito interno é... - Page 28 Robert Bosch GmbH Automotive Service Solutions www.boschaftermarket.com Franz-Oechsle-Straße 4 73207 Plochingen DEUTSCHLAND bosch.prueftechnik@bosch.com http://www.downloads.bosch-automotive.com 1 689 989 500 | 2020-12-01...