Panasonic CF-VDW07 Mode D'emploi

Panasonic CF-VDW07 Mode D'emploi

Ecran déporté sans fil
Table des Matières

Publicité

Les langues disponibles

Les langues disponibles

Liens rapides

DEUTSCH
FRANÇAIS
All manuals and user guides at all-guides.com
Ecran Déporté Sans Fil
OPERATING INSTRUCTIONS
Names and Functions of Parts .......................... 14
Starting Up/Shutting Down ................................ 16
Touchscreen ....................................................... 18
Software Keyboard ............................................ 21
Battery Power ..................................................... 23
Setting the Wireless Display ............................. 27
Capturing the Screen ......................................... 31
Troubleshooting ................................................. 32
Specifications ..................................................... 33
BEDIENUNGSANLEITUNG
Starten/Abschalten ............................................ 38
Software-Tastatur ............................................... 43
Batteriestrom ...................................................... 45
Bildschirmerfassung .......................................... 53
Störungsbeseitigung ......................................... 54
Technisch Daten ................................................ 55
MODE D'EMPLOI
Noms et fonctions des pièces........................... 58
Mise en marche/Arrêt ......................................... 60
Ecran tactile ........................................................ 62
Clavier logiciel .................................................... 65
Alimentation par batterie ................................... 67
Capture de l'écran .............................................. 75
Dépannage .......................................................... 76
Spécifications ..................................................... 77
Wireless Display
Drahtloses Display
CF-VDW07
OPERATING INSTRUCTIONS
BEDIENUNGSANLEITUNG
MODE D'EMPLOI
®
E
G
F

Publicité

Table des Matières
loading

Sommaire des Matières pour Panasonic CF-VDW07

  • Page 1: Table Des Matières

    All manuals and user guides at all-guides.com ® Wireless Display Drahtloses Display Ecran Déporté Sans Fil CF-VDW07 OPERATING INSTRUCTIONS BEDIENUNGSANLEITUNG MODE D’EMPLOI ENGLISH OPERATING INSTRUCTIONS Names and Functions of Parts ......14 Starting Up/Shutting Down ........ 16 Touchscreen ............18 Software Keyboard ..........
  • Page 2: Information To The User

    All manuals and user guides at all-guides.com Information to the User This product and your Health This product, like other radio devices, emits radio frequency electromagnetic energy. The level of energy emitted by this product however is far much less than the electromagnetic energy emitted by wireless devices like for example mobile phones.
  • Page 3: Informationen Für Den Benutzer

    All manuals and user guides at all-guides.com Informationen für den Benutzer Dieses Produkt und Ihre Gesundheit Wie viele andere Radiogeräte strahlt auch dieses Gerät hochfrequente elektromagnetische Energie aus. Jedoch ist der Pegel der von diesem Gerät ausgestrahlten Energie viel niedriger als die elektromagnetische Energie, die von drahtlosen Geräten, wie zum Beispiel Mobiltelefonen, ausgestrahlt wird.
  • Page 4: Informations Destinées À L'utilisateur

    All manuals and user guides at all-guides.com Informations destinées à l’utilisateur Cet appareil et votre santé Cet appareil, comme les autres dispositifs radio, émet une énergie électromagnétique de fréquence radio. Le niveau d’énergie émis par cet appareil est cependant bien inférieur à l’énergie électromagnétique émise par certains dispositifs sans fil comme ,par exemple, les téléphones portables.
  • Page 5: For Canada

    This product uses one or more fluorescent ceiver is connected. lamps containing a small amount of mercury. Consult the Panasonic Service Center or an It also contains lead in some components. experienced radio/TV technician for help. Disposal of these materials may be regulated...
  • Page 6: Important

    If you lose the fuse cover the plug must not be used until a replacement cover is obtained. A replacement fuse cover can be purchased from your local Panasonic Dealer. IF THE FITTED MOULDED PLUG IS UNSUITABLE FOR THE SOCKET OUTLET IN YOUR HOME THEN THE FUSE SHOULD BE REMOVED AND THE PLUG CUT OFF AND DISPOSED OF SAFELY.
  • Page 7 All manuals and user guides at all-guides.com Precautions (Battery Pack) Do Not Put into a Microwave Care should be exercised with regard to the Do not put the battery pack into a following in order to avoid the possibility microwave oven or a pressurized of overheating, fire, or damage.
  • Page 8 United States and/or other countries. RSA BSAFE Crypto-C of RSA Security Inc. has been installed. BSAFE and RSA are registered trademarks of RSA Security Inc. in the United States and other countries. Panasonic ® is a registered trademark of Matsushita Electric Industrial Co., Ltd.
  • Page 9 All manuals and user guides at all-guides.com Vorsichtsmaßnahmen (Batteriepackung) In Bezug auf Folgendes ist mit Vorsicht Nicht in einen Mikrowellenofen vorzugehen, um die Möglichkeit einer legen Überhitzung des Gerätes, eines Brandes bzw. Die Batteriepackung nicht in einen einer Beschädigung des Gerätes zu vermeiden. Mikrowellenofen oder eine Druckkammer legen.
  • Page 10 Die Anwendung RSA BSAFE Crypto-C der Firma RSA Security Inc. ist in diesem Gerät installiert. BSAFE und RSA sind eingetragene Warenzeichen der Firma RSA Security Inc. in den USA und in anderen Ländern. Panasonic ist ein eingetragenes Warenzeichen der Firma Matsushita Electric Industrial Co., Ltd. ®...
  • Page 11: Précautions Concernant La Batterie

    All manuals and user guides at all-guides.com Précautions concernant la batterie Ne mettez pas la batterie dans Respectez attentivement les consignes un four à micro-ondes suivantes afin d’éviter la possibilité de Ne mettez pas la batterie dans un surchauffe, d’incendie ou de dégât. four à...
  • Page 12: Précaution

    États-Unis et/ou dans d’autres pays. RSA BSAFE Crypto-C de RSA Security Inc. a été installé. BSAFE et RSA sont des marques déposées de RSA Security Inc. aux Etats-Unis et dans d’autres pays. Panasonic est une marque déposée de Matsushita Electric Industrial Co., Ltd. ®...
  • Page 13: English

    ENGLISH All manuals and user guides at all-guides.com Thank you for purchasing the wireless display for the Panasonic toughbook computer se- ries. This wireless display features a touchscreen function, which makes computer operation possible by simply touching the surface of the wireless display.
  • Page 14: Names And Functions Of Parts

    All manuals and user guides at all-guides.com Names and Functions of Parts <Front> Power Switch R-Button R-BUTTON page 18 Menu Button MENU page 27 Capture Button CAPTURE page 31 LED Indicator Battery pack status page 23 Power status Not lit: Power off Green: Power on <Attaching the strap>...
  • Page 15: Battery Pack

    All manuals and user guides at all-guides.com <Bottom> DC-IN 15.6V DC-IN Jack Serial Port Battery Pack page 25 Stylus <Removing the stylus> NOTE When using the serial port of the wireless display, match the COM port number to the number that is displayed in [WDSP COM Port (COMx)] under [Ports (COM & LPT)] (in [Start] - [Settings] - [Control Panel] - [System]*- [Device Manager]).
  • Page 16: Starting Up/Shutting Down

    All manuals and user guides at all-guides.com Starting Up/Shutting Down Starting Up NOTE About the First-time Operation <When using the CF-07 series computer> Operating Instructions of the computer <When using except the CF-07 series computer> Operating Instructions of the Wireless Display Interface Kit CAUTION Do not maximize the MS-DOS screen.
  • Page 17: Shutting Down

    All manuals and user guides at all-guides.com Turn on your computer Operating Instructions of the computer) <When using the CF-07 series computer> After confirming the display Power status indicator has lit, turn on Indicator the wireless display <When using except the CF-07 series Power computer>...
  • Page 18: Touchscreen

    All manuals and user guides at all-guides.com Touchscreen The wireless display is equipped with a touchscreen function allowing you to perform the same operations as the mouse by touching the surface of the display with the stylus. Moving the cursor Clicking Cursor One tap...
  • Page 19 All manuals and user guides at all-guides.com CAUTION The touchscreen function can not be used in the MS-DOS mode and when using the full screen in [MS-DOS prompt]. Handling the Touchscreen Use the stylus included with the wireless display. Do not use an implement other than the stylus that comes with the computer.
  • Page 20 All manuals and user guides at all-guides.com Touchscreen Calibration Define the calibration setup when the cursor, the stylus (included) touches do not appear to agree. Press Menu button Select [Option] Select [Calibration] Touch the five “×” marks on the calibration screen. Menu Button ×...
  • Page 21: Software Keyboard

    The software keyboard will no longer start up automati- cally if is selected to close the keyboard. In this case, it can be restarted by selecting [Start] - [Programs] - [Panasonic] - [Software Keyboard]. The system menus is displayed. ( page 22) The software keyboard will be moved to the four corners of the screen.
  • Page 22 All manuals and user guides at all-guides.com Software Keyboard NOTE If you want to press short cut key, after pressing one key, press the second key in a continuous manner. For example, if you want to type Ctrl + C , after pressing Ctrl , press C .
  • Page 23: Battery Power

    Battery pack or charger may not be working properly. Quickly remove the battery pack and disconnect the AC adaptor, then connect them again. If the problem persists, contact Panasonic Technical Support. Blinking orange* Unable to recharge due to violation of temperature limits.
  • Page 24: Menu Button

    All manuals and user guides at all-guides.com Battery Power Getting a detailed reading Press Menu button Select [Battery] page 28) Menu Button NOTE The actual remaining battery capacity and the displayed indication may differ. • The battery indicator light remains red. •...
  • Page 25: Replacing The Battery Pack

    All manuals and user guides at all-guides.com Replacing the Battery Pack When the charge provided by your battery pack is supplied for only a short period of time, even after fully charging according to the instructions, it may be time to replace your battery pack.
  • Page 26: Charging The Battery Pack

    All manuals and user guides at all-guides.com Battery Power Inserting a battery pack Firmly attach the battery pack to the connector. CAUTION Be sure to insert the battery pack as illus- Connector trated. Be sure to the battery pack is properly con- nected to the connector.
  • Page 27: Setting The Wireless Display

    All manuals and user guides at all-guides.com Setting the Wireless Display You can establish the settings for the wireless display. Press Menu button The setting menus are displayed. Menu Button General Menu By selecting [General], you can change between the mode setting and the backlight off/ low/high setting.
  • Page 28: Battery Menu

    All manuals and user guides at all-guides.com Setting the Wireless Display Wireless Menu By selecting [Wireless], the wireless settings (for connection with the computer) and current state are displayed (cannot be changed). General Wireless Battery Option Version Network Type : AdHoc SSID : cfvdw07-xxxxx Channel : 10 TxRate mode : Fully Automatic...
  • Page 29: Option Menu

    All manuals and user guides at all-guides.com Option Menu By selecting [Option], you can establish the individual settings for the wireless display. Change the settings of the wireless connection. Default settings Change the password when the General Wireless Battery Option Version wireless display is starting up.
  • Page 30 Setting the Wireless Display Version Menu By selecting [Version], the version information will be displayed. General Wireless Battery Option Version Model No. : CF-VDW07 Firmware : Vx.xxLxx Wireless Controller : 00. 08. 03. 00 Serial No. : xxxxxxxx Cancel 100% Excellent...
  • Page 31: Capturing The Screen

    All manuals and user guides at all-guides.com Capturing the Screen If you want to playback the currently displayed screen later, you can save the screen data onto the memory (up to 100 images)*. * The number of the data that can be saved is different according to the image.
  • Page 32: Troubleshooting

    “ I n i t i a l i m a g e not. receiving timeout” is Restart the computer. displayed Software keyboard has Select [Start] - [Programs] - [Panasonic] - [Software been closed Keyboard]. An afterimage appears High-precision and advanced technologies are necessary (i.e., green, red, and blue...
  • Page 33: Specifications

    All manuals and user guides at all-guides.com Specifications Model No. CF-VDW07 Type 8.4 Type (TFT) Displayed Colors 256 colors (800 × 600 dots) Touchscreen Anti-Reflection, Stylus (included) touch capable Interface Serial Port Dsub 9-pin male Battery Packs Li-ion 7.4 V, 1.7 Ah Operating Time* Approx.
  • Page 34 All manuals and user guides at all-guides.com Memo...
  • Page 35 DEUTSCH All manuals and user guides at all-guides.com Vielen Dank für den Kauf des drahtlosen Displays für den Computer der Reihe Panasonic Toughbook. Dieses drahtlose Display bietet eine Touchscreen-Funktion, die die Bedienung des Comput- ers einfach durch die Berührung des berührungsempfindlichen Bildschirms des drahtlosen Displays ermöglicht.
  • Page 36: Bezeichnungen Und Funktionen Der Teile

    All manuals and user guides at all-guides.com Bezeichnungen und Funktionen der Teile <Vorderseite> LCD-Bildschirm Ein/Aus- Schalter R-Taste R-BUTTON Seite 40 Menü-Taste MENU Seite 49 Erfassungstaste CAPTURE Seite 53 Betriebs-LED Batteriepackungs-Status Seite 45 Spannungs-Status Leuchtet nicht: Ausschaltzustand Grün: Einschaltzustand <Anbringen des Gurtes> Wählen Sie die gewünschten zwei Stellen Sie den Gurt auf seine Schraubenlöchern aus den folgenden...
  • Page 37 All manuals and user guides at all-guides.com <Unterseite> Gleichstrom-Eingangsbuchse Serieller Anschluß DC-IN 15.6V Batteriepackung Seite 47 Stift <Entfernen des Stifts> HINWEIS Bei Verwendung des seriellen Anschlusses des drahtlosen Displays, achten Sie darauf, daß die Nummer des COM-Anschlusses mit der Nummer übereinstimmt, die in [WDSP COM Port (COMx)] unter [Anschlüsse (COM und LPT)] (in [Start]-[Einstellungen]- [Systemsteuerung]-[System]*-[Geräte-Manager]) angezeigt wird.
  • Page 38: Starten/Abschalten

    All manuals and user guides at all-guides.com Starten/Abschalten Starten HINWEIS Über die erstmalige Inbetriebnahme <Bei Verwendung eines Computers der Reihe CF-07> Bedienungsanleitung des Computers <Bei Verwendung eines Computers, der nicht zur Reihe CF-07 gehört> Bedienungsanleitung des Schnittstellen-Bausatzes des drahtlosen Displays VORSICHT Maximieren Sie den MS-DOS-Bildschirm nicht.
  • Page 39 All manuals and user guides at all-guides.com Schalten Sie Ihren Computer ein Bedienungsanleitung des Computers) <Bei Verwendung eines Computers der Reihe CF-07> N a c h d e m S i e s i c h d a v o n Stromanzeige überzeugt haben, dass die Displaystatusanzeige leuchtet,...
  • Page 40: Berührungsempfindlicher Bildschirm

    All manuals and user guides at all-guides.com Berührungsempfindlicher Bildschirm Das drahtlose Display ist mit einem berührungsempfindlichen Bildschirm ausgestattet, der Ihnen die Durchführung der selben Bedienungsvorgänge wie eine Maus ermöglicht, indem Sie statt dessen die Display-Oberfläche mit dem Stift berühren. Bewegen des Cursors Klicken Einmal antippen Cursor...
  • Page 41 All manuals and user guides at all-guides.com VORSICHT Die Touchscreen-Funktion kann im MS-DOS-Modus und bei Wahl des vollen Bildschirms im Fenster [MS-DOS-Eingabeaufforderung] nicht verwendet werden. Hinweise zur Handhabung des berührungsempfindlichen Bildschirms Den mitgelieferten Stift für das drahtlose Display verwenden. Für dieses Display sollte nur der mit dem Computer mitgelieferte Stift verwendet werden.
  • Page 42 All manuals and user guides at all-guides.com Berührungsempfindlicher Bildschirm Kalibrierung Bestimmen Sie die Kalibrierungseinstellung, wenn der Cursor und die Berührung durch den (mitgelieferten) Stift nicht übereinstimmen. Drücken Sie die Menü-Taste Wählen Sie [Option] Wählen Sie [Calibration] Berühren Sie die fünf “x” Markierungen auf dem Kalibrierungsbildschirm.
  • Page 43: Software-Tastatur

    Das Software-Tastatur wird nämlich nicht mehr automatisch gestartet, falls sie durch Berühren von geschlossen wurde. In diesem Fall muss sie durch die Wahl von [Start] - [Programme] - [Panasonic] - [Software Keyboard] neu gestartet werden. Das System-Menü wird angezeigt. ( Seite 44) Die Software-Tastatur wird an die vier Ecken des Bildschirm verschoben.
  • Page 44 All manuals and user guides at all-guides.com Software-Tastatur HINWEIS Falls Sie die Kurzverfahrens-Taste drücken möchten, nachdem Sie eine Taste gedrückt haben, drücken Sie die zweite Taste in Aufeinanderfolge. Falls Sie beispielsweise Ctrl + C tippen möchten, drücken Sie die Taste C nach dem Drücken der Taste Ctrl .
  • Page 45: Batteriestrom

    Entfernen Sie die Batteriepackung umgehend, und trennen Sie den Netzadapter ab. Schließen Sie sie dann wieder an. Falls das Problem weiterhin besteht, wenden Sie sich an eine Panasonic- Kundendienststelle. Blinkt orange* Die Batteriepackung kann nicht geladen werden, da die Temperatur die zulässigen Grenzwerte überschritten hat.
  • Page 46 All manuals and user guides at all-guides.com Batteriestrom Um ein genaues Ablesen zu ermöglichen Drücken Sie die Menü-Taste Wählen Sie [Battery] Seite 50) Menü-Taste HINWEIS Die tatsächlich verbleibende Batterieladung und die angezeigte Ladung können verschieden sein. • Die Batterie-Anzeigeleuchte bleibt rot. •...
  • Page 47 All manuals and user guides at all-guides.com Ersetzen der Batteriepackung Wenn die Batteriepackung nach kurzer Zeit nicht mehr ausreichend Strom liefert, selbst nachdem es vorschriftsgemäß voll geladen wurde, muss es möglicherweise ersetzt werden. Die Batteriepackung ist ein Verbrauchsteil und muss daher von Zeit zu Zeit durch eine andere Batteriepackung (CF-VZSU21) ersetzt werden.
  • Page 48 All manuals and user guides at all-guides.com Batteriestrom Einsetzen einer Batteriepackung Befestigen Sie die Batteriepackung sicher an der Anschlussklemme an. VORSICHT Achten Sie darauf, die Batteriepackung wie Anschlussstecker gezeigt einzuführen. Lasche Achten Sie darauf, dass die Batteriepackung r i c h t i g a n d i e A n s c h l u s s k l e m m e angeschlossen ist.
  • Page 49: Einstellen Des Drahtlosen Displays

    All manuals and user guides at all-guides.com Einstellen des drahtlosen Displays Sie können die Einstellungen für das drahtlose Display durchführen. Drücken Sie die Menü-Taste Die Einstellungsmenüs werden angezeigt. Menü-Taste “General”-Menü Indem Sie [General] wählen, können Sie zwischen der Modus-Einstellung und einer der Einstellungen der Hintergrundbeleuchtung umschalten, nämlich: Aus, Niedrig, Hoch.
  • Page 50 All manuals and user guides at all-guides.com Einstellen des drahtlosen Displays “Wireless”-Menü Indem Sie [Wireless] wählen, werden die Einstellung für den drahtlosen Anschluss (an den Computer) und der aktuelle Zustand angezeigt (dies kann nicht geändert werden). General Wireless Battery Option Version Network Type : AdHoc SSID : cfvdw07-xxxxx...
  • Page 51 All manuals and user guides at all-guides.com “Option”-Menü Indem Sie [Option] wählen, können Sie die einzelnen Einstellungen für das drahtlose Display durchführen. Zum Ändern der Einstellungen des drahtlosen Anschlusses Einstellungsvorgaben Zum Ändern des Passwortes, wenn das drahtlose Display eingeschaltet wird. General Wireless Battery Option...
  • Page 52 Einstellen des drahtlosen Displays “Version”-Menü Indem Sie [Version] wählen, wird die Versions-Information angezeigt. General Wireless Battery Option Version Model No : CF-VDW07 Firmware : Vx.xxLxx Wireless Controller : 00. 08. 03. 00 Serial No. : xxxxxxxx Cancel 100% Excellent Dieser Bildschirm dient als Muster.
  • Page 53: Bildschirmerfassung

    All manuals and user guides at all-guides.com Bildschirmerfassung Falls Sie den gegenwärtig angezeigten Bildschirm später wiedergeben möchten, können Sie die Bildschirmdaten speichern (bis zu 100 Bilder)*. * Die Anzahl der Daten, die gespeichert werden können, ist je nach Bild verschieden. Drücken Sie die Erfassungstaste Erfassungstaste Der gegenwärtig angezeigte Bildschirm wird gespeichert...
  • Page 54: Störungsbeseitigung

    Anwendungsprogramm in Verbindung steht, bitte auch im Handbuch des betreffenden Programms nachschlagen. Lässt sich eine Störung anhand der Hinweise der Tabelle nicht beseitigen, bitte Kontakt mit dem Panasonic-Kundendienst aufnehmen. Keine Bildschirmanzeige Wurde der Computer oder das drahtlose Display auf...
  • Page 55: Technisch Daten

    All manuals and user guides at all-guides.com Technisch Daten Modell-Nr. CF-VDW07 LCD- 8,4-Typ (TFT) Bildschirm Angezeigte Farben 256 Farben (800 x 600 Bildpunkte) Berührungsempfindlicher Antireflex, berührbar mit dem Stift (mitgeliefert) Bildschirm Schnittstelle Serieller Port 9-polige D-sub-Stiftbuchse Batteriepackung Li-Ion 7,4 V, 1,7 Ah Betriebszeit* Ca.
  • Page 56 All manuals and user guides at all-guides.com Memo...
  • Page 57 All manuals and user guides at all-guides.com Nous vous remercions d’avoir porté votre choix sur l’écran déporté sans fil pour la série d’ordinateurs Toughbook Panasonic. Cet écran déporté sans fil comporte une fonction d’écran tactile qui permet une utilisation de l’ordinateur en touchant simplement la surface de l’écran déporté...
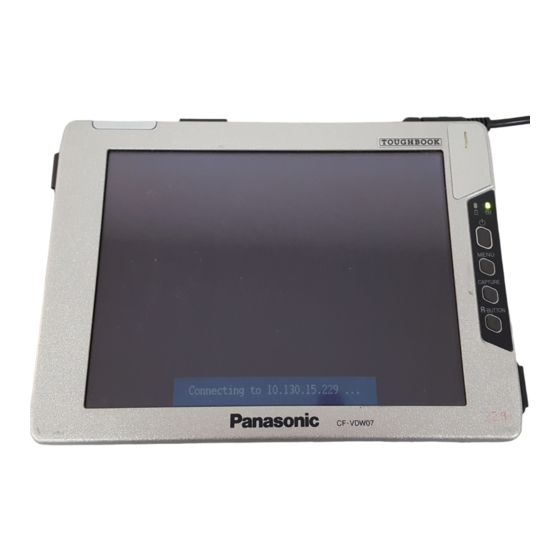
  • Page 58: Noms Et Fonctions Des Pièces

    All manuals and user guides at all-guides.com Noms et fonctions des pièces <Deavant> Écran LCD Commutateur d’alimentation Bouton R R-BUTTON page 62 Bouton Menu MENU page 71 Bouton Capture CAPTURE page 75 Témoin à DEL Etat de la batterie page 67 Etat d’alimentation Eteint: Appareil hors tension Vert: Appareil en marche...
  • Page 59 All manuals and user guides at all-guides.com <Dessous> DC-IN 15.6V Prise DC-IN Port Série Batterie page 69 Stylet <Retrait du stylet> REMARQUE Lorsque vous utilisez le port série de l’écran déporté sans fil, faites concorder le numéro du port COM avec le numéro qui est affiché dans [WDSP COM Port (COMx)] de [Ports (COM et LPT)] (dans [Démarrer] - [Paramètres] - [Panneau de configuration] - [Système]* - [Gestionnaire de périphériques]).
  • Page 60: Mise En Marche/Arrêt

    All manuals and user guides at all-guides.com Mise en marche/Arrêt Mise en marche REMARQUE Lors de la première utilisation <Lors de l’utilisation d’un ordinateur de la série CF-07> Mode d’emploi de l’ordinateur <Lors de l’utilisation d’un ordinateur autre que de la série CF-07> Mode d’emploi du kit d’interface d’écran déporté...
  • Page 61: Affichez L'écran D'arrêt

    All manuals and user guides at all-guides.com Mettez votre ordinateur sous tension. Mode d’emploi de l’ordinateur) <Lors de l’utilisation d’un ordinateur de la série CF-07> Après avoir vérifié que le Témoin témoin d’état d’écran est d’alimentation allumé, mettez l’écran déporté sans fil sous tension.
  • Page 62: Ecran Tactile

    All manuals and user guides at all-guides.com Ecran tactile L’écran déporté sans fil est équipé d’une fonction d’écran tactile qui vous permet d’effectuer les mêmes opérations que la souris en touchant la surface de l’écran avec le stylet. Déplacement du curseur Cliquage Curseur Tapotement simple...
  • Page 63: Manipulation De L'écran Tactile

    All manuals and user guides at all-guides.com ATTENTION La fonction d’écran tactile ne peut pas être utilisée en mode MS-DOS et lors de l’utilisation du plein écran dans [Invite MS-DOS]. Manipulation de l’écran tactile Utiliser le stylet fourni avec l’écran déporté sans fil. Ne pas utiliser d’objet autre que le stylet qui est fourni avec l’ordinateur.
  • Page 64: Appuyez Sur Le Bouton Menu

    All manuals and user guides at all-guides.com Ecran tactile Etalonnage Définissez la configuration d’étalonnage lorsque le curseur et les touchers du stylet (fourni) paraissent ne pas coïncider. Appuyez sur le bouton Menu Sélectionnez [Option] Sélectionnez [Calibration] Touchez les cinq marques “x” sur l’écran d’étalonnage. Bouton R ×...
  • Page 65: Clavier Logiciel

    Le clavier logiciel ne démarre plus automatiquement si sélectionné pour le fermer. Dans ce cas, il peut être redémarré en sélectionnant [Démarrer] - [Programmes] - [Panasonic] - [Software Keyboard]. Le menu de système est affiché. ( page 66) Le clavier logiciel est déplacé...
  • Page 66: Lorsque Vous Appuyez Sur Ctrl + Alt + Suppr

    All manuals and user guides at all-guides.com Clavier logiciel REMARQUE Si vous voulez appuyer sur une touche de raccourci, après avoir appuyé sur une touche, appuyez sur la seconde de manière continue. Par exemple, si vous voulez utiliser Ctrl + C , appuyez sur Ctrl puis sur C . Si un clavier externe est connecté...
  • Page 67: Alimentation Par Batterie

    La batterie ou le chargeur peut ne pas fonctionner correctement. Retirez la batterie et déconnectez l’adaptateur secteur rapidement, puis connectez-les de nouveau. Si le problème persiste, contactez le Support technique Panasonic. Orange clignotant* Recharge impossible du fait d’une violation des limites de température.
  • Page 68 All manuals and user guides at all-guides.com Alimentation par batterie Pour obtenir une indication détaillée Appuyez sur le bouton Menu Sélectionnez [Battery] page 72) Bouton R REMARQUE La capacité de batterie réelle restant et l’indication affichée peuvent être différentes. • Le témoin de batterie reste allumé en rouge. •...
  • Page 69: Remplacement De La Batterie

    All manuals and user guides at all-guides.com Remplacement de la batterie Lorsque la charge fournie par votre batterie n’est disponible que pendant une courte période de temps, même après une charge complète conformément aux instructions, il peut être temps de remplacer votre batterie. La batterie est un élément consommable et il est donc nécessaire de la remplacer (CF-VZSU21).
  • Page 70: Introduction D'une Batterie

    All manuals and user guides at all-guides.com Alimentation par batterie Introduction d’une batterie Fixez fermement la batterie au connecteur. ATTENTION Assurez-vous d’introduire la batterie comme Connecteur illustré. A s s u r e z - v o u s q u e l a b a t t e r i e e s t Languette correctement raccordée au connecteur.
  • Page 71: Configuration De L'écran Déporté Sans Fil

    All manuals and user guides at all-guides.com Configuration de l'écran déporté sans fil Vous pouvez régler les paramètres pour l’écran déporté sans fil. Appuyez sur le bouton Menu Les menus de configuration s’affichent. Bouton Menu Menu General En sélectionnant [General], vous pouvez passer entre le paramètre de mode et le paramètre d’éclairage arrière désactivé/faible/fort.
  • Page 72: Menu Wireless

    All manuals and user guides at all-guides.com Configuration de l’écran déporté sans fil Menu Wireless En sélectionnant [Wireless], les paramètres de la fonction sans fil (pour la connexion à l’ordinateur) et l’état actuel sont affichés (ne peuvent pas être changés). General Wireless Battery Option...
  • Page 73: Menu Option

    All manuals and user guides at all-guides.com Menu Option En sélectionnant [Option], vous pouvez régler les paramètres individuels pour l’écran déporté sans fil. Changement des paramètres de la connexion sans fil. Paramètres par défaut Changement du mot de passe lorsque l’écran déporté sans fil General Wireless Battery Option...
  • Page 74: Menu Version

    Configuration de l’écran déporté sans fil Menu Version En sélectionnant [Version], les informations de version s’afficheront. General Wireless Battery Option Version Model No : CF-VDW07 Firmware : Vx.xxLxx Wireless Controller : 00. 08. 03. 00 Serial No. : xxxxxxxx Cancel 100% Excellent...
  • Page 75: Capture De L'écran

    All manuals and user guides at all-guides.com Capture de l’écran Si vous voulez voir plus tard l’écran actuellement affiché, vous pouvez enregistrer les données d’écran dans la mémoire (jusqu’à 100 images)*. * Le nombre de données qui peut être enregistré est différent selon les images.
  • Page 76: Dépannage

    En cas de problème, référez-vous à cette page. Si le problème semble lié à une application logicielle, lisez le manuel se rapportant au logiciel. Si vous n’arrivez toujours pas à remédier au problème, contactez le Support technique Panasonic. Aucun affichage après L’ordinateur ou l’écran déporté...
  • Page 77: Spécifications

    All manuals and user guides at all-guides.com Spécifications N° de modèle CF-VDW07 Écran LCD Type Type 8,4 (TFT) Couleurs affichées 256 colors (800 × 600 dots) Écran tactile Anti-reflets, capacité de toucher au stylet (fourni) Interface Port Série Mâle 9 broches D...
  • Page 78 All manuals and user guides at all-guides.com Mémo...
  • Page 79 All manuals and user guides at all-guides.com...
  • Page 80 All manuals and user guides at all-guides.com © 2001 Matsushita Electric Industrial Co., LTD. All Rights Reserved. Printed in Japan FJ0901-1101 DFQX5266ZB...

Table des Matières