
Manuels Connexes pour ATOMSTACK Cambrian Pro


Sommaire des Matières pour ATOMSTACK Cambrian Pro
- Page 1 AtomStack Cambrian Pro 3D printer user manual þEnglish þDeutsche þFrançais version:V1.1 Shenzhen AtomStack Technologies Co., Ltd. www.atomstack3d.com...
-
Page 2: Table Des Matières
Table of Contents 1. Precautions and Disclaimer 9.Printing File Preparation ........18 ......3 2. Device introduction 9.1 Slice files parameter introduction.......18 ........4 9.2 Creating the Slice files........19 3. Tools and accessories ......5 10.Inspection of Structure ......20 4. Pre-assembly inspection ......6 10.1 Printer inspection before printing......20 5. -
Page 3: Precautions And Disclaimer
AtomStack may establish. Shenzhen AtomStack Technology Co., Ltd. reserves the right to update this disclaimer and safety operation guide. AtomStack is not responsible for any and all losses caused by the user’s failure to use this product due to the user’s use of this product. -
Page 4: Device Introduction
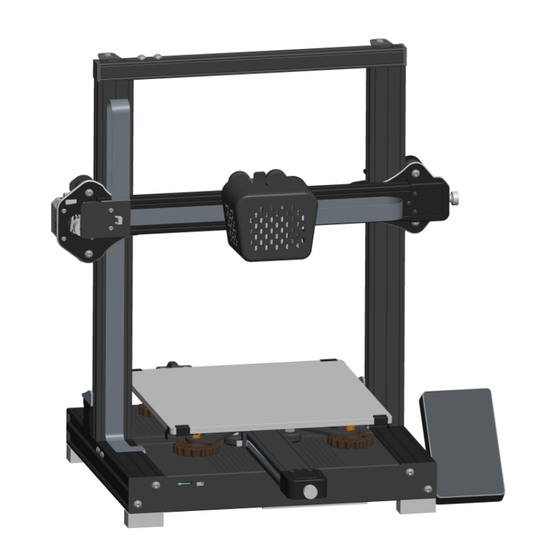
2.Device introduction Introduction Material Material bracket bracket Printer 235*235*250mm volume Power AC100~240V 50/60HZ AtomStack supply Operation Loading Ultimaker Cura X-Axis belt Software Extruder Handle adjustment (Pre-set E285 knob Support OS macOS、Windows&Linux extruder) Nozzle TF card slot at LCD X-Axis Eccentric nut... -
Page 5: Tools And Accessories
3.Tools and accessories TF memory card ding the printer object file and configuration instructioin video etc. Socket wrench for E285 printing extruder E175printing extruder replacement of for 2.85mm filament,0.8mm 1.75mmfilament,0.4mm nozzle nozzle.For TPR printing nozzle.For PLA,PETG printing hexagonal wrench TF card reader for assembling reading file Shovel... -
Page 6: Pre-Assembly Inspection
4. Pre-assembly inspection 1 . The power switch of 3D printer has two types of voltage mode, 2.we will set the positioning pin in order to keep the Z-axis part with the firm AC 115V & AC 230V, please switch to the suitable voltage to your position before package at the Z-axis.Please remove the position pin before electric circuit by manual at the bottom . -
Page 7: Structure Assembling
5. Structure assembling Step1 Z-Axis assembling Assembling parts 3.M5*44 screw*4PCS 1.Z-axis part(with E285) 2.Base G r o o v e Instruction 1.Put the Z-axis vertical into the groove at the base 2.Use 4pcs M5*44 screw to fasten from the bottom of base with the Z-axis... -
Page 8: Step2: Lcd Screen Assembling
5.2 Step2: LCD screen assembling Assembling Parts 1. LCD*1PCS 2. M5*14 screw*2PCS Instruction Fasten the LCD at the right of base with the screw 5*14... -
Page 9: Step3 Material Bracket Assembling
5.3 Step3 Material bracket assembling Assembling Parts 2.M5*14 screw*2PCS 1.bracket*1PCS Instruction Fasten the brack on the beam with M5*14 screw*2PCS... -
Page 10: Step4: Cable Connectivity
5.4 Step4: Cable connectivity E285 extruder Limitation switch motor at left FFC cable motor at right Limitation switch Vertically insert the cable into the port of base Power cable S w i t c h Z-axis motor Z-axis parts connectivity FFC connectivity connectivity Instruction... -
Page 11: Printing Extruder Replacement Method
6.Printing Extruder replacement Method( for E285/E175) 1.Remove the existing extruder 3.Insert the FFC wire into the new extruder There is 3pcs fixed screw at the back of extruder, use the hexagonal wrench to Carefully insert the FFC cable into the buckle, and press down the left and loosen the screw ( no need to remove ), and then take out the existing extruder. -
Page 12: Lcd Interface Introduction
7.LCD interface introduction 7.1 LCD button function introduce 1.Click the button to unfold or fold the menu list to set the parameter of printing temperature,heat bed temperature, fan speed etc by manual. 2.Click “Print”to select the object file you need to print, our printer is only available with “Gcode”format at present. 3.Click “Extruder”to set the material feeding and retreating by manual. -
Page 13: Software Configuration
• AtomStack Cambrian uses Marlin open-source firmware, so any object software that supports Marlin firmware can be compatible with Cambrian printers. Here, our global popular Ultimaker Cura software. Ultimaker Cura is an excellent open-source software that supports macOS, Windows, and Linux systems. -
Page 14: Step1: Material Configuration
"fdm_material" File and double-click the file name. enter the material management page Take TPR 60.xml.fdm_material as an example here. 3. Click "OK" in the pop-up window to complete the import of materials 4. You can see the imported materials under the "AtomStack" group in the list... -
Page 15: Step2: Slice Files Configuration
8.3 Step2: Slice files configuration 1. Under the "PREPARE" tab, click the parameter menu prompted by the 2. In the pop-up page, click the triangle shown by the number "1" to expand the number "2", and click the "Custom" button in the expanded page Sliced parameter list, and click the "Manager Profiles..."... -
Page 16: Printing File Preparation
9.Printing File Preparation 9.1 Slice files parameter introduction • After we finish the configuration of Ultimaker Cura, we get everything ready except the 3D printing file • Ultimaker Cura software supports 3D data formats in various formats such as .stl/.obj/.3mf/.poly. You can perform 3D modeling with your familiar modeling software, and then export the built model into these formats File. -
Page 17: Creating The Slice Files
9.2 Creating the Slice files 1. Under the "PREPARE" tab, click the Import button shown by the number "2", 2. After importing the model, if the model exceeds the printing boundary, the model and in the pop-up window, select the model you want to print and double-click will be gray. -
Page 18: Inspection Of Structure
10. Inspection of Structure 10.1 Printer inspection before printing • Before starting to print, we need to check the status of the device. Mainly to check the following points: • Whether the structure is loose, mainly to check whether the several rollers are loose after long-time transportation. •... -
Page 19: Scroll Wheel Inspection
10.2 Scroll wheel inspection Eccentric nut Eccentric nut Eccentric nut c: Z-axis roller detection and adjustment a: Inspection and adjustment of nozzle roller b: Heat bed roller detection and adjustment Rotate the nozzle gently (around the Y axis) by hand As shown in Figure 3, gently shake the hot bed from As shown in Figure 5, move the roller on the inner as shown in Figure 1, and observe whether the nozzle... -
Page 20: Transmission Belt Inspection
10.3 Transmission belt Inspection Adjustment Adjustment Knob Knob Belt inspection and adjustment Gently press the belts on the X-axis and Y-axis motors to feel the tightness of the belts. If the belt is in good condition, you will feel the obvious rebound force. If not, you need to adjust the belt. -
Page 21: Extruder Nozzle Cleaning
10.4 Extruder nozzle cleaning 1. Turn on the device, click to enter the "Extruder" page, expand the material 3. How to clean the E285 nozzle: push the feed handle above the nozzle, selection drop-down box, and select a material for preheating (select the material insert the through needle from above, and poke down with a certain force, used for the last printing, here is the TPR material as an example). -
Page 22: Levelling Adjustment
10.5 Levelling adjustment Levelling manual knob Levelling operation Click the number "1", the print head will reset and move the print head to the lower left corner of the heating bed. When leveling, insert the paper into the gap between the nozzle and the heating bed, and adjust the leveling hand wheel while pulling the Levelling Method paper back and forth. -
Page 23: Material Preparation
11.Material preparation 11.1 Prepare to load the material • Before you start printing, you need to prepare the required printing materials. The printing material should be the same as the material selected in the software when slicing, prevent the printing failure or unsatisfactory printing effect. •... -
Page 24: Loading The Material
11.2 Loading the material a:Trim the filament a:Trim the filament b:insert the filament into the extruder Trim the starting section of the filament to Trim the starting section of the filament to Push the feed handle and insert the filament the pointed end as shown in the picture to the pointed end as shown in the picture to c:Hang the material on the bracket... -
Page 25: Start Printing
12.Start printing a:Select the printing file b:Confirm the printer parameter c:Heat the heating bed d:Heat the nozzle Power on, insert the TF card into the Before starting to print, you need to After starting to print, the device will first When the heating bed is heated to the motherboard card slot at the front of confirm the printing information. -
Page 26: Finish Printing
13.Finish printing *Extruder Cleaning Now, congratulations on successfully completing the first print! But we need to develop a good habit. After each printing, we need to clean the print extruder, which can greatly extend the service life of your equipment. Support Base b:Removde the support base... - Page 27 For more details about our warranty policy, please visit our official website: www.atomstack3d.com Any technical support please send us email to: support@atomstack3d.com Manufacturer: Shenzhen AtomStack Technologies Co., Ltd Add: AB301, New Chabridge Industrial Park,No.3, Baolong 6 Rd., Longgang Dist.,Shenzhen Zip code 518116...
- Page 28 AtomStack Cambrian Bedienungsanleitung für 3D-Drucker þEnglish þDeutsche þFrançais Shenzhen AtomStack Technologies Co., Ltd. www.atomstack3d.com...
- Page 29 Inhaltsverzeichnis 1 .Vorsichtsmaßnahmen und Haftungsausschluss ..3 0 9.Vorbereitung der Druckdatei ......43 2 . G e r ä t e v o r s t e l l u n g ....... 3 1 9.1 Einführung in die Parameter für Slice-Dateien..43 3.Werkzeuge und Zubehör .
-
Page 30: Vorsichtsmaßnahmen Und Haftungsausschluss
Verluste, die durch die Nichtverwendung dieses Produkts durch den Benutzer aufgrund der Verwendung dieses Produkts durch den Benutzer verursacht werden. AtomStack hat das letzte Recht, die Dokumente zu interpretieren und die gesetzlichen Anforderungen einzuhalten. AtomStack behält sich das Recht vor, die Bedingungen... -
Page 31: Gerätevorstellung
2.Gerätevorstellung Materialhalt Materialhalt erung erung Einführung Druckerlautstär 235*235*250mm AtomStack Energieversorg AC100~240V 50/60HZ Ladegriff Einstellknopf Extruder für X-Achsen- (Voreingestellter Betriebssoftwa Gurt Ultimaker Cura Düse E285 Extruder) TF-Kartensteckplatz Betriebssystem X-Achse macOS、Windows&Linux am LCD unterstützen Exzentermutter Heizbett AtomStack Schalter TF-Kartensteckplatz USB- Nivellierungs- Einstellknopf für den... -
Page 32: Werkzeuge Und Zubehör
3.Werkzeuge und Zubehör TF-Speicherkarte E285 Druckextruder E175 Druckextruder 1,75 mm Steckschlüssel zum einschließlich der für 2,85 mm Filament, 0,8 mm Düse. Filament, 0,4 mm Düse. Für PLA-, Austausch der Düse Druckerobjektdatei und Für TPR-Druck PETG-Druck des Konfigurationsvideos usw. TF-Kartenleser Sechskantschlüssel Datei lesen Zusammenbauen Schaufel... -
Page 33: Inspektion Vor Der Montage
4. Inspektion vor der Montage 1.Der Netzschalter des 3D-Druckers verfügt über zwei Arten von 2. Wir stellen den Positionierungsstift ein, um den Z-Achsen-Teil in der festen Spannungsmodi, AC 115 V und AC 230 V. Bitte schalten Sie unten Position vor dem Paket an der X-Achse und Z-Achse zu halten. Bitte entfernen Sie manuell auf die geeignete Spannung für Ihren Stromkreis um. -
Page 34: Strukturmontage
5. Strukturmontage Schritt 1: Z-Achsen-Montage Teile zusammenbauen 1.Z-Achsen-Teil (mit E285) 2.Base 3.M5 * 44 Schraube * 4 STÜCKE R i l l e Anweisung 1.Setzen Sie die Z-Achse senkrecht in die Nut an der Basis 2.Verwenden Sie 4 Stück M5 * 44 Schrauben, um von der Unterseite der Basis mit der Z-Achse zu befestigen... -
Page 35: Schritt 2: Lcd-Bildschirm Zusammenbauen
5.2 Schritt 2: LCD-Bildschirm zusammenbauen Teile zusammenbauen 1. LCD*1STÜCKE 2. M5 * 14 Schraube * 2 STÜCKE Anweisung Befestigen Sie das LCD rechts am Sockel mit der Schraube 5*14... -
Page 36: Schritt 3:Montage Der Materialhalterung
5.3 Schritt 3:Montage der Materialhalterung zusammenbauen Teile 1.Halterung * 1 STÜCKE 2.M5 * 14 Schraube * 2 STÜCKE Anweisung Befestigen Sie die Halterung am Balken mit M5 * 14 Schraube * 2PCS... -
Page 37: Schritt 4: Kabelverbindung
5.4 Schritt 4: Kabelverbindung E285-Extruder Begrenzungssc halter Motor links Motor rechts F F C - K a b e l Begrenzungsschalter Führen Sie das Stromkabel Kabel vertikal in den Anschluss der Schalter Basis ein Konnektivität des Z- Z-axis parts connectivity FFC-Konnektivität Achsen-Motors Anweisung... -
Page 38: Druckex Truder -Ersatzmetho De
6.Druckextruder-Ersatzmethode (für E285/E175) 1.Entfernen Sie den vorhandenen Extruder 3.Führen Sie den FFC-Draht in den neuen Extruder ein Auf der Rückseite des Extruders befinden sich 3 feste Schrauben. Verwenden Sie Führen Sie das FFC-Kabel vorsichtig in die Schnalle ein und drücken Sie das linke den Sechskantschlüssel, um die Schraube zu lösen (keine Entfernung und rechte Ende der Schnalle mit einem Schraubendreher nach unten. -
Page 39: Einführung In Die Lcd-Schnittstelle
7.Einführung in die LCD-Schnittstelle 7.1 Einführung der LCD-Tastenfunktion 1.Klicken Sie auf die Schaltfläche, um die Menüliste aufzuklappen oder zu falten, um die Parameter Drucktemperatur, Heizbetttemperatur, Lüftergeschwindigkeit usw. manuell einzustellen. 2.Klicken Sie auf „Drucken“, um die zu druckende Objektdatei auszuwählen. Unser Drucker ist derzeit nur im „Gcode“-Format verfügbar. 3.Klicken Sie auf „Extruder“, um die Materialzufuhr und den Rückzug manuell einzustellen. -
Page 40: Softwarekonfiguration
8.1 Software Installation • AtomStack Cambrian verwendet die Open-Source-Firmware von Marlin, sodass jede Objektsoftware, die die Marlin-Firmware unterstützt, mit Cambrian-Druckern kompatibel sein kann. Hier unsere weltweit beliebte Ultimaker Cura-Software. Ultimaker Cura ist eine hervorragende Open-Source-Software, die macOS-, Windows- und Linux-Systeme unterstützt. -
Page 41: Schritt 1: Materialkonfiguration
"fdm_material" und doppelklicken Sie auf den Dateinamen. Nehmen Sie hier TPR 60.xml.fdm_material als Beispiel. Materialverwaltungsseite aufzurufen 4. Sie können die importierten Materialien unter der Gruppe "AtomStack" in der Liste 3. Klicken Sie im Popup-Fenster auf "OK", um den Import der Materialien sehen... -
Page 42: Schritt 2:Konfiguration Von Slice-Dateien
8.3 Schritt 2:Konfiguration von Slice-Dateien 1. Klicken Sie auf der Registerkarte "PREPARE" auf das Parametermenü, das von 2. Klicken Sie auf der Popup-Seite auf das Dreieck mit der Zahl "1", um die der Zahl "2" angezeigt wird, und klicken Sie auf die Schaltfläche "Custom" in der Liste der Sliced-Parameter zu erweitern, und klicken Sie unten auf die erweiterten Seite Schaltfläche "Manager Profiles...". -
Page 43: Vorbereitung Der Druckdatei
9.Vorbereitung der Druckdatei 9.1 Einführung in die Parameter für Slice-Dateien • Nachdem wir die Konfiguration von Ultimaker Cura abgeschlossen haben, bereiten wir alles außer der 3D-Druckdatei vor • Die Ultimaker Cura-Software unterstützt 3D-Datenformate in verschiedenen Formaten wie .stl/.obj/.3mf/.poly. Sie können die 3D-Modellierung mit Ihrer vertrauten Modellierungssoftware durchführen und dann das erstellte Modell in diese Dateiformate exportieren. -
Page 44: Erstellen Der Slice-Dateien
9.2 Erstellen der Slice-Dateien 2. Wenn das Modell nach dem Importieren des Modells die Druckgrenze 1. Klicken Sie auf der Registerkarte "PREPARE" auf die Schaltfläche "Importieren" überschreitet, ist das Modell grau. Klicken Sie auf die Werkzeugschaltfläche auf mit der Nummer "2", wählen Sie im Popup-Fenster das Modell aus, das Sie der linken Seite der Software, um die Größe, Position und den Winkel des drucken möchten, und doppelklicken Sie, um den Import abzuschließen Modells anzupassen... -
Page 45: Inspektion Der Struktur
10. Inspektion der Struktur 10.1 Druckerinspektion vor dem Drucken • Bevor wir mit dem Drucken beginnen, müssen wir den Status des Geräts überprüfen. Hauptsächlich um folgende Punkte zu überprüfen: • Ob die Struktur locker ist, hauptsächlich um zu überprüfen, ob die verschiedenen Rollen nach längerem Transport locker sind. •... -
Page 46: Scrollrad-Inspektion
10.2 Scrollrad-Inspektion Exzentermutter Exzentermutter Exzentermutter b: Erkennung und Einstellung der Heizbettwalzen a: Inspektion und Einstellung der Düsenwalze c: Z-Achsen-Rollenerkennung und -einstellung As Drehen Sie die Düse vorsichtig (um die Y-Achse) von Wie in Abbildung 3 gezeigt, schütteln Sie das heiße Wie in Abbildung 5 gezeigt, bewegen Sie die Rolle auf Hand, wie in Abbildung 1 gezeigt, und beobachten Sie, ob Bett vorsichtig von einer Seite zur anderen und... -
Page 47: Überprüfung Des Antriebsriemens
10.3 Überprüfung des Antriebsriemens Einstellknopf Einstellknopf Riemeninspektion und Einstellung Drücken Sie vorsichtig auf die Riemen auf den X-Achsen- und Y-Achsen-Motoren, um die Straffheit der Riemen zu spüren. Wenn der Riemen in gutem Zustand ist, werden Sie die Rückprallkraft deutlich spüren. Wenn nicht, müssen Sie den Riemen anpassen. Durch die Einstellknöpfe an den Enden der X-Achse und Y-Achse kann die Straffheit des Gurtes eingestellt werden. -
Page 48: Reinigung Der Extruderdüsen
10.4 Reinigung der Extruderdüsen 3. So reinigen Sie die E285-Düse: Schieben Sie den Transportgriff über die Düse, 1. Schalten Sie das Gerät ein, klicken Sie, um die Seite "Extruder" aufzurufen, erweitern Sie das stecken Sie die Durchgangsnadel von oben ein und stechen Sie mit einer Dropdown-Feld für die Materialauswahl und wählen Sie ein Material zum Vorwärmen aus gewissen Kraft nach unten, die Tiefe der in die Düse eingeführten (wählen Sie das Material aus, das für den letzten Druck verwendet wurde, hier ist das TPR-... -
Page 49: Nivellierungseinstellung
10.5 Nivellierungseinstellung Manueller Nivellierun gsknopf Nivellierbetrieb Klicken Sie auf die Zahl "1", der Druckkopf wird zurückgesetzt und bewegt den Druckkopf in die untere linke Ecke des Heizbetts. Führen Sie beim Nivellieren das Papier in den Spalt zwischen Düse und Heizbett ein und stellen Sie das Nivellierungshandrad ein, während Sie das Papier hin und her ziehen. -
Page 50: Material Vorbereitung
11.Material vorbereitung 11.1 Bereiten Sie das Laden des Materials vor • Bevor Sie mit dem Drucken beginnen, müssen Sie die erforderlichen Druckmaterialien vorbereiten. Das Druckmaterial sollte dem beim Slicing in der Software ausgewählten Material entsprechen, um Druckfehler oder unbefriedigende Druckwirkung zu vermeiden. •... -
Page 51: Laden Des Materials
11.2 Laden des Materials a:Trimmen Sie das Filament b:Setzen Sie das Filament in den Extruder ein Schneiden Sie den Anfangsabschnitt des Drücken Sie den Transportgriff und führen Sie c:Hängen Sie das Material an die Halterung Filaments wie in der Abbildung gezeigt zum das Filament in das runde Loch über der Düse Hängen Sie das Material wie in der spitzen Ende, um das Einführen der Düse zu... -
Page 52: Drucken Starten
12.Drucken starten a:Wählen Sie die Druckdatei b:Bestätigen Sie die Druckerparameter c:Heizbett aufheizen d:Erhitzen Sie die Düse Schalten Sie das Gerät ein und stecken Sie Bevor Sie mit dem Drucken beginnen, Nach dem Druckstart heizt das Gerät Wenn das Heizbett auf die Zieltemperatur die TF-Karte in den Kartensteckplatz des müssen Sie die Druckinformationen zunächst das Heizbett auf (beheizt auf die... -
Page 53: Druck Beenden
13.Druck beenden *Extruderreinigung Nun herzlichen Glückwunsch zum erfolgreichen Abschluss des ersten Drucks! Aber wir müssen eine gute Gewohnheit entwickeln. Nach jedem Druck müssen wir den Druckextruder reinigen, was die Lebensdauer Ihrer Ausrüstung erheblich verlängern kann. Unterstützte Basis b:Entfernen Sie die Stützbasis a:Sammle das Modell ein Some of the models need to add supported Nach dem Drucken können Sie eine... - Page 54 Weitere Informationen zu unseren Garantiebestimmungen finden Sie auf unserer offiziellen Website: www.atomstack3d.com Für technischen Support senden Sie uns bitte eine E-Mail an:support@atomstack3d.com Hersteller: Shenzhen AtomStack Technologies Co., Ltd Hinzufügen: AB301, New Chabridge Industrial Park, No. 3, Baolong 6 Rd., Longgang Dist., Shenzhen Postleitzahl 518116...
- Page 55 AtomStack Cambrian Manuel d'utilisation de l'imprimante 3D þEnglish þDeutsche þFrançais Shenzhen AtomStack Technologies Co., Ltd. www.atomstack3d.com...
- Page 56 Table des matières 1.Précautions et avis de non- responsabilité 9.Préparation du fichier d'impression ...57 ....70 2.Présentation de l'appareil ......58 9.1 Introduction des paramètres des fichiers Slice...70 3.Outils et accessoires 9.2 Création des fichiers Slice......71 ........59 10.Inspection de la structure 4.Inspection avant montage ......72 .......60 10.1 Inspection de l'imprimante avant impression..72...
-
Page 57: Précautions Et Avis De Non-Responsabilité
AtomStack n'est pas responsable de toutes les pertes causées par l'échec de l'utilisateur à utiliser ce produit en raison de l'utilisation de ce produit par l'utilisateur. AtomStack a le droit final d'interpréter les documents et de se conformer aux exigences légales. AtomStack se réserve le droit de mettre à jour, de modifier ou... -
Page 58: Présentation De L'appareil
2.Présentation de l'appareil Support Support introduction matériel matériel Volume de 235*235*250mm l'imprimante Source de AC100~240V 50/60HZ Poignée de courant Bouton de réglage chargement Extrudeuse Logiciel de la ceinture Ultimaker Cura (Extrudeuse E285 d'exploitation de l'axe X Buse préréglée) Système Fente pour carte TF d'exploitation macOS、Windows&Linux à... -
Page 59: Outils Et Accessoires
3.Outils et accessoires Carte mémoire TF Clé à douille pour le Extrudeuse d'impression E175 Extrudeuse d'impression E285 comprenant le fichier remplacement de la Filament de 1,75 mm, buse de 0,4 pour filament de 2,85 mm, buse de 0,8 objet de l'imprimante et buse mm. -
Page 60: Inspection Avant Montage
4. Inspection avant montage 1. L'interrupteur d'alimentation de l'imprimante 3D a deux types 2. nous définirons la goupille de positionnement afin de maintenir la partie de de mode de tension, AC 115V et AC 230V, veuillez passer à la l'axe Z avec la position ferme avant l'emballage sur l'axe X et l'axe Z. Veuillez tension appropriée à... -
Page 61: Assemblage De Structures
5. Assemblage de structures Étape 1 : Assemblage de l'axe Z Assemblage de pièces 1.Pièce d'axe Z (avec E285) 2.Base 3.Vis M5*44*4PCS Rainure Instruction 1.Placez l'axe Z vertical dans la rainure à la base 2. Utilisez 4 vis M5 * 44 pour fixer à partir du bas de la base avec l'axe Z... -
Page 62: Étape2: Assemblage De L'écran Lcd
5.2 Étape 2 : Assemblage de l'écran LCD Assemblage de pièces 1. LCD*1PCS 2. Vis M5 * 14 * 2 pièces Instruction Fixez l'écran LCD à droite de la base avec la vis 5*14... -
Page 63: Étape3: Assemblage Du Support Matériel
5.3 Étape 3 : Assemblage du support matériel Assemblage de pièces 2.Vis M5 * 14 * 2 pièces 1.support * 1PCS Instruction Fixez le support sur la poutre avec la vis M5 * 14 * 2PCS... -
Page 64: Étape4: Connectivité Du Câble
5.4 Étape 4: Connectivité du câble extrudeuse E285 Interrupteur de limitation moteur à gauche moteur à droite Interrupteur de Câble FFC limitation Insérez verticalement le câble dans le port de la base Câble d'alimentation Changer Connectivité du Connectivité FFC Connectivité des pièces de l'axe Z moteur de l'axe Z Instruction 1.Insérez verticalement le câble de l'axe Z dans le port de la base... -
Page 65: Méthode De Remplacement De L'extrudeuse D'impression
6.Méthode de remplacement de l'extrudeuse d'impression (pour E285/E175) 1.Retirer l'extrudeur existant 3.Insérez le fil FFC dans la nouvelle extrudeuse Il y a 3 vis fixes à l'arrière de l'extrudeuse, utilisez la clé hexagonale pour Insérez soigneusement le câble FFC dans la boucle et appuyez sur les desserrer la vis (pas besoin de la retirer), puis retirez l'extrudeuse existante. -
Page 66: Présentation De L'interface Lcd
7.Présentation de l'interface LCD 7.1 Fonction de bouton LCD introduire 1.Cliquez sur le bouton pour déplier ou plier la liste des menus pour définir le paramètre de température d'impression, la température du lit chauffant, la vitesse du ventilateur, etc. par manuel. 2.Cliquez sur «... -
Page 67: Paramétrage Du Logiciel
• AtomStack Cambrian utilise le micrologiciel open source Marlin, de sorte que tout logiciel objet prenant en charge le micrologiciel Marlin peut être compatible avec les imprimantes Cambrian. Ici, notre logiciel mondialement populaire Ultimaker Cura. Ultimaker Cura est un excellent logiciel open source qui prend en charge les systèmes macOS, Windows et Linux. -
Page 68: Étape 1 : Configuration Du Matériel
"fdm_material" et double-cliquez sur le nom du fichier. Prenez TPR 60.xml.fdm_material comme exemple ici. 3. Cliquez sur "OK" dans la fenêtre contextuelle pour terminer l'importation des 4. Vous pouvez voir les matériaux importés sous le groupe "AtomStack" dans la liste matériaux... -
Page 69: Étape 2 : Configuration Des Fichiers De Tranche
8.3 Étape 2 : configuration des fichiers de tranche 1. Sous l'onglet « PRÉPARER », cliquez sur le menu des paramètres invité par le 2. Dans la page contextuelle, cliquez sur le triangle indiqué par le numéro « 1 » pour développer la liste des paramètres en tranches, puis cliquez sur le bouton numéro «... -
Page 70: Préparation Du Fichier D'impression
9.Préparation du fichier d'impression 9.1 Introduction des paramètres des fichiers Slice • Après avoir terminé la configuration d'Ultimaker Cura, nous préparons tout sauf le fichier d'impression 3D • Le logiciel Ultimaker Cura prend en charge les formats de données 3D dans divers formats tels que .stl/.obj/.3mf/.poly. Vous pouvez effectuer une modélisation 3D avec votre logiciel de modélisation familier, puis exporter le modèle construit dans ces formats de fichier. -
Page 71: Création Des Fichiers Slice
9.2 Création des fichiers Slice 1. Sous l'onglet "PREPARE", cliquez sur le bouton Importer indiqué par le chiffre 2. Après avoir importé le modèle, si le modèle dépasse la limite d'impression, le "2", et dans la fenêtre contextuelle, sélectionnez le modèle que vous souhaitez modèle sera gris. -
Page 72: Inspection De La Structure
10. Inspection de la structure 10.1 Inspection de l'imprimante avant impression • Avant de commencer à imprimer, nous devons vérifier l'état de l'appareil. Principalement pour vérifier les points suivants : • Si la structure est lâche, principalement pour vérifier si les plusieurs rouleaux sont lâches après un transport de longue durée. •... -
Page 73: Inspection De La Molette De Défilement
10.2 Inspection de la molette de défilement Écrou excentrique Écrou excentrique Écrou excentrique c: Détection et réglage du rouleau sur l'axe Z a: Inspection et réglage du rouleau de buse b: Détection et réglage des rouleaux du lit chauffant Faites pivoter la buse doucement (autour de l'axe Y) à Comme le montre la figure 3, secouez doucement le Comme le montre la figure 5, déplacez le rouleau sur la main, comme illustré... -
Page 74: Contrôle De La Courroie De Transmission
10.3 Contrôle de la courroie de transmission Bouton de Bouton de réglage réglage Inspection et réglage de la courroie Appuyez doucement sur les courroies des moteurs des axes X et Y pour sentir le serrage des courroies. Si la ceinture est en bon état, vous ressentirez la force de rebond évidente. -
Page 75: Nettoyage Des Buses D'extrudeuse
10.4 Nettoyage des buses d'extrudeuse 3. Comment nettoyer la buse E285: poussez la poignée d'alimentation au- 1. Allumez l'appareil, cliquez pour accéder à la page "Extrudeuse", développez la liste déroulante dessus de la buse, insérez l'aiguille traversante par le haut et poussez vers le de sélection de matériau et sélectionnez un matériau pour le préchauffage (sélectionnez le bas avec une certaine force, la profondeur de l'aiguille traversante insérée matériau utilisé... -
Page 76: Réglage De Nivellement
10.5 Réglage de nivellement Bouton de nivellemen t manuel Opération de nivellement Cliquez sur le chiffre "1", la tête d'impression se réinitialisera et déplacera la tête d'impression dans le coin inférieur gauche du lit chauffant. Lors du nivellement, insérez le papier dans l'espace entre la buse et le lit chauffant, et ajustez le volant de nivellement tout en tirant le papier d'avant en arrière. -
Page 77: Materielle Préparation
11.Materielle préparation 11.1 Préparez-vous à charger le matériel • Avant de commencer à imprimer, vous devez préparer le matériel d'impression requis. Le matériau d'impression doit être le même que le matériau sélectionné dans le logiciel lors du tranchage, pour éviter l'échec d'impression ou un effet d'impression insatisfaisant. •... -
Page 78: Chargement Du Matériel
11.2 Chargement du matériel b:insérer le filament dans l'extrudeuse c:Accrochez le matériel sur le support a:Couper le filament Poussez la poignée d'alimentation et insérez Accrochez le matériau sur le matériau Coupez la section de départ du filament le filament dans le trou rond au-dessus de la comme indiqué... -
Page 79: Lancer L'impression
12.Lancer l'impression a:Sélectionnez le fichier d'impression b:Confirmer le paramètre de d:Chauffer la buse c:Chauffer le lit chauffant Allumez, insérez la carte TF dans la l'imprimante Lorsque le lit chauffant est chauffé à Après avoir commencé à imprimer, fente pour carte mère à l'avant de Avant de commencer à... -
Page 80: Terminer L'impression
13.Terminer l'impression *Nettoyage de l'extrudeuse Maintenant, félicitations pour avoir terminé avec succès la première impression ! Mais nous devons développer une bonne habitude. Après chaque impression, nous devons nettoyer l'extrudeuse d'impression, ce qui peut considérablement prolonger la durée de vie de votre équipement. - Page 82 : www.atomstack3d.com Tout support technique s'il vous plaît envoyez-nous un email à support@atomstack3d.com Fabricant : Shenzhen AtomStack Technologies Co., Ltd Ajouter : AB301, parc industriel de New Chabridge, n°3, Baolong 6 Rd., Longgang Dist., Shenzhen Code postal 518116...