Table des Matières

Manuels Connexes pour Alesis MULTIMIX 16 USB FX


Sommaire des Matières pour Alesis MULTIMIX 16 USB FX
- Page 1 USER GUIDE ENGLISH ( 3 – 9 ) GUÍA DEL USUARIO ESPAÑOL ( 10 – 17 ) GUIDE D’UTILISATION FRANÇAIS ( 18 – 25 ) GUIDA PER L'USO ITALIANO ( 26 – 33 ) BENUTZERHANDBUCH DEUTSCH ( 34 – 40 )
-
Page 3: Connection Diagram
• USB port *Requirements for the included PC software: Windows 7 and Vista AUDIO SETUP The MultiMix 16 USB FX is a Notes: class-compliant device that can be used with virtually any digital When recording a guitar or bass with an active pickup, set the MultiMix audio workstation or recording 16 USB FX's GUITAR SWITCH to the up/raised position. - Page 4 To enable your MultiMix 16 USB FX to send and receive audio to and from your computer, follow the instructions below for your computer's operating system: WINDOWS 7: Use the included cable to connect the MultiMix 16 USB FX to your computer. Go to Start Menu Control Panel Hardware and Sound Sound.
- Page 5 Attention, Windows Users: If you see a "permissions" error message when trying to open the software, follow these steps: Right-click the Cubase icon on your Desktop. Select Properties. Select the Compatibility tab. Under "Privilege Level," check the box that says "Run this program as an administrator." Click "Apply"...
-
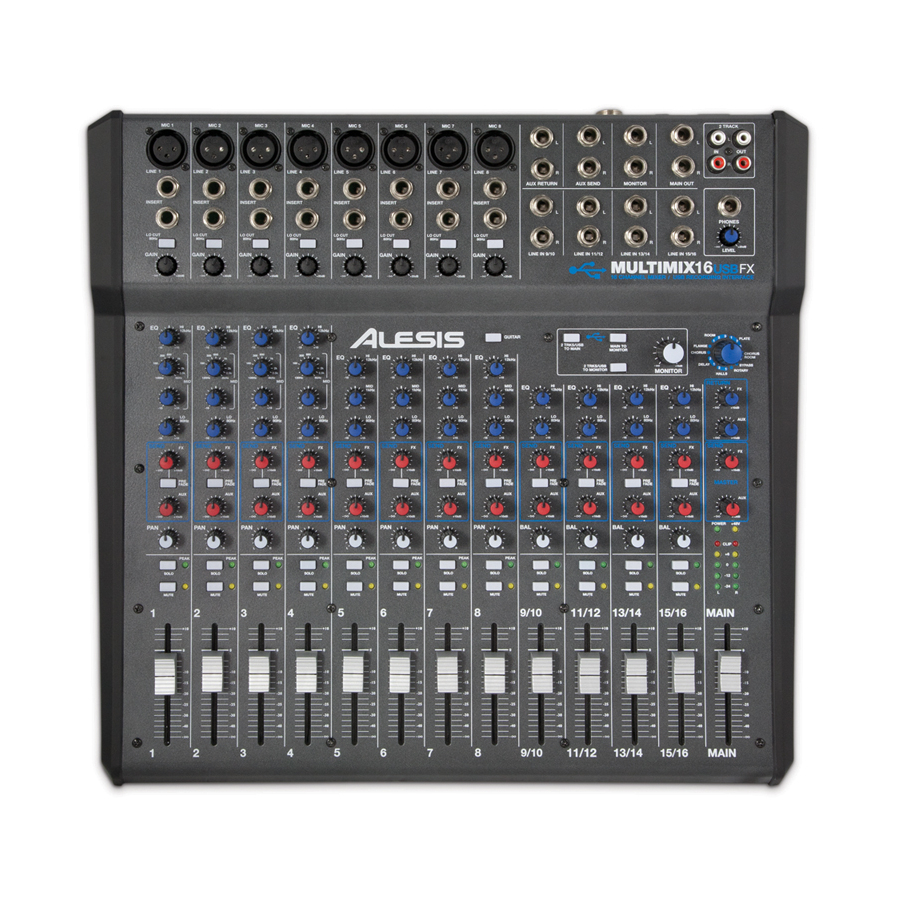
Page 6: Rear Panel Features
POWER SWITCH – Turns the MultiMix 16 USB FX on and off. Turn on the MultiMix 16 USB FX after all input devices have been connected and before you turn on amplifiers. Turn off amplifiers before you turn off the MultiMix 16 USB FX. - Page 7 TOP PANEL FEATURES 9 10 POWER LED – Illuminates when the MultiMix 16 USB FX is on. PHANTOM POWER LED – Illuminates when phantom power is engaged. MAIN OUT – Use standard 1/4" cables to connect this output to the house speaker or amplifier system. The level of this output is controlled by the MAIN VOLUME knob.
- Page 8 FX SEND – Adjusts the channel audio level that is sent to MultiMix 16 USB FX's internal effects processor. Turn this up for the channels that you want internal effects applied to.
- Page 9 EFFECTS TO HEAR THE EFFECTS ON A CHANNEL: Turn up the FX POST SEND (28) for that channel. Then, turn up the FX RETURN knob (32). Press the MAIN TO MONITOR button to hear the mix in your headphones. Use the EFFECTS SELECTOR KNOB (30) to choose one of the effects below: REVERB EFFECTS •...
-
Page 10: Contenido De La Caja
GUÍA DEL USUARIO (ESPAÑOL) CONTENIDO DE LA CAJA MultiMix 16 USB FX Cable USB Adaptador de Alimentación DVD de Software Guía del Usuario Folleto de Instrucciones de Seguridad e Información Sobre la Garantía DIAGRAMA DE CONEXIÓN Altavoces Altavoces Computadora* principales* del monitor* Micrófono*... -
Page 11: Configuración De Audio
Haga clic en OK (Aceptar) para cerrar el panel de control Sound dispositivos de audio y el software. (Sonido). WINDOWS VISTA: Use el cable incluido para conectar el MultiMix 16 USB FX a su computadora. Vaya al menú Start Control Panel Sound (Inicio Panel de control Sonido). - Page 12 MAC: Use el cable incluido para conectar el MultiMix 16 USB FX a su tiene conectados computadora. computadora otros dispositivos de Vaya al directorio Applications (Aplicaciones) y abra System audio puedan tener Preferences (Preferencias del sistema). nombres idénticos, puede Haga clic en el icono Sound (Sonido).
- Page 13 Haga clic en OK en las dos ventanas que están abiertas y luego cierre y vuelva a abrir Cubase para que los cambios tengan efecto. En Cubase, haga clic en File New Project (Archivo Nuevo proyecto), seleccione Empty (Vacío) y elija dónde desea guardar su proyecto. Haga clic en el menú...
- Page 14 Consulte la documentación de su micrófono para averiguar si necesita alimentación fantasma. PUERTO USB – Use el cable incluido para conectar el MultiMix 16 USB FX a una computadora. MultiMix 16 USB FX requiere una conexión USB 1.1 o superior (por ej. USB 2.0).
- Page 15 CARACTERÍSTICAS DEL PANEL SUPERIOR 9 10 LED DE ENCENDIDO – Se ilumina cuando el MultiMix 16 USB FX está encendido. LED DE ALIMENTACIÓN FANTASMA– Se ilumina cuando se acopla la alimentación fantasma. SALIDA PRINCIPAL – Use cables estándar TRS de 1/4" para conectar estas salidas al sistema de amplificador o altavoces del auditorio.
- Page 16 ENVÍO DE EFECTOS – Ajusta el nivel de audio del canal (post-ecualización) que se envía al procesador de efectos interno del MultiMix 16 USB FX. Aumente el ajuste para los canales a los que desea aplicar efectos internos.
- Page 17 EFECTOS PARA OÍR LOS EFECTOS EN UN CANAL: Aumente el ajuste FX - SEND (28) de ese canal. Luego, aumente el ajuste de la perilla FX RETURN (32). Pulse el botón MAIN TO MONITOR para oír la mezcla en sus auriculares. Use la PERILLA EFFECTS (Selectora de efectos) (30) para elegir uno de los siguientes efectos: EFECTOS DE REVERBERACIÓN •...
-
Page 18: Contenu De La Boîte
GUIDE D’UTILISATION (FRANÇAIS) CONTENU DE LA BOÎTE MultiMix 16 USB FX Câble USB Câble d’alimentation CD Logiciel Guide d’utilisation Consignes de Sécurité et Informations Concernant la Garantie SCHÉMA DE CONNEXION Enceintes Ordinateur* Moniteur principales* haut-parleur* Microphone* Alimentation Casque d’écoute* électrique Synthétiseur*... -
Page 19: Configuration Audio
Cliquez OK pour fermer la fenêtre Propriétés. Cliquez OK pour fermer le panneau de configuration Son. WINDOWS XP : Utilisez le câble USB inclus pour brancher le MultiMix 16 USB FX à un ordinateur. Cliquez sur Démarrer Panneau de configuration Sons et périphériques audio. - Page 20 CONFIGURATION CUBASE ACTIVATION DE CUBASE LE 6 Assurez-vous que l’ordinateur dispose d’une connexion Internet afin de procéder à l’inscription et à l’activation de votre licence à l’aide du eLicenser Control Center (eLCC) auprès du serveur Steinberg. Assurez-vous d’avoir la toute dernière version du eLCC installée à partir de www.elicenser.net. Installez Cubase LE 6.
- Page 21 INSTALLATION WINDOWS Une fois Cubase LE 6 installé et activé, veuillez suivre les étapes suivantes pour configurer le logiciel afin qu’il enregistre la console de mixage. Lancez Cubase LE 6. Si l’on vous invite à ouvrir un projet, refusez pour l’instant. À...
-
Page 22: Caractéristiques Du Panneau Arrière
PORT USB – Utilisez le câble USB inclus pour relier le MultiMix 16 USB FX au port USB d’un ordinateur. Le MultiMix 16 USB FX requiert une connexion USB 1.1 ou supérieure (p. ex., USB 2.0). -
Page 23: Caractéristiques Du Panneau Supérieur
CARACTÉRISTIQUES DU PANNEAU SUPÉRIEUR 9 10 DEL D’ALIMENTATION – S’allume lorsque le MultiMix 16 USB FX est sous tension. DEL D’ALIMENTATION FANTÔME – S’allume lorsque l’alimentation fantôme est activée. MAIN OUT – Branchez des câbles 1/4 po (6,35 mm) standards à cette sortie afin de raccorder un haut-parleur ou un système de sonorisation. - Page 24 FX SEND – Ce bouton permet d'ajuster le niveau du canal audio (après égalisation) acheminé au processeur d’effet interne du MultiMix 16 USB FX. Augmentez le réglage des canaux pour lesquels vous désirez ajouter des effets.
- Page 25 EFFETS POUR ENTENDRE LES EFFETS SUR UN CANAL : Augmentez le FX POST SEND (28) pour ce canal. Ensuite, augmentez le FX RETURN (29). Appuyez sur le bouton MAIN TO MONITOR afin d'acheminer le signal à votre casque d'écoute. Uilisez le bouton EFFECTS SELECTOR (30) pour sélectionner un des effets ci-dessous : EFFETS DE RÉVERBÉRATION •...
-
Page 26: Contenuti Della Confezione
GUIDA PER L’USO (ITALIANO) CONTENUTI DELLA CONFEZIONE MultiMix 16 USB FX Cavo USB Adattatore di Alimentazione DVD Recante il Software Guida per l'Uso Istruzioni di Sicurezza e Garanzia SCHEMA DEI COLLEGAMENTI Altoparlanti principale* Computer* Casse Monitor* Microfono* Alimentazione Cuffie* Synth*... - Page 27 Cliccare su OK per chiudere la finestra Proprietà . Cliccare su OK per chiudere il pannello di controllo Audio . WINDOWS XP: Servirsi del cavo in dotazione per collegare il MultiMix 16 USB FX al computer. Recarsi su Start Pannello di controllo Suoni e periferiche audio.
- Page 28 CONFIGURAZIONE CUBASE ATTIVAZIONE DEL CUBASE LE 6 Assicurarsi che il computer disponga di un collegamento a Internet funzionante per attivare la licenza, in quanto l'eLicenser Control Center (eLCC) si deve registrare con il server di licenza Steinberg. Assicurarsi di aver installato l'ultima versione dell'eLCC scaricandola da www.elicenser.net. Installare il Cubase LE 6.
- Page 29 CONFIGURAZIONE WINDOWS Una volta installato e attivato il Cubase LE 6, procedere come segue per configurare il software per registrare con il mixer. Aprire Cubase LE 6. Se viene richiesto di aprire un progetto, annullare per adesso. Dai menu, selezionare Periferiche Setup periferiche.
- Page 30 CONFIGURAZIONE PER MAC Una volta installato e attivato il Cubase LE 6, procedere come segue per configurare il software per registrare con il mixer. Aprire il Cubase LE 6. Se viene richiesto di aprire un progetto, annullare per adesso. Dai menu, selezionare Periferiche Setup periferiche.
- Page 31 Consultare la documentazione del microfono per scoprire se necessita di alimentazione phantom. PORTA USB – Servirsi del cavo in dotazione per collegare il MultiMix 16 USB FX al computer. Il MultiMix 16 USB FX richiede una porta USB 1.1 o superiore (es. USB 2.0).
- Page 32 FX SEND – Regola il livello del canale audio inviato al processore di effetti interno del MultiMix 16 USB FX. Alzarlo per i canali ai quali si desidera applicare effetti interni.
- Page 33 VOLUME MAIN – Regola il livello del volume dell’USCITA PRINCIPALE. VOLUME MONITOR – Regola il livello del volume dell’USCITA MONITOR. VOLUME CUFFIE – Regola il livello del volume inviato alle cuffie. EFFETTI PER SENTIRE GLI EFFETTI SU UN CANALE: accendere l’FX POST SEND (28) per quel canale. Quindi, alzare la manopola FX RETURN (32).
-
Page 34: Lieferumfang
BENUTZERHANDBUCH (DEUTSCH) LIEFERUMFANG MultiMix 16 USB FX USB-Kabel Netzteil Software-DVD Benutzerhandbuch Sicherheitshinweise und Garantieinformationen ANSCHLUSSÜBERSICHT Monitor- Computer* Hauptausgang* Lautsprecher* Mikrofon* Strom *Kopfhörer Synth* Gitarre* octave push accomp store volume pitch phrase latch a n a l o g m o d e l i n g s y n t h *Separat erhältlich... -
Page 35: Audio Setup
Klicken Sie auf OK. MAC: Verwenden Sie das mitgelieferte Kabel, um das MultiMix 16 USB FX mit Ihrem Computer zu verbinden. Navigieren Sie in Ihr Anwendungsverzeichnis und öffnen Sie die Systemeinstellungen. Klicken Sie auf das Symbol Sound. Auf der Registerkarte Eingabe und Ausgabe wählen Sie "USB Audio CODEC". - Page 36 CUBASE-SETUP AKTIVIEREN VON CUBASE LE 6 Stellen Sie sicher, dass Ihr Computer über eine funktionierende Internetverbindung verfügt, um die Lizenz zu aktivieren, da sich das eLicenser Control Center (eLCC) am Steinberg-Lizenz-Server registrieren muss. Stellen Sie sicher, dass Sie die neueste Version von eLCC von www.elicenser.net installiert haben. Installieren Sie Cubase LE 6.
- Page 37 In den Spalte Geräte-Port wählen Sie USB Audio CODEC 1 für den linken Stereo-Eingang und USB Audio CODEC 2 für den rechten Stereo-Eingang. Klicken Sie auf die Registerkarte Ausgänge und wählen Ausgabegerät genau Eingabegerät als Audiogerät eingerichtet haben. Schließen Sie das Fenster VST-Verbindungen. Klicken Sie mit der rechten Maustaste in das Hauptfenster des Projekts und wählen Audio-Track hinzufügen.
- Page 38 MultiMix 16 USB FX und stecken das Netzteil dann in eine Steckdose. NETZSCHALTER – Schaltet den MultiMix 16 USB FX ein und aus. Schalten Sie den MultiMix 16 USB FX ein, nachdem alle Eingabegeräte angeschlossen wurden und bevor Sie die Verstärker einschalten. Schalten Sie die Verstärker aus, bevor Sie den MultiMix 16 USB FX ausschalten.
- Page 39 Monitor-Mix für sich selbst oder Ihre Musiker erstellen. FX SEND – Regelt die Lautstärke des Kanals, die an den internen Effektprozessor des MultiMix 16 USB FX gesendet wird. Verwenden Sie dies für jene Kanäle, die Sie mit internen Effekten versehen möchten.
- Page 40 LED-ANZEIGE – Zeigt die Lautstärke des Hauptmix an. Reduzieren Sie die Lautstärke falls die CLIP-LED oft leuchtet. 2 TRKS/USB TO MAIN – Schaltet das Signal des Computers und der 2-TRACK EINGÄNGE zum HAUPTAUSGANG. 2 TRKS/USB TO MONITOR – Schaltet das Signal des Computers und der 2-TRACK EINGÄNGE zum MONITORAUSGANG und zu Ihren Kopfhörern.
-
Page 41: Technical Specifications
TECHNICAL SPECIFICATIONS POWER SUPPLY: 18V AC, 700mA INPUT CHANNELS: MIC INPUT Sensitivity Range: -69dBu to -19dBu nominal, +18dBu maximum LINE INPUT Sensitivity Range: -49dBu to -+1dBu nominal, +18dBu maximum MIC INPUT / LINE INPUT Gain Range: -∞ to +20dB EQUALIZATION: HI: 12kHz, ±15dB MID: 120Hz –... - Page 44 7-51-0389-B...