Table des Matières
Publicité
Les langues disponibles
Les langues disponibles
Liens rapides
AutoMatrix®
Retainerless Matrix System
For use with Automate
III Tightening Device and AutoMatrix
®
DIRECTIONS FOR USE – ENGLISH
Caution: For dental use only. USA: Rx only.
1. PRODUCT DESCRIPTION
The AutoMatrix® Retainerless Matrix System is designed to be used as a matrix to contain direct-
placement restorative materials in posterior cavities involving proximal surfaces. The AutoMatrix®
system allows matrix placement and retention without the need for bulky retainers, allowing for ease
of placement, better access, clear view of the operating field and greater patient comfort. Access for
wedge placement (where indicated) is not hindered by an external retainer. The single-use, disposable
AutoMatrix® system bands allow proper subgingival and proximal contact adaptation while protecting
against cross-contamination.
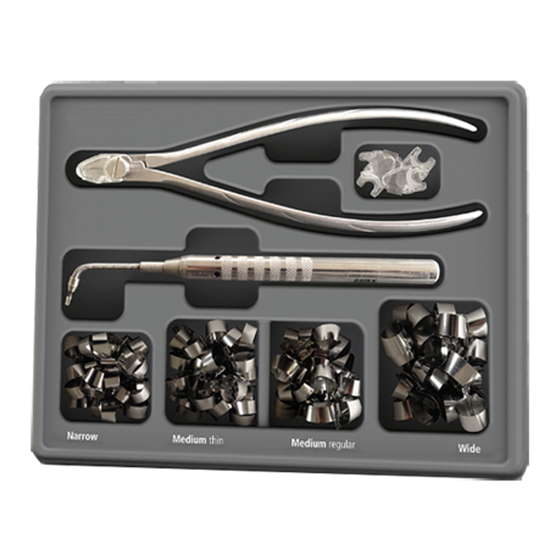
1.1 Delivery forms*
The AutoMatrix® system matrices are available in four height/width and gauge (thickness)
configurations (see table below). All AutoMatrix® system matrix sizes fit teeth of any circumference.
Type
Medium Thin
a
Narrow Regular
Height & Gauge 1/4" x .0015
3/16" x .002
Typical
Bicuspids/molars
Short Bicuspids and
Clinical Uses
molars
*Some delivery forms may not be available in all countries
Thin-gauge bands identified by notch on auto-lock loop
a
1.2 Composition
• Matrix Bands: Polished stainless steel
• Automate
III tightening device: Stainless steel
®
• AutoMatrix
Snippers+: Stainless Steel, with plastic catch-tray
®
1.3 Indication
AutoMatrix
Retainerless Matrix System is indicated where placement of a matrix band around a
®
prepared tooth will facilitate contouring of a direct placement restorative material (e.g., Class II
preparations).
1.4 Contraindications
None Known.
2. GENERAL SAFETY NOTES
Be aware of the following general safety notes and the special safety notes in other chapters of these
directions for use.
Safety alert symbol
This is the safety alert symbol. It is used to alert you to potential personal injury hazards. Obey
all safety messages that follow this symbol to avoid possible injury.
2.1 Warnings
1. AutoMatrix
System matrix band consists of small, sharp parts. As with all intraoral instruments, care
®
must be exercised to ensure stable handling and placement. During matrix removal procedures a
segment of the AUTO-LOCK LOOP (retention clip) may separate from the matrix band. Prevent this
segment from being swallowed or aspirated. Remove any separated piece immediately from the
mouth. Placement of rubber dam or other suitable isolation is advised prior to operative procedures.
Wear suitable protective eyewear and gloves.
Aspiration: If aspiration of band or any part occurs seek immediate medical attention.
Ingestion: If accidental swallowing occurs, encourage patient to seek medical assistance to locate
swallowed part. If nausea or illness develop, seek medical attention immediately.
Laceration: AutoMatrix
system matrix bands are sharp, and may cut unprotected skin. Handling
®
bands with gloved hands and/or locking college pliers or similar instrument is
recommended. In the event a clean band causes a skin laceration, employ usual first aid
measures. Discard and properly dispose of band.
2. Used matrix bands and accessories are contaminated. Follow proper exposure control plans. In the
event of an accidental exposure, follow recommended post-exposure procedures. Following use of
AutoMatrix
system matrix bands, proper handling and disposal techniques are required. Used matrix
®
bands are contaminated and sharp. When handling or disposing, use precautions as when handling or
disposing other contaminated sharps.
3. Care should be taken to have good control on any instrument to protect patients from injury. Do
not use excessive force when inserting AutoMate
allow rotating coil to contact oral tissues during tightening. When using removal snippers, employ a
technique that prevents entrapping soft tissues (skin, gingiva, mucosa) within the snipper jaws which
may result in injury to the tissue. If injury occurs, thoroughly wash the affected area with water and
seek appropriate medical attention.
2.2 Precautions
• This product is intended to be used only as specifically outlined in the Directions For Use. Any use of
this product inconsistent with the Directions For Use is at the discretion and sole responsibility of the
practitioner.
• Devices marked "single use" on the labeling are intended for single use only. Discard after use. Do not
reuse in other patients in order to prevent cross-contamination.
• Always make sure that the plastic-basket is properly connected to the AutoMatrix
application.
• When clipping AUTO-LOCK LOOP with removal snippers, shield open end with fingers to prevent
clipped part from projecting into the oral cavity. Immediately retrieve any loose part and remove from
the mouth. (See Warnings)
• Avoid placing excessive pressure in an apical direction when placing or on placed bands. Apical force
may result in injury to periodontal tissues. (See Warnings)
• Do not use accessory tools other than those designed, supplied, and/or outlined for use with
AutoMatrix
system bands. Injury may result. (See Step-by-Step Instructions)
®
2.3 Adverse reactions
• Product misuse may cause failure resulting in respiratory, digestive, eye, skin, or mucosa injury. (See
Contraindications, Warnings and Precautions)
• Failure to properly employ accepted handling and disposal techniques may present biohazard. (See
Warnings and Precautions)
®
Medium Regular
Wide Regular
1/4" x .002
5/16" x .002
Bicuspids/molars
Long molars
III tightening device into tightening coil. Do not
®
Snippers+ before
®
2.4. Storage
Store AutoMatrix
system bands and accessory AutoMate
®
Snippers+ at room temperature, away from moisture or excessive humidity. Tightening device and
snippers should be disinfected/sterilized and dried prior to storage.
3. STEP-BY-STEP INSTRUCTIONS
3.1 Pre-operative Sterilization
Matrices are intended for single use. If desired, these components may be steam autoclaved one time
(134°C, 3 minutes minimum holding time, unwrapped, 12 minutes minimum holding time, wrapped) prior
to clinical use. Tightening device and snippers are not supplied sterile, and should be steam autoclaved
Snippers+
prior to first and each subsequent use (see Hygiene section).
3.2 Cavity Preparation
Complete cavity preparation as usual utilizing rubber dam or other suitable isolation technique.
Technique Tip: Pre-wedging, or placement of a Palodent
Directions for Use) to achieve slight separation may facilitate matrix placement and acceptable
restoration proximal contact.
3.3 Matrix selection/preparation-enlarging matrix circumference
Select the appropriate height and gauge matrix band. To properly fit the tooth, matrix should be
slightly larger than the occlusal circumference.
3.3.1 Using protected hands, or suitable instrument (e.g. college pliers), unroll the coil of a clean, new
AutoMatrix® system matrix band slightly.
3.3.2 While securely holding matrix band (with instrument or by side; do not hold by sharp edges)
carefully slide the AUTO-LOCK against the coil. If necessary, repeat steps 3.2.1 and 3.2.2 above to
further enlarge matrix to the appropriate size.
3.4. Positioning Matrix
Carefully slide matrix around tooth, through the interproximals. Position matrix with the AUTO-LOCK
LOOP at the center of buccal or lingual or most secure remaining tooth wall.
Technique Tips:
1. To seat matrix in tight interproximal spaces – pre wedging, placement of a Palodent
use of an Elliot Separator on posteriors may gain temporarily required space.
2. To clear debris and facilitate seating – use waxed floss or a soft wedge between tight
interproximals.
3. For hard to reach molars – use locking college pliers to grip matrix along the side and facilitate
matrix seating. Release pliers when matrix is securely seated on tooth.
3.5 Tightening the matrix (using the AutoMate
3.5.1 Stabilize the matrix with gentle finger pressure apically until the matrix is fully tightened. Check
to be sure gingival tissue is not trapped between band and tooth surface. If so, slightly lift and
reposition band prior to tightening.
3.5.2 Insert AutoMate® III tightening device tip into the matrix coil.
3.5.3 Grasp AutoMate® III tightening device with thumb and forefinger on barrel, palm grip in palm.
Rotate knurled barrel clockwise.
indicator, thereby indicating the rotational (tightening) force required. After 2 to 3 "clicks", STOP
tightening. The band is properly subgingivally tightened.
matrix locked tightly until removal is desired.
3.5.4 Remove the tightening device. Rotate AutoMate® III tightening device continuously
counterclockwise (backwards) while simultaneously and continuously withdrawing the AutoMate®
III tightening device from the coil.
3.6 Placement of restorative
3.6.1 Place wedges as desired (buccal and/or lingual).
3.6.2 Burnish contact areas.
3.6.3 Place desired restorative material as per restorative material manufacturer's directions for use.
3.7 Removing the matrix
Following appropriate restorative curing/setting, open and remove the matrix using shielded
AutoMatrix® Snippers+.
3.7.1. Preparation of AutoMatrix® Snippers+
• Align catch-tray with the instrument axis of the snipper.
• Clip Catch-tray straight onto the snippers by sliding the u-shaped cavity into the nut below the
bolt head.
• Make sure that the pin on the lower surface of the catch-tray clicks in the hole on the upper side
of the blade edge.
Displacement of Catch-tray. Small parts-ingestion/inhalation.
• Do not open Snippers+ more than 60° to prevent displacement of Catch-tray, which may
cause leakage of the catch-tray and release of cut pieces.
• Before application, make sure that the catch-tray is properly connected to the snippers: Turn
instrument and check that there is no gap between Catch-tray and snippers. Make sure
that the catch-tray is empty.
3.7.2 Clip any part of the projecting end of the AUTO-LOCK LOOP.
3.7.3 After clipping immediately retrieve any loose part and remove from the mouth.
3.7.4 Keep snippers closed containing the cut piece during withdrawal from the mouth.
3.7.5 Empty catch-tray and properly discard cut piece.
Small parts-ingestion/inhalation
• Do not open Snippers+ widely during use. Widest opening is designed to dislodge the
catch-tray.
• After clipping the AUTO-LOCK LOOP into the catch-tray, keep Snippers+ closed during
withdrawal from the mouth.
• If tray is dislodged during use, recover any pieces from the mouth immediately.
3.7.6 Insert an explorer, scaler or suitable instrument through the lock-release hole located on the
band near the coil. Gently pull lock-release hole occlusally until the matrix slips open. NOTE:
Locate the gingival segment of the AUTO-LOCK LOOP. This part will usually remain attached
to the band upon removal, but may become dislodged. If segment of AUTO-LOCK LOOP has
separated from band, remove it from the mouth and properly discard.
3.7.7 Support the restoration marginal ridge(s) with a condenser. Slide loosened matrix buccally or
lingually, while removing matrix occlusally. Properly discard matrix.
4. HYGIENE
Cross-contamination
• Do not reuse single use products. Dispose of in accordance with local regulations.
• Reprocess reusable products as described below.
NOTICE
Wrong cleaning or disinfection method.
Damage to the device.
1. Always disassemble Snippers+ catch-tray before final reprocessing.
2. Do not clean or disinfect with aggressive agents (e.g. solutions based on orange oil or acetone).
3. Start reprocessing within 1 hour after use.
III tightening device and AutoMatrix
®
Plus ring (available separately, see complete
®
III tightening device)
®
DO NOT USE FORCE.
NOTE: AutoMate® III tightening device has an audible torque
NOTE : The AUTO-LOCK LOOP keeps
®
Plus ring or
®
Publicité
Table des Matières

Manuels Connexes pour Dentsply Sirona AutoMatrix


Sommaire des Matières pour Dentsply Sirona AutoMatrix
- Page 1 Directions for Use) to achieve slight separation may facilitate matrix placement and acceptable 1. PRODUCT DESCRIPTION restoration proximal contact. The AutoMatrix® Retainerless Matrix System is designed to be used as a matrix to contain direct- placement restorative materials in posterior cavities involving proximal surfaces. The AutoMatrix® 3.3 Matrix selection/preparation-enlarging matrix circumference system allows matrix placement and retention without the need for bulky retainers, allowing for ease Select the appropriate height and gauge matrix band.
- Page 2 • Disinfect hands with an appropriate bactericidal, virucidal, and fungicidal hand disinfectant solution 1. Clean AutoMatrix® Snippers+ and catch-tray with a soft brush, cold tap water, and an according to local regulations. Use according to disinfectant solution manufacturer’s Instructions for Manual appropriate cleaning solution (e.g.: alkaline solution: Dürr FD370 [2%]...
-
Page 3: Descripción Del Producto
• Usando unos guantes o un instrumento adecuado (p. ej. unas pinzas), desenrolle un poco la espiral de una y calibre (grosor) (consultar la tabla a continuación). Todos los tamaños de las matrices del sistema banda de matriz limpia y nueva del sistema AutoMatrix ®... - Page 4 • No reutilice los productos desechables. Desechar conforme a las regulaciones locales. • Prepare nuevamente los productos reutilizables como se describe a continuación. Lugar de aplicación 1. Para separar la bandeja de agarre abra los alicates AutoMatrix® Snippers+ el máximo posible. 2. Quite la bandeja de agarre de los AutoMatrix® Snippers+.
-
Page 5: Description Du Produit
L’accès pour la mise en place des coins (le cas échéant) rubrique Hygiène). n’est pas encombré par un porte-matrice externe. Les bandes à usage unique du système AutoMatrix ® permettent une bonne adaptation du contact sous-gingival et proximal tout en assurant une protection 3.2 Préparation de la cavité... -
Page 6: Numéro De Lot Et Durée D'utilisation Prévue
(p. ex. la solution alcaline • Les bandes du système de matrice sans porte-matrice AutoMatrix® sont à usage unique. Ne Dürr FD370 [2 %] ) contenant des tensio-actifs non ioniques (5 - 15 %), des chélateurs pas essayer de les retraiter ni de les réutiliser. -
Page 7: Allgemeine Sicherheitshinweise
• Geräte mit dem Hinweis „Einmalverwendung“ auf dem Etikett dürfen nur einmal verwendet werden. 3.7.5 Das Auffangkörbchen entleeren und das abgetrennte Stück angemessen entsorgen. Nach Gebrauch entsorgen. Nicht bei anderen Patienten wiederverwenden, um Kreuz-Kontaminationen zu vermeiden. • Vor jeder Verwendung sicherstellen, dass das Auffangkörbchen richtig mit den AutoMatrix Snippers+ ® Verschlucken/Einatmen von Kleinteilen verbunden ist. - Page 8 Band, doch er kann disloziert werden. Wenn ein Segment der AUTO-LOCK-ÖSE vom Band getrennt Warnhinweise • Eine gründliche Desinfektion alleine ist für die AutoMatrix® Kneifzange (Snippers+) und das wurde, dieses aus dem Mund entfernen und angemessen entsorgen. Auffangkörbchen nicht ausreichend.
-
Page 9: Descrizione Del Prodotto
L’accesso per il posizionamento dei cunei (se indicato) non adeguata tecnica di isolamento. Suggerimento pratico: l’applicazione preliminare di un cuneo o il è ostacolato da un elemento di ritenzione esterno. Le bande monouso del sistema AutoMatrix consentono il ®... - Page 10 Dentsply DeT GmbH Distributed by Dentsply Caulk De-Trey-Str. 1 Dentsply Canada • Una sola disinfezione di alto livello non è adeguata per le pinze AutoMatrix® Snippers+ e il Avvertenze 38 West Clarke Avenue 78467 Konstanz 161 Vinyl Court vassoio di raccolta.