Chapitres
Table des Matières

Manuels Connexes pour AEG 78001KF-N


Sommaire des Matières pour AEG 78001KF-N
- Page 1 78001KF-N Ceramic glass hob Table de cuisson vitrocéramique Glaskeramische kookplaat Installation and Operating Instructions Instructions de montage et mode d’emploi Montage- en gebruiksaanwijzing...
- Page 2 Dear Customer, Please read these user instructions carefully and keep them to refer to later. Please pass the user instructions on to any future owner of the appli- ance. The following symbols are used in the text: Safety instructions Warning! Information that affects your personal safety. Important! Information that prevents damage to the appliance.
-
Page 3: Table Des Matières
Contents Operating Instructions ........Safety instructions. -
Page 4: Operating Instructions
Operating Instructions 1 Safety instructions Please comply with these instructions. If you do not, any damage re- sulting is not covered by the warranty. This appliance conforms with the following EU Directives: – 73/23/EEC dated 19.02.1973 Low Voltage Directive – 89/336/EEC dated 03.05.1989 EMC Directive inclusive of Amending Directive 92/31/EEC –... -
Page 5: Safety During Use
Safety during use • Remove stickers and film from the glass ceramic. • There is the risk of burns from the appliance if used carelessly. • Cables from electrical appliances must not touch the hot surface of the appliance or hot cookware. •... -
Page 6: Description Of The Appliance
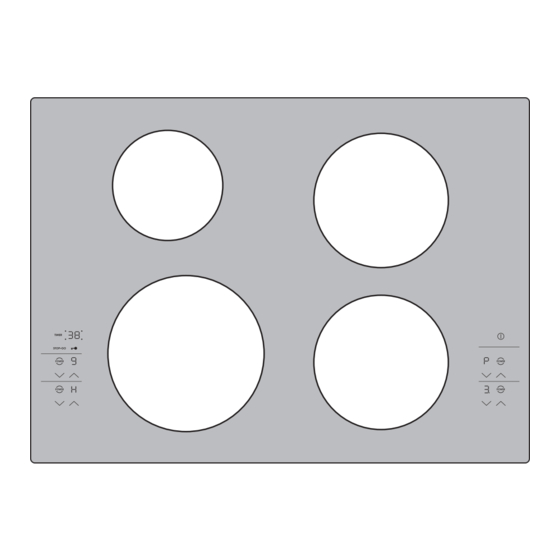
Description of the Appliance Cooking surface layout Induction cooking zone 1400W Induction cooking zone 1850 W with power function 1800W with power function 2500 W Control panel Control panel Induction cooking zone 2300W Induction cooking zone 1850 W with power function 3200W with power function 2500 W Control panel layout Cooking zone indicators... -
Page 7: Touch Control Sensor Fields
Touch Control sensor fields The appliance is operated using Touch Control sensor fields. Functions are controlled by touching sensor fields and confirmed by displays and acoustic signals. Touch the sensor fields from above, without covering other sensor fields. Sensor field Function On / Off To switch the appliance on and... -
Page 8: Displays
Displays Display Description ¾ Cooking zone is switched off Keep warm setting Keep warm setting/STOP+GO function is set ¿ Ç Heat settings Heat setting is set Heating setting plus Intermediate heat setting is set decimal point Automatic warm up Automatic warm-up function is function activated Fault... -
Page 9: Operating The Appliance
Operating the appliance Use the induction cooking zones with suitable cookware. Switching the appliance on and off Control panel Display Pilot light ¾ Switch on Touch for 2 seconds lights up Switch off Touch for 1 second / none goes out After switching on, within approx. -
Page 10: Using The Automatic Warm-Up Function
Using the automatic warm-up function Step Control panel Display Ç / p Ç Setting the level Ç Place to one side for a moment touch Æ ¿ touch in order to set the de- until sired cooking setting after 3 seconds All cooking zones are equipped with an automatic warm-up function. -
Page 11: Locking/Unlocking The Control Panel
Locking/unlocking the control panel The control panel, with the exception of the “On/Off” sensor field, can be locked at any time in order to prevent the settings being changed e.g. by wiping over the panel with a cloth. Control panel Display Switch on Touch... -
Page 12: Switching The Power Function On And Off
Overriding the child safety device The child safety device can be released in this way for a single cooking session; it remains activated afterwards. Step Control panel Display/Signal Switch on the appliance ¾ Touch at the same time / acoustic signal Until the appliance is next switched off, it can used as normal. - Page 13 Power Management The cooking zones have a maximum power available to them. If this power range is exceeded by switching on the power function, Power Management reduces the heat setting of another cooking zone. The display for this cooking zone al- ternates for two minutes between the set heat setting and the maxi- mum possible heat setting.
-
Page 14: Using The Timer
Using the timer All cooking zones can use each use one of the two timer functions at the same time. Function Condition Outcome after the time has elapsed Automatic cut-out a heat setting is set acoustic signal flashes Cooking zone switches off Countdown timer cooking zones not in use... -
Page 15: Setting The Time
Setting the time Step Control panel field Display TIMER Select cook- Pilot light of the cooking zone select- ing zone ed flashes 00 to 99 minutes Touch the cooking zone se- lected After a few seconds the pilot light flashes more slowly. The time is set. -
Page 16: Changing The Time
Changing the time Step Control panel field Display TIMER Select cook- Pilot light of the cooking zone select- ing zone ed flashes faster The time remaining is displayed 01 to 99 minutes Touch the cooking zone se- lected After a few seconds the pilot light flashes more slowly. The time is set. -
Page 17: Safety Cut-Out
Safety cut-out Cooking surface • If after switching on the cooking surface, a heat setting is not set for a cooking zone within approx. 10 seconds, the cooking surface auto- matically switches itself off. • If one or more sensor fields are covered for longer than approx. 10 seconds, e.g. -
Page 18: Tips On Cooking And Frying
Tips on Cooking and Frying Information on acrylamides According to the latest scientific knowledge, intensive browning of food, especially in products containing starch, can constitute a health risk due to acrylamides. Therefore we recommend cooking at the lowest possible temperatures and not browning foods too much. Cookware for induction cooking zones Cookware made of suitable... -
Page 19: Examples Of Cooking Applications
Examples of cooking applications The information given in the following table is for guidance only. Heat Cooking- Cooking set- suitable for Tips/Hints process time ting Off position Keeping Keeping cooked foods food as required Cover warm warm Hollandaise sauce, Melting melting butter, chocolate, 5-25 mins. -
Page 20: Cleaning And Care
Cleaning and Care Take care! Risk of burns from residual heat. Let the appliance cool down. Warning! Sharp objects and abrasive cleaning materials will damage the appliance. Clean with water and washing up liquid. Warning! Residues from cleaning agents will damage the appliance. Remove residues with water and washing up liquid. -
Page 21: What To Do If
What to do if … Problem Possible cause Remedy The cooking zones will not More than 10 seconds have Switch the appliance on switch on or are not func- passed since the appliance again. tioning was switched on The lock is switched on Switch off the lock (See the section “Locking/un- locking the control panel”) - Page 22 Problem Possible cause Remedy flashes Unsuitable cookware Use suitable cookware No cookware on the cook- Place cookware on the ing zone cooking zone The diameter of the bot- Move onto a smaller cook- tom of the cookware is too ing zone small for the cooking zone Use suitable cookware is lit...
-
Page 23: Disposal
Disposal Packaging material The packaging materials are environmentally friendly and can be recy- cled. The plastic components are identified by markings, e.g. >PE<, >PS<, etc. Please dispose of the packaging materials in the appropriate container at the community waste disposal facilities. Old appliance The symbol on the product or on its packaging indicates that this... -
Page 24: Installation Instructions
Installation Instructions Safety instructions The laws, ordinances, directives and standards in force in the country of use are to be followed (safety regulations, proper recycling in accord- ance with the regulations, etc.) Installation may only be carried out by a qualified electrician. The minimum distances to other appliances are to be observed. - Page 25 A device must be provided in the electrical installation which allows the appliance to be disconnected from the mains at all poles with a contact opening width of at least 3 mm. Suitable isolation devices include line protecting cut-outs, fuses (screw type fuses are to be removed from the holder), earth leakage trips and contactors.
-
Page 26: Installation Proud Of The Work Surface
Installation proud of the work surface • Clean the worktop around the cut-out area. • Stick the single-sided adhesive sealing tape provided on the under- side of the hob around the outside edge ensuring that it is not stretched. The two ends of the tape should join in the middle of one side. -
Page 27: Service
Service In the event of technical faults, please first check whether you can remedy the problem yourself with the help of the operating instruc- tions (section “What to do if…”). If you were not able to remedy the problem yourself, please contact the Customer Care Department or one of our service partners. - Page 28 Chère cliente, cher client, Veuillez lire attentivement la notice d’utilisation dans son intégralité et la conserver pour pouvoir la consulter ultérieurement. Veuillez la transmettre à l’éventuel propriétaire ultérieur de l’appareil. Les symboles suivants sont utilisés dans ce document : Consignes de sécurité Avertissement : conseils pour votre sécurité...
- Page 29 Sommaire Notice d'utilisation ......... 30 Sécurité...
-
Page 30: Notice D'utilisation
Notice d'utilisation 1 Sécurité Pour ne pas perdre le bénéfice de la garantie en cas de panne, veuillez observer ces recommandations. Cet appareil est conforme aux directives CE suivantes : – directive 73/23/CEE du 19.02.1973 basse tension – directive 89/336/CEE du 03.05.1989 relative à la compatibilité élec- tromagnétique (CEM) y compris la directive de révision 92/31/CEE –... -
Page 31: Précautions De Nettoyage
Précautions d’utilisation. • Retirer les étiquettes et les films protecteurs de la vitrocéramique. • Attention aux risques de brûlures lors de l’utilisation de l’appareil. • S’assurer que les câbles d’appareils électriques n’entrent pas en con- tact avec les surfaces brûlantes de l’appareil ou les récipients brû- lants. -
Page 32: Description De L'appareil
Description de l'appareil Equipement du plan de cuisson Zone de cuisson à induction 1400W Zone de cuisson à induction 1850 W avec fonction Puissance 1800W avec fonction Puissance 2500 W Bandeau de Bandeau de commande commande Zone de cuisson à induction 2300 W Zone de cuisson à... -
Page 33: Touche Sensitive "Touch Control
Touche sensitive “Touch Control” Les touches sensitives Touch Control permettent de commander l’appa- reil. Une pression sur les touches sensitives permet d’activer les fonc- tions et le fonctionnement de ces dernières est confirmé par des voyants ou par des signaux sonores. Appuyez sur les touches sensitives par un mouvement de haut en bas, en évitant de recouvrir les autres touches. -
Page 34: Voyants
Voyants Voyant Description ¾ La zone de cuisson est désactivée Position de maintien au La fonction de maintien au chaud chaud/STOP+GO est activée ¿ Ç Niveaux de cuisson Le niveau de cuisson est sélection- né Niveaux de cuisson avec Le niveau intermédiaire est activé point décimal Commande de démarra- La commande de démarrage auto-... -
Page 35: Utilisation De L'appareil
Le ventilateur de refroidissement se met en fonctionnement et s’arrê- te automatiquement en fonction de la température du système électro- nique. Utilisation de l’appareil Utilisez des plats de cuisson adaptés aux zones de cuisson à induction. Mettre l’appareil sous/hors tension Bandeau de com- Affichage Voyant de con-... -
Page 36: Activer Et Désactiver La Fonction De Maintien Au Chaud
Activer et désactiver la fonction de maintien au chaud La fonction STOP+GO permet de mettre simultanément toutes les zones de cuisson actives en position de maintien au chaud puis de réactiver le niveau de cuisson sur lequel elles se trouvaient au préalable. Cette fonction permet d’interrompre brièvement une cuisson, par ex. -
Page 37: Verrouiller/Déverrouiller Le Bandeau De Commande
Si l’indicateur de chaleur résiduelle est visible (voyant ), le démarrage automatique de la cuisson ne s’enclenche pas. La durée du démarrage automatique de la cuisson dépend du niveau cuisson sélectionné. Niveau de Durée du démarrage Niveau Durée du cuisson de la commande intermé- démarrage de la... -
Page 38: Utilisation De La Sécurité Enfants
Utilisation de la sécurité enfants La sécurité enfants évite toute activation non souhaitée de l’appareil. Activer la sécurité enfants Etape Bandeau de commande Voyant/Signal ¾ Mettre l’appareil sous tension (sans activer de niveau de cuisson) Appuyez sur jusqu’à ce que le Signal sonore signal retentisse Appuyez sur... -
Page 39: Activer/Désactiver La Fonction Puissance
Activer/désactiver la fonction Puissance La fonction Puissance augmente la performance des zones de cuis- son, comme par exemple la possibilité de faire bouillir rapidement une quantité importante d’eau. La fonction Puissance est active pendant 10 minutes. Ensuite, la zone de cuisson à induction se repositionne sur le niveau de cuisson 9. Bandeau de commande Affichage Activer Appuyez sur... -
Page 40: Utilisation Du Minuteur
Utilisation du minuteur L’une des deux fonctions Minuteur peut simultanément être attribuée à l’ensemble des zones de cuisson. Fonction Condition de mise en Résultat après oeuvre écoulement du dé- Désactivation auto- d’une zone de cuisson le signal sonore matique sélectionnée clignote La zone de cuisson se désactive... -
Page 41: Réglage De La Durée
Lorsque le clignotement du voyant de contrôle ralentit, vous pouvez sé- lectionner ou modifier un niveau de cuisson. Lorsque la fonction Minuteur est sélectionnée sur plusieurs zones de cuisson, le temps restant le plus court de l’ensemble de ces fonctions s'affiche au de quelques secondes et le voyant de contrôle correspon- dant clignote. -
Page 42: Modification De La Durée
Modification de la durée Etape Bandeau de com- Affichage mande TIMER sélection Le voyant de contrôle de la zone de d’une zone de cuis- cuisson sélectionnée clignote plus ra- pidement Le temps restant s’affiche 01 jusqu’à 99 minutes Appuyez sur de la zone de cuisson sélectionnée Après quelques secondes, le clignotement du voyant de contrôle ra-... -
Page 43: Désactivation De Sécurité
Désactivation de sécurité Table de cuisson • Si, après activation de la table de cuisson, une zone de cuisson ou un niveau de cuisson n’est pas sélectionné dans les 10 secondes environ qui suivent, la table de cuisson se désactive automatiquement. •... -
Page 44: Conseils De Cuisson
Conseils de cuisson Conseils relatifs à l’acrylamide Selon les connaissances scientifiques les plus récentes, faire brunir les aliments de manière intensive, en particulier les produits contenant de l’amidon, peut provoquer des problèmes de santé dus à l’acrylamide. C’est pourquoi nous vous recommandons de faire cuire à basse tempé- rature et de ne pas trop faire brunir les aliments. -
Page 45: Conseils D'économie D'energie
Conseils d’économie d’energie Placez votre plat de cuisson sur la zone de cuisson avant d’activer cette dernière. Dans la mesure du possible, couvrez toujours votre plat de cuisson avec un couvercle. Exemples d’utilisation pour la cuisson Les valeurs indiquées dans le tableau suivant sont indicatives. Niveau Type de adapté... -
Page 46: Nettoyage Et Entretien
Niveau Type de adapté à Durée Remarques/conseils cuisson cuisson des escalopes, des cordons bleus, des steaks de vian- Faire de hâchée, des saucisses, cuire cuisson Retournez de temps en du foie, des roux, des à feu continue temps œufs, des gâteaux aux doux œufs, faire frire des bei- gnets. -
Page 47: Nettoyez L'appareil Après Chaque Utilisation
Nettoyez l’appareil après chaque utilisation 1. Nettoyez l’appareil à l’aide d’un chiffon humide et un peu de produit de nettoyage. 2. Séchez l’appareil avec un chiffon propre. Enlever les salissures 1. Placez le grattoir de nettoyage obliquement par rapport à la surface de la vitrocéramique. -
Page 48: Que Faire Si
Que faire si … Symptôme Cause possible Solution Il est impossible d’activer Plus de 10 minutes se sont Remettez l’appareil sous les zones de cuisson ou ces écoulées depuis que l’ap- tension. dernières ne fonctionnent pareil est sous tension Le verrouillage est enclen- Déclenchez le verrouillage ché... - Page 49 Symptôme Cause possible Solution Un signal sonore retentit, La touche sensitive Mar- Ne déposez aucun objet sur l’appareil se met sous ten- che/Arrêt est recouverte, le bandeau de commande sion puis de nouveau hors par exemple par un chiffon tension au bout de 5 se- condes ;...
-
Page 50: Protection De L'environnement
Protection de l’environnement Elimination du matériel d’emballage Les matériaux d’emballage sont écologiques et recyclables. Les matières plastiques portent un signe distinctif, par ex. >PE<, >PS<, etc. Eliminez les matériaux d’emballage en fonction de leur signe distinctif dans les containeurs prévus à cet effet sur le site de collecte de votre commune. Appareils usagés Le symbole sur le produit ou son emballage indique que ce produit... -
Page 51: Instructions D'installation
Instructions d'installation Sécurité L’utilisateur est tenu de respecter la législation, la réglementation, les lignes directrices et les normes en vigueur dans son pays de résidence (dispositions relatives à la sécurité, recylage conforme et réglementaire, etc.). Le montage relève de la compétence exclusive de spécialistes. Respectez l’espacement minimal requis par rapport aux autres appa- reils. -
Page 52: Montage Par Applique
• En cas d’endommagement du câble de raccordement de l’appareil, remplacez impérativement ce dernier par un câble spécifique (de type H05BB-F Tmax. 90° ou de plus grande capacité). Ce type de câble est disponible auprès du service après-vente. Au niveau de l'installation électrique, prévoir un dispositif qui permette de couper cet appareil du secteur sur tous les pôles avec une ouverture des contacts d'au moins 3 mm. -
Page 53: Service Après-Vente
Service après-vente En cas d’anomalie de fonctionnemet vérifiez d’abord si vous ne pouvez pas remédier vous-même au dysfonctionnement à l’aide de la notice d’utilisation (chapitre “Que faire, si...“). Si vous ne parvenez pas à remédier au dysfonctionnement, veuillez contacter votre vendeur ou à défaut le Centre Contact Consommateurs qui vous communiquera l’adresse service après-vente. - Page 54 Geachte klant, Lees deze gebruiksaanwijzing zorgvuldig door en bewaar de gebruiks- aanwijzing zodat deze later kan worden geraadpleegd. Geef deze gebruiksaanwijzing door aan een eventuele volgende eige- naar van het apparaat. De volgende symbolen worden in de tekst gebruikt: Veiligheidsvoorschriften Waarschuwing! Aanwijzingen ten behoeve van uw persoonlijke veilig- heid.
-
Page 55: Montage
Inhoud Gebruiksaanwijzing ........56 Veiligheidsvoorschriften . -
Page 56: Gebruiksaanwijzing
Gebruiksaanwijzing 1 Veiligheidsvoorschriften Neem deze aanwijzingen in acht, omdat anders bij eventuele schade het recht op garantie vervalt. Dit apparaat is in overeenstemming met de volgende EG-richtlijnen: – 73/23/EEG van 19.02.1973 Laagspanningsrichtlijn – 89/336/EEG van 03.05.1989 EMC-richtlijn inclusief aangepaste richt- lijn 92/31/EEG –... -
Page 57: Veiligheid Tijdens Het Gebruik
Veiligheid tijdens het gebruik • Verwijder stickers en folies van het glaskeramiek. • Wanneer u onoplettend bent tijdens het werken met het apparaat, bestaat er risico op verbranding. • De snoeren van elektrische apparaten mogen niet tegen het hete ap- paraatoppervlak resp. -
Page 58: Beschrijving Van Het Apparaat
Beschrijving van het apparaat Uitrusting kookplaat Inductie-kookzone 1400 W Inductie-kookzone 1850 W met Powerfunctie 1800 W met Powerfunctie 2500 W Bedieningsveld Bedieningsveld Inductie-kookzone 2300 W Inductie-kookzone 1850 W met Powerfunctie 3200 W met Powerfunctie 2500 W Uitrusting bedieningsveld Kookzone-indicaties Timerfunctie Aan/uit Timer met controlelampje... -
Page 59: Touch-Control-Sensorvelden
Touch-control-sensorvelden Het apparaat wordt bediend door middel van touch-control-sensorvel- den. Functies worden door het aanraken van de sensorvelden gestuurd en door indicaties en akoestische signalen bevestigd. De sensorvelden moeten van bovenaf worden aangeraakt, zonder ande- re sensorvelden te bedekken. Sensorveld Functie Aan/uit Apparaat in- en uitschakelen... -
Page 60: Indicaties
Indicaties Indicatie Beschrijving ¾ Kookzone is uitgeschakeld Warmhoudstand Warmhoudstand/STOP+GO-func- tie is ingeschakeld ¿ Ç Kookstanden Kookstand is ingesteld Kookstanden met Tussenstand is ingeschakeld decimale punt Automatisch kooksys- Automatische kooksysteem is ac- teem tief Fout Er is een storing opgetreden Panherkenning Kookgerei is ongeschikt of te klein of er is geen kookgerei geplaatst Restwarmte... -
Page 61: Bediening Van Het Apparaat
Bediening van het apparaat Inductie-kookzone met daarvoor geschikte pannen gebruiken. Apparaat in- en uitschakelen Bedieningsveld Indicatie Controlelampje ¾ Inschakelen 2 seconden brandt aanraken Uitschakelen 1 seconde / geen gaat uit aanraken Na het inschakelen moet binnen ca. 10 seconden een kookstand of een functie worden ingesteld, anders schakelt het apparaat automatisch uit. -
Page 62: Automatisch Kooksysteem Gebruiken
Automatisch kooksysteem gebruiken Stap Bedieningsveld Indicatie Ç / p Ç / p Stap instellen Ç / p Kort uitschakelen aanraken Æ ¿ aanraken om de gewenste kookstand in te stellen na 3 seconden Alle kookzones zijn met een automatisch kooksysteem uitgevoerd. Het automatische kooksysteem stelt de kookzone voor een bepaalde tijd op vol vermogen en schakelt vervolgens automatisch op de ingestelde kookstand terug. -
Page 63: Bedieningsveld Vergrendelen / Ontgrendelen
Bedieningsveld vergrendelen / ontgrendelen Het bedieningsveld kan met uitzondering van het sensorveld ”Aan/Uit“ op ieder gewenst moment worden vergrendeld, bijv. om het wijzigen van de instellingen als gevolg van het met een lap afnemen, te voorko- men. Bedieningsveld Indicatie Inschakelen aanraken (na 5 seconden) Uitschake-... -
Page 64: Kinderbeveiliging Gebruiken
Kinderbeveiliging gebruiken De kinderbeveiliging voorkomt ongewenst gebruik van het apparaat. Kinderbeveiliging inschakelen Stap Bedieningsveld Indicatie/signaal ¾ apparaat inschakelen (geen kookstand instellen) aanraken tot het signaal akoestisch signaal klinkt aanraken Apparaat wordt uitgeschakeld. Kinderbeveiliging is ingeschakeld. Kinderbeveiliging uitschakelen Stap Bedieningsveld Indicatie/signaal apparaat inschakelen aanraken tot het signaal akoestisch signaal... -
Page 65: Powerfunctie In-En Uitschakelen
Powerfunctie in-en uitschakelen De Powerfunctie geeft extra vermogen aan de inductie-kookzones, bijv. om een extra grote hoeveelheid water snel aan het koken te bren- gen. De Powerfunctie wordt voor een periode van 10 minuten geactiveerd. Daarna schakelt de inductie-kookzone automatisch weer op kookstand 9 in. -
Page 66: Timer Gebruiken
Timer gebruiken Alle kookzones kunnen tegelijk een van de beide Timerfuncties gebrui- ken. Functie Vereisten Resultaat na verloop van de tijd Automatische uit- bij een ingestelde akoestisch signaal schakeling kookstand knippert kookzone wordt uit- geschakeld Kookwekker bij niet gebruikte akoestisch signaal kookzones knippert Als een kookzone wordt uitgeschakeld, dan wordt tevens de ingestelde... -
Page 67: Tijd Instellen
Als meerdere Timerfuncties zijn ingesteld, dan wordt na een aantal se- conden de kortste resterende tijd van alle Timerfuncties aangegeven en knippert het bijbehorende controlelampje. Tijd instellen Stap Bedieningsveld Indicatie TIMER kookzone se- Controlelampje van de geselecteerde lecteren kookzone knippert van de minuten geselecteerde kook-... -
Page 68: Tijd Wijzigen
Tijd wijzigen Stap Bedieningsveld Indicatie TIMER kookzone se- Controlelampje van de geselecteerde lecteren kookzone knippert sneller Resterende tijd wordt aangegeven van de ge- minuten selecteerde kookzo- ne aanraken Na een aantal seconden knippert het controlelampje langzamer. De tijd is ingeschakeld. De tijd geeft de resterende tijd aan (loopt terug). -
Page 69: Veiligheidsuitschakeling
Veiligheidsuitschakeling Kookplaat • Als na het inschakelen van de kookplaat niet binnen ca. 10 seconden bij een kookzone een kookstand wordt ingesteld, schakelt de kook- plaat automatisch uit. • Als een of meerdere sensorvelden langer dan ca. 10 seconden worden afgedekt, bijv. -
Page 70: Tips Voor Koken En Braden
Tips voor koken en braden Aanwijzing met betrekking tot acrylamide Volgens de laatste wetenschappelijke inzichten kan een intensieve brui- ning van levensmiddelen, met name bij zetmeelhoudende producten, een gevaar voor de gezondheid door acrylamide veroorzaken. Om die reden adviseren wij levensmiddelen zoveel mogelijk bij lage temperatu- ren te bereiden en de gerechten niet te veel te bruinen. -
Page 71: Tips Voor Energiebesparing
Tips voor energiebesparing Kookgerei vóór het inschakelen van de kookzone plaatsen. Kookgerei, indien mogelijk, altijd met een deksel afsluiten. Toepassingsvoorbeelden voor het koken De gegevens in de volgende tabel dienen slechts als richtlijn. Kook- Kook- Geschikt voor Duur Aanwijzingen/tips stand proces uit-stand Warm... -
Page 72: Reiniging En Onderhoud
Kook- Kook- Geschikt voor Duur Aanwijzingen/tips stand proces Aardappel koekjes, lende- Sterk 5-15 min. stukken, steaks, pannen- Tussendoor keren braden per pan koeken Aan de kook Aan de kook brengen van grotere hoeveelheden water, pasta ko- brengen ken, aanbraden van vlees (goulash, stoofvlees), frituren van pata- Aanbra tes frites Frituren... - Page 73 Verwijder verontreinigingen 1. Plaats een glasschraper schuin op het glaskeramische vlak. 2. Verwijder verontreinigingen door de schraper over het oppervlak te la- ten glijden. 3. Maak het apparaat schoon met een vochtige doek en een klein beetje handafwasmiddel. 4. Wrijf het apparaat droog met een schone doek. verwijderen Soort vervuiling direct...
-
Page 74: Wat Is Er Aan De Hand Als
Wat is er aan de hand als … Storing Mogelijke oorzaak Oplossing De kookzones kunnen niet Na het inschakelen van het Apparaat nogmaals inscha- ingeschakeld worden of apparaat zijn meer dan 10 kelen functioneren niet seconden verstreken De vergrendeling is inge- De vergrendeling uitscha- schakeld kelen (zie hoofdstuk ”Be-... - Page 75 Storing Mogelijke oorzaak Oplossing De indicatie wisselt tussen Power-Management redu- Zie hoofdstuk ”Powerfunc- twee kookstanden ceert het vermogen van tie in-/uitschakelen” deze kookzone knippert Ongeschikt kookgerei Geschikt kookgerei gebrui- Geen kookgerei op de Kookgerei plaatsen kookzone De diameter van de bodem Op een kleinere kookzone van het kookgerei is te plaatsen...
-
Page 76: Afvalverwerking
Afvalverwerking Verpakkingsmateriaal De verpakkingsmaterialen zijn niet schadelijk voor het milieu en her- bruikbaar. De kunststoffen hebben de volgende aanduidingen, bijv. >PE<, >PS<, enz. Verwijder de verpakkingsmaterialen in overeenstem- ming met de aanduiding bij de gemeentelijke inzamelplaatsen in de daarvoor bestemde containers. Oud apparaat verwijderen Het symbool op het product of op de verpakking wijst erop dat dit... -
Page 77: Montageaanwijzing
Montageaanwijzing Veiligheidsvoorschriften De in het land van gebruik geldende wetten, verordeningen, richtlijnen en normen moeten in acht worden genomen (veiligheidsvoorschriften, vakkundige recycling volgens de voorschriften, enzovoort). De montage mag alleen worden uitgevoerd door een vakman. De minimale afstanden tot andere apparaten moeten worden aange- houden. -
Page 78: Montage Gelijk/Vlak Naast Elkaar
• Als de aansluitkabel van dit apparaat beschadigd is, moet deze door een speciale aansluitkabel (type H05BB-F Tmax 90°; of hoger) worden vervangen. Deze is verkrijgbaar bij de service-dienst. In de elektrische installatie moet een inrichting worden aangebracht, die het mogelijk maakt het apparaat met een contactopeningswijdte van min. -
Page 79: Service
Service Controleer bij technische storingen eerst of u met behulp van de ge- bruiksaanwijzing (hoofdstuk „Wat te moet doen als…“) het probleem zelf kunt oplossen. Wanneer u het probleem niet kunt oplossen, neemt u contact op met onze service-afdeling. Om u snel te kunnen helpen, hebben wij de volgende gegevens nodig: –... -
Page 80: Montage
Assembly / Montage... - Page 83 Rating Plate / Plaque signalétique / Typeplaatje...
- Page 84 USD 14 billion in more than 150 countries around the world. AEG Hausgeräte GmbH Postfach 1036 D-90327 Nürnberg http://www.aeg.hausgeraete.de © Copyright by AEG Subject to change without notice Sous réserve de modifications 822 924 986-A-021204-01 Wijzigingen voorbehouden...