Table des Matières
Publicité
Les langues disponibles
Les langues disponibles
Liens rapides
marca propiedad de | est une marque de | trade mark propiety of |marchio di proprietà di:
El fabricante se reserva el derecho de modificar sin previo aviso las características de sus productos para introducir mejoras técnicas o cumplir con nuevas regulaciones oficiales./Le
constructeur se réserve le droit de modifier les caractéristiques de ses produits en vue d'y apporter des améliorations techniques ou de respecter de nouvelles réglamentations./The
manufacturer reserves the right to modify the specifications of its products in order to make technical improvements or comply with new regulations. Il produttore si riserva il diritto di modificare
senza preavviso le caratteristiche dei suoi prodotti al fine di introdurre dei miglioramenti tecnici o di conformarsi alle nuove normative ufficiali./Le constructeur se réserve le droit de modifier
les caractéristiques de ses produits en vue d'y apporter des améliorations techniques ou de respecter de nouvelles réglamentations./The manufacturer reserves the right to modify the
specifications of its products in order to make technical improvements or comply with new regulations.
BR16
ES|FR|IT|EN
INDICADOR
INDICATEUR
INDICATORE
INDICATOR
Pol. Empordà Internacional Calle F. Parcela 15-16
17469 VILAMALLA - (Girona) SPAIN
T. (34) 972 527 212 - F. (34) 972 527 211
V.4
20171023
Publicité
Table des Matières

Manuels Connexes pour Giropes Baxtran BR16


Sommaire des Matières pour Giropes Baxtran BR16
- Page 1 BR16 ES|FR|IT|EN INDICADOR INDICATEUR INDICATORE INDICATOR 20171023 marca propiedad de | est une marque de | trade mark propiety of |marchio di proprietà di: Pol. Empordà Internacional Calle F. Parcela 15-16 17469 VILAMALLA - (Girona) SPAIN T. (34) 972 527 212 - F. (34) 972 527 211 El fabricante se reserva el derecho de modificar sin previo aviso las características de sus productos para introducir mejoras técnicas o cumplir con nuevas regulaciones oficiales./Le constructeur se réserve le droit de modifier les caractéristiques de ses produits en vue d’y apporter des améliorations techniques ou de respecter de nouvelles réglamentations./The manufacturer reserves the right to modify the specifications of its products in order to make technical improvements or comply with new regulations.
-
Page 2: Table Des Matières
BR16 INDICE 1. ESPECIFICACIONES 2. ALIMENTACIÓN 3. ANTES DE SU UTILIZACIÓN 4. CONSUMO 5. CONEXIÓN DE LA CÉLULA DE CARGA AL INDICADOR 6. DESCRIPCIÓN DEL DISPLAY Y DEL TECLADO 7. MODO CUENTA PIEZA 8. CONFIGURACIÓN DE PARÁMETROS 8.1 CUENTAS INTERNAS (A/D) I UF-1 8.2 CONFIGURACIÓN DE LOS LÍMITES DE PESO (SUPERIOR E INFERIOR) | UF-2 8.3 AUTODESCONEXIÓN AUTOMÁTICA | UF-3 8.4 CONFIGURACIÓN DE LA ILUMINACIÓN DEL DISPLAY | UF-4... - Page 3 BR16 1. SPÉCIFICATIONS 2. ALIMENTATION 3. AVANT SON UTILISATION 4. CONSOMMATION 5. CONNEXION DE LA CAPTEURS DE CHARGE À L’INDICATEUR 6. DESCRIPTION DE L’AFFICHAGE ET DU CLAVIER 7. MODE COMPTE PIÈCES 8. CONFIGURATION DE PARAMÈTRES 8.1 COMPTES INTERNES (A/D) | UF-1 8.2 CONFIGURATION DES LIMITES DE POIDS (SUPÉRIEURE ET INFÉRIEURE) | UF-2 8.3 AUTODÉCONNEXION AUTOMATIQUE | UF-3 8.4 CONFIGURATION DE L’ÉCLAIRAGE DE L’AFFICHAGE | UF-4...
- Page 4 BR16 1. SPECIFICHE 2. ALIMENTAZIONE 3. PRIMA DELL’USO 4. CONSUMO 5. COLLEGAMENTO DELLA CELLA DI CARICO ALL’INDICATORE 6. DESCRIZIONE DEL DISPLAY E DELLA TASTIERA 7. MODALITÀ CONTAPEZZI 8. CONFIGURAZIONE DEI PARAMETRI 8.1 CALCOLI INTERNI (A/D) | UF-1 8.2 CONFIGURAZIONE DEI LIMITI DI PESO (SUPERIORE E INFERIORE) | UF-2 8.3 DISATTIVAZIONE AUTOMATICA | UF-3 8.4 CONFIGURAZIONE DELL’ILLUMINAZIONE DEL DISPLAY | UF-4 8.5 FUNZIONE HOLD | UF-5...
- Page 5 BR16 1. SPECIFICATIONS 2. POWER 3. BEFORE USE 4. CONSUMPTION 5. CONNECTING THE CHARGING CELL TO THE INDICATOR 6. DISPLAY AND KEYBOARD DESCRIPTION 7. CONTACTS 8. PARAMETER CONFIGURATION 8.1 INTERIOR CALCULATIONS (A/D) | UF-1 8.2 CONSTRUCTION OF WEIGHT LIMIT (HIGH AND LOWER) | UF-2 8.3 AUTOMATIC DISARMING | UF-3 8.4 CONFIGURING DISPLAY LIGHTING | UF-4 8.5 HOLD FUNCTION | UF-5...
-
Page 6: Especificaciones
MANUAL DE USUARIO BR16 1. ESPECIFICACIONES BR16 Precisión Clase III Rango de sensibilidad de la célula de carga 1.5 ~ 3.0mV/V No linealidad ≤0.01%F.S Voltaje célula DC 5V Escalón 1/2/5 (seleccionable) Frecuencia de muestreo 20 veces por segundo (fuera de metereologia) Resolución interna 300.000~600.000 2. - Page 7 MANUAL DE USUARIO BR16 ESQUEMA CÉLULA DE 7 PINS CÉLULA CARGA PIN 1 EXC + PIN 2 SEN+ PIN 3 SIG + PIN 4 SIG - PIN 5 SEN - PIN 6 EXC - PIN 7 CONNEXIÓN RS232 PROTOCOLO UART signal of EIA-RS232 C SEÑAL UART DE EIA-RS232 C Salida serie 1200 / 2400 / 4800 / 9600 / 19200 / 34800 bps...
-
Page 8: Descripción Del Display Y Del Teclado
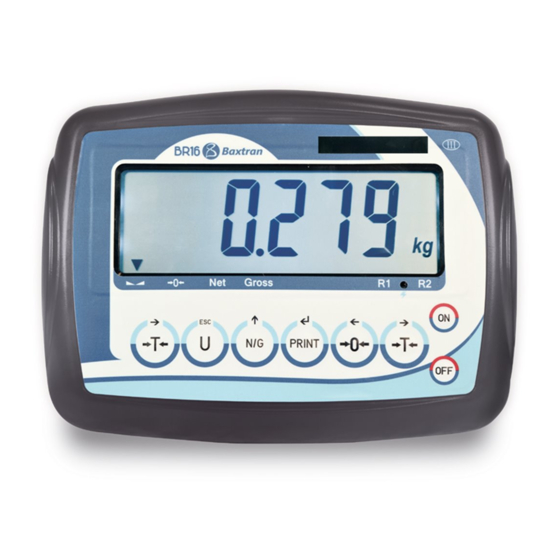
Pantone White Pantone 550 C Pantone Black Pantone 485 C MANUAL DE USUARIO BR16 6. DESCRIPCIÓN DEL DISPLAY Y DEL TECLADO Opció 1 Pulsar esta tecla para encender la balanza. Mantener pulsada esta tecla durante 2 segundos para apagar el indicador. 1º función Para cambiar de unidad de pesaje. 2º función Para salir de un menú. Para poner la lectura del display a cero “0”, el valor del display tiene que ser menor al ± 2% 1º... -
Page 9: Configuración De Parámetros
MANUAL DE USUARIO BR16 8. CONFIGURACIÓN DE PARÁMETROS CUENTAS INTERNAS (A/D) UF-1 CONFIGURACIÓN DE LOS LÍMITES DE PESO (SUPERIOR E INFERIOR) UF-2 AUTODESCONEXIÓN AUTOMÁTICA UF-3 CONFIGURACIÓN DE LA ILUMINACIÓN DEL DISPLAY UF-4 FUNCIÓN HOLD UF-5 SALIDA DE DATOS RS-232 UF-6 CONFIGURACIÓN DE LA VELOCIDAD RS-232 UF-7 PROMEDIO DEL CERO... -
Page 10: Autodesconexión Automática | Uf
MANUAL DE USUARIO BR16 9. Utilizar las teclas para mover el cursor y la tecla para seleccionar el número deseado. 10. Pulsar la tecla para confirmar. Las indicaciones en pantalla apareceran en pantalla según el peso. Lo, Ok , Hi 8.3 AUTODESCONEXIÓN AUTOMÁTICA | UF-3 MODOS: Autodesconexión desactivada. AoFF 00 Autodesconexión activada, la balanza se apagará automáticamente transcurrido 1 minuto AoFF 01 sin ser utilizada. Seleccione el tiempo de autodesconexión antre 1 y 99 minutos. 1. Pulsar la tecla para acceder al parámetro. -
Page 11: Salida De Datos Rs-232 | Uf
MANUAL DE USUARIO BR16 MODOS: • HOLD 0 : Desactivado. • HOLD 1 : Animal en movimiento. • HOLD 2 : Valor de pico. • HOLD 3 : Hold estable. • HOLD 4 : Hold estable con auto cancelación a cero. HOLD 1. • Una vez se ha accedido a este parámetro, la pantalla muestra PCt, • Use las teclas para mover el cursor y la tecla para seleccionar el valor del rango de HOLD deseado de 001 a 100. - Page 12 MANUAL DE USUARIO BR16 FORMATO DE LOS DATOS Ningún formato 232 0 Salida RS-232 Desactivada Formato 1 PC FORMATO AUTOMÁTICO DE PESO O PIEZAS 232 1 Envío de trama, sin acumulación, cuando consigue estabilidad con formato 1. ENVÍO DE TRAMA 232 2 Envío de trama continuo con formato 1. 232 3 Envío de trama, sin acumulación, manual presionando la tecla con formato 1. Formato 2 PC FORMATO AUTOMÁTICO DE PESO O PIEZAS 232 4 Envío de trama, sin acumulación, cuando consigue estabilidad con formato 2.
- Page 13 MANUAL DE USUARIO BR16 Formato 4 impresora FORMATO AUTOMÁTICO DE PESO O PIEZAS NOTA: totalización no disponible en metrologia legal. ENVÍO DE TRAMA 232 9 Envío de trama y acumulación manual, pasando por cero y presionando la tecla con formato 4 Si estando la pantalla a 0, se presiona dos veces seguidas la tecla se imprime el resumen de tiquets Y se borra la memoria de pesadas NOTA: totalización no disponible en metrologia legal. ENVÍO DE TRAMA 232 10 Envío de trama y acumulación automática a la estabilidad, pasando por cero y presionando la tecla con formato 4. Si estando la pantalla a 0, se presiona dos veces seguidas la tecla se imprime el resumen de tiquets Y se borra la memoria de pesadas...
-
Page 14: Configuración De La Velocidad Del Convertidor| Uf-7 (*)
MANUAL DE USUARIO BR16 FORMATO 1 (232 1 ~ 3): 18 BYTES ASCII PARA LAS UNIDADES kg, g, t, lb CR LF Cabecera 1 Cabecera 2 Datos Unidad 21 BYTES ASCII PARA LAS UNIDADES tl, T, lboz CR LF Cabecera 1 Cabecera 2 Datos Unidad... -
Page 15: Configuración De La Gravedad | Uf-9 (*)
MANUAL DE USUARIO BR16 8.9 CONFIGURACIÓN DE LA GRAVEDAD | UF-9 (*) 1. Pulsar la tecla para acceder al parámetro. 2. Para cambiar el valor, pulsar la tecla , seguidamente utilizar las teclas, utilizar las teclas y para mover el cursor y la tecla para seleccionar el número deseado. 9. CALIBRACIÓN ( SOLO PARA EL PERSONAL AUTORIZADO) (*) CALIBRACIÓN DE CERO + PESO (SPAN) ECF-1 CALIBRACIÓN DE CERO ECF-2... -
Page 16: Parámetros Técnicos
MANUAL DE USUARIO BR16 10. PARÁMETROS TÉCNICOS NO MODIFIQUE LOS PARÁMETROS TÉCNICOS SI NO ES ESTRICTAMENTE NECESARIO. UNA MALA CONFIGURACIÓN DE ESTA SECCIÓN PUEDE PROVOCAR UN MAL FUNCIONAMIENTO DE LA BALANZA. En el caso de visores verificados, abra el visor y cambie el interruptor de calibración a la posición CAL ON. En este caso, recuerde que romper los precintos conlleva la perdida de la verificación. ENTRAR Y SALIR DE LA CALIBRACIÓN DISPLAY DESCRIPCIÓN y SECUENCIA DE USO • CON EL INTERRUPTOR INTERNO EN POSICION CAL ON. • Con el visor apagado, presione y mantenga presionada la tecla y encendida de equipo, cuando LF 1 1001 la pantalla muestre , suelte la tecla Presione la tecla para acceder a las teclas para cambiar de parámetro y la tecla para salir del menú y el visor se reiniciará automáticamente. - Page 17 MANUAL DE USUARIO BR16 CONFIGURACIÓN LF 2 DISPLAY DESCRIPCIÓN Y SECUENCIA DE USO PRIMER PASO 262144 • VISUALIZACIÓN DE LAS CUENTAS INTERNAS • POSIBLES VALORES DE LOS PARÁMETROS DE CONFIGURACIÓN SEGUNDO PASO A: Sistema Métrico 0:NO 1: kg B: Sistema Americano 0:NO 1: lb 2:lb oz C: otras unidades 0:NO 1: TW kg 2:HK kg 3:VISS 1 0 0 0 0 1 D: PCS 0:OFF 1: ON...
- Page 18 MANUAL DE USUARIO BR16 VELOCIDAD DEL CONVERTIDOR AD LF 4 SPEED 1 velocidad estándar 15Hz. SPEED 2 alta velocidad 30Hz. SPEED 3 baja velocidad 7.5Hz *Esta función queda bloqueada cuando UF-5 se encuentra en modo HOLD 1. *El valor de fábrica es 1 DISPLAY DESCRIPCIÓN Y SECUENCIA DE USO •Presione para empezar o para salir del menú y la báscula se reiniciará automática- mente. SPEED 1 • Utilice y después para seleccionar la velocidad del convertidor AD (presione para salir de la configuración y volver al menú LF4) LF 4 •...
- Page 19 MANUAL DE USUARIO BR16 CONFORMIDAD DE APROBACIÓN LF 6 DISPLAY DESCRIPCIÓN Y SECUENCIA DE USO nonE Versión no verificada OIML versión verificada NO MODIFIQUE BAJO NINGÚN CONCEPTO ESTE PARÁMETRO. LF 6 El cambio de este parámetro implica el bloqueo de ciertas funcionalidades. GRAVEDAD LF 7 *Introduzca la gravedad de su zona antes de realizar la primera calibración. *Introduzca la gravedad de destino después de realizar la calibración. *El valor de gravedad será denegado si es mayor que 9.83217 (gravedad de polo) o inferior que 9.78031 (gravedad del ecuador). Valor de fábrica: 9.801 DISPLAY DESCRIPCIÓN Y SECUENCIA DE USO •...
-
Page 20: Garantía
MANUAL DE USUARIO BR16 11. GARANTÍA Esta indicador está garantizado contra todo defecto de fabricación y de material, por un periodo de 1 año a partir de la fecha de entrega. Durante este periodo, GIROPÈS, se hará cargo de la reparación del indicador. Esta garantía no incluye los daños ocasionados por uso indebido o sobrecargas. La garantía no cubre los gastos de envío (portes) necesarios para la reparación del indicador. -
Page 21: Spécifications
MANUEL D’UTILISATION BR16 1. SPÉCIFICATIONS BR16 Précision Classe III Plage de sensibilité de la capteurs de 1.5 ~ 3.0mV/V charge Non linéarité ≤0.01%F.S Voltage capteurs DC 5V Échelon 1/2/5 (sélectionnable) Fréquence d’échantillonnage 20 fois par seconde (au delà de la météorologie) Résolution interne 300.000~600.000 2. ALIMENTATION BR16 Entrée 100/240VAC Sortie 12V/1A Batterie rechargeable... - Page 22 MANUEL D’UTILISATION BR16 SCHÉMA CAPTEURS À 7 BROCHES CÉLULA CARGA PIN 1 EXC + PIN 2 SEN+ PIN 3 SIG + PIN 4 SIG - PIN 5 SEN - PIN 6 EXC - PIN 7 CONNEXION RS232 PROTOCOLE signal UART de EIA-RS232 C SIGNAL UART DE EIA-RS232 C Sortie série 1200 / 2400 / 4800 / 9600 / 19200 / 34800 bps Bits de données...
-
Page 23: Description De L'affichage Et Du Clavier
Pantone White Pantone 550 C Pantone Black Pantone 485 C MANUEL D’UTILISATION BR16 6. DESCRIPTION DE L’AFFICHAGE ET DU CLAVIER Opció 1 Appuyez sur cette touche pour faire mettre la balance en marche. Maintenez cette touche appuyée pendant 2 secondes pour éteindre l’indicateur. 1ère fonction Pour changer l’unité de pesage. 2ème fonction Pour quitter un menu. Pour régler l’affichage de lecture à zéro « 0 », la valeur d’affichage doit être inférieure à ± 2 % 1ère fonction de la capacité maximale. 2ème fonction Pour déplacer un espace vers la gauche ou vers le bas dans le mode de programmation. 1ère fonction Pour soustraire le poids d’un récipient. 2ème fonction Pour déplacer un espace vers la droite ou vers le bas dans le mode de programmation. -
Page 24: Configuration De Paramètres
MANUEL D’UTILISATION BR16 8. CONFIGURATION DE PARAMÈTRES COMPTES INTERNES (A/D) UF-1 CONFIGURATION DES LIMITES DE POIDS (SUPÉRIEURE ET INFÉRIEURE) UF-2 AUTOCONNEXION AUTOMATIQUE UF-3 CONFIGURATION DE L'ÉCLAIRAGE DE L'AFFICHAGE UF-4 FONCTION HOLD UF-5 SORTIE DE DONNÉES RS-232 UF-6 CONFIGURATION DE LA VITESSE RS-232 UF-7 MOYENNE DU ZÉRO UF-8... -
Page 25: Autodéconnexion Automatique | Uf
MANUEL D’UTILISATION BR16 9. Utilisez les touches pour déplacer le curseur et la touche pour sélectionner le numéro désiré. 10. Appuyer sur la touche pour confirmer. Les indications à l’écran apparaîtront à l’écran selon le poids. Lo, Ok , Hi 8.3 AUTODÉCONNEXION AUTOMATIQUE | UF-3 MODES: Autodéconnexion désactivée. AoFF 00 Autodéconnexion activée, la balance s’éteindra automatiquement après 1 minute sans AoFF 01 utilisation. Sélectionnez le temps d’autodéconnexion entre 1 et 99 minutes. 1. Appuyez sur la touche pour accéder au paramètre. 2. Utilisez les touches pour déplacer le curseur et la touche pour sélectionner le temps désiré. 3. Appuyer sur la touche pour confirmer. 8.4 CONFIGURATION DE L’ÉCLAIRAGE DE L’AFFICHAGE | UF-4 MODES: Automatique. -
Page 26: Sortie De Données Rs-232 | Uf
MANUEL D’UTILISATION BR16 MODES: • HOLD 0: Désactivé. • HOLD 1: Animal en mouvement. • HOLD 2: Valeur de pic. • HOLD 3: Hold stable. • HOLD 4: Hold stable avec auto-annulation à zéro. HOLD 1. • Une fois que vous avez accédé à ce paramètre, l’écran affiche PCt, • Utilisez les touches pour déplacer le curseur et la touche pour sélectionner la valeur de la plage HOLD désirée de 00 à 100. • Appuyer sur la touche pour confirmer. • L ’écran affichera time 8, utilisez les touches pour déplacer le curseur et la touche pour sélectionner le nombre de répétitions au cours de la plage de hold. - Page 27 MANUEL D’UTILISATION BR16 Format 3 imprimante FORMAT AUTOMATIQUE DE POIDS OU PIÈCES 232 7 Envoi de trame et accumulation manuelle, en passant par zéro et en appuyant sur la touche avec format 3. Si l’écran est à 0, on appuie deux fois de suite sur la touche et la ligne totale est imprimée. Et on efface la mémoire des pesées. Remarque : Accumulation et totalisation non disponible pour la métrologie légale. ENVOI DE TRAME 232 8 Envoi de trame et accumulation automatique à la stabilité, en passant par 0 avec format 3. Si l’écran est à 0, on appuie deux fois de suite sur la touche et la ligne totale est imprimée. Et on efface la mémoire des pesées. Remarque : Accumulation et totalisation non disponible pour la métrologie légale.
- Page 28 MANUEL D’UTILISATION BR16 Format 4 imprimante FORMAT AUTOMATIQUE DE POIDS OU PIÈCES REMARQUE: totalisation non disponible en métrologie légale. ENVOI DE TRAME 232 9 Envoi de trame et accumulation manuelle en passant par zéro et en appuyant sur la touche avec format 4 Si l’écran est à 0, on appuie deux fois de suite sur la touche et le résumé des tickets est imprimé. Et on efface la mémoire des pesées. REMARQUE: totalisation non disponible en métrologie légale. ENVOI DE TRAME 232 10 Envoi de trame et accumulation automatique à la stabilité, en passant par zéro et en appuyant sur la touche avec format 4. Si l’écran est à 0, on appuie deux fois de suite sur la touche le résumé des tickets est imprimé. Et on efface la mémoire des pesées. REMARQUE: totalisation non disponible en métrologie légale. REMARQUE: Chaque fois qu’une accumulation est terminée, le viseur affiche le total cumulé pendant 3 secondes.
-
Page 29: Configuration De La Vitesse Du Convertisseur | Uf-7 (*)
MANUEL D’UTILISATION BR16 FORMAT 2 (232 4 ~ 6): 12 OCTETS ASCII POUR LES UNITÉS kg, g, t, lb CR LF Données Unité 15 OCTETS ASCII POUR LES UNITÉS tl, t, lboz CR LF Données Unité 13 OCTETS ASCII POUR L’UNITÉ pcs CR LF Données Unité... -
Page 30: Étalonnage (Uniquement Pour Le Personnel Autorisé) (*)
MANUEL D’UTILISATION BR16 9. ÉTALONNAGE (UNIQUEMENT POUR LE PERSONNEL AUTORISÉ) (*) ÉTALONNAGE DE ZÉRO+POIDS (PORTÉE) ECF-1 ÉTALONNAGE DE ZÉRO ECF-2 ÉTALONNAGE DE POIDS (PORTÉE) ECF-3 0. Déplacer le switch interne sur CAL ON. 1. Dans le mode de pesage normal, appuyez sur les touches , l’écran affichera le message ECF – 1. 2. Appuyez sur les touches pour sélectionner la fonction désirée: ECF-1, ECF-2 o ECF-3 9.1 ÉTALONNAGE DE ZÉRO+POIDS| ECF-1 Appuyez sur la touche , l’écran affichera CALZ. - Page 31 MANUEL D’UTILISATION BR16 les joints d’étanchéité implique la perte de la vérification. ENTRER DANS ET QUITTER L’ÉTALONNAGE ÉCRAN DESCRIPTION ET SÉQUENCE D’UTILISATION • AVEC INTERRUPTEUR INTERNE EN POSITION CAL ON. • Avec le viseur éteint, appuyez et maintenez la touche appuyée et sous tension lorsque l’écran LF 1 1001 affiche , relâchez la touche Appuyez sur la touche pour accéder aux touches pour modifier le paramètre et la touche pour quitter le menu et le viseur redémarrera automatiquement. ÉTALONNAGE DE POIDS LF 1 ÉCRAN DESCRIPTION ET SÉQUENCE D’UTILISATION L’étalonnage peut être effectué avec n’importe quel poids, mais le poids ne doit pas être inférieur à 1/3 LF 1 de la capacité maximale ou ne doit jamais être dépassé.
- Page 32 MANUEL D’UTILISATION BR16 CONFIGURATION LF 2 ÉCRAN DESCRIPTION ET SÉQUENCE D’UTILISATION PREMIÈRE ÉTAPE 262144 • VISUALISATION DES COMPTES INTERNES • POSSIBLES VALEURS DES PARAMÈTRES DE CONFIGURATION DEUXIÈME ÉTAPE A: Système métrique 0:NO 1: kg B: Système américain 0:NO 1: lb 2:lb oz C: autres unités 0:NO 1: TW kg 2:HK kg 3:VISS 1 0 0 0 0 1 D: PCS 0:OFF 1: ON A B C D E F E: double plage...
- Page 33 MANUEL D’UTILISATION BR16 VITESSE DU CONVERTISSEUR AD LF 4 SPEED 1 vitesse standard 15Hz. SPEED 2 vitesse élevée 30Hz. SPEED 3 vitesse basse 7.5Hz *Cette fonction est bloquée lorsque UF-5 est en mode HOLD 1. *La valeur d’usine est 1. ÉCRAN DESCRIPTION ET SÉQUENCE D’UTILISATION •Appuyez sur pour démarrer ou sur pour quitter le menu et la balance redémarrera automatiquement. SPEED 1 •...
- Page 34 MANUEL D’UTILISATION BR16 CONFORMITÉ D’APPROBATION LF 6 DISPLAY DESCRIPTION ET SÉQUENCE D’UTILISATION nonE Version non vérifiée OIML version vérifiée NE MODIFIER EN AUCUN CAS CE PARAMÈTRE. LF 6 La modification de ce paramètre implique le blocage de certaines fonctionnalités. GRAVITÉ LF 7 *Entrez la gravité de votre région avant de réaliser le premier étalonnage. *Entrez la gravité de destination avant de réaliser l’étalonnage. *La valeur de la gravité sera refusée si supérieure à 9,83217 (gravité de pôle) ou inférieure à 9,78031 (gravité de l’Équateur). Valeur d’usine: 9.801 ÉCRAN DESCRIPTION ET SÉQUENCE D’UTILISATION • Appuyez sur pour continuer ou sur pour quitter le menu et la balance redémarrera LF 7 automatiquement.
-
Page 35: Garantie
MANUEL D’UTILISATION BR16 11. GARANTIE Cet indicateur est garanti contre les défauts de fabrication et de matériaux pour une période de 1 an à compter de la date de livraison. Durant cette période, Giropès, se chargera de la réparation de l’indicateur.Cette garantie ne couvre pas les dommages causés par une mauvaise utilisation ou une surcharge. La garantie ne couvre pas les frais d’expédition (fret) nécessaires à la réparation de l’indicateur. -
Page 36: Specifiche
MANUALE DI ISTRUZIONI BR16 1. SPECIFICHE BR16 Precisione Classe III Intervallo di sensibilità della cella di carico 1,5 ~ 3,0 mV/V Non linearità 0,01%F.S Voltaggio cella CC 5V Gradino 1/2/5 (selezionabile) Frequenza di campionamento 20 volte al secondo (al di fuori della metrologia) Risoluzione interna 300.000-600.000 2. - Page 37 MANUALE DI ISTRUZIONI BR16 SCHEMA DELLA CELLA A 7 PIN CÉLULA CARGA PIN 1 EXC + PIN 2 SEN+ PIN 3 SIG + PIN 4 SIG - PIN 5 SEN - PIN 6 EXC - PIN 7 COLLEGAMENTO RS232 PROTOCOLLO UART signal of EIA-RS232 C SEGNALE UART DI EIA-RS232 C Uscita serie...
-
Page 38: Descrizione Del Display E Della Tastiera
Pantone White Pantone 550 C Pantone Black Pantone 485 C MANUALE DI ISTRUZIONI BR16 6. DESCRIZIONE DEL DISPLAY E DELLA TASTIERA Opció 1 Per accendere la bilancia, premere questo tasto. Per spegnere l’indicatore, mantenere premuto questo tasto per 2 secondi. 1 funzione Per cambiare l’unità di pesatura. 2 funzione Per uscire da un menu. Per mettere la lettura del display sullo zero “0”, il valore del display deve essere inferiore a 1 funzione ±2% della capacità massima. 2 funzione Per spostarsi di uno spazio verso sinistra o verso il basso in modalità di programmazione. 1 funzione Per sottrarre il peso di un contenitore. -
Page 39: Configurazione Dei Parametri
MANUALE DI ISTRUZIONI BR16 8. CONFIGURAZIONE DEI PARAMETRI CALCOLI INTERNI (A/D UF-1 CONFIGURAZIONE DEI LIMITI DI PESO (SUPERIORE E INFERIORE) UF-2 DISATTIVAZIONE AUTOMATICA UF-3 CONFIGURAZIONE DELL’ILLUMINAZIONE DEL DISPLAY UF-4 FUNZIONE HOLD UF-5 USCITA DEI DATI RS-232 UF-6 CONFIGURAZIONE DELLA VELOCITÀ RS-232 UF-7 MEDIA DELLO ZERO UF-8... -
Page 40: Disattivazione Automatica | Uf
MANUALE DI ISTRUZIONI BR16 9. Utilizzare i tasti per muovere il cursore e il tasto per selezionare il numero desiderato. 10. Premere il tasto per confermare. Le indicazioni sullo schermo appariranno sullo schermo secondo il peso. Lo, Ok , Hi 8.3 DISATTIVAZIONE AUTOMATICA | UF-3 MODALITÀ: Disattivazione automatica disabilitata. AoFF 00 Disattivazione automatica abilitata, la bilancia si spegnerà automaticamente dopo 1 minuto- AoFF 01 senza essere utilizzata. Selezionare il tempo di disattivazione automatica tra 1 e 99 minuti. 1. -
Page 41: Uscita Dei Dati Rs-232 | Uf
MANUALE DI ISTRUZIONI BR16 MODALITÀ: • HOLD 0 : Disattivata • HOLD 1 : Animale in movimento. • HOLD 2 : Valore di picco. • HOLD 3 : Hold stabile. • HOLD 4 : Hold stabile con autocancellazione a zero. HOLD 1. • Dopo aver acceduto a questo parametro, lo schermo visualizza PCt, • Utilizzare i tasti per spostare il cursore e il tasto per selezionare il valore dell’intervallo di HOLD desiderato da 001 a 100. - Page 42 MANUALE DI ISTRUZIONI BR16 FORMATO DEI DATI Nessun formato 232 0 Uscita RS-232 Disattivata Formato 1 PC FORMATO AUTOMATICO DI PESO O PEZZI 232 1 Invio di frame, senza accumulo, quando raggiunge la stabilità con formato 1. 232 2 Invio di frame continuo con formato 1. INVIO DI FRAME 232 3 Invio di frame, senza accumulo, manuale premendo il tasto con formato 1. Formato 2 PC FORMATO AUTOMATICO DI PESO O PEZZI...
- Page 43 MANUALE DI ISTRUZIONI BR16 Formato 4 stampante FORMATO AUTOMATICO DI PESO O PEZZI N.B: totale non disponibile in metrologia legale. INVIO DI FRAME 232 9 Invio di frame e accumulo manuale, passando per zero e premendo il tasto con formato 4 Con lo schermo a 0, se si preme due volte consecutive il tasto stampa il riassunto degli scontrini. e si cancellano le pesature in memoria. N.B: totale non disponibile in metrologia legale. INVIO DI FRAME 232 10 Invio di frame e accumulo automatico alla stabilità, passando...
-
Page 44: Configurazione Della Velocità Del Convertitore| Uf-7 (*)
MANUALE DI ISTRUZIONI BR16 FORMATO 1 (232 1 ~ 3): 18 BYTES ASCII PER LE UNITÀ kg, g, t, lb CR LF Intestazione 1 Intestazione 2 Dati Unità 21 BYTES ASCII PER LE UNITÀ tl, T, lboz CR LF Intestazione 1 Intestazione 2 Dati Unità... -
Page 45: Configurazione Della Gravità | Uf-9 (*)
MANUALE DI ISTRUZIONI BR16 8.9 CONFIGURAZIONE DELLA GRAVITÀ | UF-9 (*) 1. Premere il tasto per accedere al parametro. 2. Per modificare il valore, premere il tasto , quindi utilizzare i tasti, utilizzare i tasti per spostare il cursore e il tasto per selezionare il numero desiderato. 9. CALIBRAZIONE (SOLO PER IL PERSONALE AUTORIZZATO) (*) CALIBRAZIONE DELLO ZERO + PESO (SPAN) ECF-1 CALIBRAZIONE DELLO ZERO ECF-2... -
Page 46: Parametri Tecnici
MANUALE DI ISTRUZIONI BR16 10. PARAMETRI TECNICI NON MODIFICARE I PARAMETRI TECNICI SE NON È STRETTAMENTE NECESSARIO. UNA ERRATA CONFIGURAZIONE DI QUESTA SEZIONE PUÒ PROVOCARE UN MALFUNZIONAMENTO DELLA BILANCIA. In caso di schermi collaudati, aprire lo schermo e spostare l’interruttore di calibrazione nella posizione CAL ON. In tal caso, è opportuno ricordare che la rottura dei sigilli comporta la perdita del collaudo. ENTRARE E USCIRE DALLA CALIBRAZIONE DISPLAY DESCRIZIONE E SEQUENZA D’USO • CON L’INTERRUTTORE INTERNO IN POSIZIONE CAL ON. • Con lo schermo spento, tenere premuto il tasto e accensione di apparecchiatura; quando LF 1 1001 lo schermo mostra , rilasciare il tasto Premere il tasto... - Page 47 MANUALE DI ISTRUZIONI BR16 CONFIGURAZIONE LF 2 DISPLAY DESCRIZIONE E SEQUENZA D’USO PRIMO PASSAGGIO 262144 • VISUALIZZAZIONE DEI CALCOLI INTERNI • POSSIBILI VALORI DEI PARAMETRI DI CONFIGURAZIONE SECONDO PASSAGGIO A: Sistema metrico 0:NO 1: kg B: Sistema americano 0:NO 1: lb 2:lb oz C: Altre unità 0:NO 1: TW kg 2:HK kg 3:VISS 1 0 0 0 0 1 D: PCS 0:OFF 1: ON...
- Page 48 MANUALE DI ISTRUZIONI BR16 VELOCITÀ DEL CONVERTITORE AD LF 4 SPEED 1 velocità standard 15Hz. SPEED 2 alta velocità 30Hz. SPEED 3 bassa velocità 7.5Hz *Questa funzione rimane bloccata quando UF-5 è in modalità HOLD 1. *Il valore di fabbrica 1 DISPLAY DESCRIZIONE E SEQUENZA D’USO •Premere per iniziare o per uscire dal menu e la bascula si riavvierà automaticamente. SPEED 1 •...
- Page 49 MANUALE DI ISTRUZIONI BR16 CONFORMITÀ DI APPROVAZIONE LF 6 DISPLAY DESCRIZIONE E SEQUENZA D’USO nonE Versione non verificata OIML versione verificata NON MODIFICARE PER NESSUN MOTIVO QUESTO PARAMETRO. LF 6 La modifica di questo parametro implica il blocco di alcune funzionalità. GRAVITÀ LF 7 *Prima di effettuare la prima calibrazione, inserire la gravità della propria zona. *Dopo aver effettuato la calibrazione, inserire la gravità di destinazione. *Il valore della gravità sarà rifiutato se è maggiore di 9.83217 (gravità del polo) o minore di 9.78031 (gravità dell’equatore). Valore di fabbrica: 9.801 DISPLAY DESCRIPCIÓN Y SECUENCIA DE USO •Premere...
-
Page 50: Garanzia
MANUALE DI ISTRUZIONI BR16 11. GARANZIA Questo indicatore è protetto da una garanzia contro qualsiasi difetto di fabbricazione e di materiali della durata di un anno a partire dalla data di consegna. Durante questo periodo, GIROPÈS SL si farà carico della riparazione della stesso. Questa garanzia non include i danni causati da uso improprio o sovraccarichi. La garanzia non copre le spese di spedizione (trasporto) necessarie alla riparazione dell’indicatore. -
Page 51: Specifications
USER’S MANUAL BR16 1. SPECIFICATIONS BR16 Precision Clase III Load Cell Sensitivity Range 1.5 ~ 3.0mV/V Nonlinearity ≤0.01%F.S Voltage cell DC 5V Step 1/2/5 (selectable) Frequency of sampling 20 times per second (outside meteorology) Internal resolution 300.000~600.000 2. EXCITATION BR16 Input 230~240V Output 10V 600mA Rechargeable Battery 6V/4Ah 3. - Page 52 USER’S MANUAL BR16 7 PIN CELL SCHEME CÉLULA CARGA PIN 1 EXC + PIN 2 SEN+ PIN 3 SIG + PIN 4 SIG - PIN 5 SEN - PIN 6 EXC - PIN 7 CONNECTION RS232 PROTOCOL UART signal of EIA-RS232 C SIGNAL UART EIA-RS232 C Serial output 1200 / 2400 / 4800 / 9600 / 19200 / 34800 bps Data Bits 8 bits...
-
Page 53: Keyboard Description
USER’S MANUAL BR16 Pantone 7469 C Pantone White 6. KEYBOARD DESCRIPTION Pantone 550 C Pantone Black Pantone 485 C Opció 1 Press this key to turn on the balance. Press and hold this key for 2 seconds to turn off the indicator. 1º function To change the weighing unit. 2º function To exit a menu. To set the display reading to zero “0”, the display value must be less than ± 2% of the 1º... -
Page 54: Piece Counting Mode
USER’S MANUAL BR16 7. PIECE COUNTING MODE 1. Press the key until the symbol PCS appears on the screen 2. Press the key successively to choose the quantity of pieces of the sample. On the screen will appear, successively, C10/C20/ C50/C100/C200. 3. Place the sample on the platform, and wait until the sign of stability and press the key 4. Place the product on the platform and the screen will show the number of pieces. The accumulation and the sending of data will depend on the mode chosen in the section UF-6. • To turn to the normal weighing mode, press the key • If the user wants to go back to the piece counting mode, using the same sample of reference, press the key again. • If the user want to change the sample of reference, the user must repeat the steps described above. 8. PARAMETERS CONFIGURATION INTERNAL COUNTING (A/D) UF-1 CONFIGURATION OF THE WEIGHT LIMITS (SUPERIOR AND INFERIOR) UF-2 AUTO SWITCH OFF UF-3... -
Page 55: Hold Function | Uf
USER’S MANUAL BR16 5. The display will show the message “000.00h” (Superior limit=Hi) 6. Use the keys to move the cursor and the key to choose the desired number. Note: If you need to change or modify the last digit you can place the cursor on it to do it. 7. Press the key to confirm. 8. The display will show the value. (configuration of the alarm) DISPLAY VALUE ESTABILITY There is no need to stabilize the alarm to make it ring The alarm must be stabilized to ring Always 0 Alarm switched off The alarm ring if it is place on the band OK ( between the limits Lo and Hi) The alarm rings if it is situated below the inferior limit Lo or above the superior limit 9. Press the keys to move the cursor and the key to choose the desired number.. - Page 56 USER’S MANUAL BR16 1. Press the key to access to the parameter. 2. Press the key to choose the desired mode. 3. Press the key to confirm. MODES: • HOLD 0 : Deactivated. • HOLD 1 : Animal in movement • HOLD 2 : Value of peak • HOLD 3 : Hold steady •...
- Page 57 USER’S MANUAL BR16 Format 3 printer DIFFERENT POSSIBLE FORMATS 232 7 232 8 Connection sending and manual accumulation, passing by zero and Connection sending and automatic accumulation to stability, passing pressing the key with format 3. 0 with format 3. If the user presses the key twice one after the other when the screen is in 0, the total line is printed. If the user presses the key twice one after the other when the screen is in 0, the total line is printed And the memory of the weights is removed And the memory of the weights is removed Format 4 printer DIFFERENT POSSIBLE FORMATS 232 9 232 10 Connection sending and manual Connection sending and automatic accumulation, passing 0 and accumulation to stability, passing...
- Page 58 USER’S MANUAL BR16 FORMAT 1 (232 1 ~ 3): 18 BYTES ASCII FOR THE UNITIES kg, g, t, lb CR LF Headboard 1 Headboard 2 data Unit 21 BYTES ASCII FOR THE UNITIES tl, T, lboz CR LF Headboard 1 Headboard 2 data Unit 19 BYTES ASCII FOR THE UNIT pcs CR LF Headboard 1...
-
Page 59: Configuration Of Gravity | Uf-9 (*)
USER’S MANUAL BR16 8.7 CONFIGURATION OF THE SPEED OF THE CONVERTER | UF-7 1. Press the key to access the parameter. 2. Press the key to choose the desired mode: • Mode 1 : Normal • Mode 2: Fast • Mode 3: Slow 3. Press the key to confirm. 8.8 BLIND| UF-8 It appears 0 on screen until the next division is selected. It starts to show values from that division. Example: Scale with e =2g Blind in 5 divisions It will show 0 until it reaches 25= 10 g, the first value it will show will be 12g. -
Page 60: Calibration (Only For Authorized Personnel) (*)
USER’S MANUAL BR16 9. CONFIGURATION OF THE READJUSTMENTS IN CALIBRATION 1. When the user is in the normal mode of weighing, he must press the keys , the message ECF-1 is going to appear on the display. 2. Press the keys to select the desired function: ECF-1, ECF-2 or ECF-3 * ECF-1 CALIBRATION OF ZERO + WEIGHT Press the key ,the display will show CALZ. Press the key ,to put the reading of the display to zero. Press the keys to move the cursor. - Page 61 USER’S MANUAL BR16 CALIBRATION OF THE WEIGHT LF 1 DISPLAY DESCRIPTION AND SEQUENCE OF USE The calibration can be done with any weight, but the weight ca not be inferior to 1/100 of the maxi- LF 1 mum capacity and it must also never be exceeded. CAL Z •Press the key to start the calibration of zero ( press To exit the calibration and go back to the menu LF1) 0 ~ 9 150.00 kg •Use and then press to introduce the weight with which the calibration will be done. ( press the key to exit the calibration and go back to the menu LF1) •Place the required weight on the scale as it is indicated in the display. 150.00 kg 150.00 kg •Once everything is steady, press the key to calibrate it ( press the key ESC to exit the calibration...
- Page 62 USER’S MANUAL BR16 After introducing the parameters LF2, the indicator will show the last configuration saved. All the steps to follow must be completed, if they are not done the indicator will continue with the previous configuration. Proceed with the calibration of weight after LF2. LF 2 •Press the key to start and display the internal value. Press to exit the menu and the scale will automatically restart. 262144 •Press the key To continue with the configuration. (press the key to exit from the configu- ration and go back to the menu LF2). 0 ~ 9 •Use the keys and then press the key to choose the UNITS 100001 OF WEIGHT . (press the key to exit from the configuration and go back to the menu LF2). 0 ~ 9 •Use the keys and then press the key to choose the MAXI- 000000kg MUM WEIGHT. press the key to exit from the configuration and go back to the menu LF2). d 0.0kg •Use the keys and Then To move the decimal point ( press the key To exit from the configuration and go back to the menu LF2).
- Page 63 USER’S MANUAL BR16 SPEED 1 •Use the key and then the key to select the speed of the AD converter ( press the key to exit from the configuration and go back to the menu LF4) LF 4 •Use the keys and then To continue with the other adjustment and press the key to exit from the menu and the scale will start again automatically. BLINF LF 5 DISPLAY DESCRIPTION AND SEQUENCE OF USE ZP 0 OFF LF 5 ZP 1 One division will not show being at zero ZP 2 Two division will not show being at zero ZP 3 Three divisions will not show being at zero ZP 4 Four divisions will not show being at zero ZP 5 Five divisions will not show being at zero *This function is going to be blocked when UF-5 is in mode HOLD 1 *The value of factory is ZP 0 DISPLAY DESCRIPTION AND SEQUENCE OF USE...
- Page 64 INITIAL ZERO LF 8 SEtZ Y resets of the point of zero every time that the scale is begun again. SEtZ n resets of the point zero OFF DISPLAY DESCRIPTION AND SEQUENCE OF USE • Press the key to start or the key to exit from the menu and the scale will start again LF 8 automatically. • Use the key and then the key to choose the mode of zero initial ( press the key …to exit SetZ Y from the configuration and go back to the menu LF8) LF 8 • Use the keys and then the key to continue with other adjustments o press the key to exit from the menu and the scale will start again automatically. 11. GUARANTEE This scale has a warranty against all manufacture and material defects, for a period of a year starting with the delivery date. During this period, GIROPES, will be in charge of the repairing of the scale. This warranty does not include the damages done by overload or wrong use. The warranty does not cover the delivery expenses necessary for the repair of the scale.
- Page 65 BR16...
- Page 66 marca propiedad de | est une marque de | trade mark propiety of: Pol. Empordà Internacional Calle F. Parcela 15-16 17469 VILAMALLA - (Girona) SPAIN T. (34) 972 527 212 - F. (34) 972 527 211...