Chapitres
Table des Matières

Manuels Connexes pour Comelit 1998NV

Sommaire des Matières pour Comelit 1998NV
- Page 1 MANUALE TECHNICAL MANUEL TECNICO MANUAL TECHNIQUE Centralino di portineria audio/video Art. Audio/video porter switchboard 1998NV Standard de conciergerie audio/vidéo...
-
Page 3: Table Des Matières
Avvertenze • Questo prodotto Comelit è progettato e realizzato con lo scopo di essere utilizzato nella realizzazione di impianti per comunicazione audio e video in edifici residenziali, commerciali, industriali e in edifici pubblici o ad uso pubblico. • Tutte le attività connesse all’installazione dei prodotti Comelit devono essere realizzate da personale tecnicamente qualificato, seguendo attentamente le indicazioni di manuali / istruzioni dei prodotti stessi. - Page 4 Figura 1 PQRS WXYZ...
-
Page 5: Descrizione
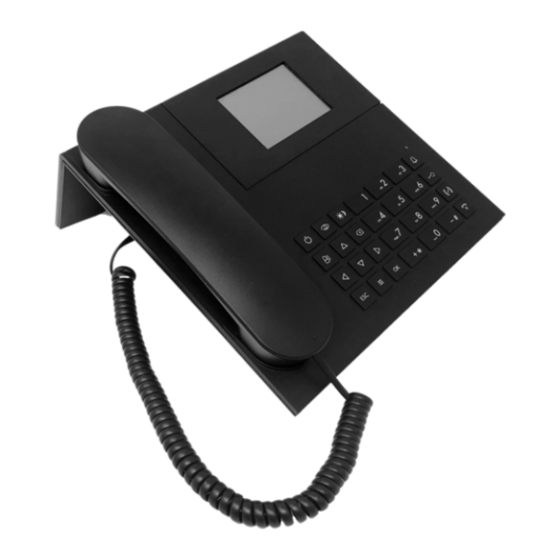
Descrizione Tastiera Centralino audio/video di portineria in versione da tavolo per sistema Simplebus 1 con tastiera a microswitch e display alfanumerico a 32 caratteri. ON/OFF Accensione/spegnimento (tenere Cornetta ergonomica con aggancio alla base di premuto per 2 secondi) appoggio agevolato da inserti calamitati invisibili. Tasto per attivare l’autoaccensione Consente di visualizzare il codice e il nome dell’utente da chiamare e dell’utente chiamante, mantenendo in... -
Page 6: Collegamenti
Collegamenti 1195 MONTANTE VIDEOCITOFONICA 1998NV POSTO ESTERNO Descrizione morsettiera RX TX GND Seriale rs232 da connettere al centralino remoto negli impianti multicentralino in serie o in parallelo LP1 LP2 Linea dati in arrivo da posto esterno LM LM Linea dati verso i montanti CH CH Contatto libero per “ripetizione di chiamata”... -
Page 7: Caratteristiche Tecniche
Caratteristiche tecniche DATI GENERALI Altezza prodotto (mm) 110 Larghezza prodotto (mm) 225 Profondità prodotto (mm) 225 Peso (g) 1500 Colore prodotto Nero Materiale ABS Montaggio su base da tavolo Si SISTEMI COMPATIBILI Audio/video Simplebus 2 con alimentatore art. 4888C CARATTERISTICHE DEL DISPLAY Tipo di display LCD, grafico Dimensione (pollici) (“) 3,5 Risoluzione (pixel) 320x240... -
Page 8: Interfaccia E Modalità Di Navigazione
Interfaccia e modalità di navigazione Descrizione interfaccia Notifiche lampeggiante indica il numero di STATO IMPIANTO chiamate non risposte in modalità 5 6 7 8 GIORNO e NOTTE 12:45:07 lampeggiante indica il numero di allarmi Mar 05 Nov 19 ricevuti e non evasi DATA NOTIFICHE Navigazione menu... -
Page 9: Utilizzo
Utilizzo Le seguenti funzioni sono quelle che caratterizzano U2 Come rispondere a una chiamata da posto il centralino ed il suo modo di operare, sono tutte esterno accessibili in modo diretto senza ricorrere ai menu. Il centralino deve essere in modalità GIORNO, in modalità... -
Page 10: U3 Come Chiamare Un Posto Interno
14:15:26 14 :15 : 26 Lun 12 Mar 20 Lun 12 Mar 20 ______________________ Sergio Rossi Codice Apriporta eseguito Scorri Menù - per terminare la conversazione riagganciare la - premere il numero breve corrispondente (es. cornetta. numero breve 1= codice memorizzato “002”, vedi “U21 Registrazione numeri brevi”). -
Page 11: U4 Come Inoltrare Una Chiamata Da Posto Esterno A Posto Interno
U4 Come inoltrare una chiamata da posto sollevare la cornetta e premere il tasto esterno a posto interno rimettersi in comunicazione col posto esterno; Quando il centralino riceve una chiamata da un 14 :15 : 26 posto esterno indirizzata a un posto interno: Lun 12 Mar 20 - viene visualizzato il NOME del chiamato (se esiste in rubrica un nominativo associato al codice... -
Page 12: U6 Come Chiamare Un Posto Interno Presente Nelle Chiamate Ricevute
14 :15 : 26 U6 Come chiamare un posto interno presente Lun 12 Mar 20 nelle chiamate ricevute Quando il centralino riceve una chiamata da posto interno che non viene gestita entro 30 sec. (operatore momentaneamente assente o occupato in altra conversazione), questa viene automaticamente memorizzata nel menu Chiamate ricevute. -
Page 13: U7 Come Chiamare Un Centralino Secondario Da Centralino Principale
- premendo il tasto MENU viene visualizzata una - Se la chiamata è avvenuta correttamente: 14:15:26 schermata nell’angolo in basso a destra. Lun 12 Mar 20 14:15:26 Lun 12 Mar 20 Chiamante Sergio Rossi Codice Ricevuta Lun 12 Mar 20 Alle ore Chiamato utente centralino Elimina voce... -
Page 14: U8 Come Chiamare Un Centralino Principale Da Centralino Secondario
- per rispondere alla chiamata proveniente dal U8 Come chiamare un centralino principale da centralino secondario sollevare la cornetta; centralino secondario Per chiamare un centralino principale da centralino secondario premere - il centralino principale va in comunicazione con il centralino secondario, la durata massima della Quando il centralino principale chiamato solleva conversazione è... -
Page 15: U11 Come Attivare O Disattivare I Centralini Principali
ATTENZIONE! Se il centralino è occupato o il Centralinista è - premere il tasto MENU del centralino inattivo e momentaneamente assente e non può rispondere visualizzare tramite i tasti il menu Configurazioni, entro 30 secondi, essa verrà inserita nella coda premere il tasto OK;... -
Page 16: U13 Come Attivare Un Relè Supplementare
U13 Come attivare un relè supplementare (es. per attivare in modo indipendente e con un comando dedicato: luci, contatti di allarme TVCC, cancelli carrai, ingressi senza posto esterno o altri dispositivi) Gli attuatori si possono attivare sia in modalità di riposo, sia in modalità... -
Page 17: Rubrica
Rubrica - verranno visualizzati in ordine alfabetico i nomina- Rubrica • Visualizza ___________________ tivi memorizzati in rubrica; utilizzare i tasti Sergio Rossi Codice scorrere la lista. Per velocizzare lo scorrimento dei nominativi, tener • Nuova voce premuto il tasto Nome _____________ 14:15:26 Codice ___ Lun 12 Mar 20... -
Page 18: U17 Come Cancellare Un Nome In Rubrica
- visualizzare tramite i tasti la voce Nuova voce, 14 :15 : 26 premere il tasto OK; Lun 12 Mar 20 14 :15 : 26 • Visualizza Lun 12 Mar 20 • Nuova voce • Visualizza • Numeri brevi • Nuova voce •... -
Page 19: U18 Come Modificare Un Nome In Rubrica
14 :15 : 26 14:15:26 Lun 12 Mar 20 Lun 12 Mar 20 ______________________ ______________________ Sergio Rossi Sergio Rossi Elimina voce? Codice Codice Nuova voce Ok Esc Elimina voce Modifica voce Scorri Menù Scorri Menù Elimina tutto - selezionare tramite il tasto la voce Modifica - per confermare l’eliminazione premere il tasto OK;... -
Page 20: U20 Info Rubrica
- comparirà una schermata in cui verrà chiesto se U21 Registrazione numeri brevi si vuole eliminare l’intera rubrica; confermare con il Tramite questa funzione è possibile memorizzare tasto OK oppure annullare con il tasto ESC; modificare e cancellare i numeri brevi. 14 :15 : 26 Lun 12 Mar 20 - premere il tasto MENU e visualizzare tramite i tasti... -
Page 21: Chiamate Ricevute
Chiamate ricevute Chiamate • Visualizza 14:15:26 Chiamate Sergio Rossi ricevute Codice Lun 12 Mar 20 Ricevuta Lun 12 Mar. 12 Alle ore 14 : 15 : 26 Chiamante Sergio Rossi Codice • Elimina tutto Ricevuta Lun 12 Mar 12 Elimina tutto? Alle ore 13 : 15 : 11 Elimina voce... -
Page 22: Allarmi
Allarmi - premendo il tasto MENU viene visualizzata una Allarmi • Visualizza Allarme Sergio Rossi schermata nell’angolo in basso a destra. Codice Ricevuto Lun 12 Mar. 12 Alle ore 14 : 15 : 26 14:15:26 • Elimina tutto Lun 12 Mar 20 Elimina tutto? Allarme Sergio Rossi... -
Page 23: Impostazioni
Impostazioni Impostazioni • Lingua Italiano English Français Deutsch Español Português Nederlands Dansk Norsk Suomi Svenska Türkçe Русский Polski Hrvatski Luminosità • Video Contrasto Colore • Interno Microfono • Audio • Esterno Altoparlante Esterno Classica 1 Interno Classica 1 • Suoni Allarme Allarme 1 Tono tasti... -
Page 24: I1 Modifica Lingua
I1 Modifica lingua I2 Impostazioni video È possibile impostare la lingua selezionandola tra Tramite questa funzione è possibile regolare la le seguenti: luminosità, il contrasto e il colore del monitor del centralino. Italiano (default) English - Per accedere velocemente alle impostazioni video Français premere il tasto MENU + tasto 3 oppure premere il Deutsch... -
Page 25: I3 Impostazioni Audio
14 :15 : 26 I3 Impostazioni audio Lun 12 Mar 20 Tramite questa funzione è possibile regolare il volume del microfono e dell’altoparlante del centralino verso i Microfono posti interni e verso il posto esterno. Altoparlante N.B. Per modificare i volumi il centralino deve essere in comunicazione con il posto interno o il posto esterno. -
Page 26: I5 Modifica Data
14 :15 : 26 14 :15 : 26 Lun 12 Mar 20 Lun 12 Mar 20 Esterno Classica 1 Anno 2012 Interno Classica 1 Mese Marzo Allarme Allarme 1 Giorno Tono tasti Impostazione data - selezionare la melodia con i tasti - premere il tasto OK per confermare le impostazioni;... -
Page 27: I7 Impostazione Tema
I7 Impostazione tema I8 Regolazione tempi Tramite questa funzione è possibile modificare i colori Tramite questa funzione è possibile impostare i tempi delle schermate dei menu. di fonica, attesa reset, standby, attivazione relè e di ripetizione di chiamata. - premere il tasto MENU e visualizzare tramite i tasti il menu Impostazioni, premere il tasto OK;... -
Page 28: I9 Impostazione Modalitá Giornaliera
settimana, posizionarsi sulla voce Abilita e attivare I9 Impostazione modalitá giornaliera l’intera programmazione con il tasto , per disabilitare ; Si può decidere di organizzare la settimana scegliendo - premere il tasto OK per confermare le impostazioni; per ogni giorno una delle seguenti 3 modalità di - premere ripetutamente il tasto ESC per tornare alla funzionamento: schermata principale. -
Page 29: I11 Reset Impostazioni
Il valore va da 00 a 23. I11 Reset impostazioni Per velocizzare lo scorrimento dei valori, tener premuto il tasto - premere il tasto MENU e visualizzare tramite i tasti il menu Impostazioni, premere il tasto OK; - posizionarsi sul valore in minuti della commut. 1 14 :15 : 26 col tasto , diminuire o aumentare il valore con i... -
Page 30: Configurazioni Installatore
Configurazioni installatore Configurazioni • Sistema Sistema Simplebus Simplebus Top Link Singolo Parall. LS-IN Parall. LP-IN Serie master Serie slave Chiamata Simplebus Indiretto Audio Video Retrocom. • Servizi FollowMe Ripetizione chiamata Accensione interni Chiamata tripla Aiuto codici Questo capitolo è indirizzato personale 1424;... -
Page 31: C2 Come Configurare Un Centralino Principale O Secondario
C2 Come configurare un centralino principale o C3 Come configurare un centralino come secondario singolo, parallelo o serie - premere il tasto MENU e visualizzare tramite i tasti - premere il tasto MENU e visualizzare tramite i tasti il menu Configurazioni, premere il tasto OK; il menu Configurazioni, premere il tasto OK;... -
Page 32: C4 Chiamata Tramite Codice Simplebus O Indiretto
14 :15 : 26 C4 Chiamata tramite codice Simplebus o Lun 12 Mar 20 indiretto Tramite questa funzione si sceglie la modalità di Sistema Simplebus chiamata manuale del centralino, tra 2 diverse Link Singolo modalità: Chiamata Indiretto 1- Chiamata Simplebus (di default), la chiamata Audio avviene digitando il codice abbinato ad ogni utente. -
Page 33: C6 Chiamata Audio O Video
C6 Chiamata audio o video C7 Configurazione servizi Chiamata audio di default. FollowMe: Attivando la chiamata video sarà possibile effettuare Funzione non utilizzabile una chiamata video verso un posto interno. Il monitor chiamato dal centralino si accenderà consentendo Ripetizione di chiamata: ad es. - Page 34 14 :15 : 26 Lun 12 Mar 20 • Sistema • Servizi - visualizzare tramite i tasti il servizio da attivare (ripetizione di chiamata, accensione interni, chiamata tripla, aiuto codici). ATTENZIONE! La funzione FollowMe non è utilizzabile Attivare il servizio con il tasto . Disabilitare con .
- Page 35 • Comelit Group S.p.A. accepts no liability for any purpose other than the intended use, or failure to observe the indications and warnings contained in this manual / instruction sheet. Comelit Group S.p.A. reserves the right to change the information provided in this manual / instruction sheet at any time and without prior notice.
- Page 36 Figure 1 PQRS WXYZ...
-
Page 37: Description
Description Keypad Audio/video porter switchboard in desk version for Simplebus 1 system with microswitch keypad and 32-character alphanumeric display. Ergonomic handset ON/OFF Power on/power off (press and with positioning on the base facilitated by invisible hold for 2 seconds) magnetised panels. Allows the code and name of Self activation enable key the called and calling users to be displayed, keeping unanswered calls stored in the memory. -
Page 38: Connections
Connections 1195 VIDEO ENTRY SYSTEM RISER 1998NV ENTRANCE PANEL Description of terminal block RX TX GND RS232 serial port for connection to the remote switchboard in systems with multiple switchboards in series or in parallel LP1 LP2 Line for incoming data from the external unit LM LM Data line to risers CH CH Free contact for “call repetition”... -
Page 39: Technical Specifications
Technical specifications GENERAL DATA Product height (mm) 110 Product width (mm) 225 Product depth (mm) 225 Weight: (g) 1500 Product colour Black Material ABS Desk base mounting Yes COMPATIBLE SYSTEMS Simplebus 2 audio/video with power supply unit art. 4888C DISPLAY SPECIFICATIONS Type of display Graphic LCD Size (inches, ”) 3.5 Resolution (pixel) 320x240... -
Page 40: Interface And Navigation Mode
Interface and navigation mode Description of the interface Alerts flashing indicates the number of SYSTEM STATUS unanswered calls in DAY and NIGHT TIME 5 6 7 8 mode 12:45:07 flashing indicates the number of alarms Mar 05 Nov 19 received and not implemented DATE ALERTS Menu navigation... -
Page 41: Use
The following functions are the main features of the U2 How to answer a call from an external unit switchboard and its operating mode, which can all be accessed directly without using the menus. The switchboard must be in DAY mode; in NIGHT mode it will only answer direct switchboard calls. -
Page 42: U3 How To Call An Internal Unit
14:15:26 14 :15 : 26 Mon 12 Mar 20 Mon 12 Mar 20 ______________________ John Smith Code Door open Scroll Menu - to end the conversation, hang up the handset. - press the corresponding fast number (e.g. fast number 1= stored code “002”, see “U21 Recording fast numbers”). -
Page 43: U4 How To Transfer A Call From The External Unit To An Internal Unit
U4 How to transfer a call from the external unit up, then lift the handset and press to re-establish to an internal unit communication with the external unit; When the switchboard receives a call from an 14 :15 : 26 external unit, directed to an internal unit: Mon 12 Mar 20 - the NAME of the called unit is displayed (if a... -
Page 44: U6 How To Call An Internal Unit Listed In The Incoming Call Log
14 :15 : 26 U6 How to call an internal unit listed in the Mon 12 Mar 20 incoming call log When the switchboard receives a call from an internal unit and it is not dealt with within 30 sec. (operator momentarily absent or busy with another conversation), this is automatically stored in the Incoming call menu. -
Page 45: U7 How To Call A Secondary Switchboard From A Main Switchboard
- press MENU to view a screen in the bottom right- - If the call has taken place correctly: 14:15:26 hand corner. Mon 12 Mar 20 14:15:26 Mon 12 Mar 20 Calling John Smith Code Received Mon 12 Mar 20 Called user switchboard Delete item Scroll... -
Page 46: U8 How To Call A Main Switchboard From A Secondary Switchboard
- to answer the call originating from the secondary U8 How to call a main switchboard from a switchboard, lift the handset; secondary switchboard To call a main switchboard from a secondary switchboard, press - the main switchboard communicates with the secondary switchboard, with a maximum When the main switchboard receiving the call conversation time ... -
Page 47: U11 How To Activate Or Deactivate The Main Switchboards
CAUTION! If the switchboard is busy or the Switchboard - press MENU on the inactive switchboard and use operator is momentarily absent and cannot keys to view the Configurations menu; answer within 30 seconds, it will be added to the press OK;... -
Page 48: U13 How To Activate An Additional Relay
U13 How to activate an additional relay (e.g. to activate independently using a specific command: lights, CCTV alarm contacts, vehicle barriers, entrances without an external unit or other devices) Actuators can be activated in standby mode and during conversation with an external unit. CAUTION! To use this function, there must be a main external unit and actuators Art. -
Page 49: Name Directory
Name directory - the names stored in the directory will be displayed Namedir • Display ___________________ in alphabetical order; use the keys to scroll John Smith Code through the list. To speed up scrolling, press and hold • New heading 14:15:26 Name _____________ Mon 12 Mar 20... -
Page 50: U17 How To Delete A Name In The Directory
- use the keys to show the New heading 14 :15 : 26 option, then press OK; Mon 12 Mar 20 14 :15 : 26 • Display Mon 12 Mar 20 • New heading • Display • Fast numbers • New heading •... -
Page 51: U18 How To Edit A Name In The Directory
14 :15 : 26 14:15:26 Mon 12 Mar 20 Mon 12 Mar 20 ______________________ ______________________ John Smith John Smith Delete heading? Code Code New heading Ok Esc Delete item Modify heading Scroll Menu Scroll Menu Delete all - use to select Modify heading, press OK; - to confirm deletion press OK;... -
Page 52: U20 Directory Info
U21 Recording fast numbers 14 :15 : 26 Mon 12 Mar 20 This function can be used to store, edit and delete speed numbers. - press MENU and use the keys to view the Delete all? Namedir menu, then press OK; 14 :15 : 26 Ok Esc Mon 12 Mar 20... -
Page 53: Incoming Call
Incoming call • Display 14:15:26 Call John Smith Incoming call Code Mon 12 Mar 20 Received Mon 12 Mar. 12 14 : 15 : 26 Calling John Smith Code • Delete all Received Mon 12 Mar 12 Delete all? 13 : 15 : 11 Delete item Scroll Delete all... -
Page 54: Alarms
Alarms Alarms • Display Alarm John Smith 14:15:26 Code Received Mon 12 Mar. 12 Mon 12 Mar 20 14 : 15 : 26 Alarm John Smith • Delete all Code Delete all? Received Mon 12 Mar 20 13 : 15 : 11 U24 View alarms Delete item Scroll... -
Page 55: Settings
Settings Settings • Language Italian English Français Deutsch Español Português Nederlands Dansk Norsk Suomi Svenska Türkçe Русский Polski Hrvatski Brightness • Video Contrast Color • User Microphone • Audio • External Loudspeaker External Classic 1 User Classic 1 • Sounds Alarm Alarm 1 Key tone... -
Page 56: I1 Change Language
I1 Change language I2 Video settings The switchboard language can be selected from the This function can be used to adjust the brightness, following list: contrast and colour of the switchboard monitor. Italiano (default) - To view the video settings quickly, press MENU + English 3 or press MENU and use the keys to view the... -
Page 57: I3 Audio Settings
14 :15 : 26 I3 Audio settings Mon 12 Mar 20 This function can be used to adjust the volume of the switchboard microphone and loudspeaker Microphone as it communicates with the internal units and the Loudspeaker external unit. N.B. To change the volume levels, the switchboard should be in communication with the internal unit or entrance panel. -
Page 58: I5 Change Date
14 :15 : 26 14 :15 : 26 Mon 12 Mar 20 Mon 12 Mar 20 External Classic 1 Year 2012 User Classic 1 Month March Alarm Alarm 1 Key tone Set date - select the melody using the keys. - press OK to confirm the settings;... -
Page 59: I7 Themes Settings
I7 Themes settings I8 Adjust timing This function can be used to change the colour of This function can be used to set the communication, the menu screens. wait reset, standby, relay activation and call repetition timers. - press MENU and use the keys to view the Settings menu, then press OK;... -
Page 60: I9 Set Day Mode
I9 Set day mode I10 Set auto commutation You can decide to organise the week by selecting The system can be set to allow automatic switching one of these 3 operating modes for each day: from DAY mode to NIGHT mode at specific times as •... -
Page 61: I11 Reset Settings
To speed up scrolling, press and hold or . I11 Reset settings - press MENU and use the keys to view the - select the value, in minutes, of switching 1 using Settings menu, then press OK; key; decrease or increase the value using the 14 :15 : 26 keys. -
Page 62: Installer Configurations
Installer configurations Configurations • System System Simplebus Simplebus Top Link Single Parall. LS-IN Parall. LP-IN Series master Series slave Call Simplebus Indirect Audio Video Back com. • Services FollowMe Call repetition Self Activation Triple call Help code This section is aimed at qualified technicians who, the LPin-LPin line of switching device Art. -
Page 63: C2 How To Configure A Main Or Secondary Switchboard
C2 How to configure a main or secondary C3 How to configure a switchboard as single, switchboard parallel or series - press MENU and use the keys to view the - press MENU and use the keys to view the Configurations menu, then press OK;... -
Page 64: C4 Call Via Simplebus Or Indirect Code
14 :15 : 26 C4 Call via Simplebus or indirect code Mon 12 Mar 20 This function can be used to select the manual System Simplebus switchboard calling mode, from the 2 options Link Single available: Call Indirect 1- Simplebus call (default), the call is made by Audio entering the code corresponding to each user. -
Page 65: C6 Audio Or Video Call
C6 Audio or video call C7 Configure services Audio call by default. FollowMe: Activating video calling will allow you to make a Function cannot be used video call to an internal unit. The monitor called by the switchboard will switch on, making it possible Call repetition: to view, for example, the images from the remote Timed contact closure between 1 and 30 seconds... - Page 66 - use the keys to view the service to be activated (call repetition, self activation, triple call, help code). CAUTION! The FollowMe function cannot be used Activate the service using the key. Disable it using . 14 :15 : 26 Mon 12 Mar 20 FollowMe Call repetition...
- Page 67 • Comelit Group S.p.A. Décline toute responsabilité en cas d'utilisation contraire aux indications et de non-respect des indications et des recommandations présentes dans ce manuel/notice d’instructions. Comelit Group S.p.A. se réserve le droit de modifier à tout moment et sans préavis le contenu de ce manuel/notice d’instructions.
- Page 68 Figure 1 PQRS WXYZ...
-
Page 69: Description
Description Clavier Standard de conciergerie audio/vidéo en version de table pour système Simplebus 1 avec clavier à microswitch et afficheur alphanumérique à 32 ON/OFF Marche/arrêt (maintenir la caractères. Combiné ergonomique s’emboîtant pression 2 secondes) aisément dans la base d’appui grâce à des aimants Touche mise en marche automatique invisibles. -
Page 70: Connexions
Connexions 1195 COLONNE MONTANTE VIDÉOPHONIQUE 1998NV POSTE EXTÉRIEUR Description bornier RX TX GND Série rs232 à connecter au standard à distance dans les installations à plusieurs standards en série ou en parallèle LP1 LP2 Ligne de données entrantes depuis le poste extérieur LM LM Ligne de données vers les montants... -
Page 71: Caractéristiques Techniques
Caractéristiques techniques DONNÉES GÉNÉRALES Hauteur produit (mm) 110 Largeur produit (mm) 225 Profondeur produit (mm) 225 Poids (g) 1500 Coloris produit Noir Matériau ABS Montage sur base de table Oui SYSTÈMES COMPATIBLES Audio/vidéo Simplebus2 avec alimentation art. 4888C CARACTÉRISTIQUES DE L’ÉCRAN Type d’écran LCD, graphique Dimension (pouces) (“) 3,5 Résolution (pixels) 320x240... -
Page 72: Interface Et Mode De Navigation
Interface et mode de navigation Description interface Notifications Clignotant indique le nombre d’appels ÉTAT SYSTÈME manqués dans les modes JOUR et NUIT HEURE 5 6 7 8 Clignotant indique le nombre d’alarmes 12:45:07 reçues et non acquittées Mar 05 Nov 19 DATE NOTIFICATIONS Navigation menu... -
Page 73: Utilisation
Utilisation Les fonctions suivantes sont celles qui caractérisent U2 Comment répondre à un appel d'un poste le standard et son mode d'opérer ; elles sont toutes extérieur accessibles en mode direct sans avoir besoin de recourir aux menus. Le standard doit être en modalité JOUR, en modalité NUIT il ne pourra répondre qu'aux appels adressés U1 Comment répondre à... -
Page 74: U3 Comment Appeler Un Poste Intérieur
14:15:26 14 :15 : 26 Lun 12 Mars 20 Lun 12 Mars 20 ______________________ Sergio Rossi Code Ouv.-porte effectué Dérouler Menu - pour terminer la conversation, raccrocher. - appuyer sur le numéro bref correspondant (ex. numéro bref 1= code mémorisé « 002 », voir « U21 Enregistrement numéros brefs »). -
Page 75: U4 Comment Transférer Un Appel Du Poste Extérieur Au Poste Intérieur
conversation avec le poste intérieur en raccrochant et U4 Comment transférer un appel du poste soulever le combiné puis appuyer sur la touche pour extérieur au poste intérieur retourner en communication avec le poste extérieur ; Lorsque le standard reçoit un appel d'une platine extérieure adressé... -
Page 76: U6 Comment Appeler Un Poste Intérieur Présent Dans Les Appels Reçus
14 :15 : 26 U6 Comment appeler un poste intérieur présent Lun 12 Mars 20 dans les appels reçus Lorsque le standard reçoit un appel depuis un poste intérieur qui n'est pas géré dans les 30 sec. (opérateur momentanément absent ou occupé dans une autre conversation), ledit appel est automatiquement mémorisé... -
Page 77: U7 Comment Appeler Un Standard Secondaire Depuis Le Standard Principal
- appuyer sur la touche MENU pour afficher une - Si l'appel a eu lieu correctement : 14:15:26 fenêtre en bas à droite. Lun 12 Mars 20 14:15:26 Lun 12 Mars 20 Appelant Sergio Rossi Code Reçu Lun 12 Mars 20 à... -
Page 78: U8 Comment Appeler Le Standard Principal Depuis Un Standard Secondaire
secondaire, soulever le combiné ; U8 Comment appeler le standard principal depuis un standard secondaire Pour appeler un standard principal depuis un - le standard principal entre en communication standard secondaire, appuyer sur avec le standard secondaire, la durée maximum de la conversation correspond au temps de phonie Lorsque le standard principal appelé... -
Page 79: U11 Comment Activer Ou Désactiver Les Standards Principaux
ATTENTION ! Si le standard est occupé ou le/la standardiste est - appuyer sur la touche MENU du standard désactivé momentanément absent/e et ne peut pas répondre et appuyer sur les touches pour afficher le menu dans les 30 secondes, l'appel sera inséré dans Configurations puis appuyer sur la touche OK ;... -
Page 80: U13 Comment Activer Un Relais Supplémentaire
U13 Comment activer un relais supplémentaire (par ex. pour activer en mode indépendant et avec une commande dédiée : éclairage, contacts d'alarme TVCC, portails de sortie de garage, entrées sans poste extérieur ou autres dispositifs) Les actionneurs peuvent être activés tant en mode de repos qu'en mode conversation vers le poste extérieur. -
Page 81: Répertoire
Répertoire pour dérouler la liste. Répertoire • Visualiser ___________________ Pour accélérer le déroulement de la liste des noms, Sergio Rossi Code appuyer sur la touche ou sur la touche 14:15:26 • Nouvelle rubrique Lun 12 Mars 20 Nom _____________ Code ___ ______________________ •... -
Page 82: U17 Comment Effacer Un Nom Du Répertoire
- appuyer sur les touches pour afficher la - appuyer sur les touches pour afficher la rubrique Nouvelle rubrique puis appuyer sur OK ; rubrique Visualiser puis appuyer sur OK ; 14 :15 : 26 14 :15 : 26 Lun 12 Mars 20 Lun 12 Mars 20 •... -
Page 83: U18 Comment Modifier Un Nom En Répertoire
14 :15 : 26 14:15:26 Lun 12 Mars 20 Lun 12 Mars 20 ______________________ ______________________ Sergio Rossi Sergio Rossi Éliminer rubrique? Code Code Nouvelle rubrique Ok Esc Éliminer rubrique Modifier rubrique Dérouler Menu Dérouler Menu Éliminer tout - appuyer sur la touche pour sélectionner la - pour confirmer l’effacement, appuyer sur la touche OK;... -
Page 84: U20 Info Répertoire
- une page demandant de confirmer l'élimination de U21 Enregistrement numéros abrégés tout de répertoire s'affiche ; confirmer en appuyant Cette fonction permet de mémoriser, modifier et sur OK ou annuler en appuyant sur ESC ; effacer les numéros brefs. 14 :15 : 26 Lun 12 Mars 20 - appuyer sur la touche MENU et utiliser les touches... -
Page 85: Appels Reçus
Appels reçus • Visualiser 14:15:26 Appels Sergio Rossi Appels reçus Code Lun 12 Mars 20 Reçu Lun 12/03 12 à 14 h 00 : 15 : 26 Appelant Sergio Rossi Code • Éliminer tout Reçu Lun 12/03/12 Éliminer tout ? À... -
Page 86: Alarmes
Alarmes - appuyer sur la touche MENU pour afficher une Alarmes • Visualiser Alarme Sergio Rossi fenêtre en bas à droite. Code Reçu Lun 12/03 12 à 14 h 00 : 15 : 26 14:15:26 • Éliminer tout Lun 12 Mars 20 Éliminer tout ? Alarme Sergio Rossi... -
Page 87: Paramètres
Paramètres Paramètres • Langue Italiano English Français Deutsch Español Português Nederlands Dansk Norsk Suomi Svenska Türkçe Русский Polski Hrvatski Luminosité • Vidéo Contraste Couleur • Intérieur Micro • Audio • Extérieur Haut-parleur Extérieur Classica 1 Intérieur Classica 1 • Sons Alarme Alarme 1 Touches... -
Page 88: I1 Modifier Langue
I1 Modifier langue I2 Paramètres vidéo Il est possible de programmer la langue en la Cette fonction permet de régler la luminosité, le sélectionnant parmi les suivantes : contraste et la couleur du moniteur du standard. Italiano (défaut) - Pour accéder rapidement aux paramètres vidéo, English appuyer sur la touche MENU + touche 3 ou sur Français... -
Page 89: I3 Paramètres Audio
14 :15 : 26 I3 Paramètres audio Lun 12 Mars 20 Cette fonction permet de régler le volume du micro et du haut-parleur du standard vers les postes Micro intérieurs et vers la platine extérieure. Haut-parleur N.B. : Pour modifier les volumes, le standard doit être en communication avec le poste intérieur ou le poste extérieur. -
Page 90: I5 Modifier Date
14 :15 : 26 14 :15 : 26 Lun 12 Mars 20 Lun 12 Mars 20 Extérieur Classica 1 Année 2012 Intérieur Classica 1 Mois Mars Alarme Alarme 1 Jour Touches Réglage date - sélectionner la mélodie à l'aide des touches - appuyer sur la touche OK pour confirmer les Valider le service Tonalité... -
Page 91: I7 Réglage Thème
I7 Réglage thème I8 Réglage temps Cette fonction permet de modifier les couleurs des Cette fonction permet de régler les temps de phonie, pages des menus. attente reset, veille, activation relais et répétition d'appel. - appuyer sur la touche MENU et utiliser les touches pour afficher le menu Paramètres puis appuyer - appuyer sur la touche MENU et utiliser les touches sur la touche OK ;... -
Page 92: I9 Réglage Mod. Quotidienne
- après avoir terminé la programmation de chaque I9 Réglage mod. quotidienne jour de la semaine, se placer sur la rubrique Valider On peut décider d'organiser la semaine en et valider toute la programmation à l’aide de la choisissant, pour chaque jour, l'une des 3 modalités touche , pour désactiver, appuyer sur suivantes de fonctionnement : - appuyer sur la touche OK pour confirmer les... -
Page 93: I11 Reset Paramètres
La valeur peut varier de 00 à 23. I11 Reset paramètres Pour faire défiler plus rapidement les valeurs, appuyer sur la touche ou sur la touche . - appuyer sur la touche MENU et utiliser les touches pour afficher le menu Paramètres puis appuyer - se mettre sur la valeur en minutes de la commut. -
Page 94: Configurations Installateur
Configurations installateur Configurations • Système Système Simplebus Simplebus Top Link Simple Parall. LS-IN Parall. LP-IN Série master Série slave Appel Simplebus Indirect Audio Vidéo Rétrocom. • Services FollowMe Répétition appel Allumage postes int. Appel triple Aide codes Ce chapitre s'adresse au personnel qualifié qui, configurer comme Parall. -
Page 95: C2 Comment Configurer Un Standard Principal Ou Secondaire
C2 Comment configurer un standard principal ou C3 Comment configurer un standard simple, en secondaire parallèle ou en série - appuyer sur la touche MENU et utiliser les touches - appuyer sur la touche MENU et utiliser les touches pour afficher le menu Configurations puis pour afficher le menu Configurations puis appuyer sur la touche OK ;... -
Page 96: C4 Appel Via Code Simplebus Ou Indirect
- sélectionner Simplebus ou Indirect à l'aide des C4 Appel via code Simplebus ou indirect touches - appuyer sur la touche OK pour confirmer les Cette fonction permet de choisir la modalité manuelle paramètres ; d'appel du standard, entre 2 modalités différentes : - appuyer plusieurs fois sur la touche ESC pour 1- Appel Simplebus (par défaut), l'appel a lieu en retourner à... -
Page 97: C6 Appel Audio Ou Vidéo
C6 Appel audio ou vidéo C7 Configuration services Appel audio par défaut. FollowMe: En activant l'appel vidéo, il sera possible d'effectuer Fonction non disponible un appel vidéo vers un poste intérieur. Le moniteur appelé par le standard s'allumera en permettant par Répétition d'appel : exemple de voir les caméras déportées associées à... - Page 98 14 :15 : 26 Lun 12 Mars 20 • Système • Services - utiliser les touches pour afficher le service à valider (répétition d'appel, allumage postes intérieurs, appel triple, aide codes). ATTENTION ! La fonction FollowMe n’est pas disponible Valider le service à l'aide de la touche . Désactiver en appuyant sur .
- Page 99 6601W/BM 4888C 230V Max 20 m. Pulsante comando apriporta locale. 1195 Max 20 m. Local door-opener button. Max 20 m. Bouton commande ouvre-porte local. 1998NV NO C 1595 1595 120-230 V 120-230 V SE NO NC SE NO NC UT1020...
- Page 100 POSTO ESTERNO PRINCIPALE AUDIO MAIN EXTERNAL AUDIO UNIT PLATINE EXTÉRIEUR PRINCIPAL AUDIO CENTRALINO DI PORTINERIA PORTER SWITCHBOARD 4888C STANDARD DE CONCIERGERIE 230V 1195 1998NV NO C 1224A 1200 12V~ 230V~ 1 2 3 4 1 2 3 4 1595 1595...
- Page 101 For setting and operation of Art. 1259C, see Technical manual for accessory Art. 1259C Pour programmation et fonctionnement Art. 1259C voir Manuel technique accessoire Art. 1259C 1259C 1200 12V~ 230V~ IN IN 1 2 3 4 1195 1998NV NO C...
- Page 102 POSTI ESTERNI SECONDARI VIDEO 1224A 4888C SECONDARY VIDEO EXTERNAL UNITS PLATINES EXTÉRIEURES SECONDAIRES VIDÉO ~ 230V CENTRALINO DI PORTINERIA PORTER SWITCHBOARD STANDARD DE CONCIERGERIE 1595 120-230 V SE NO NC UT1020 UT9200 4834/9 1195 1998NV 1595 120-230 V SE NO NC UT1020 UT9200...
- Page 103 1224A 4888C 230V 1595 120-230 V SE NO NC UT1020 UT9200 Max 20 m. Pulsante comando apriporta locale. Max 20 m. Local door-opener button. Max 20 m. Bouton commande ouvre-porte local. Tagliare solo la resistenza dell’uscita utilizzata. Only cut off the resistance of the output used. Couper seulement la résistance de la sortie utilisée.
- Page 104 POSTI ESTERNI PRINCIPALI VIDEO MAIN VIDEO EXTERNAL UNITS 1224A 4888C PLATINES EXTÉRIEURES PRINCIPALES VIDÉO ~ 230V POSTI ESTERNI SECONDARI AUDIO SECONDARY AUDIO EXTERNAL UNITS PLATINES EXTÉRIEURES SECONDAIRES AUDIO CENTRALINO DI PORTINERIA PORTER SWITCHBOARD STANDARD DE CONCIERGERIE 1595 120-230 V SE NO NC UT1010 UT9200 1595...
- Page 105 1224A 4888C 230V 1595 120-230 V SE NO NC UT1010 UT9200 4834/9 1195 1998NV NO C 1224A 1200 12V~ 230V~ 1 2 3 4 1 2 3 4 Max 20 m. Pulsante comando apriporta locale. 1595 Max 20 m. Local door-opener button.
- Page 106 SECONDARY VIDEO EXTERNAL UNITS 4888C PLATINES EXTÉRIEURES SECONDAIRES VIDÉO 230V CENTRALINI SECONDARI SECONDARY SWITCHBOARDS STANDARDS SECONDAIRES 1195 SECONDARY 1424 1998NV LPin LPout NO C 1 2 3 4 1 2 3 4 TOP 2 1595 120-230 V SE NO NC...
- Page 107 1-100 USER 4888C ~ 230V 1195 SECONDARY 1 2 3 4 1 2 3 4 1424 1998NV LPin LPout NO C TOP 2 1595 120-230 V SE NO NC UT1020 UT9200 4834/9 1595 Max 20 m. Pulsante comando apriporta locale.
- Page 108 SIMPLEBUS POSTI ESTERNI PRINCIPALI VIDEO MAIN VIDEO EXTERNAL UNITS PLATINES EXTÉRIEURES PRINCIPALES VIDÉO POSTI ESTERNI SECONDARI VIDEO SECONDARY VIDEO EXTERNAL UNITS PLATINES EXTÉRIEURES SECONDAIRES VIDÉO 1-100 CENTRALINO DI PORTINERIA USER PORTER SWITCHBOARD 4888C STANDARD DE CONCIERGERIE 230V 1 2 3 4 1 2 3 4 1424 LPin...
- Page 109 1424 LPin LPout TOP 1 1595 120-230 V SE NO NC UT1020 UT9200 4834/9 1195 SECONDARY 1998NV 1 2 3 4 1 2 3 4 NO C 1424 1200 LPin LPout 12V~ 230V~ TOP 3 1595 Max 20 m. Pulsante comando apriporta locale.
- Page 110 STANDARD PRINCIPAL CENTRALINI SECONDARI SECONDARY SWITCHBOARDS STANDARDS SECONDAIRES 1195 1424 1 2 3 4 1 2 3 4 SECONDARY LPin LPout 1998NV NO C TOP 2 1595 120-230 V SE NO NC UT1020 UT9200 1595 120-230 V SE NO NC...
- Page 111 1-100 USER 4888C ~230V 1195 1 2 3 4 1 2 3 4 1424 SECONDARY LPin LPout 1998NV NO C TOP 2 1595 120-230 V SE NO NC UT1020 UT9200 4834/9 1195 1 2 3 4 1 2 3 4...
- Page 112 POSTO ESTERNO PRINCIPALE VIDEO MAIN VIDEO EXTERNAL UNIT PLATINE EXTÉRIEURE PRINCIPALE VIDÉO POSTI ESTERNI SECONDARI AUDIO SECONDARY EXTERNAL AUDIO UNITS PLAQUES DE RUE SECONDAIRES AUDIO CENTRALINI PRINCIPALI MAIN SWITCHBOARDS STANDARDS PRINCIPAUX 1224A 4888C ~ 230V 1595 120-230 V SE NO NC UT1010 UT9200...
- Page 113 4888C 230V 1595 120-230 V SE NO NC UT1010 UT9200 4933 1234 6 1195 1998NV 1195 1998NV 1595 120-230 V SE NO NC UT1020 UT9270 Max 20 m. Pulsante comando apriporta locale. Max 20 m. Local door-opener button. Max 20 m. Bouton commande ouvre-porte local.
- Page 114 1 2 3 4 1 2 3 4 1424 LPin LPout TOP 1 1424 1200 1 2 3 4 1 2 3 4 12V~ LPin LPout 230V~ TOP 3 1195 LS-IN 1998NV 4834/9 1595 120-230 V SE NO NC UT1020 UT9270...
- Page 115 LPin LPout TOP 1 1195 LP-IN 1998NV Max 20 m. Pulsante comando apriporta locale. Max 20 m. Local door-opener button. Max 20 m. Bouton commande ouvre-porte local. Tagliare solo la resistenza dell’uscita utilizzata. Only cut off the resistance of the output used.
- Page 116 C E R T I F I E D M A N A G E M E N T S Y S T E M S w w w . c o m e l i t g r o u p . c o m Via Don Arrigoni, 5 - 24020 Rovetta (BG) - Italy...