Publicité

Les langues disponibles
  • FR

Les langues disponibles

Liens rapides

Publicité

Table des Matières
loading

Sommaire des Matières pour Saitek CLOSER TO REALITY

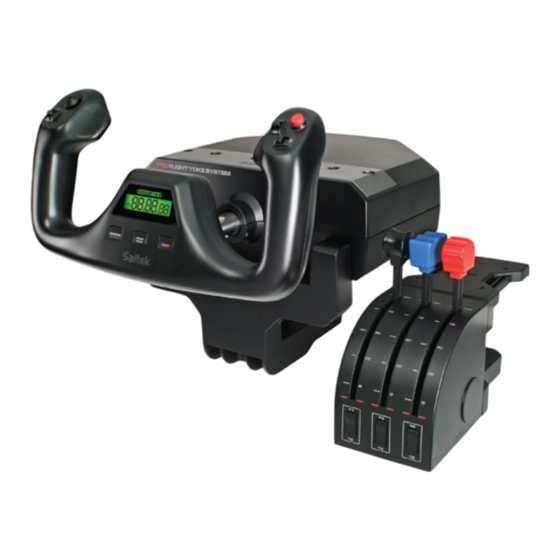
  • Page 2 CLOSER TO REALITY WITH SAITEK’S PRO FLIGHT RANGE YOUR COMPLETE COCKPIT SOLUTION // DIGITAL LCD DISPLAY YOKE SYSTEM THROTTLE/PROP./MIXTURE CONTROLS AND QUADRANT PERFECT PARTNERS BACKLIT INFORMATION PANEL...
  • Page 3: Table Des Matières

    ENGLISH INTRODUCTION INSTALLATION TROUBLESHOOTING FRANÇAIS DÉMARRAGE INSTALLATION DÉPANNAGE DEUTSCH ERSTE SCHRITTE INSTALLATION FEHLERBEHEBUNG ITALIANO AVVIO INSTALLAZIONE RISOLUZIONE PROBLEMI ESPAÑOL PRIMEROS PASOS INSTALACIÓN RESOLUCIÓN DE PROBLEMAS...
  • Page 4: Introduction

    INTRODUCTION The Switch Panel features realistic switches and controls which interact in real time with Microsoft Flight Simulator X to make your flying experiences more realistic. ENGINE START/STOP FUNCTIONS Fonctions Moteur démarrer/arrêter Funktionen zum Starten/Stoppen des Triebwerks Funzioni start/stop motore Funciones de iniciar/parar el motor MISC BATTERY, COCKPIT AND DE-ICE FUNCTIONS Fonctions batterie divers, cockpit et dégivrage...
  • Page 5: Software Installation

    INSTALLATION You can fix the Switch Panel to your desk using the velcro strips. If you already own a Saitek Pro Flight Yoke System, you can also mount the Switch Panel on top of the Yoke unit using the screws provided.
  • Page 6: Troubleshooting

    Saitek.” Click yes, then click Next. 2. After installation, you have the option to Run Profile Editor, which will show you the programming environment. To skip the Profile Editor now, uncheck the box and click Finish to complete installation.
  • Page 7: Technical Support

    a. Submit a Ticket at http://support.madcatz.com b. Call the Mad Catz Tech Support Center nearest you: North America: 1-800-659-2287 (USA) or 1-619-683-2815 (outside USA) United Kingdom: 01633 928072 Europe (outside UK): +44(0) 1633 883110 France: 01 82 88 01 80 Germany: 089-21094818 Spain: 93 181 63 94 Once you have your unique Return Authorization Number, do the following:...
  • Page 8: Eu Declaration Of Conformity

    mitter. IC RF Exposure Statement: The device meets the exemption from the routine evaluation limits in section 2.5 of RSS 102 and compliance with RSS-102 RF exposure, users can obtain Canadian information on RF exposure and compliance. Under Industry Canada regulations, this radio transmitter may only operate using an antenna of a type and maximum (or lesser) gain approved for the transmitter by Industry Canada.
  • Page 9: Démarrage

    DÉMARRAGE Ce panneau de contrôle vous apporte des interrupteurs et contrôles réalistes qui interagissent en temps réel avec le logiciel Microsoft Flight Simulator X pour rendre vos expériences de vol plus réalistes. ENGINE START/STOP FUNCTIONS Fonctions Moteur démarrer/arrêter Funktionen zum Starten/Stoppen des Triebwerks Funzioni start/stop motore Funciones de iniciar/parar el motor MISC BATTERY, COCKPIT AND DE-ICE FUNCTIONS...
  • Page 10: Installer Le Switch Panel

    Vous pouvez fixer le panneau de contrôle sur votre bureau en utilisant les bandes velcro. Si vous possédez déjà un Pro Flight Yoke System de Saitek, vous pouvez également fixer le panneau de contrôle sur le dessus de votre yoke en utilisant les visses fournies.
  • Page 11: Installation Du Logiciel

    1. À l’écran Configuration du logiciel, cliquez sur Suivant, une fenêtre pop-up vous demandera si vous « souhaitez faire confiance au logiciel de Saitek. » Cliquez sur oui, puis sur Suivant. 2. Après l’installation, vous avez la possibilité d’Exécuter l’éditeur de profil, qui vous montrera l’environnement de programmation.
  • Page 12: Amérique Du Nord Et Europe

    Européens. Votre recours exclusif est la réparation ou le remplacement de votre produit Mad Catz. En aucun cas la responsabilité de Mad Catz ne pourra dépasser le prix d’achat d’origine du produit. Cette garantie ne s’applique pas à : (a) une usure normale ou un mauvais usage ; (b) une utilisation industrielle, professionnelle ou commerciale ;...
  • Page 13 Téléphone pour l’Europe (en dehors du Royaume-Uni) : du lundi au vendredi (sauf jours fériés) au +44(0) 1633 883110. ATTENTION - N’utilisez cette unité que dans le but pour lequel elle a été conçue. - Pour prévenir tout risque d’incendie ou de choc électrique, n’exposez pas cette unité à la pluie ou à...
  • Page 14: Déclaration De Conformité De L'ue

    rayonnement établies dans le cadre d’un environnement non contrôlé. Cet émetteur ne doit pas être combiné à ou fonctionner simultanément avec une autre antenne ou un autre émetteur. Déclaration d’IC relativement aux radiofréquences : Cet appareil répond aux exigences lui permettant d’être exempté des limites de l’évaluation de routine exposées à...
  • Page 15: Erste Schritte

    ERSTE SCHRITTE Das Switch Panel verfügt über realistische Schalter und Bedienelemente, die in Echtzeit mit Microsoft Flight Simulator X interagieren und Ihnen somit ein noch realistischeres Flugerlebnis bieten. ENGINE START/STOP FUNCTIONS Fonctions Moteur démarrer/arrêter Funktionen zum Starten/Stoppen des Triebwerks Funzioni start/stop motore Funciones de iniciar/parar el motor MISC BATTERY, COCKPIT AND DE-ICE FUNCTIONS Fonctions batterie divers, cockpit et dégivrage...
  • Page 16: Installation Des Switch Panel

    INSTALLATION DES SWITCH PANEL Sie können die Konsole mit den Klettbändern auf Ihrem Schreibtisch befestigen. Falls Sie bereits ein Saitek Pro Flight Yoke besitzen, können Sie das Switch Panel auch mithilfe der mitgelieferten Schrauben oben auf dem Yoke-System befestigen. Wichtig: Zum Befestigen des Pro Flight Switch Panels am Pro Flight Yoke Sytem nehmen Sie zuerst das Switch Panel aus der Konsole, schrauben Sie die Konsole an der Oberseite des Yoke Systems fest und befestigen Sie das Switch Panel erneut an der Vorderseite der Konsole.
  • Page 17: Fehlerbehebung

    Sie das Kontrollkästchen, und klicken Sie auf Fertigstellen, um die Installation abzuschließen. TESTEN DES SWITCH PANEL Zum Testen des Switch Panel klicken Sie auf Windows Start, Verzeichnis Saitek Pro Flight Switch Panel und wählen Sie danach die Pro Flight Switch Panel Testseite aus. FEHLERBEHEBUNG...
  • Page 18: Technischer Support

    Authorization Number) vom technischen Support von Mad Catz an: a. Übermitteln Sie auf http://support.madcatz.com ein Ticket. b. Setzen Sie sich telefonisch mit dem nächstgelegenen Technischen Supportzentrum von Mad Catz in Verbindung: Deutschland: 089-21094818 Großbritannien: 01633 928072 Europa (außerhalb Großbritanniens): +44(0) 1633 883110 Frankreich: 01 82 88 01 80 Spanien: 93 181 63 94 Nordamerika: 1-800-659-2287 (USA) oder 1-619-683-2815 (außerhalb der USA)
  • Page 19: Eu-Konformitätserklärung

    Führen Sie, mit Ausnahme der zulässigen Elemente, keine Gegenstände jeglicher Art in das Gerät ein, da sie gefährliche Spannungspunkte berühren oder einen Kurzschluss auslösen können, was zum Ausbruch von Feuer oder elektrischem Schock führen kann. Wenn Sie sich müde oder unwohl fühlen oder Schmerzen in Ihrer Hand oder Ihrem Arm haben, beenden Sie unverzüglich die Verwendung der Einheit.
  • Page 20: Avvio

    AVVIO Lo Switch Panel è dotato di realistici switch e controlli che interagiscono in tempo reale con Microsoft Flight Simulator X per rendere più realistiche le vostre esperienze di volo. ENGINE START/STOP FUNCTIONS Fonctions Moteur démarrer/arrêter Funktionen zum Starten/Stoppen des Triebwerks Funzioni start/stop motore Funciones de iniciar/parar el motor MISC BATTERY, COCKPIT AND DE-ICE FUNCTIONS...
  • Page 21: Installazione Dei Driver

    INSTALLAZIONE DELLO SWITCH PANEL Potete fissare il panello alla scrivania usando le strisce di velcro. Se possedete già una cloche Saitek Pro Flight Yoke System, potete anche montare lo Switch Panel sopra alla cloche usando le viti fornite. Importante: per fissare lo Switch Panel alla cloche Pro Flight, per prima cosa rimuovete la staffa di montaggio dello Switch Panel, avvitate la staffa alla parte superiore della cloche e poi riattacate lo Switch Panel di fronte alla staffa.
  • Page 22: Installazione Del Software

    Finish (Fine) per completare l’installazione. TEST DELLO SWITCH PANEL Per testare il vostro Switch Panel, fate click su Start in Windows, sulla cartella Saitek Pro Flight Switch Panel, poi selezionate la pagina di test dello Switch Panel Pro Flight.
  • Page 23: Assistenza Tecnica

    garantisce solo ed esclusivamente la riparazione o la sostituzione del prodotto. In nessun caso, la responsabilità di Mad Catz sarà superiore al prezzo di acquisto originale del prodotto. Questa garanzia non viene applicata nei seguenti casi: (a) normale usura o uso non corretto; (b) uso industriale, professionale o commerciale;...
  • Page 24: Dichiarazione Di Conformità Ce

    distanza minima di 10 m dall’acqua (piscine, vasche e lavelli). - Non smontare per evitare scosse elettriche. Eventuali riparazioni vanno eseguite da personale qualificato. - Non inserire nel prodotto oggetti, se non quelli previsti, per evitare che raggiungano punti con tensioni pericolose o che causino un cortocircuito con conseguenti scosse elettriche e incendio.
  • Page 25: Primeros Pasos

    PRIMEROS PASOS El Panel Conmutador consta de conmutadores y controles prácticos que interactúan en tiempo real con el Simulador de Vuelo X Microsoft para que sus experiencias de vuelo sean más realistas. ENGINE START/STOP FUNCTIONS Fonctions Moteur démarrer/arrêter Funktionen zum Starten/Stoppen des Triebwerks Funzioni start/stop motore Funciones de iniciar/parar el motor MISC BATTERY, COCKPIT AND DE-ICE FUNCTIONS...
  • Page 26: Instalación

    COMO INSTALAR EL PANEL CONMUTADOR Puede acoplar el panel a su escritorio utilizando las tiras de velcro. Si ya tiene un Sistema Yoke Pro Vuelo de Saitek, también puede montar el Panel Conmutador encima de la unidad del Yoke utilizando los tornillos proporcionados.
  • Page 27: Instalación Del Software

    INSTALACIÓN DEL SOFTWARE 1. En la pantalla Instalación del software, haz clic en Siguiente y un cuadro emergente te preguntará si “deseas confiar en el software de Saitek.” Haz clic en sí, y a continuación en Siguiente. 2. Tras la instalación, puedes Ejecutar el editor de perfiles, que te mostrará el entorno de programación.
  • Page 28 exclusivamente a usted, el comprador original, y no podrá traspasarse a otra persona. Si se presenta algún defecto cubierto por esta garantía Y presenta comprobante de compra, Mad Catz, a su criterio, reparará o repondrá el producto sin cargo alguno. La garantía limitada de dos (2) años de Mad Catz sólo se aplica a los compradores de Norteamérica y Europa.
  • Page 29 Teléfono España: de lunes a viernes (con excepción de los días festivos), 93 181 63 94. Teléfono Reino Unido: de lunes a viernes (con excepción de los días festivos), 01633 928072 Teléfono Europa (fuera del Reino Unido): de lunes a viernes (con excepción de los días festi- vos), +44(0) 1633 883110.
  • Page 32 ©2015 Mad Catz Europe, Ltd. 1-2 Shenley Pavilions, Chalkdell Drive. Shenley Wood, Milton Keynes, Buckinghamshire MK5 6LB, Royaume-Uni (UK). Mad Catz, Saitek, le logo Pro Flight, le logo Saitek et le logo Mad Catz sont des marques de commerce ou des marques déposées de Mad Catz Interactive, Inc., de ses filiales et sociétés affiliées.

Ce manuel est également adapté pour:

FipTpmBipYoke system

Table des Matières