Saitek X52 Mode D'emploi
Table des Matières
Les langues disponibles
Les langues disponibles
X52 manual(ok)(24/11/04)
2004.12.22
9:05 PM
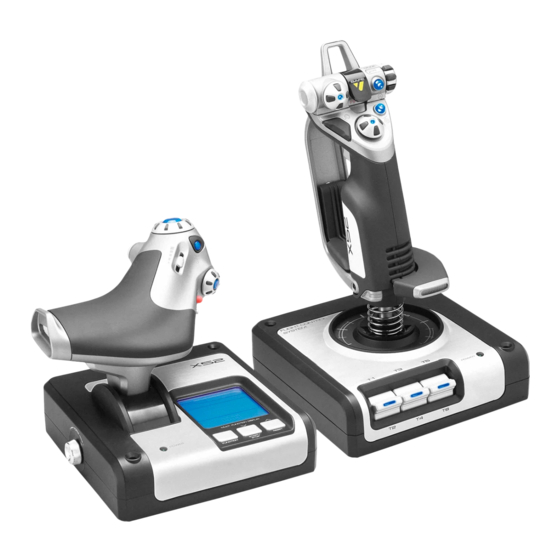
SAITEK X52 FLIGHT CONTROL SYSTEM - PRODUCT TOUR
Joystick
5-position adjustment
2-Stage metal trigger
to suit all hand sizes.
Destroy the enemy with the aid of a
precise and durable, cool-touch trigger.
Two-stages can be programmed with
separate fire functions.
Cool-touch
metal pinkie
switch can be
assigned shift
functionality to
double up on
programmable
commands.
3D Rudder Twist
handle on
joystick for
precise rudder
control; includes
integrated rudder
lock mechanism.
Precision centering mechanism
Non-contact technology on x and
y axes and constant spring force
reduce free play, improve control
and increase durability.
Page 3
3 toggle switches
Spring loaded and conveniently
positioned on the base for an
extra 6 programmable flight
commands.
Missile Launcher
Flip up the spring-loaded
safety cover to activate
missile launches.
Mode selector switch
2 x 8-way hat switches
3-position rotary switch with tri-
-1 pre-defined as point
state LED to indicate program
of view; select from
mode.
multiple view
3 Fire Buttons
perspectives and
assign frequently used
Backlit buttons
commands.
conveniently
positioned on
joystick head for
instant access in the
heat of the battle.
General Features
Backlighting
Illuminated buttons and Multi-Function Display (MFD) - ideal for
low light environments, guaranteed to stand out from the crowd.
Adjust brightness via Windows control panel.
Metal parts
Part metal construction for increased durability and maximum
comfort during extended gameplay.
3
Table des Matières

Manuels Connexes pour Saitek X52


Sommaire des Matières pour Saitek X52
-
Page 17: Manette Des Gaz
Lorsque l'Žcran de contr™le Saitek appara”t, essayez tous les boutons de votre contr™leur, ainsi que les contr™les, fonctionnalitŽ des touches en afin de vous assurer qu'ils fonctionnent correctement. Lorsque vous avez terminŽ, veuillez cliquer sur OK. - Page 18 9:05 PM Page 36 invitŽ(e) ˆ installer des fonctions telles que la souris Saitek Magic Mouse ou le clavier Saitek Magic Keyboard (c'est mon contr™leur Saitek) et suivez les instructions donnŽes ˆ l'Žcran ou sŽlectionnez Register Later (Enregistrer plus le nom que XP donne aux diffŽrents ŽlŽments de votre contr™leur Saitek). Cliquez toujours sur Suivant, Continuer tard) et cliquez sur Suivant.
-
Page 19: Gestion Des Rfglages De Votre Contrïleur
(MFD). maintenant. Pour cela, il vous suffit de changer les rŽglages de votre contr™leur dans la fen•tre de propriŽtŽs Saitek X52 Flight Stick. Apr•s avoir redŽmarrŽ l'ordinateur, l'Žcran d'Installation du pilote du pŽriphŽrique s'affiche. Cliquez sur Suivant Vous pouvez ouvrir cette fen•tre de deux fa•ons diffŽrentes : et suivez les instructions donnŽes ˆ... - Page 20 X52 manual(ok)(24/11/04) 2004.12.22 9:05 PM Page 40 Tester les axes Vous pouvez les axes et les contr™les suivants : CaractŽristique Explication X/Y Axes (Axes X/Y) DŽplacez le joystick vers l'avant et vers l'arri•re ou de gauche ˆ droite. Le symbole + se dŽplace dans la fen•tre X/Y Axes pour indiquer que les pilotes dŽtectent correctement les mouvements du joystick.
- Page 21 X52 manual(ok)(24/11/04) 2004.12.22 9:05 PM Page 42 Tester les touches, les commutateurs et les commutateurs de mode Qu'est-ce qu'une zone morte ? Vous pourrez vous assurer que lorsque vous appuyez sur une touche ou un bouton, cette action est bien dŽtectŽe par Une zone morte est une partie de la plage de mouvements dans les pilotes.
- Page 22 Vous pouvez changer ce rŽglage si vous voulez uniquement ajuster un c™tŽ de la zone morte. et sur le joystick de votre contr™leur de jeu Saitek X52. Vous pouvez modifier l'apparence de ces diodes LED, en rendant Pour cela, cliquez ˆ...
- Page 23 Cliquer sur un point de l'Žchelle pour dŽplacer la glissi•re par Žtapes graduŽes le long de cette Žchelle. Votre contr™leur de simulation de vol Saitek X52 comprend un MFD, ou Affichage multi-fonctions. Vous pouvez contr™ler la fa•on dont les informations sont affichŽes dans votre MFD en modifiant les diffŽrents rŽglages dans l'onglet MFD : La luminositŽ...
- Page 24 Des informations utiles sur le logiciel de programmation SST sont fournies, ainsi qu'un lien vers le site Internet o• vous dans la fen•tre de propriŽtŽs Saitek X52 Flight Stick. Pour de plus amples informations, voir le chapitre intitulŽ Gestion pourrez tŽlŽcharger la version la plus rŽcente du logiciel. Vous pourrez Žgalement visualiser les dŽtails des versions des des rŽglages du MFD dans la partie Gestion des rŽglages de votre contr™leur.
- Page 25 Travailler avec les modes ¥ Mode 3 + Pinkie Le contr™leur Saitek X52 vous offre des possibilitŽs tr•s importantes Affichage du mode actuel pour configurer votre contr™leur de la fa•on dont vous dŽsirez qu'il fonctionne. Vous y parviendrez en crŽant des profils ˆ l'aide du Le mode actuellement sŽlectionnŽ...
- Page 26 Gestion des rŽglages de votre contr™leur. caractŽristique. NB : Vous ne pouvez pas afficher les noms des boutons si la fen•tre de propriŽtŽs Saitek X52 Flight Stick est ouverte. Changer le profil actuel Vous pouvez utiliser le MFD pour changer rapidement le profil actif. Il se peut, par exemple, que vous rŽalisiez que vous n'utilisez pas le bon profil pour la partie en cours.
- Page 27 X52 manual(ok)(24/11/04) 2004.12.22 9:05 PM Page 54 sŽlectionner les autres fuseaux horaires disponibles et le format dans lequel l'heure est affichŽe. Voir Gestion des Pour utiliser le verrouillage du palonnier rŽglages de l'horloge dans la partie Gestion des rŽglages de votre contr™leur pour une explication de cette procŽdure.
- Page 28 Navigateur de canal intŽgrŽ pour vous aider ˆ trouver d'autres interlocuteurs Avertissement : Roger Wilco est la propriŽtŽ de GameSpy Industries et, en tant que tel, Saitek plc n'acceptera aucune responsabilitŽ pour ce produit. Ainsi, toutes les questions relatives ˆ ce produit devront •tre adressŽes ˆ GameSpy Industries.
-
Page 29: Mise En Service De Votre Contrïleur Dans Le Jeu
Q1 Mon ordinateur ne reconna”t pas le contr™leur Saitek : quel est le probl•me ? vous tenir informŽ(e) des toutes derni•res mises ˆ jour en vous rendant sur le site Internet de Saitek et en cliquant sur Avez-vous installŽ les pilotes sur le CD fourni avec ce produit ? TŽlŽchargements. -
Page 30: Support Technique
Dans l'Editeur de profil, sŽlectionnez les commandes que vous dŽsirez assigner ˆ chaque commande du clavier. Pour un guide complet sur la programmation de votre contr™leur Saitek, veuillez visiter le site web Saitek ˆ l'adresse Pour cela, cliquez ˆ gauche sur la cellule de commande dans la liste des commandes situŽe ˆ droite de l'Žcran. - Page 31 Afin d'obtenir la rŽparation d'un produit sous cette garantie, veuillez prŽsenter le produit et sa preuve d'achat (c'est ˆ dire le ticket de caisse ou une facture) au Centre de Support Technique Saitek agrŽŽ (la liste vous est fournie sur une feuille sŽparŽe se trouvant Žgalement dans l'emballage du produit), en ayant au prŽalable payŽ...
- Page 77 X52 manual(ok)(24/11/04) 2004.12.22 9:05 PM Page 154...