Publicité
Liens rapides
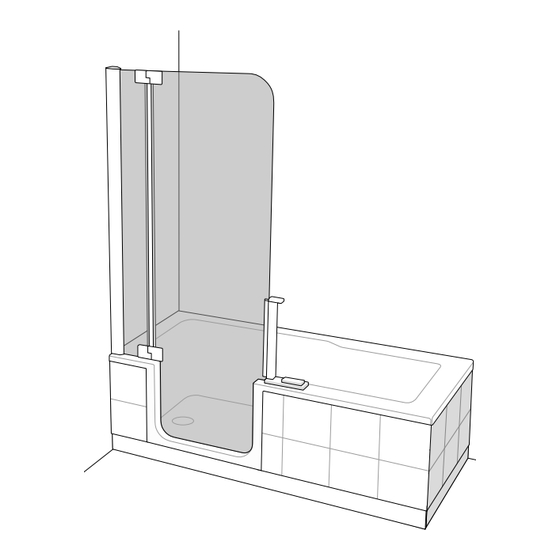
MONTAGEANLEITUNG Duschtür und Seitenwand, Untertrittblenden
ASSEMBLY INSTRUCTIONS Shower door and sidescreen, plinth-panels
NOTICE DE MONTAGE Porte de douche et un panneau fixe, les bandeaux
MONTAGEVOORSCHRIFT Douchedeur en 1 zijwand, onderste panelen
ISTRUZIONI DI MONTAGGIO Porta doccia con laterale fisso, rivestimenti inferiori
Vor Montage sorgfältig Lesen! Zum Nachschlagen und Aufbewahren dem Endkunden übergeben!
Read carefully before use! Hand over to the customer for looking up and storage!
Avant emploi lire soigneusement! Remettez le au client pour la recherche et le stockage!
Voordien gebruik zorgvuldig lezend! Overhandig de klant voor het kijken omhooggaand en opslag!
Prima dell'uso con attenzione leggendo! cosegni il cliente per lo sguardo in su e l'immagazzinaggio!
DEUTSCH
Originalsprache
ENGLISH
FRANCAIS
Translation
Traduction
NEDERLANDS
Vertaling
1 / 32
T2S.3F
T2S.4F
T2S.88
ITALIANO
Traduzione
MA_TL2_TSW_11761_11_20
Publicité

Manuels Connexes pour Artweger TWIN LINE 2 T2S.3F


Sommaire des Matières pour Artweger TWIN LINE 2 T2S.3F
- Page 1 MONTAGEANLEITUNG Duschtür und Seitenwand, Untertrittblenden T2S.3F ASSEMBLY INSTRUCTIONS Shower door and sidescreen, plinth-panels T2S.4F NOTICE DE MONTAGE Porte de douche et un panneau fixe, les bandeaux T2S.88 MONTAGEVOORSCHRIFT Douchedeur en 1 zijwand, onderste panelen ISTRUZIONI DI MONTAGGIO Porta doccia con laterale fisso, rivestimenti inferiori Vor Montage sorgfältig Lesen! Zum Nachschlagen und Aufbewahren dem Endkunden übergeben! Read carefully before use! Hand over to the customer for looking up and storage! Avant emploi lire soigneusement! Remettez le au client pour la recherche et le stockage!
- Page 3 INHALTSVERZEICHNIS OVERVIEW VUE D’ENSEMBLE OVERZICHT SOMMARIO Gefahrenhinweise, Montare la maniglia della porta Danger notice, Abdichten mit Sanitärsilikon, Avertissements de sécurité, Sealing with sanitary silicone, Gevaren toelichting Etancher avec du silicone sanitaire, Avvertenza Afdichten met sanitair-siliconen Siliconare all‘interno il profilo a muro Vor dem Einbau bitte unbedingt beachten! Please note carefully before installing the tub! Untertritt-Blenden montieren...
- Page 4 ACHTUNG! Beim Hantieren mit Glas Schutzkleidung tragen! Bitte untersuchen Sie nach dem Auspacken das Einscheiben-Sicherheitsglas (ESG) unverzüglich auf mögliche Transport schäden, wie abgesprungene Kanten oder Ecken. Wird ein Schaden festgestellt bitte umgehend Schadensmeldung machen und die Scheibe nicht ein- bauen, da dieser Fehler auch später zu einem Bruch führen kann! Alle Gläser werden vor dem Verpacken sorgfältigst kontrolliert. Spätere Reklamationen, auch bei Bruch, können daher nicht anerkannt werden.
-
Page 5: A Respecter Impérativement Avant Le Montage
Mentre forate fate attenzione a non rovinare le condutture (elettriche, gas, acqua). • La ditta ARTWEGER garantisce per il prodotto stesso e declina ogni responsabilità per il montaggio. Costi derivanti da smontaggio e montaggio postumo ed eventuali danni causati non sono compresi nella garanzia. -
Page 6: Montage
BENÖTIGTES NECESSARY OUTILLAGE BENODIGD ATTREZZATURE WERKZEUG TOOLS NECESSAIRE GEREEDSCHAP NECESSARIA Ø 8 mm MONTAGE- ASSEMBLY SET DE MONTAGE CORREDO MONTAGE DELL‘ASSEMBLEA 4,8 x 60 mm Ø 8 mm SW 5 SW 4 4,2 x 38 mm 4,2 x 25 mm Ø... - Page 7 Seitenwand montieren. Wandprofil auf Abdeckkappe stecken. WICHTIG! Richtiges Positionieren der Seitenwand. Siehe dazu Punkt 2! Install side screen. Insert wall bracket onto cap. IMPORTANT! Correct positioning of the side screen. See fig. 2! Monter le panneau fixe.Poser le profilé mural sur le cache. IMPORTANT! Positionnement correct du panneau. Voir illustration Nº...
- Page 8 1. WICHTIG! Wandprofil ge- nau 15mm vom Wannenrand entfernt senkrecht einrichten. 2. Insgesamt 6 Löcher anzeichnen. 1. IMPORTANT! Vertically adjust wall bracket exactly 15mm away from tub edge. 2. Mark 6 holes in all. 1. IMPORTANT ! Régler le niveau vertical du profilé mural à exactement 15mm du bord de la baignoire.
- Page 9 WICHTIG! Seitenwand-Positi- onshilfe auf die Wanne montieren! IMPORTANT! Mount side- screen posi-tioning aid on the tub! IMPORTANT! Monter l’aide au positionnement de la paroi fixe sur la baignoire ! BELANGRIJK! Zijwand-positie- hulp op het bad monteren! IMPORTANTE! Fissare la guida di posizionamento del fisso laterale sulla vasca! 9 / 32 MA_TL2_TSW_11761_11_20...
- Page 10 Seitenwand einsetzen. Insert side screen. Introduisez la paroi latérale. Blick von aussen! View from outside! Zijwand plaatsen en voorlopig vastzetten. Vue de l’exterieur! Van buiten gezien! Vista dall'esterno! Posizionare il laterale fisso M8 x 30mm Innenseite inside intérieur binnenkant interno 10mm 10 / 32 MA_TL2_TSW_11761_11_20...
- Page 11 Blick von aussen! View from outside! Vue de 11 / 32 MA_TL2_TSW_11761_11_20...
- Page 12 1. Deckenstütze mit Eckprofil (A) 3x verbohren. Lochpositionen (P) sind durch Senkun- gen vorgegeben. 2. Vorhandene 3 Schrauben entfernen. 1. Drill 3 holes through ceiling support and corner frame piece (A). Hole positions (P) are preset with countersinks. 2. Remove the 3 existing screws. 1.
- Page 13 Wandprofil (B) der Dusch-Tür mit Eckprofil (A) der Seitenwand verschrauben. Screw wall bracket (B) of the shower door to corner frame piece (A) of side screen. Visser le profilé mural (B) de la porte de douche avec le profilé d’angle (A) de la paroi latérale. Wandprofiel (B) van de douchedeur aan hoekprofiel (A) van de zijwand vastschroeven.
- Page 14 Fixteil einsetzen und nur sichern - noch nicht fest anziehen. Insert fixed part and only secure; do not tighten yet. Introduire l‘élément fixer et sécuriser – ne pas fixer complètement. Vaste del erin zetten en enigszins vastzetten – nog niet vast aandraaien. Inserire il fisso della porta e bloccarlo leggermente, non fissarlo completamente SW 5...
- Page 15 Innenseite inside intérieur binnenkant lato interno Fixteil senkrecht einrichten und Schrauben fest anziehen. Adjust fixed part vertically and tighten screws securely. Régler le niveau vertical l‘élément fixe et bien serrer la vis. Vaste deel loodrecht uitrichten en vast aandraaien. Mettere a bolla il fisso della porta e stringere bene le viti di bl- occaggio.
- Page 16 Innenseite Innenseite inside inside intérieur intérieur binnenkant binnenkant lato interno lato interno Innenseite inside intérieur binnenkant lato interno Innenseite inside intérieur binnenkant lato interno Türgriff montieren. Install door handle. Monter la poignée de la porte. Deurgrep monteren. Montare la maniglia della porta 16 / 32 MA_TL2_TSW_11761_11_20...
- Page 17 Innenseite inside intérieur Detail 1 binnenkant lato interno Dichtprofil richtig aufstecken. Insert seal correctly. Poser correctement le profilé d’étanchéité. Afdichtprofiel op juiste wijze erop zetten. Inserire in modo giusto il profilo di guarnizione. 17 / 32 MA_TL2_TSW_11761_11_20...
- Page 18 Prüfen Sie alle Funktionen! Türverriegelung, Dichtheit der Tür und den Siphon-Verschluss und Ein- und Überlauf. (siehe MONTAGEANLEITUNG WANNE ab Seite 14. ) Test all functions! Door closure, watertightness of door and odour-trap lock and overflow set. (see ASSEMBLY INSTRUCTIONS TUB page from 14 up). Contrôlez toutes les fonctions! Verrouillage de la porte, étanchéité...
- Page 19 Inbetriebnahmeprüfung lt. EN 12764:2004+A1:2008(D) Im Anschluss an den erfolgten EInbau ist die Wanne auf Sauberkeit zu prüfen. Die Wanne ist mit Wasser mit einer Eingangstemperatur von (40 ± 5)°C bis zu einem Füllstand oberhalb der am höchsten angeordneten Düse, der den Betrieb des Whirlsystems ermöglicht, zu befüllen.
- Page 20 1. Wandprofil INNEN abdichten! 2. WICHTIG! Überflüssiges Silikon mit Spachtel abziehen um das Verkleben des Wandprofiles mit dem Blendprofil zu vermeiden. 3-4. Blendprofil auf die Innenseite des Profilrahmens stecken. 1.Seal wall bracket on the inside! 2. Important! Remove excess caulking with spatula to avoid sticking wall bra- cket to moulding.
- Page 21 Mit Silikon außen abdichten. Seal with silicon from outside. Etancher au silicone à l’extérieur. Met siliconen aan buitenkant afdichten. Siliconare all‘esterno 21 / 32 MA_TL2_TSW_11761_11_20...
- Page 22 1./2. Blendprofile aufstecken. 3. Am Blendprofil unten abdichten. 1./2. Insert cover mouldings. 3. Seal on bottom of cover moulding. 1./2. Clipser les profilés déflecteur. 3. Etancher le profilé déflecteur en partie basse. 1./2. Bekledingsprofielen plaatsen. 3. Aan onderkant bekledingsprofiel afdichten. 1./2.
- Page 23 Untertritt-Blenden montieren. Insert plinth-panels. Posez les bandeaux. Onderste panelen monteren. Montaggio del rivestimento inferiore della vasca. 23 / 32 MA_TL2_TSW_11761_11_20...
- Page 24 Variante A Länge der Untertritt-Blenden (A+B) festlegen und auf Naturmaß kürzen. (Länge der Blende A = X+5mm) (Länge der Blende B = Y -3mm) Determine length of plinth panels (A+B) and shorten actual measurement. (Length of panel A = X+5mm) (Length of panel B = Y -3mm).
- Page 25 Variante B Länge der Untertritt-Blenden (A+B) festlegen und auf Naturmaß kürzen. (Länge der Blende A = X+8mm) (Länge der Blende B = Y -3mm) Determine length of plinth panels (A+B) and shorten actual measurement. (Length of panel A = X+8mm) (Length of panel B = Y -3mm).
- Page 26 1/2/3. Untertritt-Blenden ankleben. 1/2/3. Affix plinth panels. 1/2/3. Coller les bandeaux. 1/2/3. Onderste panelen lijmen. 1/2/3. Incollare il rivestimento inferiore. 26 / 32 MA_TL2_TSW_11761_11_20...
- Page 27 Eckabdeckung an den Untertritt-Blenden anbrin- gen. Affix corner cap to the plinth panels. Poser la cache sur les bandeaux. Hoekafdekking aan de onderste panelen aanbrengen Incollare la copertura dell‘angolo del rivestimento inferior 27 / 32 MA_TL2_TSW_11761_11_20...
- Page 28 NOTIZEN: 28 / 32 MA_TL2_TSW_11761_11_20...
- Page 29 TWINLINE 2 TWINLINE 2 Duschbadewanne T2Z103 links T2Z104 rechts T2Z117 links ohne Einlauf T2Z107 links T2Z118 rechts ohne Einlauf T2Z108 rechts T2Z115 (7x) T2Z203 T2Z114 T2Z110 (5 Stk.) T2Z112 T2Z111 T2Z113 TLZ101 T2Z105 links T20B01 links T2Z106 rechts T20B02 rechts T2Z109 TLZ103 TLZ102...
- Page 30 NOTIZEN: 30 / 32 MA_TL2_TSW_11761_11_20...
- Page 31 TWINLINE 2 TWINLINE 2 Duschtür T2ZT01 links T2ZT02 rechts T2Z201 T2Z301 links T2Z302 rechts T2Z101 links T2Z102 rechts T2Z202 TZ501 T2Z201 T2Z202...
- Page 32 Artweger GmbH. & Co. KG Sulzbacherstraße 60 | 4820 Bad Ischl | Austria Tel. +43 6132 205-0 | Fax +43 6132 25034 info@artweger.at | www.artweger.at Verkauf Deutschland Artweger GmbH. & Co. KG Postfach 1169 | 83402 Ainring | Deutschland Tel. 0800 1114442-0 | Fax 0800 1114442-41 info@artweger.de | www.artweger.de...