Yamaha AV1 Mode D'emploi
Table des Matières
Les langues disponibles
Les langues disponibles
Liens rapides
PUSH OPEN
POWER
O W
O W
M O
M O
CINEMA DSP
OPEN/CLOSE
M A
M A
R ' S
R ' S
N E
N E
M P
M P
D ' E
D ' E
D E
D E
TRACK PRESET
PRO LOGIC DSP OFF
ENHANCED MONO MOVIE
ROCK CONCERT VIDEO
DISCO HALL STADIUM
/
CD
TUNER
TAPE/MD
VCR
U C A
A L
A L
N U
N U
I
I
L O
L O
TIMER
SLEEP
F REP
AUTO ST
Hz
MEMORY
K
MHz
PTY HOLD
VIDEO 1
VIDEO 2
VOLUME
Active Servo
Technology
Chapitres
Table des Matières

Manuels Connexes pour Yamaha AV1


Sommaire des Matières pour Yamaha AV1
- Page 1 U C A R ’ S R ’ S D ’ E D ’ E TRACK PRESET TIMER SLEEP PRO LOGIC DSP OFF F REP AUTO ST ENHANCED MONO MOVIE ROCK CONCERT VIDEO MEMORY DISCO HALL STADIUM PTY HOLD PUSH OPEN CINEMA DSP OPEN/CLOSE TUNER...
- Page 59 FRANÇAIS INTRODUCTION Nous vous remercions d’avoir porté votre choix sur ce produit YAMAHA et nous espérons qu’il vous apportera de nombreuses années de satisfaction. Avant l’utilisation, veuillez lire ce mode d’emploi très attentivement. Petit guide pour bien utiliser ce système et le manuel du propriétaire...
- Page 60 TABLE DES MATIERES Page Page MESURES DE PRECAUTION ECOUTE D’UNE SOURCE SONORE MESURES DE PRECAUTION........3-4 OPERATIONS DE BASE POUR L’ECOUTE ..28-29 REMARQUES CONCERNANT LA ECOUTE D’UN DISQUE COMPACT TELECOMMANDE............5 LECTEUR DE DISQUES COMPACTS....30-32 PRESENTATION DE CE SYSTEME ECOUTE D’UNE EMISSION DE RADIO CONFIGURATION DU SYSTEME.......6 SYNTONISATION..........33-37 CARACTERISTIQUES..........7...
-
Page 61: Mesures De Precaution
Les ouvertures pratiquées sur la surface de dangereux et risque de provoquer un incendie ou l’amplificateur de puissance/subwoofer assurent une tout autre type d’accident. YAMAHA ne sera pas ventilation adéquate de l’appareil. Si ces ouvertures tenu pour responsable des dommages causés par le sont bouchées, la température va s’élever... - Page 62 Noter le numéro de série de votre appareil dans (modèle général seulement) l’espace ci-dessous. Le sélecteur de tension situé au bas de l’amplificateur de puissance/subwoofer (SW-AV1) N° de série: doit être réglé sur votre tension locale AVANT de brancher l’appareil sur une prise de courant CA.
-
Page 63: Remarques Concernant La Telecommande
MESURES DE PRECAUTION REMARQUES CONCERNANT LA TELECOMMANDE Mise en place des piles pour la Manipulation de la télécommande télécommande TRACK PRESET PRO LOGIC DSP OFF TIMER SLEEP ENHANCED MONO MOVIE F REP AUTO ST ROCK CONCERT VIDEO MEMORY DISCO HALL STADIUM PTY HOLD PUSH OPEN POWER... -
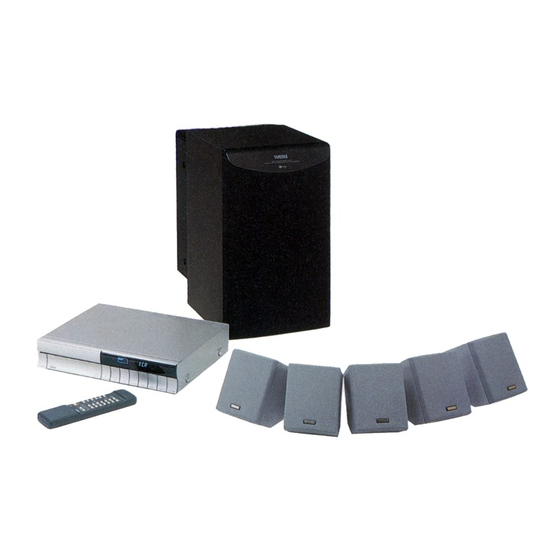
Page 64: Presentation De Ce Systeme
Lorsqu’on visionne une source visuelle, le décodeur Logique Pro d’effet ambiophonique Dolby et le processeur de champ sonore numérique transforme votre pièce en salle de cinéma avec un impact extraordinaire. Les sons ultra-graves reproduits par le subwoofer (SW-AV1) ajoutent une nouvelle dimension de réalisme et de puissance au son. -
Page 65: Caracteristiques
Recréation de l’univers sonore d’une salle de cinéma grâce à la combinaison le système au mode d’attente du système Dolby Pro Logic et de la ● Luminosité de l’affichange réglable technologie DSP de Yamaha (Programme: DOLBY PRO LOGIC ● Minuterie multi-usages ENHANCED) minuterie/sommeil ●... -
Page 66: Processeur De Champ Sonore Numerique (Dsp)
PROCESSEUR DE CHAMP SONORE NUMERIQUE (DSP) Toute l’expérience de Yamaha, leader incontesté dans le domaine du traitement audio numérique, a été exploitée pour mettre au point le Processeur de champ sonore numérique (DSP) de ce système, afin de vous offrir un monde acoustique tout nouveau. -
Page 67: Montage Des Enceintes
MONTAGE DES ENCEINTES MONTAGE DES ENCEINTES Avant d’effectuer les raccordements, bien placer tous les appareils de ce système à leur position respective. Le bon positionnement des enceintes est particulièrement important, car de lui dépend la bonne qualité sonore du système tout entier. -
Page 68: Montage Des Enceintes Avant Et Centrale
MONTAGE DES ENCEINTES Montage des enceintes avant et centrale Placer les enceintes avant sur un casier ou une étagère, et placer l’enceinte centrale sur le téléviseur ou sur une étagère, ou dans le casier du téléviseur de manière qu’il soit stabilisé. Support de Pour obtenir une meilleure stabilité... -
Page 69: Si L'on Désire Monter L'enceinte Sur Un Support D'enceinte Disponible Dans Le Commerce
MONTAGE DES ENCEINTES Visser les vis dans un mur ferme ou un support mural comme montré dans l’illustration, et pendre les trous du support de montage aux vis faisant protubérance. * S’assurer que les vis soient bien prises par la partie étroite du trou. -
Page 70: Raccordement Du Système Entre L'unité De Contrôle Principale (Tcd-Av1) Et L'amplificateur De Puissance/Subwoofer (Sw-Av1)
Ne jamais brancher le cordon d’alimentation CA de cette chaîne dans une prise CA avant d’avoir accompli tous les raccordements. Raccordement du système entre l’unité de contrôle principale (TCD-AV1) et l’amplificateur de puissance/subwoofer (SW-AV1) Raccorder entre elles les bornes SYSTEM... -
Page 71: Raccordement Des Enceintes (Nx-Av1) À L'amplificateur De Puissance/ Subwoofer (Sw-Av1)
RACCORDEMENTS Raccordement des enceintes (NX-AV1) à l’amplificateur de puissance/ subwoofer (SW-AV1) Enceinte avant Enceinte avant Enceinte arrière Enceinte arrière droite gauche droite Enceinte centrale gauche FRONT REAR CENTER REAR MARK SYSTEM CONNECTOR INPUT FROM TCD–AV1 FRONT REAR CENTER REAR Amplificateur de... - Page 72 Pour être sûr, raccorder le câble avec la ligne argent à la gauche. borne + sur l’amplificateur de puissance/subwoofer (SW- AV1) et l’enceinte, puis raccorder le câble sans ligne sur les deux. Remarques ● Ne pas raccorder d’autres enceintes que celles qui Précaution...
-
Page 73: Raccordement Des Antennes
Pour utiliser une antenne AM (PO/GO), laisser le fil du cadre-antenne AM (PO/GO) branché à l’appareil. 7,5 m 7.5 m (25 feet) Piquet de terre Earth rod ANTENNA 75Ω UNBAL. ANTENNA MONITOR OUT VIDEO SIGNAL 75Ω UNBAL. TO SW-AV1 MARK SYSTEM AUDIO CONNECTOR VIDEO 1 TAPE/MD OUTPUT F-15... -
Page 74: Raccordements Raccordements
AUDIO VIDEO 1 TAPE/MD CONNECTOR OUTPUT Lecteur de disque laser, etc. Platine à cassettes, magnétophone à minidisque, etc. Unité de contrôle principale (TCD-AV1) TRACK PRESET TIMER SLEEP PRO LOGIC DSP OFF F REP AUTO ST ENHANCED MONO MOVIE ROCK CONCERT VIDEO... -
Page 75: Pour Le Modèle Général Seulement
(modèle général seulement) Le sélecteur de tension situé au bas de 240V l’amplificateur de puissance/subwoofer (SW-AV1) doit être réglé sur votre tension locale AVANT de brancher l’appareil sur une prise de courant CA. Les tensions sont de 110/120/220/240V, CA, 50/60... -
Page 76: Les Commandes Et Leurs Fonctions
LES COMMANDES ET LEURS FONCTIONS LES COMMANDES ET LEURS FONCTIONS PANNEAU AVANT PUSH OPEN OPEN/CLOSE TUNER TAPE/MD VIDEO 1 VIDEO 2 VOLUME POWER MINI COMPONENT SYSTEM AV–1 MEMORY AUTO/MAN’L PRESET/BAND DISPLAY VIDEO 2 TIME ADJ TIMER REPEAT HOUR PHONES RDS MODE RDS START FREQ PS/PTY/RT/CT Les lettres figurant dans la zone ombrée (... - Page 77 LES COMMANDES ET LEURS FONCTIONS Sélecteur d’entrée du disque compact Touche de mémoire (MEMORY) (arrêt), (lecture/pause)] Cette touche est utilisable lorsque le tuner est Si une source d’entrée autre que le lecteur de disques sélectionné. compacts incorporé est sélectionnée, lorsqu’on appuie Lorsqu’on appuie sur cette touche, “MEMORY”...
-
Page 78: Ouverture Et Fermeture Du Couvercle Du Panneau
LES COMMANDES ET LEURS FONCTIONS RDS START (modèles pour le Royaume-Uni et Touche de saut/recherche ( l’Europe seulement) Lorsque le lecteur de disques compacts est Lorsque le tuner est sélectionné, si l’on appuie sur sélectionné, cette touche permet d’effectuer la cette touche, on enclenchera la recherche d’une recherche par saut ou la recherche manuelle (vers station après que le type de programme désiré... -
Page 79: Panneau D'affichage
LES COMMANDES ET LEURS FONCTIONS PANNEAU D’AFFICHAGE 67 8 9 0 TRACK PRESET TIMER SLEEP PRO LOGIC DSP OFF F REP AUTO ST ENHANCED MONO MOVIE ROCK CONCERT VIDEO MEMORY DISCO HALL STADIUM PTY HOLD Indicateurs de programme de processeur Indicateur de minuterie (TIMER) de champ sonore (DSP) Il s’allume lorsque la minuterie incorporée fonctionne. -
Page 80: Pour Le Tuner
LES COMMANDES ET LEURS FONCTIONS TELECOMMANDE Pour le tuner PRESET TUNER Pour le lecteur de disques compacts CENTER/REAR LEVEL /DELAY C/R/D Pour le processeur PROGRAM de champ sonore ON/OFF numérique SUBWOOFER TEST INPUT SLEEP VOLUME Pour le système POWER Pour le tuner Pour le lecteur de disques compacts Sélecteurs ( ) de numéro de station... -
Page 81: Pour Le Système
Lorsqu’on appuie sur la touche “+”, le niveau de sortie au Lorsque le lecteur de disques compacts n’est pas subwoofer (SW-AV1) augmente, et il diminue lorsqu’on sélectionné comme source d’entrée, si l’on appuie sur appuie sur la touche “–”. -
Page 82: Mise Sous Tension Ou En Mode D'attente Du Recepteur
MISE SOUS TENSION OU EN MODE D’ATTENTE DU RECEPTEUR MISE SOUS TENSION OU EN MODE D’ATTENTE DU RECEPTEUR Lorsque le cordon d’alimentation CA est raccordé à la prise CA, il est possible de mettre le récepteur sous tension ou en mode d’attente en appuyant sur l’interrupteur d’alimentation POWER situé... -
Page 83: Reglages Avant D'entreprendre L'ecoute
REGLAGES AVANT D’ENTREPRENDRE L’ECOUTE REGLAGE DE L’HORLOGE Lorsque l’appareil est sous tension, appuyer sur la touche DISPLAY pour afficher l’heure. Lorsque ce système est en mode d’attente, passer à l’étape suivante. MEMORY AUTO/MAN’L PRESET/BAND DISPLAY TIME ADJ TIMER Tout en maintenant la touche TIME ADJ enfoncée, REPEAT appuyer sur la touche HOUR et régler les heures. -
Page 84: Reglage De La Balance Des Enceintes
REGLAGES AVANT D’ENTREPRENDRE L’ECOUTE REGLAGE DE LA BALANCE DES ENCEINTES En utilisant le générateur de tonalité de test incorporé, cette procédure permet de régler l’équilibre du niveau de sortie des sons entre les enceintes avant, arrière et centrale. Lorsqu’on effectue ce réglage, le niveau sonore sera identique à... - Page 85 REGLAGES AVANT D’ENTREPRENDRE L’ECOUTE Avec les touches LEVEL +/–, régler les niveaux de sortie des sons à l’enceinte centrale et aux enceintes arrière de manière qu’ils soient pratiquement identiques à celui des enceintes avant. Lorsque la tonalité de test est émise sur l’enceinte centrale, le niveau de sortie de l’enceinte centrale change lorsqu’on appuie sur la touche LEVEL “+”...
-
Page 86: Ecoute D'une Source Sonore
ECOUTE D’UNE SOURCE SONORE OPERATIONS DE BASE POUR L’ECOUTE Après avoir accompli tous les raccordements et les réglages avant d’entreprendre l’écoute, écouter d’abord une source sur ce système. Appuyer sur l’interrupteur POWER pour mettre le système sous tension. * Lorsque le système est sous tension, l’affichage de l’unité... -
Page 87: Pour Terminer L'écoute D'une Source
ECOUTE D’UNE SOURCE SONORE Pour terminer l’écoute d’une source Arrêter la lecture de la source. TRACK PRESET TIMER SLEEP PRO LOGIC DSP OFF F REP AUTO ST ENHANCED MONO MOVIE ROCK CONCERT VIDEO MEMORY DISCO HALL STADIUM PTY HOLD Appuyer sur la touche VOLUME “ ”... -
Page 88: Ecoute D'un Disque Compact
ECOUTE D’UN DISQUE COMPACT LECTEUR DE DISQUES COMPACTS Lecture de disques compacts Appuyer sur le sélecteur d’entrée CD. Appuyer sur la touche OPEN/CLOSE pour ouvrir le 2, 4 plateau du disque. Placer des disques sur les plateaux, face munie d’une étiquette tournée vers le haut. TRACK PRESET TIMER SLEEP... -
Page 89: Fonctionnement Direct
ECOUTE D’UN DISQUE COMPACT Fonctionnement direct Précautions à prendre Lorsque l’appareil est en mode d’attente, si on appuie • En cas de parasites sur la télévision ou la radio au sur le sélecteur d’entrée CD, l’appareil se mettra sous cours de l’utilisation du lecteur de disques compacts, tension et la lecture du disque compact commencera éloigner l’appareil du téléviseur ou du poste radio. -
Page 90: Recherche Manuelle Rapide En Avant Ou En Arrière (Recherche Manuelle)
ECOUTE D’UN DISQUE COMPACT Recherche manuelle rapide en avant ou en arrière (Recherche manuelle) Lancer la lecture. Maintenir enfoncée la touche pour effectuer l’avance rapide de la lecture, et la touche pour l’inversion rapide. * L’écoute est possible (cependant légèrement altérée) pendant la recherche manuelle dans les TRACK PRESET PRO LOGIC DSP OFF... -
Page 91: Syntonisation Automatique
ECOUTE D’UNE EMISSION DE RADIO SYNTONISATION Lorsque les signaux des stations sont forts et qu’il n’y a pas d’interférences, la syntonisation rapide avec recherche automatique (syntonisation automatique) est possible. Cependant, si les signaux de la station désirée sont faibles, il faudra avoir recours à une syntonisation manuelle. -
Page 92: Ecoute D'une Emission De Radio Syntonisation
ECOUTE D’UNE EMISSION DE RADIO Syntonisation manuelle Si le tuner incorporé n’est pas sélectionné comme source d’entrée, appuyer sur le sélecteur d’entrée TUNER. Sélectionner la gamme d’ondes de réception [FM TRACK PRESET PRO LOGIC DSP OFF ENHANCED MONO MOVIE ROCK CONCERT VIDEO ou AM (PO ou GO)] en appuyant sur la touche DISCO HALL STADIUM PRESET/BAND tout en vérifiant la sélection sur... -
Page 93: Syntonisation Préréglée
ECOUTE D’UNE EMISSION DE RADIO Syntonisation préréglée Cet appareil peut mémoriser la fréquence des stations d’émission sélectionnée par syntonisation. Grâce à 2, 4 cette fonction, il suffit de rappeler le numéro de préréglage de station pour sélectionner la station correspondante. Il est possible de mémoriser jusqu’à TRACK PRESET PRO LOGIC DSP OFF 40 stations (8 stations pour chacune des 5 groupes). -
Page 94: Pour Rappeler Une Station Préréglée
ECOUTE D’UNE EMISSION DE RADIO Pour rappeler une station préréglée Sur la télécommande: Sélectionner le numéro de station préréglée désiré en appuyant sur le sélecteur de numéro de station préréglée PRESET “ ou “ ” ” TRACK PRESET PRO LOGIC DSP OFF Sur le panneau avant: ENHANCED MONO MOVIE ROCK CONCERT VIDEO... -
Page 95: Syntonisation Préréglée Automatique
ECOUTE D’UNE EMISSION DE RADIO Syntonisation préréglée automatique Il est aussi possible d’utiliser la fonction de syntonisation préréglée automatique. Grâce à cette fonction, ce tuner peut effectuer la syntonisation automatique et la mémorisation ordonnée des stations émettant des signaux puissants. Jusqu’à 40 stations TRACK PRESET PRO LOGIC DSP OFF peuvent être mémorisées automatiquement en suivant... -
Page 96: Reception Des Stations Rds
< > RECEPTION DES STATIONS RDS Modèles pour le Royaume-Uni et l’Europe seulement < RECEPTION DES STATIONS RDS Modèles pour le Royaume- > Uni et l’Europe seulement Le système RDS (Radio Data System) est un système de transmission des données que les stations FM se mettent progressivement à... - Page 97 < > RECEPTION DES STATIONS RDS Modèles pour le Royaume-Uni et l’Europe seulement Types de programmes dans le mode PTY NEWS VARIED Nouvelles: Emissions variées: Court compte-rendus de faits, Programmes surtout parlés, à vocation d’évènements et d’opinions exprimées récréative, non couverts par les publiquement, reportages et actualités.
-
Page 98: Changement Des Modes Rds
< > RECEPTION DES STATIONS RDS Modèles pour le Royaume-Uni et l’Europe seulement Changement des modes RDS FREQ PS/PTY/RT/CT Lorsqu’une station RDS est reçue, si on appuie une fois ou plus sur le sélecteur FREQ PS/PTY/RT/CT, on peut afficher successivement les différents modes RDS utilisés par la station reçue, dans l’ordre indiqué... - Page 99 < > RECEPTION DES STATIONS RDS Modèles pour le Royaume-Uni et l’Europe seulement Remarques Mode RT (Texte Radio) ● Le service des données RDS ne peut pas être utilisé Les informations concernant le progamme de la par cet appareil si le signal reçu est trop faible. En station actuellement reçue sont affichées.
-
Page 100: Modèles Pour Le Royaume-Uni Et L'europe Seulement
< > RECEPTION DES STATIONS RDS Modèles pour le Royaume-Uni et l’Europe seulement Appel d’un programme du type désiré parmi les stations RDS préréglées (PTY SEEK) Lorsqu’on désigne un type de programme, l’appareil recherche automatiquement toutes les stations FM préréglées pour une station RDS qui diffuse un programme de ce type. -
Page 101: Autres Fonctions Utilisant Le Service Des Données Rds
< > RECEPTION DES STATIONS RDS Modèles pour le Royaume-Uni et l’Europe seulement Autres fonctions utilisant le service > ON (OFF) CT CLOCK Cet appareil corrige automatiquement l’heure de des données RDS l’horloge incorporée en la synchronisant avec les données CT de la station RDS actuellement reçue. Ce tuner dispose des fonctions suivantes qui utilisent * Si l’on reçoit une station RDS d’un autre pays, le service des données RDS. -
Page 102: Ecoute D'une Source Sur Un Appareil Exterieur
ECOUTE D’UNE SOURCE SUR UN APPAREIL EXTERIEUR UNITES EXTERNES FONCTIONNANT RACCORDEES A CE SYSTEME Pour écouter ou regarder une source sur une unité externe raccordée à ce système. Sélectionner la source d’entrée désirée en appuyant sur le sélecteur d’entrée correspondant. TRACK PRESET TIMER SLEEP... -
Page 103: Utilisation Du Processeur De Champ Sonore Numerique (Dsp)
UTILISATION DU PROCESSEUR DE CHAMP SONORE NUMERIQUE (DSP) UTILISATION DU PROCESSEUR DE CHAMP SONORE NUMERIQUE (DSP) Ce système possède un processeur de champ sonore Bref aperçu des programmes de numérique à programmes multiples sophistiqué. Le champ sonore numérique processeur permet d’étendre et de changer électroniquement la forme du champ sonore des Une description sommaire des divers champs sonores sources audio et vidéo, reproduisant l’univers sonore... - Page 104 UTILISATION DU PROCESSEUR DE CHAMP SONORE NUMERIQUE (DSP) Ecoute d’une source avec effets sonores en utilisant le traitement numérique du champ sonore (y compris le décodage Logique Pro d’effet ambiophonique Dolby) Enclencher la lecture d’une source. (Pour ce qui concerne la lecture d’une source, se reporter aux sections à...
-
Page 105: Réglage Du Niveau De Sortie De L'enceinte Centrale
UTILISATION DU PROCESSEUR DE CHAMP SONORE NUMERIQUE (DSP) Réglage du niveau de sortie de l’enceinte centrale II est possible de régler le niveau de sortie des sons de l’enceinte centrale, même si le niveau de sortie a déjà été réglé lors du “REGLAGE DE LA BALANCE DES ENCEINTES”, pages 26 –... -
Page 106: Réglage De La Durée De Retard
UTILISATION DU PROCESSEUR DE CHAMP SONORE NUMERIQUE (DSP) Réglage de la durée de retard Il est possible de régler la différence de temps entre le début des sons des enceintes avant et le début de l’effet sonore des enceintes arrière. Plus la valeur est grande, plus le son d’effet sera émis tard. -
Page 107: Minuterie Incorporee
MINUTERIE INCORPOREE LECTURE AVEC MINUTERIE En utilisant la minuterie intégrée, il est possible de régler automatiquement l’heure de mise en marche de ce système et de la source de lecture, ainsi que l’heure de mise en mode d’attente de ce système. TRACK PRESET PRO LOGIC DSP OFF Faire les préparatifs sur la source de lecture. - Page 108 MINUTERIE INCORPOREE Mode de réglage de l’heure/ON TIME [L’indication “ON TIME” apparaît à l’affichage, puis est remplacée peu après par le mode de réglage de l’heure.] Régler l’heure à laquelle vous voulez faire démarrer la lecture avec minuterie au moyen de la touche HOUR et de la touche MIN.
-
Page 109: Minuterie De Sommeil
MINUTERIE INCORPOREE MINUTERIE DE SOMMEIL On peut faire passer ce système automatiquement au mode d’attente. Allumer la source souhaitée. Appuyer sur la touche SLEEP. L’indication “SLEEP” apparaît à l’affichage, et est peu après remplacée par l’indication “2h00m”. POWER Appuyer à plusieurs reprises sur la touche SLEEP jusqu’à... -
Page 110: En Cas De Difficulte
Si l’appareil ne fonctionne pas correctement, avant de conclure qu’il est en panne, le vérifier selon la liste de problèmes possibles suivante. Cette liste donne des détails sur les remèdes que vous pouvez appliquer vous-même sans avoir à appeler un spécialiste. Si vous avez quelque doute ou question, consulter votre revendeur officiel YAMAHA le plus proche. SYMPTOME... - Page 111 CARACTERISTIQUES TECHNIQUES YAMAHA se réserve le droit d’apporter des modifications sans préavis à la présentation et aux caractéristiques des appareils à fin d’amélioration. Les valeurs indiquées dans ce document sont les valeurs nominales des appareils de série. Amplificateur Tuner Puissance de sortie minimum RMS par canal...
-
Page 112: Caracteristiques Techniques Caracteristiques Techniques
YAMAHA ELECTRONICS (UK) LTD. YAMAHA HOUSE, 200 RICKMANSWORTH ROAD WATFORD, HERTS WD1 7JS, ENGLAND YAMAHA SCANDINAVIA A.B. J A WETTERGRENS GATA 1, BOX 30053, 400 43 VÄSTRA FRÖLUNDA, SWEDEN YAMAHA MUSIC AUSTRALIA PTY, LTD. 17-33 MARKET ST., SOUTH MELBOURNE, 3205 VIC., AUSTRALIA...