Chapitres
Table des Matières

Manuels Connexes pour Ivoclar Vivadent Gnathometer CAD


Sommaire des Matières pour Ivoclar Vivadent Gnathometer CAD
- Page 1 Gnathometer CAD Bedienungsanleitung Istruzioni d’uso Seite 3 Pagina 63 Operating Instructions Instrucciones de uso Page 15 Pagina 83 Mode d’emploi Instruções de operação Page 43 Página 83...
-
Page 3: Table Des Matières
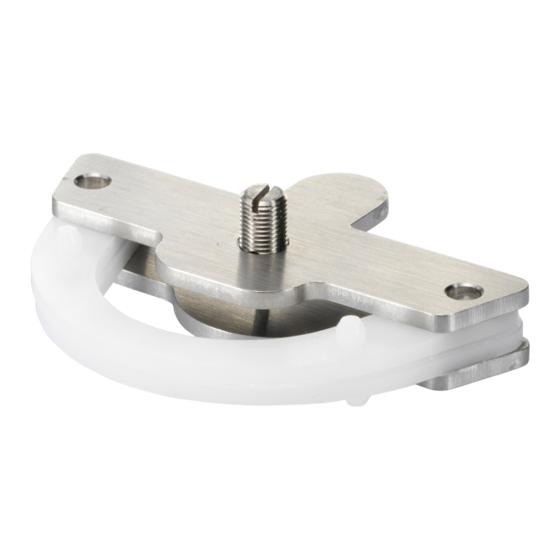
Inhaltsverzeichnis 1 Einleitung und Zeichenerklärung 1.1 Vorwort 1.2 Einleitung 1.3 Angaben zur Bedienungsanleitung 2 Sicherheit geht vor 2.1 Bestimmungsgemässe Verwendung 2.2 Sicherheits- und Gefahrenhinweise 3 Produktbeschreibung 3.1 Aufbau und Funktionsbeschreibung 3.2 Indikationen, Kontraindikation 4 Installation und erste Inbetriebnahme 4.1 Auspacken und Lieferumfang prüfen 4.2 Zusammenbau und erste Inbetriebnahme 5 Handhabung, Bedienung 5.1 Bisswallauflagen befestigen... - Page 4 Geräteübersicht / Teileverzeichnis Teileverzeichnis 1 Registrierplatte UK 2 Registrierplatte OK 3 Bisswallauflagen 4 Schreibstiftaufnahme 5 Retentionen 6 Schreibstift 7 Fixierplättchen 8 Schnappverschluss 9 Fixierschraube 10 Trichterloch 11 Schreibspitze 12 Unterlagscheibe...
-
Page 5: Einleitung Und Zeichenerklärung
Zunge unter die Schreibstiftplatte zu legen. Gefahren und Risiken 2.2 Sicherheits- und Gefahrenhinweise Nicht zulässige Anwendung Der Gnathometer CAD darf ausschliesslich für den im Kapitel 3 beschriebenen Bereich verwendet werden. Zur bestimmungsgemässen Verwendung gehört zudem: Die Beachtung der Anweisungen, Vorschriften und 1.3 Angaben zur Bedienungsanleitung... -
Page 6: Produktbeschreibung
Sodann kann das Registrat zur Digitalisierung Reinigung im Kapitel 7.2) mittels eines speziellen Scanhalters in den Scanner gebracht Das Gnathometer CAD ist bereits teilweise vormontiert. In werden. dieser Übersichtszeichnung werden die verschiedenen Kom- Die Besonderheit dieses Registriergerätes besteht darin, dass ponenten und Einzelteile abgebildet. -
Page 7: Handhabung, Bedienung
5 Handhabung, Bedienung 5.1 Bisswallauflagen befestigen Ebenfalls ist zu berücksichtigen, dass eine geringe Zunahme der Bisshöhe durch die Funktionsabformung entsteht. Die Bisswallauflagen (3) können mittels den Retentionen (5) Mit einer Rechtsdrehung kann die Höhe des Schreibstiftes (6) schnell und einfach auf dem Abdrucklöffeln mit dem angehoben werden. -
Page 8: Praktische Anwendung Am Patienten
6 Praktische Anwendung am Patienten 6.1 Funktionsabdruck erstellen 6.1.3 Bisswallauflagen von den Abdrucklöffeln entfernen. 6.1.1 Bisswallauflagen anbringen Bisswallauflagen (3) mittels dem Schnappverschluss und den Retentionen (5) auf den UK und OK-Abdrucklöffel anbringen. Die Bisswallauflagen (3) sind baugleich und passen im OK als auch im UK Abdrucklöffel. -
Page 9: Wichtige Information
6.2.2 Vertikale Höhe überprüfen 6.2.4 Pfeilwinkelaufzeichnung durchführen Höhenverstellung wenn nötig durchführen. Je nach Methode Beide Funktionsabformungen werden mit den Registrierteilen können dazu entsprechende Hilfsmittel (z.B. Massstab, wieder in den Mund eingesetzt. Nun den Patienten an - Schieb lehren) oder Methoden (Sprachlaute) verwendet weisen, folgende Bewegungen auszuführen: werden. - Page 10 6.2.5 Fixierplättchen auf Pfeilwinkelspitze ausrichten 6.2.7 Registrat verschlüsseln und mit Fixierschraube fixieren. Die Verschlüsselung erfolgt am einfachsten mit dem Regi- Richten Sie nun das Trichterloch (10) des Fixierplättchens (7) strier silikon (z.B. CADBite) welches direkt aus der Spritze auf die Spitze des Pfeilwinkels aus und fixieren Sie das mittels der Kanüle zwischen die Registrierteile aufgetragen Fixierplättchen mit der Fixierschraube (9).
-
Page 11: Unterhalt, Reinigung, Diagnose
7 Unterhalt, Reinigung, Diagnose In diesem Kapitel wird aufgezeigt, welche Wartungs- und 7.3 Pflegehinweise Reinigungsarbeiten am Gnathometer CAD ausgeführt werden Jeglichen Kontakt mit starken Säuren und können. Dabei werden nur die Arbeiten aufgelistet, welche Lösungsmitteln (z.B. MMA, Aceton) vermeiden. vom zahnärztlichen- und zahntechnischen Fach personal Dadurch wird eine Beschädigung der Oberflächen-... -
Page 12: Was Ist, Wenn
8 Was ist, wenn … 8.2 Reparaturarbeiten Dieses Kapitel soll Ihnen helfen, Störungen zu erkennen, sich im Störfall korrekt zu verhalten, die Störungsbehebung Reparaturen dürfen nur von einer qualifizierten Ivoclar einzuleiten oder, wo zulässig, einfache Reparaturen selber Vivadent-Servicestelle durchgeführt werden. Bei sämtlichen durchzuführen. -
Page 13: Produktspezifikationen
9 Produktspezifikationen 10 Sonstiges 9.1 Lieferform Tipps für Pfeilwinkel-Analyse und Interpretation Die Lieferformen können länderspezifisch Bitte beachten Sie dazu auch die Fachliteratur, welche zu unterschiedlich sein. diesem Fachthemenbereich erhältlich ist. 9.2 Technische Daten Gewicht (zirka): – Registrierplatte UK mit Schreibspitze: 13,1 g Das Gerät wurde für den Einsatz im Dentalbereich –... - Page 15 Table of Contents 1 Introduction / Signs and Symbols 1.1 Preface 1.2 Introduction 1.3 Notes regarding the Operating Instructions 2 Safety First 2.1 Indications 2.2 Health and safety instructions 3 Product Description 3.1 Construction and functional description 3.2 Indications, Contraindications 4 Installation and Initial Start-Up 4.1 Unpacking and checking the contents 4.2 Installation and initial start-up...
- Page 16 Views of Gnathometer CAD / List of Parts List of Parts 1 Mandibular registration plate 2 Maxillary registration plate 3 Bite rim supports 4 Registration pin holder 5 Retentions 6 Registration pin 7 Fixing plate 8 Snap fit 9 Fixation screw...
-
Page 17: Introduction/Signs And Symbols
When manipulating the Gnathometer CAD while it is attached to the patient, make sure that the tongue of the The Gnathometer CAD has been designed according to the patient is not injured by the stylus of the registration pin. latest industry standards. Inappropriate use may damage the equipment and be harmful to personnel. -
Page 18: Product Description
4 Installation and Initial Start-Up 3.1 Construction and functional description 4.1 Unpacking and checking the contents Gnathometer CAD is an intraoral support pin registration Please make sure that the contents are complete. device or the individualized determination of the centric jaw 1 Mandibular registration plate position in edentulous patients. -
Page 19: Handling, Operation
5 Handling, Operation 5.1 Attaching the bite rim supports The height of the registration pin (6) can be increased with a right turn. The bite rim supports (3) can be easily secured on and The height of the registration pin (6) can be reduced with a removed from the impression trays with the snap-action left turn. -
Page 20: Practical Use On The Patient
6 Practical Use on the Patient 6.1 Taking the functional impression 6.1.3 Removing the bite rim supports from the impression trays 6.1.1 Placing the bite rim supports Secure the bite rim supports (3) with the snap-action mechanism and the retentions (5) on the mandibular and maxillary impression trays. - Page 21 6.2.2 Verifying the vertical height 6.2.4 Conducting the needle point tracing Adjust height, if necessary. Depending on the method, Both functional impressions together with the registration adequate auxiliaries (e.g. ruler, sliding caliper) or techniques components are replaced in the mouth of the patient. Now (speech-sounds) can be used.
- Page 22 6.2.5 Aligning the fixing plate with the Gothic Arch tip 6.2.7 Locking the registration and securing with the fixation screw The key is best fabricated with a registration silicone (e.g. Now align the funnel hole (10) of the fixing plate (7) with CADBite), which is directly injected between the the tip of the Gothic Arch and secure the fixing plate with registration components from the syringe using the...
-
Page 23: Maintenance, Cleaning, Diagnosis
7 Maintenance, Cleaning, Diagnosis This chapter describes the user maintenance and cleaning 7.3 Maintenance procedures for Gnathometer CAD. Only those tasks are listed Avoid any contact with strong acids and solvents that may be performed by dental professionals. All other (e.g. -
Page 24: What If
8 What If... 8.2 Repair This chapter will help you to recognize malfunctions and take appropriate measures or, if possible, to perform some Repairs may only be carried out by a certified Ivoclar minor repairs. Vivadent Service Centre. If repairs during the warranty The expendable parts are as follows: period are not carried out by a certified Service Centre, the Fixing plates... -
Page 25: Product Specifications
9 Product Specifications 10 Miscellaneous 9.1 Delivery form Tips for Gothic Arch analysis and interpretation Delivery forms may varyfrom country to country. Please also refer to the specialized literature available on this subject matter. 9.2 Technical data Weight (approximately): – Mandibular registration plate with registration pin: 13.1 g The device has been developed solely for use in –... - Page 27 Sommaire Introduction et explication des symboles 1.1 Préface 1.2 Introduction 1.3 Remarques concernant le manuel d'utilisation 2 La sécurité avant tout 2.1 Indications 2.2 Consignes de sécurité et mises en garde 3 Description du produit 3.1 Construction et description des fonctions 3.2 Indications et contre-indications 4 Installation et première mise en service 4.1 Déballage et contrôle de la livraison...
- Page 28 Vues du Gnathometer CAD / Liste des composants Liste des composants 1 Plaque d'enregistrement mandibulaire 2 Plaque d'enregistrement maxillaire 3 Supports de bourrelets d'occlusion 4 Support de tige d'enregistrement 5 Rétentions 6 Tige d'enregistrement 7 Plaque de fixation 8 Clip...
-
Page 29: Introduction Et Explication Des Symboles
Dangers et risques Contre-indications 2.2 Consignes de sécurité et mises en garde Le Gnathometer CAD ne doit être utilisé que pour les indications décrites au chapitre 3. L’utilisation conforme du Remarques concernant le manuel d'utilisation Gnathometer CAD suppose également : Le respect des consignes, des directives et des remarques Appareil concerné... -
Page 30: Description Du Produit
7.2 Nettoyage) spécial et placé dans le scanner en vue de la numérisation. Le Gnathometer CAD est déjà assemblé en partie. Ce schéma La caractéristique principale de cet appareil d'enregistrement général illustre les différents composants et pièces. -
Page 31: Manipulation, Utilisation
5 Manipulation, utilisation 5.1 Fixation des supports de bourrelets d'occlusion La hauteur d'enregistrement (6) peut être augmentée en tournant le pointeau vers la droite. Grâce au mécanisme d'enclenchement, les supports de La hauteur d'enregistrement (6) peut être réduite en tournant bourrelets d'occlusion (3) peuvent être facilement fixés et le pointeau vers la gauche. -
Page 32: Utilisation Sur Le Patient
6 Utilisation sur le patient 6.1 Prise d'empreinte fonctionnelle 6.1.3 Retrait des supports de bourrelets d'occlusion des porte-empreintes 6.1.1 Mise en place des supports de bourrelets d'occlusion Fixer les supports de bourrelets d'occlusion (3) à l'aide du mécanisme d'enclenchement et des rétentions (5) sur les porte-empreintes mandibulaire et maxillaire. -
Page 33: Contrôle De La Hauteur Occlusale
6.2.2 Contrôle de la hauteur occlusale 6.2.4 Tracé du point d'appui central Ajuster la hauteur si nécessaire. Selon la méthode utilisée, il Les empreintes fonctionnelles, tout comme les éléments est possible d'avoir recours à des accessoires (ex. règle, pied d'enregistrement, sont replacés dans la bouche du patient. à... -
Page 34: Verrouillage De L'enregistrement
6.2.5 Alignement de la plaque de fixation avec la 6.2.7 Verrouillage de l'enregistrement pointe de l'arc gothique et maintien avec la vis La meilleure façon de réaliser une clé consiste à utiliser un de fixation silicone d'enregistrement (ex. CAD Bite), injecté directement Alignez la plaque percée (10) de la plaque de fixation (7) entre les éléments d'enregistrement à... -
Page 35: Entretien, Nettoyage Et Diagnostic
7 Entretien, nettoyage et diagnostic Ce chapitre aborde les travaux de maintenance et de 7.3 Entretien nettoyage pouvant être effectués sur le Gnathometer CAD. Évitez tout contact avec des acides et des solvants Seuls figurent les travaux qui peuvent être exécutés par les puissants (ex. -
Page 36: Que Faire Si
8 Que faire si... 8.2 Travaux de réparation Ce chapitre vise à aider l’utilisateur à reconnaître les défaillances et à réagir correctement en cas de panne. Seul un technicien qualifié du Service Après-Vente Ivoclar Les pièces consommables sont les suivantes : Vivadent est autorisé... -
Page 37: Spécifications Du Produit
9 Spécifications du produit 10 Divers 9.1 Présentation Aide sur l'analyse et l'interprétation de l'arc gothique Les présentations peuvent varier d'un pays à Veuillez également consulter la bibliographie spécialisée sur l'autre. ce sujet. 9.2 Données techniques Poids (approximatif) Cet appareil a été développé exclusivement pour –... - Page 39 Indice 1 Introduzione e spiegazione dei simboli 1.1 Premessa 1.2 Introduzione 1.3 Indicazioni relative alle istruzioni d’uso 2 La sicurezza innanzitutto 2.1 Utilizzo conforme 2.2 Note di sicurezza e di pericolo 3 Descrizione prodotto 3.1 Costruzione e descrizione della funzione 3.2 Indicazioni, controindicazioni 4 Installazione e prima messa in funzione 4.1 Disimballaggio e controllo del contenuto...
-
Page 40: Panoramica, Elenco Componenti
Panoramica, elenco componenti Elenco componenti 1 Piastra di registrazione inferiore 2 Piastra di registrazione superiore 3 Valli occlusali 4 Alloggiamento per punta scrivente 5 Ritenzioni 6 Perno scrivente 7 Piastrine di fissaggio 8 Chiusura a scatto 9 Vite di fissaggio 10 Foro per punta scrivente 11 Punta scrivente 12 Rondella... -
Page 41: Introduzione E Spiegazione Dei Simboli
Egregio Cliente, manutenzione. La ringraziamo per la preferenza accordataci con l'acquisto del prodotto Gnathometer CAD. Questo strumento è un 2.1 Utilizzo conforme prodotto di elevata qualità e precisione. Nel corso delle manipolazioni dello Gnathometer CAD su L'apparecchio è... -
Page 42: Descrizione Prodotto
3.1 Costruzione e descrizione della funzione 4.1 Disimballaggio e controllo del contenuto Lo Gnathometer CAD è un apparecchio di registrazione Si prega di controllare che l'apparecchio sia completo. intraorale con perni di sostegno per la determinazione 1 Piastra di registrazione inferiore individuale della posizione di centrica di pazienti edentuli. -
Page 43: Manipolazione, Utilizzo
5 Manipolazione, utilizzo 5.1 Fissaggio dei valli occlusali Allo stesso tempo è necessario considerare, che attraverso l'impronta funzionale si ha un minimo aumento dell'altezza I valli occlusali (3) con le ritenzioni (5) possono essere fissati occlusale. e staccati in modo rapido e semplice sui cucchiai con il Con un movimento verso destra è... -
Page 44: Impiego Pratico Sul Paziente
6 Impiego pratico sul paziente 6.1 Realizzazione dell'impronta funzionale 6.1.3 Prelievo dei valli occlusali (3) dai cucchiai. 6.1.1 Applicazione dei valli occlusali Applicare i valli occlusali (3) tramite meccanismo a scatto e ritenzioni (5) sul cucchiaio inferiore e superiore. I valli occlusali (3) sono costruiti in modo identico e vanno bene sia per cucchiaio superiore che per quello inferiore. -
Page 45: Controllo Dell'altezza Verticale
6.2.2 Controllo dell'altezza verticale 6.2.4 Registrazione dell'arco gotico Se necessario, spostare l'altezza. A seconda del metodo si Entrambe le impronte funzionali si riposizionano in bocca possono utilizzare i relativi ausili (p.es. righello, calibro) o con le parti di registrazione. Quindi invitare il paziente ad altri metodi (fonetica). - Page 46 6.2.5 Orientare la piastrina di fissaggio sulla punta 6.2.7 Fissaggio della registrazione dell'arco gotico e fissare con la vite di fissaggio. Il modo più semplice per eseguire il fissaggio è con silicone Orientare quindi il foro per la punta scrivente (10) della da registrazione (p.es.
-
Page 47: Manutenzione, Pulizia, Diagnosi
7 Manutenzione, pulizia, diagnosi In questo capitolo vengono illustrati i lavori di manutenzione 7.3 Avvertenze per la cura e pulizia che possono essere effettuati sullo Gnathometer Evitare qualsiasi contatto con acidi o solventi (p.e. CAD. In tal senso vengono elencati i lavori che possono MMA, acetone). -
Page 48: Cosa Succede, Se
Riparazioni possono essere eseguite solo dal Servizio permesso, di eseguire semplici riparazioni. Assistenza Ivoclar Vivadent qualificato. In caso di tentativi di Sono componenti soggette ad usura: riparazione non eseguiti dal servizio assistenza Ivoclar... -
Page 49: Specifiche Del Prodotto
9 Specifiche del prodotto 10 Altro 9.1 Confezionamento Consigli per l'analisi e l'interpretazione dell'arco gotico I confezionamenti possono variare da paese a paese. Si prega di consultare la bibliografia disponibile in merito a questo argomento specifico. 9.2 Dati tecnici Peso (circa): L’apparecchio è... - Page 51 Tabla de Contenidos 1 Introducción / Señales y símbolos 1.1 Prefacio 1.2 Introducción 1.3 Datos para la manipulación 2 La seguridad ante todo 2.1 Indicaciones 2.2 Datos sobre la seguridad y la salud 3 Descripción de producto 3.1 Montaje y descripción sobre el funcionamiento 3.2 Indicaciones,Contraindicaciones 4 Instalación y primera puesta en marcha 4.1 Desembalaje y control del contenido...
- Page 52 Gnathometer CAD / Despiece Despiece 1 Bandeja de registro mandibular 2 Bandeja de registro maxilar 3 Soporte de mordida 4 Soporte para pin de registro 5 Retenciones 6 Pin de registro 7 Bandeja de fijación 8 Fijador de click 9 Tornillo de fijación...
-
Page 53: Introducción / Señales Y Símbolos
Riesgos 2.2 Datos sobre la seguridad y la salud Contraindicaciones Gnathometer CAD sólo debe usarse para lo descrito en el capítulo 3. Instrucciones adicionales para asegurar el uso adecuado de Gnathometer CAD: Tener en cuenta las indicaciones, instrucciones y 1.3 Datos para la manipulación... -
Page 54: Descripción De Producto
4.1 Desembalaje y control del contenido funcionamiento Por favor, asegúrese de que el contenido está completo. Gnathometer CAD es un dispositivo que sirve de soporte para el registro intraoral y para la determinación personali- 1 Bandeja de registro mandibular zada de la posición céntrica de la mandíbula en pacientes 1 Bandeja de registro maxilar edéntulos. -
Page 55: Manipulación, Uso
5 Manipulación, Uso 5.1 Adjuntar la bandeja de mordida La altura del pin de registro (6) puede incrementar con un giro a la derecha. El soporte de la bandeja de mordida (3) puede asegurarse o La altura del pin de registro (6) puede reducirse con un giro eliminarse de la impresión con el mecanismo de acción a la izquierda. -
Page 56: Uso Práctico Para El Paciente
6 Uso práctico para el paciente 6.1 Tomando la impresión funcional 6.1.3 Retirar el soporte de mordida de la impresión. 6.1.1 Colocando el soporte de mordida Asegurar el soporte de mordida (3) con el mecanismo de acción rápida y las retenciones (5) en la impresión mandi- bular y maxilar. - Page 57 6.2.2 Verificar la altura vertical 6.2.4 Realizar el punto trazado de aguja Tanto las impresiones funcionales como los componentes de Ajustar la altura, si es necesario. Dependiendo del método, registro se colocan en la boca del paciente. Ahora solicite al pueden usarse las herramientas adecuadas (por ejemplo, paciente a realizar los siguientes movimientos: regla, calibre deslizante) o técnicas (sonidos del habla).
- Page 58 6.2.5 Alinear la bandeja de fijación con la punta del 6.2.7 Bloquear el registro Arco Gótico y asegurar el tornillo de fijación(9) La mejor forma de fabricar la llave es con una silicona de Ahora alinear el agujero del embudo (10) con el plato de registro (por ej.
-
Page 59: Mantenimiento, Limpieza, Diagnóstico
7 Mantenimiento, Limpieza, Diagnóstico Este capítulo describe el mantenimiento y limpieza por parte 7.3 Mantenimiento del usuario para Gnathometer CAD. Estas pautas sólo Evitar cualquier contacto con ácidos fuertes y pueden llevarlas a cabo profesionales dentales. El resto sólo solventes (por ej. MMA, acetona) para prevenir debe realizarse por personal cualificado y certificado por el daños en la superficie. -
Page 60: Qué Sucede Si
Las reparaciones pueden llevarse a cabo por un Centro de alguna pequeña reparación. Servicios Ivoclar Vivadent certificado. Si la reparación se Las piezas de desgaste son las siguientes: realizase durante el periodo de garantía por un Centro no certificado, la garantía expirará... -
Page 61: Descripción De Producto
9 Descripción de producto 10 Miscelánea 9.1 Formato de suministro Puntas del Arco Gótico, análisis e interpretación. Los formatos de suministro pueden variar de un Por favor, diríjase también a la bibliografía especializada país a otro. disponible en esta materia. 9.2 Fallos técnicos El dispositivo ha sido desarrollado única y Peso (aproximadamente):... - Page 63 Índice 1 Introdução / Sinais e Símbolos 1.1 Prefácio 1.2 Introdução 1.3 Observações a respeito das Instruções de Operação 2 Segurança em primeiro lugar 2.1 Indicações 2.2 Instruções de Saúde e Segurança 3 Descrição do Produto 3.1 Construção e descrição funcional 3.2 Indicações 4 Instalação e Configuração Inicial 4.1 Desembalando e verificando o conteúdo...
- Page 64 Visualização do Gnathometer CAD / Lista das Partes Lista das Partes 1 Plataforma de registro mandibular 2 Plataforma de registro da maxila 3 Suportes do arco de mordida 4 Retentor do pino de registro 5 Retenções 6 Pino de registro 7 Placa de fixação...
-
Page 65: Introdução / Sinais E Símbolos
Contraindicações 2.2 Instruções de Saúde e Segurança Gnathometer CAD só pode ser utilizado para os fins descritos no Capítulo 3. Instruções adicionais para garantir a utilização adequada do Gnathometer CAD 1.3 Observações a respeito das Instruções de Operação... -
Page 66: Descrição Do Produto
4 Instalação e Configuração Inicial 3.1 Construção e descrição funcional 4.1 Desembalando e verificando o conteúdo Gnathometer CAD é um dispositivo intra-oral de suporte do Por favor, certifique-se de que o conteúdo está completo. pino de registro ou pode realizar a determinação individuali- zada da posição da mandíbula centrada em pacientes... -
Page 67: Manipulação, Operação
5 Manipulação, Operação 5.1 Conectando os suportes do arco de mordida A altura do pino de registo (6) pode ser aumentada girando- opara a direita. Os suportes do arco de mordida (3) podem ser facilmente A altura do pino de registo (6) pode ser reduzida girando-o fixados e removidos a partir das bandejas de impressão com para a esquerda. -
Page 68: Uso Prático No Paciente
6 Uso Prático no paciente 6.1 Tomando a impressão funcional 6.1.3 Removendo os suportes do arco de mordida a partir das bandejas de impressão 6.1.1 Posicionando os suportes do arco de mordida Prenda os suportes do arco de mordida (3) com o mecanismo de ação de pressão e as retenções (5) sobre as bandejas de impressão mandibular e maxilar. -
Page 69: Informações Importantes
6.2.2 Verificando a dimensão vertical 6.2.4 Conduzindo o traçado da ponta da agulha Ajustar a altura, se necessário. Dependendo do método, Ambas as impressões funcionais em conjunto com os acessórios adequados (por exemplo. régua, paquímetro) ou componentes de registro são posicionados na boca do técnicas (sons da fala) podem ser utilizados. - Page 70 6.2.5 Alinhar a plataforma de fixação com a ponta do 6.2 Bloqueando o registro Arco Gótico e prender com o parafuso de fixação A chave é melhor fabricada com um registro de silicone (por exemplo CADBite), o qual é injetado diretamente entre os Agora alinhar o furo do funil (10) na plataforma de fixação componentes de registro com o auxílio da seringa com a (7) com a ponta do Arco Gótico e fixar a plataforma de...
-
Page 71: Manutenção, Limpeza, Diagnóstico
7 Manutenção, Limpeza, Diagnóstico Este capítulo descreve a manutenção e os procedimentos de 7.3 Manutenção limpeza para o Gnathometer CAD pelo usuário. Apenas Evite qualquer contato com ácidos fortes e aquelas tarefas que podem ser realizadas por profissionais solventes (por exemplo, MMA, acetona) para evitar de odontologia estão listadas. -
Page 72: Reparo
Reparos só podem ser efetuados por uma Central de Serviços alguns reparos simples. Ivoclar Vivadent certificada. Se os reparos durante o período de garantia não forem realizados por uma Central de As peças de desgaste são as seguintes: Serviços certificada, a garantia será... -
Page 73: Especificações Do Produto
9 Especificações do Produto 10 Diversos 9.1 Forma de entrega Dicas para análise e interpretação do Arco Gótico As formas de entrega podem variar de país para Por favor, consulte também a literatura especializada país. disponível sobre este assunto. 9.2 Dados técnicos Este equipamento foi desenvolvido exclusivamente Peso (aproximadamente): para uso em odontologia. - Page 76 Fax +91 22 2673 0301 www.ivoclarvivadent.co.nz Leicester LE19 4SD United Kingdom www.ivoclarvivadent.in Ivoclar Vivadent Ltda. Ivoclar Vivadent Polska Sp. z o.o. Tel. +44 116 284 7880 Alameda Caiapós, 723 Ivoclar Vivadent Marketing Ltd. ul. Jana Pawla II 78 Fax +44 116 284 7881 Centro Empresarial Tamboré...