Table des Matières
Publicité
Les langues disponibles
Les langues disponibles
Liens rapides
ECOFIRE
ECOFIRE
MANUALE DI INSTALLAZIONE E MANUTENZIONE
Il presente manuale è parte integrante del prodotto.
Si raccomanda di leggere attentamente le istruzioni prima
dell'installazione, manutenzione o utilizzo del prodotto.
Istruzioni originali
INSTALLATION AND MAINTENANCE MANUAL
This manual is an integral part of the product.
Read the instructions carefully before installing, servicing or
operating the product.
Translation of the original instructions
INSTALLATIONS UND WARTUNGSANLEITUNGEN
Die vorliegende Anleitung ist fester Bestandteil des Produkts.
Vor der Installation, Wartung und Verwendung die
Anleitugen stets aufmerksam durchlesen.
Übersetzung der Original-Bedienungsanleitung
NOTICE D'INSTALLATION ET D'ENTRETIEN
Le présent manuel fait partie intégrante du produit.
Il est conseillé de lire attentivement les consignes avant
l'installation, l'entretien ou l'utilisation du produit.
Traduction des instructions originales
MANUAL DE INSTALACIÓN Y MANTENIMIENTO
Este manual es parte integrante del producto.
Se recomienda leer detenidamente las instrucciones antes
de la instalación, el mantenimiento y el uso del producto.
Traducción de las instrucciones originales
MELITA
®
NINA
®
Publicité
Chapitres
Table des Matières

Manuels Connexes pour Palazzetti ECOFIRE MELITA


Sommaire des Matières pour Palazzetti ECOFIRE MELITA
- Page 1 ECOFIRE MELITA ® ECOFIRE NINA ® MANUALE DI INSTALLAZIONE E MANUTENZIONE Il presente manuale è parte integrante del prodotto. Si raccomanda di leggere attentamente le istruzioni prima dell’installazione, manutenzione o utilizzo del prodotto. Istruzioni originali INSTALLATION AND MAINTENANCE MANUAL This manual is an integral part of the product. Read the instructions carefully before installing, servicing or operating the product.
- Page 2 Gentile cliente, desideriamo innanzitutto ringraziarLa per la preferenza che ha voluto accordarci acquistando il nostro prodotto e ci congratuliamo con Lei per la scelta. Per consentirLe di utilizzare al meglio il suo prodotto, la invitiamo a seguire attentamente quanto descritto nel presente manuale.
-
Page 3: Table Des Matières
ITALIANO ENGLISH DEUTSCH ENGLISH ESPAÑOL FRANÇAIS INDICE Utente e Installatore Installatore 1 PREMESSA GENERALE Simbologia Destinazione d’uso Scopo e contenuto del manuale Conservazione del manuale Aggiornamento del manuale Generalità Conformità Responsabilità del costruttore Assistenza tecnica e manutenzione 1.10 Parti di ricambio 1.11 Targhetta matricola 1.12 Consegna dell’apparecchio... - Page 4 5 MOVIMENTAZIONE E TRASPORTO Trasporto 5.2 Verifica piano d'appoggio 6 PREPARAZIONE DEL LUOGO DI INSTALLAZIONE Considerazioni generali 6.2 Precauzioni per la sicurezza 6.3 Luogo d’installazione 6.4 Aria comburente 6.5 Raccordo fumi 6.6 Scarico a tetto mediante camino tradizionale 7 INSTALLAZIONE Considerazioni generali 7.2 Livellamento dell’apparecchio 7.3 Collegamento elettrico...
-
Page 5: Premessa Generale
Palazzetti. Il manuale d’installazione è parte integrante Palazzetti si riserva il diritto di modificare spe- dell’apparecchio. cifiche e caratteristiche tecniche e/o funzionali Deterioramento o smarrimento del prodotto in qualsiasi momento senza darne preavviso. -
Page 6: Conformità
La responsabilità delle opere eseguite per l’in- Sono state applicate le seguenti norme armoniz- stallazione dell'apparecchio non può essere con- zate e/o regolamenti: siderata a carico della Palazzetti; essa è e rimane EMCD: a carico dell’installatore, al quale è demandata - EN 55014-1:2017 l’esecuzione delle verifiche relative alla canna... -
Page 7: Assistenza Tecnica E Manutenzione
L’apparecchio viene consegnato perfettamente imballato e fissato ad una pedana in legno che Palazzetti mette a disposizione una fitta rete di ne permette la movimentazione mediante car- centri di assistenza con tecnici specializzati, for- relli elevatori e/o altri mezzi. -
Page 8: Avvertenze Per La Sicurezza
AVVERTENZE PER LA Verificare che le predisposizioni SICUREZZA della canna fumaria e della presa d’aria siano conformi al tipo d’installazione. Avvertenze per l’installatore Osservare le prescrizioni indicate nel Non effettuare collegamenti elettrici presente manuale. volanti con cavi provvisori o non isolati. Verificare che la messa a terra dell’im- Le istruzioni di montaggio e pianto elettrico sia efficiente. -
Page 9: Avvertenze Per Il Personale Tecnico Addetto Alla Manutenzione
ITALIANO ENGLISH DEUTSCH ENGLISH ESPAÑOL FRANÇAIS 2.2 Avvertenze per il personale 2.3 Avvertenze per l'utilizzatore tecnico addetto alla manutenzione Per il corretto uso del prodotto e delle Le operazioni di manutenzione devono apparecchiature elettroniche ad essa essere eseguite solo da personale auto- collegate e per prevenire incidenti si devono sempre osservare le indicazioni rizzato e qualificato. - Page 10 alla comprensione dei pericoli ad esso do la connessione elettrica di rete. inerenti. I bambini non devono giocare Non appoggiarsi sulla porta aperta, con l'apparecchio. La pulizia destinata potrebbe compromettere la stabilita ad essere effettuata dall'utilizzatore dell'apparecchio. non deve essere effettuata da bambini senza sorveglianza.
- Page 11 ITALIANO ENGLISH DEUTSCH ENGLISH ESPAÑOL FRANÇAIS Utilizzare esclusivamente il combu- È vietato far funzionare l'appa- stibile raccomandato dal produttore. recchio con la porta aperta. Il prodotto non deve essere utilizzato come inceneritore. È vietato utilizzare l'apparecchio se il È vietato utilizzare benzina, combustibi- vetro o le guarnizioni della porta sono le per lampade, kerosene, accendifuoco danneggiati.
-
Page 12: Caratteristiche Del Combustibile
CARATTERISTICHE DEL 3.2 Stoccaggio del pellet COMBUSTIBILE II pellet deve essere conservato in un ambiente asciutto, non troppo freddo Caratteristiche del combustibile e mantenendo i sacchi chiusi. II pellet (Fig. 2) è un composto costituito da varie Si consiglia di conservare alcuni sacchi di pellet tipologie di legno pressato con procedimenti nel locale di utilizzo dell'apparecchio o in un meccanici nel rispetto delle normative a tutela... -
Page 13: Conoscere Il Prodotto
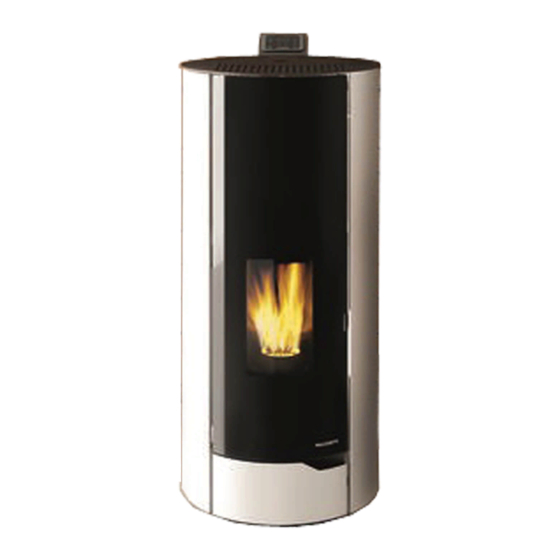
ITALIANO ENGLISH DEUTSCH ENGLISH ESPAÑOL FRANÇAIS CONOSCERE IL PRODOTTO Descrizione MELITA NINA Fig. 3 Maniglia di apertura Porta estetica Vetro porta estetica Vetro porta tecnica Porta tecnica focolare Cassetto cenere Braciere Serbatoio pellet Coperchio serbatoio Display 004778851 - 19/10/2021... - Page 14 Fig. 4 Sonda ambiente Interruttore di accensione Cavo di alimentazione Termostato a riarmo manuale Tubo di uscita fumi Ingresso aria comburente Connettore RJ11 004778851 - 19/10/2021...
-
Page 15: Dimensioni
ITALIANO ENGLISH DEUTSCH ENGLISH ESPAÑOL FRANÇAIS 4.2 Dimensioni MELITA Ø 60 ingresso aria comburente Ø 80 uscita fumi 141,8 Dimensioni in mm Fig. 5 004778851 - 19/10/2021... - Page 16 NINA Ø 60 ingresso aria comburente Ø 80 uscita fumi 141,8 Dimensioni in mm Fig. 6 004778851 - 19/10/2021...
-
Page 17: Caratteristiche Tecniche
ITALIANO ENGLISH DEUTSCH ENGLISH ESPAÑOL FRANÇAIS 4.3 Caratteristiche tecniche MELITA 6 MELITA 8 NINA 6 NINA 8 MELITA - NINA Potenza termica globale (resa) Rendimento 92,3 92,3 87,7 Temperatura fumi °C 85,8 167,9 85,8 224,5 Portata fumi 3,47 3,47 Consumo orario di combustibile kg/h 0,628 1,36... -
Page 18: Targhetta Matricola
4.4 Targhetta matricola Palazzetti Lelio S.p.A. - via Roveredo 103 - 33080 Porcia (PN) Combustibile Pellet Potenza termica max introdotta PImax Potenza termica min introdotta PImin Potenza termica nominale Pmax Potenza termica ridotta Pmin Rendimento alla potenza nominale EFFmax Rendimento alla potenza ridotta... -
Page 19: Schema Elettrico
ITALIANO ENGLISH DEUTSCH ENGLISH ESPAÑOL FRANÇAIS 4.5 Schema elettrico t° t° UI / F01/02 +VIO RE SAFETY ~220 - 240 Vac BROWN BLUE comb * Solo nei modelli ventilatore con condensatore * Only in models with a condenser room fan. ~220÷240 004726703 - 19/10/2020 150 mm... -
Page 20: Movimentazione Etrasporto
MOVIMENTAZIONE E • Rimozione dalla paletta di trasporto TRASPORTO Lo smaltimento dei materiali può essere affidato anche a terzi, purché si ricorra sempre a ditte autorizzate al recupero e all’eliminazione dei L'apparecchio viene consegnato completo di materiali in questione. tutte le parti previste. Attenersi sempre e comunque alle normative in Fare attenzione alla tendenza allo sbilanciamen- vigore nel paese in cui si opera per lo smaltimento... -
Page 21: Verifica Piano D'appoggio
ITALIANO ENGLISH DEUTSCH ENGLISH ESPAÑOL FRANÇAIS PREPARAZIONE Durante il sollevamento evitare strappi o bruschi movimenti. DEL LUOGO DI Fare attenzione alla tendenza allo sbilanciamen- INSTALLAZIONE to dell’apparecchiatura. 5.2 Verifica piano d'appoggio Considerazioni generali Verificare la portata del solaio. Nei paragrafi successivi sono riportate alcune Nel caso di un solaio non idoneo a sostenere il indicazioni da rispettare per ottenere il massimo peso dell'apparecchio procedere all'installazione... -
Page 22: Aria Comburente
Fig. 12 Modello Fig. 13 MELITA NINA Prevedere l'arrivo della linea elettrica in prossimi- tà dell'apparecchio per il collegamento del cavo di alimentazione. Pavimenti costituiti da materiale infiammabile come ad esempio legno, parquet, linoleum, 6.4 Aria comburente laminato o coperti da tappeti devono essere pro- tetti da una base ignifuga sotto l'apparecchio che L'apparecchio, durante il suo funzionamento, protegga anche la parte frontale dall’eventuale... - Page 23 ITALIANO ENGLISH DEUTSCH ENGLISH ESPAÑOL FRANÇAIS Prelievo dell'aria comburente in ambiente Realizzare la presa d'aria sulla parete (Fig. 16 - PA = Presa d'Aria), e lasciare che l'apparecchio sia libero di prelevare aria in ambiente avendo cura di collegare sul tubo di ingresso dell‘aria il tubo fornito a corredo, al fine di prevenire eventuali effetti di risonanza.
-
Page 24: Raccordo Fumi
Se non fosse possibile realizzare la presa d'aria parete. esterna nel locale, è possibile realizzare il foro II raccordo di scarico dei fumi NON DEVE ESSERE esterno in un locale adiacente purché comu- collegato: nicante in maniera permanente con griglia di •... -
Page 25: Scarico A Tetto Mediante Camino Tradizionale
ITALIANO ENGLISH DEUTSCH ENGLISH ESPAÑOL FRANÇAIS 6.6 Scarico a tetto mediante camino In caso di camino di sezione maggiore tradizionale è necessario “intubare” il camino con una tubazione in acciaio (con diametro Il camino per lo scarico dei fumi deve essere rea- in funzione del percorso) opportuna- lizzato da personale qualificato in osservanza alle mente isolato (Fig. -
Page 26: Installazione
INSTALLAZIONE 7.3 Collegamento elettrico È sufficiente collegare l'apparecchio all'impianto Considerazioni generali elettrico attraverso la spina in dotazione (Fig. 22). Nei paragrafi successivi sono riportate alcune II collegamento elettrico (spina) deve essere indicazioni da rispettare per ottenere il massimo facilmente accessibile anche dopo l'installazione rendimento dal prodotto acquistato. -
Page 27: Configurazione Iniziale
ITALIANO ENGLISH DEUTSCH ENGLISH ESPAÑOL FRANÇAIS CONFIGURAZIONE INIZIALE In funzione della tipologia di installazione è necessario impostare la configurazione ideale per il cor- retto funzionamento. Configurazione 1 - Sonda ambiente Sonda ambiente Fig. 23 L'apparecchio modula la potenza in funzione La configurazione 1 è... -
Page 28: Prima Accensione
PRIMA ACCENSIONE 9.2 Primo avvio Durante la prima accensione della stufa La prima accensione deve essere esegui- mantenere i locali ben arieggiati, in ta dall'installatore. quanto si possono generare sgradevo- li odori o fumi causati dall'evaporazione o dall'essiccamento di alcuni materiali Carico pellet utilizzati. -
Page 29: Manutenzione
ITALIANO ENGLISH DEUTSCH ENGLISH ESPAÑOL FRANÇAIS 10 MANUTENZIONE Le operazioni di manutenzione devono essere effettuate da parte di un centro di assistenza tecnico autorizzato. Prima di effettuare qualsiasi operazione di manutenzione adottare le seguenti precauzioni: • Assicurarsi che tutte le parti dell'apparecchio siano fredde. •... -
Page 30: Programma Di Pulizia E Manutenzione Ordinaria
10.3 Programma di pulizia e manutenzione ordinaria 10.3.1 Pulizia ordinaria (utente) OGNI OGNI SETTIMANA ACCENSIONE Braciere (Fig. 27) Cassetto/Vano cenere (Fig. 28) Vetro (Fig. 29) Griglia ventilatore 10.3.2 Manutenzione ordinaria (centro di assistenza tecnico abilitato) 1 ANNO (*) Guarnizioni porta e braciere Sistema fumario Collettore fumi (Fig. -
Page 31: Pulizia Ordinaria
ITALIANO ENGLISH DEUTSCH ENGLISH ESPAÑOL FRANÇAIS 10.4 Pulizia ordinaria 10.4.1 Pulizia interna del focolare Quotidianamente oppure prima di ogni accensio- ne è necessario verificare che il braciere sia pulito per assicurare il libero afflusso dell’aria di combu- stione dai fori del braciere stesso. Asportare la cenere che si deposita all’interno del braciere (Fig. -
Page 32: Manutenzione Ordinaria
10.5 Manutenzione ordinaria 10.5.1 Manutenzione del collettore fumi Dopo aver pulito il braciere, toglierlo dalla sua sede e pulire il vano che lo contiene. Estrarre il cassetto cenere e aspirare con un appo- sito aspiracenere i residui presenti nel vano che ospita il cassetto cenere. -
Page 33: Demolizione Esmaltimento
ITALIANO ENGLISH DEUTSCH ENGLISH ESPAÑOL FRANÇAIS 11 DEMOLIZIONE E SMALTIMENTO La responsabilità per eventuali danni a persone La demolizione e lo smaltimento dell'apparec- ed animali ricade sempre sul proprietario. All’atto chio sono ad esclusivo carico e responsabilità del della demolizione la marcatura CE, il presente proprietario che dovrà... - Page 34 TABLE OF CONTENTS User and Installer Installer 1 GENERAL INTRODUCTION Symbols Intended use Purpose and content of the manual Preservation of the manual Update of this manual Overview Compliance Responsibility of the manufacturer Technical assistance and maintenance 1.10 Spare parts 1.11 Serial plate 1.12 Delivery of the appliance...
- Page 35 ITALIANO ENGLISH DEUTSCH FRANÇAIS ESPAÑOL 5 HANDLING AND TRANSPORTATION Transportation 5.2 Checking the floor where the appliance will be placed 6 PREPARING THE PLACE OF INSTALLATION General considerations 6.2 Safety Precautions 6.3 Place of installation 6.4 Combustion air 6.5 Flue gas fitting 6.6 Roof exhaust with traditional fireplace 7 INSTALLATION General considerations...
-
Page 36: General Introduction
Palazzetti specialised personnel. The installation manual is an integral part of the appliance. Palazzetti reserves the right to change specifi- cations and technical and/or functional charac- Deterioration or loss teristics of the product at any time without prior If needed, request an additional copy from notice. -
Page 37: Compliance
Responsibility for the works carried out for the in- stallation of the appliance cannot be considered The following harmonised standards and/or reg- to be taken on by Palazzetti; it is and remains the ulations have been applied: responsibility of the installer, who is responsible... -
Page 38: Technical Assistance And Maintenance
1.12 Delivery of the appliance maintenance The appliance is delivered perfectly packaged and fixed to a wooden platform which allows Palazzetti has a dense network of service centres handling it using fork lift trucks and/or other with specialised, trained and skilled technicians. means. -
Page 39: Safety Warning
ITALIANO ENGLISH DEUTSCH FRANÇAIS ESPAÑOL SAFETY WARNING Do not carry out on-the-fly electrical connections with temporary or uninsu- lated cables. Warnings for the installer Check that the earthing of the electri- Observe the prescriptions contained in cal system is efficient. this manual. -
Page 40: Warnings For Technical Maintenance Personnel
2.2 Warnings for technical 2.3 Warnings for users maintenance personnel To ensure correct use of the product Maintenance operations must be car- and electronic appliances connected ried out only by authorised and quali- thereto and to prevent accidents, it is important to always follow the instruc- fied personnel. - Page 41 ITALIANO ENGLISH DEUTSCH FRANÇAIS ESPAÑOL responsible must not be carried out by Do not use the appliance as an anchor unsupervised children. support of any kind. Before performing any type of opera- It is prohibited to use the product as a tion, the user or whoever is operating ladder or support structure.
- Page 42 Any type of unauthorised handling or operation. replacement with non-original spare It is prohibited to insert other types parts shall place the safety of the opera- of fuels in the tank other than wood tor at risk and relieve the manufacturer pellets.
-
Page 43: Fuel Characteristics
ITALIANO ENGLISH DEUTSCH FRANÇAIS ESPAÑOL FUEL CHARACTERISTICS 3.2 Pellet storage Pellets must be kept in a dry place, not Fuel characteristics too cold and the bags must be kept sealed. The pellet (Fig. 2) is a compound made from various types of wood pressed together with mechanical procedures in compliance with envi- It is advisable to keep a number of bags of pellets ronment protection regulations, and it is the only... -
Page 44: Becoming Familiar With The Product
BECOMING FAMILIAR WITH THE PRODUCT Description MELITA NINA Fig. 3 Opening handle Aesthetic door Aesthetic door glass Technical door glass Fire box technical door Ash drawer Burn pot Pellet hopper Tank lid Display Display 004778851 - 19/10/2021... - Page 45 ITALIANO ENGLISH DEUTSCH FRANÇAIS ESPAÑOL Fig. 4 Room sensor Power switch Power cable Manual reset thermostat Flue gas pipe Combustion air inlet RJ11 connector 004778851 - 19/10/2021...
-
Page 46: Dimensions
4.2 Dimensions MELITA Ø 60 combustion air inlet Ø 80 flue gas outlet 141,8 Dimensions in mm Fig. 5 004778851 - 19/10/2021... - Page 47 ITALIANO ENGLISH DEUTSCH FRANÇAIS ESPAÑOL NINA Ø 60 combustion air inlet Ø 80 flue gas outlet 141,8 Dimensions in mm Fig. 6 004778851 - 19/10/2021...
-
Page 48: Technical Features
4.3 Technical features MELITA 6 MELITA 8 NINA 6 NINA 8 MELITA - NINA Overall thermal power (output) Yield 92,3 92,3 87,7 Flue gas temperature °C 85,8 167,9 85,8 224,5 Flue gas flow rate 3,47 3,47 Hourly fuel consumption kg/h 0,628 1,36 0,628... -
Page 49: Serial Plate
ITALIANO ENGLISH DEUTSCH FRANÇAIS ESPAÑOL 4.4 Serial plate Palazzetti Lelio S.p.A. - via Roveredo 103 - 33080 Porcia (PN) Combustibile Pellet Potenza termica max introdotta PImax Potenza termica min introdotta PImin Potenza termica nominale Pmax Potenza termica ridotta Pmin Rendimento alla potenza nominale... -
Page 50: Wiring Diagram
4.5 Wiring diagram t° t° UI / F01/02 +VIO RE SAFETY ~220 - 240 Vac BROWN BLUE comb * Solo nei modelli ventilatore con condensatore * Only in models with a condenser room fan. ~220÷240 004726703 - 19/10/2020 150 mm Fig. -
Page 51: Handling And Transportation
ITALIANO ENGLISH DEUTSCH FRANÇAIS ESPAÑOL HANDLING AND • Removal of the transport pallet TRANSPORTATION Disposal can be entrusted to a third party, provid- ed only companies authorised for the recovery and elimination of the materials in question are The appliance is delivered complete with all the used. -
Page 52: Checking The Floor Where The Appliance Will Be Placed
PREPARING THE PLACE During lifting, avoid jerking or abrupt movements. Pay attention to overbalancing. OF INSTALLATION 5.2 Checking the floor where the General considerations appliance will be placed The following paragraphs contain some guide- Check the load capacity of the floor slab. lines to be followed to obtain the maximum If a floor is not suitable for supporting the efficiency of the product purchased and to... -
Page 53: Combustion Air
ITALIANO ENGLISH DEUTSCH FRANÇAIS ESPAÑOL Fig. 12 Model Fig. 13 MELITA NINA Set up the electricity supply line to arrive near the appliance for the connection of the power cable. Floors made of flammable material such as wood, 6.4 Combustion air parquet, linoleum, laminate or floors covered with carpets must be protected by a fireproof The appliance, during its operation, requires... - Page 54 Extraction of combustion air in the room Create the air intake on the wall (Fig. 16 - PA =Air Intake), and leave the appliance to withdraw the room air, making sure to connect the provided pipe on the air inlet pipe, to prevent any reso- nance effects.
-
Page 55: Flue Gas Fitting
ITALIANO ENGLISH DEUTSCH FRANÇAIS ESPAÑOL adjacent room provided it is permanently inter- The flue gas fitting MUST NOT BE connected: connected by means of a transfer grille. • to a chimney used by other generators (boilers, stoves, fireplaces, etc..); It is prohibited to withdraw combustion air from a garage, warehouse containing combustible •... -
Page 56: Roof Exhaust With Traditional Fireplace
6.6 Roof exhaust with traditional If the chimney has a larger section, it fireplace must be “intubated” with a suitably in- sulated steel pipe (with diameter suita- The chimney for the evacuation of flue gases ble for the route) (Fig. 20). must be made by qualified personnel in compli- ance with standards UNI 10683- EN 1856-1-2- EN Make sure that the connection to the brickwork... -
Page 57: Installation
ITALIANO ENGLISH DEUTSCH FRANÇAIS ESPAÑOL INSTALLATION 7.3 Electrical connection Simply connect the appliance to the electrical General considerations system using the supplied plug (Fig. 22). In the following paragraphs some indications The electrical connection (plug) must be easily are provided to be respected in order to obtain accessible after appliance installation as well. -
Page 58: Initial Configuration
INITIAL CONFIGURATION Depending on the type of installation it is necessary to set up the ideal configuration for correct operation. Configuration 1 - Room sensor Room temperature probe Fig. 23 The appliance modulates the power according to Configuration 1 is the default configu- the room temperature read by the room probe ration for this appliance. -
Page 59: First Ignition
ITALIANO ENGLISH DEUTSCH FRANÇAIS ESPAÑOL FIRST IGNITION 8.4 First start up During the first ignition of the stove, The first ignition must be carried out make sure the rooms are properly ven- by the installer. tilated as unpleasant odours or fumes may be generated due to the evapo- ration or drying of certain materials 8.3 Pellet loading... -
Page 60: Maintenance
MAINTENANCE Maintenance operations must be performed by an authorised technical assistance centre. Before performing any maintenance operation, take the following precautions: • Ensure that all appliance parts are cold. • Make sure that the ashes are completely extinguished. • Use personal protective equipment provided for by Directive 89/391/EEC. •... -
Page 61: Ordinary Maintenance Cleaning Program
ITALIANO ENGLISH DEUTSCH FRANÇAIS ESPAÑOL 9.3 Ordinary maintenance cleaning program 9.3.1 Ordinary cleaning (User) EVERY TIME THE APPLIANCE IS EVERY WEEK TURNED ON Burn pot (Fig. 27) Ash drawer/compartment (Fig. 28) Glass (Fig. 29) Fan grille 9.3.2 Ordinary maintenance (certified technical service centre) 1 YEAR (*) Door and burn pot seals Smoke system... -
Page 62: Ordinary Cleaning
9.4 Ordinary cleaning 9.4.1 Cleaning the inside of the firebox Daily or before each ignition, it is necessary to check that the burn pot is clean to ensure the free flow of combustion air from the holes of the burn pot itself. Vacuum the ash accumulated in the burn pot (Fig. -
Page 63: Ordinary Maintenance
ITALIANO ENGLISH DEUTSCH FRANÇAIS ESPAÑOL 9.5 Ordinary maintenance 9.5.1 Maintenance of flue manifold After cleaning the burn pot, remove it from its housing and clean the space where it is contained. Remove the ash drawer and, using a special ash vacuum, remove any residues in the compart- ment that contains it. -
Page 64: Demolition And Disposal
10 DEMOLITION AND DISPOSAL Any liability for damage to people and animals The demolition and disposal of the appliance are always falls on the owner. Upon demolition, the the sole liability and responsibility of the owner EC marking, this manual and other documents who must act in compliance with the laws in relating to this appliance must be destroyed. - Page 65 ITALIANO ENGLISH DEUTSCH FRANÇAIS ESPAÑOL INHALTSVERZEICHNIS Benutzer und Installateur Installateur 1 ALLGEMEINES Symbole Verwendungszweck Zweck und Inhalt des Handbuchs Aufbewahrung des Handbuchs Aktualisierung des Handbuchs Allgemeines Konformität Herstellerhaftung Technischer Kundendienst und Wartung 1.10 Ersatzteile 1.11 Typenschild 1.12 Lieferung des Geräts 2 SICHERHEITSHINWEISE Warnhinweise für den Installateur 2.2 Hinweise für das Wartungspersonal...
- Page 66 5 HANDHABUNG UND TRANSPORT Transport 5.2 Prüfen der Auflagefläche 6 VORBEREITUNG DES INSTALLATIONSORTES Allgemeine Anmerkungen 6.2 Sicherheitsvorkehrungen 6.3 Installationsort 6.4 Verbrennungsluft 6.5 Rauchanschluss 6.6 Rauchableitung mit traditionellem Schornstein 7 INSTALLATION Allgemeine Anmerkungen 7.2 Nivellierung des Geräts 7.3 Elektrischer Anschluss 7.4 Verbrennungsoptimierung 8 ANFANGSKONFIGURATION Konfiguration 1 - Raumsonde 9 ERSTE ZÜNDUNG...
-
Page 67: Allgemeines
ESPAÑOL ALLGEMEINES Zweck und Inhalt des Handbuchs Der Zweck dieses Handbuchs besteht darin, die Die Heizgeräte von Palazzetti sind gemäß den von den Grund- und Grundregeln für eine korrekte Installation europäischen Richtlinien angegebenen Sicherheits- des Geräts zu vermitteln. vorschriften hergestellt und geprüft. -
Page 68: Konformität
Die Verantwortung für die für die Installation des EMV-Richtlinie: Geräts ausgeführten Arbeiten liegt nicht beim Un- - EN 55014-1:2017 ternehmen PALAZZETTI; sie liegt und bleibt beim - EN 61000-3-2:2015 Installateur, der mit der Durchführung der Prüfungen bezüglich des Rauchabzugs, des Lufteinlasses und der - EN 61000-3-3:2014 /EC:2016 Korrektheit der vorgesehenen Installationslösungen... -
Page 69: Technischer Kundendienst Und Wartung
1.12 Lieferung des Geräts Wartung Das Gerät wird perfekt verpackt und auf einer Holzpa- lette befestigt, die seine Handhabung durch Gabelsta- Palazzetti verfügt über ein dichtes Kundendienstnetz- pler und/oder andere Mittel erlaubt, geliefert. werk mit Zentren mit spezialisierten, ausgebildeten und geschulten Technikern. -
Page 70: Sicherheitshinweise
SICHERHEITSHINWEISE Keine elektrischen Anschlüsse mit pro- visorischen oder nicht isolierten Kabeln ausführen. Warnhinweise für den Installateur Überprüfen Sie, ob die Erdung der elektri- Die im vorliegenden Handbuch enthalte- schen Anlage effizient ist. nen Vorgaben müssen beachtet werden. Der Installateur muss, bevor er mit der Mon- Die Montage- und Demon- tage oder Demontage des Geräts beginnt, tagearbeiten dürfen nur von... -
Page 71: Hinweise Für Das Wartungspersonal
ITALIANO ENGLISH DEUTSCH FRANÇAIS ESPAÑOL 2.2 Hinweise für das Wartungspersonal 2.3 Warnungen für den Benutzer Wartungsarbeiten dürfen nur von autori- Für den korrekten Gebrauch des Produkts siertem und qualifiziertem Personal durch- und der daran angeschlossenen elektro- geführt werden. nischen Geräte sowie zur Vermeidung von Unfällen sind die in diesem Handbuch ent- Die im vorliegenden Handbuch enthalte- haltenen Anweisungen stets zu beachten. - Page 72 Gerät spielen. Die vom Benutzer durchzu- Sich nicht auf die geöffnete Tür stützen, da führende Reinigung darf nicht von Kindern dies die Stabilität des Geräts beeinträchti- ohne Aufsicht durchgeführt werden. gen kann. Vor jedem Vorgang muss der Benutzer Das Gerät nicht als Auflage oder Befesti- oder jede Person, die das Produkt in Betrieb gung benutzen.
- Page 73 ITALIANO ENGLISH DEUTSCH FRANÇAIS ESPAÑOL Verwenden Sie nur den vom Hersteller Es ist verboten, das Gerät bei empfohlenen Kraftstoff. Das Produkt darf geöffneter Tür zu betreiben. nicht als Verbrennungsofen verwendet werden. Es ist verboten, das Gerät zu benutzen, Es ist verboten, Benzin, Lampentreibstoff, wenn die Glas- oder Türdichtungen be- Kerosin, Flüssigholzfeuerzeug, Äthylalkohol schädigt sind.
-
Page 74: Eigenschaften Des Brennstoffs
EIGENSCHAFTEN DES Lagerung der Pellets BRENNSTOFFS Das Pellet muss an einem trockenen, nicht zu kalten Ort gelagert werden Eigenschaften des Brennstoffs und die Säcke müssen geschlossen bleiben. Pellets (Abb. 2) ist ein Verbund aus verschiedenen Holzarten, die mit mechanischen Verfahren unter Ein- Wir empfehlen, einige Pelletsäcke in dem Raum, in haltung der Umweltschutzbestimmungen gepresst dem das Gerät verwendet wird, oder in einem an-... -
Page 75: Das Produkt Kennen
ITALIANO ENGLISH DEUTSCH FRANÇAIS ESPAÑOL DAS PRODUKT KENNEN Beschreibung MELITA NINA Abb. 3 Öffnungsgriff Ästhetische Tür Ästhetische Glastür Technische Glastür Technische Feuerraumtür Aschekasten Brennschale Pelletbehälter Behälterdeckel Display 004778851 - 19/10/2021... - Page 76 Abb. 4 Raumsonde Zündschalter Stromkabel Thermostat mit manueller Rückstellung Rauchabzugsrohr Eingang Verbrennungsluft Anschluss RJ11 004778851 - 19/10/2021...
-
Page 77: Abmessungen
ITALIANO ENGLISH DEUTSCH FRANÇAIS ESPAÑOL 4.2 Abmessungen MELITA Ø 60 Verbrennungslufteinlass Ø 80 Rauchabzug 141,8 Abmessungen in mm Abb. 5 004778851 - 19/10/2021... - Page 78 NINA Ø 60 Verbrennungslufteinlass Ø 80 Rauchabzug 141,8 Abmessungen in mm Abb. 6 004778851 - 19/10/2021...
-
Page 79: Technische Eigenschaften
ITALIANO ENGLISH DEUTSCH FRANÇAIS ESPAÑOL 4.3 Technische Eigenschaften MELITA 6 MELITA 8 NINA 6 NINA 8 MELITA - NINA Gesamtwärmeleistung (Leistung) Leistungsgrad 92,3 92,3 87,7 Rauchtemperatur °C 85,8 167,9 85,8 224,5 Rauchgasstrom 3,47 3,47 Stündlicher Kraftstoffverbrauch kg/h 0,628 1,36 0,628 1,917 CO-Emissionen (bei 13% O2) Rauchabzug... -
Page 80: Typenschild
4.4 Typenschild Palazzetti Lelio S.p.A. - via Roveredo 103 - 33080 Porcia (PN) Combustibile Pellet Potenza termica max introdotta PImax Potenza termica min introdotta PImin Potenza termica nominale Pmax Potenza termica ridotta Pmin Rendimento alla potenza nominale EFFmax Rendimento alla potenza ridotta... -
Page 81: Schaltplan
ITALIANO ENGLISH DEUTSCH FRANÇAIS ESPAÑOL 4.5 Schaltplan t° t° UI / F01/02 +VIO RE SAFETY ~220 - 240 Vac BROWN BLUE comb * Solo nei modelli ventilatore con condensatore * Only in models with a condenser room fan. ~220÷240 004726703 - 19/10/2020 150 mm Abb. -
Page 82: Handhabung Und Transport
HANDHABUNG UND • Entfernen der Transportpalette TRANSPORT Die Entsorgung der Materialien kann auch Dritten anvertraut werden, vorausgesetzt, dass für die Verwer- tung und Entsorgung der betreffenden Materialien Das Gerät wird komplett mit allen Teilen geliefert. stets zugelassene Unternehmen eingesetzt werden. Achten Sie auf die Unwuchttendenz des Geräts. -
Page 83: Prüfen Der Auflagefläche
ITALIANO ENGLISH DEUTSCH FRANÇAIS ESPAÑOL VORBEREITUNG DES Während des Hubs müssen Reißen oder plötzliche Bewegungen vermieden werden. INSTALLATIONSORTES Achten Sie darauf, dass das Gerät zu Ungleichgewicht neigt. Allgemeine Anmerkungen Prüfen der Auflagefläche In den folgenden Abschnitten werden einige Hinweise Kontrollieren Sie die Tragfähigkeit der Decke. gegeben, die für eine maximale Leistung des Produkts und einen sicheren Betrieb beachtet werden müssen. -
Page 84: Verbrennungsluft
Abb. 12 Modell Abb. 13 MELITA NINA Dafür sorgen, dass die Stromleitung in der Nähe des Geräts für den Anschluss des Stromkabels angeschlos- sen wird. Böden aus brennbarem Material wie zum Beispiel Holz, Parkett, Linoleum, Laminat oder Teppich müssen 6.4 Verbrennungsluft durch eine feuerfeste Auflage unter dem Ofen, die auch den vorderen Teil vor eventuell beim Reinigen Gerät... - Page 85 ITALIANO ENGLISH DEUTSCH FRANÇAIS ESPAÑOL Absaugung der Verbrennungsluft im Raum Den Lufteinlass an der Wand vornehmen (Abb. 16 - PA = Lufteinlass), und lassen Sie das Gerät frei, um Luft in den Raum anzusaugen. Um Resonanzeffekte zu vermeiden, schließen Sie bitte das mitgelieferte Rohr- stück an den Luftzufuhranschluss an.
-
Page 86: Rauchanschluss
ten, über ein Lüftungsgitter ständig mit dem Aufstel- • zu einem Schornstein, der von anderen Generatoren (Heizkessel, Öfen, Kamine usw..) verwendet wird; lungsraum verbundenen Raum ausgeführt werden. • zu Luftabzugssystemen (Hauben, Entlüftungen usw. Es ist die Entnahme von Verbrennungsluft aus Gara- ...), auch wenn diese bereits "in einer Leitung“... -
Page 87: Rauchableitung Mit Traditionellem Schornstein
ITALIANO ENGLISH DEUTSCH FRANÇAIS ESPAÑOL 6.6 Rauchableitung mit traditionellem Wenn der Schornstein einen größeren Schornstein Querschnitt hat, muss er mit einem angemessen isolierten Stahlrohr „ver- Der Rauchabzug für die Ableitung der Rauchgase rohrt“ werden (Durchmesser je nach muss unter Beachtung der Normen UNI 10683- EN Leitungsverlauf) (Abb. -
Page 88: Installation
INSTALLATION Elektrischer Anschluss Schließen Sie das Gerät einfach über den mitgeliefer- Allgemeine Anmerkungen ten Stecker (Abb. 22) an das elektrische System an. In den folgenden Absätzen werden einige zu befol- Der elektrische Anschluss (Stecker) muss auch nach gende Anweisungen aufgeführt, um den maximalen der Installation des Gerätes leicht zugänglich sein. -
Page 89: Anfangskonfiguration
ITALIANO ENGLISH DEUTSCH FRANÇAIS ESPAÑOL ANFANGSKONFIGURATION Abhängig von der Art der Installation ist es notwendig, die ideale Konfiguration für einen korrekten Betrieb einzustellen. Konfiguration 1 - Raumsonde Raumsonde Abb. 23 Das Gerät moduliert die Leistung in Abhängigkeit Konfiguration 1 ist die Standardkon- von der Raumtemperatur, die von der Raumsonde an figuration für dieses Gerät. -
Page 90: Erste Zündung
ERSTE ZÜNDUNG 9.2 Erste Inbetriebnahme Halten Sie die Räume beim ersten Die erste Zündung muss vom Installa- Anzünden des Ofens gut gelüftet, da teur vorgenommen werden. durch die Verdunstung oder Trock- nung einiger der verwendeten Mate- rialien unangenehme Gerüche oder Laden der Pellets Dämpfe entstehen können. -
Page 91: Wartung
ITALIANO ENGLISH DEUTSCH FRANÇAIS ESPAÑOL 10 WARTUNG Die Wartungsarbeiten müssen von einem autorisierten technischen Kundendienst ausgeführt werden. Vor jeglichem Wartungseingriff müssen folgende Sicherheitsmaßnahmen getroffen werden: • Sicherstellen, dass alle Teile des Geräts erkaltet sind. • Sicherstellen, dass die Asche vollständig gelöscht ist. •... -
Page 92: Routinemäßiger Reinigungs- Und Wartungsplan
10.3 Routinemäßiger Reinigungs- und Wartungsplan 10.3.1 Routinemäßige Reinigung (Benutzer) BEI JEDER JEDE WOCHE ZÜNDUNG Brennschale (Abb. 27) Schublade f. Asche/ Aschefach (Abb. 28) Glas (Abb. 29) Lüftergitter 10.3.2 Routinemäßige Wartung (Qualifiziertes Technisches Kundendienstzentrum) 1 JAHR (*) Tür- und Kohlenbeckendichtungen Rauchabzugsystem Rauchgassammler (Abb. -
Page 93: Ordentliche Reinigung
ITALIANO ENGLISH DEUTSCH FRANÇAIS ESPAÑOL 10.4 Ordentliche Reinigung 10.4.1 Innenreinigung des Feuerraums Täglich oder vor jeder Zündung muss die Sauberkeit der Brennschale überprüft werden, damit die Verbren- nungsluft aus den Öffnungen der Brennschale selbst ungehindert strömen kann. Entfernen Sie die Asche, die sich im Inneren der Brennschale absetzt (Abb. -
Page 94: Routinemäßige Wartung
10.5 Routinemäßige Wartung 10.5.1 Wartung des Rauchgassammlers Nach der Reinigung der Brennschale, diese aus dem Fach herausziehen und dieses selbst reinigen. Den Aschekasten herausnehmen und die Rückstände im Fach, in dem der Aschekasten sitzt, mit einem Aschesauger absaugen. Verwenden Sie eine Bürste mit einer flexiblen Kordel, um die Austauschrohre in der Brennkammer zu reinigen (Abb. -
Page 95: Verschrottung Und Entsorgung
ITALIANO ENGLISH DEUTSCH FRANÇAIS ESPAÑOL VERSCHROTTUNG UND ENTSORGUNG Für eventuelle Schäden an Personen und Tieren Die Verschrottung und Entsorgung des Geräts liegen haftet immer der Eigentümer. Zum Zeitpunkt der in der alleinigen Verantwortung des Eigentümers, Verschrottung müssen die CE-Kennzeichnung, dieses der in Übereinstimmung mit den in seinem Land gel- Handbuch und die anderen Unterlagen bezüglich tenden Gesetzen bezüglich Sicherheit, Respekt und... - Page 96 INDEX Utilisateur et Installateur Installateur 1 INTRODUCTION Symboles utilisés Destination d’emploi Objet et contenu du manuel Conservation du manuel Mise à jour du manuel Généralités Conformité Responsabilité du fabricant Assistance technique et entretien 1.10 Pièces détachées 1.11 Plaque signalétique 1.12 Livraison de l’appareil 2 AVERTISSEMENTS POUR LA SÉCURITÉ...
- Page 97 ITALIANO ENGLISH DEUTSCH FRANÇAIS ESPAÑOL 5 MANUTENTION ET TRANSPORT Transport 5.2 Contrôle du plan d’appui 6 PRÉPARATION DU LIEU D’INSTALLATION Considérations générales 6.2 Précautions pour la sécurité 6.3 Lieu d’installation 6.4 Air de combustion 6.5 Raccord fumée 6.6 Évacuation sur le toit à travers un conduit de cheminée traditionnel 121 7 INSTALLATION Considérations générales 7.2 Mise à...
-
Page 98: Introduction
Le manuel d’installation fait partie intégrante de spécialisé Palazzetti. l’appareil. Palazzetti se réserve le droit de modifier les spé- Perte ou détérioration cifications et les caractéristiques techniques et/ ou fonctionnelles du produit à tout moment sans Si nécessaire, demander un autre exemplaire à... -
Page 99: Conformité
La responsabilité des travaux exécutés pour l’ins- EMCD : tallation de l’appareil ne peut pas être considérée à la charge de la société Palazzetti ; en effet, celle- - EN 55014-1:2017 ci est et reste à la charge de l’installateur qui est - EN 61000-3-2:2015 tenu d’effectuer les contrôles relatifs au conduit... -
Page 100: Assistance Technique Et Entretien
Assistance technique et entretien 1.12 Livraison de l’appareil Palazzetti met à disposition un réseau dense de L'appareil est livré parfaitement emballé et fixé centres d’assistance avec des techniciens spécia- à une palette en fois permettant de le déplacer lisés, formés et préparés. -
Page 101: Avertissements Pour La Sécurité
ITALIANO ENGLISH DEUTSCH FRANÇAIS ESPAÑOL AVERTISSEMENTS POUR Vérifier que les prédispositions LA SÉCURITÉ du conduit de fumée et de l'ar- rivée d'air soient conformes au type d'installation. Avertissements pour l'installateur Respecter les consignes indiquées dans Ne pas effectuer de branchements le présent manuel. -
Page 102: Avertissements Pour Les Techniciens Préposés À L'entretien
2.2 Avertissements pour les 2.3 Avertissements pour l’utilisateur techniciens préposés à l’entretien Pour une utilisation correcte du produit Les opérations d’entretien doivent être et des équipements électroniques qui y effectuées exclusivement par un person- sont connectés et pour prévenir les acci- dents, les instructions données dans ce nel autorisé... - Page 103 ITALIANO ENGLISH DEUTSCH FRANÇAIS ESPAÑOL personnes aient reçu des instructions Ne pas s’appuyer sur la porte ouverte, relatives à l'usage sûr de l'appareil et à la cela pourrait compromettre la stabilité compréhension des dangers afférents. de l’appareil. Les enfants ne doivent pas jouer avec Ne pas utiliser l’appareil comme support l’appareil.
- Page 104 Utiliser uniquement le combustible re- Il est interdit de faire fonctionner commandé par le fabricant. Le produit ne l'appareil avec la porte ouverte. doit pas être utilisé comme incinérateur. Il est interdit d'utiliser de l'essence, du Il est interdit d'utiliser l'appareil si les combustible pour lampe, du kérosène, joints des vitres ou des portes sont du liquide allume-feu pour bois, de l'al-...
-
Page 105: Caractéristiques Du Combustible
ITALIANO ENGLISH DEUTSCH FRANÇAIS ESPAÑOL CARACTÉRISTIQUES DU 3.2 Stockage des granulés de bois COMBUSTIBLE Les granulés de bois doivent être conservés dans un lieu sec, pas trop Caractéristiques du combustible froid et à l’intérieur de sacs fermés. Les granulés de bois (Fig. 2) sont un composé Il est conseillé... -
Page 106: Connaître Le Produit
CONNAÎTRE LE PRODUIT Description MELITA NINA Fig. 3 Poignée d’ouverture Porte décorative Vitre porte décorative Vitre porte technique Porte technique foyer Tiroir à cendres Brasier Réservoir granulés Couvercle réservoir Afficheur 004778851 - 19/10/2021... - Page 107 ITALIANO ENGLISH DEUTSCH FRANÇAIS ESPAÑOL Fig. 4 Sonde ambiante Interrupteur d’allumage Câble d’alimentation Thermostat à réarmement manuel Tube évacuation des fumées Arrivée de l’air de combustion Connecteur RJ11 004778851 - 19/10/2021...
-
Page 108: Dimensions
4.2 Dimensions MELITA Ø 60 arrivée de l’air de combustion Ø 80 évacuation des fumées 141,8 Dimensions en mm Fig. 5 004778851 - 19/10/2021... - Page 109 ITALIANO ENGLISH DEUTSCH FRANÇAIS ESPAÑOL NINA Ø 60 arrivée de l’air de combustion Ø 80 évacuation des fumées 141,8 Dimensions en mm Fig. 6 004778851 - 19/10/2021...
-
Page 110: Caractéristiques Techniques
4.3 Caractéristiques techniques MELITA 6 MELITA 8 NINA 6 NINA 8 MELITA - NINA Puissance thermique globale (délivrée) Rendement 92,3 92,3 87,7 Température des fumées °C 85,8 167,9 85,8 224,5 Débit des fumées 3,47 3,47 Consommation horaire de combustible kg/h 0,628 1,36 0,628... -
Page 111: Plaque Signalétique
ITALIANO ENGLISH DEUTSCH FRANÇAIS ESPAÑOL 4.4 Plaque signalétique Palazzetti Lelio S.p.A. - via Roveredo 103 - 33080 Porcia (PN) Combustibile Pellet Potenza termica max introdotta PImax Potenza termica min introdotta PImin Potenza termica nominale Pmax Potenza termica ridotta Pmin Rendimento alla potenza nominale... -
Page 112: Schéma De Câblage
4.5 Schéma de câblage t° t° UI / F01/02 +VIO RE SAFETY ~220 - 240 Vac BROWN BLUE comb * Solo nei modelli ventilatore con condensatore * Only in models with a condenser room fan. ~220÷240 004726703 - 19/10/2020 150 mm Fig. -
Page 113: Manutention Et Transport
ITALIANO ENGLISH DEUTSCH FRANÇAIS ESPAÑOL MANUTENTION ET • Enlèvement de la palette de transport TRANSPORT L'élimination des matériaux peut également être confiée à des tiers, à condition de s’adresser à des entreprises autorisées à récupérer et à éliminer L’appareil est livré avec toutes les parties prévues. les matériaux en question. -
Page 114: Contrôle Du Plan D'appui
PRÉPARATION DU LIEU Pendant le soulèvement, éviter les mouvements brusques et les à-coups. D’INSTALLATION Faire attention à la tendance de l'appareil à être en déséquilibre. Considérations générales 5.2 Contrôle du plan d’appui Les paragraphes suivants contiennent quelques Vérifier la capacité de charge du plancher. instructions à... -
Page 115: Air De Combustion
ITALIANO ENGLISH DEUTSCH FRANÇAIS ESPAÑOL Fig. 12 Modèle Fig. 13 MELITA NINA Prévoir l’arrivée de la ligne électrique à proxi- mité de l’appareil pour brancher le cordon d’alimentation. Les planchers faits de matériaux inflammables comme le bois, le parquet, le linoléum, le stratifié 6.4 Air de combustion ou recouverts de tapis doivent être protégés par une base ignifuge sous l’appareil qui protège... - Page 116 Prélèvement de l’air de combustion dans l’en- vironnement Réaliser la prise d'air sur la paroi (Fig. 16 - PA = Prise d’Air) et laisser un espace pour que l'appareil puisse aspirer l'air de la pièce, en prenant soin de raccorder la tuyau fourni à celui de l'arrivée d'air comburant, afin de prévenir d'éventuels effets de résonance.
-
Page 117: Raccord Fumée
ITALIANO ENGLISH DEUTSCH FRANÇAIS ESPAÑOL le trou dans une pièce voisine à condition d’être Le raccord d’évacuation de la fumée NE DOIT PAS ÊTRE raccordé : constamment communicante avec la grille de transfert. • à une cheminée utilisée par d’autres généra- teurs (chaudières, poêles, inserts, etc.) ;... -
Page 118: Évacuation Sur Le Toit À Travers Un Conduit De Cheminée Traditionnel
6.6 Évacuation sur le toit à travers un Si la section de la cheminée est supé- conduit de cheminée traditionnel rieure, il est nécessaire d’« intuber » la cheminée avec un tube en acier (dont La cheminée pour l’évacuation de la fumée doit le diamètre dépend du parcours) bien être réalisée par un personnel qualifié... -
Page 119: Installation
ITALIANO ENGLISH DEUTSCH FRANÇAIS ESPAÑOL INSTALLATION 7.3 Branchement électrique Il suffit de brancher l’appareil à l’installation élec- Considérations générales trique à travers la fiche fournie (Fig. 22). Les paragraphes suivants fournissent des indi- Le branchement électrique (fiche) doit être facile cations à... -
Page 120: Configuration Initiale
CONFIGURATION INITIALE En fonction du type d’installation, il est nécessaire de programmer la configuration idéale pour le bon fonctionnement. Configuration 1 - Sonde d’ambiance Sonde ambiante Fig. 23 L’appareil module la puissance en fonction de la La configuration 1 est la configuration température ambiante lue par la sonde ambiante programmée par défaut pour cet ap- située sur le poêle-même. -
Page 121: Premier Allumage
ITALIANO ENGLISH DEUTSCH FRANÇAIS ESPAÑOL PREMIER ALLUMAGE 9.2 Premier démarrage Lors du premier allumage du poêle, Le premier allumage doit être effectué veiller à ce que les pièces soient bien par l’installateur. ventilées, car des odeurs ou des fumées désagréables peuvent être générées par l'évaporation ou le séchage de cer- Chargement des granulés de bois tains des matériaux utilisés. -
Page 122: Entretien
10 ENTRETIEN Les opérations d’entretien doivent être effectuées par un centre d’assistance technique autorisé. Avant d’effectuer toute opération d’entretien, prendre les précautions suivantes : • S'assurer que toutes les parties de l’appareil soient froides. • S'assurer que les cendres soient complètement éteintes. •... -
Page 123: Programme De Nettoyage Et Entretien Ordinaire
ITALIANO ENGLISH DEUTSCH FRANÇAIS ESPAÑOL 10.3 Programme de nettoyage et entretien ordinaire 10.3.1 Nettoyage courant (utilisateur) À CHAQUE TOUTES LES ALLUMAGE SEMAINES Brasier (Fig. 27) Tiroir/Compartiment à cendres (Fig. 28) Vitre (Fig. 29) Grille ventilateur 10.3.2 Entretien ordinaire (Service après-vente agréé) 1 AN (*) Joints porte et brasier Système d’évacuation de la fumée... -
Page 124: Nettoyage Ordinaire
10.4 Nettoyage ordinaire 10.4.1 Nettoyage de l'intérieur du foyer Tous les jours ou avant chaque allumage, il est nécessaire de vérifier que le brasier est propre pour assurer le libre passage de l’air de combus- tion par les trous du brasier. Enlever la cendre qui se dépose dans le brasier (Fig. -
Page 125: Entretien Ordinaire
ITALIANO ENGLISH DEUTSCH FRANÇAIS ESPAÑOL 10.5 Entretien ordinaire 10.5.1 Entretien du collecteur des fumées Après avoir bien nettoyé le brasier, l’enlever de son logement et nettoyer le compartiment qui le contient. Extraire le tiroir à cendres et aspirer à l’aide d'un aspirateur à... -
Page 126: Démolition Et Élimination
11 DÉMOLITION ET ÉLIMINATION Le propriétaire est le seul responsable en cas La démolition et l'élimination de l’appareil sont d’éventuels dommages à des personnes et des exclusivement à la charge du propriétaire qui animaux. Lors de la démolition, le marquage devra agir conformément aux lois en vigueur CE, le mode d’emploi et les autres documents dans son pays en matière de sécurité... - Page 127 ITALIANO ENGLISH DEUTSCH FRANÇAIS ESPAÑOL ÍNDICE Usuario e Instalador Instalador 1 PREMISA GENERAL Simbología Destino de uso Finalidad y contenido del manual Conservación del manual Actualización del manual Generalidades Conformidad Responsabilidad del fabricante Asistencia técnica y mantenimiento 1.10 Piezas de repuesto 1.11 Placa de la matrícula 1.12 Entrega del aparato...
- Page 128 5 DESPLAZAMIENTO Y TRANSPORTE Transporte 5.2 Verificación de la superficie de apoyo 6 PREPARACIÓN DEL LUGAR DE INSTALACIÓN Consideraciones generales 6.2 Precauciones de seguridad 6.3 Lugar de instalación 6.4 Aire comburente 6.5 Racor de humos 6.6 Descarga de techo por medio de chimenea tradicional 7 INSTALACIÓN Consideraciones generales 7.2 Nivelación del aparato...
-
Page 129: Premisa General
Palazzetti. El manual de instalación es parte integrante del Palazzetti se reserva el derecho de modificar las aparato. especificaciones y características técnicas y/o Deterioro o pérdida funcionales del producto en cualquier momento sin aviso previo. -
Page 130: Conformidad
Han sido aplicadas las siguientes normas armo- instalación del aparato no se pueden considerar nizadas y/o reglamentos: a cargo de Palazzetti; la misma está, y perma- EMCD: nece, a cargo del instalador, el cual tiene la res- - EN 55014-1:2017... -
Page 131: Asistencia Técnica Y Mantenimiento
1.12 Entrega del aparato mantenimiento El aparato se entrega perfectamente embalado y fijado a una tarima de madera que permite el Palazzetti pone a disposición una densa red de desplazamiento mediante carretillas elevadoras centros de asistencia con técnicos especializa- y/u otros medios. -
Page 132: Advertencias Para La Seguridad
ADVERTENCIAS PARA LA Verificar que las predisposicio- SEGURIDAD nes del humero y de la toma de aire estén en conformidad con el tipo de instalación. Advertencias para el instalador Cumplir con las prescripciones indica- No realizar conexiones eléctricas sus- das en el presente manual. pendidas con cables provisorios o sin aislar. -
Page 133: Advertencias Para El Personal Técnico Encargado Del Mantenimiento
ITALIANO ENGLISH DEUTSCH FRANÇAIS ESPAÑOL 2.2 Advertencias para el personal 2.3 Advertencias para el usuario técnico encargado del Para el correcto uso del producto y de mantenimiento los equipos electrónicos a este conec- tados y para prevenir accidentes se Las operaciones de mantenimiento deben observar siempre las indicacio- deben ser realizadas por personal au- nes señaladas en el presente manual. - Page 134 peligros relacionados a este. Los niños No apoyarse en la puerta abierta, no deben jugar con el aparato. La lim- podría comprometer la estabilidad del pieza destinada a ser realizada por el aparato. usuario no debe ser realizada por niños No usar el aparato como elemento de sin vigilancia.
- Page 135 ITALIANO ENGLISH DEUTSCH FRANÇAIS ESPAÑOL pueden causar un riesgo serio de ex- Está prohibido hacer funcionar plosión en la cámara de combustión. el aparato con la puerta abierta. Utilizar exclusivamente el combusti- ble recomendado por el fabricante. El Está prohibido utilizar el aparato si el producto no debe ser utilizado como vidrio o las guarniciones de la puerta incinerador.
-
Page 136: Características Del Combustible
CARACTERÍSTICAS DEL 3.2 Almacenaje del pellet COMBUSTIBLE El pellet debe ser conservado en un ambiente seco, no demasiado frío y Características del combustible manteniéndolo en bolsas cerradas. EI pellet (Fig. 2) es un compuesto formado por Se aconseja conservar algunas bolsas de pellet varios tipos de madera prensada con proce- en el local de uso del aparato o en un local conti- sos mecánicos de acuerdo con las normas de... -
Page 137: Conocer El Producto
ITALIANO ENGLISH DEUTSCH FRANÇAIS ESPAÑOL CONOCER EL PRODUCTO Descripción MELITA NINA Fig. 3 Tirador de apertura Puerta estética Vidrio puerta estética Vidrio puerta técnica Puerta técnica fogón Cajón de cenizas Brasero Depósito de pellet Tapa depósito Display Display 004778851 - 19/10/2021... - Page 138 Fig. 4 Sonda ambiente Interruptor de encendido Cable de alimentación Termostato de rearme manual Tubo de salida humos Entrada aire comburente Conector RJ11 004778851 - 19/10/2021...
-
Page 139: Dimensiones
ITALIANO ENGLISH DEUTSCH FRANÇAIS ESPAÑOL 4.2 Dimensiones MELITA Ø 60 entrada aire comburente Ø 80 salida humos 141,8 Dimensiones en mm Fig. 5 004778851 - 19/10/2021... - Page 140 NINA Ø 60 entrada aire comburente Ø 80 salida humos 141,8 Dimensiones en mm Fig. 6 004778851 - 19/10/2021...
-
Page 141: Características Técnicas
ITALIANO ENGLISH DEUTSCH FRANÇAIS ESPAÑOL 4.3 Características técnicas MELITA 6 MELITA 8 NINA 6 NINA 8 MELITA - NINA Mín Máx Mín Máx Potencia térmica total (rendimiento) Rendimiento 92,3 92,3 87,7 Temperatura humos °C 85,8 167,9 85,8 224,5 Caudal de humos 3,47 3,47 Consumo horario de combustible... -
Page 142: Placa De La Matrícula
4.4 Placa de la matrícula Palazzetti Lelio S.p.A. - via Roveredo 103 - 33080 Porcia (PN) Combustibile Pellet Potenza termica max introdotta PImax Potenza termica min introdotta PImin Potenza termica nominale Pmax Potenza termica ridotta Pmin Rendimento alla potenza nominale... -
Page 143: Esquema Eléctrico
ITALIANO ENGLISH DEUTSCH FRANÇAIS ESPAÑOL 4.5 Esquema eléctrico t° t° UI / F01/02 +VIO RE SAFETY ~220 - 240 Vac BROWN BLUE comb * Solo nei modelli ventilatore con condensatore * Only in models with a condenser room fan. ~220÷240 004726703 - 19/10/2020 150 mm Fig. -
Page 144: Desplazamiento Ytransporte
DESPLAZAMIENTO Y • Remoción del palet de transporte TRANSPORTE La eliminación de los materiales se puede encar- gar a terceros, siempre que se recurra a empresas autorizadas en la recuperación y la eliminación El aparato se entrega completo con todas las de los materiales en cuestión. -
Page 145: Verificación De La Superficie De Apoyo
ITALIANO ENGLISH DEUTSCH FRANÇAIS ESPAÑOL PREPARACIÓN DEL Durante el levantamiento evitar tirones o movi- mientos bruscos. LUGAR DE INSTALACIÓN Prestar atención a la tendencia del desequilibrio del aparato. Consideraciones generales 5.2 Verificación de la superficie de En los siguientes párrafos se describen algunas apoyo instrucciones a seguir para obtener el máximo rendimiento del producto adquirido y un... -
Page 146: Aire Comburente
Fig. 12 Modelo Fig. 13 MELITA NINA Contemplar la llegada de la línea eléctrica en cercanía del aparato para la conexión del cable de alimentación. Los suelos de material inflamable como por ejemplo madera, parqué, linóleo, laminado o al- 6.4 Aire comburente fombra deben protegerse con una base ignífuga debajo del aparato que también proteja el frente El aparato requiere aire comburente durante su... - Page 147 ITALIANO ENGLISH DEUTSCH FRANÇAIS ESPAÑOL Extracción de aire comburente en el ambiente Realizar la toma de aire en la pared (Fig. 16 - PA = Toma de Aire), y dejar que el aparato esté libre de extraer aire en el ambiente teniendo cuidado de conectar en el tubo de entrada del aire el tubo suministrado, con el fin de prevenir posibles efectos de resonancia.
-
Page 148: Racor De Humos
Si no es posible hacer la toma de aire externa en pared. el local, es posible hacer el agujero externo en un El empalme de descarga de los humos NO DEBE local adyacente siempre y cuando esté en comu- SER conectado: nicación permanente con la rejilla de tránsito. -
Page 149: Descarga De Techo Por Medio De Chimenea Tradicional
ITALIANO ENGLISH DEUTSCH FRANÇAIS ESPAÑOL 6.6 Descarga de techo por medio de En caso de chimenea de sección mayor chimenea tradicional es necesario “entubar” la chimenea con una tubería de acero (con diámetro en La chimenea para la descarga de los humos debe función del recorrido) adecuadamente ser fabricada por personal cualificado en cumpli- aislada (Fig. -
Page 150: Instalación
INSTALACIÓN 7.3 Conexión eléctrica Simplemente conectar el aparato al sistema Consideraciones generales eléctrico usando el enchufe suministrado (Fig. En los siguientes párrafos se describen algunas 22). indicaciones que se deben respetar para obtener La conexión eléctrica (enchufe) debe ser fácil- el rendimiento máximo del producto adquirido. -
Page 151: Configuración Inicial
ITALIANO ENGLISH DEUTSCH FRANÇAIS ESPAÑOL CONFIGURACIÓN INICIAL Dependiendo del tipo de instalación, es necesario establecer la configuración ideal para el correcto funcionamiento. Es posible escoger entre dos configuraciones diversas: Descripción Configuración Sonda ambiental (por defecto) Termostato ambiente Configuración 1 - Sonda ambiente Sonda ambiente Fig. -
Page 152: Primer Encendido
PRIMER ENCENDIDO 9.2 Primera puesta en marcha Durante el primer encendido de la El primer encendido debe ser realizado estufa mantener los locales bien venti- por el instalador. lados, ya que se pueden generar olores desagradables o humos causados por la evaporación o por el secado de algu- Carga de pellet nos materiales utilizados. -
Page 153: Mantenimiento
ITALIANO ENGLISH DEUTSCH FRANÇAIS ESPAÑOL 10 MANTENIMIENTO Las operaciones de mantenimiento deben ser realizadas por parte de un centro de asistencia técnico autorizado. Antes de realizar cualquier operación de mantenimiento adoptar las siguientes precauciones: • Asegurarse de que todas las partes del aparato estén frías. •... -
Page 154: Programa De Limpieza Y Mantenimiento Ordinario
10.3 Programa de limpieza y mantenimiento ordinario 10.3.1 Limpieza ordinaria (usuario) CADA CADA SEMANA ENCENDIDO Brasero (Fig. 27) Cajón/Compartimiento de cenizas (Fig. 28) Vidrio (Fig. 29) Rejilla ventilador 10.3.2 Mantenimiento ordinario (centro de asistencia técnica habilitado) 1 AÑO (*) Guarniciones puerta y brasero Sistema de chimeneas Colector humos (Fig. -
Page 155: Limpieza Ordinaria
ITALIANO ENGLISH DEUTSCH FRANÇAIS ESPAÑOL 10.4 Limpieza ordinaria 10.4.1 Limpieza interna del fogón Cotidianamente o antes de cada encendido es necesario verificar que el brasero esté limpio para asegurar el libre flujo del aire de combustión desde los agujeros del brasero mismo. Retirar la ceniza que se deposita dentro del bra- sero (Fig. -
Page 156: Mantenimiento Ordinario
10.5 Mantenimiento ordinario 10.5.1 Mantenimiento del colector de humos Después de haber limpiado el brasero, quitarlo de su lugar y limpiar el compartimiento que lo contiene. Extraer el cajón de cenizas y aspirar con un ade- cuado aspirador de cenizas los residuos presen- tes en el compartimiento que alberga el mismo. -
Page 157: Desguace Y Eliminación
ITALIANO ENGLISH DEUTSCH FRANÇAIS ESPAÑOL 11 DESGUACE Y ELIMINACIÓN La responsabilidad ante eventuales daños a per- La demolición y la eliminación del aparato están sonas y animales recae siempre sobre el propie- a cargo y responsabilidad exclusivo del propie- tario. En el momento de la demolición la marca tario que deberá... - Page 160 Produkte jederzeit und ohne vorherige Ankündigung zu ändern, um sie zu verbessern, ohne ihre grundlegenden Eigenschaften zu beeinträchtigen. Palazzetti se réserve le droit de modifier ses produits à tout moment et sans préavis afin de les améliorer sans en compromettre les caractéristiques essentielles.