Teac MC-D800 Mode D'emploi
Masquer les pouces Voir aussi pour MC-D800:
Table des Matières

Publicité

Les langues disponibles

Les langues disponibles

Liens rapides

77-20MD80002000
Z
MC-D800
TURNTABLE AUDIO SYSTEM
OWNER'S MANUAL
MODE D'EMPLOI
Z

Publicité

Chapitres

Table des Matières
loading

Sommaire des Matières pour Teac MC-D800

  • Page 1 77-20MD80002000 MC-D800 TURNTABLE AUDIO SYSTEM OWNER'S MANUAL MODE D’EMPLOI...
  • Page 2: Important Safety Instructions

    IMPORTANT SAFETY INSTRUCTIONS WARNING: TO PREVENT FIRE OR SHOCK HAZARD, DO NOT EXPOSE THIS APPLIANCE TO RAIN OR MOISTURE. CAUTION: TO REDUCE THE RISK OF ELECTRIC SHOCK, DO NOT REMOVE COVER (OR BACK). NO USER-SERVICEABLE PARTS CAUTION INSIDE. REFER SERVICING TO QUALIFIED SERVICE PERSONNEL. o DO NOT REMOVE THE EXTERNAL CASES OR CABINETS TO EXPOSE THE ELECTRONICS.
  • Page 3 This product contains a semiconductor laser system inside the cabi- Q Precautions concerning batteries net and is classified as a “CLASS 1 LASER PRODUCT”. Misuse of batteries could cause them to rupture or leak leading To prevent being exposed to the laser beam, do not try to open the to fire, injury or the staining of nearby things.
  • Page 4 The Bluetooth® word mark and logos are registered trademarks owned by Bluetooth SIG, Inc. and any use of such marks by TEAC is under license. This product is protected by certain intellectual property rights of Microsoft.
  • Page 5: Wireless Equipment Precautions

    Wireless equipment precautions Compliance of radio transmitter and CAUTION Changes or modifications not expressly approved by interference the party responsible for compliance could void the user’s authority to operate the equipment. Model for USA This device complies with Part.15 of FCC Rules. CAUTION Operation is subject to the following two conditions: Authorization of wireless devices are different in coun-...
  • Page 6: Bluetooth® Notes

    Wireless equipment precautions (cont'd) Bluetooth® notes When using this unit with a mobile phone or other Information for interference Bluetooth devices, they should be no more than about (FCC requirements) 10 m (33 ft) apart. Depending on the circumstances of use, however, the effective transmission distance might This equipment has been tested and found to comply be shorter.
  • Page 8: Table Des Matières

    Contents Before use Thank you for choosing TEAC . Read this manual care- Included items fully to get the best performance from this unit . Check to be sure the box includes all the supplied accessories shown below . Please contact the store IMPORTANT SAFETY INSTRUCTIONS .
  • Page 9: Precautions For Use

    . When installing this unit, leave at least 20 cm (8") between it and walls . To allow good heat dis- Customers in the USA, please visit the following TEAC sipation, leave a little space between it and other website to register your TEAC product online .
  • Page 10: Discs

    Discs Discs that can be played on this unit CD-R/CD-RW discs This unit can play back CD-R and CD-RW discs that have CDs with the Compact disc Digital Audio logo been recorded in the audio CD format (CD-DA) and the MP3 or WMA format .
  • Page 11: Handling Precautions

    Handling precautions Storage precautions o Always insert the disc into the disc tray with the label o Discs should be stored in their cases when not being side up . Only one side of a Compact Disc can be used . Failure to do so could result in warping and played or used for recording .
  • Page 12: Mp3/Wma Files

    MP3/WMA files This unit can play MP3 and WMA files that are on CD-R/ Precautions when creating MP3/WMA CD-RW discs and USB flash drives . files on a computer o Audio file formats that can be played back MP3 (file extension: . m p3) o Only discs that have been recorded using the ISO Bit rate: 8 kbps to 320 kbps 9660 standard can be played by this unit .
  • Page 13: Handling Records

    Handling records Holding records Precautions When holding a record or removing it from its sleeve, o Do not leave records in places that are exposed to avoid touching the grooves by holding the record by direct sunlight or are very hot or very humid . Leaving its label and edge with one hand or by holding it by its a record in such a condition for a long time could edge with both hands .
  • Page 14: Connections

    Connections V Precautions when making connections o Do not turn the unit on until after making all connections . o Carefully read the manuals of the devices that you are connecting and follow their instructions when making connections . Wall outlet Recording device Audio output Audio input...
  • Page 15: Ac Power Cord

    Analog audio input and output jacks AC power cord (AUX IN/LINE OUT) Confirm that the power plug is plugged into a working outlet . These input and output analog audio signals . Use commercially available audio cables to connect V Be sure to connect the power cord to an AC other equipment to the input and output jacks of outlet that supplies the correct voltage.
  • Page 16: Connecting The Speakers

    Connections (continued) Connect the end of the ¥ speaker cable with the red Connecting the speakers mark to the red speaker terminal of the unit . Connect the end of the ^ speaker cable with no mark Connect the speaker cables that are already attached to to the black speaker terminal of the unit .
  • Page 17: Replacing The Stylus

    Attaching a new stylus records . Replace the stylus with a replacement stylus specified by TEAC as soon as possible . Insert it in the “B” direction so that the In general, you should replace a sapphire stylus for LP and EP records after about 50 hours of use and a dia- end of the stylus fits into the cartridge.
  • Page 18: Names And Functions Of Parts (Main Unit)

    Names and functions of parts (main unit) Each time you press the CD/Bluetooth/USB button, STANDBY/ON button the function will change as shown below . Press this button to turn the unit on or put it in standby . Bluetooth To listen to a CD, press the CD/Bluetooth/USB but- FUNCTION buttons ton and select “CD”...
  • Page 19 Remote control signal receiver Search (m/,) buttons PRESET (j/k) buttons Signals sent from the remote control are received here . When using a remote, point it toward this Press and hold during CD or MP3/WMA file play- spot . back to search forward/backward (page 33) . Display When listening to the radio, use to select preset sta- tions (page 51) .
  • Page 20: Names And Functions Of Parts (Remote Control)

    Names and functions of parts (remote control) STANDBY/ON button DIMMER button Use to adjust the display brightness (page 29) . TIMER button Use to turn the wakeup timer on and off (pages 52 and 55) . SLEEP button Use to set the sleep timer (page 55) . PRESET/MP3 (j/k) buttons When listening to the radio, use to select preset radio stations (page 51) .
  • Page 21 To listen to a device connected to the auxiliary PLAY MODE/FM MODE button input (AUX IN) jacks, press the PHONO/AUX button When listening to a CD or USB flash drive, use to and select “AUX” . change the play mode (normal, repeat, shuffle) Each time you press the FM/AM button, the unit will (page 38) .
  • Page 22: Using The Remote Control

    Using the remote control Precautions for use When to replace batteries o When using the remote control, point it toward the If the distance required between the remote and main remote control signal receiver on the main unit from unit decreases or if the unit stops responding to the a distance of 5 m (16 ft) or less .
  • Page 23: Names And Functions Of Parts (Turntable)

    Names and functions of parts (turntable) Before use, remove the needle cover (white plastic part) by pulling it in the direction of the arrow . Turntable Cue lever Place records centered on the turntable . Use this lever to lift the tone arm from the record . 45 RPM adapter Tone arm holder Use this when playing back records with large holes .
  • Page 24: Turntable Cover

    Turntable cover Attaching the turntable cover Opening and closing the turntable cover Turntable cover Open Main unit Hinge Opening Insert the hinges completely into the Hold the front edge of the turntable cover and gently lift it open completely until it stops . hinge holders at the left and right ends The turntable cover will stay open in this position .
  • Page 25: Setting The Clock

    Setting the clock Set the current time before using the unit . Press the STANDBY/ON button to put the unit into standby. o If a setting is left for more than 20 seconds, this time setting mode will end . NOTE The clock can also be set when the unit is on, but Press the CLOCK ADJUST button again.
  • Page 26 Setting the clock (continued) Press the CLOCK ADJUST button. Current time display The clock is always shown when the unit is in standby mode (off ) and when the function is set to PHONO/ AUX . Press the remote control's DISPLAY button to show the clock on the display .
  • Page 27: Basic Operation

    Basic operation Press the STANDBY/ON button to turn Turn the VOLUME knob to adjust the the unit on. volume. o Even when in standby (unit off ), pressing a func- tion button will turn the unit on . MIN (0): minimum volume MAX (40): maximum volume Press a function button to set the play- back source.
  • Page 28 Basic operation (continued) Setting items and ranges Adjusting the bass, treble and stereo BASS (low frequencies) balance Use to adjust the bass . Setting range: −5 to +5 Press the SOUND button to select the Default value: 0 item you want to adjust. Display example TREBLE (high frequencies) Use to adjust the treble .
  • Page 29: Adjusting The Brightness Of The Display

    Adjusting the brightness of the display Muting the output Press the DIMMER button to cycle through the follow- Press the MUTE button to temporarily silence the out- ing brightness settings . put . Press the MUTE button again to resume output at the previously set volume level .
  • Page 30: Listening To A Cd

    Listening to a CD Press the CD/Bluetooth/USB button to Place a disc centered on the tray with select “CD”. the labeled side up. o Never place more than one disc on the tray . o If the tray is closed while a disc is outside the center guides, the disc might become stuck inside and the Each time you press the CD/Bluetooth/USB button, tray might not open .
  • Page 31 Audio CD display example Press the play/pause (y/9) button. Total number of tracks Total playback time MP3/WMA file display example Playback will start from the first track and y will appear on the display . Folder number File number o A non-audio disc might be “played” in the same Audio CD display example manner as an audio disc, but sound will not be output .
  • Page 32: Listening Files On A Usb Flash Drive

    Listening files on a USB flash drive You can play audio files stored on a USB flash drive by Press the play/pause (y/9) button. connecting it to this unit . * For details about the playback order of MP3/WMA files, see “MP3/WMA files”...
  • Page 33: Listening To A Cd/Files On A Usb Flash Drive

    Listening to a CD/files on a USB flash drive Pausing playback Skipping tracks/files Press the play/pause (y/9) button to pause playback . When paused, press the play/pause (y/9) button to During playback, turn the skip (.//) knob to resume playback from the paused point . skip to the previous or next track/file and start play- o When paused, the playback time will blink .
  • Page 34: Programmed Playback (Cd/Usb)

    Programmed playback (CD/USB) Up to 32 CD tracks or MP3/WMA files can be programmed o To stop programming, press the stop (8) button in the desired order . or wait 20 seconds or more . Program tracks/files when playback is stopped . o During programming if you do nothing for 20 seconds or more, the program will be confirmed .
  • Page 35 To select a file by number, use the skip/search When you have finished adding tracks/ (.m/,/) buttons . files to a program, press the play/pause (y/9) button to start programmed playback. Display example o To stop programmed playback, press the stop (8) button .
  • Page 36 Programmed playback (CD/USB) (continued) Press the MEMORY button. Checking the program order The track/file is added to the end of the program . When stopped, press the MEMORY button to cycle through the program numbers and the programmed track/file numbers in order . Changing a track/file within the program Adding tracks/files to the end of the When programmed playback is stopped,...
  • Page 37 Press the MEMORY button. Clearing all the program contents The selected track/file is added at the selected program number, replacing the track/file that was Press and hold the stop (8) button for at least two sec- there . onds when stopped . The contents of the program are cleared .
  • Page 38: Repeat And Shuffle Playback (Cd/Usb)

    Repeat and shuffle playback (CD/USB) o You can also change the playback mode by pressing the PLAY MODE button during playback . o Any of the following operations will end repeat or shuffle playback mode . • The stop (8) button is pressed •...
  • Page 39: About Mp3/Wma File Playback

    About MP3/WMA file playback REPEAT FOLDER File playback order (MP3/WMA files only) Press the PLAY MODE button twice . A disc or USB flash drive that contains MP3/WMA files “REPEAT FOLDER” appears on the display, and the files in can have files in folders in the same manner that files the selected folder are played back repeatedly .
  • Page 40: Selecting Folders And Files

    About MP3/WMA file playback (continued) Selecting folders and files Changing the display To select a folder by number, use the main unit's search (m/,) buttons . Each time you press the INFO button, the information on the display changes . o The first 32 characters of the song/artist/album names are shown .
  • Page 41 Example of display when CD function is active Title name File number Playback elapsed time Album name File name Artist name Folder name o If the USB function is active, the USB indicator will appear .
  • Page 42: Listening To Audio From A Bluetooth Device

    Listening to audio from a Bluetooth device With this unit, you can enjoy listening to music played When connection with a Bluetooth device succeeds, back on another Bluetooth device wirelessly . the Bluetooth icon ( ) appears and “BLUETOOTH” scrolls across the display . Press the CD/Bluetooth/USB button to select “Bluetooth”.
  • Page 43 Operate the Bluetooth device to start Unpairing a device playback. To unpair with a connected Bluetooth device, press the If the connected Bluetooth device supports AVRCP, PAIRING button . you can use this unit or the remote control to play, o If you later want to use a Bluetooth connection with pause or stop audio on that device .
  • Page 44: Pairing With Another Bluetooth Device

    Pairing with another Bluetooth device Pairing is necessary before using the Bluetooth function Enable the Bluetooth communication of this unit for the first time and when you want to con- function on the other Bluetooth device. nect a new Bluetooth device . Follow these procedures to pair the unit with the other From the Bluetooth device select “MC- device .
  • Page 45: Listening To Records

    Listening to records Before using the record player, use a coin or other tool Touch pairing to turn the transport locking screw clockwise until it stops . Remove the stylus cover (made of white plastic) . If the other Bluetooth device supports NFC, you can (page 23) pair it with this unit using the following procedures .
  • Page 46 Listening to records (continued) Place a record on the turntable. Lift the cue lever to raise the tone arm. When playing a 45 RPM large-hole single record, Tone arm use the included adapter . Cue lever o You can also leave the cue lever down and move the raised tone arm over the record and then lower the tone arm slowly to start playback .
  • Page 47: When Playback Finishes

    Slowly lower the cue lever to slowly When playback finishes lower the tone arm. When the end of the record is reached, the tone arm automatically returns to the tone arm holder and turn- table rotation stops (auto return function) . Tone arm o To stop playback manually, slightly lift the tone arm using the cue lever or a finger and return the tone...
  • Page 48: Listening To The Radio

    Listening to the radio Press the FM/AM button to select FM or AM band . Automatic station selection When using the main unit Press a j/k button repeatedly until the frequency begins to change . After the frequency starts chang- ing, stop pressing the button to start automatic station selection .
  • Page 49: Manual Station Selection

    Stereo mode selection Manual station selection When an FM stereo broadcast is being received in ste- reo, the STEREO indicator appears . When using the main unit o If reception is poor, the STEREO indicator will not light . Display example Stereo indicator Turn the scroll (MULTI JOG) knob to change the recep- tion frequency .
  • Page 50: Preset Tuning

    Preset tuning You can store FM and AM stations into preset numbers Display example 1 to 20 respectively . Press the FM/AM button to select FM or AM band. Preset number Use the PRESET buttons to select the preset number that you want to use to store that radio station.
  • Page 51: Listening To A Preset Station

    Automatic presets Listening to a preset station The unit can automatically search for and add presets Press the FM/AM button to choose the for the stations that it can receive . band. Press the FM/AM button to select FM or AM broadcast reception.
  • Page 52: Wakeup Timer

    Preset tuning (continued) Wakeup timer When using the remote control At the set time, sound will be output from the speakers . o Adjust the clock before setting the timer (page 25) . Setting the timer Put the unit into standby (power off). The preset number appears on the left side of the The unit must be in standby to set the timer .
  • Page 53 Press the TIME (j/k) buttons to set the TIMER ON minute and press the TIMER button. Display example The “hour” value blinks . o If no action is taken for 20 seconds, timer setting will end automatically . After making the TIMER ON setting, “OFF TIME” Press the TIME (j/k) buttons to set appears and the hour value blinks .
  • Page 54 Wakeup timer (continued) Press the TIME (j/k) buttons to select Press the TIME (j/k) buttons to set the playback source and press the the volume level. TIMER button. You can set the volume between 5 (minimum) and 32 (maximum) . Display example o When the wakeup timer turns the unit on, the volume will gradually increase until the set vol-...
  • Page 55: Sleep Timer

    Sleep timer Turn the wakeup timer on and off when the unit is in The unit can be set to enter standby after a specified standby mode . amount of time . Turning the timer off Setting the sleep timer When you do not want to use the wakeup timer, press Press the SLEEP button repeatedly until the desired set- the TIMER button to turn it off .
  • Page 56: Listening To A Connected Device

    Listening to a connected device You can connect the audio output jack or headphones Start playback on the playback device. jack of a portable audio player or other device to this Then, adjust the volume of both this unit and listen to its audio playback through this unit . unit and the connected device.
  • Page 57: Troubleshooting

    Troubleshooting CD player If you experience a problem with this unit, please check the following items before requesting service . Playback is not possible. Something other than this unit could also be the cause e If the disc is upside down, reload it with the labeled of the problem .
  • Page 58: Bluetooth Function

    AM antenna . you are trying to pair the unit with . e Confirm that the FM antenna cable has been con- e After deleting the “MC-D800” data from the other nected correctly . Bluetooth device, try pairing again .
  • Page 59: Specifications

    Specifications Amplifier General - Main unit Output power . . . . . . . . . . . . . . . . . . . . . . . 10 W + 10 W (8 Ω) Input jacks .
  • Page 61: Instructions De Sécurité Importantes

    INSTRUCTIONS DE SÉCURITÉ IMPORTANTES o N'exposez pas cet appareil aux gouttes ni aux V Précautions concernant les piles éclaboussures. Un mauvais emploi des piles peut entraîner leur o Ne placez pas d'objet rempli de liquide sur l'appareil, rupture ou leur fuite, avec pour conséquence un comme par exemple un vase.
  • Page 62: Précautions Pour Les Équipements Sans Fil

    Précautions pour les équipements sans fil Conformité de l'émetteur radio et Exigences pour l'exposition aux interférences rayonnements Cet équipement est conforme à la réglementation Modèle pour le Canada reconnue internationalement en matière d'exposition Le présent appareil est conforme aux CNR d'Industrie humaine aux ondes radio générées par l'émetteur.
  • Page 63: Information Sur Le Laser

    Notes pour la technologie sans fil Bluetooth® Information sur le laser Si vous utilisez cette unité avec un téléphone mobile ou Ce produit contient un système laser à semi-conducteur d'autres dispositifs à technologie sans fil Bluetooth, ils dans son boîtier et est répertorié comme «  PRODUIT ne doivent pas être éloignés l'un de l'autre de plus de LASER DE CLASSE 1 ».
  • Page 64: Avant L'utilisation

    Sommaire Avant l’utilisation Nous vous remercions d’avoir choisi TEAC . Lisez ce Éléments fournis mode d'emploi avec attention pour tirer les meilleures performances de cette unité . Vérifiez que vous disposez bien de tous les accessoires représentés ci-dessous . Veuillez contacter le magasin INSTRUCTIONS DE SÉCURITÉ...
  • Page 65: Précautions D'emploi

    o N’ouvrez pas le boîtier car cela peut endomma- Précautions d'emploi ger le circuit ou causer un choc électrique . Si un objet étranger pénètre dans l’unité, consultez votre o Ne placez rien sur le couvercle de la platine . Les revendeur .
  • Page 66: Disques Compacts

    Disques compacts Disques lisibles par cette unité CD-R/CD-RW Cette unité peut lire les CD-R et CD-RW ayant été enre- CD portant le logo Compact disc Digital Audio gistrés au format CD audio (CD-DA) et au format MP3 ou WMA . o Les disques créés par un enregistreur de CD doivent être finalisés avec celui-ci pour être utilisés dans cette unité...
  • Page 67: Précautions De Manipulation

    Précautions de manipulation Précautions de rangement o Placez toujours le disque dans le tiroir, face sérigra- o Les disques doivent être rangés dans leurs boîtiers phiée vers le haut . Les CD ne peuvent être lus ou quand ils ne sont pas utilisés . Ne pas le faire peut enregistrés que d'un côté...
  • Page 68: Fichiers Mp3/Wma

    Fichiers MP3/WMA Cette unité peut lire les fichiers MP3 et WMA sur CD-R/ Précautions pour créer des fichiers CD-RW et supports de stockage USB . MP3/WMA sur un ordinateur o Formats de fichier audio lisibles MP3 (extension de fichier : . m p3) o Seuls les disques enregistrés selon la norme ISO 9660 Débit binaire : 8 kb/s à...
  • Page 69: Manipulation Des Disques Vinyle

    Manipulation des disques vinyle Tenue des disques Précautions Lors de la prise en mains d'un disque ou sa sortie de la o Ne laissez pas les disques dans des lieux exposés pochette, évitez de toucher le sillon en maintenant le directement à...
  • Page 70: Branchements

    Branchements V Précautions lors des branchements o Ne mettez sous tension qu’une fois tous les branchements effectués . o Lisez attentivement les modes d'emploi des appareils que vous branchez et suivez leurs instructions quand vous faites les branchements . Prise secteur Appareil d'enregistrement Prises de sortie Prises d'entrée...
  • Page 71: Cordon D'alimentation Secteur

    Prises d'entrée et de sortie audio Cordon d’alimentation secteur analogiques (AUX IN/LINE OUT) Vérifiez que le cordon d'alimentation est branché à une prise secteur fonctionnelle . Reçoivent et produisent les signaux audio analogiques . V Veillez à brancher le cordon d'alimentation Utilisez des câbles audio du commerce pour bran- dans une prise secteur fournissant la ten- cher d'autres appareils aux prises d'entrée et de...
  • Page 72: Branchement Des Enceintes

    Branchements (suite) Branchez l'extrémité ¥ avec repère rouge du câble Branchement des enceintes d'enceinte au bornier rouge pour enceinte de l'unité . Branchez l'extrémité ^ sans repère du câble d'en- Branchez les câbles captifs des enceintes fournies aux ceinte au bornier noir pour enceinte de l'unité . borniers pour enceinte de cette unité...
  • Page 73: Remplacement De La Pointe

    . Remplacez dès que possible la pointe par un modèle Insérez-la dans la direction «  B  », de de rechange spécifié par TEAC . sorte que l'extrémité de la pointe s'in- En général, vous devez remplacer une pointe saphir sère dans la cellule.
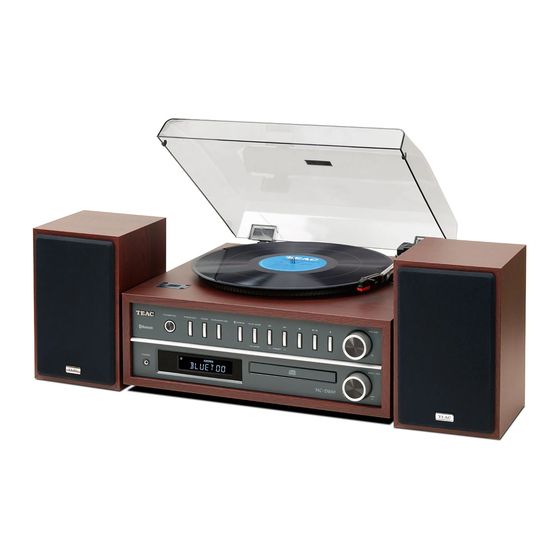
  • Page 74: Nomenclature Et Fonctions Des Parties (Unité Principale)

    Nomenclature et fonctions des parties (unité principale) Chaque fois que vous appuyez sur la touche CD/ Touche STANDBY/ON Bluetooth/USB, la fonction change comme indiqué Appuyez sur cette touche pour allumer l'unité ou la ci-dessous . mettre en veille (standby) . Bluetooth Touches de fonction Pour écouter un CD, appuyez sur la touche CD/...
  • Page 75 Récepteur du signal de télécommande Touches de recherche (m/,) Touches PRESET (j/k) Les signaux envoyés par la télécommande sont reçus ici . Quand vous utilisez une télécommande, Maintenez la touche pressée durant la lecture d'un pointez-la vers ce capteur . CD ou d'un fichier MP3/WMA pour une recherche en arrière/avant (page 89) .
  • Page 76: Nomenclature Et Fonctions Des Parties (Télécommande)

    Nomenclature et fonctions des parties (télécommande) Touche STANDBY/ON Touche DIMMER Sert à régler la luminosité de l'écran (page 85) . Touche TIMER Sert à mettre le réveil en et hors service (pages 108 et 111 ) . Touche SLEEP Sert à régler la minuterie d'extinction (page 111) . Touches PRESET/MP3 (j/k) En écoute de la radio, servent à...
  • Page 77 Pour écouter un disque vinyle, appuyez sur la Touche MEMORY/CLOCK ADJ touche PHONO/AUX et sélectionnez « PHONO » . En écoute de la radio, sert au préréglage de stations Pour écouter un appareil branché aux prises d'en- de radio (pages 106 and 107) . trée auxiliaires (AUX IN), appuyez sur la touche Utilisez-la pour programmer fichiers et pistes et PHONO/AUX et sélectionnez « AUX »...
  • Page 78: Emploi De La Télécommande

    Emploi de la télécommande Précautions d'emploi Quand faut-il remplacer les piles ? o Pour utiliser la télécommande, pointez-la vers le Si la portée d'action de la télécommande diminue ou capteur de télécommande de l’unité principale dans si l'unité cesse de répondre aux touches de la télécom- un rayon maximal de 5 m .
  • Page 79: Nomenclature Et Fonctions Des Parties

    Nomenclature et fonctions des parties (platine tourne-disque) Avant utilisation, retirez le cache de la pointe (pièce en plastique blanc) en le tirant dans le sens de la flèche . Plateau tourne-disque Lève-bras Placez les disques au centre du plateau . Utilisez ce levier pour soulever le bras de lecture du disque .
  • Page 80: Couvercle De La Platine

    Couvercle de la platine Fixation du couvercle de la platine Ouverture et fermeture du couvercle de la platine Couvercle de la platine Ouvrir Unité principale Charnière Ouverture Insérez les charnières à fond dans les porte-charnières aux extrémités Tenez le bord avant du couvercle de la platine et soule- vez-le délicatement pour l'ouvrir complètement jusqu'à...
  • Page 81: Réglage De L'horloge

    Réglage de l'horloge Réglez l'heure avant d'utiliser l'unité . Appuyez sur la touche STANDBY/ON pour mettre l’unité en veille. o Si un réglage reste inchangé pendant plus de 20 secondes, le mode de réglage de l'heure prend NOTE fin . L'horloge peut également être réglée quand l'unité...
  • Page 82: Réglage De L'horloge

    Réglage de l'horloge (suite) Appuyez sur la touche CLOCK ADJUST. Affichage d'horloge actuelle L'horloge est toujours affichée quand l'unité est en veille (off ) et quand la fonction est réglée sur PHONO/ AUX . Appuyez sur la touche DISPLAY de la télécommande pour afficher l'horloge à...
  • Page 83: Fonctionnement De Base

    Fonctionnement de base Appuyez sur la touche STANDBY/ON Tournez le bouton VOLUME pour régler pour allumer l’unité. le volume. o Même en veille (unité éteinte), appuyer sur une touche de fonction rallume l'unité . MIN (0) : volume minimal MAX (40) : volume maximal Appuyez sur une touche de fonction pour changer de source de lecture.
  • Page 84: Fonctionnement De Base (Suite)

    Fonctionnement de base (suite) Paramètres et plages de réglage Réglage des graves, des aigus et de la BASS (basses fréquences) balance stéréo Sert à régler les graves . Plage de réglage : −5 à +5 Appuyez sur la touche SOUND pour Valeur par défaut : 0 sélectionner le paramètre que vous Exemple d'affichage...
  • Page 85: Réglage De La Luminosité De L'écran

    Réglage de la luminosité de l'écran Coupure du son en sortie Appuyez sur la touche DIMMER pour passer en revue Appuyez sur la touche MUTE pour temporairement les réglages de luminosité suivants : couper le son de la sortie . Appuyez à nouveau sur la touche MUTE pour rétablir la sortie avec le niveau de Luminosité...
  • Page 86: Écoute D'un Cd

    Écoute d'un CD Appuyez sur la touche CD/Bluetooth/ Placez un disque au centre du tiroir USB pour sélectionner « CD ». avec sa face sérigraphiée vers le haut. o Ne placez jamais plusieurs disques sur le tiroir . o Si le tiroir est refermé alors qu'un disque est en dehors des guides de centrage, le disque peut être Chaque fois que vous appuyez sur la touche CD/ coincé...
  • Page 87: Appuyez Sur La Touche Lecture/Pause

    Exemple d'affichage de CD audio Appuyez sur la touche Lecture/Pause (y/9). Nombre total de pistes Durée totale de lecture Exemple d'affichage de fichier MP3/WMA La lecture commencera à la première piste et y Numéro de dossier Numéro de fichier s'affichera . o Un disque non audio peut être « lu »...
  • Page 88: Écoute Des Fichiers D'une Clé Usb

    Écoute des fichiers d'une clé USB Vous pouvez lire les fichiers audio sauvegardés sur une Appuyez sur la touche Lecture/Pause clé USB en connectant cette dernière à cette unité . * (y/9). Pour des détails sur l'ordre de lecture des fichiers MP3/ WMA, voir « Fichiers MP3/WMA »...
  • Page 89: Écoute D'un Cd/Des Fichiers D'une Clé Usb

    Écoute d'un CD/des fichiers d'une clé USB Mise en pause de la lecture Saut de fichiers/pistes Appuyez sur la touche Lecture/Pause (y/9) pour mettre la lecture en pause . Durant la lecture, tournez la molette (.//) pour En pause, appuyez sur la touche Lecture/Pause (y/9) sauter au fichier/piste précédent ou suivant et com- pour reprendre la lecture depuis le point de mise en mencer la lecture .
  • Page 90: Lecture Programmée (Cd/Usb)

    Lecture programmée (CD/USB) 32 pistes de CD ou fichiers MP3/WMA peuvent être pro- o Pour arrêter la programmation, appuyez sur la grammés dans l'ordre désiré . touche Stop (8) ou attendez 20  secondes ou Programmez les pistes/fichiers quand la lecture est plus .
  • Page 91 Pour sélectionner un fichier par son numéro, Quand vous avez fini d'ajouter des u t i l i s e z l e s t o u c h e s d e s a u t / r e c h e r c h e pistes/fichiers au programme, appuyez (.m/,/) .
  • Page 92: Lecture Programmée (Cd/Usb) (Suite)

    Lecture programmée (CD/USB) (suite) Appuyez sur la touche MEMORY. Vérification de l'ordre de programmation Le fichier/piste est ajouté à la fin du programme . À l'arrêt, appuyez sur la touche MEMORY pour faire défi- ler dans l'ordre les positions dans le programme et les numéros des pistes/fichiers qui leur sont associés .
  • Page 93: Effacement De Tout Le Contenu Du Programme

    Appuyez sur la touche MEMORY. Effacement de tout le contenu du programme Le fichier/piste sélectionné est ajouté au numéro sélectionné dans le programme, remplaçant le fichier/piste qui s'y trouvait . Maintenez pressée la touche Stop (8 ) au moins deux secondes à l'arrêt . Le contenu du programme est effacé...
  • Page 94: Lecture En Boucle Et Lecture Aléatoire (Cd/Usb)

    Lecture en boucle et lecture aléatoire (CD/USB) Appuyez sur la touche Lecture/Pause (y/9) quand le mode que vous voulez sélectionner apparaît pour lan- cer la lecture . * Si le mode aléatoire (Shuffle) est sélectionné, la lecture démarre automatiquement . o Vous pouvez aussi changer le mode de lecture en appuyant sur la touche PLAY MODE durant la lecture .
  • Page 95: À Propos De La Lecture Des Fichiers Mp3/Wma

    À propos de la lecture des fichiers MP3/WMA REPEAT FOLDER (lecture en boucle d'un dossier) Ordre de lecture des fichiers (fichiers MP3/WMA uniquement) Appuyez deux fois sur la touche PLAY MODE . Un disque ou une clé USB qui contient des fichiers « ...
  • Page 96: À Propos De La Lecture Des Fichiers Mp3/Wma (Suite)

    À propos de la lecture des fichiers MP3/WMA (suite) Sélection de dossiers et de fichiers Changement d'affichage Pour sélectionner un dossier par son numéro, utilisez les touches de recherche (m/,) de l'unité principale . Chaque fois que vous appuyez sur la touche INFO, les informations affichées changent .
  • Page 97 Exemple d'affichage quand la fonction CD est active Titre Numéro de fichier Temps de lecture écoulé Nom de l'album Nom du fichier Nom de l'artiste Nom du dossier o Si la fonction USB est active, l'indicateur USB s'affiche .
  • Page 98: Écoute Du Son Venant D'un Appareil Bluetooth

    Écoute du son venant d'un appareil Bluetooth Avec cette unité, vous pouvez bénéficier sans fil de Si la connexion avec un appareil Bluetooth réussit, l'écoute de musique lue sur un autre appareil Bluetooth . l'icône Bluetooth ( ) apparaît et «  BLUETOOTH  » défile à...
  • Page 99: Désappairer Un Appareil

    Lancez la lecture sur l'appareil Bluetooth. Désappairer un appareil Si l'appareil Bluetooth connecté prend en charge Pour désappairer un appareil Bluetooth connecté, l'AVRCP, vous pouvez utiliser cette unité ou sa télé- appuyez sur la touche PAIRING . commande pour lire, mettre en pause ou arrêter o Pour réutiliser ultérieurement une connexion l'audio sur cet appareil .
  • Page 100: Appairage Avec Un Autre Appareil Bluetooth

    Bluetooth. Suivez ces procédures pour appairer cette unité avec l'autre appareil . Sur l'appareil Bluetooth, sélectionnez « MC-D800 » (cette unité). o Si un mot de passe est demandé pendant l'ap- Appairage pairage, saisissez « 0000 » . Lorsque la connexion réussit, l'unité émet un bip Appuyez sur la touche CD/Bluetooth/ électronique, et le symbole Bluetooth ( ) s'affiche .
  • Page 101: Écoute De Disques Vinyle

    Écoute de disques vinyle Avant d'utiliser la platine, faites tourner la vis de ver- Appairage de proximité rouillage de transport dans le sens horaire au moyen d'une pièce de monnaie ou d'un autre outil jusqu'à ce Si l'autre appareil Bluetooth est compatible NFC (Near qu'elle s'arrête .
  • Page 102: Écoute De Disques Vinyle (Suite)

    Écoute de disques vinyle (suite) Placez un disque sur la platine. Soulevez le levier (lève-bras) pour lever le bras de lecture. Pour lire un 45 tr/min à grand trou central, utilisez l'adaptateur fourni . Bras de lecture Lève-bras o Vous pouvez aussi laisser le lève-bras baissé et amener le bras de lecture au-dessus du disque Réglez la vitesse de rotation (tr/min) en puis l'y poser lentement pour lancer la lecture .
  • Page 103: Baissez Lentement Le Levier (Lève-Bras)

    Baissez lentement le levier (lève-bras) Lorsque la lecture est terminée pour poser doucement le bras de Lorsque la fin du disque est atteinte, le bras de lecture lecture. retourne automatiquement sur son support et la pla- tine cesse de tourner (fonction de retour automatique) . o Pour arrêter manuellement la lecture, soulevez légè- Bras de lecture rement le bras de lecture à...
  • Page 104: Écoute De La Radio

    Écoute de la radio Appuyez sur la touche FM/AM pour sélectionner la Sélection automatique de station bande FM ou AM . Appuyez à plusieurs reprises sur une touche j/k Avec l'unité principale jusqu'à ce que la fréquence commence à changer . Quand la fréquence a commencé...
  • Page 105: Sélection Manuelle De Station

    Sélection du mode stéréo Sélection manuelle de station Quand une émission FM stéréo est reçue en stéréo, l'in- dicateur STEREO s'affiche . Avec l'unité principale o Si la réception est mauvaise, l'indicateur STEREO ne s'allume pas . Exemple d'affichage Indicateur stéréo Tournez la molette de défilement (MULTI JOG) pour changer la fréquence de réception .
  • Page 106: Préréglage De Syntonisation (Preset)

    Préréglage de syntonisation (preset) Vous pouvez mémoriser des stations FM et AM dans les Exemple d'affichage préréglages (presets) numérotés de 1 à 20 . Appuyez sur la touche FM/AM pour sélectionner la bande FM ou AM. Numéro de preset (préréglage) Avec les touches PRESET, sélectionnez le numéro de preset dans lequel vous souhaitez mémoriser cette station de...
  • Page 107: Presets Automatiques

    Presets automatiques Écoute d'une station préréglée (preset) L'unité peut automatiquement rechercher les stations Appuyez sur la touche FM/AM pour qu'elle peut recevoir et les ajouter aux presets . choisir la bande. Appuyez sur la touche FM/AM pour sélectionner la réception FM ou AM. Chaque fois que vous appuyez sur la touche FM/ AM, la réception de l'unité...
  • Page 108: Réveil

    Préréglage de syntonisation (preset) (suite) Réveil Avec la télécommande À l'heure fixée, un son sera produit par les haut-parleurs . o Réglez l'horloge avant de régler le réveil (page 81) . Réglage du réveil Mettez l'unité en veille (standby). Le numéro de preset apparaît sur le côté gauche de L'unité...
  • Page 109: Avec Les Touches Time (J/K), Réglez

    Avec les touches TIME (j/k), réglez la valeur des minutes pour le réveil et appuyez sur la touche TIMER. Exemple d'affichage La valeur des « heures » clignote . o Si aucune action n'est menée durant 20 secondes, le réglage du réveil est automatiquement abandonné...
  • Page 110: Avec Les Touches Time (J/K), Sélec

    Réveil (suite) Avec les touches TIME (j/k), sélec- Avec les touches TIME (j/k), réglez le tionnez la source de lecture et appuyez niveau de volume. sur la touche TIMER. Vous pouvez régler le volume entre 5 (minimum) et 32 (maximum) . Exemple d'affichage o Lorsque le réveil met l'unité...
  • Page 111: Minuterie D'extinction

    Minuterie d'extinction Activez et désactivez le réveil lorsque l'unité est en L'unité peut être réglée pour se mettre en veille après mode de veille . un temps défini . Désactivation du réveil Réglage de la minuterie d'extinction Si vous ne souhaitez pas utiliser le réveil, appuyez sur la Appuyez plusieurs fois sur la touche SLEEP jusqu'à...
  • Page 112: Écoute D'un Appareil Connecté

    Écoute d'un appareil connecté Vous pouvez connecter à cette unité la prise casque Lancez la lecture sur l'appareil de lec- ou de sortie audio d'un lecteur audio portable ou autre ture. Puis réglez le volume à la fois sur appareil et faire produire son signal audio par cette cette unité...
  • Page 113: Guide De Dépannage

    Guide de dépannage Lecteur de CD Si vous avez des problèmes avec cette unité, veuillez vérifier les points suivants avant de demander une La lecture n'est pas possible. intervention . Le problème pourrait aussi venir d'ailleurs e Si le disque est à l'envers, rechargez-le avec sa face que de cette unité...
  • Page 114: Guide De Dépannage

    Vérifiez que le câble de l'antenne FM a été correcte- celui avec lequel vous essayez d'appairer l'unité . ment connecté . e Après avoir supprimé les données «  MC-D800  » e S’il y a un téléviseur près de l’unité, éteignez-le . depuis l'autre appareil Bluetooth, réessayez l'appairage .
  • Page 115: Caractéristiques Techniques

    Caractéristiques techniques Amplificateur Générales - unité principale Puissance de sortie . . . . . . . . . . . . . . . . . . 10 W + 10 W (8 Ω) Prises d'entrée .
  • Page 116 Phone: +1-323-726-0303 TEAC AUDIO EUROPE Gutenbergstr. 3, 82178 Puchheim, Germany Phone: +49-8142-4208-141 This device has a serial number located on its rear panel. Please record the serial number and retain it for your records. Model name: MC-D800 Serial number: 0416.MA-2073C...

Table des Matières