
Manuels Connexes pour Fracarro FRPRO 10A


Sommaire des Matières pour Fracarro FRPRO 10A
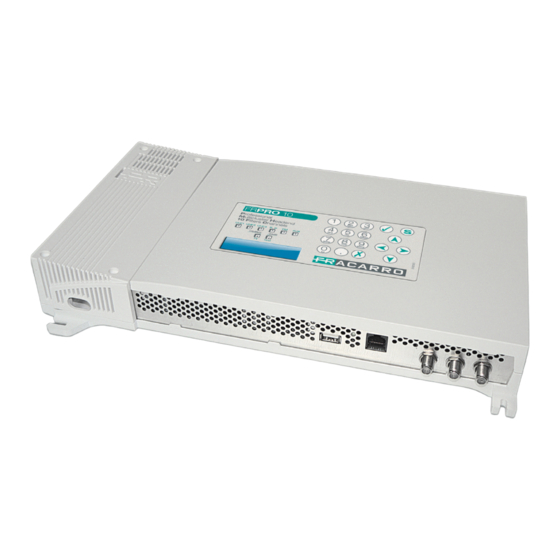
- Page 1 FRPRO 10 FRPRO 10A - FRPRO 10S ISTRUZIONI PER L’USO OPERATING INSTRUCTIONS INSTRUCTIONS D’EMPLOI INSTRUCCIONES DE FUNCIONAMIENTO...
-
Page 2: Avvertenze Per La Sicurezza
La programmazione delle centrali avviene tramite tastiera e display LCD a bordo del prodotto stesso oppure tramite software da PC (FR PRO, scaricabile da www.fracarro.it). È possibile copiare la configurazione da una centrale in un’altra dello stesso modello o stessa serie (es. - Page 3 Ingressi larga banda Ingressi programmabili BIII + lle- UHF1 UHF2 UHF3 DAB FM AUX ale. e la iliz- FRPRO 10 FRPRO 10A orto TEST Uscite tale Ingressi larga banda Ingressi programmabili BIII + UHF1 UHF2 UHF3 FM AUX SAT FRPRO 10S (es.
-
Page 4: Led Di Stato
alimentazione RJ-45 LED di stato UHF1: primo ingresso programmabile banda UHF (470÷862 MHz). UHF2: secondo ingresso programmabile banda UHF (470÷862 MHz). UHF3: terzo ingresso programmabile banda UHF (470÷862 MHz). ingresso larga banda per segnali FM (87÷108 MHz). BIII + DAB: ingresso larga banda per segnali in banda III e segnali DAB (174÷300 MHz). AUX: ingresso ausiliario (47÷862 MHz). - Page 5 Led di indicazione della telealimentazione. Quando il led è acceso (rosso) significa che l’alimentazione è attiva per quel ingresso. L’alimentazione può essere selezionata tra- mite programmazione (12V o 24V). UHF1 UHF2 UHF3 2.2 DESCRIZIONE DEI CLUSTER Tramite programmazione si definiscono i 10 cluster impostando il canale d’inizio e canale di fine, tipo canale (analogico o digitale), livello e ingresso UHF associato.
- Page 6 2.3 DESCRIZIONE DEGLI STADI DI AMPLIFICAZIONE Il Profiler è costituito da tre stadi di amplificazione: dinamica di ingresso, amplificazione del cluster e gua- dagno finale. Tutti e tre questi guadagni sono interessati nella fase automatica di autoallineamento e sono modificabili manualmente, tramite programmazione, dall’utente. La funzione di autoallineamento consente di mantenere la figura di rumore più...
-
Page 7: Montaggio A Muro
3. INSTALLAZIONE DEL PRODOTTO 3.1 MONTAGGIO A MURO La centrale va installata utilizzando le staffe integrate nella meccanica del prodotto. Si preveda lo spazio e di necessario per l’eventuale collegamento del cavo di alimentazione e la corretta ventilazione del prodotto (15cm di aria su tutti i lati). -
Page 8: Esempio Di Installazione
Per la corretta programmazione della centrale Profi ler si eseguano i seguenti passi: collegare la centrale Profi ler alla rete elettrica. attendere l’inizializzazione della centrale (compare il logo FRACARRO sul display). attendere l’inizializzazione della centrale (compare il logo FRACARRO sul display). -
Page 9: Programmazione Di Fabbrica
4.1 PROGRAMMAZIONE DI FABBRICA Menu Parametri di default o di Codice installatore 1234 Lingua Italiano iliz- Telealimentazioni Alimentazione LNB* o il Regolazione Guadagno ingressi UHF (dB) 20 (massimo) Regolazione Guadagno ingresso B.III+DAB (dB) 20 (massimo) Regolazione Guadagno ingresso FM (dB) 20 (massimo) Regolazione Guadagno ingresso AUX (dB) 20 (massimo) -
Page 10: Menu Iniziale
Cambio dei parametri usando freccia su e/o freccia giù 5.1 MENU INIZIALE Impostazione dei parametri della Centrale IMPOSTAZIONI vedi pag. FRACARRO CENTRALE FRPRO10 Digitare il PIN Digita codice Impostazioni dei parametri di IMPOSTAZIONI vedi pag. ingresso e impostazione... -
Page 11: Menu Centrale
5.2 MENU CENTRALE Selezione della lingua del menu di programmazione CENTRALE IMPOSTAZIONI LINGUA LINGUA Italiano CENTRALE Italiano per selezionare Francais Espanol Portuguese Deutsch LINGUA English English Impostazioni del CODICE CENTRALE digita rididigita PIN di accesso CODICE UTENTE UTENTE SI codice codice (default 1234) ****... -
Page 12: Cambio Della Lingua
SI=V / NO=X NOME LCD 15 Impostazioni del NOME Configurazione1 Salvataggio OK CENTRALE • In caso di smarrimento del codice utente, contattare il supporto tecnico Fracarro CONTRASTO contrasto dell’LCD. CONTRASTO LCD Valori ammessi 0…15 LCD 0 per selezionare CENTRALE CARICA... - Page 13 CARICAMENTO FILE DI CONFIGURAZIONE Nel menu “CENTRALE - MEMORIA USB” si può caricare (menu “CARICA”) una confi gurazione precedente- mente memorizzata o salvata da PC, dalla pen drive al Profi ler. gle- Quando indicato nel display “inserire USB” inserire la pen drive e premere il tasto ;...
- Page 14 5.3 MENU IMPOSTAZIONI INGRESSO clus Programmazione cluster UHF. IMPOSTAZIONI INGRESSO UHF 1 Vedere paragrafo 5.3.1 UHF1 INGRESSO Programmazione cluster UHF” alla <_ _ _ _ _ _ _XXX> -- pagina 15 Programmazione cluster UHF. Vedere paragrafo 5.3.1 INGRESSO UHF 2 UHF2 Programmazione cluster UHF”...
- Page 15 5.3.1 PROGRAMMAZIONE INGRESSO UHFx E CLUSTER ASSOCIATI Ogni cluster deve essere programmato singolarmente impostando: canale di inizio cluster, canale di fine cluster, tipo canale (analogico o digitale o cluster spento), guadagno del cluster, ingresso UHF. Per eseguire la programmazione dei singoli cluster si faccia riferimento al flow-chart seguente: Programmazione cluster numero 01 CELLA 1 - UHF3...
- Page 16 Per selezionare il cluster da programmare, spostarsi utilizzando le frecce sinistra/destra. staz Canale di inizio cluster Canale di fi ne cluster * UHF 3 E21 - E21 * Presente se il cluster è attivato <DDDDDDDDDD> 01 Indicazione del numero di Il cluster selezionato lampeggia cluster che si sta programmando Il cluster selezionato lampeggia.
- Page 17 stazioni sono visualizzate come nel menu seguente: Menu relativo Cluster numero 6 all’ingresso UHF3 CELLA 6 - UHF 3 Cluster associato E33 : E37 - all’ingresso UHF2 Canale di inizio cluster Canale di fine cluster zare 5.3.2 PROGRAMMAZIONE INGRESSI B.III – FM – AUX - SAT Per gli ingressi B.III, FM, AUX e (solo su FRPRO10S) SAT e’...
- Page 18 5.4 MENU IMPOSTAZIONI AUTOALLINEAMENTO Avvio regolazione automatica di tutti i guadagni per confermare IMPOSTAZIONI ATTENZIONE AUTOALLINEAMENTO V = Avvio Il menu “AUTOALLINEAMENTO” può essere utilizzato dopo aver programmato tutti i cluster che si desidera utilizzare. In questo modo, automaticamente, il Profiler calcola le potenze dei singoli canali in ingresso ed imposta i valori di tutti i guadagni: dinamica iniziale, guadagno celle e guadagno finale.
- Page 19 5.6 MENU TELEALIMENTAZIONE Impostazione della tensione di TELE. 12V/ IMPOSTAZIONI TELEALIMENTAZ. Attenzione telealimentazione 12V o 24V 24V 12V TELEALIMENTAZ. TELE. 12V/24V SI=V / NO=X per selezionare Attenzione TELE. 12V/ SI=V / NO=X dera o ed UHF1 TELEALIMENTAZ. indi TELE. UHF1 o in per selezionare Attivazione della...
- Page 20 Defi 6. SOFTWARE PER LA PROGRAMMAZIONE FR PRO può essere scaricato dal sito www.fracarro.it 1) M Requisiti minimi di sistema: 2) M • Dotnet Framework v.2 o superiore • Windows XP Service Pack 2 o superiore (Windows Vista e 7)
- Page 21 Definizione dei cluster Per definire i cluster si può operare in due modi: 1) Modalità grafica 2) Modalità Mask Di seguito una breve descrizione per entrambe le modalità: 1) Modalità grafica tipo Per la definizione dei cluster in modalità grafica è sufficiente spostare il selettore di cella che si stà program- e di mando, allargandolo per aumentare il numero dei canali appartenenti alla cella, e aumentandone la dimen- ura-...
- Page 22 Impostazione guadagno FM, B.III+DAB, AUX Per determinare il guadagno sugli ingressi FM, B.III+DAB e AUX è sufficiente alzare/abbassare la corrispon- dente barra verde. live Regolazione del Guadagno per la cella B.III+DAB Valore del Guadagno (in dB) per la Cella B.III+DAB Indicazione della Cella: B.III Impostazioni guadagno e tilt SAT (solo per FR PRO10S)
- Page 23 Impostazioni del guadagno finale (Master Level) Modificando la barra Master Level si può impostare il guadagno finale per tutti gli ingressi (nell’FRPRO10S il livello master non tiene conto dell’ingresso SAT). rde. e al Regolazione guadagno Master Impostazioni per gli ingressi UHF Per definire le impostazioni di telealimentazione per gli ingressi è...
-
Page 24: Aggiornamento Firmware
La centrale Profiler è aggiornabile sul campo direttamente utilizzando un PC per mezzo della porta seriale RJ45. Per reperire l’ultimo firmware, si faccia riferimento alla sezione “Software aggiornamento” del nostro sito internet www.fracarro.com. 7. SPECIFICHE TECNICHE Caratteristiche generali del prodotto FRPROx Tastiera a bordo per la programmazione e display 16 caratteri x 2 righe Led verde sull’alimentatore che indica la presenza della rete... - Page 25 Livello di uscita max segnali analogici (dBμV) Livello di uscita max segnali digitali (dBμV) Telealimentazione 12V (max 200mA) 12V/24V 12V/24V 12V/24V 24V (max 100mA) Figura di rumore (dB) FRPRO 10A Ingressi UHF1 UHF2 UHF3 BIII+DAB Frequenza (MHz) 470÷862 470÷862 470÷862 87÷108 170÷320...
- Page 26 Per ciascun cluster Regolazione Guadagno cella (dB) (a step di 1 dB) tion Regolazione del guadagno to t finale (dB) Livello di ingresso max (dBμV@ 1CH) • Livello di uscita max segnali • analogici (dBμV) Livello di uscita max segnali •...
-
Page 27: Installation Warnings
The headend unit can be programmed through a keyboard and a LCD screen or through PC software (FR PRO, downlodable from www.fracarro.com). The configuration of a headend unit can be copied quickly and easily onto another unit of the same model or series (i.e. - Page 28 Wide band inputs Ingressi larga banda Programmable inputs Ingressi programmabili BIII + DAB FM AUX UHF1 UHF2 UHF3 FRPRO 10 FRPRO 10A TEST Outputs Uscite Ingressi larga banda Wide band inputs Programmable inputs Ingressi programmabili BIII + UHF1 UHF2 UHF3...
- Page 29 Power supply alimentazione RJ-45 Status LED LED di stato UHF1: first programmable input of UHF band (470÷862 MHz). UHF2: second programmable input of UHF band (470÷862 MHz). UHF3: third programmable input of UHF band (470÷862 MHz). wide band input for FM signals (87÷108 MHz). BIII + DAB: wide band input for III band signals and DAB signals (174÷300 MHz).
- Page 30 LED to show remote power supply. When the LED is ON (red), it means that the power is activated for that input. The power supply can be selected by means of programming (12V or 24V). UHF1 UHF2 UHF3 2.2 CLUSTER DESCRIPTION Programming defines the 10 clusters by setting the initial channel and the end channel, channel type (analogue or digital), level and UHF associated input.
- Page 31 2.3 DESCRIPTION OF THE AMPLIFICATION STAGES The Profiler unit is comprised of 3 amplification stages. input dynamics, cluster amplification and final gain. These 3 gains are included in the automatic phase of the self-alignment and they can be programmed ma- nually by the user.
-
Page 32: Wall Assembly
3. PRODUCT INSTALLATION 3.1 WALL ASSEMBLY Install the unit by means of the brackets integrated in the mechanic parts of the product. Please leave a gap to connect the power supply cable and allow the ventilation (15 cm of gap on all sides). of t Please refer to the following figures (Fig 3.1) to install the unit;... -
Page 33: Example Of Installation
For the correct programming of the Profi ler headend, proceed as follows: Connect the Profi ler unit to the electric network. wait for the headend unit’s initialization (the FRACARRO logo will appear on the display). wait for the headend unit’s initialization (the FRACARRO logo will appear on the display). -
Page 34: Programming Instructions
4.1 Default Programming Menu Default parameters Installer code 1234 Language English Remote power LNB* power supply Gain adjustment of UHF inputs (dB) (maximum) 20 Gain adjustment of B.III+DAB input (dB) (maximum) 20 Gain adjustment of FM input (dB) (maximum) 20 Gain adjustment of AUX input (dB) (maximum) 20 Gain adjustment of SAT* input (dB) - Page 35 Scroll the menu upwards or downwards Change the parameters by means of the UP and/or DOWN arrows 5.1 INITIAL MENU Setting the headend parameters FRACARRO CONTROL UNIT see page FRPRO10 SETUP Enter PIN Enter code INPUT...
- Page 36 5.2 HEADEND UNIT MENU To c lang Select language from the programming menu CONTROL CONTROL UNIT LANGUAGE UNIT SETUP LANGUAGE Italiano Italiano Francais To select Espanol Portuguese Deutsch LANGUAGE English English CONTROL UNIT USER CODE Setting the access Enter code Re-enter code PIN (default 1234) USER CODE...
-
Page 37: Changing The Language
Enter USB LCD CONTRAST SAVE AS Configuration1 Accepted values 0… Saving OK YES=V / NO=X To select • If the user code is lost, contact Fracarro Technical Support. LCD CONTRAST LOAD Enter USB Load/Save Press DOWN to LOAD CONTROL UNIT STORAGE... - Page 38 LOADING THE CONFIGURATION FILE By means of a pen drive, a confi guration that was previously memorized or saved from a PC can be loaded into the “CONTROL UNIT - UBS MEMORY”. When the display shows “insert USB,” insert the pen drive and press the key.
-
Page 39: Input Setting Menu
5.3 INPUT SETTING MENU w to Programming UHF cluster. INPUT UHF1 UHF 1 See paragraph 5.3.1 Programming INPUT SETTINGS <DDDDDDDDDD> -- ete. UHF cluster on page 40 Programming UHF cluster. UHF 2 UHF2 See paragraph 5.3.1 Programming INPUT <DDDDDDDDDD> -- UHF cluster on page 40 Programming UHF cluster. - Page 40 5.3.1 PROGRAMMING THE UHFx INPUT AND ASSOCIATED CLUSTERS Each cluster shall be individually programmed by setting the cluster’s initial channel, the cluster’s end chan- nel, the channel type (analogue or digital or cluster OFF), the cluster gain and the UHF input. To program each cluster, refer to the following flow-chart: Programming cluster number 01...
- Page 41 Use the left/right arrows to select the cluster to program. Start channel of cluster Finish channel of cluster * UHF 3 E21 - E21 * if the cluster is enabled <DDDDDDDDDD> 01 Indication of the number of The selected cluster fl ashes clusters you are programming The selected cluster will fl ash.
- Page 42 By selecting the cluster shown in the previous figure, you can enter the settings of the cell. The settings are displayed as shown in the following menu: Menu relevant to Cluster number 6 the UHF3 input CELL 6 - UHF 3 Cluster associated E33 : E37 - to the UHF2 input...
- Page 43 5.4 SELF-ALIGNMENT SETTINGS MENU Start automatic adjustment of all gains To select SELF-ALIGNING WARNING SETTINGS V = Start-up The “SELF-ALIGNMENT” menu can be used after programming all the clusters. That way, the Profiler unit will automatically calculate the powers of each input channel and set the values of all gains, such as the initial dynamics, the cell gain and the final gain.
- Page 44 5.6 REMOTE POWER SUPPLY MENU • Setting the remote power TELE. 12V/ Warning 12V REMOTE POWER REMOTE POWER supply voltage at 12V or 24V • 24V 12V YES=V / NO=X SETTINGS TELE. 12V/24V To select Warning 24V TELE. 12V/24V YES=V / NO=X will rati REMOTE POWER...
-
Page 45: Programming Software
6. PROGRAMMING SOFTWARE FR PRO can be downloaded from www.fracarro.com. Minimum requirements for the system: • Dotnet Framework v.2 or later • Windows XP Service Pack 2 or later (Windows Vista and 7) Using the FRPRO software, you can create a configuration of the clusters (initial channel and end channel, channel type, cluster level, etc.) and of the other inputs by working from the computer. - Page 46 Cluster definition To define the clusters, choose one of the following methods: To d 1) Graphics mode 2) Mask mode The following is a brief description of both modes: 1) Graphics mode To define the clusters within the graphics mode, move the selector of the cell you are programming and enlarge it if you wish to increase the number of channels in the cell and enlarge it upwards if you want to increase the gain.
- Page 47 Setting the gain of the FM, B.III+DAB, AUX inputs To determine the gain in the FM, B.III+DAB and AUX inputs, lift/lower the corresponding green bar. t to Gain adjustment for the Regolazione del Guadagno per la cella B.III+DAB cell B.III+DAB Valore del Guadagno (in dB) Gain value (in dB) for the per la Cella B.III+DAB...
- Page 48 Setting the final gain (Master Level) To l By modifying the Master Level bar, you can set the final gain of all inputs (in the FRPRO10S model, the Ma- exte ster level does not consider the SAT input). If yo Afte as s Prin...
-
Page 49: Firmware Upgrade
7. FIRMWARE UPGRADE The Profiler unit can be upgraded by a PC by means of the RJ45 serial port. To find the last firmware, refer to the section “Software updating” within the website www.fracarro.com. 8. TECHNICAL SPECIFICATIONS General features of the FRPROX product... - Page 50 Max output level analog signals (dBμV) Max output level digital signals (dBμV) Remote power 12V (max 200mA) 12V/24V 12V/24V 12V/24V 24V (max 100mA) Noise figure (dB) FRPRO 10A Inputs UHF1 UHF2 UHF3 BIII+DAB Frequency (MHz) 470÷862 470÷862 470÷862 87÷108 170÷320 47÷862...
- Page 51 FRPRO 10S Inputs UHF1 UHF2 UHF3 BIII+DAB Frequency (MHz) 470÷862 470÷862 470÷862 87÷108 170÷320 47÷862 950÷2150 10 Clusters : each one made up N° Cluster of 1 to 6 adjacent channels Flexible and programmable 1÷4 cell con- 5÷10 8÷10 UHF input combination nected selectable selectable...
-
Page 52: Avertissement De Sécurité
La programmation des unités centrales est effectuée depuis le clavier et l’écran LCD incorporé dans le pro- duit ou depuis le logiciel sur PC (FRPRO, que peut être téléchargé de fracarro.com). Il est possible de copier la configuration d’une unité centrale sur une autre unité du même modèle ou de la même série (ex. - Page 53 Entrées large bande Ingressi larga banda Entrées programmables Ingressi programmabili BIII + UHF1 UHF2 UHF3 DAB FM AUX allé duit FRPRO 10 FRPRO 10A rée port tifs, TEST Sorties Uscite ette Entrées large bande Ingressi larga banda Entrées programmables Ingressi programmabili...
- Page 54 alimentation alimentazione RJ-45 de fi LED d’état LED di stato clus UHF1 : première entrée programmable bande UHF (470÷862 MHz). UHF2 : deuxième entrée programmable bande UHF (470÷862 MHz). UHF3 : troisième entrée programmable bande UHF (470÷862 MHz). FM : entrée bande large pour signaux FM (87÷108 MHz).
-
Page 55: Description Des Clusters
LED d’indication de la téléalimentation. Lor- sque la LED est allumée (rouge) l’alimenta- tion est activée pour cette entrée. L’alimenta- tion peut être sélectionnée par l’intermédiaire de la programmation (12V ou 24V). UHF1 UHF2 UHF3 2.2 DESCRIPTION DES CLUSTERS Par l’intermédiaire de la programmation, les 10 clusters sont définis en réglant le canal de début et le canal de fin, le type de canal (analogique ou numérique), le niveau et l’entrée UHF associée. -
Page 56: Description Des Étages D'amplification
2.3 DESCRIPTION DES ÉTAGES D’AMPLIFICATION Le Profiler est constitué de trois étages d’amplification : dynamique d’entrée, amplification du cluster et gain final. Les trois gains sont impliqués dans la phase automatique d’alignement automatique et ils sont L’un programmables manuellement par l’utilisateur. La fonction d’alignement automatique permet de maintenir la néc figure de bruit la plus basse possible et elle aligne les clusters pour le niveau maximum de sortie. -
Page 57: Montage Mural
3. INSTALLATION DU PRODUIT r et 3.1 MONTAGE MURAL L’unité centrale est installée en utilisant les brides intégrées dans la mécanique du produit. Prévoir l’espace ir la nécessaire pour le branchement éventuel du câble d’alimentation et la ventilation correcte du produit (15 cm d’espace sur tous les côtés). -
Page 58: Exemple D'installation
Pour programmer correctement l’unité centrale Profi ler, suivre les instructions suivantes : brancher l’unité centrale Profi ler au secteur. attendre l’initialisation de l’unité centrale (le logo FRACARRO apparaît à l’écran). attendre l’initialisation de l’unité centrale (le logo FRACARRO apparaît à l’écran). -
Page 59: Programmation D'usine
4.1 Programmation d’usine Menu Paramètres par défaut Code installateur 1234 Langue Français Téléalimentations Alimentation LNB* re). Réglage gain entrées UHF (dB) 20 (maximum) Réglage gain entrée B.III+DAB (dB) 20 (maximum) Réglage gain entrée FM (dB) 20 (maximum) Réglage gain entrée AUX (dB) 20 (maximum) Réglage gain entrée SAT* (dB) 20 (maximum) -
Page 60: Menu Initial
Changer les paramètres en utilisant la fl èche haut et/ou la fl èche bas 5.1 MENU INITIAL Réglage des paramètres de la station de tête FRACARRO RÉGLAGES voir page FRPRO10 UNITÉ CENTRALE Entrer le PIN Entrer le code Réglages des paramètres... - Page 61 5.2 MENU CENTRAL Sélection de la langue du menu de programmation RÉGLAGE DE CENTRALE LANGUE LA CENTRALE Italiano LANGUE Italiano pour Francais sélectionner Espanol Portuguese Deutsch LANGUE English English Entrer de Réglages du PIN Entrer le CENTRALE CODE UTILISAT. nouveau le code d’accès CODE UTILISAT.
-
Page 62: Changer La Langue
LCD. CONTRASTE LCD 15 NON=X CONTRASTE LCD Valeurs admises 0… LCD 0 • En cas de perte du code, contacter le support technique Fracarro pour sélectionner CONTRASTE MÉMOIRE Insérer USB Charger/Mémoriser CHARGER CENTRALE LCD 15 CHARGER Réglage vitesse... -
Page 63: Chargement Fichier De Configuration
CHARGEMENT FICHIER DE CONFIGURATION gler Sur le menu “UNITÉ CENTRALE - MÉMOIRE USB” charger (menu “CHARGER”) une confi guration mémori- sée précédemment ou sauvegardée depuis le PC ou la clé sur le Profi ler. ais, Lorsque l’écran affi che le message “insérer USB”, insérer la clé et appuyer sur la touche ;... -
Page 64: Menus Réglages Entrée
5.3 MENUS RÉGLAGES ENTRÉE Programmation cluster UHF. RÉGLAGES ENTRÉE UHF 1 Voir paragraphe 5.3.1 UHF1 D’ENTRÉE <DDDDDDDDDD> Programmation cluster UHF à la page 65 Programmation cluster UHF. ENTRÉE UHF 2 Voir paragraphe 5.3.1 UHF2 <DDDDDDDDDD> Programmation cluster UHF à la page 65 Programmation cluster UHF. -
Page 65: Programmation Entrée Uhfx Et Clusters Associés
5.3.1 PROGRAMMATION ENTRÉE UHFx ET CLUSTERS ASSOCIÉS Chaque cluster doit être programmé individuellement en réglant : canal de début cluster, canal de fin cluster, type de canal (analogique ou numérique ou cluster éteint), gain du cluster, entrée UHF. Pour programmer chaque cluster, se rapporter au diagramme de flux suivant : Programmation cluster numéro 01 CELLULE 1 - UHF3... - Page 66 Pour sélectionner le cluster à programmer, se déplacer avec les fl èches gauche/droite. Canal de début cluster Canal de fi n cluster * UHF 3 E21 - E21 * Présent si le cluster est activé <DDDDDDDDDD> 01 Indication du numéro du Le cluster sélectionné...
- Page 67 sont affichés comme dans le menu suivant : Menu relatif Cluster numéro 6 à l’entrée UHF3 CELL. 6 - UHF 3 Cluster associé E33 : E37 - à l’entrée UHF2 Canal de début cluster Canal de fin cluster 5.3.2 PROGRAMMATION ENTRÉES B.III – FM – AUX - SAT Pour les entrées B.III, FM, AUX et (seulement sur FRPRO10S) SAT, il est possible de régler le gain de 0 à...
-
Page 68: Menu Réglages Alignement Automatique
5.4 MENU RÉGLAGES ALIGNEMENT AUTOMATIQUE Démarrage réglage automatique de tous les gains pour sélectionner RÉGLAGES ATTENTION ALIGNEMENT AUTOMATIQUE V = Démarrage Le menu “ALIGNEMENT AUTOMATIQUE» peut être utilisé après avoir programmé tous les clusters. De cette façon, le Profiler calcule automatiquement les puissances de chaque canal en entrée et il programme les valeurs de tous les gains : dynamique initiale, gain cellules et gain final. -
Page 69: Menu Téléalimentation
5.6 MENU TÉLÉALIMENTATION Réglage de la tension de TELE. 12V/ Attention 12V RÉGLAGES TÉLÉALIMENT. téléalimentation 12V ou 24V 24V 12V OUI=V / NON=X TÉLÉALIMENT. TELE. 12V/24V pour sélectionner Attention 24V TELE. 12V/ OUI=V / NON=X ette TÉLÉALIMENT. UHF1 ster TELE. UHF1 lisé... -
Page 70: Logiciel De Programmation
Défi 6. LOGICIEL DE PROGRAMMATION FR PRO peut être téléchargé de fracarro.com 1) M Dispositions minimum du système : 2) M • Dotnet Framework v.2 ou supérieur • Windows XP Service Pack 2 ou supérieur (Windows Vista et 7) 1) M Le logiciel FRPRO permet de configurer les clusters (canal de début et de fin cluster, type de canal, niveau du... - Page 71 Définition des clusters Deux modes sont disponibles pour définir les clusters : 1) Mode graphique 2) Mode Mask Les deux modes sont décrits brièvement ci-dessous : 1) Mode graphique Pour définir les clusters en mode graphique, il suffit de déplacer le sélecteur de la cellule en programmation. Elargir le sélecteur pour augmenter le nombre de canaux qui appartiennent à...
- Page 72 Réglage du gain FM, B.III+DAB, AUX Rég Pour déterminer le gain sur les entrées FM, B.III+DAB et AUX, il suffit de lever/baisser la barre verte corres- pondante. Réglage du Gain pour la Regolazione del Guadagno per la cella B.III+DAB cellule B.III+DAB Valeur du Gain (en dB) pour Valore del Guadagno (in dB) per la Cella B.III+DAB...
- Page 73 Réglages du gain final (Master Level) res- En modifiant la barre Master Level, il est possible de régler le gain final pour toutes les entrées (dans le FRPRO10S le niveau maître ne considère pas l’entrée SAT). ncli- den- Regolazione guadagno Master Réglage du Gain Master Réglages pour les entrées UHF Pour définir les réglages de téléalimentation pour les entrées, il suffit de double-cliquer sur une des 3 entrées...
-
Page 74: Mise A Jour Du Logiciel
L’unité centrale Profiler peut être mise à jour sur place en utilisant un PC par le biais du port série RJ45. Pour trouver le dernier micrologiciel, se rapporter à la section “Logiciel de mise à jour” sur notre site Internet www. fracarro.com. 8. SPECIFICATIONS TECHNIQUES Caractéristiques générales du produit FRPROX... - Page 75 (dBμV) Niveau de sortie max pour les signaux numériques (dBμV) Téléalimentation (max 200mA) @ 12V 12V/24V 12V/24V 12V/24V (max 100mA) @ 24V Facteur de bruit (dB) FRPRO 10A Entrées UHF1 UHF2 UHF3 BIII+DAB Fréquence (MHz) 470÷862 470÷862 470÷862 87÷108 170÷320 47÷862...
- Page 76 Niveau de sortie max pour les signaux numériques (dBμV) Téléalimentation El u (max 200mA) @ 12V 12V/24V 12V/24V 12V/24V (max 100mA) @ 24V Facteur de bruit (dB) • • FRPRO 10S Entrées • UHF1 UHF2 UHF3 BIII+DAB Fréquence (MHz) 470÷862 470÷862 470÷862 87÷108...
-
Page 77: Advertencias De Seguridad
La programación de las centrales se efectúa por medio del teclado y de la pantalla LCD incluida en el mismo producto o también por medio de software de PC (FR PRO, descargable de www.fracarro.com). Se puede copiar la configuración de una central en otra del mismo modelo o misma serie (por ej. FIL10) de modo simple y rápido, mediante un lápiz USB. - Page 78 Ingressi larga banda Entradas de banda ancha Entradas programables Ingressi programmabili BIII + UHF1 UHF2 UHF3 DAB FM AUX FRPRO 10 FRPRO 10A TEST Salidas Uscite BIII Entradas de banda ancha Ingressi larga banda Entradas programables Ingressi programmabili BIII +...
- Page 79 alimentación alimentazione RJ-45 LED de estado LED di stato UHF1: primera entrada programable banda UHF (470÷862 MHz). UHF2: segunda entrada programable banda UHF (470÷862 MHz). UHF3: tercera entrada programable banda UHF (470÷862 MHz). entrada de banda ancha para señales FM (87÷108 MHz). BIII + DAB: entrada de banda ancha para señales en banda III y señales DAB (174÷300 MHz).
- Page 80 El P Led de indicación de la telealimentación. Cuando el led está encendido (rojo) significa que la alimentación está activada para esa entrada. La alimentación puede ser seleccio- nada por medio de programación (12V o 24V). UHF1 UHF2 UHF3 2.2 DESCRIPCIÓN DE LOS CLUSTERS Por medio de la programación se definen los 10 clusters programando el canal de inicio y canal de fin, tipo de canal (analógico o digital), nivel y entrada UHF asociada.
- Page 81 2.3 DESCRIPCIÓN DE LOS ESTADOS DE AMPLIFICACIÓN El Profiler está constituido por tres estados de amplificación: dinámica de entrada, amplificación del cluster y ganancia final. Estas tres ganancias se refieren a la fase automática de autoalineamiento y se pueden modificar manualmente por el usuario por medio de programación. La función de autoalineamiento permite mantener la figura de ruido más baja posible y alinea los clusters para el máximo nivel de salida.
-
Page 82: Montaje En La Pared
3. INSTALACIÓN DEL PRODUCTO 3.1 MONTAJE EN LA PARED La central se instala utilizando las abrazaderas integradas en el mecanismo del producto. Prever el espacio necesario para la posible conexión del cable de alimentación y la correcta ventilación del producto (15cm de nive aire en todos los lados). -
Page 83: Ejemplo De Instalación
Para la correcta programación de la central Profi ler realice los siguientes pasos: conectar la central Profi ler a la red eléctrica. esperar la inicialización de la central (aparece el logotipo FRACARRO en la pantalla). esperar la inicialización de la central (aparece el logotipo FRACARRO en la pantalla). - Page 84 4.1 Programación di fábrica Menu Parámetros por defecto Código instalador 1234 Idioma Español Telealimentación Alimentación LNB* Regulación Ganancia entradas UHF (dB) 20 (máximo) Regulación Ganancia entrada B.III+DAB (dB) 20 (máximo) Regulación Ganancia entrada FM (dB) 20 (máximo) Regulación Ganancia entrada AUX (dB) 20 (máximo) Regulación Ganancia entrada SAT* (dB) 20 (máximo)
- Page 85 Desplazar el menú hacia arriba o hacia abajo Cambio de los parámetros usando la fl echa arriba y/o fl echa abajo 5.1 MENÚ INICIAL Ajuste de los parámetros de la Central FRACARRO AJUSTES véase la pág. FRPRO10 CENTRAL Teclear el PIN Teclear el...
- Page 86 5.2 MENU CENTRALE Selección del idioma del menú de programación AJUSTES CENTRAL IDIOMA IDIOMA CENTRAL Italiano Italiano Francais para seleccionar Espanol Portuguese Deutsch IDIOMA English English Programaciones CENTRAL CÓDIGO del PIN de acceso Teclear el Volver a teclear (defecto 1234) CÓDIGO USUARIO USUARIO SI código...
-
Page 87: Cambio Del Idioma
LCD 15 Valores admitidos 0… LCD 0 CONTRASTO LCD para seleccionar • En caso de pérdida del código usuario, contactar con la asistencia técnica Fracarro. Programación CONTRASTO VELOCIDAD SERIAL MEMORIA CENTRAL Introducir... - Page 88 CARGA DEL ARCHIVO DE CONFIGURACIÓN En el menú “CENTRAL - MEMORIA USB” se puede cargar (menú “CARGA”) una confi guración precedente- mente memorizada o guardada desde el PC, con el lápiz al Profi ler. Cuando se indica en la pantalla “introducir USB” introducir la lápiz y pulsar la tecla ;...
- Page 89 5.3 MENÚ PROGRAMACIONES ENTRADA nte- bajo Programación cluster UHF. AJUSTES DE ENTRADA UHF 1 Ver parágrafo 5.3.1 Programación UHF1 ENTRADA <DDDDDDDDDD> -- cluster UHF en la página 80 Programación cluster UHF. UHF 2 ENTRADA Ver parágrafo 5.3.1 Programación UHF2 <DDDDDDDDDD> -- cio- cluster UHF en la página 80 Programación cluster UHF.
- Page 90 5.3.1 PROGRAMACIÓN ENTRADA UHFX Y CLUSTER ASOCIADOS Cada cluster debe ser programado individualmente configurando: canal de inicio cluster, canal de fin cluster, tipo canal (analógico o digital o cluster apagado), ganancia del cluster, entrada UHF. Para efectuar la programación de cada cluster hacer referencia al flow-chart siguiente: Programación cluster número 01 CELDA 1 - UHF3...
- Page 91 Para seleccionar el cluster que programar, desplazar utilizando las fl echas izquierda/derecha. Canal de inicio cluster Canal de fi n cluster * ter, UHF 3 E21 - E21 * Presente si el <DDDDDDDDDD> 01 cluster está activado Indicación del número de El cluster seleccionado parpadea cluster que se está...
- Page 92 Seleccionado el cluster visualizado en la figura precedente se accede a las programaciones de la celda. Las programaciones se visualizan como en el menú siguiente: Menú relativo a Cluster numero 6 la entrada UHF3 CELDA 6 - UHF 3 Cluster asociado E33 : E37 - a la entrada UHF2 El m...
-
Page 93: Programación Avanzada
5.4 MENÚ PROGRAMACIONES AUTOALINEAMIENTO Arranque regulación automática de todas las ganancias para seleccionar AJUSTES ATENCIÓN AUTOALINEACIÓN V = Inicio El menú “AUTOALINEAMIENTO” puede ser utilizado después de haber programado todos los clusters. De este modo, automáticamente, el Profiler calcula las potencias de cada canal en entrada y programa los valo- res de todas las ganancias: Dinámica inicial, ganancia celdas y ganancia final. - Page 94 5.6 MENÚ TELEALIMENTACIÓN • Programación de la tensión de AJUSTES TELE. 12V/ Atención TELEALIMENT. telealimentación 12V o 24V • TELEALIMENTACIÓN 24V 12V TELE. 12V/24V SI=V / NO=X para seleccionar Util Atención TELE. 12V/ tipo SI=V / NO=X TELEALIMENTACIÓN UHF1 TELE. UHF1 Activación de la para seleccionar telealimentación para la...
- Page 95 6. SOFTWARE PARA LA PROGRAMACIÓN FR PRO puede ser descargade de www.fracarro.com. Requisitos mínimos de sistema: • Dotnet Framework v.2 o superior • Windows XP Service Pack 2 o superior (Windows Vista y 7) Utilizando el software FRPRO se puede crear una configuración de los clusters (canal de inicio y fin cluster, tipo de canal, nivel del cluster, …) y de las demás entradas trabajando directamente en el ordenador, se...
- Page 96 Definición de los clusters Para definir los clusters se puede trabajar de dos maneras: Para 1) Modalidad gráfica corr 2) Modalidad Mask A continuación una breve descripción para ambas modalidades: 1) Modalidad gráfica Para la definición de los clusters en modalidad gráfica es suficiente desplazar el selector de la celda que se está...
- Page 97 Programación ganancia FM, B.III+DAB, AUX Para determinar la ganancia en las entradas FM, B.III+DAB y AUX es suficiente subir/bajar la barra verde correspondiente. e se a, y Regulación de la Ganancia Regolazione del Guadagno para la celda B.III+DAB per la cella B.III+DAB Valore del Guadagno (in dB) Valor de la Ganancia (en per la Cella B.III+DAB...
- Page 98 Programaciones de la ganancia final (Master Level) Para Modificando la barra Master Level se puede programar la ganancia final para todas las entradas (en el FR- gura PRO10S el nivel master no tiene en cuenta la entrada SAT). Si s el p La f La c...
-
Page 99: Actualización Firmware
La central Profiler se puede actualizar en el campo directamente utilizando un PC por medio del puerto serie RJ45. Para encontrar el último firmware, hacer referencia a la sección “Software actualización” de nuestra página internet www.fracarro.com. 8. ESPECIFICACIONES TÉCNICAS c en Características generales del producto FRPROX... - Page 100 Max output level analog signals (dBμV) Max output level digital signals (dBμV) Telealimentación 12V (max 200mA) 12V/24V 12V/24V 12V/24V 24V (max 100mA) Figura de ruido (dB) FRPRO 10A Entradas UHF1 UHF2 UHF3 BIII+DAB Frecuencia (MHz) 470÷862 470÷862 470÷862 87÷108 170÷320 47÷862...
- Page 101 Max output level digital signals (dBμV) Telealimentación 12V (max 200mA) 12V/24V 12V/24V 12V/24V 24V (max 100mA) Figura de ruido (dB) FRPRO 10S Entradas UHF1 UHF2 UHF3 BIII+DAB Frecuencia (MHz) 470÷862 470÷862 470÷862 87÷108 170÷320 47÷862 950÷2150 10 Cluster : Cada uno compuesto N°...
- Page 104 Tel: +39 0423 7361 - Fax: +39 0423 736220 Società a socio unico. Fracarro France S.A.S. - 7/14 rue du Fossé Blanc Bâtiment C1 - 92622 Gennevilliers Cedex - FRANCE - Tel: +33 1 47283400 - Fax: +33 1 47283421 Fracarro Ibérica S.A.U.