Table des Matières
Publicité
Les langues disponibles
Les langues disponibles
Liens rapides
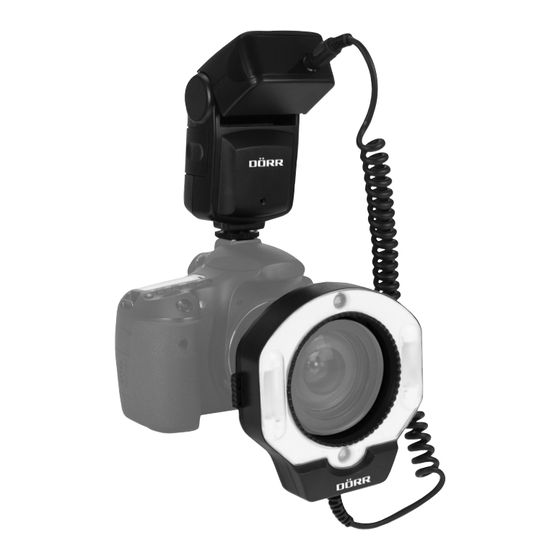
Macro Flash DMF-15
DÖRR DMF-15 Makro TTL Blitz
DÖRR DMF-15 Macro TTL Flash
Flash DÖRR TTL Macro DMF-15
Flash DÖRR TTL Macro DMF-15
DÖRR DMF-15 Macro TTL Flash
DÖRR DMF-15 Macro TTL-Blixt
Вспышка DÖRR DMF-15 Macro TTL
DE
Gebrauchsanweisung
GB
Instruction Manual
FR
Notice d´utilisation
ES
Manual de Instrucciones
IT
Manuale di Istruzioni
RU
Руководство пользователя
SE
Bruksanvisning
2-6
7-11
12-16
17-21
22-26
27-31
32-36
www.doerrfoto.de
1
Publicité
Chapitres
Table des Matières

Manuels Connexes pour Dörr Macro Flash DMF-15


Sommaire des Matières pour Dörr Macro Flash DMF-15
- Page 1 Macro Flash DMF-15 DÖRR DMF-15 Makro TTL Blitz DÖRR DMF-15 Macro TTL Flash Flash DÖRR TTL Macro DMF-15 Flash DÖRR TTL Macro DMF-15 DÖRR DMF-15 Macro TTL Flash DÖRR DMF-15 Macro TTL-Blixt Вспышка DÖRR DMF-15 Macro TTL Gebrauchsanweisung Instruction Manual 7-11 Notice d´utilisation...
-
Page 2: Table Des Matières
Inhaltsverzeichnis Vorwort ............... Fotografieren mit dem DÖRR Macroblitz ....TTL Blitzautomatik ............ Bauteile und Bezeichnungen ........Manuelles Blitzen ............Steuergerät ..............AF Hilfslicht ............... Makroblitz ..............Farbtemperatur und Weißabgleich ......Wichtige Hinweise ............ Blitzabschalt- Automatik ........... Batteriehinweise ............Belichtungskontrollanzeige OK ........ -
Page 3: Makroblitz
2.2 Makroblitz Autofokus- Hilfslicht Befestigungs-Klemmtaste Makro Blitzröhre rechts Anschlussstecker Befestigungs-Klemmtaste Ein/Aus-Schalter separat für Makroblitz links & rechts Autofokus-Hilfslicht Haupt-Anschlussringe 58 und 72mm Makro Blitzröhre links 2.3 Wichtige Hinweise Bevor Sie dieses Blitzgerät benutzen sollten, Sie folgende Sicherheitshinweise unbedingt beachten: • Im Falle eines Defektes sollten Sie nicht das Blitzgerät auseinander nehmen oder selbst reparieren, da im Blitzgerät ein Kondensator für hohe Spannungen eingebaut ist. -
Page 4: Einlegen Der Batterien
3 Verwendung des DÖRR DMF-15 Macro TTL Blitz 3.1 Einlegen der Batterien • Öffnen Sie den Batteriefachdeckel am Steuergerät, indem Sie ihn in Pfeilrichtung schieben und aufklappen. Der Hauptschalter sollte dabei auf OFF (Aus) stehen. • Legen Sie 4 Mignon Batterien (Typ AA) bzw. Akkus des gleichen Typs in das Batteriefach ein. Die richtige Polung entnehmen Sie bitte den Symbolen im Batteriefach. -
Page 5: Ttl Blitzautomatik
• Wählen Sie die gewünschte Blende an Ihrer Kamera. Zugunsten eines möglichst großen Schärfenbereichs sollten Sie sich für eine kleinere Blendenöffnung entscheiden (= große Blendenzahl, z.B. 11, 16 oder 22). • Die TTL Blitzautomatik steuert nun automatisch die erforderliche Lichtmenge und sorgt für korrekte Belichtung. •... -
Page 6: Einstellblitz
keinen Fall unterschritten werden, da es sonst zu fehlerhaften Belichtungen kommt. Bei der Verwendung des DÖRR Macro TTL Blitz wird in der Betriebsart TTL automatisch die richtige Blitzsynchronzeit eingestellt. 3.11 Einstellblitz Mit der Funktion Einstellblitz können Sie vor einer Aufnahme prüfen, ob Ihr Objekt richtig ausgeleuchtet ist oder ob Schatten oder Spiegelungen entstehen. -
Page 7: Preface
Table of Contents Preface ............... Taking Pictures with DÖRR DMF-15 Macro TTL Flash ..............Nomenclature ............TTL Flash Mode ............Control Unit ............... Manual Flash Mode ..........Macro Flash ............... Autofocus Illumination ..........Caution ..............Color Temperature & Auto White Balance.... -
Page 8: Caution
2.2 Macro Flash Autofocus Illumination Fixing Clamp Macro Flash Tube right side Connection Plug Fixing Clamp On/Off Switch for both Left & Right Macro Flash Tube Autofocus Illumination Adapter Rings 52 to 72mm Macro Flash Tube left side 2.3 Caution! Before using this flash unit, it is important to carefully read and follow these security instructions: •... -
Page 9: Loading Of The Batteries
3 Usage of DÖRR DMF-15 Macro TTL Flash 3.1 Loading of the Batteries • Open the battery compartment cover of the control unit by sliding it in direction of the arrow. The flash must be switched off. • Insert four AA batteries (Mignon type) or rechargeable NiMH of the same performance making sure to respect the correct plus/minus order as shown inside the compartment. -
Page 10: Ttl Flash Mode
Note: Your camera’s stop down button allows checking the focus area before shooting, depending on the selected aperture. The Macro Flash boasts of the following guide numbers: • one side operation: guide no. 10,7 • both sides in operation: guide no. 15 3.4 TTL Flash Mode The TTL flash mode is easy to handle and provides a high exposure precision. -
Page 11: Specifications
4 Specifications (subject to change without notice) Flash Control: TTL Flash or manually in 3 ratio steps (full, 1/4 and 1/16) Max. Guide No. at ISO 100: 15 (both sides); 10,7 (one side only) Exposure Control Display: green LED at rear side of control unit Flash Ready Indicator: red LED at rear side of control unit Flash Duration:... - Page 12 Table des Matières Préambule ..............Mode flash TTL avec programmation automatique ............. Composants et nomenclature ......... Flash manuel ............Unité de contrôle............Télémètre AF additionnel ......... Flash macro ............. Température de coleurs et contraste blanc .... Recommandations importantes ......Mise hors tension automatique ......
-
Page 13: Flash Macro
2.2 Flash macro Lumière additionnelle de mise Clip de fixation au point automatique Connecteur Rampe flash macro droite Interrupteur marche/arrêt séparé flash macro Clip de fixation droite et gauche Télémètre AF Bagues de fixation principales 52 jusqu‘à 72mm Rampe flash macro gauche 2.3 Recommandations importantes Avant d’utiliser ce flash, il est important de lire et d’appliquer les instructions de sécurité: •... -
Page 14: Utilisation Du Flash
3 Utilisation du flash DÖRR combi TTL Macro DMF-15 3.1 Mise en place des piles • Ouvrir le compartiment à piles de l‘unité de contrôle en faisant glisser le couvercle dans le sens des flèches. L ’interrupteur principal du flash doit être sur « OFF ». •... -
Page 15: Mode Flash Ttl Avec Programmation Automatique
• En cas de sur- ou de sous-exposition, il est conseillé de réitérer la prise de vue avec une valeur d’obturateur modifiée ou réglage ISO. Note: au moyen de la touche d‘ouverture du diaphragme sur votre caméra vous pouvez contrôler la profondeur de champ de votre objet avant la prise de vue en fonction de l‘ouverture choisie. -
Page 16: Affichage Contrôle D'exposition
3.11 Affichage contrôle d’exposition / Flash de réglage La fonction flash de réglage vous permet, avant d’effectuer une prise de vue, de vérifier la mise en lumière du sujet ou si des ombres sont générées. Pour cela, appuyez pendant 2 secondes sur le bouton MODE. Le flash macro déclenche alors une séquence de flashs qui vous aideront à... -
Page 17: Prefacio
Indice Prefacio ..............Control de flash TTL con modo de programa automático ..............Componentes y nomenclatura ....... Modo de Flash Manual ..........Unidad de control ............. Iluminación de enfoque automático AF ....Flash macro ............... Temperatura de color y equilibrio de blanco Recomendaciones importantes ....... -
Page 18: Flash Macro
2.2 Flash macro Iluminación adicional de enfoque Clip de sujeción automático Conector Tubo flash macro derecho Conectador/desconectador separado para tubo de flash Clip de sujeción en modo macro derecho e izquierdo Iluminación de enfoque automático AF Anillos de conexión principales 52 hasta 72mm Tubo flash macro izquierdo 2.3 Recomendaciones importantes Antes de utilizar este flash, es importante leer atentamente las siguientes advertencias de seguridad:... -
Page 19: Montaje Y Desmontaje Del Flash
3 Utilización del flash DÖRR TTL Macro DMF-15 3.1 Insertar las pilas Abra la tapa del compartimento para baterías empujándola en dirección de la flecha. El interruptor principal del flash debe encontrarse en la posición OFF (apagado). • Inserte 4 pilas miniaturas (tipo AA) o baterías recargables NiMH del mismo tipo en el compartimento para baterías, respetando la polaridad +/- tal como se muestra en el interior del compartimento para baterías. -
Page 20: Control De Flash Ttl Con Modo De Programa Automático
• Ajuste el tiempo de exposición deseado en su cámara. Este tiempo no debe ser más corto que el tiempo de sincronización del flash (ver el manual de instrucciones de su cámara). • Seleccione la apertura deseada en su cámara. Es posible incrementar el campo de enfoque seleccionando una apertura más pequeña (= número de diafragma del objetivo grande, p.ej. -
Page 21: Flash De Prueba
3.10 Tiempo de sincronización del flash El tiempo de sincronización se refiere a las velocidades de obturador que permiten hacer fotografías con flash. Hay que prestar especial atención a las velocidades de obturador más cortas. Cada cámara tiene un tiempo de sincronización de flash más corto diferente dependiendo del modelo . -
Page 22: Introduzione
Indice dei contenuti Introduzione ............Modalità flash TTL ..........Modalità flash manuale ......... Nomenclatura ............Illuminazione Autofocus ........Flash principale ............Temperatura colore e bilanciamento Macro Flash ............automatico del bianco ........... Precauzioni ............. Spegnimento automatico ........Informazioni sulla batteri ........ -
Page 23: Macro Flash
2.2 Macro Flash Illuminazione Autofocus Pulsante di bloccaggio Tubo Macro Flash a destra Connettore Pulsante di bloccaggio Leva On / Off separata per i due macroflash a Illuminazione Autofocus sinistra e a destra Tubo Macro Flash a sinistra Anelli adattatori da 52 a 72 millimetri 2.3 Attenzione! Prima di usare il flash, leggete attentamente le istruzioni di sicurezza: •... -
Page 24: Caricamento Delle Batterie
3 Utilizzo dell‘ DÖRR DMF-15 Macro Flash TTL 3.1 Inserimento delle batterie • Aprire il coperchio del vano porta batterie facendolo scorrere nella direzione della freccia. Il flash deve essere spento. • Inserire quattro batterie stilo AA (tipo Mignon) o ricaricabili NiMH della stessa prestazione avendo cura di rispettare la polarità, come indicato all‘interno del vano. -
Page 25: Modalità Flash Ttl
Note: Il pulsante “stop down” della vostro fotocamera vi consente di verificare l’area di messa a fuoco prima di effettuare lo scatto, a seconda del diaframma selezionato. Il Macro Flash vanta i seguenti numeri guida: • un solo lato in funzione: guida no. 10,7 •... -
Page 26: Flash "Modeling
3.11 Flash “Modeling” La funzione “modeling” flash vi permette di controllare le ombre, le riflessione e il bilanciamento della luce sul soggetto prima di scattare la fotografia. Per utilizzare questa funzione semplicemente premette il pulsante “MODE” per due secondi. Il Macro flash emetterà... -
Page 27: Предисловие
Содержание Предисловие ............Режим вспышки TTL ..........Наименование составных частей ......Ручной режим вспышки ........Блок управления ............ Подсветка автофокуса .......... Макро вспышка ............Цветовая температура и автоматический Внимание ..............баланс белого ............Информация о батареях ........Автоматическое выключение питания .... -
Page 28: Макро Вспышка
2.2 Макро-вспышка Подсветка автофокуса Импульсная лампа макро вспышки левая сторона Импульсная лампа макро Фиксирующий зажим вспышки правая сторона Соединительная вилка Фиксирующий зажим Выключатель левой и правой импульсных ламп Подсветка автофокуса Переходное кольцо с 52 на 72мм 2.3 Внимание! Перед использованием вспышки, необходимо внимательно прочитать и следовать настоящим правилам безопасности: •... -
Page 29: Установка Батарей
3 Использование вспышки DÖRR DMF-15 Macro TTL Flash 3.1 Установка батарей • Откройте крышку батарейного отсека блока управления по направлению стрелки. Вспышка должна быть выключена. • Вставьте четыре батареи или перезаряжаемые NiMH аккумуляторы (тип AA), соблюдая правильную полярность в соответствии с символами, указанными на стенке отделения батарей питания. •... -
Page 30: Режим Вспышки Ttl
• Система управления вспышкой TTL не обеспечивает точное количество света, необходимого для правильной экспозиции. • В случае передержки и недодержки, измените, настройки диафрагмы или чувствительность ISO, а затем повторите снимок. Внимание: Кнопка репетитора диафрагмы вашей камеры позволяет проверить области фокуса до съемки, в зависимости от выбранной... -
Page 31: Пилотный Свет
„самая короткая“ выдержка синхронизации - так называемая х-синхронизации. Пожалуйста, см. Руководство пользователя вашей камеры. Не используйте выдержки затвора, более короткие, чем выдержка синхронизации, во избежание неправильной экспозиции. При использовании вспышки DORR DMF-15 TTL в режиме TTL, выдержка синхронизации вашей камеры будет настроена... -
Page 32: Förord
Innehållsförteckning Förord ................ Fotografera med DÖRR Macroblixt ......TTL-blixtautomatik ........... Delar och beteckningar ..........Manuella blixtinställningar ........Styrenhet ..............AF-hjälpbelysning ............ Macroblixtenhet ............Färgtemperatur och vitbalans ......... Säkerhetsanvisningar ..........Avstängningsautomatik ........... Batterianvisningar ............ Exponering OK-lampa ..........3.10 Blixtsynkroniseringstid ..........Användning av blixten .......... -
Page 33: Styrenhet
2.2 Macroblixtenhet Autofokushjälpbelysning Fästklämma Höger macroblixtrör Anslutningskontakt för styrenhet Fästklämma På/av-strömbrytare för höger och vänster blixtrör Autofokushjälpbelysning Filteradapterringar 52 till 72mm Vänster macroblixtrör 2.3 Säkerhetsanvisningar Innan du använder blixten, läs dessa säkerhetanvisningar noggrant: • Om blixten slutar att fungera bör du inte plocka isär den eller själv försöka reparera den. Blixten innehåller högspänningskondensatorer som medför risk för elektriska stötar och gnistbildning. -
Page 34: Isättning Av Batterier
3 Användning av DÖRR DMF-15 Macro TTL-blixt 3.1 Isättning av batterier • Öppna styrenhetens batterifack genom att skjuta luckan i pilens riktning och sedan fälla upp den. Se till att blixtens huvudströmbrytare är satt till OFF . • Sätt i 4 st alkaliska eller laddningsbara AA/R6-batterier av samma typ i batterifacket (vänd batterierna enligt bilderna på... -
Page 35: Ttl-Blixtautomatik
• TTL-automatiken reglerar nu automatiskt ljusmängden och säkerställer en korrekt exponering. • Om du får en över- eller underexponerad bild, reglerar du exponeringen enklast genom att justera bländar- eller ISO-inställningen i kameran. TIPS: Med kamerans nedbländningsfunktion kan du enkelt se hur respektive bländarinställning i kameran påverkar skärpedjupet i ditt motiv (kräver kamera med nedbländningsfunktion/skärpedjupskontroll). -
Page 36: Inställningsljus/Modelleringsblixt
tillgängliga blixtsynkroniseringstid får man inte underskrida, detta för att undvika att endast delar av bilden exponeras eller att annan felfunktion uppkommer. Vid användandet av DÖRR Macro TTL-blixt i TTL-läge ställer kameran normalt automatiskt in korrrekt blixtsynkroniseringtid. 3.11 Inställningsljus/modelleringsblixt Med inställningsljusfunktionen kan du se, redan innan exponeringen, om motivet är korrekt belyst eller om det uppkommer oönskade skuggor eller reflektioner. - Page 37 Notizen / Notes...
- Page 38 Notizen / Notes...
- Page 39 Notizen / Notes...
- Page 40 Macro Flash DMF-15 DÖRR GmbH Postfach 128 • 89202 Neu-Ulm/Germany Fon +49 731 97037-0 • Fax +49 731 97037-37 info@doerrfoto.de • www.doerrfoto.de www.doerrfoto.de...