Publicité
Les langues disponibles
Les langues disponibles
Liens rapides
EN
EN : This product is only suitable for well insulated rooms or occasional use. DE : Dieses Produkt ist nur für gut isolierte Bereiche oder gelegentliche
Verwendung geeignet. FR : Ce produit convient uniquement à des endroits bien isolés ou pour un usage occasionnel. IT : Questo prodotto è
adatto solo per spazi ben isolati o per uso occasionale. ES : Este producto sólo es adecuado para espacios bien aislados o un uso ocasional. NL :
Dit product is uitsluitend geschikt voor goed geïsoleerde ruimten of voor sporadisch gebruik. PL : Produkt ten jest odpowiedni wyłącznie do dobrze
odizolowanych miejsc lub do okazjonalnego użytku. NO : Dette produktet egner seg kun for godt isolerte rom eller sporadisk bruk. RO : Acest
produs este adecvat exclusiv spaţiilor bine ventilate sau utilizării ocazionale. CZ : Tento výrobek je vhodný pouze do dobře izolovaných prostor
nebo k příležitostnému použití. DK : Dette produkt er kun egnet til velisolerede rum eller lejlighedsvis brug. PT : Este produto somente é adequado
para espaços bem isolados ou uso ocasional. SE : Denna produkt är endast avsedd för välisolerade utrymmen eller tillfällig användning. FI : Tämä
tuote soveltuu ainoastaan hyvin eristettyihin tiloihin tai satunnaiseen käyttöön. SK : Tento výrobok je vhodný len pre dobre izolované priestory alebo
na občasné použitie. SI : Ta izdelek je primeren le za dobro izolirane prostore ali za občasno uporabo. HR : Ovaj proizvod je pogodan samo za
dobro izolirane prostore ili povremenu upotrebu. HU : Ez a termék csak jól szigetelt terekhez vagy eseti használatra alkalmas. SV : Denna produkt är
endast lämplig för användning i väl isolerade utrymmen eller enstaka användning.
The product complies with the European Safety Standards EN60335-2-30 and the European Standard Electromagnetic Compatibility (EMC) EN55014, EN60555-2
and EN60555-3. These cover the essential requirements of EEC Directives 2006/95/EC and 2004/108/EC
DE
NL
FR
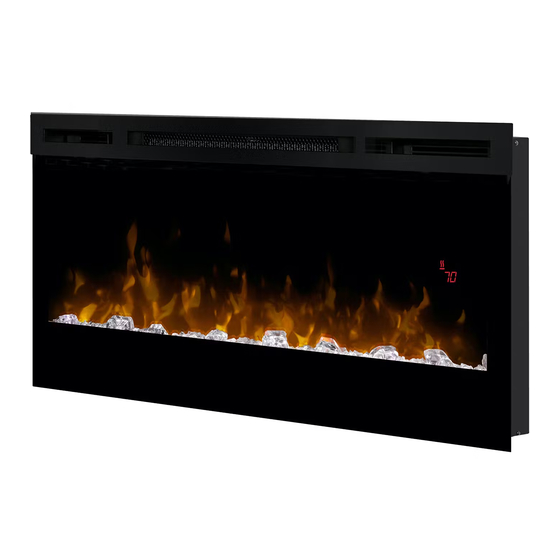
34" Models
50" Models
74" Models
NO
IT
PL
34" Prism (BLF3451EU-E)
Wickson (BLF34EU-E)
50" Prism (BLF5051EU-E)
Synergy (BLF50EU-E)
74" Prism (BLF7451EU-E)
Galveston (BLF74EU-E)
RO
ES
08/ 53710/0 (EU)
Issue 1
Publicité

Manuels Connexes pour Dimplex 34 Prism


Sommaire des Matières pour Dimplex 34 Prism
- Page 1 34" Models 34" Prism (BLF3451EU-E) Wickson (BLF34EU-E) 50" Models 50" Prism (BLF5051EU-E) Synergy (BLF50EU-E) 74" Models 74" Prism (BLF7451EU-E) Galveston (BLF74EU-E) EN : This product is only suitable for well insulated rooms or occasional use. DE : Dieses Produkt ist nur für gut isolierte Bereiche oder gelegentliche Verwendung geeignet.
- Page 2 34" Models: 34" Prism (BLF3451EU-E) / Wickson (BLF34EU-E) 50" Models: 50" Prism (BLF5051EU-E) / Synergy (BLF50EU-E) 74" Models: 74" Prism (BLF7451EU-E) / Galveston (BLF74EU-E)
- Page 3 BLF: Wickson (BLF34EU-E) Synergy (BLF50EU-E) Galveston (BLF74EU-E) PRISM: 34" Prism (BLF3451EU-E) 50" Prism (BLF5051EU-E) 74" Prism (BLF7451EU-E)
- Page 6 IMPORTANT: THESE INSTRUCTIONS SHOULD BE READ CAREFULLY AND RETAINED FOR FUTURE REFERENCE Important Safety Advice If the supply cord is damaged it must be replaced by the manufacturer or service When using electrical appliances, basic agent or similarly qualified person in precautions should be followed to order to avoid a hazard.
- Page 7 Controls: See Fig. 2 & 3 Icon Display Function Description Press once to turn the product ‘ON’. Press a second time to put the product into ‘STANDBY’ Power / (When returning from ‘STANDBY’ mode the product will return to previous settings unless the product Standby has been plugged out, in which case it will reset to factory settings) Press multiple times to change the ‘SLEEP TIMER’...
- Page 8 Fitting Product - see Fig. 4 - 11 • Remove two Phillips screws from each of the two glass brackets (Fig. 6) marked (A). • Remove glass brackets (Fig. 6) marked (B). There are three possible mounting meathods 1. Surface Mounting •...
- Page 9 Battery Information - See Fig. 3 3. Lift fireplace and insert into opening (Fig. 9). 1. To activate the remote control remove the clear battery 4. Use bubble level (supplied) to level the fireplace within isolation strip at the base of the remote control, which the framing.
- Page 10 WICHTIG: DIESE ANWEISUNGEN SORGFÄLTIG LESEN UND AUFBEWAHREN Wichtige Sicherheitshinweise nicht auf Hochflor-Teppichen zu benutzen oder auf Teppichen mit langen Fasern. Bei der Benutzung von elektrischen Wenn das Stromkabel beschädigt ist, muss Anwendungen sollten die grundlegenden es durch den Hersteller oder Dienstleister Sicherheitsmaßnahmen befolgt werden, oder eine ähnlich qualifizierte Person ersetzt um das Risiko für Feuer, Stromschlag oder...
- Page 11 Recycling Siehe Abb. 2 & 3 Passend Display Reinigung Wartung Einmal drücken, um das Gerät einzuschalten („ON“). Noch einmal drücken, um das Gerät auf „STANDBY“ zu schalten. Strom / (Nach dem „STANDBY“ Modus kehrt das Gerät zum vorherigen Modus zurück, es sei denn, es wurde Standby vom Strom getrennt.
- Page 12 PassendeProdukt Siehe Abb. 4 - 11 3. Entfernen Sie das teils reflektierende Glas vom Kamin: • Legen Sie den Kamin auf seinen Rücken. Es gibt drei Montagearten • Entfernen Sie zwei Kreuzschlitzschrauben von jeder der 1. Aufbaumontage beiden Glashalter (Abb. 6, Markierung A). 2.
- Page 13 • Mit der Steckdose verbinden (das Stromkabel aus ACHTUNG: Der Receiver für die Fernbedienung befindet sich der gerahmten Wandöffnung an eine existierende im Display. Halten Sie die Fernbedienung bei der Eingabe in Steckdose anschließen oder eine Steckdose in der Nähe diese Richtung.
- Page 14 BELANGRIJK: DEZE INSTRUCTIES DIENEN ZORGVULDIG DOORGELEZEN EN BEWAARD TE WORDEN VOOR TOEKOMSTIG GEBRUIK. Belangrijke veiligheidsmededeling Hoewel het apparaat aan de veiligheidsnormen voldoet, raden wij het gebruik op hoogpolig Bij gebruik van elektrische apparaten dienen tapijt of langharige kleden af. basisvoorzorgmaatregelen in acht genomen Als het snoer beschadigd is, moet hij vervangen te worden om het risico op brand, elektrische worden door de fabrikant of servicedienst of...
- Page 15 Vaste bedrading In bepaalde jurisdicties wordt deze toepassing zonder stekker geleverd. Dit gebeurt om aan plaatselijke regels te voldoen. In dergelijke gevallen dient dit apparaat te worden geïnstalleerd door een goed gekwalificeerde installateur en men moet de middelen voor het verbreken van de verbinding opnemen in de vaste bedrading, zoals geldt volgens de plaatselijke regels voor bedrading.
- Page 16 Plaatsing product Zie afb. 4 - 11 3. Verwijder het gedeeltelijk reflecterend glas uit de kachel: • leg de kachel op zijn rug. Er zijn drie mogelijke plaatsingsmethoden • Verwijder de twee kruiskopschroeven uit elk van de twee 1. Plaatsen op oppervlak glasbeugels (afb.
- Page 17 2. Draai om de batterij van de afstandsbediening te vervangen WAARSCHUWING: Zorg ervoor dat de stroom van het circuit deze om en volg het diagram dat is aangebracht op de waarop de kachel wordt geplaatst is uitgeschakeld via het afstandsbediening. servicepaneel tot de installatie is voltooid.
- Page 18 IMPORTANT : LIRE ATTENTIVEMENT CES INSTRUCTIONS ET LES CONSERVER SOIGNEUSEMENT POUR RÉFÉRENCE ULTÉRIEURE Conseils de sécurité importants Bien que cet appareil respecte les normes de sécurité, nous ne recommandons pas Lors de l'utilisation d'appareils électriques, son utilisation sur des tapis à poils profonds t o u j o u r s p r e n d r e d e s p r é...
- Page 19 Commandes : Voir Fig. 2 & 3 Icône Affichage Fonction Description Appuyez une fois sur « ON » pour allumer le produit. Appuyez une seconde fois pour mettre le produit en « VEILLE » Marche / Veille (En retournant du mode « STANDBY », le produit reviendra aux réglages précédents à moins que le produit a été...
- Page 20 Raccordementdu produit - Voir Fig. 4 - 11 3. Retirez le verre réfléchissant partiellement de la cheminée : • Posez la cheminée sur le dos. Il existe trois méthodes de montage possibles • Retirer les deux vis cruciformes de chacun des deux 1.
- Page 21 • Câblez solidement la cheminée. REMARQUE : Le récepteur de la télécommande se trouve dans l'affichage. Orientez la télécommande dans cette AVERTISSEMENT : Ne tentez pas de brancher vos propres direction lors de la saisie des commandes. prises ou circuits. Pour réduire les risques d'incendie, Ne pas appuyer sur les boutons plus d'une fois dans les deux d'électrocution ou de blessures, faites toujours recours à...
- Page 22 VIKTIG: DISSE INSTRUKSJONENE MÅ LESES NØYE OG OPPBEVARES FOR FREMTIDIG REFERANSE. Viktig sikkerhetsrådgivning Hvis strømledningen er skadet, må den skiftes ut av produsenten eller Ved bruk av elektriske apparater bør forhandleren eller tilsvarende kvalifisert grunnleggende forholdsregler følges for person for å unngå fare. å...
- Page 23 Kontroller: Se fig. 2 og 3 Ikon Skjerm Funksjon Beskrivelse Trykk en gang for å slå produktet ”PÅ”. Trykk en gang til for å sette produktet inn i ”VENTEMODUS” Strøm / (Når det kommer tilbake fra ”VENTEMODUS”, går produktet tilbake til forrige innstillinger, ventemodus med mindre produktet er koblet fra, i så...
- Page 24 Monterng av produkt - se fig. 4 - 11 • Fjern glassbeslagene (figur 6) merket (B). • Med en hånd som holder trykket på det delvis Det er tre mulige monteringmetoder reflekterende glasset, vipp opp peisen i oppreist stilling 1. Overflatemontering og litt fremover slik at det delvis reflekterende glasset 2.
- Page 25 Batteriinformasjon - Se fig. 3 3. Løft peisen og sett inn i åpningen (figur 9). 1. For å aktivere fjernkontrollen, fjern fjernkontrollens 4. Bruk vater (følger med) for å justere peisen i rammen. isolasjonsstrimmel på undersiden av fjernkontrollen, som Juster etter behov. brukes til å...
- Page 26 IMPORTANTE: LE PRESENTI ISTRUZIONI DEVONO ESSERE LETTE CON ATTENZIONE E CONSERVATE PER USO FUTURO Importanti informazioni sulla sicurezza Se il cavo di alimentazione è danneggiato, deve essere sostituito dal produttore o Quando si utilizzano apparecchiature dall'addetto di assistenza o personale elettriche, è...
- Page 27 Comandi: Vedere Fig. 2 e 3 Icona Schermo Funzione Descrizione Premere una volta per accendere (ON) il prodotto. Accensione / Premere una seconda volta per porre la stufa in modalità STANDBY Standby (Quando la stufa esce dalla modalità STANDBY, tornerà alle impostazioni precedenti, a meno che non sia stata disconnessa dalla presa di rete, nel qual caso si ripristinerà...
- Page 28 Installazione prodotto - vedere Fig. 4 - 11 • Rimuovere le staffe del vetro (Fig. 6) contrassegnate (B). • Con una mano che preme sul vetro parzialmente riflettente, portare la stufa in posizione verticale e leggermente Sono possibili tre metodi di montaggio diversi in avanti per consentire al vetro parzialmente riflettente 1.
- Page 29 Informazioni sulla batteria: Vedere Fig. 3 AVVERTENZA: Accertarsi che il circuito su cui sarà installata 1. Per attivare il telecomando, rimuovere la striscia trasparente la stufa disponga di interruttore di circuito sul pannello isolante della batteria alla base del telecomando, utilizzata di servizio fino a installazione completata.
- Page 30 WAŻNE: NALEŻY UWAŻNIE PRZECZYTAĆ TĘ INSTRUKCJĘ I ZACHOWAĆ JĄ W CELU WYKORZYSTANIA W PRZYSZŁOŚCI Zasady bezpieczeństwa Jeżeli przewód zasilający jest uszkodzony, powinien zostać wymieniony przez W celu zmniejszenia ryzyka pożaru, producenta lub zakład serwisowy lub porażenia lub innych urazów podczas inną...
- Page 31 Elementy sterowania: patrz rys. 2 i 3 Ikona Wyświ- Funkcja Opis etlacz Naciśnij jeden raz, aby włączyć urządzenie. Zasilanie / Naciśnij drugi raz, aby przejść w tryb spoczynku. Tryb (Po uruchomieniu z trybu spoczynku przywrócone zostaną ostatnie ustawienia, z wyjątkiem spoczynku przypadku odłączenia od zasilania, kiedy to urządzenie powróci do ustawień...
- Page 32 Montażproduktu - patrzrys. 4 - 11 3. Zdjąć półprzepuszczalną szybę z kominka: • Położyć kominek na ściance tylnej. Produkt można zamontować na trzy sposoby. • Wykręcić po dwa wkręty z gniazdem krzyżowym 1. Montaż naścienny z obydwu wsporników szyby (rys. 6), szczegół (A). 2.
- Page 33 Aby zapewnić prawidłową pracę, nie naciskać przycisków OSTRZEŻENIE: Nie należy próbować samodzielnego częściej niż raz na dwie sekundy. montażu nowych gniazd ani obwodów. W celu zmniejszenia ryzyka pożaru, porażenia prądem lub innych obrażeń należy Informacje o baterii - patrz rys. 3 korzystać...
- Page 34 IMPORTANTE: LEA ATENTAMENTE ESTAS INSTRUCCIONES Y CONSÉRVELAS PARA FUTURAS CONSULTAS Aviso importante sobre seguridad servicio o persona con cualificación similar para evitar peligros. Al utilizar aparatos eléctricos, deberán PRECAUCIÓN: Para evitar peligros debido adoptarse precauciones básicas para reducir al reinicio involuntario del desconectador riesgos de incendio, descarga eléctrica térmico, este aparato no debe recibir y lesiones personales, como por ejemplo:...
- Page 35 Controles: Consulte las Figs. 2 y 3 Icono Pantalla Función Descripción Pulse el botón una vez para ENCENDER el producto. Pulse una segunda vez para poner el producto “EN ESPERA” Encendido / (Al desactivar el modo “EN ESPERA”, el producto recuperará la configuración anterior a menos En espera que se haya desenchufado, en cuyo caso recuperará...
- Page 36 Ajustedelproducto - Consulte la Fig. 4 - 11 • Retire los soportes de cristal (Fig. 6), marca (B). • Ejerciendo presión con una mano en el cristal Existen 3 métodos de montaje posibles parcialmente reflectante, incline la parte superior de 1.
- Page 37 Información sobre las pilas - Consulte la Fig. 3 ADVERTENCIA: Asegúrese de que la corriente del circuito 1. Para activar el mando a distancia, elimine la cinta de en el que se va a instalar la chimenea permanece cortada en el panel de servicio hasta que la instalación se haya aislamiento de las pilas de la parte inferior del mismo, que completado.
- Page 38 IMPORTANT: ACESTE INSTRUCȚIUNI TREBUIE CITITE CU ATENȚIE ȘI PĂSTRATE PENTRU CONSULTARE ULTERIOARĂ Recomandări importante acestuia pe carpete groase sau pe covoare referitoare la siguranță cu fire lungi. În cazul în care cablul de alimentare este Pentru a se reduce riscul de incendiu, deteriorat, acesta trebuie înlocuit de către electrocutare şi vătămare a persoanelor, producător, un tehnician de service sau...
- Page 39 Comenzi: Consultați Fig. 2 şi 3 Pictogramă Afișaj Funcție Descriere Apăsați o singură dată pentru a „PORNI” aparatul. Apăsați a doua oară pentru a pune aparatul în „AȘTEPTARE” Alimentare / (După revenirea din modul „AȘTEPTARE”, aparatul va reveni la setările anterioare, cu excepția cazului Așteptare în care a fost scos din priză, când va reveni la setările din fabrică) Cronometru...
- Page 40 Accesor- consultaţi Fig. 4 - 11 • Cu o mână puneți presiune pe sticla parțial reflectorizantă, înclinați șemineul în poziție verticală și ușor spre înainte, pentru a permite sticlei să cadă din cadrul interior. Există trei metode de montare posibile 1.
- Page 41 Informații privind bateria - Consultați Fig. 3 3. Ridicați șemineul și introduceți-l în degajare (Fig. 9). 1. Pentru a activa telecomanda, scoateți banda de izolare a bateriei 4. Utilizați nivela (furnizată) pentru a asigura orizontalitatea de la baza telecomenzii care este folosită pentru a asigura livrarea șemineul în cadru.