Table des Matières
Publicité
Les langues disponibles
Les langues disponibles
Liens rapides
D
Uhrenradio mit Leselampefunktion
NL
Klokradio met leeslampfunctie
F
Radio réveil avec fonction de lampe de lecture
E
Radio despertador con función de lámpara de lectura
I
Radiosveglia con funzione luce di lettura
GB
Clock Radio with Reading Lamp Function
PL
Radio z zegarem i funkcją lampki do czytania
H
Órás rádió olvasólámpa funkcióval
UHRENRADIO
MIT LESELAMPE-
FUNKTION
MRC 4147 L
Bedienungsanleitung/Garantie
04
10
15
20
25
30
35
41
Publicité
Table des Matières

Manuels Connexes pour AEG MRC 4147 L


Sommaire des Matières pour AEG MRC 4147 L
-
Page 1: Table Des Matières
Radiosveglia con funzione luce di lettura Istruzioni per l’uso Clock Radio with Reading Lamp Function Instruction Manual Radio z zegarem i funkcją lampki do czytania Instrukcja obsługi Órás rádió olvasólámpa funkcióval Használati utasítás UHRENRADIO MIT LESELAMPE- FUNKTION MRC 4147 L... - Page 2 Inhalt Deutsch Italiano Inhalt Indice Übersicht der Bedienelemente ........Seite 3 Elementi di comando.............Pagina 3 Bedienungsanleitung ............Seite 4 Istruzioni per l’uso............Pagina 25 Technische Daten ............... Seite 8 Dati tecnici ................Pagina 29 Garantie ................Seite 8 Smaltimento ..............Pagina 29 Entsorgung ................
-
Page 3: Übersicht Der Bedienelemente
Übersicht der Bedienelemente Overzicht van de bedieningselementen • Liste des différents éléments de commande Indicación de los elementos de manejo • Elementi di comando • Overview of the Components Przegląd elementów obsługi • A kezelőelemek áttekintése... -
Page 4: Bedienungsanleitung
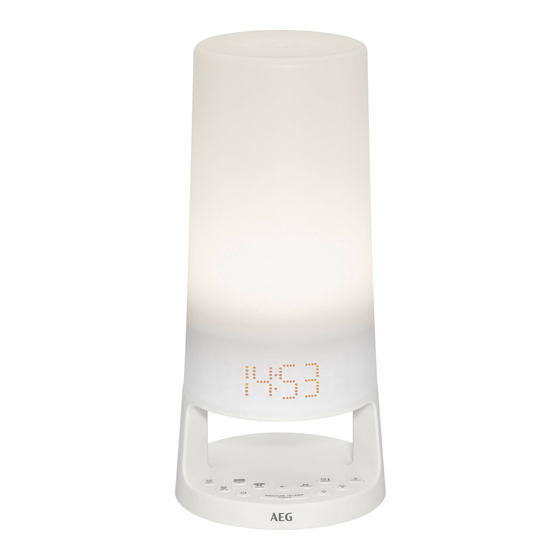
Deutsch Bedienungsanleitung • Verdecken Sie keine Lüftungsöffnungen mit Gegenstän- den, wie z.B. Zeitschriften, Tischdecken, Vorhängen usw. Vielen Dank, dass Sie sich für unser Produkt entschieden • Setzen Sie das Gerät keinem Tropf- oder Spritzwasser aus haben. Wir wünschen Ihnen viel Freude mit dem Gerät. und stellen Sie keine mit Flüssigkeiten gefüllten Gefäße, wie z.B. - Page 5 Deutsch Übersicht der Bedienelemente 5 FM (Radiobetrieb) 6 Display 1 AL1 (aktivierte Weckfunktion 1) 7 AL2 (aktivierte Weckfunktion 2) 2 LINE IN (Audiokabel an LINE IN Buchse ist angeschlos- 8 Stimmungslicht sen) 9 DC 5V USB CHARGING Buchse 3 PM (Anzeige für „Nachmittags“ bei 12 Std. Anzeige) 10 LINE IN Buchse 4 Lampenschirm 11 Festangeschlossenes Netzteil...
- Page 6 Deutsch Leselampenfunktion HINWEIS: 1. Drücken Sie Taste (19), um die Funktion einzuschalten. • Eine Wiedergabe von Audiodateien ist über diese 2. Mit der Taste (20) erhöhen Sie die Helligkeit. Mit der Buchse nicht möglich. Taste (21) verringern Sie die Helligkeit. 3.
- Page 7 Deutsch Weckfunktion 7a. Wenn Sie sich mit einem Radiosender wecken lassen wollen, wählen Sie die maximale Wecklautstärke mit den Einstellen der Weckzeit (im Standby) Tasten aus. 8. Drücken Sie die Taste zur Bestätigung. Wählen Sie an- Sie haben die Möglichkeit zwei Weckzeiten einzustellen. Es schließend aus, mit welcher Lichtintensität ( ) Sie geweckt stehen Ihnen dabei jeweils 4 verschiedene Weckoptionen zur werden möchten.
-
Page 8: Technische Daten
2. Schalten Sie das Gerät mit der Taste (23) ein. Die Mel- dung LINE IN erscheint im Display. Hiermit erklärt der Hersteller, dass sich das Gerät MRC 4147 L 3. Starten Sie die Wiedergabe an Ihrer Audioquelle. Über in Übereinstimmung mit den folgenden Anforderungen be- die Lautsprecher hören Sie die Tonwiedergabe. -
Page 9: Entsorgung
Deutsch 3. Mängel müssen innerhalb von 14 Tagen nach Erkenn- Bitte vergessen Sie nicht, dem Gerät eine Kopie Ihres Kaufbe- barkeit uns gegenüber schriftlich angezeigt werden. leges (Kassenbon, Rechnung, Lieferschein) als Garantienach- Besteht der Garantieanspruch zu Recht, entscheiden wir, weis beizulegen, da wir sonst keine kostenlosen Garantieleis- auf welche Art der Schaden/Mangel behoben werden tungen erbringen können. -
Page 10: Gebruiksaanwijzing
Nederlands Gebruiksaanwijzing • Vuurbronnen met open vlam zoals brandende kaarsen mogen niet op het apparaat worden geplaatst. Dank u voor uw keuze van dit product. We hopen dat u er • Open nooit de behuizing van het apparaat. Door on- veel plezier van beleeft. - Page 11 Nederlands 5 FM (radiomodus) 9 DC 5 V USB-CHARGING-aansluiting 6 Scherm 10 LINE IN-aansluiting 7 AL2 (alarmfunctie 2 geactiveerd) 11 Vaste lichtnetadapter 8 Sfeerverlichting 12 Draadantenne (FM) Toetsen voor de bediening Volume verlagen / instellen/activeren/deactiveren alarm 1 Schakel sfeerverlichting aan/uit Weergave jaar/datum / selecteren temperatuureenheid Vorige voorkeuzestation radio Zoek naar het volgende radiostation / selecteer zomertijd/normale tijd / “dutje”functie...
- Page 12 Nederlands Weergave van diverse informatie OPMERKING: 1. Schakel het apparaat op stand-by met behulp van de • De invoer wordt automatisch na ongeveer 30 seconden toets (23). opgeslagen als er geen toets wordt ingedrukt. 2. Druk kort en herhaaldelijk op de toets (15).
- Page 13 Nederlands • 1-5 = Maandag tot Vrijdag Uitschakelen van het weksignaal • 1-7 = Maandag tot Zondag Druk op de -toets (23) om het alarm uit te schakelen. • 6-7 = Zaterdag tot Zondag • 1-1 = Een Dag van de Week Automatische wekinterval 6a.
-
Page 14: Technische Gegevens
LINE IN- gaat af, ook al IN-aansluiting aansluiting is er “radio” geselecteerd Technische gegevens Model: ................MRC 4147 L Spanningstoevoer: ........100-240 V~ 50/60 Hz Opgenomen vermogen: ............7 W Batterij gangreserve: ............3 V, CR2032 Beschermingsklasse:................II Nettogewicht: ............ong. 0,502 kg Radio-element: Frequentiebereiken: ......FM 87,5 ~ 108,0 MHz... -
Page 15: Mode D'emploi
Français Mode d’emploi • N’exposez pas l’appareil aux éclaboussures ou aux gouttes d’eau et ne placez aucun récipient rempli de Merci d’avoir choisi notre produit. Nous espérons que vous liquide tel que, p.ex. des vases remplis de fleurs, sur saurez profiter votre appareil. l’appareil. - Page 16 Français Liste des différents éléments de com- 5 FM (mode radio) 6 Écran mande 7 AL2 (fonction alarme 2 activée) 8 Éclairage d’ambiance 1 AL1 (fonction alarme 1 activée) 9 Port DC 5 V USB CHARGING 2 LINE IN (câble audio branché à la prise LINE IN) 10 Prise LINE IN 3 PM (indique “après-midi”...
- Page 17 Français Éclairage d’ambiance heures et les minutes avec les boutons (17) et (15). 1. Appuyez sur le bouton (14) pour activer l’éclairage • Dans chaque cas, confirmez l’entrée avec le bouton d’ambiance (8). L’éclairage changera de couleurs. . L’indication actuelle devant être réglée clignote 2.
- Page 18 Français 3. Utilisez les boutons (17) et (15) pour le réglage. Pour régler la deuxième heure d’alarme, répétez les étapes 4. Appuyez sur le bouton pour confirmer. Les minutes ci-dessus avec le bouton (24). commencent à clignoter. NOTE : 5. Utilisez les boutons pour le réglage.
-
Page 19: Données Techniques
Français Prise AUX IN Données techniques (Câble non inclus) Modèle : .................MRC 4147 L Alimentation : ..........100-240 V~ 50/60 Hz 1. Si besoin est, utilisez un adaptateur approprié (non Consommation : ................7 W fourni). Pile relais : ................3 V, CR2032 Connectez l’appareil externe comme suit :... -
Page 20: Instrucciones De Servicio
Español Instrucciones de servicio • No obture las aperturas de ventilación con objetos como periódicos, manteles, cortinas, etc. Le agradecemos la confianza depositada en este producto y • No exponga el dispositivo a goteo ni salpicaduras de esperamos que disfrute de su uso. agua, ni coloque objetos llenos de agua, como jarrones, sobre el dispositivo. - Page 21 Español Indicación de los elementos de manejo 5 FM (modo de radio) 6 Pantalla 1 AL1 (función de alarma 1 activada) 7 AL2 (función de alarma 2 activada) 2 LINE IN (cable de audio conectado a la toma LINE IN) 8 Luz tenue 3 PM (indicación para “tarde”...
- Page 22 Español Configurar el reloj Función de luz de lectura 1. Pulse el botón (19) para activar la función. 1. Use el botón (23) para poner el dispositivo en espera. 2. Use el botón (20) para aumentar el brillo. Use el botón 2.
- Page 23 Español 1. Pulse el botón (13). Se mostrará la hora de alarma 9. Para terminar, pulse otra vez el botón . La primera establecida actualmente. alarma estará activada. 2. Mantenga pulsado el botón durante aprox. 3 segun- Para establecer la segunda hora de alarma, repita los pasos dos cuando se muestre la hora de alarma.
-
Page 24: Datos Técnicos
Español Clavija AUX IN Datos técnicos (Cable no incluido) Modelo: ................MRC 4147 L Suministro de tensión: ......... 100-240 V~ 50/60 Hz 1. Si fuera necesario, emplee un adaptador apropiado (no Consumo de energía: ..............7 W incluido con el producto). Pila de reserva: ...............3 V, CR2032 Conecte el dispositivo externo del modo siguiente: Clase de protección: ................II... -
Page 25: Istruzioni Per L'uso
Italiano Istruzioni per l’uso • Non esporre il dispositivo a perdite o schizzi d’acqua e non mettere recipiente con liquidi, ad es. vasi con fiori, Grazie per aver scelto il nostro prodotto. Vi auguriamo un sul dispositivo. buon utilizzo del dispositivo. •... - Page 26 Italiano Elementi di comando 5 FM (modalità radio) 6 Display 1 AL1 (funzione sveglia 1 attivata) 7 AL2 (funzione sveglia 2 attivata) 2 LINE IN (cavo audio connesso alla presa LINE IN) 8 Luce d’atmosfera 3 PM (indica “pomeriggio” in modalità modalità di visualiz- 9 Porta DC 5V CHARGING USB zazione 12 ore) 10 Porta LINE IN...
- Page 27 Italiano 2. Per disattivare la luce d’atmosfera, premere di nuovo il • In ogni caso, confermare l’immissione con il tasto tasto . L’indicazione corrente da impostare lampeggia sul display. Visualizzazione di informazioni diverse NOTA: 1. Passare il dispositivo a standby usando il tasto (23).
- Page 28 Italiano 4. Premere il tasto per confermare. I minuti iniziano a NOTA: lampeggiare. • Se l’orario della sveglia è stato attivato, AL1 (1) o AL2 (7) 5. Usare i tasti per eseguire l’impostazione. comparirà sul display. 6. Ora selezionare i giorni in cui si desidera far suonare la •...
-
Page 29: Dati Tecnici
LINE IN sebbene sia stato seleziona- to “radio” Dati tecnici Modello: .................MRC 4147 L Alimentazione rete: ........100-240 V~ 50/60 Hz Consumo di energia: ..............7 W Batterie di riserva: ............3 V, CR2032 Classe di protezione: ...............II Peso netto: ..............ca. 0, 502 kg Componente della radio: Gamma di frequenza: ......FM 87,5 ~ 108,0 MHz... -
Page 30: Instruction Manual
English Instruction Manual • Exposed ignition sources such as burning candles may not be placed onto the device. Thank you for choosing our product. We hope you will enjoy • Never open the housing of the device. Incorrect repairs using the appliance. can constitute a considerable risk for the user. - Page 31 English 6 Display 9 DC 5V USB CHARGING port 7 AL2 (alarm function 2 activated) 10 LINE IN jack 8 Mood light 11 Fixed power adapter 12 Wire antenna (FM) Control buttons Reduce volume / set/activate/deactivate alarm 1 Turn mood light on/off Display year/date / select temperature unit Previous radio preset Search next radio station / select summer time/normal time / “nap”...
- Page 32 English Displaying diverse information Switching to Summer Time 1. Switch the device to standby using the button (23). 1. Use the button (23) to switch the device to standby. 2. Briefly press the button (15) repeatedly. The following 2. Keep the button (17) depressed to switch between information is displayed in succession: summer time and normal time.
- Page 33 English 7. Press the button to confirm. Then select how you want Deactivate the Alarm Function to be awakened. Select from: 1. Switch the device to standby with the button (23). • “bu” (buzzer): 2. To deactivate the alarm function, keep the button (13) A buzzer sounds when the alarm time is reached.
-
Page 34: Technical Data
IN jack posed of can be obtained from your local authority. dio” has been selected Technical Data Model: ................MRC 4147 L Power supply: ..........100-240 V~ 50/60 Hz Power consumption:..............7 W Battery power reserve: ..........3 V, CR2032 Protection class: ................II Net weight: ............approx. -
Page 35: Instrukcja Obsługi
Język polski Instrukcja obsługi • Urządzenia nie należy wystawiać na działanie kapiącej ani rozchlapującej się wody, a także nie należy na nim Dziękujemy za wybór naszego produktu. Mamy nadzieję, że stawiać naczyń wypełnionych płynami, takich jak wazony z korzystanie z urządzenia sprawi Państwu radość. kwiatami. - Page 36 Język polski Przegląd elementów obsługi 5 FM (tryb radiowy) 6 Wyświetlacz 1 AL1 (aktywna funkcja 1 alarmu) 7 AL2 (aktywna funkcja 2 alarmu) 2 LINE IN (kabel audio podłączony do gniazdka typu jack 8 Światło nastrojowe LINE IN) 9 Port DC 5V USB CHARGING (ładowanie) 3 PM (wskazanie “popołudnia”...
- Page 37 Język polski Ustawienia zegara Światło nastrojowe 1. Nacisnąć przycisk (14) w celu włączenia nastrojowego 1. Za pomocą przycisku (23) przełączyć urządzenie do światła (8). Lampa będzie się świeciła, zmieniając kolory trybu czuwania. światła. 2. Wcisnąć i przytrzymać przycisk (18) do momentu 2.
- Page 38 Język polski Funkcja budzenia WSKAZÓWKA: Światło wewnątrz klosza lampy (4) wyłączy się na 30 Ustawianie czasu budzenia (w trybie pogotowia) minut przed przed ustawionym czasem alarmu. Jasność Zegar posiada możliwość ustawienia dwóch czasów dla załą- światła będzie stopniowo wzrastała, począwszy od czenia się...
-
Page 39: Dane Techniczne
Dane techniczne • Po upływie wybranego czasu, będzie pojawiał się szybko rosnący sygnał dźwiękowy. Za pomocą przycisku (23) Model: ................MRC 4147 L wyłączyć sygnał dźwiękowy. Napięcie zasilające: ........100-240 V~ 50/60 Hz Pobór mocy: .................7 W Gniazdko typu jack AUX IN Bateria rezerwowa: ............3 V, CR2032... -
Page 40: Usuwanie
Język polski • roszczeń z tytułu parametrów technicznych wyrobu, o ile są one zgodne z podanymi przez producenta, • prawidłowego zużycia i uszkodzeń, które mają nieistotny wpływ na wartość lub działanie tego urządzenia. Karta gwarancyjna bez pieczątki sklepu, daty sprzedaży, nie Usuwanie wypełniona, źle wypełniona, ze śladami poprawek, nieczy- telna wskutek zniszczenia, bez możliwości ustalenia miejsca... -
Page 41: Használati Utasítás
Magyarul Használati utasítás • Ne takarja le a szellőzőnyílásokat különböző tárgyakkal, pl. újságokkal, asztalterítővel, függönnyel stb. Köszönjük, hogy a termékünket választotta. Reméljük, elége- • Ne tegye ki a készüléket csepegő vagy fröccsenő víznek detten használja majd a készüléket. és ne helyezzen folyadékokkal töltött edényeket, pl. virágvázát a készülékre. - Page 42 Magyarul A kezelőelemek áttekintése 6 Kijelző 7 AL2 (2. ébresztő funkció aktiválva van) 1 AL1 (1. ébresztő funkció aktiválva van) 8 Hangulatvilágítás 2 LINE IN (audiokábel van csatlakoztatva a LINE IN aljzatba) 9 DC 5 V USB CHARGING töltőport 3 PM (a „délután” jelzése a 12 órás kijelzés esetén) 10 LINE IN csatlakozó...
- Page 43 Magyarul Az óra beállítása Hangulatvilágítás 1. Nyomja meg a gombot (14) a hangulatvilágítás (8) be- 1. Nyomja meg a gombot (23) a készülék készenléti kapcsolásához. A lámpa különböző színekben váltakozva üzemmódba kapcsolásához. fog világítani. 2. Tartsa lenyomva a gombot (18) amíg az év kijelzés 2.
- Page 44 Magyarul Ébresztési funkció MEGJEGYZÉS: A lámpaburában (4) lévő lámpa az előre beállított Az ébresztési idő beállítása (készenléti üzemmódban) ébresztési idő előtt 30 perccel bekapcsol. A fényerő Két ébresztési időt állíthat be. 4 különböző ébresztési opció fokozatosan nő majd, az előzőleg beállított intenzitási érhető...
-
Page 45: Műszaki Adatok
Magyarul Műszaki adatok kezd. Válasszon a 90 - 10 perc vagy az OFF (ki) beállítások között 10 perces ugrásokkal. Modell: ................MRC 4147 L • A kiválasztott idő elteltekor egy folyamatosan erősödő sí- polás lesz hallható. A gomb (23) segítségével kapcsolja Feszültségellátás: ......... - Page 46 MRC 4147 L Elektro-technische Vertriebsges. mbH www.etv.de...