Table des Matières

Publicité

Les langues disponibles
  • FR

Les langues disponibles

  • FRANÇAIS, page 9

Liens rapides

Installation and operating instructions
Notice de montage et de mise en service Montage- en bedrijfsinstructies
Instrucciones de montaje y uso
EA-Nr.:
FAR-Best.-Nr.:
EA-Nr.:
FAR-Best.-Nr.:
Franke Aquarotter GmbH, Germany
ZMI_001_2000100431-ZAQUA015_#SALL_#AQU_#V3.fm/21.02.08
Istruzioni per il montaggio e l'uso
Montaż i instrukcja obsługi
7612982073236
2000100431
ZAQUA015
7612982095733
2000104443
ESHOW0014
DE
EN
FR
ES
IT
NL
PL
SV
CS
FI
RU

Publicité

Table des Matières
loading

Sommaire des Matières pour Franke ZAQUA015

  • Page 1 Istruzioni per il montaggio e l’uso Notice de montage et de mise en service Montage- en bedrijfsinstructies Instrucciones de montaje y uso Montaż i instrukcja obsługi EA-Nr.: 7612982073236 FAR-Best.-Nr.: 2000100431 ZAQUA015 EA-Nr.: 7612982095733 FAR-Best.-Nr.: 2000104443 ESHOW0014 Franke Aquarotter GmbH, Germany ZMI_001_2000100431-ZAQUA015_#SALL_#AQU_#V3.fm/21.02.08...
  • Page 2 ...................3 Please refer to the graphics in the German Installation and Operating Instructions..................9 Les graphiques sont disponibles dans la notice de montage et de mise en service allemande..................15 Por favor, consulte los gráficos en las instrucciones alemanas de montaje y uso.
  • Page 3: Table Des Matières

    0English Solenoid-valve Cartridge A3000 open as a Retrofit Kit and Spare Parts Kit ZAQUA015 ....without Adapter (A3000 open, from 2007) ESHOW0014....with Adapter (A3000, up to 2007) Please refer to the graphics in the German Installation and Operating Instructions.
  • Page 4: Key

    Warning! Failure to observe can cause mortal danger or bodily injury. Important! Failure to observe can cause material damages. ☞ Important! Failure to observe can cause the product to malfunction. ☞ Useful information for optimally handling the product. Warranty Liability is accepted according to the General Terms and Conditions of Business and Supply.
  • Page 5: Installation Of Fitting For In-Wall Installation (2-Part Function Block)

    Installation of Fitting for In-wall Installation (2-part Function Block) Remove the cover plate. ☞ For further details please consult the Installation and Operating Instructions for the fitting. Use a hollow hexagon wrench to close the water volume regulators. a: closed b: open Trigger the valve.
  • Page 6: Installation Of Fitting For In-Wall Installation (1-Part Function Block)

    Installation of Fitting for In-wall Installation (1-part Function Block) Remove the cover plate. ☞ For further details please consult the Installation and Operating Instructions for the fitting. Use a hollow hexagon wrench to close the water volume regulators. a: closed b: open Trigger the valve.
  • Page 7: Assembly Of Shower Panel (2-Part Function Block)

    Assembly of Shower Panel (2-part Function Block) Remove the stainless steel housing or open the glass front. ☞ For further details please consult the Installation and Operating Instructions for the fitting. Use a hollow hexagon wrench to close the water volume regulators. a: closed b: open Trigger the valve.
  • Page 8 10. Assembly of Shower Panel (2-part Function Block) 10.1 Remove the stainless steel housing or open the glass front. ☞ For further details please consult the Installation and Operating Instructions for the fitting. 10.2 Use a hollow hexagon wrench to close the water volume regulators. a: closed b: open 10.3 Trigger the valve.
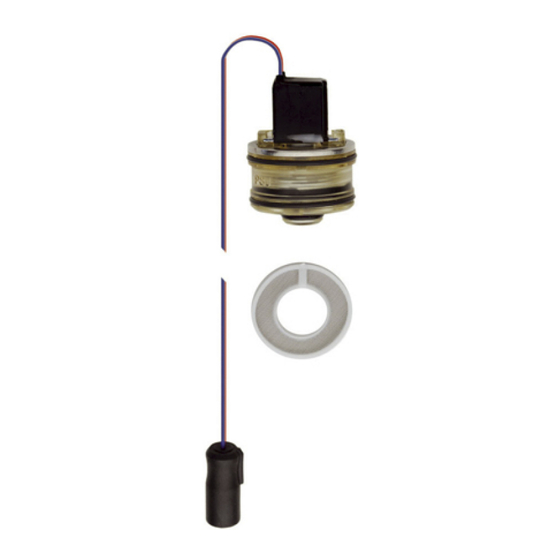
  • Page 9 Cartouche A3000 open d’électrovanne magnétique en kit d’équipement ultérieur ou pièce de rechange ZAQUA015 ....sans adaptateur (A3000 open, à partir de 2007) ESHOW0014....avec adaptateur (A3000 open, à partir de 2007) Les graphiques sont disponibles dans la notice de montage et de mise en service allemande.
  • Page 10: Explication Des Pictogrammes

    Explication des pictogrammes Avertissement ! Le non-respect des consignes peut entraîner un danger mortel ou des blessures corporelles. Attention ! Le non-respect des consignes peut entraîner des dommages matériels. ☞ Important ! Le non-respect des consignes peut entraîner des dysfonctionnements du produit. ☞...
  • Page 11: Montage Robinetterie Pour Montage Mural (Bloc De Fonctionnement En 2 Pièces)

    Montage robinetterie pour montage mural (bloc de fonctionnement en 2 pièces) Retirer la plaque de recouvrement. ☞ Vous trouverez des détails dans la notice de montage et de mise en service de la robinetterie. Fermer les régulations du débit d’eau à l’aide d’une clé mâle coudée pour vis à six pans creux.
  • Page 12: Montage Robinetterie Et Pour Montage Mural

    Montage robinetterie et pour montage mural (bloc de fonctionnement en 1 pièce) Retirer la plaque de recouvrement. ☞ Vous trouverez des détails dans la notice de montage et de mise en service de la robinetterie. Fermer les régulations du débit d’eau à l’aide d’une clé mâle coudée pour vis à six pans creux.
  • Page 13: Montage Panneau De Douche (Bloc De Fonctionnement En 2 Pièces)

    Montage panneau de douche (bloc de fonctionnement en 2 pièces) Retirer le boîtier en inox ou ouvrir la façade en verre. ☞ Vous trouverez des détails dans la notice de montage et de mise en service de la robinetterie. Fermer les régulations du débit d’eau à l’aide d’une clé mâle coudée pour vis à six pans creux.
  • Page 14: Montage Panneau De Douche (Bloc De Fonctionnement En 1 Pièce)

    10. Montage panneau de douche (bloc de fonctionnement en 1 pièce) 10.1 Retirer le boîtier en inox ou ouvrir la façade en verre. ☞ Vous trouverez des détails dans la notice de montage et de mise en service de la robinetterie.
  • Page 15 ZAQUA015 ....sin adaptador (A3000 open, a partir de 2007) ESHOW0014....con adaptador (A3000, hasta 2007) Por favor, consulte los gráficos en las instrucciones alemanas de montaje y servicio.
  • Page 16 Aclaración gráfica ¡Aviso! La no observación puede ser causa de un peligro mortal o de una lesión corporal. ¡Atención! La no observación puede tener como consecuencia daños materiales. ☞ ¡Importante! La no observación puede tener como consecuencia fallos en el funcionamiento del producto.
  • Page 17 Montaje de grifería para empotramiento en pared (bloque de función de 2 partes) Quitar la placa de cubierta. ☞ En las Instrucciones de montaje y servicio de la grifería puede encontrar más detalles. Cerrar los reguladores de cantidad de agua con una llave de hexágono hembra. a: cerrado b: abierto Desmontaje de la grifería.
  • Page 18 Montaje de grifería para empotramiento en pared (bloque de función de 1 parte) Quitar la placa de cubierta. ☞ En las Instrucciones de montaje y servicio de la grifería puede encontrar más detalles. Cerrar los reguladores de cantidad de agua con una llave de hexágono hembra. a: cerrado b: abierto Desmontaje de la grifería.
  • Page 19 Montaje del panel de ducha (bloque de función de 2 partes) Retirar la carcasa de acero o abrir la parte frontal de vidrio. ☞ En las Instrucciones de montaje y servicio de la grifería puede encontrar más detalles. Cerrar los reguladores de cantidad de agua con una llave de hexágono hembra. a: cerrado b: abierto Desmontaje de la grifería.
  • Page 20 10. Montaje del panel de ducha (bloque de función de 1 parte) 10.1 Retirar la carcasa de acero o abrir la parte frontal de vidrio. ☞ En las Instrucciones de montaje y servicio de la grifería puede encontrar más detalles. 10.2 Cerrar los reguladores de cantidad de agua con una llave de hexágono hembra.
  • Page 21 Valvola elettromagnetica a cartuccia A3000 open come set di completamento e di ricambio ZAQUA015 ....senza adattatore (A3000 open, a partire dal 2007) ESHOW0014....con adattatore (A3000 fino al 2007) Per le grafiche fare riferimento alle istruzioni per il montaggio e l’uso in tedesco.
  • Page 22: Spiegazione Dei Simboli

    Spiegazione dei simboli Avvertenza! La non osservanza può causare pericolo per la vita o lesioni corporee. Attenzione! La non osservanza può causare danni materiali. ☞ Importante! La non osservanza può causare malfunzionamenti del prodotto. ☞ Informazioni utili per l’uso ottimale del prodotto. Garanzia La garanzia viene accordata conformemente alle nostre condizioni generali di vendita e consegna.
  • Page 23: Montaggio Murale Ad Incasso Della Rubinetteria (Blocco Funzionale In Due Parti)

    7. Montaggio murale ad incasso della rubinetteria (blocco funzionale in due parti) Rimuovere la piastra di copertura. ☞ Per maggiori dettagli, fare riferimento alle istruzioni per il montaggio e l’uso della rubinetteria. Chiudere le regolazioni della portata d’acqua con l’ausilio di una brugola. a: chiusa b: aperta Azionare il rubinetto.
  • Page 24: Montaggio Murale Ad Incasso Della Rubinetteria (Blocco Funzionale Monopezzo)

    8. Montaggio murale ad incasso della rubinetteria (blocco funzionale monopezzo) Rimuovere la piastra di copertura. ☞ Per maggiori dettagli, fare riferimento alle istruzioni per il montaggio e l’uso della rubinetteria. Chiudere le regolazioni della portata d’acqua con l’ausilio di una brugola. a: chiusa b: aperta Azionare il rubinetto.
  • Page 25: Montaggio Del Pannello Doccia (Blocco Funzionale In Due Parti)

    Montaggio del pannello doccia (blocco funzionale in due parti) Rimuovere il telaio in acciaio inox o aprire il frontale in vetro. ☞ Per maggiori dettagli, fare riferimento alle istruzioni per il montaggio e l’uso della rubinetteria. Chiudere le regolazioni della portata d’acqua con l’ausilio di una brugola. a: chiusa b: aperta Azionare il rubinetto.
  • Page 26: Montaggio Del Pannello Doccia (Blocco Funzionale Monopezzo)

    10. Montaggio del pannello doccia (blocco funzionale monopezzo) 10.1 Rimuovere il telaio in acciaio inox o aprire il frontale in vetro. ☞ Per maggiori dettagli, fare riferimento alle istruzioni per il montaggio e l’uso della rubinetteria. 10.2 Chiudere le regolazioni della portata d’acqua con l’ausilio di una brugola. a: chiusa b: aperta 10.3 Azionare il rubinetto.
  • Page 27 0Nederlands Magneetventielpatroon A3000 open als uitbreidingsset en reserveonderdelenset ZAQUA015 ....zonder adapter (A3000 open, vanaf 2007) ESHOW0014....met adapter (A3000, tot 2007) De tekeningen kunt u in de Duitse montage- en bedrijfsinstructies vinden. Inhoudsopgave Afkortingen en eenheden ................27 Verklaring van de symbolen ................. 28 Garantie......................
  • Page 28: Verklaring Van De Symbolen

    Verklaring van de symbolen Waarschuwing! Het niet in acht nemen van de instructie kan tot levensgevaar of lichamelijk letsel leiden. Attentie! Het niet in acht nemen van de instructie kan materiële schade veroorzaken. ☞ Belangrijk! Het niet in acht nemen van de instructie kan storingen in de werking van het product veroorzaken.
  • Page 29: Montage Armatuur Voor Inbouw (Functieblok 2-Delig)

    Montage armatuur voor inbouw (functieblok 2-delig) Afdekplaat verwijderen. ☞ Details zijn te vinden in de montage- en bedrijfsinstructies van de armatuur. Waterhoeveelheidreguleringen met een inbussleutel sluiten. a: gesloten b: open Armatuur activeren. Reserveonderdeel Leidingverbinding tussen magneetventielpatroon en elektronicamodule verbreken. Schroeven (c) losdraaien. Magneetventielpatroon (d) verwijderen.
  • Page 30: Montage Armatuur Voor Inbouw (Functieblok 1-Delig)

    Montage armatuur voor inbouw (functieblok 1-delig) Afdekplaat verwijderen. ☞ Details zijn te vinden in de montage- en bedrijfsinstructies van de armatuur. Waterhoeveelheidreguleringen met een inbussleutel sluiten. a: gesloten b: open Armatuur activeren. Reserveonderdeel Leidingverbinding tussen magneetventielpatroon en elektronicamodule verbreken. Schroeven (c) losdraaien. Magneetventielpatroon (d) verwijderen.
  • Page 31: Montage Douchepaneel (Functieblok 2-Delig)

    Montage douchepaneel (functieblok 2-delig) Behuizing van roestvrij staal verwijderen of glazen front openen. ☞ Details zijn te vinden in de montage- en bedrijfsinstructies van de armatuur. Waterhoeveelheidreguleringen met een inbussleutel sluiten. a: gesloten b: open Armatuur activeren. Reserveonderdeel Leidingverbinding tussen magneetventielpatroon en elektronicamodule verbreken. Schroeven (c) losdraaien.
  • Page 32: Montage Douchepaneel (Functieblok 1-Delig)

    10. Montage douchepaneel (functieblok 1-delig) 10.1 Behuizing van roestvrij staal verwijderen of glazen front openen. ☞ Details zijn te vinden in de montage- en bedrijfsinstructies van de armatuur. 10.2 Waterhoeveelheidreguleringen met een inbussleutel sluiten. a: gesloten b: open 10.3 Armatuur activeren. Reserveonderdeel 10.4 Leidingverbinding tussen magneetventielpatroon en elektronicamodule verbreken.
  • Page 33 0Polski Wkład zaworu elektromagnetycznego A3000 open jako zestaw wyposażenia i zestaw części zamiennych ZAQUA015 ....bez adaptera (A3000 open, od 2007) ESHOW0014....z adapterem (A3000, do 2007) Ilustracje można pobrać z niemieckiej wersji instrukcji montażu i eksploatacji. Spis treści Skróty i jednostki ........33 Wyjaśnienia dotyczące ilustracji .
  • Page 34: Wyjaśnienia Dotyczące Ilustracji

    Wyjaśnienia dotyczące ilustracji Ostrzeżenie! Nieprzestrzeganie może spowodować zagrożenie dla życia lub obrażenia ciała. Uwaga! Nieprzestrzeganie może spowodować szkody materialne. ☞ Ważne! Nieprzestrzeganie może spowodować zakłócenia w funkcjonowaniu produktu. ☞ Przydatne informacje dotyczące optymalnego postępowania z urządzeniem. Gwarancja Przejęcie odpowiedzialności odbywa się w oparciu o Ogólne Warunki Handlowe. Należy używać...
  • Page 35: Montaż Baterii Do Montażu Naściennego (Blok Funkcyjny 2-Częściowy)

    Montaż baterii do montażu naściennego (blok funkcyjny 2-częściowy) Zdjąć pokrywę. ☞ Szczegóły zostały umieszczone w instrukcji montażu i obsługi baterii. Zamknąć regulatory wielkości przepływu kluczem imbusowym. a: zamknięte b: otwarte Włączyć armaturę. Części zamienne Poluzować połączenie kablowe pomiędzy wkładem zaworu elektromagnetycznego i modułem elektronicznym.
  • Page 36: Montaż Baterii Do Montażu Naściennego (Blok Funkcyjny 1-Częściowy)

    Montaż baterii do montażu naściennego (blok funkcyjny 1-częściowy) Zdjąć pokrywę. ☞ Szczegóły zostały umieszczone w instrukcji montażu i obsługi baterii. Zamknąć regulatory wielkości przepływu kluczem imbusowym. a: zamknięte b: otwarte Włączyć armaturę. Części zamienne Poluzować połączenie kablowe pomiędzy wkładem zaworu elektromagnetycznego i modułem elektronicznym.
  • Page 37: Montaż Panelu Prysznicowego (Blok Funkcyjny 2-Częściowy)

    Montaż panelu prysznicowego (blok funkcyjny 2-częściowy) Zdjąć obudowę ze stali nierdzewnej lub otworzyć szklaną ścianę przednią. ☞ Szczegóły zostały umieszczone w instrukcji montażu i obsługi baterii. Zamknąć regulatory wielkości przepływu kluczem imbusowym. a: zamknięte b: otwarte Włączyć armaturę. Części zamienne Poluzować...
  • Page 38: Montaż Panelu Prysznicowego (Blok Funkcyjny 1-Częściowy)

    10. Montaż panelu prysznicowego (blok funkcyjny 1-częściowy) 10.1 Zdjąć obudowę ze stali nierdzewnej lub otworzyć szklaną ścianę przednią. ☞ Szczegóły zostały umieszczone w instrukcji montażu i obsługi baterii. 10.2 Zamknąć regulatory wielkości przepływu kluczem imbusowym. a: zamknięte b: otwarte 10.3 Włączyć armaturę. Części zamienne 10.4 Poluzować...
  • Page 39 0Svenska Magnetventilpatron A3000 open som eftermonteringssats och reservdelssats ZAQUA015 ....utan adapter (A3000 open, från 2007) ESHOW0014....med adapter (A3000, fram till 2007) Bilderna finns i den tyska monterings- och bruksanvisningen. Innehållsförteckning Förkortningar och enheter ......39 Teckenförklaring .
  • Page 40: Teckenförklaring

    Teckenförklaring Varning! Underlåtenhet att följa kan leda till livsfara eller kroppsskada. Observera! Underlåtenhet att följa kan leda till sakskador. ☞ Viktigt! Underlåtenhet att följa kan leda till att produkten inte fungerar som den ska. ☞ Användbar information om optimalt handhavande av produkten. Garanti Vi ansvarar enligt de allmänna leverans- och affärsvillkoren.
  • Page 41: Montering Av Armatur För Väggmontering (Funktionsblock 2-Delat)

    Montering av armatur för väggmontering (funktionsblock 2-delat) Ta av täckplattan. ☞ Mer information finns i monterings- och bruksanvisningen för armaturen. Stäng vattenflödesregulatorerna med en insexnyckel. a: stängd b: öppen Utlösa armaturen. Reservdel Lossa ledningsanslutning mellan magnetventilpatron och elektronikmodul. Skruva ur skruvarna (c). Ta ur magnetventilpatronen (d).
  • Page 42: Montering Av Armatur För Väggmontering (Funktionsblock 1-Delat)

    Montering av armatur för väggmontering (funktionsblock 1-delat) Ta av täckplattan. ☞ Mer information finns i monterings- och bruksanvisningen för armaturen. Stäng vattenflödesregulatorerna med en insexnyckel. a: stängd b: öppen Utlösa armaturen. Reservdel Lossa ledningsanslutning mellan magnetventilpatron och elektronikmodul. Skruva ur skruvarna (c). Ta ur magnetventilpatronen (d).
  • Page 43: Montering Av Duschpanel (Funktionsblock 2-Delat)

    Montering av duschpanel (funktionsblock 2-delat) Ta av höljet av rostfritt stål eller öppna glasfronten. ☞ Mer information finns i monterings- och bruksanvisningen för armaturen. Stäng vattenflödesregulatorerna med en insexnyckel. a: stängd b: öppen Utlösa armaturen. Reservdel Lossa ledningsanslutningen mellan magnetventilpatron och elektronikmodul. Skruva ur skruvarna (c).
  • Page 44: Montering Av Duschpanel (Funktionsblock 1-Delat)

    10. Montering av duschpanel (funktionsblock 1-delat) 10.1 Ta av höljet av rostfritt stål eller öppna glasfronten. ☞ Mer information finns i monterings- och bruksanvisningen för armaturen. 10.2 Stäng vattenflödesregulatorerna med en insexnyckel. a: stängd b: öppen 10.3 Utlösa armaturen. Reservdel 10.4 Lossa ledningsanslutningen mellan magnetventilpatron och elektronikmodul.
  • Page 45 0Čeština Kartuše s magnetickým ventilem A3000 open jako doplňková sada nebo sada náhradních dílů ZAQUA015 ....bez adaptéru (A3000 open, od 2007) ESHOW0014....s adaptérem (A3000, do 2007) Obrázky najdete v německém návodu k montáži a obsluze. Seznam Zkratky a jednotky ........45 Vysvětlení...
  • Page 46 Vysvětlení značek Varování! Zanedbání těchto pokynů může mít za následek ohrožení života nebo zranění osob. Pozor! Zanedbání těchto pokynů může mít za následek způsobení věcných škod. ☞ Důležité! Zanedbání těchto pokynů může mít za následek způsobení funkčních poruch daného produktu. ☞...
  • Page 47 Montáž armatury pro instalaci do stěny (funkční blok 2dílný) Sejměte krycí desku. ☞ Podrobnosti jsou uvedeny v návodu k montáži a obsluze k armatuře. S použitím klíče na vnitřní šestihran uzavřete regulační prvky množství vody. a: uzavřeno b: otevřeno Uvolněte armaturu. Náhradní...
  • Page 48 Montáž armatury pro instalaci do stěny (funkční blok 1dílný) Sejměte krycí desku. ☞ Podrobnosti jsou uvedeny v návodu k montáži a obsluze k armatuře. S použitím klíče na vnitřní šestihran uzavřete regulační prvky množství vody. a: uzavřeno b: otevřeno Uvolněte armaturu. Náhradní...
  • Page 49 Montáž sprchového panelu (funkční blok 2dílný) Kryt u ušlechtilé oceli sejměte nebo otevřete čelní sklo. ☞ Podrobnosti jsou uvedeny v návodu k montáži a obsluze k armatuře. S použitím klíče na vnitřní šestihran uzavřete regulační prvky množství vody. a: uzavřeno b: otevřeno Uvolněte armaturu.
  • Page 50 10. Montáž sprchového panelu (funkční blok 1dílný) 10.1 Kryt u ušlechtilé oceli sejměte nebo otevřete čelní sklo. ☞ Podrobnosti jsou uvedeny v návodu k montáži a obsluze k armatuře. 10.2 S použitím klíče na vnitřní šestihran uzavřete regulační prvky množství vody. a: uzavřeno b: otevřeno 10.3 Uvolněte armaturu.
  • Page 51 0Suomi Magneettiventtiilikasetti A3000 open jälkiasennussarjana ja varaosasarjana ZAQUA015 ....ilman sovitinta (A3000 open, alkaen 2007) ESHOW0014....sovittimella (A3000, 2007 saakka) Kuvat löytyvät saksankielisestä asennus- ja käyttöohjeesta. Sisällysluettelo Lyhenteet ja yksiköt ........51 Merkkien selitys .
  • Page 52: Merkkien Selitys

    Merkkien selitys Varoitus! Huomiotta jättäminen voi aiheuttaa hengenvaaran tai ruumiinvamman. Huomio! Huomiotta jättäminen voi aiheuttaa aineellisia vahinkoja. ☞ Tärkeää! Huomiotta jättäminen voi aiheuttaa tuotteen toimintahäiriöitä. ☞ Hyödyllistä tietoa parhaaseen mahdolliseen työskentelyyn tuotteen parissa. Takuu Vastuu siirtyy yleisten toimitus- ja kauppaehtojen mukaisesti. Käytä...
  • Page 53: Asennuslaite Seinäasennukseen (Funktiolohko 2-Osainen)

    Asennuslaite seinäasennukseen (funktiolohko 2-osainen) Irrota peitelevy. ☞ Katso yksityiskohdat laitteen asennus- ja käyttöohjeesta. Sulje vesimäärän säädin kuusiokoloavaimella. a: suljettu b: auki Irrota laite. Varaosa Irrota johdotus magneettiventtiilikasetin ja sähkömoduulin välillä. Avaa ruuvit (c). Poista magneettiventtiilikasetti (d). ☞ Magneettiventtilikasetti (d) muut mallit mahdollisia. Vedä...
  • Page 54: Asennuslaite Seinäasennukseen (Funktiolohko 1-Osainen)

    Asennuslaite seinäasennukseen (funktiolohko 1-osainen) Irrota peitelevy. ☞ Katso yksityiskohdat laitteen asennus- ja käyttöohjeesta. Sulje vesimäärän säädin kuusiokoloavaimella. a: suljettu b: auki Irrota laite. Varaosa Irrota johdotus magneettiventtiilikasetin ja sähkömoduulin välillä. Avaa ruuvit (c). Poista magneettiventtiilikasetti (d). Vedä olemassa oleva siivilä (e) pihdeillä ulos. Jatka työvaihe 8.11.
  • Page 55: Suihkupaneelin Asennus (Funktiolohko 2-Osainen)

    Suihkupaneelin asennus (funktiolohko 2-osainen) Poista ruostumatonta terästä oleva kotelo tai avaa edessä oleva lasi. ☞ Katso yksityiskohdat laitteen asennus- ja käyttöohjeesta. Sulje vesimäärän säädin kuusiokoloavaimella. a: suljettu b: auki Irrota laite. Varaosa Irrota johdotus magneettiventtiilikasetin ja sähkömoduulin välillä. Avaa ruuvit (c). Poista magneettiventtiilikasetti (d).
  • Page 56: Suihkupaneelin Asennus (Funktiolohko 1-Osainen)

    10. Suihkupaneelin asennus (funktiolohko 1-osainen) 10.1 Poista ruostumatonta terästä oleva kotelo tai avaa edessä oleva lasi. ☞ Katso yksityiskohdat laitteen asennus- ja käyttöohjeesta. 10.2 Sulje vesimäärän säädin kuusiokoloavaimella. a: suljettu b: auki 10.3 Irrota laite. Varaosa 10.4 Irrota johdotus magneettiventtiilikasetin ja sähkömoduulin välillä. 10.5 Avaa ruuvit (c).
  • Page 57 0Русский Вставной электромагнитный клапан A3000 как комплект для дооснащения и комплект запчастей ZAQUA015 ....без адаптера (A3000 open, с 2007 г.) ESHOW0014....с адаптером (A3000, до 2007 г.) Рисунки приведены в инструкции по монтажу и эксплуатации на немецком языке. Содержание...
  • Page 58: Объяснение Условных Знаков

    Объяснение условных знаков Предупреждение! Несоблюдение данного указания может привести к опасности для жизни или телесным повреждениям. Внимание! Несоблюдение данного указания может привести к материальному ущербу. ☞ Важно! Несоблюдение данного указания может привести к неполадкам в работе изделия. ☞ Полезная информация по оптимальному обращению с изделием. Гарантия...
  • Page 59: Комплект Поставки

    Комплект поставки Позиция Наименование Вставной электромагнитный клапан Сетчатый фильтр Адаптер с винтом и уплотнителем (только № для заказа FAR ESHOW0014) Инструкция по монтажу и эксплуатации Монтаж смесителя со скрытой проводкой (функциональный блок из 2 частей) Снимите декоративную панель. ☞ Для получения дополнительных сведений см. инструкцию по монтажу и эксплу- атации.
  • Page 60: Монтаж Смесителя Со Скрытой Проводкой

    7.14 Установите кабельное соединение между вставным электромагнитным клапаном и электронным модулем (k). l: вставной электромагнитный клапан для смешанной воды m:вставной электромагнитный клапан для байпаса термической дезинфекции ☞ При необходимости подсоедините адаптер (n). 7.15 Установите декоративную панель. Монтаж смесителя со скрытой проводкой (функциональный блок...
  • Page 61 5Монтаж душевой панели (функциональный блок из 2 частей) Снимите корпус из нержавеющей стали или откройте стеклянную фронтальную панель. ☞ Для получения дополнительных сведений см. инструкцию по монтажу и эксплу- атации. Закройте регуляторы расхода воды с помощью торцового шестигранного ключа. a: закрыто b: открыто...
  • Page 62 10. Монтаж душевой панели (функциональный блок из 1 части) 10.1 Снимите корпус из нержавеющей стали или откройте стеклянную фронтальную панель. ☞ Для получения дополнительных сведений см. инструкцию по монтажу и эксплу- атации. 10.2 Закройте регуляторы расхода воды с помощью торцового шестигранного ключа.
  • Page 63 Notes / Notes / Notas / Annotazioni / Notities / Uwagi / Notiser / Poznámky / Muistiinpanot / Примечания...
  • Page 64 +213 (0)21 60 13 60 e: ws-info.de@franke.com e: info@handassagroup.com.tn e: customer@bfi xgroupe.com Franke Caucasus Ltd. Franke Mutfak ve Banyo Sistemleri San. ve PR Kitchen and Washroom Systems Pty Ltd 7, Agladze Street Tic. A.S 83 Bangholme Road Tbilisi, 0154 / Georgia Gebze Organize Sanayi Bölgesi...

Ce manuel est également adapté pour:

Eshow001476129820957337612982073236

Table des Matières