Table des Matières
Publicité
Les langues disponibles
Les langues disponibles
Liens rapides
Publicité
Chapitres
Table des Matières

Manuels Connexes pour De Dietrich DTE1111W


Sommaire des Matières pour De Dietrich DTE1111W
- Page 1 FR GUIDE D'INSTALLATION ET D’UTILISATION EN GUIDE FOR INSTALLATION AND USE ES MANUAL DE INSTALACIÓN Y UTILIZACIÓN PT GUIA DE INSTALAÇÃO E DE UTILIZAÇÃO DE BEDIENUNG UND INSTALLATION Table de cuisson Cooking hob Placa de cocción Placa de cozinha Kochfeld...
- Page 2 En vous remerciant de votre confiance. De Dietrich Retrouvez toutes les informations de la marque sur www.de-dietrich.com Visitez La Galerie De Dietrich, 6 rue de la Pépinière à Paris VIIIème Ouvert du mardi au samedi de 10h à 19h. Service Consommateurs 0892 02 88 04.
-
Page 3: Table Des Matières
1 1 / / A L’ATTENTION DE L’UTILISATEUR 1/ A L’ATTENTION DE L’UTILISATEUR • Consigne de sécurité ..........04 •... - Page 4 1 1 / / A L’ATTENTION DE L’UTILISATEUR — Les conditions de réglage sont inscrites sur une étiquette située dans la pochette, ainsi Important que sur l’emballage. Conservez cette notice d'utilisation avec votre appareil. Si l'appareil devait être vendu — — Afin de retrouver aisément à l’avenir les ré- ou cédé...
-
Page 5: Consigne De Sécurité
1 1 / / A L’ATTENTION DE L’UTILISATEUR • • CONSIGNES DE SÉCURITÉ • • RESPECT DE L’ENVIRONNEMENT — Les matériaux d’emballage de cet appareil Attention sont recyclables. Participez à leur recyclage Les conditions de réglage sont inscri- et contribuez ainsi à la protection de l’envi- tes sur une étiquette située dans la pochet- ronnement en les déposant dans les conte- te, ainsi que sur l’emballage. -
Page 6: Description De Votre Table
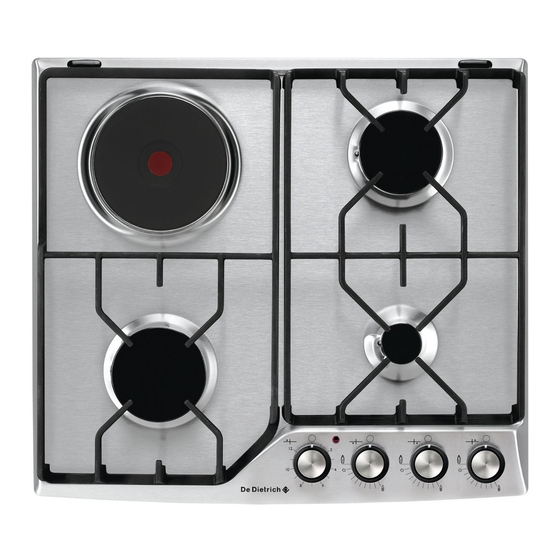
1 1 / / A L’ATTENTION DE L’UTILISATEUR • • DESCRIPTION DE VOTRE TABLE Brûleur Table modèle 4 feux gaz Grille support casserole Fig. 01 Table modèle 3 feux gaz Manette + 1 foyer électrique Fig. 02 Chapeau de brûleur Bougie d’allumage Bague d’étanchéité... -
Page 7: 2/ Installation De Votre Appareil
2 2 / / INSTALLATION DE VOTRE APPAREIL APPAREIL Largeur Profondeur Epaisseur 58 cm 52,2 cm 4,9 cm Dimensions hors tout a a u u - - d d e e s s s s u u s s du plan de travail Dimensions 55,4 cm... -
Page 8: Conseils D'encastrement
2 2 / / INSTALLATION DE VOTRE APPAREIL RACCORDEMENT ELECTRIQUE • • CONSEILS D’ENCASTREMENT • • Votre table est livrée avec un cordon d'alimen- Vue de dessous tation (de type H05V2V2F - T90, section du carter 1 mm ² ) à 3 conducteurs (phase + terre + neut- re) réf. -
Page 9: Raccordement Gaz
2 2 / / INSTALLATION DE VOTRE APPAREIL • • RACCORDEMENT GAZ • Remarques préliminaires Si votre table de cuisson est installée au-dessus d'un four ou si la proximité d'autres éléments chauffants risque de provoquer un échauffement du raccordement, il est impératif de réaliser ce- lui-ci en tube rigide. - Page 10 2 2 / / INSTALLATION DE VOTRE APPAREIL • Dans une installation existante, un tube sou- Gaz distribué par bouteille ou réservoir ple équipé de ses colliers de serrage (confor- (gaz butane/propane) me à la norme XP D 36-110) dont la durée de Pour votre sécurité, vous devez choisir exclu- vie est de 5 ans peut être utilisé.
-
Page 11: Changement De Gaz
2 2 / / INSTALLATION DE VOTRE APPAREIL • • CHANGEMENT DE GAZ Conseil A chaque changement de gaz, Attention cochez la case correspondante au niveau Votre appareil est livré pré-réglé gaz sur l’étiquette située dans la pochette. pour le gaz naturel. Reportez-vous au paragraphe Les injecteurs nécessaires à... - Page 12 2 2 / / INSTALLATION DE VOTRE APPAREIL • R R é é g g l l e e z z l l e e s s r r a a l l e e n n t t i i s s d d e e s s r r o o b b i i n n e e t t s s : ceux-ci sont situés sous les manettes (Fig.
- Page 14 2 2 / / INSTALLATION DE VOTRE APPAREIL •Caractéristiques gaz (Modèle avec brûleur grand rapide) F F R R - - C C H H - - F F R R - - C C H H - - F F R R - - C C H H - - F F R R C C Y Y - - H H R R C C Y Y - - H H R R...
- Page 15 2 2 / / INSTALLATION DE VOTRE APPAREIL • Repérage des injecteurs Le tableau ci-contre indique les implantations Exemple : repère injecteur 62 des injecteurs sur votre appareil en fonction du gaz utilisé. Chaque numéro est marqué sur l’injecteur. M M o o d d è è l l e e 4 4 f f e e u u x x a a v v e e c c b b r r û û l l e e u u r r g g r r a a n n d d r r a a p p i i d d e e G G a a z z B B u u t t a a n n e e / / P P r r o o p p a a n n e e G G a a z z N N a a t t u u r r e e l l 9 9 4 4...
-
Page 16: Description De Votre Dessus
3 3 / / UTILISATION DE VOTRE APPAREIL • • DESCRIPTION DE VOTRE DESSUS DTE 1110*/* DTE 1111*/* Brûleur semi-rapide 1,50 kW* * Brûleur rapide 2,25 kW* * Brûleur grand rapide 3,10 kW* * Brûleur auxiliaire 0,85 kW* * Plaque électrique 1.50 kW - diamètre 145 mm * * Puissances obtenues en gaz naturel G20... -
Page 17: Mise En Marche Des Brûleurs Gaz
3 3 / / UTILISATION DE VOTRE APPAREIL MISE MARCHE • • BRULEURS GAZ La sécurité gaz des brûleurs est matérialisée par une tige métallique, située directement au voisinage de la flamme. Chaque brûleur est contrôlé par un robinet muni d’un système de sécurité qui, en cas d’extinction acciedentelle de la flamme (dé- bordement, courant d’air...) coupe rapide- ment et automatiquement l’arrivée de gaz et... -
Page 18: Récipients Pour Les Brûleurs Gaz
3 3 / / UTILISATION DE VOTRE APPAREIL • • RECIPIENTS POUR LES BRULEURS GAZ • Quel brûleur utiliser en fonction de votre récipient ? D D i i a a m m è è t t r r e e d d u u r r é é c c i i p p i i e e n n t t B B r r û... -
Page 19: Récipients Pour La Plaque Électrique (Selon Modèle)
3 3 / / UTILISATION DE VOTRE APPAREIL Voyant • • RECIPIENTS LES PLUS ADAPTES SUR LA PLAQUE ELECTRIQUE (selon modèle) Utilisez des récipients à fond plat qui plaquent parfaitement à la surface du foyer : — en acier inoxydable avec fond trimétal épais ou “sandwich”, —... -
Page 20: Entretenir Votre Appareil
4 4 / / ENTRETIEN COURANT DE VOTRE APPAREIL • • ENTRETENIR VOTRE APPAREIL C C O O M M M M E E N N T T P P R R O O C C E E D D E E R R ? ? P P R R O O D D U U I I T T S S / / A A C C C C E E S S S S O O I I R R E E S S E E N N T T R R E E T T I I E E N N . -
Page 21: 5/ Messages Particuliers, Incidents
5 5 / / MESSAGES PARTICULIERS, INCIDENTS • • EN COURS D’UTILISATION VOUS CONSTATEZ QUE : QUE FAUT-IL FAIRE : • . Vérifiez le branchement électrique de votre appareil Allumage des brûleurs : . Vérifiez la propreté des bougies d’allumage. Il n’y a pas d’étincelles lors de . -
Page 22: Guide De Cuisson Gaz
6 6 / / TABLEAU DE CUISSON • • GUIDE DE CUISSON GAZ P P R R E E P P A A R R A A T T I I O O N N S S T T E E M M P P S S G G R R A A N N D D R R A A P P I I D D E E S S E E M M I I... -
Page 23: 7/ Service Apres-Vente Et Relations Consommateurs
(Fig. 01). ment. > Vous pouvez nous écrire : Service Consommateurs DE DIETRICH BP 9526 95069 CERGY PONTOISE CEDEX DTE ------------------------ > ou nous téléphoner au : Nr . XX-XX-XXXXX... - Page 24 Dear valued customer, To discover a De Dietrich product is to experience the range of unique emotions which only high-value items can produce. The attraction is immediate, from the moment you set eyes on the pro- duct. The sheer quality of the design shines through thanks to the time-...
- Page 25 TABLE OF CONTENTS 1/ NOTICES TO THE USER • Safety instructions ..........26 •...
-
Page 26: 1/ Notices To The User
1 1 / / NOTICES TO THE USER as on the packaging. Attention — — In order to easily locate the reference infor- Keep this user guide with your appli- mation for your appliance, we recommend ance. If the appliance is ever sold or trans- that you note this data on the “After-Sales Ser- ferred to another person, ensure that the vice Department and Customer Relations”... -
Page 27: Caring For The Environment
1 1 / / NOTICES TO THE USER • • SAFETY INSTRUCTIONS • • CARING FOR THE ENVIRONMENT — This appliance’s packing materials are recy- Attention clable. Recycle them and play a role in pro- - The required settings for the hob are tecting the environment by depositing them written on a sticker located in the plastic in local authority containers provided for this... - Page 28 1 1 / / NOTICES TO THE USER • • DESCRIPTION OF THE HOB Burner Hob model: 4 gas burners Grill support Fig. 01 Hob model: 3 gas burners Knob + 1 electric plate Fig. 02 Burner cover Thermocouple Gasket Burner head Injector Spark igniter...
-
Page 29: 2/ Installing Your Appliance
2 2 / / INSTALLING YOUR APPLIANCE APPLIANCE Width Deep Thick 58 cm 52,2 cm 4,9 cm Total dimensions a a b b o o v v e e the work 55,4 cm 47,4 cm 3,5 cm Total dimensions b b e e l l o o w w the work Fig. -
Page 30: Tips For Flush Mounting
2 2 / / INSTALLING YOUR APPLIANCE ELECTRIC CONNECTION • • TIPS FOR FLUSH MOUNTING • • Your hob is sold with a power cable (type Vue de dessous H05V2V2F - T90, cross-section 1 mm ) with du carter three conductors (phase + ground + neutral). After-sales service reference: After-sales service: 77X3767 (6470.1516). -
Page 31: Gas Connection
2 2 / / INSTALLING YOUR APPLIANCE • • GAS CONNECTIONS • Preliminary comments If your hob is installed above an oven or if proximity to other heating elements poses a threat of overheating the connection, you absolutely must insulate the cable in a rigid pipe. If a hose or soft pipe (in the case of butane gas) is used, it should not come into contact with a moving part of the cabinet, nor should it pass through a location that may become blocked. - Page 32 2 2 / / INSTALLING YOUR APPLIANCE • Dans une installation existante, un tube sou- Gas supplied by tank or cylinder ple équipé de ses colliers de serrage (confor- (butane/propane) me à la norme XP D 36-110) dont la durée de For your safety, you must choose from the vie est de 5 ans peut être utilisé.
-
Page 33: Changing Of Gas Supply
2 2 / / INSTALLING YOUR APPLIANCE • • CHANGING OF GAZ SUPPLY Each time you change the gas supply, Warning tick the box corresponding to the new gas Your appliance is sold pre-set for level on the label found in the plastic bag. natural gas. - Page 34 2 2 / / INSTALLING YOUR APPLIANCE • A A d d j j u u s s t t t t h h e e h h o o b b c c o o n n n n e e c c t t i i o o n n s s : : they are located underneath the knobs (Fig.
- Page 36 2 2 / / INSTALLING YOUR APPLIANCE •Gas properties F F R R - - C C H H - - F F R R - - C C H H - - F F R R - - C C H H - - F F R R C C Y Y - - H H R R C C Y Y - - H H R R...
- Page 37 2 2 / / INSTALLING YOUR APPLIANCE • Markings on the injectors The adjacent table shows where the injectors are positioned on your appliance Example: according to the type of gas injector marking 94 Each number is marked on the injector.used. F F o o u u r r - - b b u u r r n n e e r r g g a a s s m m o o d d e e l l w w i i t t h h h h i i g g h h s s p p e e e e d d b b u u r r n n e e r r B B u u t t a a n n e e / / P P r r o o p p a a n n e e G G a a s s N N a a t t u u r r a a l l G G a a s s...
-
Page 38: Description Of The Worktop
3 3 / / USING YOUR APPLIANCE DESCRIPTION OF THE WORKTOP • • DTE 1110*/* DTE 1111*/* Semi-fast burner 1,50 kW* * Speed burner 2,25 kW* * High-speed burner 3,10 kW* * Auxiliary burner 0,85 kW* * Electric plate 1.50 kW - diameter 145 mm * * Powered by G20 natural gas... -
Page 39: Lighting The Hob
3 3 / / USING YOUR APPLIANCE LIGHTING THE HOB • • The burner safety measure is a metal rod located directly to the side of the flame. Each burner is controlled by a tap fitted with a safety system that, in the event of acciden- tal flame extinction (spills, draughts, etc.), quickly and automatically cuts the gas supply and prevents it from escaping. -
Page 40: Cookware Suitable For The Gas Burners (Depending On Model)
3 3 / / USING YOUR APPLIANCE • • COOKWARE SUITABLE FOR THE GAS BURNERS • Which burner should you use depending on your cookware? I I A A M M E E T T E E R R O O F F T T H H E E C C O O O O K K W W A A R R E E U U R R N N E E R R S S A A G G E E F F r r y y i i n n g g - - B B o o i i l l i i n n g g... -
Page 41: Switching On The Electric Plate (Depending On Model)
3 3 / / USING YOUR APPLIANCE Indicator light • • MOST SUITABLE COOKWARE TO BE USED WITH THE ELECTRIC PLATE (depending on model) Use cookware with flat bottoms that are per- fectly flush with the surface of the burner: —... -
Page 42: 4/ Daily Care Of Your Appliance
4 4 / / DAILY CARE OF YOUR APPLIANCE MAINTAINING YOUR APPLIANCE • • M M A A I I N N T T E E N N A A N N C C E E ..W W H H A A T T T T O O D D O O ? ? P P R R O O D D U U C C T T S S / / A A C C C C E E S S S S O O R R I I E E S S T T O O B B E E U U S S E E D D... -
Page 43: 5/ Special Messages, Incidents
5 5 / / SPECIAL MESSAGES, INCIDENTS • • DURING USE YOU OBSERVE THAT: WHAT SHOULD YOU DO? • .Check the electrical connection of your appliance Lighting of burners: . Check that the spark plugs are clean. There are no sparks when you . -
Page 44: 6/ Cooking Guides
6 6 / / COOKING GUIDES • • GAS COOKING GUIDE P P R R E E P P A A R R A A T T I I O O N N S S T T E E M M P P S S S S U U P P E E R R F F A A S S T T S S E E M M I I... -
Page 45: 7/ After-Sales Service
7 7 / / AFTER-SALES SERVICE •SERVICE CALLS Any maintenance on your equipment should be undertaken by: - either your dealer, - or another qualified mechanic who is an authorized agent for the brand appliances. When making an appointment, state the full reference of your equipment (model, type and serial number).